Energizer Step 1 User manual

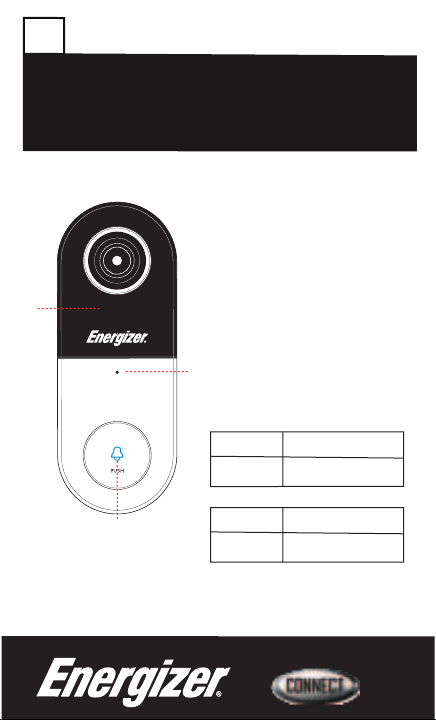
Thank you for choosing the Energizer
®Smart Video
Doorbell. This quick start guide will help you setup
your device.
Note: Energizer
®Connect devices only work
on a 2.4ghz WiFi network.
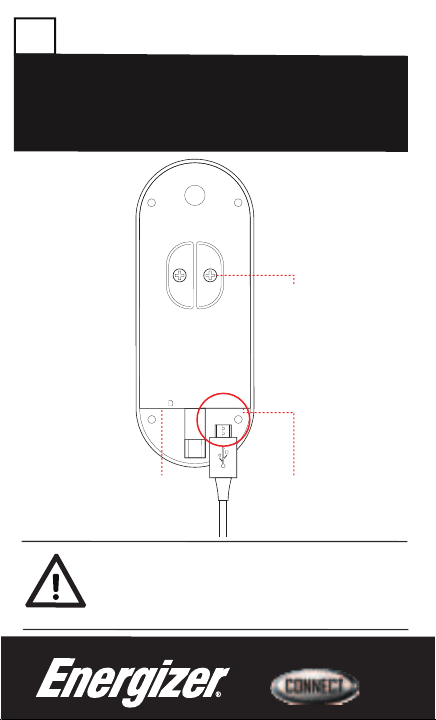
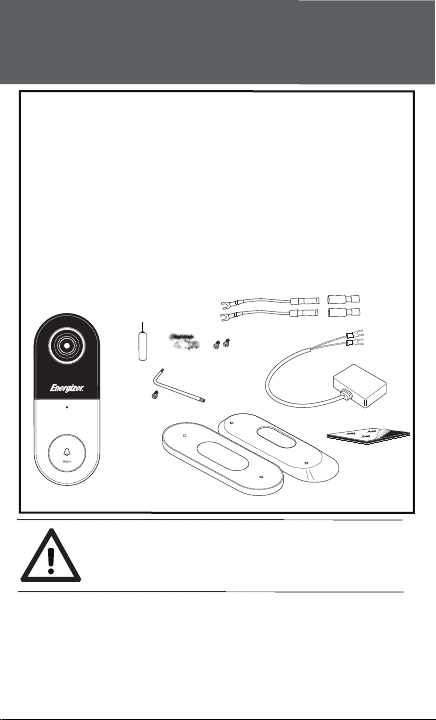
1 – Wedge Mounting Bracket
1 – Chime Power Kit
1 – Mounting Hardware Pack
1 – Security Screw &Tool
1 – Flat Mounting Bracket
2 – Crimp Connectors
1 – Quick Start Guide
1 – Installation Guide
1 – SmartVideo Doorbell
2 – ExtraTerminal Screws
1 – Reset Tool
2 – Wire Extenders
Package Includes:
©2019 Energizer. Energizer and certain graphic designs are trademarks of Energizer Brands, LLC and related
subsidiaries and are used under license by Jem Connected IOT, Inc. All other brand names are trademarks of their
respective owners. Neither Jem Connected IOT, Inc. nor Energizer Brands, LLC is affiliated with the respective
owners of their trademarks.
Apple and the Apple logo are trademarks of Apple Inc., registered in the U.S. and other countries. App store is a
service mark of Apple Inc.
Google and Google Play are trademarks of Google LLC. All rights reserved.
Amazon Alexa and all related logos are trademarks of Amazon.com, Inc. or its affiliates.

Download the Energizer
®Connect app from the App Store
(for iPhones) or Google Play Store (for Android phones).
Before opening the app, make sure your phone is connected
to theWiFi network that your SmartVideo Doorbell will be
placed on.
1
Pair the Smart Video Doorbell with the app.
1

Open the app and create an account by following the
on-screen instructions.
2
2

It is recommended to first pair the doorbell indoors, close
to your router, using the included micro USB adapter and
micro USB cable. After plugging in wait 2 minutes for the
doorbell to power up.
3
3
Note: If you are planning to save recordings, you will
need to insert a Micro SD card before installing the
doorbell on your door.
USB RSTSD
back
micro SD
card slot
(not included)
reset
button
screw
terminals

After the doorbell powers up, the indicator light on the
front will start blinking. Confirm the status using the
chart below.
4
4
Blinking Blue Checking forWiFi signal
Solid Blue Connected
Blinking Red Pairing Mode
Solid Red Restart, booting up
indicator
light
microphone
IR
LED
front

After logging in, click“+”on the top right of the screen
and select "Add Device".
5
5

Doorbell
Select the“cameras catagory”and then confirm that the
indicator light is rapidly blinking, then click next step.
6-7
6

Confirm that the network WiFi displayed is your 2.4ghz
WiFi network, enter your WiFi password and click confirm.
8
7

Energizer Video Doorbell
Your Smart Video Doorbell will now be connected to the
network. Confirm the settings for your device and then
click Finish Device Setup.
9
8
Note: Now that your Smart Video Doorbell
is paired with the app, please follow
Step 2: Installation Guide

If you need to reset or troubleshoot your Smart Video Doorbell, press and
hold the reset button on the back of the doorbell for 5-10 seconds. (You
may need to use the provided reset tool to push the reset button.)
When the doorbell is powering off you may hear a sound as the doorbell
powers down.
If you have trouble pairing your Smart Video Doorbell, try using the secondary
pairing process, QR mode. Click“QR Mode”and follow the on-screen instructions.
Troubleshooting
9
USB RSTSD
indicator
light
reset
button
front back
Blinking Blue Checking forWiFi signal
Solid Blue Connected
Blinking Red Pairing Mode
Solid Red Restart, booting up

10
CameraTimestamp
Quality Switch:Toggle between HD (High
Definition) and SD (Standard Definition)
Audio Switch: Enable camera audio so
you can hear through the camera
Microphone Switch: Enable the
microphone so you can speak through
the camera. Note: To enable two way
communication at the same time, make
sure to turn on two-way speech in the
device settings. (Basic Function Settings >
Speech Method)
Alarm Settings: Enable mobile
notifications for motion detection
Manual Screenshot: Save a snapshot of
the current live video to your smart device
Device Settings
WiFi Signal Strength
Full Screen LandscapeView
Recording Playback Controls
(see next page for details)
Manual Record: Begin recording the
current live video of the camera
directly to your smart device
1
2
3
4
5
6
7
8
9
10
11
1
7
8
9
10
11
3
5
4
6
2

11
Date: Shows the current date of
recordings you are viewing
Date Controls: Click the arrows to go to
the previous/next day of recordings
CameraTimestamp
Audio Switch: Enable the sound of
the recording
Pause Button
LiveView Controls
(see previous page for details)
Calendar: Select a specific day to
view recordings
Manual Screenshot: Save a snapshot
of the current playback video to your
smart device
Device Settings
Full Screen LandscapeView
RecordingsTimeline: Gray areas show
when there is a saved recording
Time Marker: Scroll the line to
choose the time of the recording
you want to view
Manual Record: Begin recording the
current playback video of the camera
directly to your smart device
1
9
10
11
12
13
3
4
5
6
7
8
2
1
2
3
4
5
6
7
8
9
10
11
12
13

12
To enable voice access for your Smart Video Doorbell, you will need to
link the Energizer Connect skill with your choice of voice assistant.
Search for & choose Energizer Connect.
1
2
Authorize your account with Smart & Home skills using the
username and password from your Energizer Connect app.
Now you can view your Smart Video Doorbell by using the name
you gave it in the Energizer Connect app. Just use the command
phrase“Alexa, show me the -name of your doorbell-.”
4
5
3
Voice Activation for Alexa
Make sure your Alexa device is installed and set up first.
Open your Alexa app.
Open the menu to search for Skills.

13
Voice Activation for the Google Assistant
Make sure your Google Assistant device is installed and set up first.
Open your Google Home app.
Search for & choose Energizer Connect.
Now you can view your Smart Video Doorbell by using the name
you gave it in the Energizer Connect app. Just use the command
phrase“Ok Google, show me the -name of your doorbell-.”
Click“Have something already set up?”
2
1
3
4
7
5
6Authorize your account with the Google Assistant skills using the
username and password from your Energizer Connect app.
Click“Set up a device”Click the + to add a new device

Notice
14
FCC Compliance
This device complies with Part 15 of the FCC. Operation is subject to the
following two conditions: (1) this device may not cause harmful
interference, and (2) this device must accept any interference received,
including interference that may cause undesired operation. Changes or
modifications not expressly approved by the party responsible for
compliance could void the user's authority to operate the equipment.
This equipment has been tested and found to comply with the limits for a
Class B digital device, pursuant to part 15 of the FCC Rules. These limits
are designed to provide reasonable protection against harmful
interference in a residential installation.This equipment generates uses
and can radiate radio frequency energy and, if not installed and used in
accordance with the instructions, may cause harmful interference to radio
communications. However, there is no guarantee that interference will
not occur in a particular installation. If this equipment does cause harmful
interference to radio or television reception, which can be determined by
turning the equipment off and on, the user is encouraged to try to correct
the interference by one or more of the following measures:
- Reorient or relocate the receiving antenna.
- Increase the separation between the equipment and receiver.
- Connect the equipment into an outlet on a circuit different from
that to which the receiver is connected.
- Consult the dealer or an experienced radio/TV technician for help.
RF Exposure Statement
To satisfy FCC’s RF exposure requirements, a separation distance of 20 cm
or more should be maintained between the antenna of this device and
persons during device operation.To ensure compliance, operations at
closer than this distance is not recommended.
This manual suits for next models
1
Other Energizer Accessories manuals
Popular Accessories manuals by other brands

Gastro-Cool
Gastro-Cool ELDC300XL Instructions for use

Hubbell
Hubbell LightHawk LHMT Installation and operating instructions

pass & seymour
pass & seymour CS500 installation instructions

KaVo
KaVo Dexis Titanium user manual

Omron
Omron MX2 COMPONET OPTION BOARD user manual

Speaks z wave
Speaks z wave SP814 user manual

SONBEST
SONBEST KM2130B-O3 user manual

PCB Piezotronics
PCB Piezotronics 103B02 Installation and operating manual

Ulvac
Ulvac G-Tran Series instruction manual

Airzone
Airzone AZJ-8FT BASIC Assembly instructions

Steinberg
Steinberg UR22mkII Recording Pack Operation manual

Honeywell
Honeywell DUAL TEC DT8M Wireless installation instructions