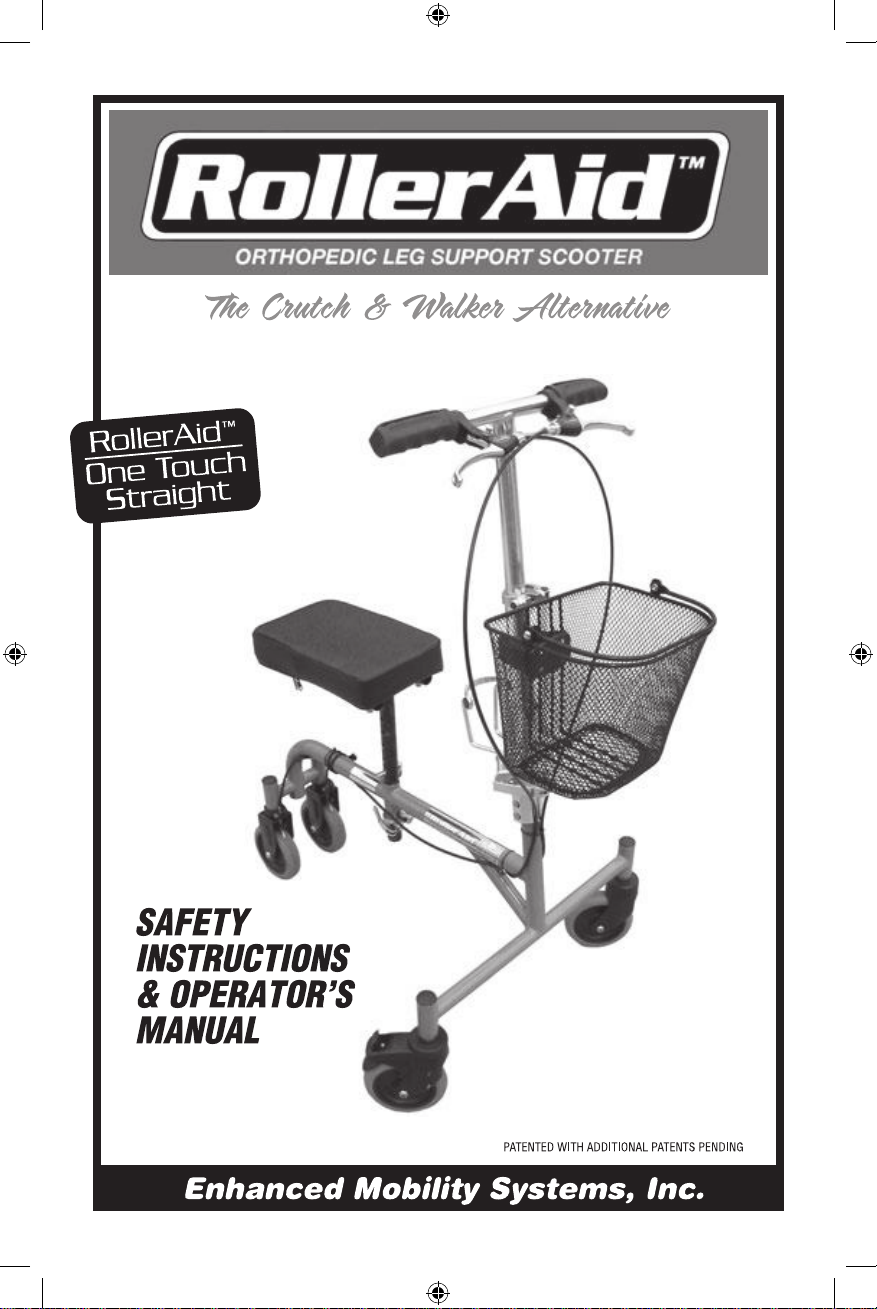
Enhanced Mobility Systems RollerAid OTS Operation and maintenance manual
Roller Air Manual Complete.indd 1 5/20/08 3:37:31 PM
and remove handlebar completely
9
Roller Air Manual Complete.indd 2 5/20/08 3:37:34 PM
8
Roller Air Manual Complete.indd 3 5/20/08 3:37:35 PM
7
Roller Air Manual Complete.indd 4 5/20/08 3:37:37 PM

6
Roller Air Manual Complete.indd 5 5/20/08 3:37:38 PM

5
Roller Air Manual Complete.indd 6 5/20/08 3:37:40 PM
For Both OTS and FFOTS Models
4
Roller Air Manual Complete.indd 7 5/20/08 3:37:42 PM

Roller Air Manual Complete.indd 8 5/20/08 3:37:43 PM
Roller Air Manual Complete.indd 9 5/20/08 3:37:45 PM

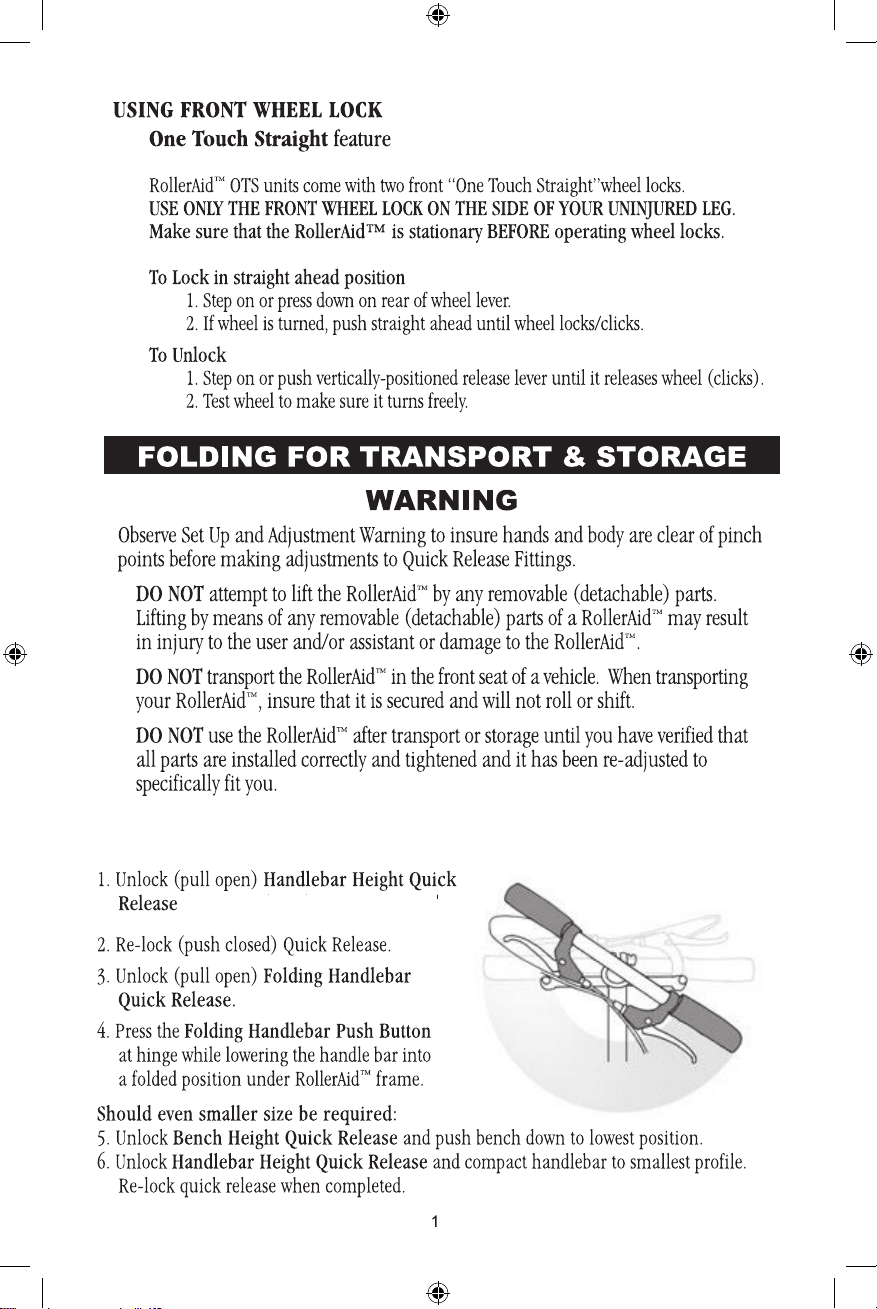
For OTS Folding Instructions, see page 19
REFOLDING the RollerAid™ FFOTS
In most circumstances simply removing the basket and handlebars
before folding down the handlebar folding assembly will be sufficient to
collapse the RollerAid™ for transport. Where the minimum dimensions
are required the frame hinge can also be folded.
1. Remove the basket by pressing down on the red button on the
basket collar and lifting the basket off.
2. Remove the handlebar by opening the handlebar height quick
release and sliding it out of the handlebar folding assembly.
3. Undo the handlebar folding assembly quick release and then
press the silver button in before folding the assembly down.
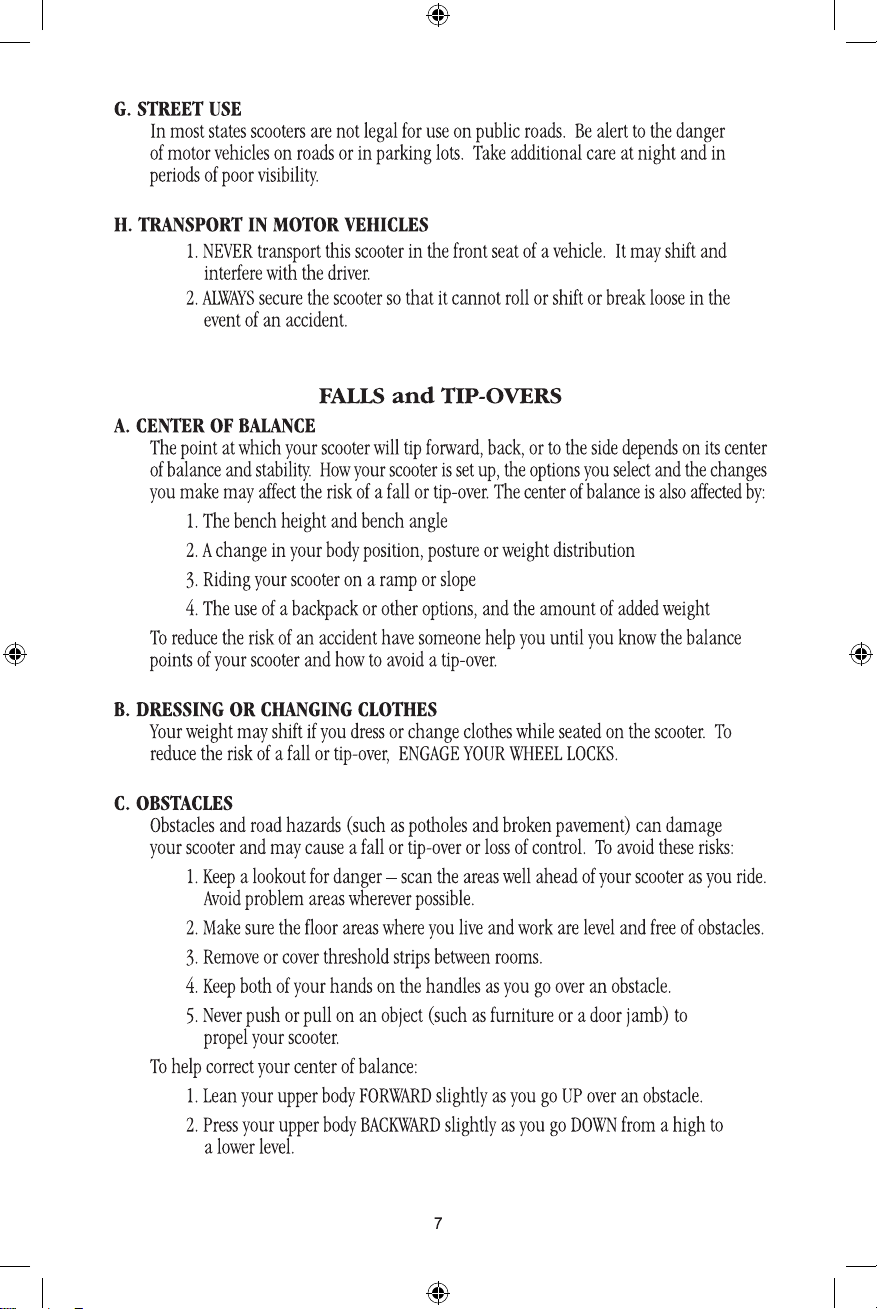
4. To fold the frame hinge, open the frame hinge quick release and
rotate it towards you. Allow the pin to drop down.
5. Fold the frame and lock it in place using the Velcro™ strap.
Slide the handlebar through the strap and, if necessary, release
the bench quick release to lower the bench.
Detailed instructions for attaching and removing the basket,
removing and replacing the handlebars and for folding the
handlebar assembly begin on Page 14 of this manual.
13
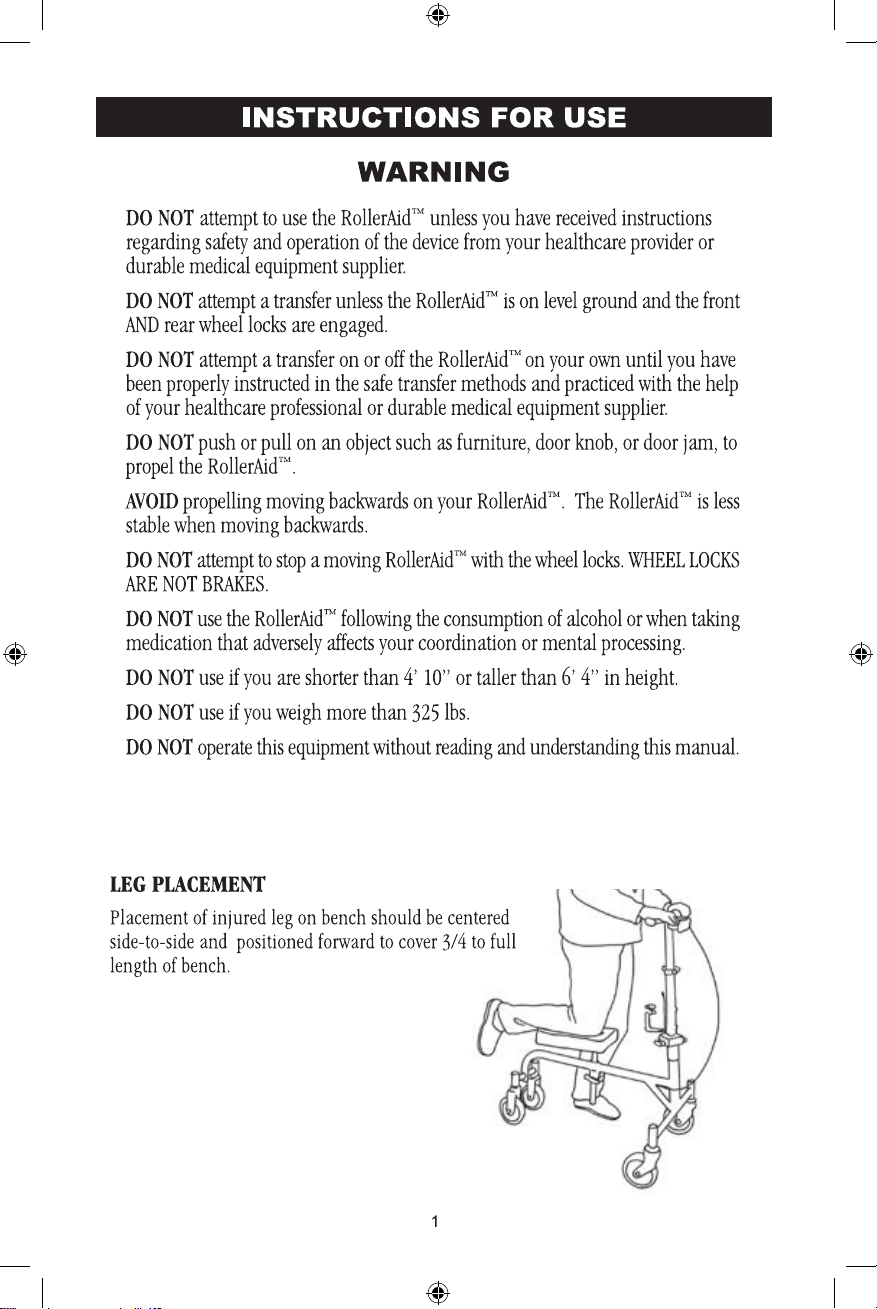
SET UP & ADJUSTMENT
For OTS Set Up, see page 14
Special Instructions for FFOTS models
The Folding Frame OTS model of the RollerAid has an additional
folding hinge that allows it to be folded down to extremely small
dimensions. Please read these instructions carefully before using your
FFOTS RollerAid™ for the first time.
Please use the photograph below to orient yourself to the major features
referred to in this section.
Your safety is our primary concern. If you have any concerns or
problems please call our staff at 800-755-0455 and we will be pleased to
help.
Before using your RollerAid™ please consult the remainder of
this manual for important Safety and Use information.
10
Velcro™ strap
Bench Quick
Release
Hinge Assembly and Quick Release
Handlebar Folding
Assembly
Basket Release
Handlebar Quick
Release
Roller Air Manual Complete.indd 10 5/20/08 3:37:46 PM

For OTS Set Up, see page 14
Instructions for straightening the handlebar folding assembly,
adjusting the basket or handlebar, and attaching the basket
begin on Page 14 of this Safety and Use Manual.
UNFOLDING the RollerAid™ FFOTS
Unfolding and setting up the RollerAid™ FFOTS for the first time is
simple and easy.
1. Remove the unit from its box and lay it out on a stable surface.
2. Undo the Velcro™ tie and straighten the hinged assembly as
shown below. Wrap the Velcro™loosely around the crossbar so
that it does not get trapped under the rear wheels.
Note: If the hinge assembly appears tight open the bench quick release,
raise the bench up slightly and retighten the quick release.
3. With the hinge assembly quick release in the position shown, lift
the locking pin until you can see it at the top of the hinge
assembly and rotate it towards the front of the unit using the
quick release lever.
11
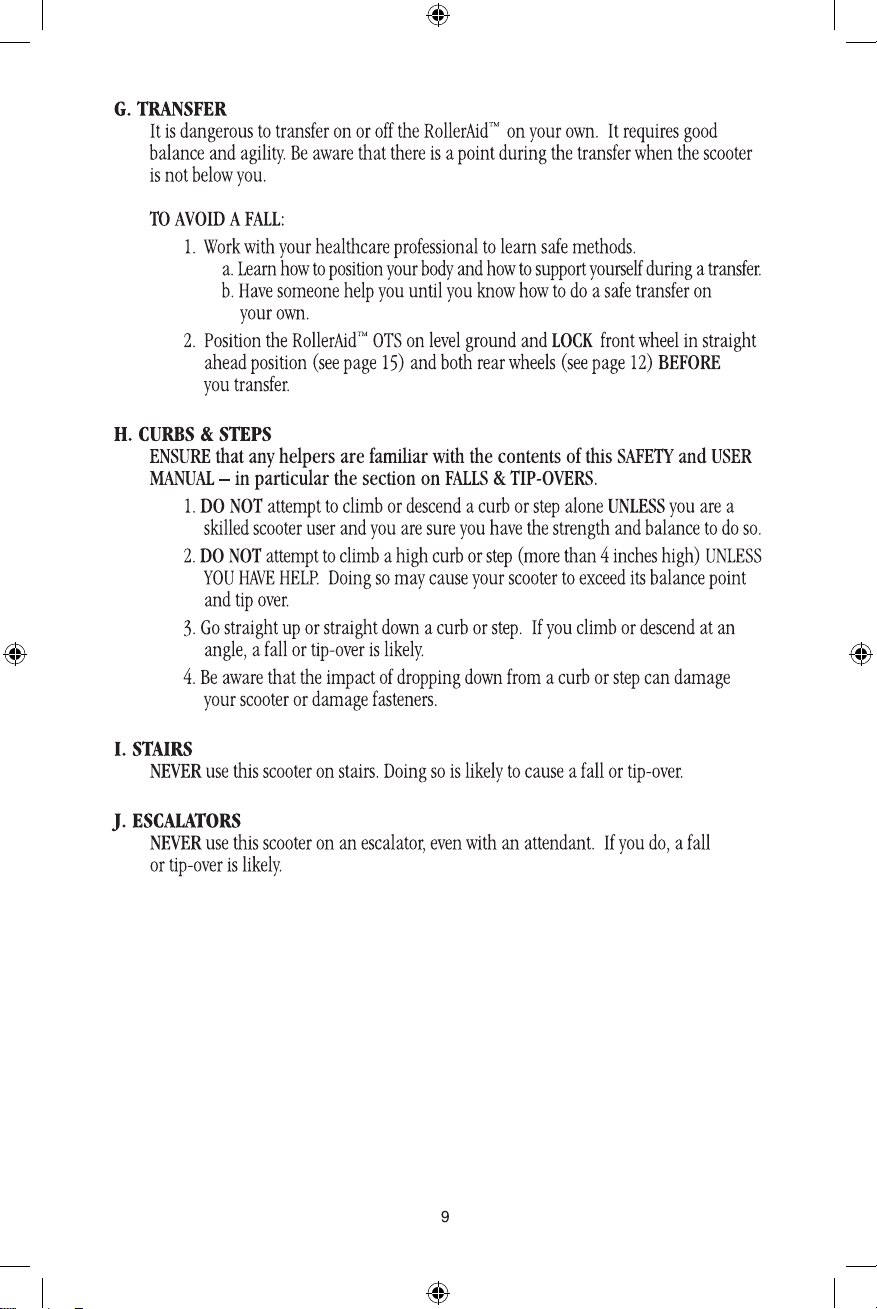
4. Lock the quick release by rotating it to the vertical position as
shown below. Position the brake cables on either side of the
bench post and above the quick release.
The hinge assembly should now be locked firmly in place.
12
1 Lift locking pin
2 Rotate lever toward
front of unit
Rotate lever down
to lock in position
Roller Air Manual Complete.indd 11 5/20/08 3:37:47 PM
For OTS Set Up, see page 14
Instructions for straightening the handlebar folding assembly,
adjusting the basket or handlebar, and attaching the basket
begin on Page 14 of this Safety and Use Manual.
UNFOLDING the RollerAid™ FFOTS
Unfolding and setting up the RollerAid™ FFOTS for the first time is
simple and easy.
1. Remove the unit from its box and lay it out on a stable surface.
2. Undo the Velcro™ tie and straighten the hinged assembly as
shown below. Wrap the Velcro™loosely around the crossbar so
that it does not get trapped under the rear wheels.
Note: If the hinge assembly appears tight open the bench quick release,
raise the bench up slightly and retighten the quick release.
3. With the hinge assembly quick release in the position shown, lift
the locking pin until you can see it at the top of the hinge
assembly and rotate it towards the front of the unit using the
quick release lever.
11
4. Lock the quick release by rotating it to the vertical position as
shown below. Position the brake cables on either side of the
bench post and above the quick release.
The hinge assembly should now be locked firmly in place.
12
1 Lift locking pin
2 Rotate lever toward
front of unit
Rotate lever down
to lock in position
Roller Air Manual Complete.indd 12 5/20/08 3:37:47 PM

For OTS Folding Instructions, see page 19
REFOLDING the RollerAid™ FFOTS
In most circumstances simply removing the basket and handlebars
before folding down the handlebar folding assembly will be sufficient to
collapse the RollerAid™ for transport. Where the minimum dimensions
are required the frame hinge can also be folded.
1. Remove the basket by pressing down on the red button on the
basket collar and lifting the basket off.
2. Remove the handlebar by opening the handlebar height quick
release and sliding it out of the handlebar folding assembly.
3. Undo the handlebar folding assembly quick release and then
press the silver button in before folding the assembly down.
4. To fold the frame hinge, open the frame hinge quick release and
rotate it towards you. Allow the pin to drop down.
5. Fold the frame and lock it in place using the Velcro™ strap.
Slide the handlebar through the strap and, if necessary, release
the bench quick release to lower the bench.
Detailed instructions for attaching and removing the basket,
removing and replacing the handlebars and for folding the
handlebar assembly begin on Page 14 of this manual.
13
SET UP & ADJUSTMENT
For OTS Set Up, see page 14
Special Instructions for FFOTS models
The Folding Frame OTS model of the RollerAid has an additional
folding hinge that allows it to be folded down to extremely small
dimensions. Please read these instructions carefully before using your
FFOTS RollerAid™ for the first time.
Please use the photograph below to orient yourself to the major features
referred to in this section.
Your safety is our primary concern. If you have any concerns or
problems please call our staff at 800-755-0455 and we will be pleased to
help.
Before using your RollerAid™ please consult the remainder of
this manual for important Safety and Use information.
10
Velcro™ strap
Bench Quick
Release
Hinge Assembly and Quick Release
Handlebar Folding
Assembly
Basket Release
Handlebar Quick
Release
Roller Air Manual Complete.indd 13 5/20/08 3:37:47 PM

For Both OTS and FFOTS Models
4
Roller Air Manual Complete.indd 14 5/20/08 3:37:49 PM
5
Roller Air Manual Complete.indd 15 5/20/08 3:37:51 PM

6
Roller Air Manual Complete.indd 16 5/20/08 3:37:52 PM
7
Roller Air Manual Complete.indd 17 5/20/08 3:37:54 PM

8
Roller Air Manual Complete.indd 18 5/20/08 3:37:55 PM
and remove handlebar completely
9
Roller Air Manual Complete.indd 19 5/20/08 3:37:56 PM

Roller Air Manual Complete.indd 20 5/20/08 3:37:58 PM
This manual suits for next models
1
Table of contents
Popular Mobility Aid manuals by other brands


Handicare
Handicare FREECURVE MONORAIL installation manual

munevo
munevo DRIVE instruction manual

identités
identités NEO XL user manual

Invacare
Invacare Single Density Cushion Installation and operating instructions

Harmar Mobility
Harmar Mobility AL600 Pioneer Installation guide & owner's manual

Invacare
Invacare 6007 Assembly, installation and operating instructions