ENOCHS Power 4550 User manual
INDEX
Back adjustment, 10
Before operating table, 8
Cautions
foot control, 5, 17
irrigation basin, 13
patient load, 5,8
pull out leg extension, 15
receptacle load, 12
symbol, 4
Cleaning
foot & hand controls, 17
not recommended, 18
painted surfaces, 17
stainless steel surfaces, 17
vacuum formed top, 17, 18
Circuit breaker
receptacles, 12
reset, 12
mains power entry module, 14
reset, 14
Disposal of table, 3
Duty cycle, 4,5,9
Electrical
cut or damaged cord, 5
accessory receptacles, 12
circuit breaker, 12
reset, 12
maximum amp load, 12
requirements, 4
Electro Magnetic Interference, 8
Extension cord use, 5
Foot control
cautions, 5,17
cleaning, 17
features, 9-10
placement note, 9
operation, 9-10
warnings, 9
Height adjustment, 9
Hand controls
Standard control operation, 10
Programmable control, 11
Introduction, 3
Intended use of table, 3
Instrument warming drawer, 13
Irrigation basin
adjustment, 13
features, 13
Lifting table, 8
Leg extension
adjustment, 15
features, 15
Mains power
circuit breaker, 14
cord replacement, 5
indicator ,14
Mains power (continued)
Input module, 13
reset, 13
Maintenance, 17
contact information, 3
log, 22
semi-annual checklist, 19
questions, 3
Malfunction of table, 5
Operational conditions, 4
Paper cutter, 14
Paper roll holder, 14
Patient load, 8
Pelvic tilt, 14
adjustment, 14
Power features, 9
warnings, 9, 11
Perineal recess, 14
Product at a glance, 6-7
Purchase record, 23
Range of motion, 6
Safety information, 5
Symbol definitions, 4
Setting up table, 8
Specifications, 21
Stirrups
adjustment, 15
features, 15
Storage , 16
Technical description 3
Transportation/storage conditions, 4
Troubleshooting guide, 20
Upholstery care, 18
UL compliance, 3
Vacuum formed top
cleaning , 17, 18
features, 16
Warnings
adjusting/ positioning, 5,9,10
cauterization type procedures, 5
duty cycle, 5
electrical receptacle, 12
explosive atmosphere, 5
foot control, 9
hand control, 10, 11
leg extension, 15
moving table, 8
oxygen enriched areas, 5
patient load, 8
pelvic tilt, 14
power cord replacement, 13
removing from skid, 8
stirrups, 15
symbol, 4
Warranty, 23
ENOCHS Examining Room Furniture Inc., 14701 Cumberland Road, Suite 107 Noblesville, IN 46060 800-428-2305
COPYRIGHT 2018ENCORE Series 4550, 4520, 4510 Issue 1 9-2018
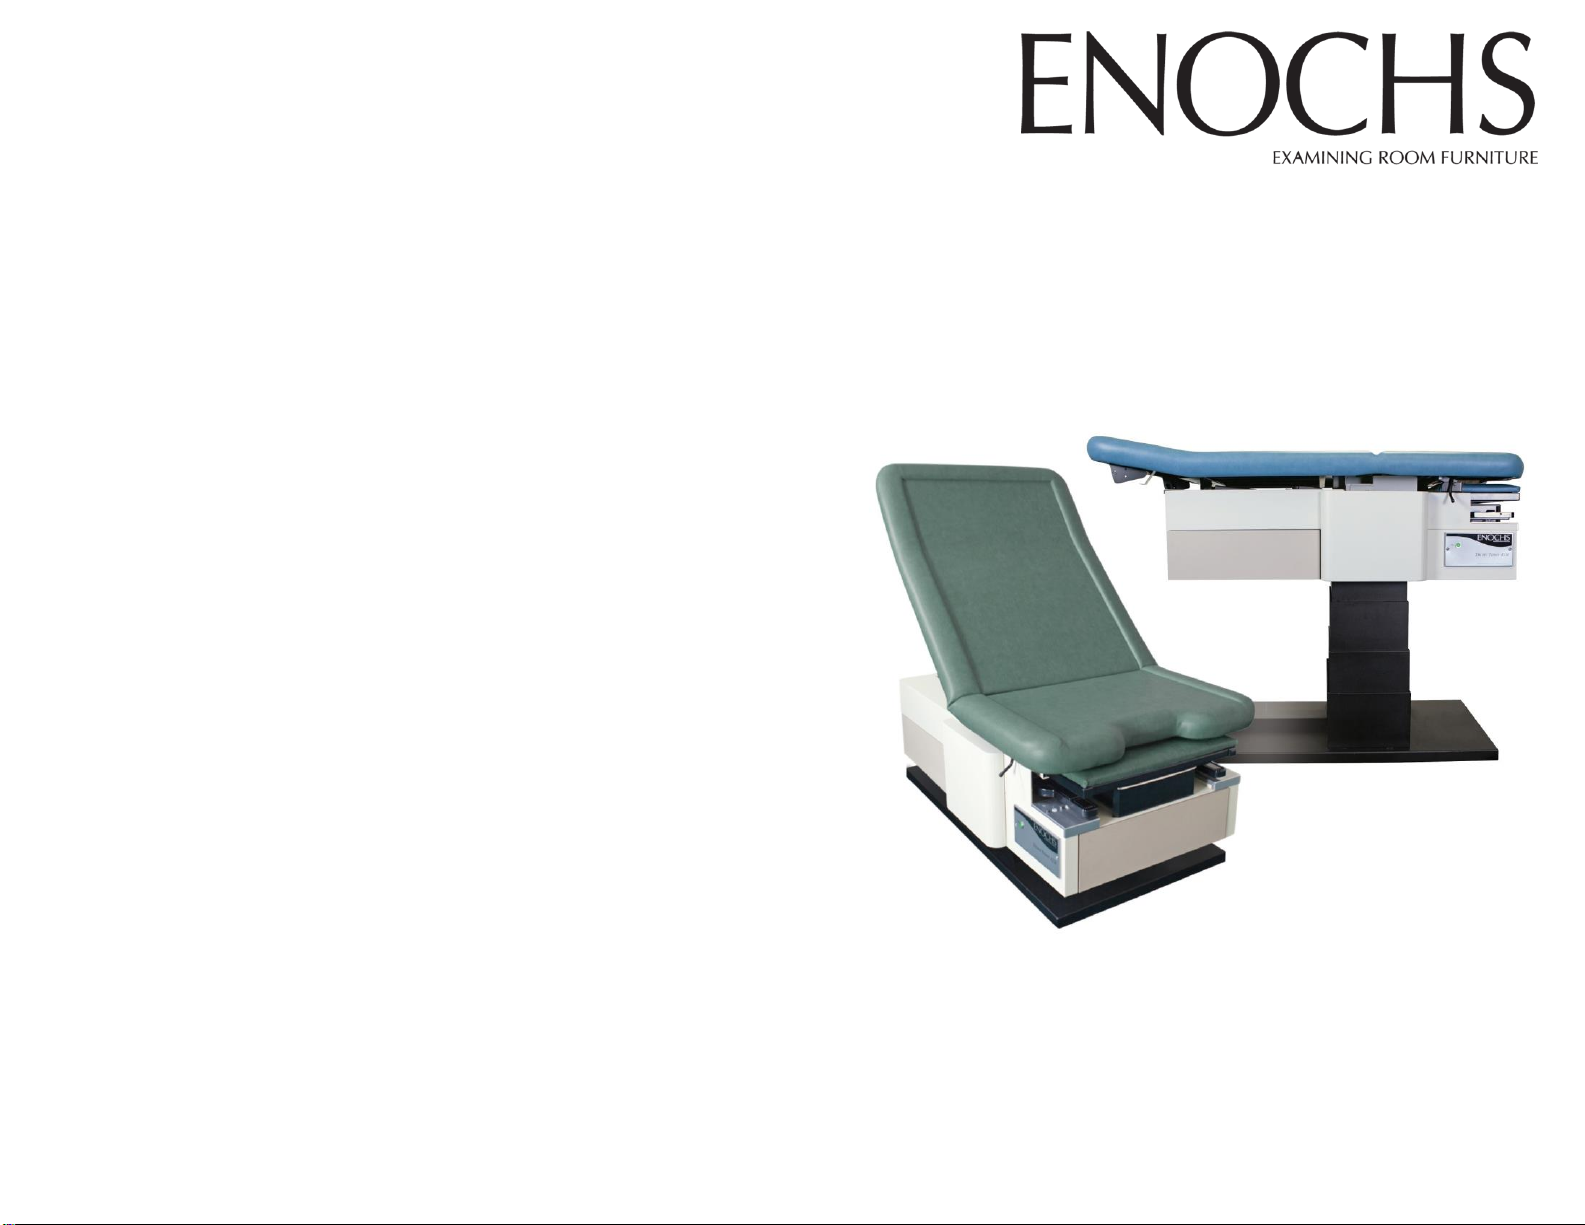
Encore Low Access Power Tables
MODELS: Power 4550 Programmable Table
Power 4520 General Table
Power 4510 Basic Table
Installation and
Operation Manual

TABLE OF CONTENTS
Page
Introduction
Technical Use of Tables
Intended Use of Tables
Disposal of Equipment
Maintenance and Service Questions
Classification
3
Symbols in this Manual
Electrical Requirements
Environmental Conditions
4
Safety Information
If Table Malfunctions
5
Product at a Glance
6-7
Setting Up Your Table
Before Operating Table
Electro Magnetic Interference
Patient Load
8
Power Features : Foot Control
Height adjustment
9
Back adjustment
Standard Hand Control Operation
Height adjustment
Back adjustment
10
Programmable Hand Control Operation
Program Memory Positions
11
Table Features
Electrical Receptacles, accessory
Receptacle Circuit Breaker
12
Instrument Warming Drawer
Irrigation Basin
Mains Power Entry Module
13
Mains Power Circuit Breaker & reset
Mains Power Indicator
Paper roll holder
Paper cutter
Pelvic Tilt
Pelvic Tilt adjustment
Perineal Recess
14
Pull Out Leg Extension
Stirrups
Stirrup adjustment
15
Storage
Vacuum Formed Top
16
Table Maintenance and Cleaning Recommendations
17
Upholstery Care
18
Preventative Maintenance Checklist
19
Troubleshooting
20
Product Specifications
21
Table Maintenance History
22
Guarantee of Quality Warranty Index
23
INDEX
24
ENOCHS Guarantee of Quality
ENOCHS, Inc. guarantees ENOCHS products to be free from
defects in material or workmanship under normal installation,
use and service, for a period of four years for the ENCORE
Power 4550 & 4520 and two years for the 4510. Warranty
period is from date of shipment from our factory, unless
otherwise specified for a specific product. All items and
component parts manufactured for ENOCHS by others are
warranted against defects for a period equal to warranty offered
by original equipment manufacturer.
This guarantee is invalid if product is damaged as a result of
misuse, abuse, neglect or alteration. Transportation costs for
return of product or part is responsibility of purchaser. All other
expressed or implied warranties of the company are
superseded.
Serial Number:
EL
Purchase Date:
Purchased From:
Phone:
Service Group:
Phone:
ENOCHS CUSTOMER SERVICE 1-800-428-2305
2
23
TABLE MAINTENANCE HISTORY
Date
SERVICE DONE
22
3
INTRODUCTION
This manual covers the installation, operation and maintenance for the ENOCHS
ENCORE Low Access Examination Tables. This series includes the ENCORE
4550, 4520, and 4510. Read and understand all operations and maintenance
requirements for maximum performance of this product. Improper operation of this
product could result in injury to staff and/or patient as well as damage to the
product.
TECHNICAL DESCRIPTION
This series of tables is designed for use in hospitals, clinics and private physician
examination rooms. Examination tables have positioning capability to adjust table
height and back section of the upholstered couch section by use of a foot control
and/or optional hand control.
INTENDED USE OF TABLES
The Encore Low Access Power Tables are intended to be used for general
examinations by qualified medical professionals. Tables are designed to position
and support patients during procedures.
DISPOSAL OF EQUIPMENT
At the end of the product life, consult local codes and ordinances for proper
disposal of table, accessories and other consumable goods.
Note: products may have become contaminated from normal use.
MAINTENANCE AND SERVICE QUESTIONS
Contact ENOCHS with questions concerning this manual, proper operation of the
product or for the nearest Authorized Service Company. A Service Manual with
circuit diagrams, component parts list and information to assist qualified technical
personnel in repairing parts of the equipment designated repairable by
manufacturer is available from ENOCHS upon request.
ENOCHS Examining Room Furniture
14701 Cumberland Road, Suite 107 Noblesville, IN 46060
Phone
800-428-2305
FAX
317-580-2944
E-mail
enochs@enochsmed.com
MEDICAL –GENERAL MEDICAL EQUIPMENT
AS TO ELECTRICAL SHOCK, FIRE AND
MECHANICAL HAZARDS ONLY
IN ACCORDANCE WITH ANSI/AAMI
ES60601-1 (2005) + AMD 1 (2012),
CAN/CSA-C22.2 No. 60601-1 (2014)
CLASSIFICATION: Class I, Type B Applied Part, IPXO
E504103
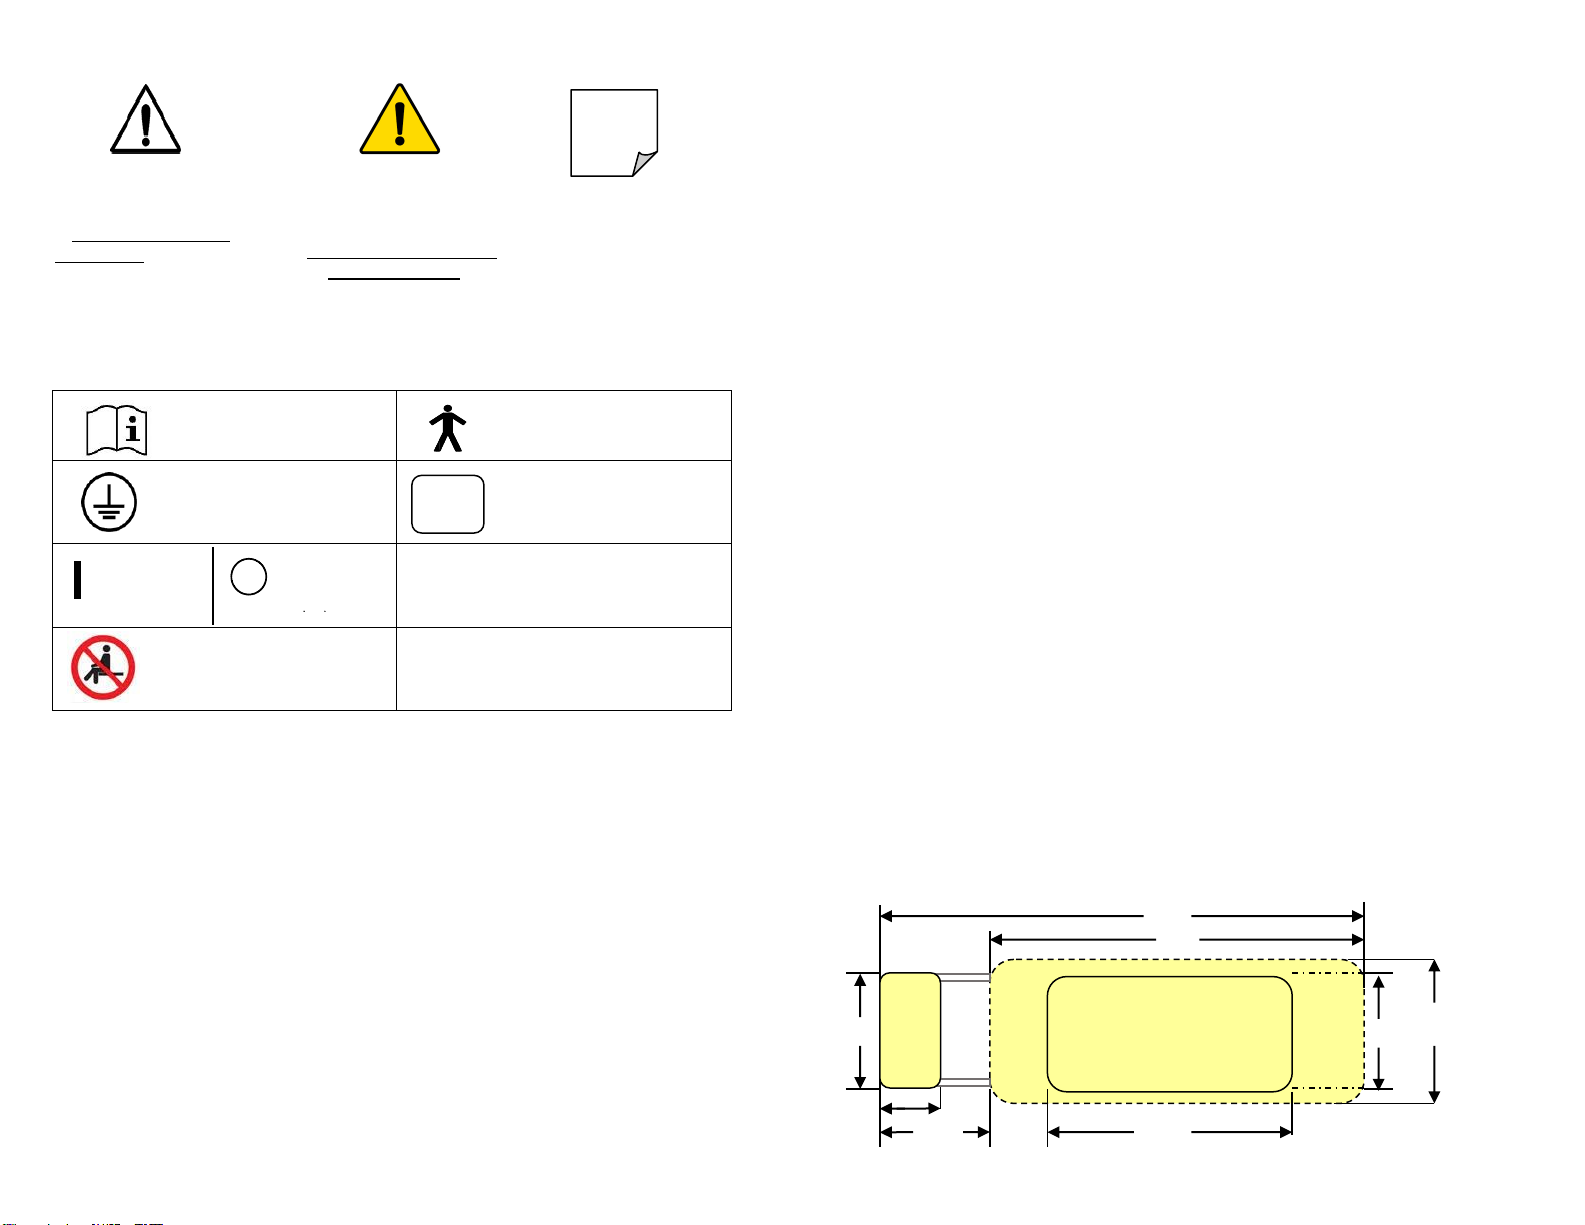
SYMBOL DEFINITIONS
ELECTRICAL REQUIRMENTS
Electrical rating for Encore Low Access Power Table series is 115V AC, 60 Hz, 10
amp. Do not connect table to other voltages. If incorrect power source is used, table
will not function properly and component parts could be damaged. Plug table into a
supply mains with protective earth.
ENVIRONMENTAL CONDITIONS
TRANSPORTATION/STORAGE
Ambient Temperature Range:
-20ºC to +40ºC (-4º F to 104º F )
Relative Humidity:
10% to 100%
Atmospheric Pressure:
500 hPa to 1060 hPa (0.49atm to 1.05atm)
OPERATIONAL
Ambient Temperature Range:
+10ºC to +35ºC (+50º F to 95º F )
Relative Humidity:
30% to 75%
Atmospheric Pressure:
700 hPa to 1060 hPa
4
21
Operating Instructions
Duty cycle (motor run time)
1 minute ON, 9 minutes OFF
IPXO
IPX1
Ordinary equipment (enclosed
EQUIPMENT without protection
against ingress of water)
Drip proof equipment (enclosed
EQUIPMENT protected against
splashing water)
PRODUCT SPECIFICATIONS
Adjustments: Power: height: Min: 18.5 ±.25 in. Max: 38 ± .25 in.
back: 0º horizontal to 80º ± 2º
Manual: pelvic tilt: flat, 11º (± 2 º)
leg extension: extends 19.75" from end of seat section
Classification: Class 1, Type B Applied Parts IPXO
Controls: "hands free" foot control (option for 4550, standard for 4520 & 4510)
Programmable hand control (standard for 4550 )
Non-programmable hand control (option for 4520)
Both controls are Safety Extra-Low Voltage (SELV) and IPX1
Couch top: 100% seamless vacuum formed style, all steel frame construction
Electrical receptacles: hospital grade dual electrical receptacles with circuit
breaker and reset (option for 4550 and 4520 only)
Instrument warmer: located in foot end drawer (option for 4550 and 4520 only)
Instrument warmer ON/OFF switch: located on front side of table, illuminates
when warming unit is ON. Switch has internal circuit breaker with reset
Irrigation basin: 2.5" deep stainless steel basin
Mains power entry module: IEC connection, internal circuit breaker with reset
Mode of operation: Table: Intermittent Operation ,
duty cycle:1 minute ON / 9 minutes OFF
Receptacles & warming drawer: Continuous Operation
Paper roll holder: accommodates 18" or 21" paper widths
Patient load (maximum):700 lbs.
Perineal recess: moulded, seamless, 10" W x 2" D at center
Power system: electro-mechanical
Protection against ingress of fluids: Table: IPX0 Foot control: IPX1
Hand control: IPX1
Ratings: Table: 115V 60 Hz 10 amps
Receptacles : 115V 60Hz Total Load: 3.9 amps
Stirrups: positive lock multi-position stirrups, length and lateral adjustment
Storage: side drawer-15.5" Wx15" D x 4.5" H foot-end drawer-16" W x 10.75" D x 4" H
Table weight: 420 lbs.
Dimensions:
Floor Base
Vacuum
Top
40.75"
52.5"
72.5"
19"
19.75"
10.25″
Leg
Rest
22"
27″
Type B, Applied Part
(upholstered top,
leg extension, stirrups)
CAUTION
NOTE
WARNING
Protective Earth Grounding
This symbol indicates a
potential hazard to
operator’s or patient’s
personal safety if
information stated within the
WARNING is not followed.
This symbol indicates
potential damage to
equipment if information
or instruction in the
CAUTION is not
followed.
This symbol
indicates additional
information for an
applicable
statement.
ON (power
connection to
the mains)
Off (power
disconnection
from the
mains)
DO NOT SIT
TROUBLESHOOTING
SYMPTOM
CAUSE
SOLUTION
Table does not respond to foot
or hand control, Mains Power
Light is not ON.
Table not getting
Mains Power
Follow instructions above to
Confirm Power to Table
Table does not respond to foot
or hand control, Mains Power
Light is ON
Internal Problem
Call for service
Table height does not work,
but table back works
Internal Problem
Call for service
Table back does not work, but
height works
Internal Problem
Call for service
Electrical receptacles and
warmer work, but table height
and back will not respond to
foot control
Internal Problem
Call for service
Electrical receptacles and
warmer work, but table height
and back will not respond to
hand control
A. Hand control not
installed correctly
B. Internal Problem
A. Make sure connection of
hand control to table is
solid.
B. Call for service
Instrument warmer not
warming
A. Warmer ON/OFF
switch circuit
breaker tripped
B. Table does not have
power
A. Reset circuit breaker
B. Follow instructions above
to Confirming Power to
Table
Electrical receptacle not
working
A. Receptacle circuit
breaker tripped
B. Table does not
have power
A. Reset circuit breaker
B. Follow instructions above
to Confirming Power to
Table
Safety Information
.
CAUTION: DO NOT SUBMERGE FOOT CONTROL in water or
any other liquid. Failure to follow this instruction will cause severe
damage to product.
20
5
Confirming Mains Power Procedure
Confirm wall receptacle has power.
If receptacle does not have power, call building maintenance.
If receptacle has power then confirm Mains Power Cord is correctly installed.
Correctly install cord and if table functions, no additional action needed.
If table does not function, confirm the table’s Mains ON/OFF Circuit Breaker
has not been tripped.
If tripped, reset and test table functions, no additional action required.
If table does not function, call for service.
The Encore Power Series Tables are designed for intermittent
operation with a duty cycle of 1 minute ON / 9 minutes OFF.
DO NOT EXCEED duty cycle, doing so could damage system.
WARNING: To avoid a fire hazard or risk of electric shock, this table
must only be connected to a supply mains with protective earth ground.
CAUTION: Table is rated for a 700 pound patient load with patient
centered on seat section.Operating table with a patient over
recommended load, will result in damage to table.
WARNING: No modification of the equipment is allowed.
WARNING: Connecting equipment to the multiple socket outlets
effectively leads to creating a Medical Electrical System and the result
can be a reduced level of safety.
WARNING: Before positioning or adjusting table make sure arms,
legs, accessories and other objects are clear and safe from all
moving parts of table.
WARNING DO NOT use this product in presence of
FLAMMABLE ANESTHETIC MIXTURES WITH AIR OR WITH
OXYGEN OR NITROUS OXIDE.
WARNING: All exposed metal parts of this product are grounded.
For procedures involving cauterization or similar treatment, insulate
patient from metal parts of table with non-conductive material.
Failure to follow recommended procedures could result in
electrical shock and/or burns to patient.
IF TABLE MALFUNCTIONS
1. IMMEDIATELY stop using foot control or hand control.
2. Unplug mains power cord from wall outlet.
3. Assist patient off table if applicable
4. Report malfunction of table to ENOCHS at 1-800-428-2305.
DO NOT REPLACE IEC Mains Power Cord with other type of cord.
DO NOT USE other type of hand control.
DO NOT USE extension cord unless NEMA approved for specifications.
DO NOT USE table if mains power, foot control or hand control cord is cut,
worn, frayed or otherwise damaged.
DO NOT USE table if abnormal sounds are heard during any adjustment.
Preventative Maintenance Checklist
Maintenance of the table is responsibility of the owner. Manufacturer recommends
following areas be inspected by certified technician every six months to assure proper
operation of table. Copy of this checklist should be used for each inspection and
maintained in table’s master file. Each inspection area is required to indicate a pass or
fail status. ALL AREAS failing inspection must be serviced/repaired immediately by
certified technician. See ENOCHS Service Manual for Power Encore Series Tables for
repair/service advice and instructions. Direct all questions to ENOCHS Technical
Support at 1-800-428-2305.
Serial Number:
EL
Inspection
Date:
PASS
FAIL
INSPECTION AREA
grounding continuity
mains power cord and electrical plug free from all nicks, cuts, abrasions or
any other damage.
mains power cord ON/OFF switch operates.
mains power indicator light on front face plate functional.
table’s receptacles functional (applicable on 4550 & 4520 with this option)
Instrument warming drawer indicator ON/OFF switch functional.
(applicable on 4550 & 4220 with warming drawer option)
warming drawer functional (applicable on 4550 & 4520 with this option)
all foot control pedals move freely, returning to neutral position without
sticking (applicable on all tables with this option)
foot control power cord free of damage and firmly held in place by strain
relief at back of foot control and at table base
TABLE UP/DN functions exhibit smooth range of movement
BACK UP/DN functions exhibit smooth range of movement
pelvic tilt adjusts smoothly and easily
leg extension moves freely in and out of table
irrigation basin drawer moves freely in and out of table
stirrup length and lateral adjustments have smooth range of movement
upholstery is free from cuts, rips or punctures
accessories rails (if applicable) are secure
accessories in good working order
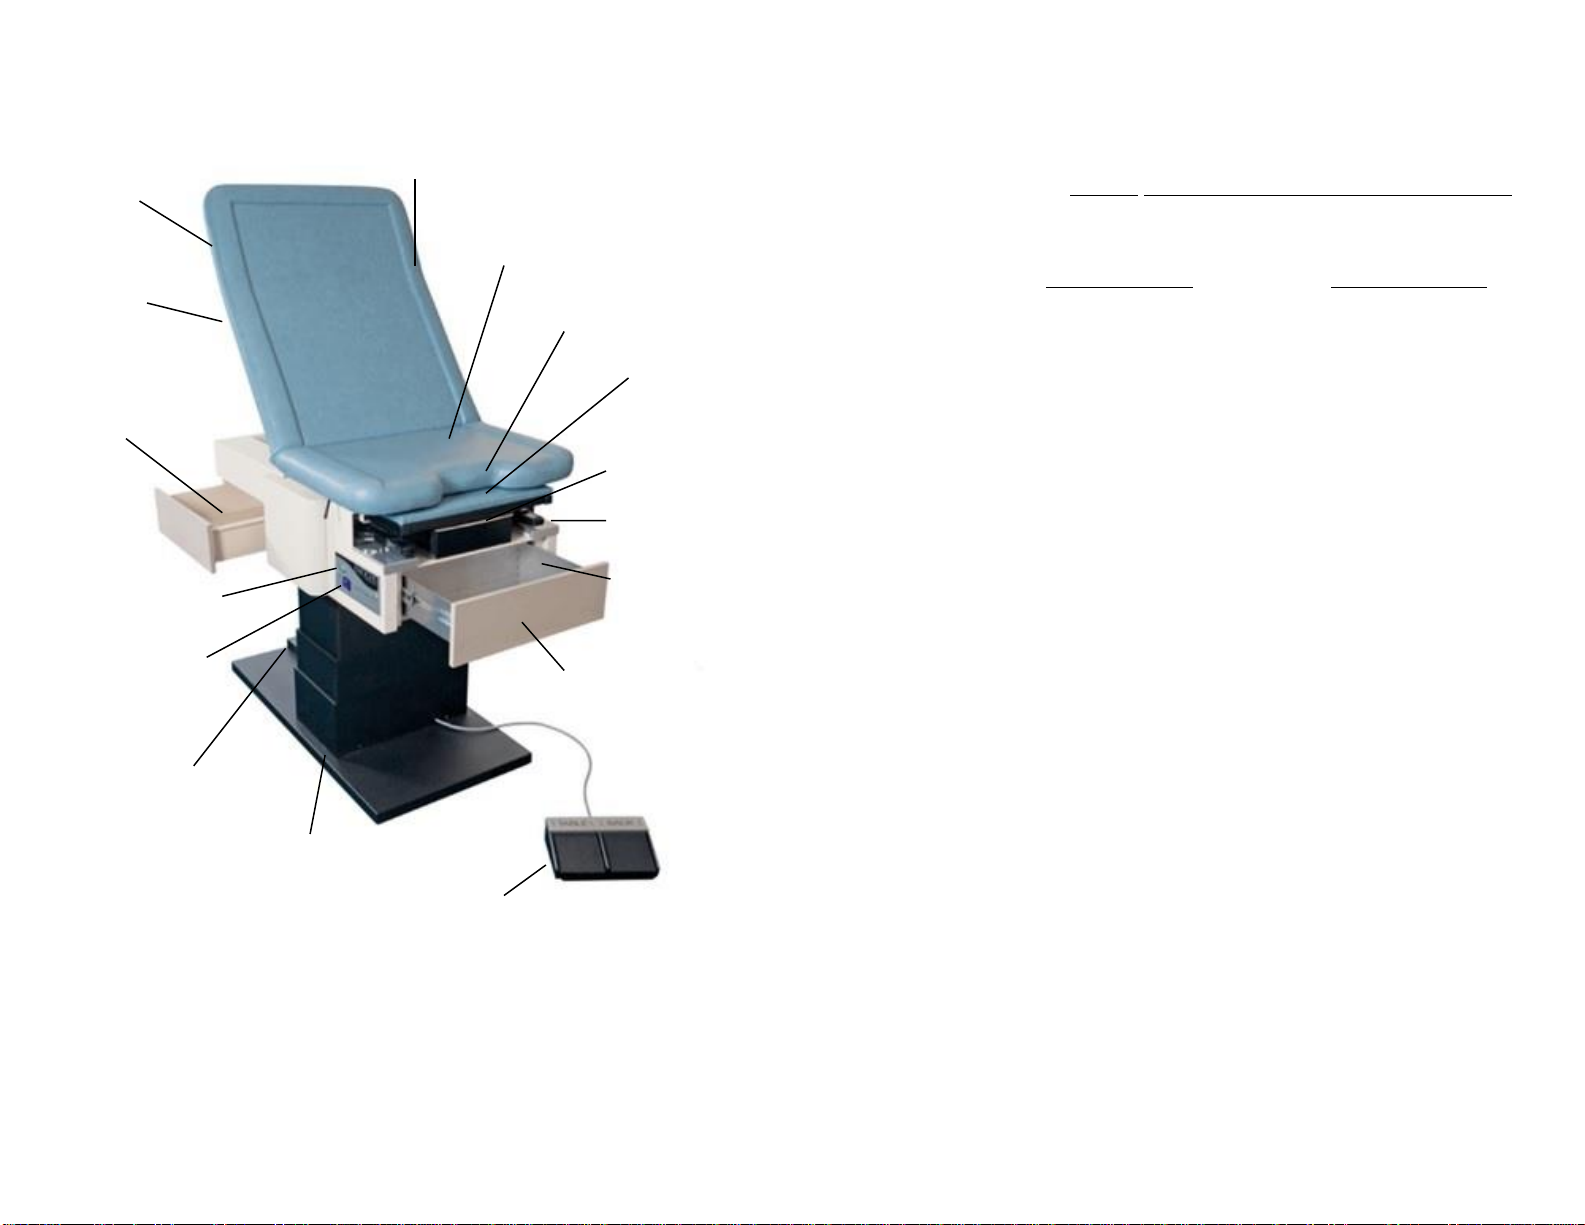
PRODUCT AT A GLANCE
6
19
Range of Motion
Power Back: 0º horizontal to +80º =± 2º
Power Height: Min: 18.5” ± .25 in. Max: 38” ± .25 in.
Stainless Steel
Irrigation basin
Perineal
recess
Adjustable stirrups
Pelvic tilt
Range of Motion
Min: Flat
Max.: 11º ± 2º
Pull-out
leg extension
Paper cutter
Paper roll holder
Instrument warmer
drawer (optional on models
4550 & 4520 only)
Power back
Side drawer
storage (not
available on 4510)
Stainless steel drawer
(standard on all models)
Mains Power light
Mains Power Input Module
Instrument Warming
Drawer ON/OFF SWITCH
(on models with optional
warmer drawer )
Power Height
Foot control (standard on models 4520 & 4510,
optional on model 4550)
UPHOLSTERY CARE
S P E C I A L AL E R T : Follow guidelines for cleaning procedures set forth
by the CDC (reference: Isolation Precautions), OSHA (reference: Bloodborne
Pathogen Standards), APIC (Association for Practitioners in Infection Control)
and other appropriate federal or state agencies.
Upholstery surface should be cleaned after each patient. Vinyl upholstery requires
general periodic cleaning to maintain a neat appearance and prevent build-up of dirt
and contaminants. A cloth damp with warm soapy water followed by a clear cold
water rinse* may be used for general cleaning of upholstery. Indiscriminate use of
strong solvents, bleaches, cleaners formulated for nonporous surfaces and
cleaners containing alcohol will severely damage or discolor vinyl surface.
Procedures for removing substances that cause staining are listed below.
SUBSTANCE
SOLUTION
PROCEDURE
Blood
Cold water- DO NOT USE
hot or soapy water, this will
set stain.
THEN USE
3/4 cup bleach to one gallon
warm water for final cleaning
IMMEDIATELY, following appropriate guidelines,
remove substance from surface. If stain remains,
use household ammonia directly on stain followed
by a clear cold water rinse*.
THEN
Wipe entire surface with cloth damp with bleach
solution followed by a clear cold water rinse*.
Vomitus
Commercial Disinfectant
THEN USE
3/4 cup bleach to one gallon
warm water for final cleaning
IMMEDIATELY, following appropriate guidelines,
remove substance from surface. Follow with a clear
cold water rinse*.
THEN
Wipe entire surface with cloth damp with bleach
solution, followed by a clear cold water rinse*.
Urine
1 part household ammonia to
5 parts water
THEN USE
3/4 cup bleach to one gallon
warm water for final cleaning
IMMEDIATELY, following appropriate guidelines,
remove substance from surface. Follow with a
clear cold water rinse*.
THEN
Wipe entire surface with cloth damp with bleach
solution followed by a clear cold water rinse*.
Surface
Mildew
1 Tablespoon bleach to one
quart water
Sponge area with solution until mildew is removed.
Follow with a clear cold water rinse*.
Ball-point Ink
Isopropyl alcohol 70%
followed immediately by
several clear water rinses
IMMEDIATELY remove mark using full strength
Isopropyl alcohol 70%. Rub lightly until ink is
removed. Wipe down several times with a clear
cold water rinse*. Ink will stain vinyl permanently if
not removed immediately.
Chewing
Gum,
Lip Stick,
Grease, Oil,
Shoe Polish
Scuffs
Mineral Spirits or Carbon
Tetrachloride
Gum: Following appropriate guidelines, peel off
loose gum. Using a soft cloth damp with solution,
rub soiled area lightly until gum is removed. Follow
with clear cold water rinse*.
Lip stick, grease, oil: Taking care not to smear
substance, gently remove substance with a soft
cloth damp with solution. Follow with clear cold
water rinse*.
Shoe polish: IMMEDIATELY remove polish as it
contains dye which permanently stain upholstery.
Follow with clear cold water rinse*.
*clear cold water rinse: immerse cloth in clear cold water then wring out excess water before use.
For substances not listed call ENOCHS 1-800-428-2305 for instructions.
The following cleaners are NOT RECOMMENDED for this product:
powder abrasives
steel wool
industrial strength cleaners
lacquer solvents
peroxide
full strength chlorine bleach
waxes
alcohol based cleaners
vinyl cleaners & conditioners
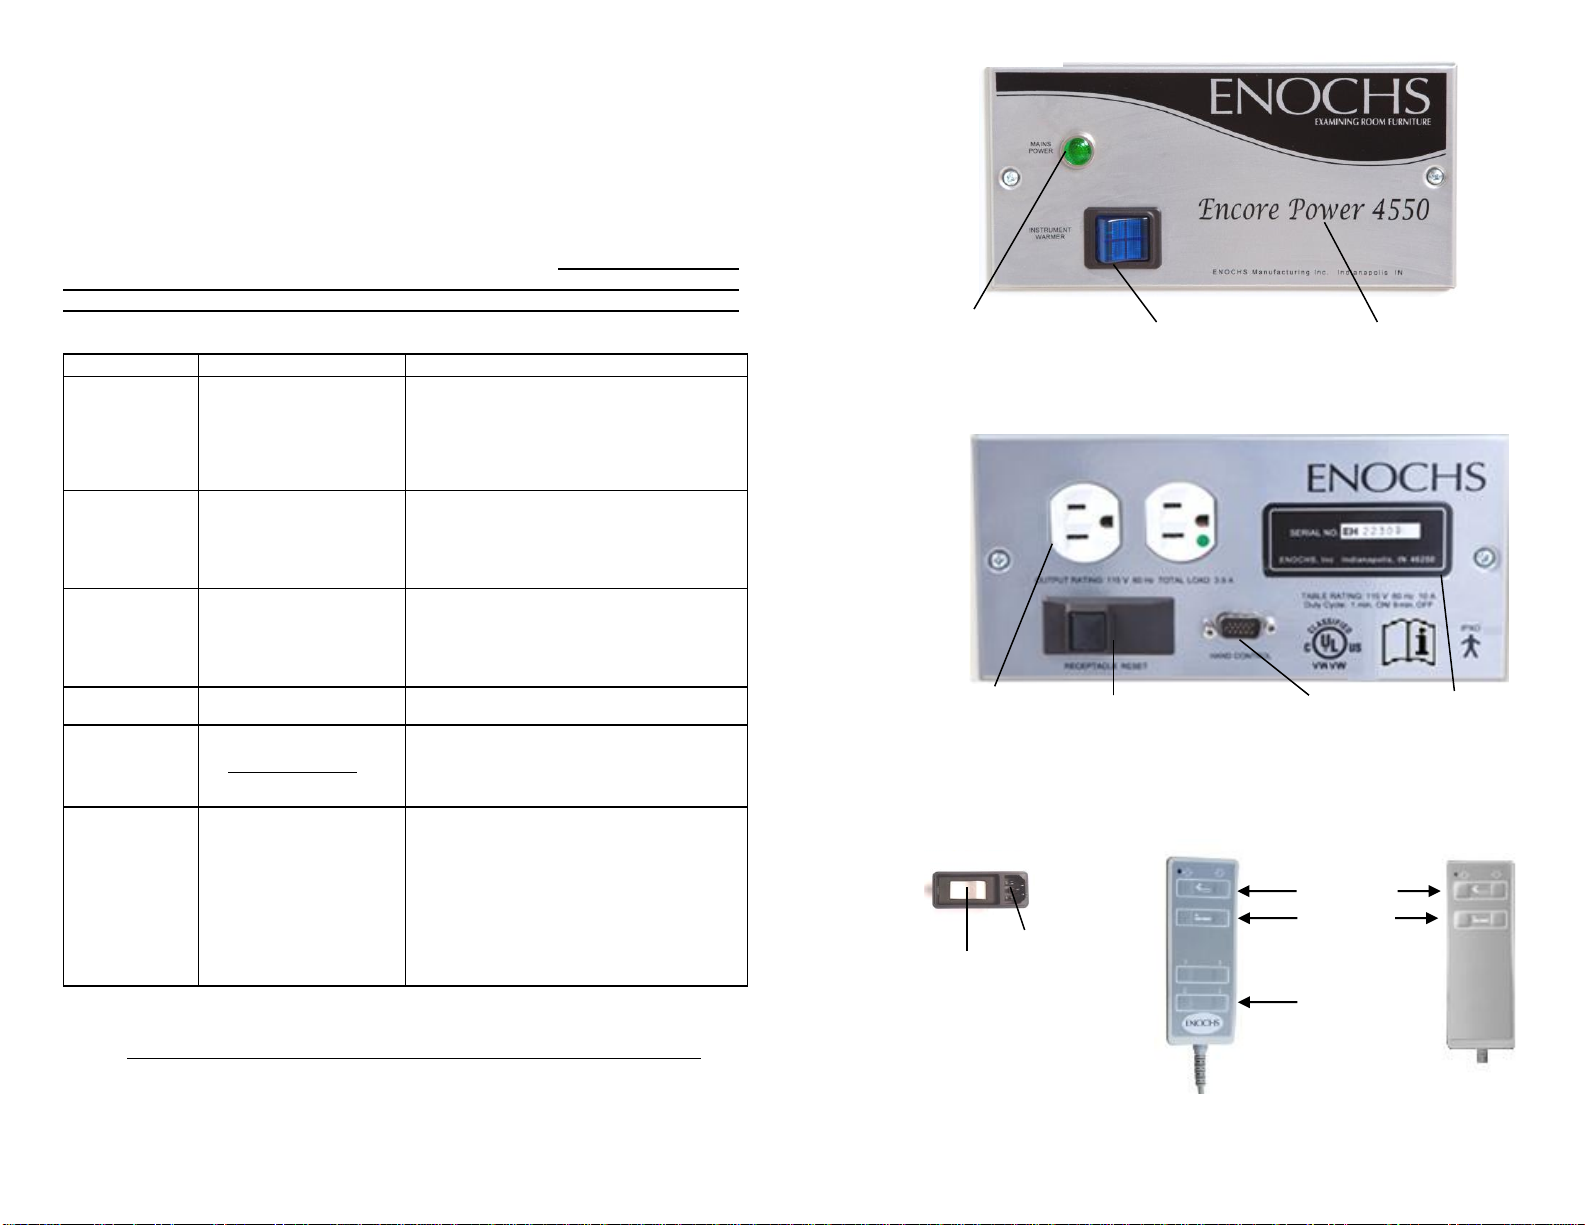
Front Panel
Mains Power
Indicator
Model Name
Mains Power
Input Module
ON/OFF Switch
& Circuit
Breaker Reset
Power
Supply Cord
Input
18
7
Hand Controls
(applicable only on 4550 & 4520
with this option)
Electrical
Accessory
Receptacles
Back Panel
Serial Number
Hand Control Input
(on all models
except 4510)
Instrument Warmer ON/OFF
(applicable on 4550 & 4520 with
this option)
Programmable
Non-programmable
Receptacle
Circuit Breaker
Back: Up/ Down
Adjustment
Height: Up/
Down
Adjustment
Programming
Buttons
SETTING UP YOUR TABLE
WARNING: Remove table from skid by lifting only at table’s base. DO
NOT LIFT AT COUCH SEAT, HEAD SECTION OR BY STIRRUPS,
LEG EXTENSION or BASIN DRAWER -- lifting at these points could
result in product damage and/or bodily injury.
Table rating is 115V AC, 60 Hz, 10 ampere. Connect table to correct electrical source.
Do not connect table to other voltages. If incorrect power source is used, table will not
function properly and component parts could be damaged.
Plug table into a to a supply mains with protective earth.
Position table in the final location so power cord is easily accessible by staff. Table
must sit firmly on all four levelers to operate correctly. To level unit adjust the four
threaded levelers located under each corner of the table base.
BEFORE OPERATING TABLE
ALWAYS place the foot control on floor away from all moving parts of the table.
ALWAYS keep hand control and cord clear from all moving parts of the table.
NEVER place foot control on the base of the table to operate.
Keep patient feet, legs and arms away from all moving parts.
Keep all accessories, room equipment and operator stools away from all moving
parts of table.
ELECTROMAGNETIC INTERFERENCE
Electromagnetic interference can impact performance of medical equipment. If
interference is experienced, determine interfering device and, if practical, remove it from
the area. If removing the interfering device is not practical;
Increase distance between affected devices.
Connect table or any affected devices into isolated circuits.
Contact ENOCHS if interference persists.
PATIENT LOAD
The Encore Low Access Power Series tables are designed for a patient load of
700 lbs. with patient centered on seat section. Do not allow patient to sit on back
section of table.
TABLE MAINTENANCE
ENCORE LOW ACCESS tables do not require any mechanical maintenance.
Manufacturer does recommend a standard PREVENTATIVE MAINTENANCE
INSPECTION by an authorized service technician. Reference Semi-annual
Maintenance Inspection Checklist, page 19.
CLEANING RECOMMENDATIONS
SPECIAL CLEANING ALERT
Follow guidelines for cleaning procedures set forth by the CDC (reference
Isolation Precautions), OSHA (reference Bloodborne Pathogen Standards), APIC
(Association for Practitioners in Infection Control) and any other appropriate
federal or state agencies.
PAINTED OR STAINLESS STEEL SURFACES:NEVER USE ABRASIVE
CLEANERS on these surfaces. Abrasive cleaners will cause irreversible damage
to finishes. Clean stainless steel surfaces with commercial cleaners designed for
this type of surface. Most soil can be cleaned from painted surfaces with mild
soap and water. Clean all painted surfaces on a regular basis. Disinfect with
cleaners formulated for painted or stainless steel surfaces.
FOOT CONTROL:BEFORE CLEANING unplug table from wall receptacle. DO
NOT USE excessive liquid on foot control, doing so could result in product
damage. With soft bristle brush, remove loose dirt particles from pedal tread.
Clean outer case with sponge or soft cloth. To avoid damage by housekeeping,
place foot control on table base for storage when not in use.
HAND CONTROL: BEFORE CLEANING unplug table from wall receptacle.
Using a sponge or soft cloth, clean outer case with disinfecting solution
recommended for vinyl or plastic surfaces. To avoid damage by housekeeping,
properly store hand control on table when not in use.
VACUUM FORMED TOP:Manufacturer of material recommends cleaning
upholstered surface after each patient. Certain substances will stain if not
removed immediately, consult Manufacturer’s Upholstery Cleaning, and page 18.
Most soil can be easily removed with warm soapy water and several clear rinses.
Disinfect using products designed specifically for vinyl. DO NOT USE cleaners
formulated for nonporous surfaces or cleaners containing alcohol.
CAUTION: DO NOT SUBMERGE FOOT CONTROL in water or
any other liquid. Failure to follow this instruction will cause severe
damage to product.
8
17
WARNING: The Equipment shall be transported only when the unit
is in the fully down position without the patient.
CAUTION: DO NOT EXCEED table’s weight limit to avoid
product damage.
STORAGE
Side Drawer: The 4.5" deep moulded high impact polystyrene storage
drawer has an attached laminate front and is field
reversible if ever needed. Drawer has an integrated
stop that eliminates accidental dumping of drawer
contents when drawer is pulled to full extension. Drawer
easily removes for cleaning. Drawer operates on a steel
reinforced, side-guide mounting system. Nylatron strips
on the bottom drawer edges protect against wear and
provides smooth drawer movement. Side drawer is not
included on model 4510.
Foot End Drawer:
The 4" deep footend drawer is 100% stainless steel with
an attached laminate front. Drawer moves in and out of
table on a steel ball bearing glide system. Drawer can
be easily removed for cleaning.
Removal of Footend Drawer: Pull drawer out to full extension and push glide lock on
drawer glide down on one side and up on the other. Pull drawer out.
Replace of Footend Drawer: Line up guides on drawer to table guides and push
drawer into table to set guide locks.
Removal of Side Drawer: Pull drawer out to full extension, lift approximately 15º then
remove.
Replace of Side Drawer: Inserting drawer at approximately 15º angle, lower front
edge while pushing drawer into the table.
Reversing of Side Drawer:
1. Remove side drawer and set aside in a safe area. Tape opposite panel in
place.
2. Reach through drawer opening and locate and remove the brackets holding
the laminate panel in place on opposite side of table.
3. Tape laminate panel in place on side of table and working from the opposite
side of table, reach through opening and secure laminate to table.
4. Insert drawer into table.
VACUUM FORMED TOP
Top is 100% seamless and manufactured without crevices or decorative embossing
that collect dirt and makes cleaning difficult. Top is padded with high density foam
with additional contoured padding on the sides for patient comfort. Top is
constructed with a steel frame and backing designed for strength and durability.
The perineal recess is an exclusive feature of this top.
POWER FEATURES
FOOT CONTROL
WARNING: Place Foot Control in clear area to avoid
accidental activation. NEVER place foot control on base of
table to operate, always place foot control away from any
moving parts of table to avoid product damage and/or bodily
injury.
Before positioning or adjusting table, make sure arms,
legs, accessories and other objects are clear and safe from all
moving parts of table to prevent bodily injury to patient or staff
and/or product damage.
Place Foot Control in a clear plastic bag or position unit to a
safe area to avoid damage by solutions used in procedures
and to assist in maintaining a clean unit.
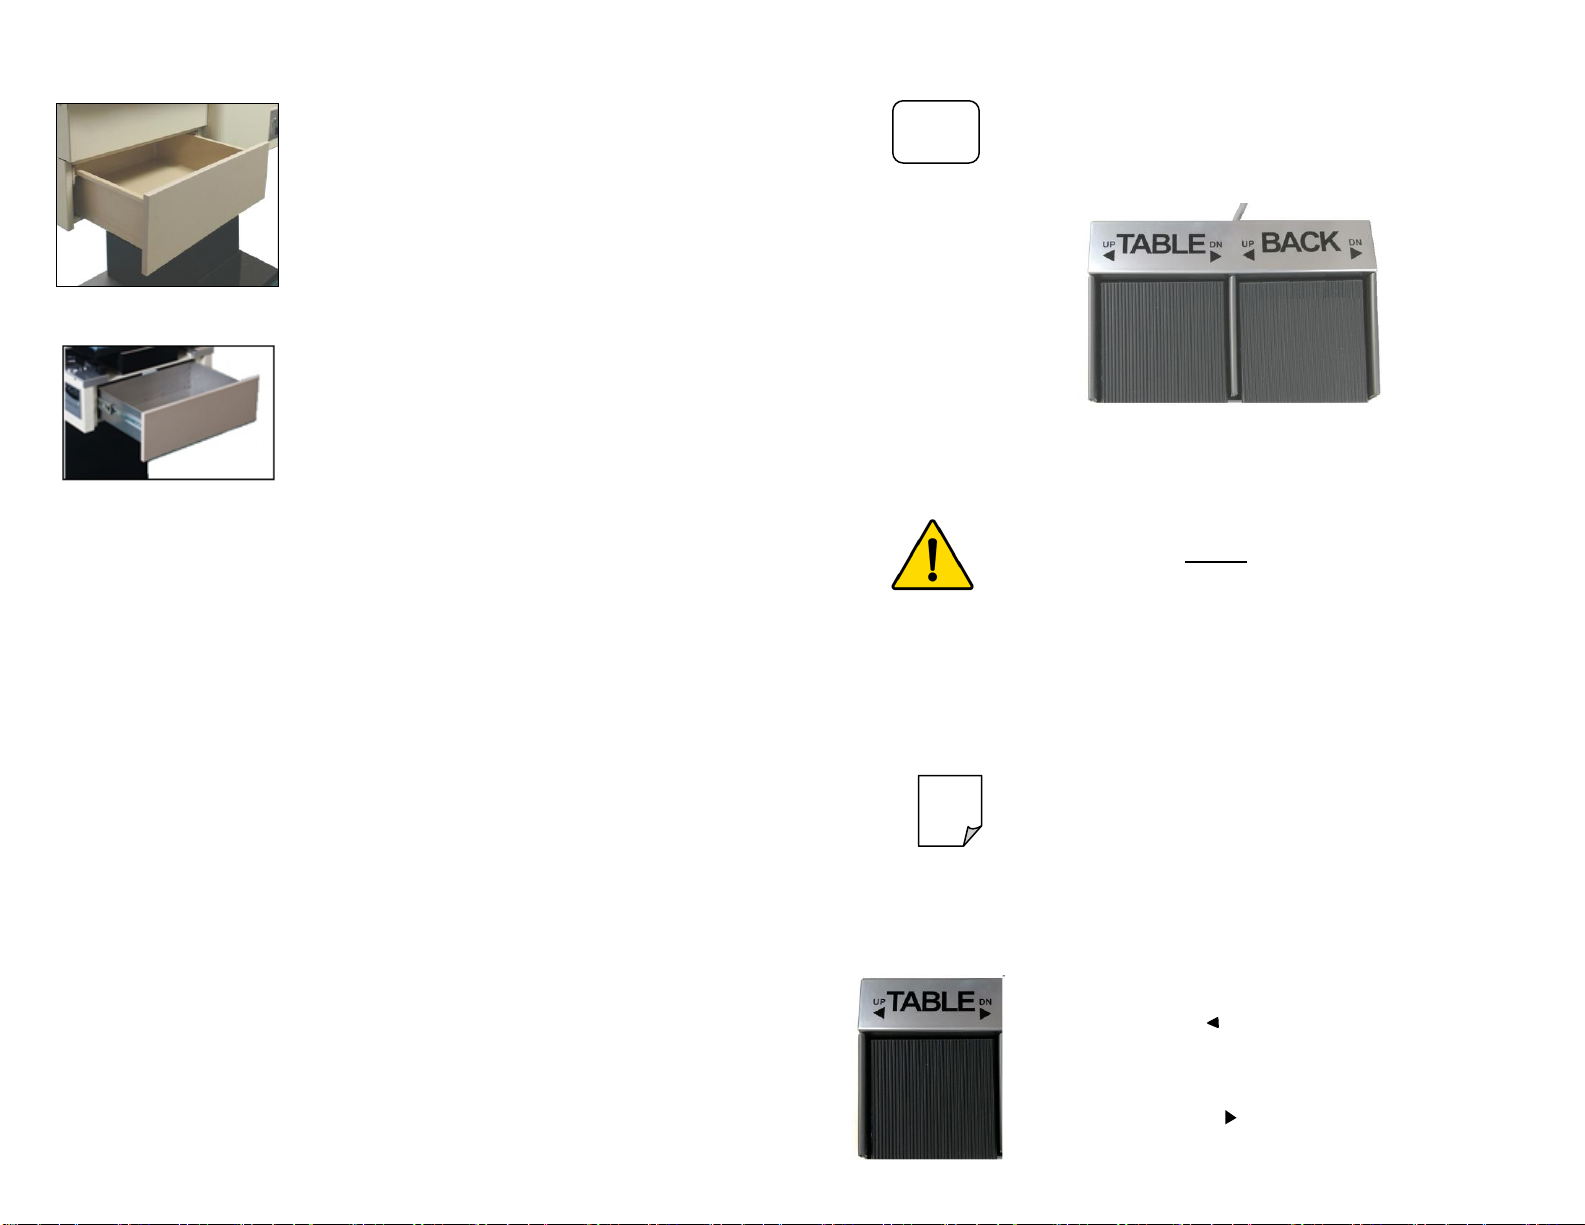
FOOT CONTROL OPERATION
Height adjustment
Raise Table: Place foot firmly on center of pedal
marked TABLE. Depress left side of pedal
designated by UP. When desired height is
reached, release pressure from pedal
Lower Table: Place foot firmly on center of pedal
marked TABLE. Depress right side of pedal
designated by DN . When desired height is
reached, release pressure from pedal.
If included, the "Easy Touch" foot control allows fast convenient adjustment
of table’s HEIGHT and the couch BACK.
NOTE
16
9
Tables are designed for intermittent operation with a duty
cycle of 1 minute ON / 9 minutes OFF. DO NOT EXCEED
duty cycle, doing so could damage system.
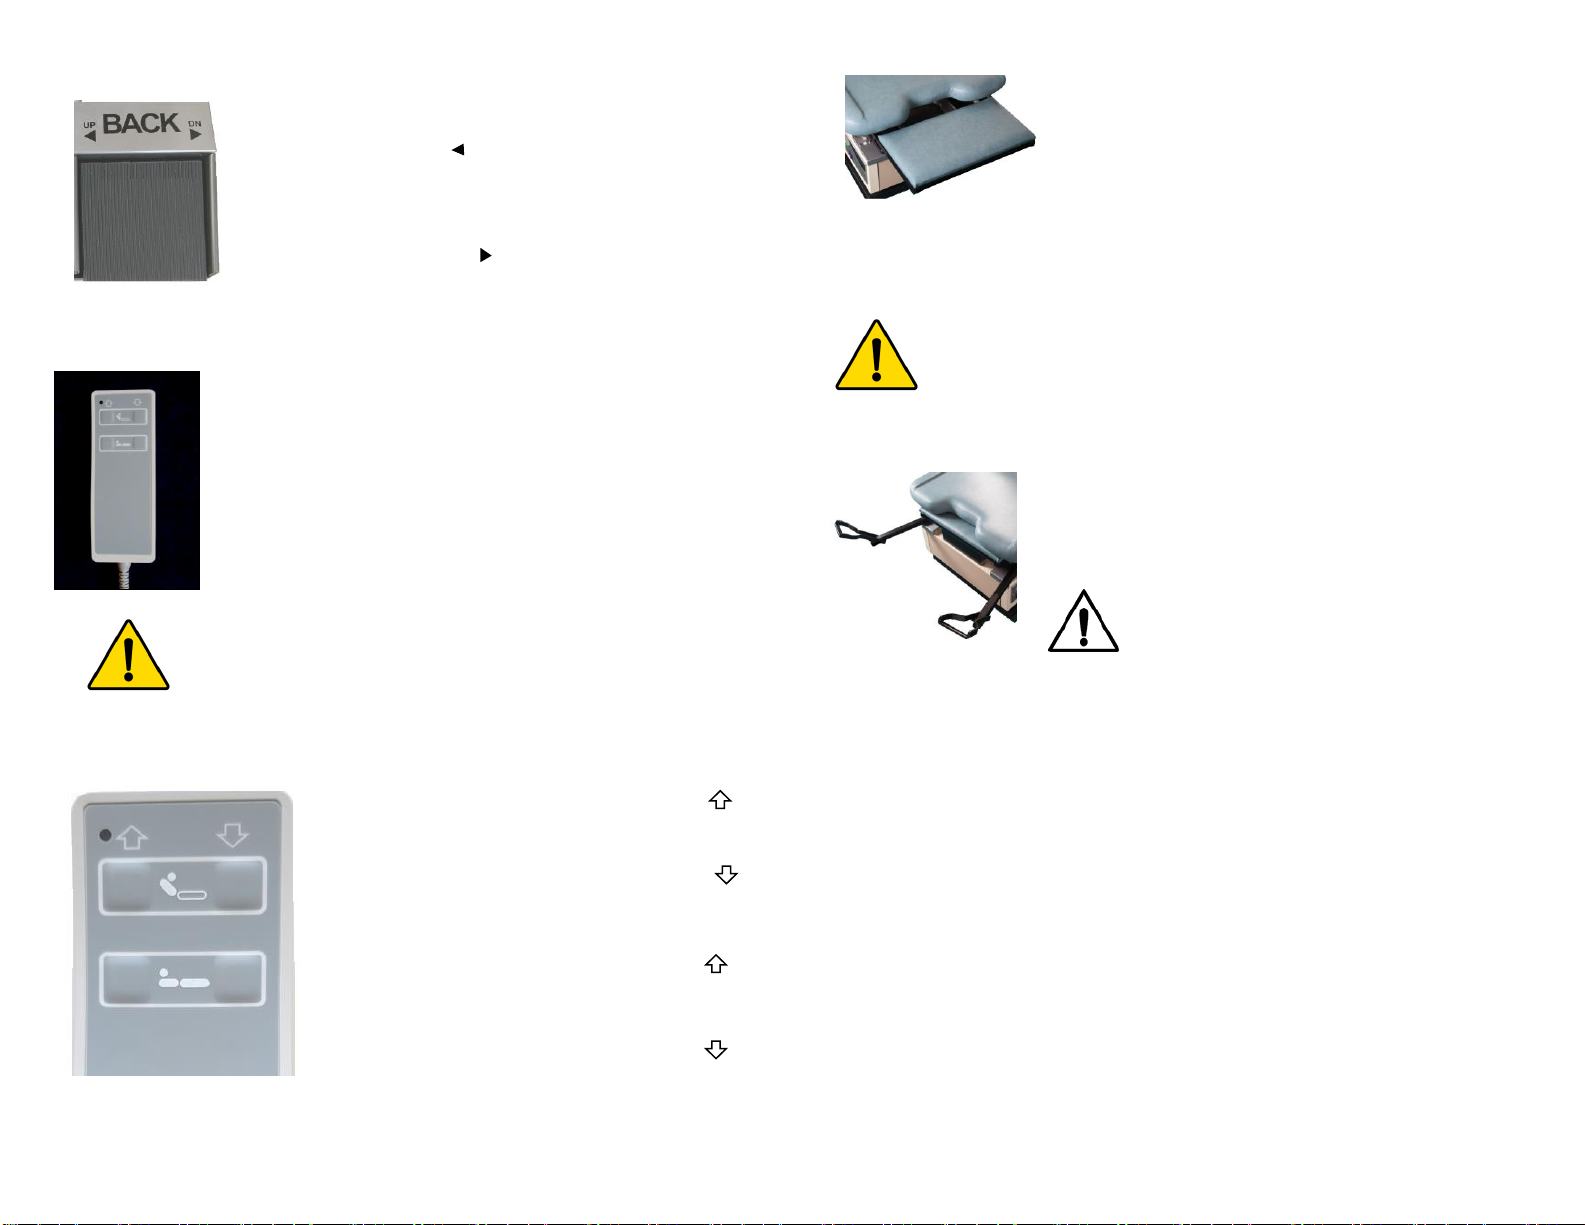
Back adjustment
Raise Back: Place foot firmly on center of pedal
marked BACK. Depress left side of pedal
designated by
UP. When desired angle is
reached, release pressure from pedal.
Lower Back: Place foot firmly on center of pedal
marked BACK. Depress right side of pedal
designated by DN . When desired angle is
reached, release pressure from pedal.
STANDARD HAND CONTROL
The ENCORE 4545 Hand Control is an option for model
4520. Hand Control allows fast easy adjustment of table’s
HEIGHT from 18.5” to 38" and the couch BACK to various
degrees from horizontal to an 80º chair position.
DO NOT CONNECT ANY OTHER HAND CONTROL INTO
INPUT PORT.
To install: Connect hand control cable to input port on the
back face plate of table and secure with fasteners.
To disconnect: Unscrew fasteners, securely grasp plug and
pull from port. DO NOT PULL plug out with hand control
cable.
STANDARD HAND CONTROL OPERATION
Height Adjustment
Raise Table: Press button marked TABLE .
When desired height is reached, release
pressure from button.
Lower Table: Press button marked TABLE .
When desired height is reached, release
pressure from button.
Back Adjustment
Raise Back: Press button marked BACK .
When desired angle is reached, release
pressure from button.
Lower Back: Press button marked BACK .
When desired angle is reached, release pressure
from button
PULL-OUT LEG EXTENSION
The extra wide padded leg extension moves in and out
from under the seat section. Extension is padded and
upholstered in durable vinyl. Independent operation
allows fast transition between leg extension and basin.
Patients with limited hip rotation may be positioned with
feet on extension while still allowing full access to basin
by practitioner.
To Extend: Grasp front edge of extension and pull out to desired length.
To Store: Push unit gently back under seat section of table.
Irrigation Basin Access: push extension into stored position lifting slightly
while pushing under seat section for direct access to basin.
STIRRUPS Concealed when not in use, the multi-position stirrups offer
length as well as lateral adjustment to accommodate each
patient. Stirrup locks into position with weight of patient’s
foot. Stirrup shoes are coated in durable Plastisol for
efficient cleaning and patient comfort
STIRRUP ADJUSTMENT
Lateral Adjustment: Grasp stirrup bars, located under seat section and pull out to
full bar extension. Unfold stirrup shoes. Lift bar approximately ½"(1.3cm) and
move outward, lowering to desired angle.
Length Adjustment: First make desired lateral adjustment of stirrups.
To Decrease Stirrup Bar Length: Firmly push stirrup bar into table stopping at
desired length. Stirrup bar automatically locks, prohibiting increase in length.
To Increase Stirrup Bar Length: Remove weight from stirrups, lift bar
approximately ½ " (1.3cm), return to center position and bring to full extension.
Make lateral adjustment to desired position then push bar into table to desired
length.
Perineal Angle: To increase patient’s leg angle for great perineal access, decrease
stirrup bar length creating a shorter distance from stirrup shoe to end of table.
Stirrup Storage: Lift bars approximately ½" (1.3cm) and move to center position.
Fold down stirrup shoes against bar and gently slide bars under seat section.
10
15
WARNING: Before activating hand control, confirm area around
all moving parts of the table is clear of any obstructions to avoid
product damage and/or bodily injury.
CAUTION: Confirm stirrup bars are secure in
the lateral position before using.
Stirrups are designed to support patient’s
legs, NOT entire patient’s weight
WARNING: Do not use leg extension to support entire patient weight.
Extension designed to support weight of lower portion of patient’s legs.

MAINS POWER CIRCUIT BREAKER
This double pole protective device trips if the rated current
level is exceeded, interrupting the electrical current to the
table. When breaker is tripped, the ON/OFF toggle switch
is in the neutral position.
To Reset: Press mains power ON/OFF Switch to OFF
position, then to the ON position.
MAINS POWER INDICATOR
The green indicator light on front side of table illuminates when table has power.
PAPER ROLL HOLDER
Holder is located at head end section of table and accommodates 18" (45.7 cm) or 21"
(54.3 cm) table paper.
Installing Paper Roll: Lift end of paper roll rod out of the open u-bracket on back
of table couch, slide paper roll onto rod and insert rod end back into bracket.
PAPER CUTTER
Located at head end section to reduce cross contamination, cutter is attached to
upholstered top by quick release snaps located on either side of couch back.
PELVIC TILT The pelvic tilt manually adjusts from flat to 11º. Tilt
lowers from either side of table with use of release lever
located under the seat section.
PELVIC TILT ADJUSTMENT
To Raise: Grasp either side of seat section and lift up. Seat will
automatically lock.
To Lower: Support seat section with one hand, depress release lever
located under the seat section on either side of table and lower seat.
PERINEAL RECESS
The moulded recessed at the end of the seat section is
designed to allow greater access to patient’s perineal region
during procedures.
Recess measures 10" wide at opening and 2" deep at center.
PROGRAMMABLE HAND CONTROL
The ENCORE 4550’s Programmable Hand Control has
three memory positions along with independent controls to
adjust table’s HEIGHT from 18.5" to 38" and the couch
BACK to various degrees from horizontal to an 80º chair
position.
To install: Connect hand control cable to input port on the
back face plate of table and secure with fasteners.
DO NOT CONNECT ANY OTHER HAND CONTROL
INTO TABLE’S INPUT PORT.
To disconnect: Unscrew fasteners, securely grasp plug and
pull from port. DO NOT PULL plug out with hand
control cable.
HAND CONTROL OPERATION
Back Adjustment
Raise Back: Press button marked BACK . When desired
angle is reached, release pressure from button.
Lower Back: Press button marked BACK . When desired
angle is reached, release pressure from button
Height Adjustment
Raise Table: Press button marked TABLE . When desired
height is reached, release pressure from button.
Lower Table: Press button marked TABLE . When
desired height is reached, release pressure from
button.
Program Memory Position
14
11
WARNING: BEFORE USING pelvic
tilt release levers, confirm all hands,
fingers and arms are away from under
seat section.
1. Position the height and back to the desired positions.
2. To save the position, press Sbutton.
3. Within 2 seconds, press and release memory position button
1, 2or 3to store position. An audible beep will sound when
programming is complete
4. To initiate a programmed position: PRESS and HOLD
the button where the position is stored. Release
button when table articulation stops.
5. Any stored memory position may be overridden by new
positioning by following steps 1-3.
WARNING: Before activating hand control,
confirm area around all moving parts of the
table is clear of any obstructions to avoid
product damage and/or bodily injury.
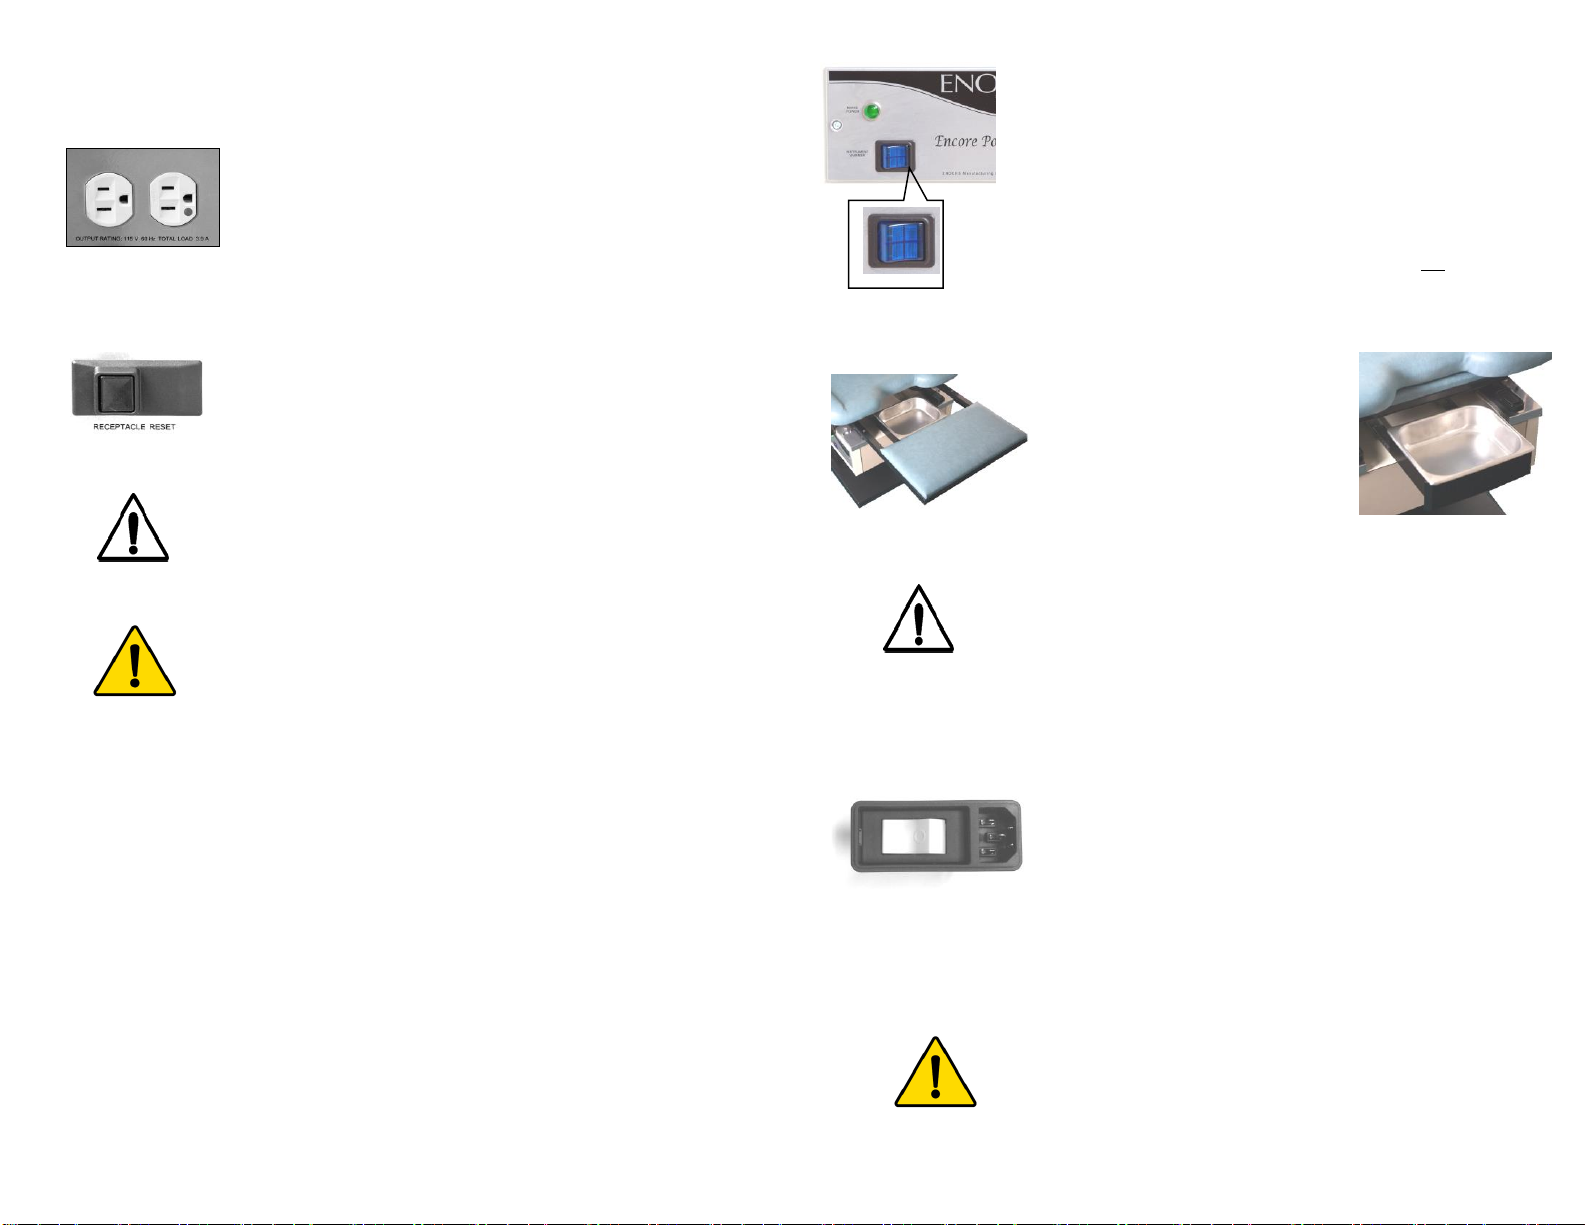
TABLE FEATURES
ELECTRICAL ACCESSORY RECEPTACLES
If included, UL Listed, hospital grade, dual accessory
receptacles are located on back side of the table. A circuit
breaker with a reset button is directly below receptacles.
Unit has a total 3.9 amp maximum load.
ELECTRICAL ACCESSORY RECEPTACLE CIRCUIT BREAKER
(applies to models with electrical accessory receptacles)
If accessory receptacle circuit is overloaded by exceeding the
maximum amperage, the circuit breaker will trip. The button
on the circuit breaker will pop out, interrupting power to
receptacles. Receptacles will not function until circuit is reset.
Reset: Depress reset button to reestablish power to receptacles.
INSTRUMENT WARMING DRAWER
If included, drawer is located at footend of table. The
stainless steel instrument warming drawer is designed to
warm speculums and instruments to approximate body
temperature. The ON/OFF toggle switch with circuit
breaker is located on the front side of table for instant
confirmation of unit’s status.
Warmer ON: Press "ON"side of switch. Switch will be
illuminated when unit is ON.
Warmer OFF: Press "OFF" side of switch. Switch will not be
illuminated when unit is OFF.
Reset circuit breaker: Turn switch OFF, then ON
IRRIGATION BASIN
The 2.5" (6.35 cm) deep stainless
steel irrigation basin fits into the basin
drawer and operates independent of
the leg extension. Basin easily lifts
out for cleaning.
To Access: Grasp basin drawer
handle, extend to desired length.
To Remove Basin: Extend basin drawer to full extension and lift basin out.
To Store: Gently push basin back under seat section.
MAINS POWER INPUT MODULE
The mains power connection at the base of the table,
provides power for table height and back adjustment on all
models. It also provides power to the dual electrical
receptacles and instrument warmer available on the 4550
& 4520. The module consists of an ON/OFF toggle
switch, internal circuit breaker and IEC input.
Connect Mains Power: Plug the power cord’s IEC end into the Mains Power
Entry Module then plug cord into a NEMA wall receptacle. Confirm
ON/OFF switch is in the ON position.
Disconnect Mains Power: Unplug power cord from wall outlet.
12
13
WARNING: Risk of Electrical Shock Hazard: Accessory
equipment connected to the accessory receptacles must be
certified according to the medical device safety standards (i.e., UL
60601-1, CAN/CSA C22.2 No. 601.1, or IEC 60601-1 for electro-
medical equipment). All combinations of equipment must be in
compliance with IEC 60601-1(Clause 16) systems requirements.
Anyone connecting additional equipment to the accessory
receptacle configures a medical system, and therefore is
responsible that the system complies with the requirements of the
system standard IEC 60601-1(Clause 16).
The use of accessory equipment not complying with the safety standards UL
60601-1, CAN/CSA C22.2 No. 601.1, or IEC 60601-1 will lead to a reduced level
of safety of the resulting system.
Read and retain all user manuals for accessory equipment powered by the
receptacles to ensure continued safety of the system.
WARNING! –Risk of Electrical Shock Hazard: Do not plug a multiple socket
outlet or an extension cord into the accessory receptacles of the examination
table.
CAUTION: DO NOT EXCEED maximum receptacle
load of 3.9 amps total
CAUTION: Irrigation basin drawer is not designed to
support any patient weight.
WARNING: UNDER NO CIRCUMSTANCES SHOULD
Mains Power Cord be replaced with any other type cord.
This manual suits for next models
2
Other ENOCHS Medical Equipment manuals


Popular Medical Equipment manuals by other brands

Cando
Cando STAIRCASE Assembly instructions

Thuasne
Thuasne ImmoClassic manual

Haemonetics
Haemonetics Cell Saver 5+ Operator's manual

BEYES
BEYES CareMaster Instructions for use

Mettler Electronics
Mettler Electronics Auto Therm 395 instruction manual

Cardinal Health
Cardinal Health Kangaroo Omni 385400 Instructions for use


