BEYES CareMaster User manual
Automatic Handpiece Cleaning & Lubrication System
CareMaster®
Instructions For Use

2
Table of Contents
Safety Information................................................................... 3
Features.................................................................................... 4
Parts Names............................................................................. 4
Standard Accessories
Installation and Assembly ...................................................... 5
Fuse Rating
Connecting Air Tube
Filling Maintenance Oil
Oil Absorbent Sheet
Connecting Power Cord
Operation Procedure............................................................... 7
Attaching Handpiece
Cleaning and Lubricating
Removing Handpiece
Door .......................................................................................... 10
How to remove the Door
How to mount the Door
Maintenance............................................................................. 11
Replacing Mist Filter
Replacing Oil Absorbent Sheet
Replacing O-ring
Replacing Air Filter
Draining Air Filter
Changing Fuses
Troubleshooting ...................................................................... 14
Specications .......................................................................... 15
Warranty ................................................................................... 15
2 3
Thank you for purchasing the CareMaster. This product is designed to clean and lubricate the
handpiece easily and thouroughly. Please read this Instructions For Use carefully before use and
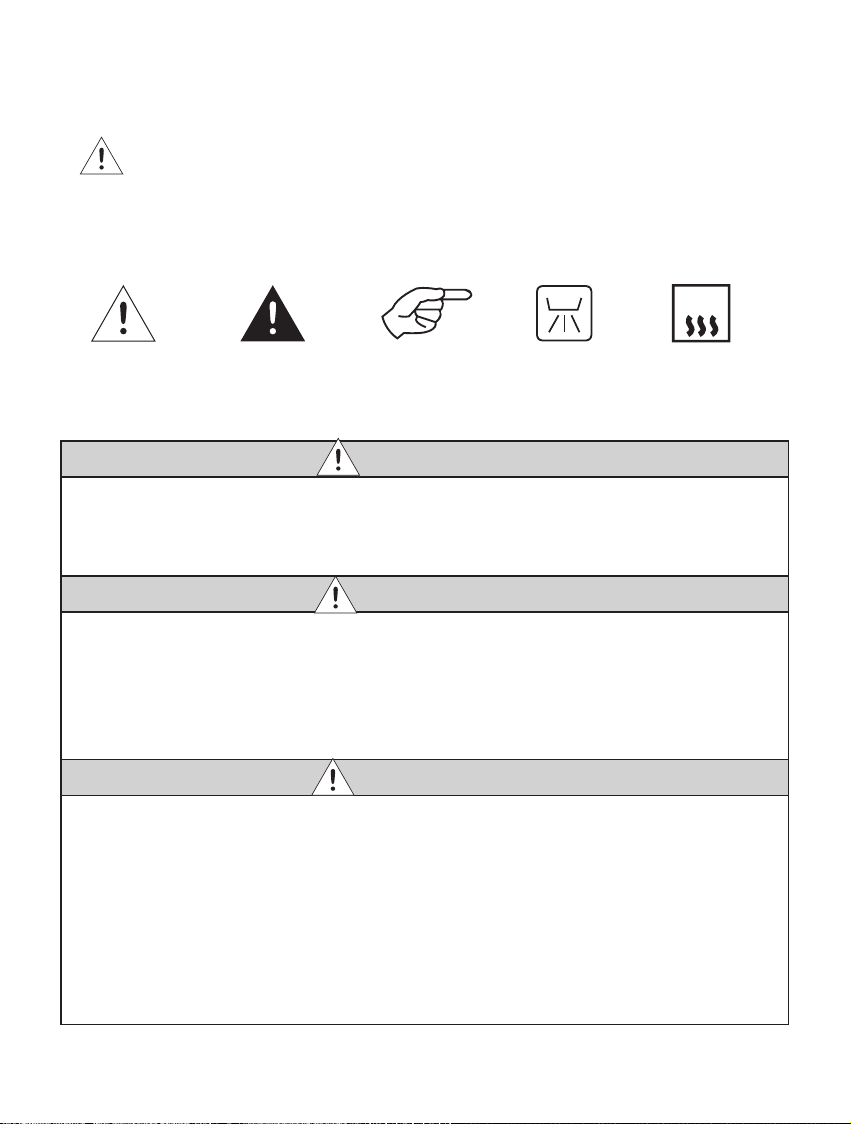
Safety Information
Read these safety precautions before use and operate the product properly.
The indicators are to allow you to use the product safely and prevent danger and harm to you
DANGER
described in this Operating Manual.
WARNING
Do not handle the Power Cord with wet hands as this may result in an electric shock.
circuit.
Do not disassemble or alter the Control Unit. For service or repair contact your authorised dealer.
Contact your dealer.
CAUTION
Always autoclave handpieces after cleaning and lubricating with this product.
outside these limits may cause malfunction.
Place a collector such as a tray under the Control Unit.
and defeat the purpose of this device.
Remove the Air Tube and the Power Cord if the Control Unit is not to be used for a long time.
135°C
WARNING!
ATTENTION!
General
without risk to
Thermal washer
disinfectable
Sterilizable
up to the stated
temperature
4
chemicals.
The user shall be responsible for operation and maintenance.
other than original Beyes accessories could cause damage and malfunction.
1. Features
HPL2010
HPL2011
Helps to perform uniform handpiece maintenance and lubrication.
Three handpieces can be cleaned and lubricated simultaneously whilst keeping your hands clean.
Straight Handpieces.
handpiece.
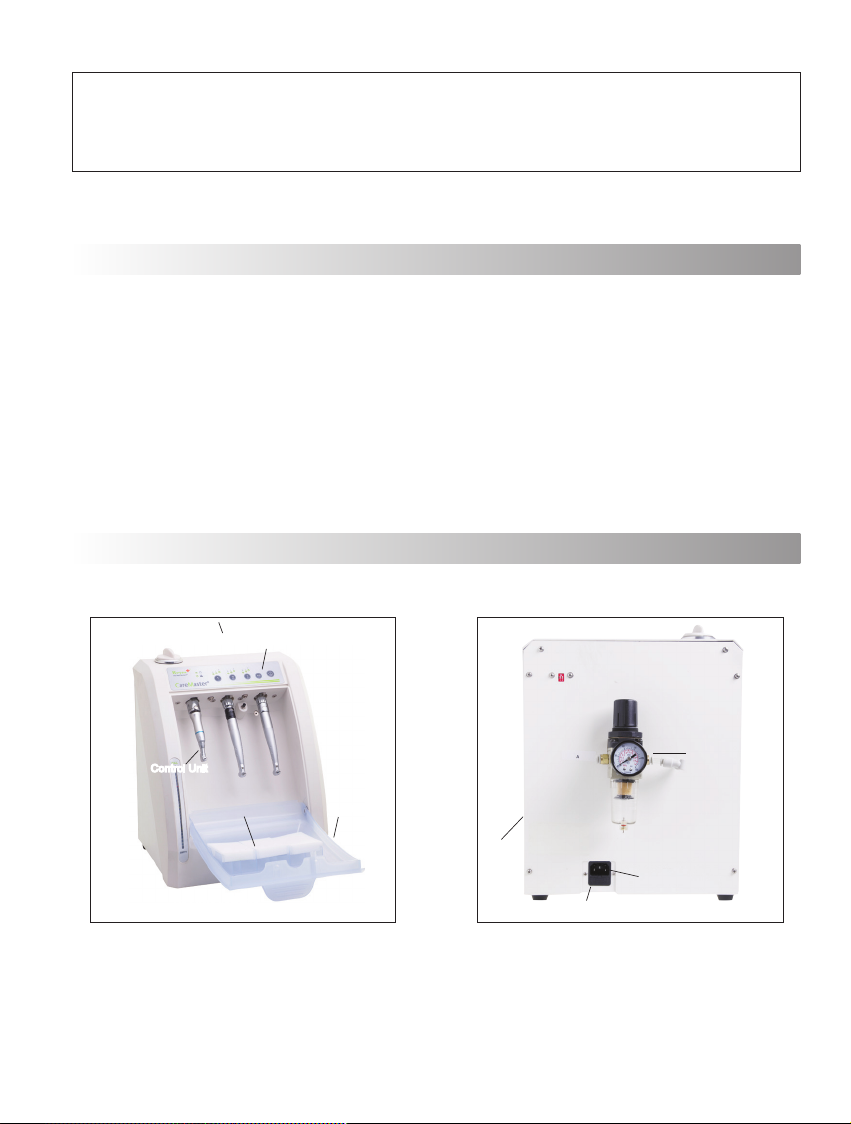
2. Parts Names
Oil Fill Cap Control Panel
Air Filter
Power Inlet
Power Switch
Door
Oil Level Indicator
Control Unit
4 5
• Standard Accessories
dealer.
Product Names Product Names Nombre Quantity
Power Cord Oil Absorbent Sheet Set
Oil Supply Funnel with Filter O-ring Set
Mist Filter Set Poly Male insert Q.D
Air Tube
3. Installation and Assembly
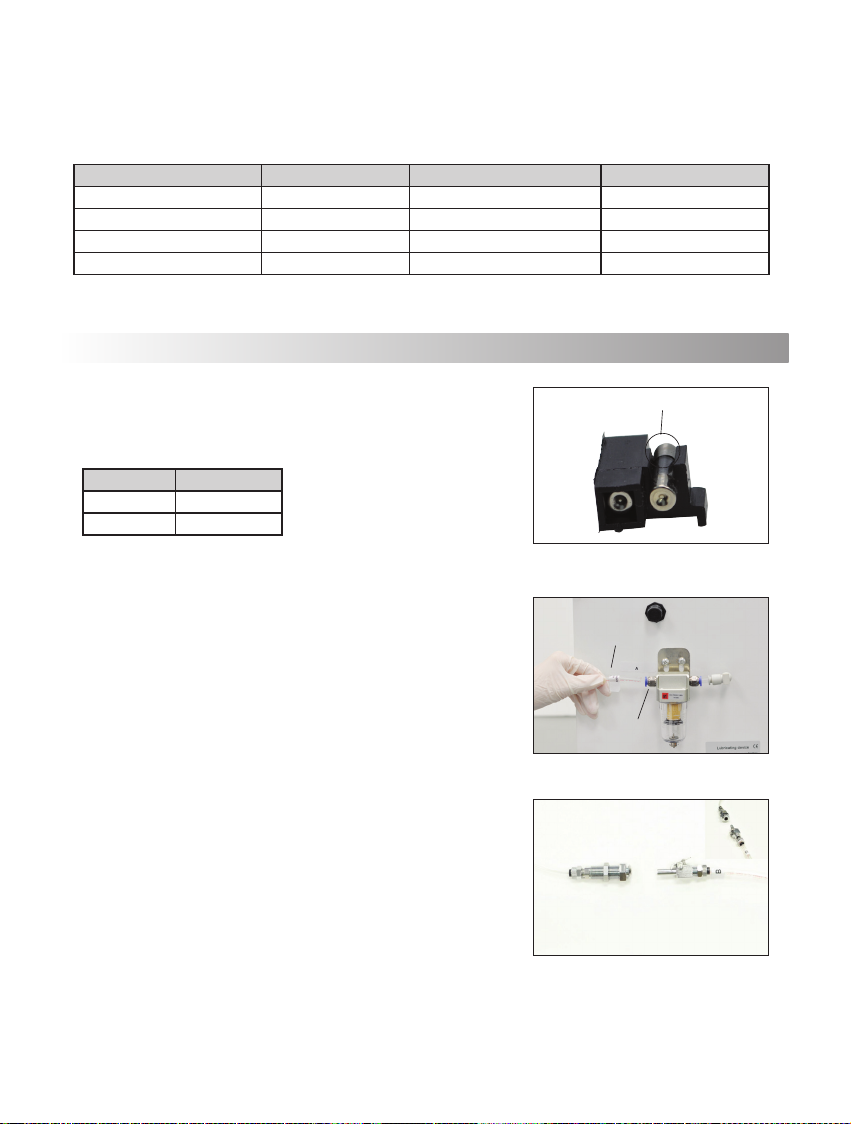
(1) Fuse Rating
Refer to the table below and check that the power supply
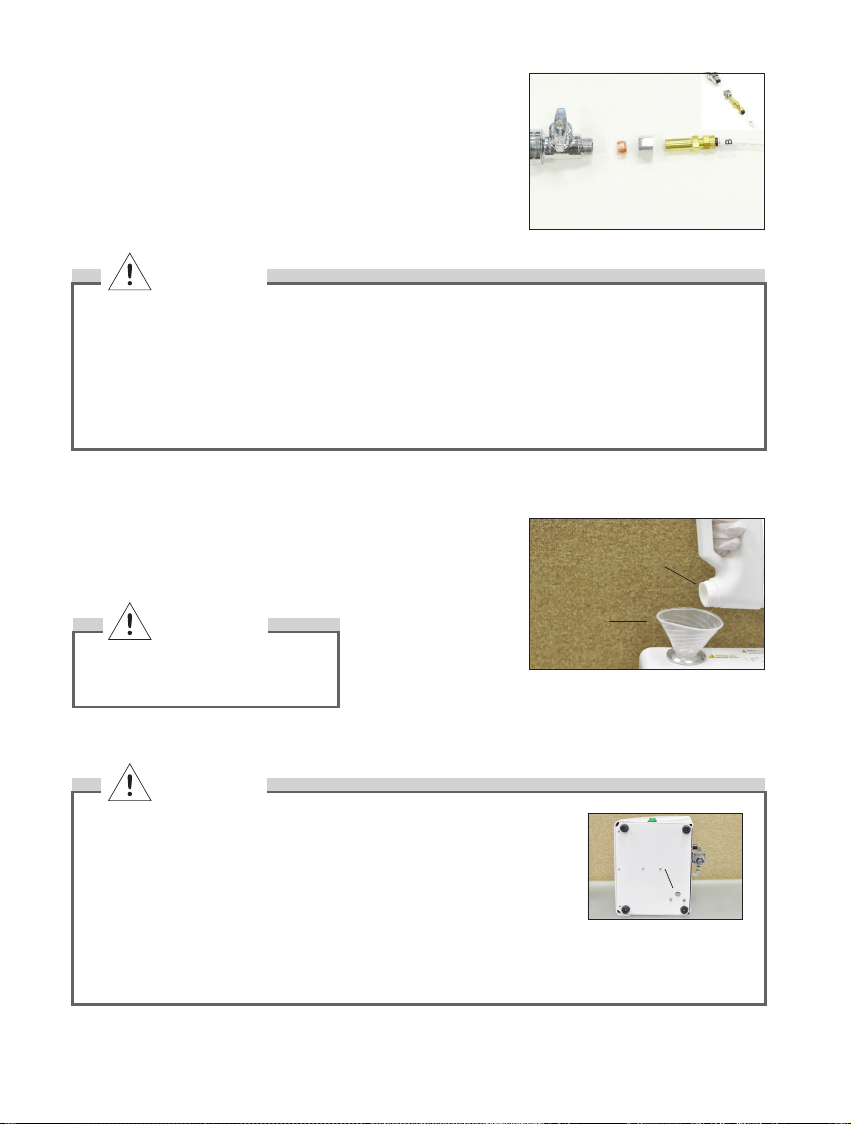
(2) Connecting Air Tube
Connect CareMaster to the air source. There are
provide two most common connectors.
Connect " B" side of the air tube to the Poly Male
Press down the release lever on the Poly Male insert
Q.D
3. Insert Poly Male insert Q.D into the Poly Q.D Female
Panel Mount
Rating
The Fuse rating is marked here
Air Tube
Fig.3
6
Connect " B" side of the air tube to the Poly X
Insert the Poly X Compression Tubing into the
3. Tighten the compression nut
(3) Filling Maintenance Oil
CAUTION
Do not twist or bend the Air Tube.
Maintenance Oil and defeat the purpose of this device.
CAUTION
debris to avoid clogging the system.
Make sure that the Oil Drain Bolt on the underside of the Unit is
tightened securely. A loose bolt may leak Maintenance Oil.
accidental oil leaking. Pour slowly.
Always securely tighten the Oil Fill Cap of the Unit.
Do not remove the Oil Fill Cap during operation. Only remove it after the
Unit has completely stopped.
DANGER
Oil Supply Funnel
with Filter
Maintenance Oil
Oil Drain Bolt
6 7
(4) Oil Absorbent Sheet
Place an Oil Absorbent Sheet at the bottom of the
lubricating and cleaning chamber of the Control Unit as
Oil.
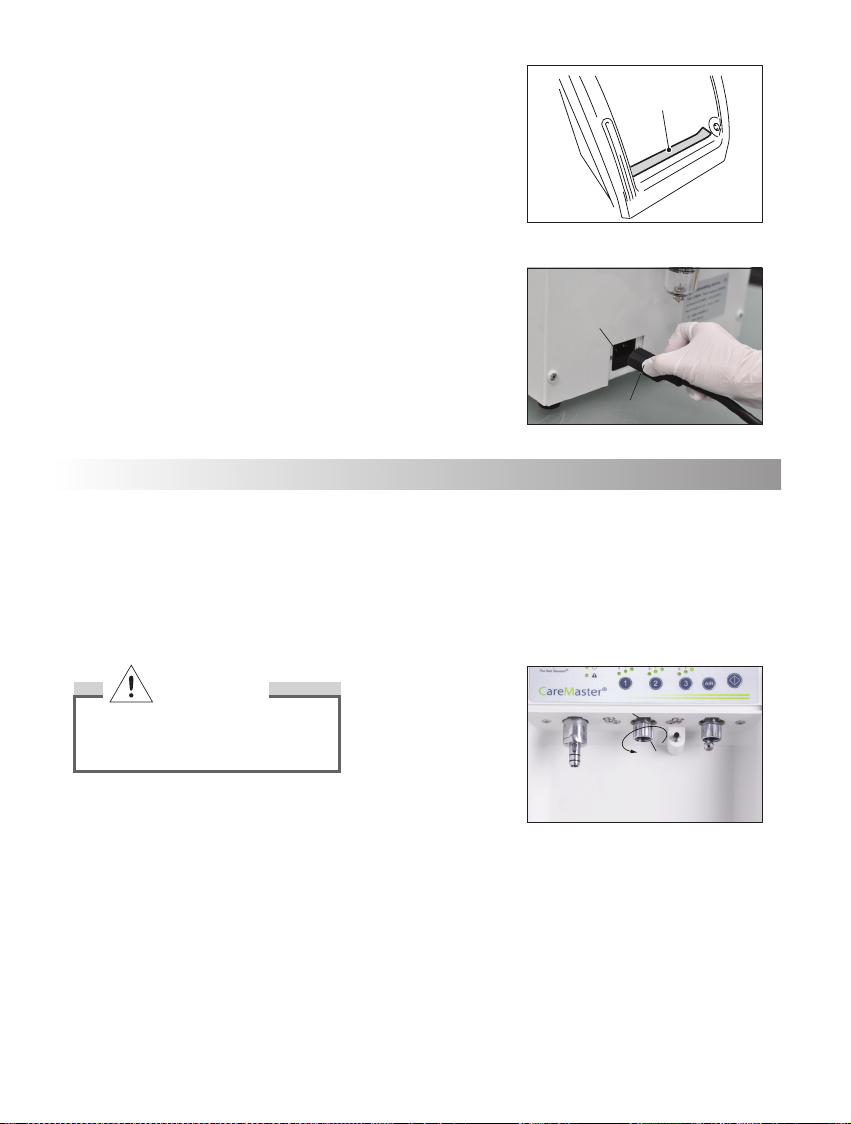
(5)Connecting Power Cord
Insert the Power Cord into the Power Inlet at the
CAUTION
Be sure to remove the bur from the
handpiece before connecting it to
each connector.
4. Operation Procedures
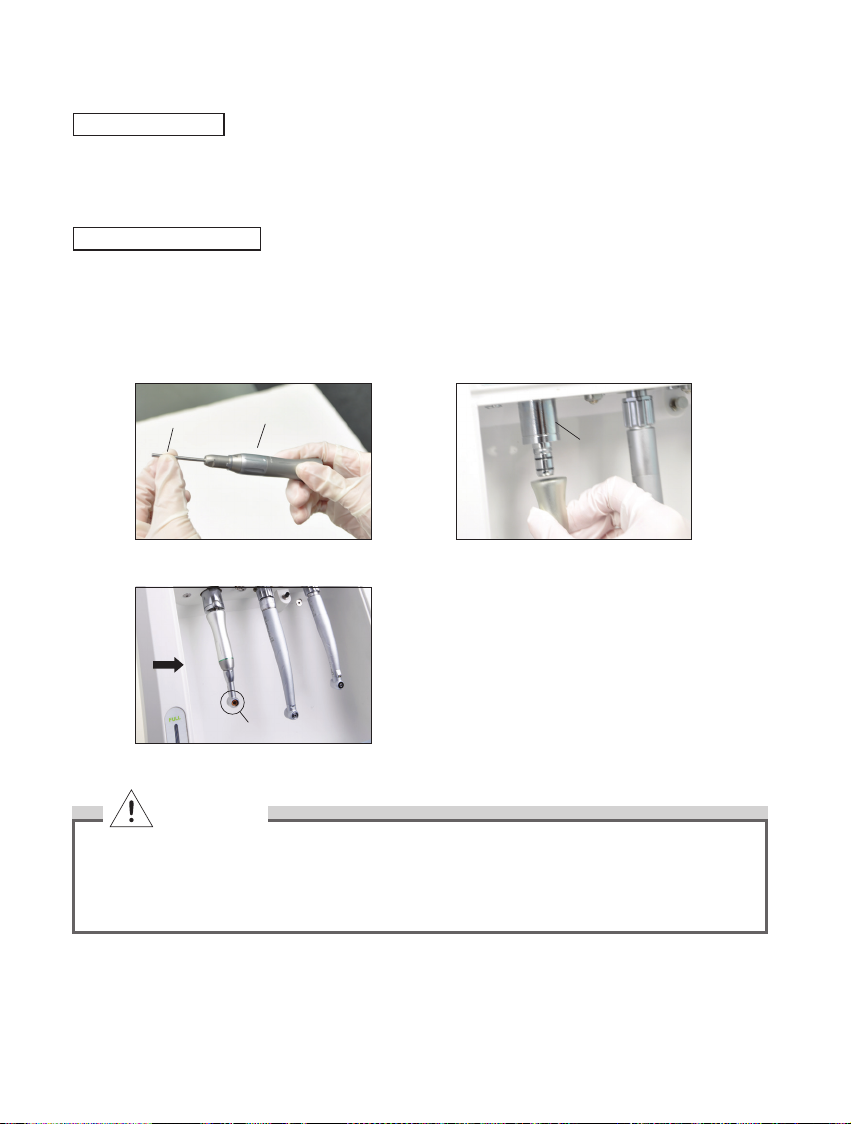
(1) Attaching Handpiece
Oil Absorbent Sheet
Power Inlet
Connector
Nut
Tighten
8
Straight Handpiece
Contra Angle Handpiece
CAUTION
Be sure to remove the bur from the Contra Angle Handpiece before attaching it to the Connector. For
the Straight handpiece make sure to insert the supplied Test Bur and lock the chuck before connecting
to the Connector.
For the Contra Angle Handpiece point the Bur Insertion Hole towards the Door and close the Door.
Not pointing the Bur Insertion Hole towards the Door may prevent the Door from closing.
Test Bur Straight Handpiece
E-Type Connector
Door Side
Bur Insertion Hole
8 9
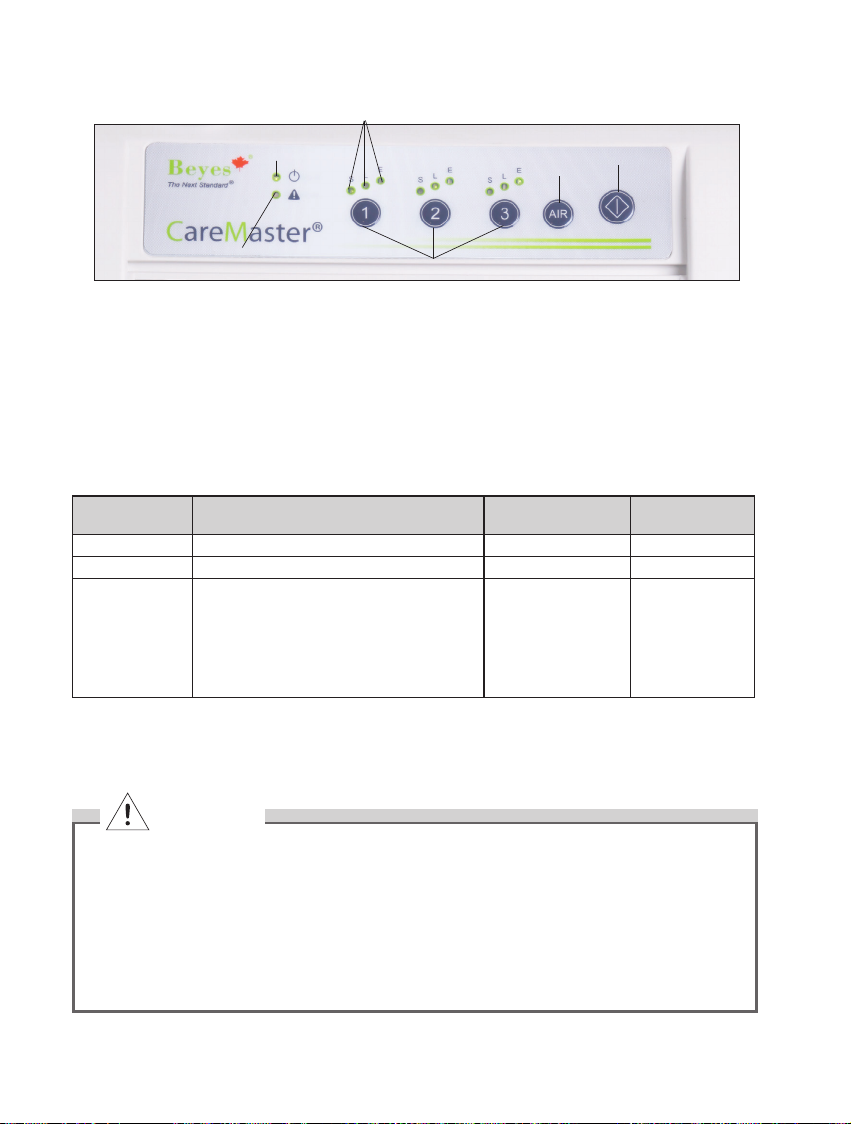
(2) Cleaning and Lubricating
indicate the completion of the cycle.
oil. Do this as and when required.
Mode Handpiece Lubrication and
cleaning time Air time
Short Mode Air Turbine Handpiece
Long Mode Contra Angle Handpiece
adequate lubrication and cleaning cannot
Speed Increasing Contra Angle Handpiece
Speed Reducing Contra Angle Handpiece
* Above show the total clean-lubricate-purge time.
* Only use original Beyes accessories and consumables. Please contact us.
CAUTION
Use only 3-wire Power Cords that have 3-prong grounding plugs and 3-hole grounded receptacles
that accepts the Control Unit's plug.
Select an appropriate mode according to the type of handpiece. Select an inappropriate mode may
Do not open the Oil Fill Cap or Door during operation.
Power Indicator
Error Indicator
10
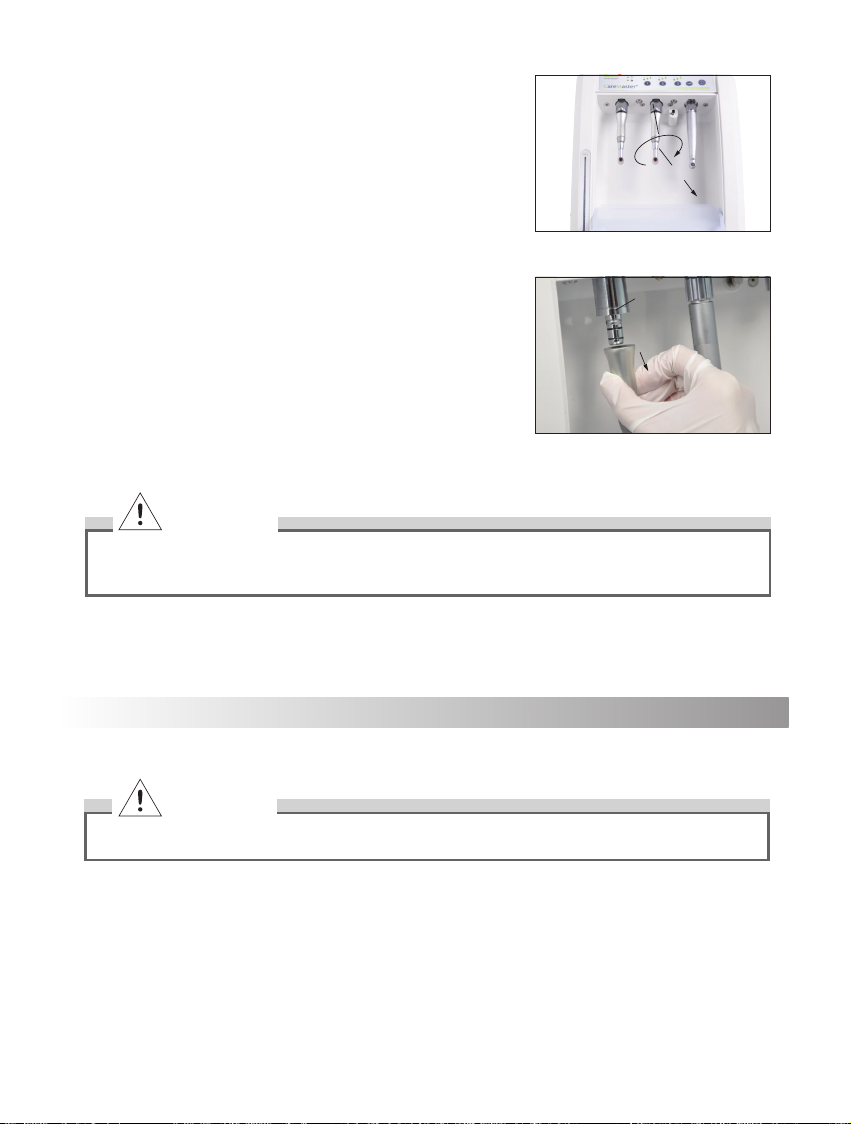
(3) Removing Handpiece
Open the Door after the mode indicator lights again and
Loosen the Nut and pull out the handpiece straight from
Open the Door after the mode indicator lights again and
CAUTION
Wipe off the Maintenance Oil collected at the bottom of the cleaning chamber and the Door. The
collected oil could leak from the bottom of the Door. Dispose of wiped cloth as medical waste according
to the laws and regulations in your country.
5. Door
The Door could be removed when cleaning or replacing the Door gasket.
CAUTION
Connector
Connector
Loosen Nut
10 11
(1) How to remove the Door
(2) How to mount the Door
6. Maintenance
(1) Replacing Mist Filter
CAUTION
Dispose of used Mist Filters as medical
waste according to the laws and
regulations in your country.
NOTICE
Detachment Pin
Detachment Pin
3
Mist Filter

12
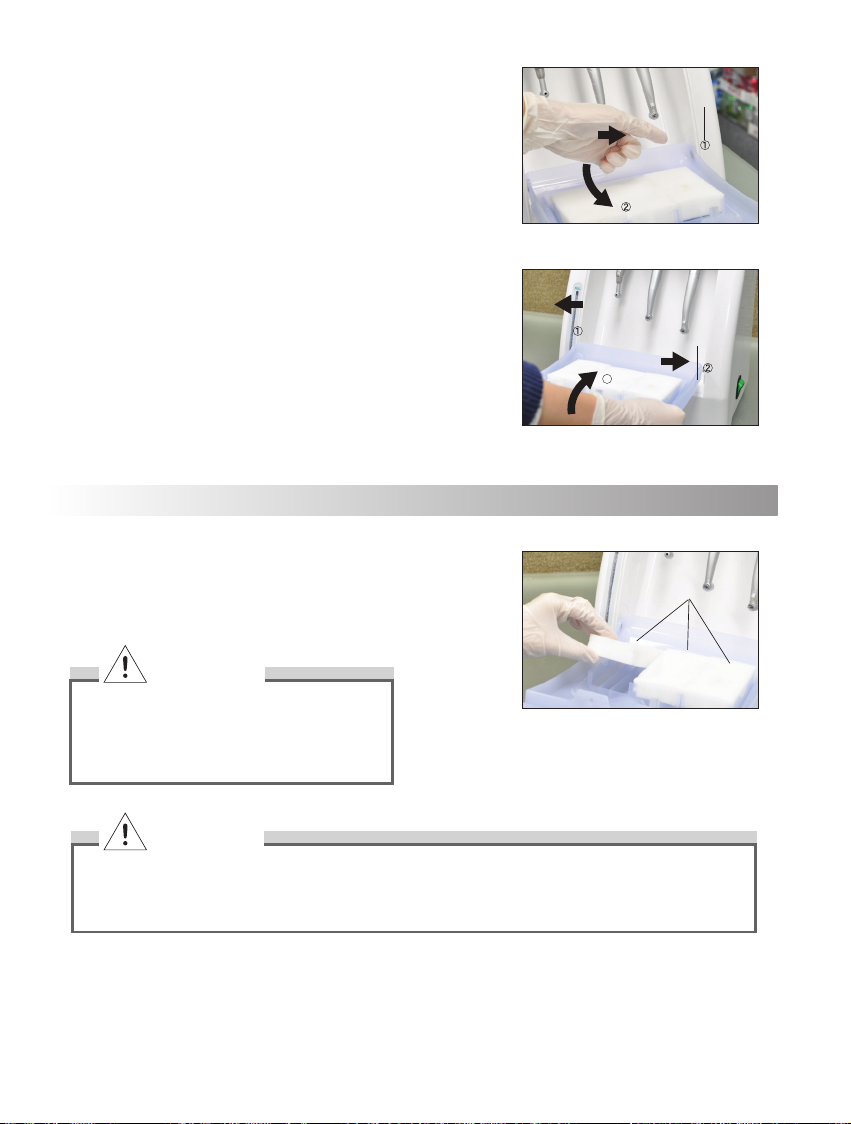
(2) Replacing Oil Absorbent Sheet
After opening the Door and removing used Oil Absorbent
CAUTION
Dispose of used Oil Absorbent Sheets as medical waste according to the laws and regulations of your
country.
(3) Replacing O-ring
(4) Replacing Air Filter
Connector.
Oil Absorbent Sheet
O-ring
Air Tube
Connector Ring
Screw
Air Filter
12 13
CAUTION
Do not remove the Air Filter Element until the air supply has complety stopped.
Replace the Air Filter Element once every one to two years.
Be careful not to attach the Air Filter upside down.
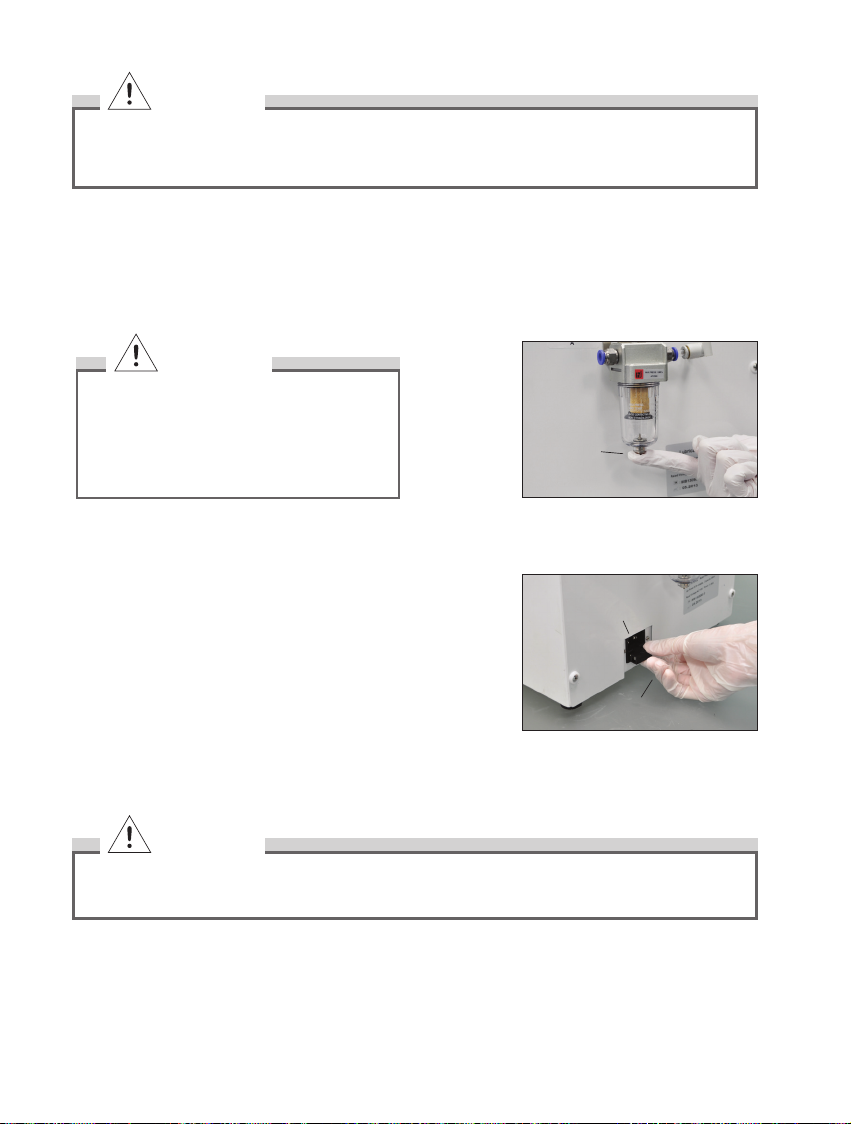
(5) Draining Air Filter
(6) Changing Fuses
Switch and unplug the Power Cord.
position.
CAUTION
has been unplugged.
Drain Button
Fuse
CAUTION
Air Filter need to be clean and free from
moisture. Drain the Air Compressor and Air
Filter at least once a week. Moisture from
Oil and defeat the purpose of this device.

14
7. Troubleshooting
Problem Possible Cause and Check Solution
The power does not turn on
Is the Cord Plug inserted into the
outlet?
Insert the Power Cord Plug into the
outlet
the inlet of the Control Unit?
Is the power turned ON? Turn on the Power.
Has the Fuse blown? Replace the Fuse with the
recommended Range.
The Control Unit does not
clean and lubricate
Does the mode indicator light up? Press the corresponding selector key to
light mode indicator.
Is the Door open? Is the error
indicator light on? Close the Door securely.
selector keys and press the start
button.
Does the Control Unit produce an
If the Control Unit produces an
the Air Tube or the air supply. If the
Control Unit produces no operating
sound it has a fault. Contact your dealer.
The Control Unit does not
lubricate and clean
effectively
Is the Air Tube connected securely
to the Air Connector?
Connect the Air Tube to the Connector
Securely.
Is the air pressure set within the
Set the Air Pressure between
Is the mode set at the Short Mode? Select the correct mode according to
the type of handpiece.
Is the handpiece connected
securely? Connect the handpiece securely.
Oil Mist is released outside
the Control Unit
Has an appropriate mode been
selected?
Select the correct mode according to
the type of handpiece.
Check that the opening in the
instrument head which receives the
bur is facing the Control Unit Door.
When attaching the instruments make
sure that the opening in the head which
receives the bur is facing the Control
Unit Door.

14 15
SPECIFICATIONS
LIMITED WARRANTY
maintenance. Beyes shall under no circumstances be liable for incidental or consequential damages or damage due to improper
use or maintenance.
Model CareMaster
Air Pressure
Reservoir Capacity
Dimensions
Weight
the law of the states in which he or she practices to use or order the use of this device.

Printed in Canada
Beyes Dental Canada Inc.
23-595 Middleeld Road
Toronto, Ontario, M1V 3S2
Canada
Tel: 1-855-603-1888
Fax: 1-855-720-1228
Email: [email protected]
Web: www.beyes.ca
Lotus NL B.V.
Koningin Julianaplein 10, Ie Verd,
2595AA, The Hague,
Netherlands
Tel: +31645171879 (English)
+31626669008 (Dutch) 0197
Table of contents
Other BEYES Medical Equipment manuals


Popular Medical Equipment manuals by other brands


Blatchford
Blatchford Esprit user guide

Trudell Medical International
Trudell Medical International Aerobika Instructions for use

HANS RUDOLPH
HANS RUDOLPH V2 Mask 6500 Series Instructions for use

Cognionics
Cognionics CGX Mobile-128 manual

Bemer
Bemer Classic-Set user manual

Pari
Pari Lamira quick start guide


