Entel HT700 Series Setup guide

Model Description ATEX IECEx Permitted models
CNB550E 1800mAh Li-Ion battery pack All HT500 Series
CNB950E 1800mAh Li-Ion battery pack All HT800 V2, HT90 0 V2
CMP500 Speaker/microphone All HT500 Series
CMP950 Speaker/microphone All HT800 V2, HT900 V2
CHP950D Ear defender headset All HT500, HT800 V2, HT900 V2
CHP950HS Ear defender headset All HT500, HT800 V2, HT900 V2
CHP950HD Ear defender headset All HT500, HT800 V2, HT900 V2
PTT 9 51 Push to talk switch All HT500, HT800 V2, HT900 V2
PTT950E Push to talk switch All HT500, HT800 V2, HT900 V2
PTT 9 51E Push to talk switch All HT500, HT80 0 V2, HT9 00 V2
PTT 9 51C Push to talk switch All HT500, HT80 0 V2, HT9 00 V2
CXR16/950 Throat earphone/microphone All HT500, HT800 V2, HT900 V2
CXR5/9 50 Skull earphone/microphone All HT500, HT800 V2, HT900 V2
EA12/ 9 50 Earphone/microphone All HT500, HT800 V2, HT900 V2
EA15/ 950 Earphone/microphone All HT500, HT80 0 V2, HT9 00 V2
EA19/ 950 Earphone/microphone All HT500, HT80 0 V2, HT9 00 V2
EHP950 Earphone All HT500, HT800 V2, HT900 V2
Savox C-C500 Cert no. VT T 06 ATE X 043X All HT800 V2, HT90 0 V2
Savox 100+ Cer t no. VTT 06 ATEX 036X HT981, HT 981S
Savox 40 0 Cert no. VT T 05 ATEX 009X HT9 81, HT981S
Savox, FPS-COM Cert no. ITS0 8ATEX 25772X HT981, HT981S, HT983, HT983U, HT983S, HT983SU
SABRE-COM Cert no. ITS 03ATEX21290X HT981, HT981S, HT983, HT983U, HT983S, HT983SU
FPS- COM-Plus VA R- C Cert no. ITS11ATE X27318X All HT800 V2, HT90 0 V2
The Entel ATEX and IECEx transceivers should only be used with the specic, permitted accessories, as detailed above.
CONTACT
For more information about our products please c ontact us:
+44 (0)20 8236 0032 [email protected] entel.co.uk
All Rights Reserved. Copyright Entel UK Ltd.
HT Series
HT500 |HT700 |HT800 |HT900 |HT4 46
Quick Start User Guide
Designed in the United Kingdom
Quick Start Guide HT Series V2.6 gate-fold.indd 4 07/08/2017 08:45
Quick Start User Guide V2.6
HT Series
HT500 |HT700 |HT800 |HT900 |HT446
INTRODUCTION
The HT ser ies is a professional r ange of commercial grade portables
designed and manufactured to meet IP68 specication for total protection
against water and dust intrusi on.
To meet your exact requirements, the radio may have been customised by
your Entel authorised deale r. These features will be explained in a separate
guide issued by the dealer.
PACK IN G LI ST
HTxxx Radio
CSAHT Rapid c harger (not supplied with HTxx5 & H Txx6)
CNBx xx Rechargeable Li-Ion bat tery
CBHx xx Spring loade d belt c lip
CATxxx High ef ciency antenna
OPTIONAL ACCESSORIES
Attaching and removing accessories
To attach an accessory, remove the accessory cover by unscrewing the locking
screw anti-clock wise (leave cover attached or store in a safe place).
Plug the accessor y into the socket, then carefully
tighten the locking screw clockwise until nger tight
(do not over tighten or use any implement).
To remove an accessor y, unscrew the locking
screw of the accessor y by hand in an anti-c lock wise
direction.
Ensure you re- t the accessory socket cover (the
radio is not submersible without the socket covered).
BAT T ERY INFORMAT ION
Battery charging
1. Connect the AC adapter to the charger pod and plug in.
2. Turn the r adio of f.
3. Insert the batter y pack into the char ger p od, e ither with or without the radio
attac hed. The charger LED status light changes to red and charging begins.
4. When charging is com plete the charger LED status c hanges from red
to green. A fully discharged battery pack will take approximately 3 hours to
recharge.
A ashing red LED on the c harger indicates there is a problem with the
battery. Remove the battery f rom the charger and consult your Entel Dealer.
CAUTION
BATTERY PACK PRECAUTIONS
• Do not recharge the battery pack if it is already fully charged. Doing so may
reduce the life of the batter y pack.
• After c har gin g is c omp let e, re move the batter y fr om the ch arg er. If the p ower
to the ch ar ger is turn ed o ff and o n ag ain , ch argin g wi ll rest ar t an d th e batte ry
will be come overchar ged.
• Pleas e ensure that the ra dio is turned off befor e plac ing it in the c harger and
never switch a radio on whilst in t he char ger.
• Only use Entel br anded batter y packs and chargers.
• Do not short t he battery terminals or dispose of the battery in a re.
• Do not charge the radio and/or batter y pack if they are wet.
DANGER
DO NOT DISASSEMBLE OR MODIFY THE BATTERY IN ANY WAY!
Your Entel batter y pack incorporates a safety circuit to avoid danger, if the safet y
circuit is damaged or bypassed, or the battery cells are damaged directly, they
may generate extreme heat, smoke, r upture and emit ames.
Above approvals apply to specic models only
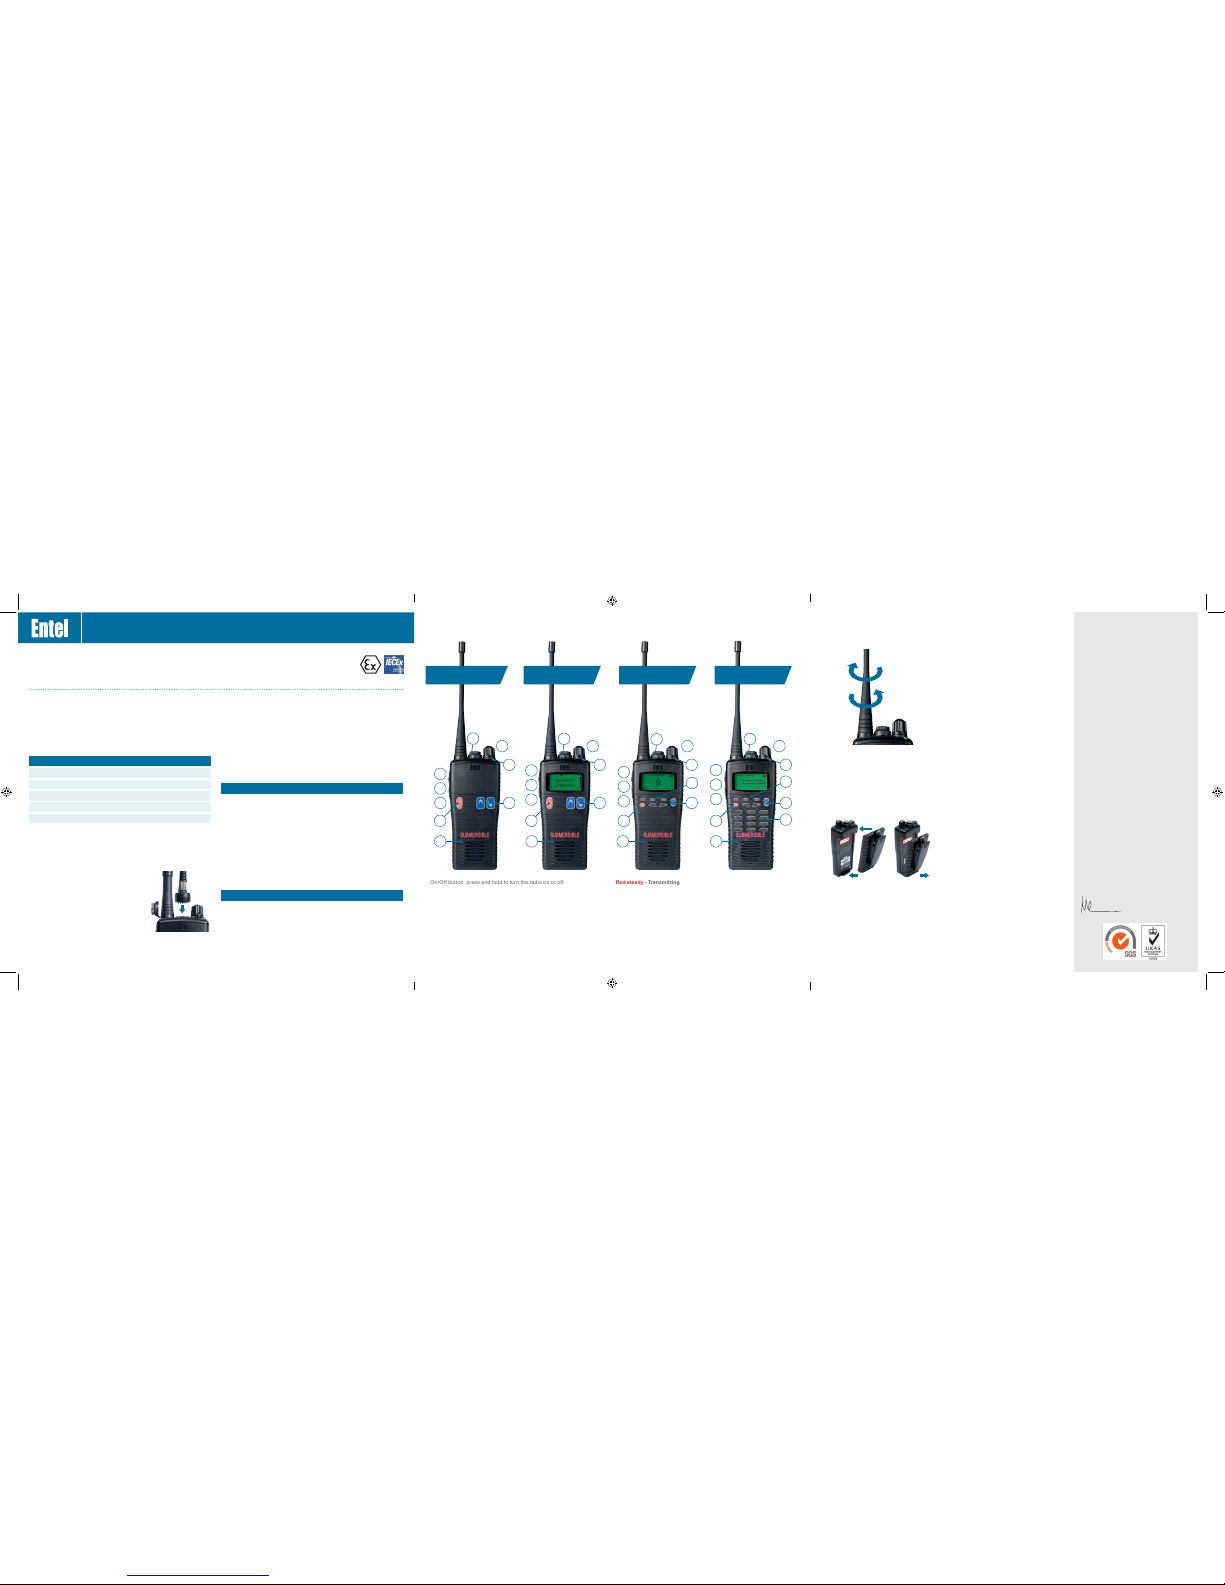
CONTROLS & INDICATORS
1. On/Off button: press and hold to turn the radio on or off.
2. Volume control
3. Channel control
4. Push To Talk (PTT) button: press to speak and release to listen.
5. Dealer programmable button (ask your dealer for more information)
6. Dealer programmable Soft Key (long press only)
7. LED indic ator
Red steady- Transmitting
Red ashing slowly - Battery needs recharging
Green steady - Receiving
Amber steady - Invalid signal being received
Amber ashing rapidly - Scanning
Amber pulsing - In standby mode
8. Keypad buttons
9. Microphone
4444
5555
5555
5
111 1 8
3 2 2 2
NON DISPLAY 3 KEY LCD 8 KEY LCD 20 KEY LCD
2 3 33
7 7 7 7
9
T
a
l
k
H
e
r
e
9
T
a
l
k
H
e
r
e
9
T
a
l
k
H
e
r
e
9
T
a
l
k
H
e
r
e
66
555
PREPARING YOUR RADIO FOR USE
Attaching/removing the antenna
Attaching/removing the battery pack
1. To at tach, carefully align the antenna with
the soc ket. Screw in the antenna clockw ise
(taking care not to cross the thread) until it
is seated rmly with the ac cessory cover ’s
rubber ring bet ween the antenna and the top
of the radio (A).
2. To remove, unscrew the antenna
anti-clockwise (B).
1. To attach, locate the pegs on the bottom of the
battery into t he slots on the radio and press
the top of the bat tery against the radio. Secure
battery by tightening the screw cloc kwise
by hand. (Do not use any implement or over
tight en) (C).
To remove, unscrew the locking screw
anti- clockwise and pull the batter y away
from the top of t he radi o (D).
A
B
C
SWITCHING ON, RECEPTION
AND SWITCHING OFF
1. To switch on, press and hold the on/off butto n
(1) on the front of the radio.
2. Wh en the ra di o ha s passe d it s diagn os ti c te sts,
it will emit a fanfare to ne.
3. The radio will enter st andby mode. This is
indicated by the LED A mber ashing once
every 5 seconds, signaling that the radio is
ready for use.
4. Adjust the volume control to select the desired
volume level.
5. Using the channel buttons, ensure you have
the correct channel selected.
6. When receiving a valid signal, the LED will
illuminate steady green and audio will be
emitted from the radio’s speaker or audio
accessor y (if at tached).
7. When nished using the radio, switch of f
by pressing and holding the on/off button
(1) until the radi o beeps and the LED/LCD is
extinguished.
TRANSMITTING
1. Per form steps 1 through to 5 above.
2. Before transmitting, monitor the channel and
make sure it is clear.
3. When receiving a signal, wait until the signal
stops before transmitting. The radio cannot
transmit and receive simultaneously.
4. Pre ss th e Pu s h To Tal k (P T T) bu t t o n (4) to be g i n
your transmission. To conrm transmission the
LED will illuminate red.
5. For best transmitted speech quality, you must
talk directly into the radio’s microphone (9) at
ar ou nd 4c m be t we en your m ou th an d th e rad io .
6. Please note: if you talk into the top of the
radio or with your mouth fur ther away, you will
transmit poor quality speech.
7. When the transmission is nished release the
PTT button.
EU DECLARATION OF CONFORMITY
Hereby, Entel U K Limited of:
320 Centennial Ave, Centennial Park,
Elstree, WD6 3TJ, United Kingdom:
Decla res that the radio equip ment ty pe
HT446, HT500 se ries, H T700 V2 series,
HT80 0 V2 series, HT900 V2 serie s,
HT80 0 V2 seri es and HT900 V2 series
is in co mpliance with Directive 2014/53/EU.
The ful l text of t he EU dec larati on of co nformity is
available at the f ollowi ng inter net address:
www.entel.c o.uk/red
This declarat ion is va lid for D irect ive 2014/34/EU
HT800 V2 Seri es, HT900 V2 Series, HT500 Serie s
EN 60079- 0:2012
EN 60079-11:2012
Related certicates:
HT800 V2 Seri es, HT900 V2 Series
Sira 10ATEX2066X
HT9X X marking Ex ll 2G Ex ib llC T4 Gb
HT8X X marking Ex ll 2G Ex ib llA T4 Gb
HT500 Series
IECEx S IR 10.0097X
HT5X X marking Ex II 2G Ex ib IIA T4 Gb
Sira Certication. Unit 6, Hawarden Indu strial
Park, H awarden, Deesi de. CH5 3US, UK
Noti ed Body No. 0518
Quality Assurance Notication:
Intertek. Intertek House, Leatherhead
KT22 7SB, UK
Noti ed Body No. 035 9
Name: Mi ke Jamieson
Position: Quality Manager
Date: 1st May 2017
Signed:
www.entel.co.uk
D
All Rig hts Rese rved. C opyrigh t Entel UK Lt d.
Quick Start Guide HT Series V2.6 gate-fold.indd 5-7 07/08/2017 08:45
Other manuals for HT700 Series
6
This manual suits for next models
4
Other Entel Portable Radio manuals


