Entes GEM-10 User manual

GEM-10 GPRS/Modbus Gateway
User Manual
Rev 1.04
05/2012
1.Introduction
1.1 General Features
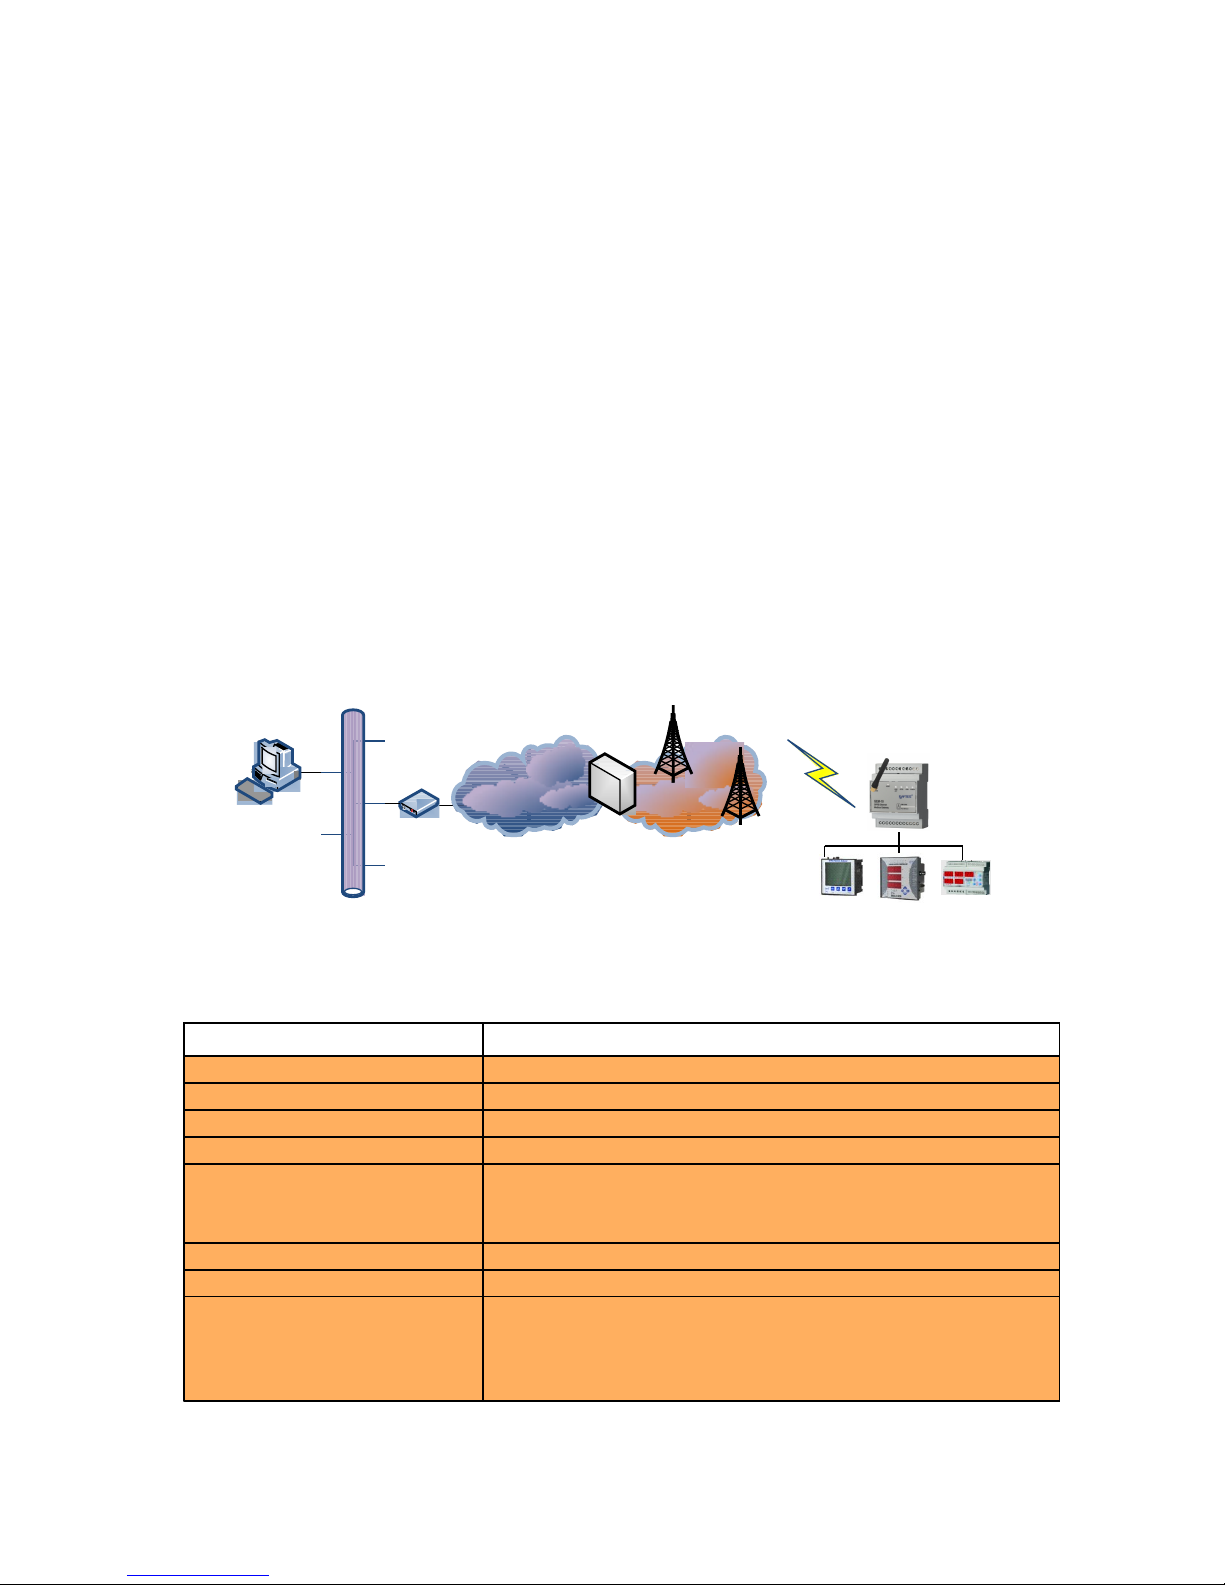
ENTES GEM-10 GPRS/Modbus Gateway allows you to connect to your devices which communicate
usin Modbus protocol via GPRS or Ethernet network. With GEM-10, you can use just one of the GPRS
or Ethernet connection options or you can use one of them as backup connection for the other one.
General features of GEM-10 are listed below.
●Cinterion MC55i Quad-band GPRS modem
●10/100 Mbps Ethernet port
●RS485 port (300...115200 bps)
●Mini-USB port for confi uration
●Ability to work with SIM cards which have static or dynamic IP
●Ability to set the device parameters via WEB (only available via ethernet)
●Ability to work in server or client mode
●Ability to work in ModbusTCP and Tunnel mode
Technical Data:
Table 1. GEM-10 Tec nical Data
Category Description
Network Protocols TCP/IP, ARP, ICMP,HTTP, ModbusTCP
Serial Ports RS485 for communication, USB port for confi uration
Operating Modes ModbusTCP/RTU and Modbus Tunnel
Network Interface 10/100 Mbps auto-ne otiation
Serial
Communication
Formats
Data Bits: 5-6-7-8 data bit
Stop Bit: 1-1.5-2 characters
Parity: Odd-Even-None
Serial Interface 300-115200 bps
Power Supply 12-20V DC
Isolation and Protection
RS485 port: 500V
Ethernet port: 1500V
15KV ESD protection on USB port
10/1000 µs (600W) transient pulse protection on RS485 port
Ethernet
Internet
Modem
GPRS
Gateway
GEM-10

1.2 LED Functions
POWER GSM GPRS LINK
Green Not
Ready
- Connected to
GPRS
Ethernet Link
Red Ready - - -
Red (flas ) - Connectin to
GSM
- -
Red -Green - Si nal Stren th - -
Green (flas ) - - - Ethernet Data
Si nal level is very ood
Si nal level is ood
Si nal level is moderate
Si nal level is low
Si nal level is very low
1.3 Placing t e SIM card
Place a pen or a screwdriver with a fine tip to the hole next to the SIM card slot and push ently. Place
the SIM card to the opened SIM card tray and slide the tray back in. Turn t e power supply of t e
device off before placing t e SIM card.

1.4 Driver Installation
Since GEM-10 confi uration tool communicates usin the USB port of your computer, USB drivers
in accompanyin CD must be installed to your computer.
To install the drivers;
1. Connect the device to the USB port of your computer. POWER LED will turn on and your
hardware will be automatically detected.
2. To locate the driver files, click on “Browse my computer for driver software” option.
3. On the next window, select the location of your drivers and click on “Next” button.

4. Click on “Install this driver software anyway” on the driver compatibility verification window.
5. Your computer will backup your files for System Restore.
6. When the window below is displayed, copyin of necessary files to computer is finished.
7. After the installation is finished, you can see your device under Start->Control Panel->Device
Manager->Universal Serial Bus controllers.

Important: Before inseting t e SIM card into t e device, disable t e PIN code
request of SIM using your mobile p one. Ot erwise, GEM-10 will not connect to
Internet.
Configuration
In order to use the GEM-10 confi uration pro ram, you must install the .NET Framework pro ram located
in the CD.
2.1 Connection Settings
●TCP Connection Type
If you want the device to connect to the IP address in the “Server IP” box, select the “TCP Client”
option. Otherwise to wait for the incomin TCP connections, select “TCP Server” option.
●Operating Mode
In this section, you can select if your Modbus packa es are converted to ModbusTCP or et
tunneled when they are transferred via TCP.
●ModbusTCP Port
It represents the port number which will be used for ModbusTCP.
●TCP Timeout
If GEM-10 is confi ured as Server, this value represents the waitin time in seconds for GPRS
connection to refresh in case of a data transmission absence.
●Connection Type

In this section, you can select the interface oon which the ModbusTCP communication will occur.
If you select Ethernet/GPRS option, GEM-10 will first try to connect to server usin Ethernet. In
case of failure, the device tries to connect to server IP address usin GPRS. After the GPRS
connection is established, GEM-10 continues to send pin requests to the server in 5 second
intervals usin Ethernet. If 4 consecutive pin requests et responds, connection via GPRS is
terminated and it is redirected to Ethernet.
This settin is valid only if the device is confi ured as Client.
●Server IP
If GEM-10 is confi ured as Client, this adddress represents the IP address to connect to.
2.2 Et ernet Settings
●DHCP Active
It indicates that GEM10 will take its IP address for ethernet connection from a DHCP server.
●IP Address
It shows the IP address of GEM-10 for ethernet connection. If GEM-10 is assi ned an IP address
by a DHCP server then this field shows the IP address assi ned to GEM-10.
●Gateway
It shows the address of the ateway or modem on which GEM-10 connects to Internet..
●Subnet Mask
It shows the network address to which GEM-10 is connected..
●MAC ID
It shows the unique MAC address of GEM-10.

● WEB Access Active
This settin enables the user to chan e the device settin s via WEB interface. To enable this
feature, click on this option.
● WEB Port
It indicates the port number which will be used for WEB access.
● Login Timeout
It indicates for how lon the device will wait before disablin the user to reenter to WEB access
pa e if the WEB access pa e is closed without clickin on the Exit button.
● Password
To chan e the password which is used for WEB access, activate the “Change Password” option
and enter your new password. Default password is “ em10” and case-sensitive.
** Access to t e WEB interface of GEM-10 is only possible by using t e et ernet port.
2.3 GPRS Settings
●Username
Username which will be used for GPRS connection.
●Password
Password which will be used for GPRS connection.
●APN
Enter the APN name which is defined by your GSM carrier for GPRS connection.
●Keep-Alive Interval
It indicates the interval of keep-alive packa es sent by GEM-10 to detect idle status of GPRS data
channel.
●Failed Keep Alives
If GEM-10 can't et responses to keep-alive packa es as the number defined in this box, it
refreshes the GPRS connection.
●Connection Delay
This option is valid if GEM-10 is set as Client and it indicates the reconnection attempt interval to
the server (monitorin point).
** Please contact your GSM provider for information about your Username, Password and APN
Name.
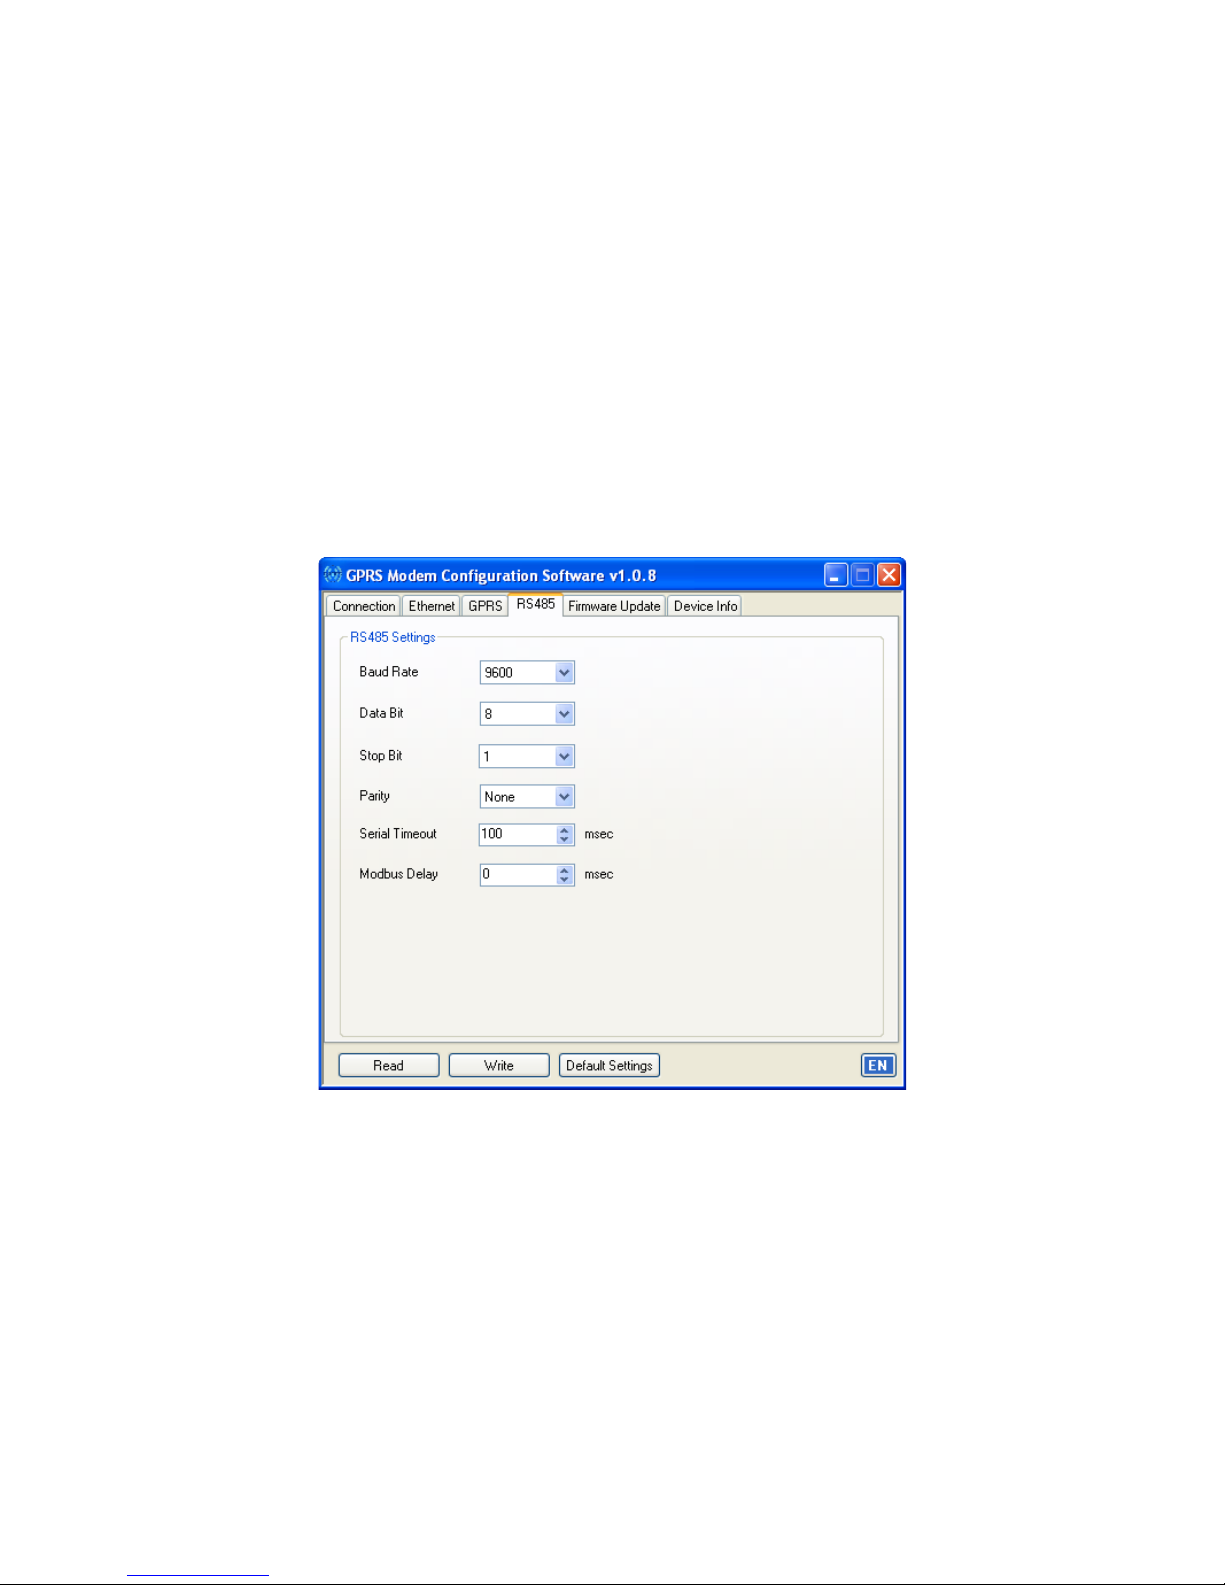
2.4 RS485 Settings
●Baud Rate
It indicates the communication speed of your device. Supported speeds are 1200, 2400, 4800,
9600, 19200, 38400, 57600 and 115200 bps.
● Data Bit
It indicates how many bits constitute the data packa e. Supported bit numbers are 5, 6, 7 and 8.
● Stop Bit
In serial communication protocols, stop bit comes after data and parity bits and it indicates the end
of data packa e. Supported stop bit numbers are 1, 1.5 and 2.
● Parity
It is the parameter which is used to verify the authenticity of data packa e. Supported options are
Odd, Even and None.
● Serial Timeout
It indicates for how lon the response from the queried device will be waited.
● Delay
It indicates the delay between the response of Modbus device and next transmitted Modbus query
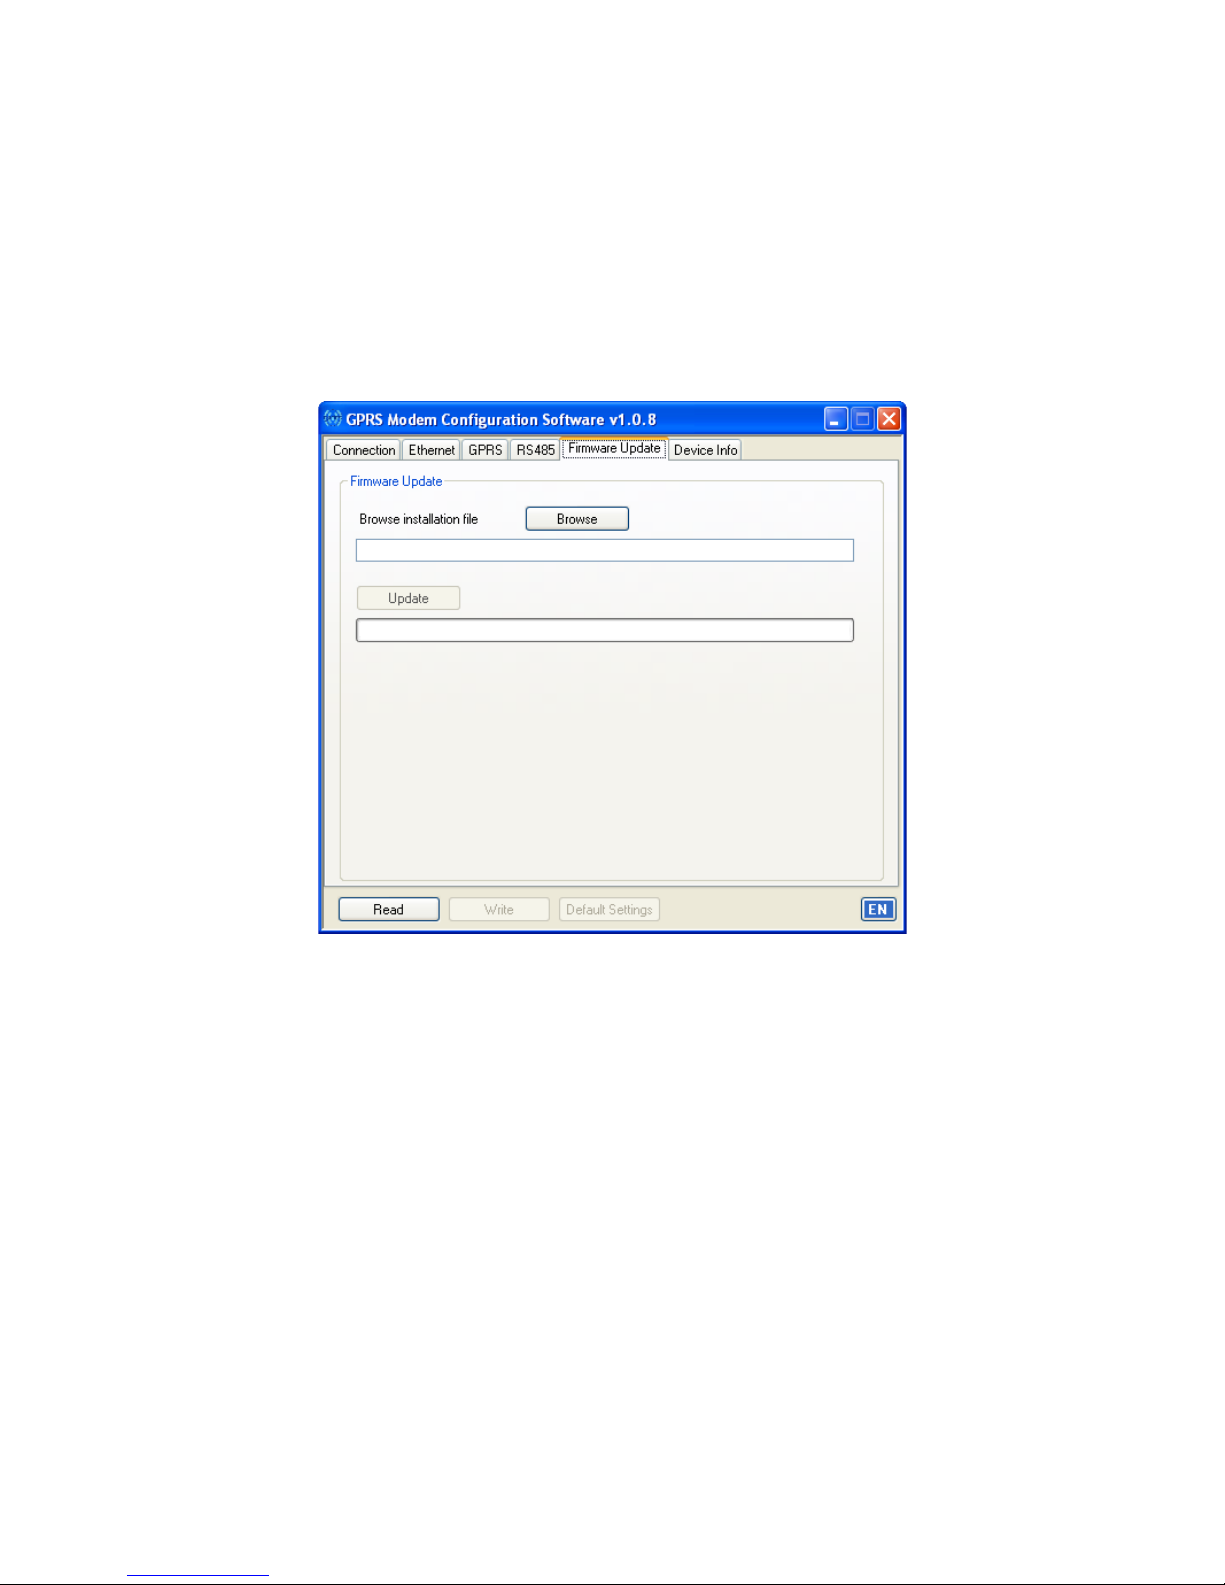
2.5 Firmware Update
You can update GEM-10 to latest fimware from this section.
To do this;
i. Click on Open button and select the firmware file that you will upload.
ii. Click on Update button and start the update process. After the device resets, it will install the
selected file.
iii. After the updatin is finished, the device will restart itself and start its operation a ain.
iv. After the update, the device will start operation with factory settin s.
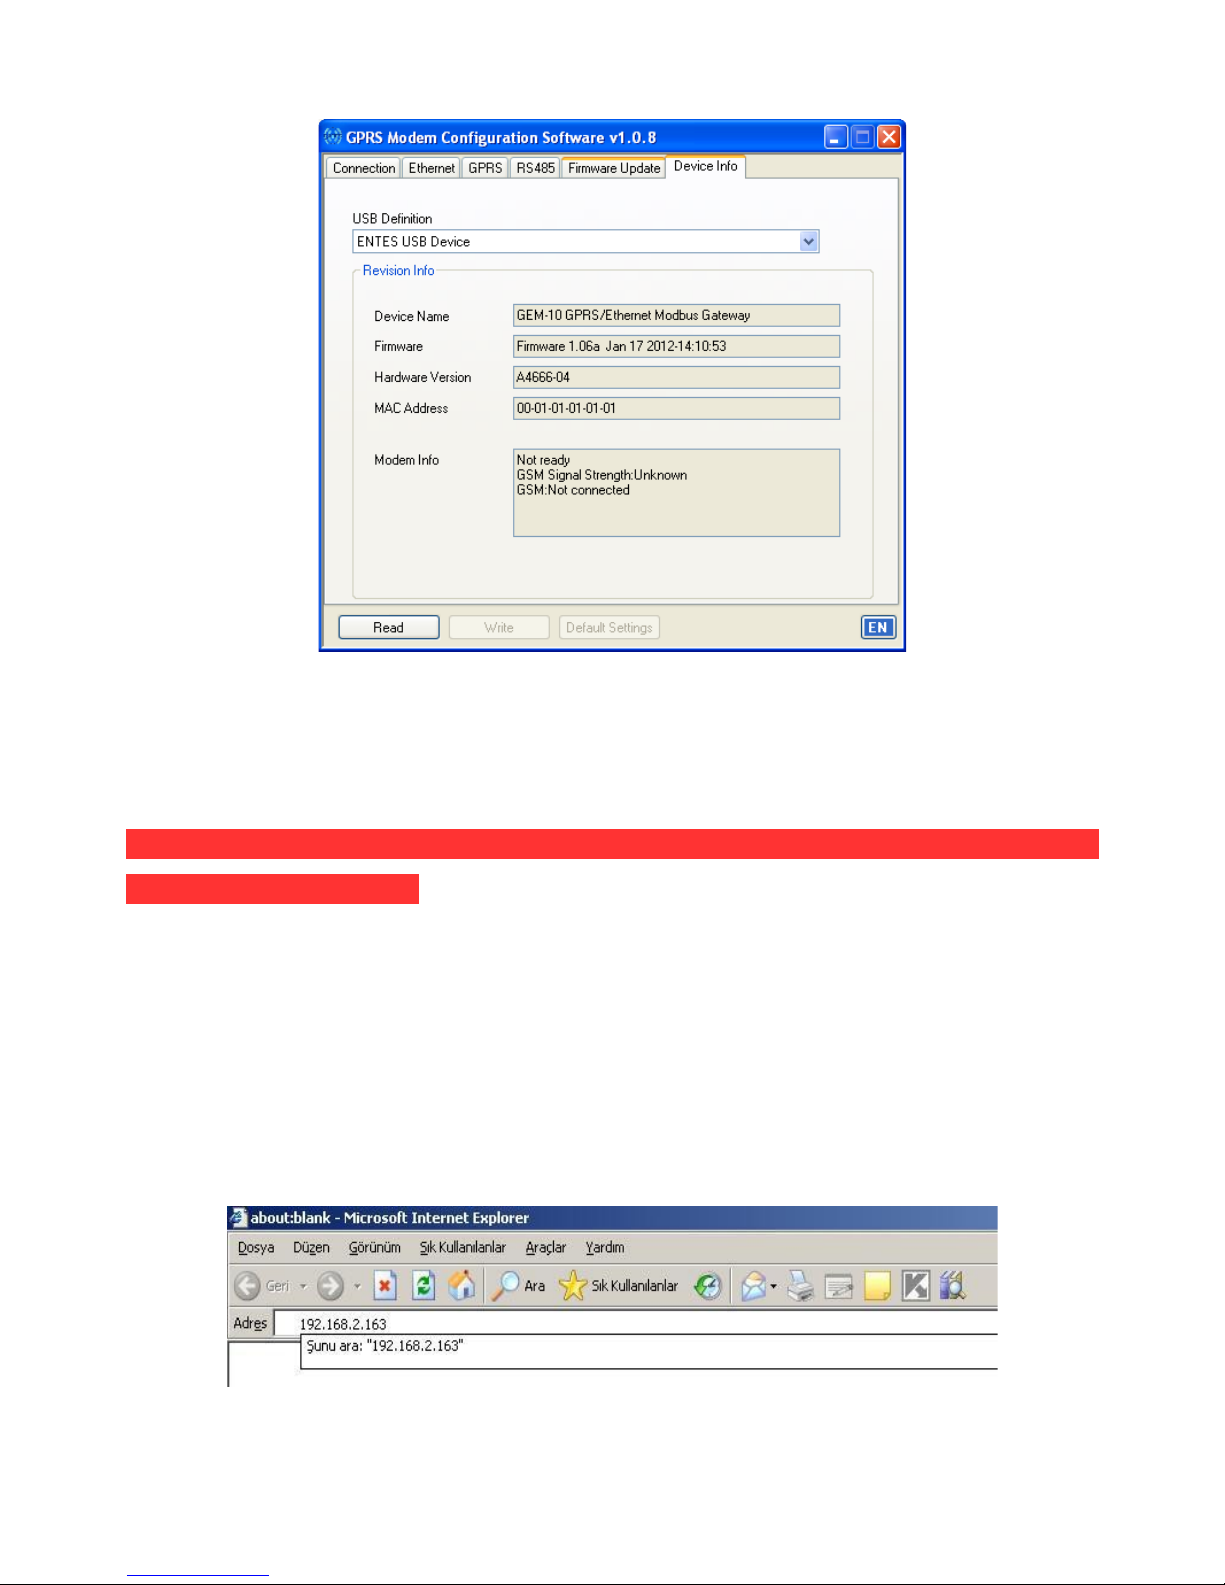
2.6 Device Info
All hardware/software information is displayed in this section. Additionally; GSM connection state,
GSM si nal stren th and GPRS IP of modem can be monitored in this section.
Important: For t e new settings to take effect, t e power supply of t e device as to be
switc ed off and on again.
2.7 Accessing Device Settings via WEB Interface
GEM-10 contains an HTTP server which lets the user to chan e the device settin s remotely. This
way, the user can chan e device settin s without the need of actually bein near the device. In order
for this feature to be usable, “WEB Access Active” under WEB Settin s must be selected.
To access the device settin s;
i. Enter the IP address of GEM-10 into your browser address line.
ii.Enter the WEB access password on the followin pa e (gem10 by factory default).
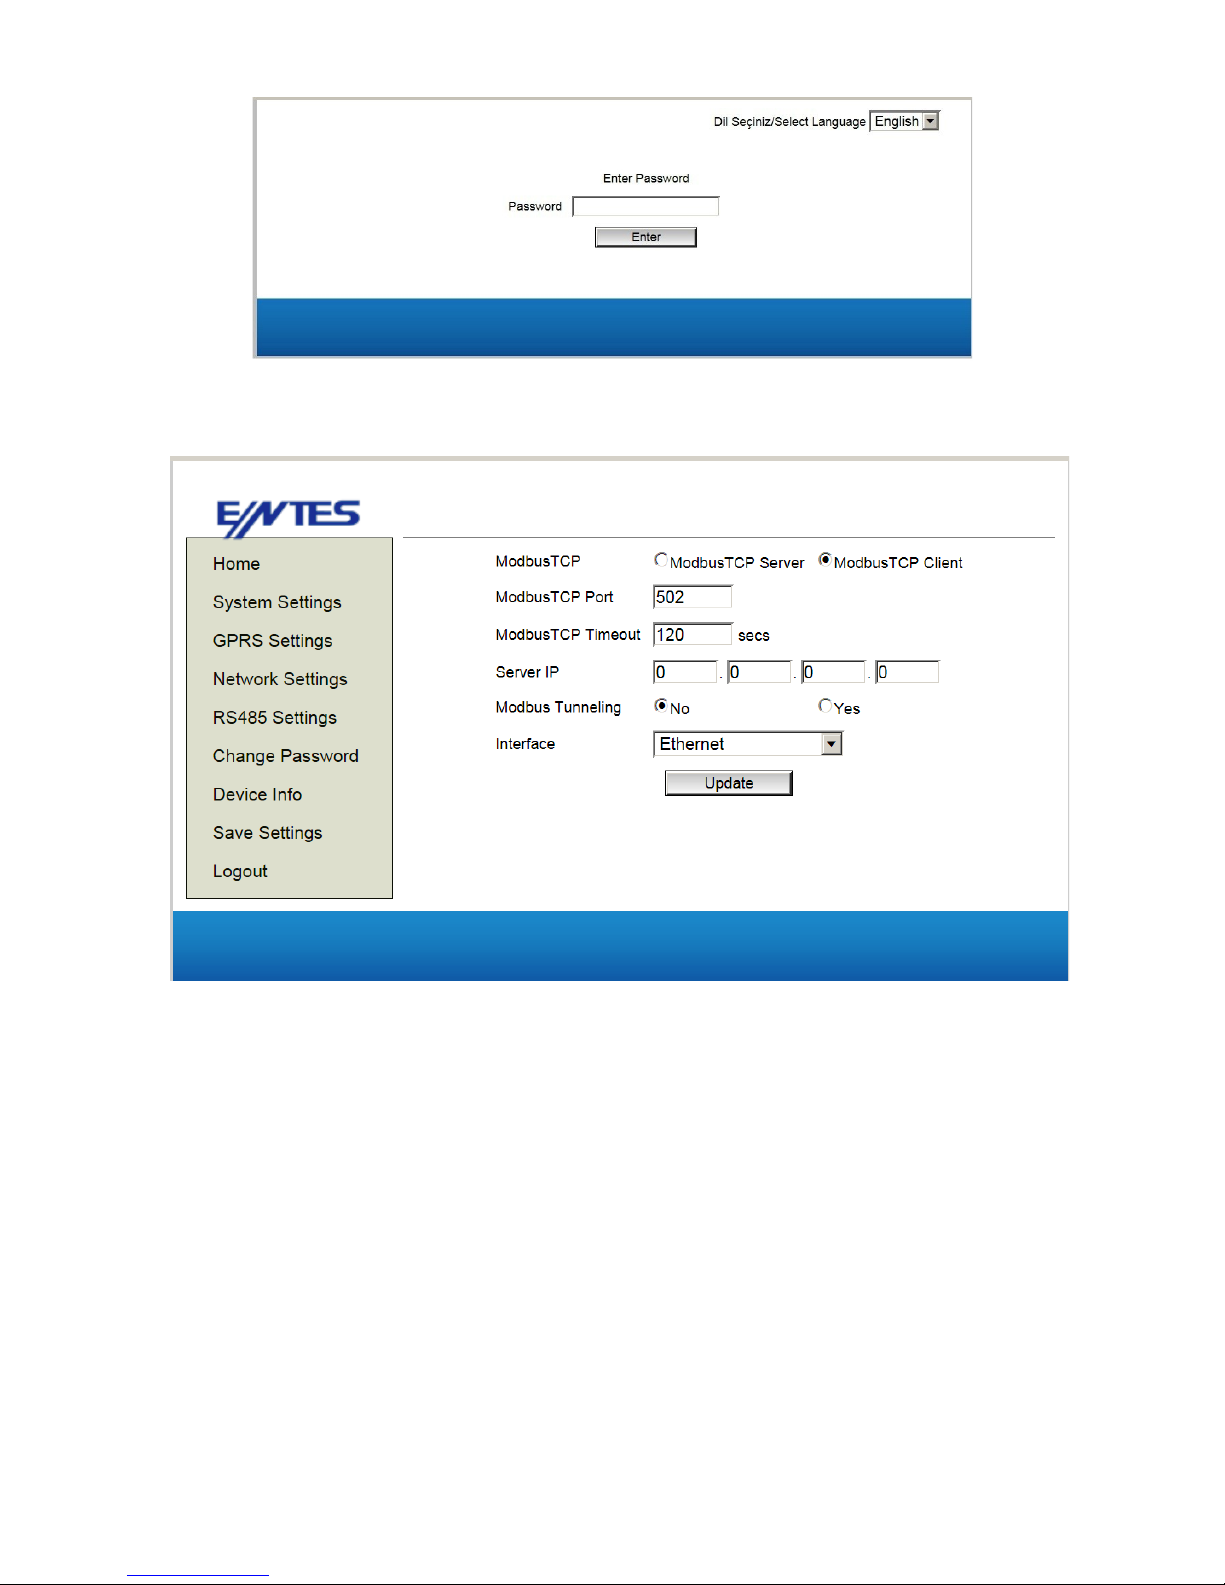
iii.A pa e that shows the device settin s will be displayed. By usin the menus on the left side, all
device settin s can be accessed.
iv. After chan in any of the settin s on each pa e, click on “Update” button. When all operations on
pa es are finished, click on “Save Settings” option. Your new settin s will be saved on the permanent
memory, GEM-10 will restart itself and start its operation a ain.
Table of contents
Other Entes Gateway manuals

Popular Gateway manuals by other brands


3Com
3Com 3CRWX5850GS - AirProtect Sentry 5850 Wireless Intrusion Prevention... datasheet

M2M
M2M IDG701AM-0T001 user manual

Moxa Technologies
Moxa Technologies MGate 5105-MB-EIP Quick installation guide

Siemens
Siemens SIMATIC IOT2050 Product information

ZyXEL Communications
ZyXEL Communications EMG2306-R10A quick start guide

ZyXEL Communications
ZyXEL Communications ZyWALL USG 100 Series release note


