ENTR Dead Bolt User manual

ii ENTR® Dead Bolt User Manual
Table of Content
1. Cylinder Installaon 5
1.1 Package Content 5
1.2 Tools Requirements 5
1.3 Prior to Installaon 6
1.4 Cylinder & Unit Installaon 6
1.5 Magnet Fing 8
2. ENTR® Descripon 9
2.1 ENTR® Descripon 9
2.2 Indicaons 9
2.3 ON/OFF Switch 10
2.3.1 Switching the ENTR® ON 10
2.3.2 Switching the ENTR® OFF 10
2.3.3 Low Baery Indicaon 10
2.4 Iniang the Lock 11
2.5 Default PIN Code 11
3. Operaon 12
3.1 Changing PIN Code 12
3.2 Door Conguraon 13
3.3 Pairing Remote Control 16
3.4 Deleng Remote Control 17
3.5 Seng the Sound Signal 18
3.6 Seng Locking Mode 19
3.7 Operated by Knob 20
3.8 Operated by Slide Buons 20

iii
ENTR® Dead Bolt User Manual
4. Touchpad Reader 21
4.1 Changing PIN Code 21
4.2 Baery Replacement 21
4.2.1 Low Baery Indicaon 21
5. Touchpad Reader Operaon 22
5.1 Operaon 22
5.2 Pairing Touchpad Reader 22
5.3 Touchpad Reader Master PIN Code 24
5.4 Menu Mode 24
5.5 Adding Personal User Code 24
5.6 Open Door 25
5.7 Lock Door 25
5.8 Delete Personal User Code 25
5.9 Delete All Personal User Codes 25
5.10 Volume Control 26
5.11 Factory Reset 26
6. Fingerprint Reader 27
6.1 Mounng the Fingerprint Reader 27
6.2 Baery Replacement 27
6.3 Adjust Date & Time 27
6.4 Pairing Fingerprint Reader 28
6.4.1 Add Master 29
6.4.2 Set Finger 29
6.4.3 Set PIN Code 29
6.5 Unlock the Door 30

4ENTR® Dead Bolt User Manual
iv
6.6 Lock Door 31
6.7 Low-baery Indicaon 31
6.8 Seng Menu 31
6.9 Add User 32
6.10 Delete User 33
6.11 Enable/Disable User 33
6.12 Delete all Users 34
6.13 Add Time Schedule 34
6.14 Edit Time Schedule 35
6.15 Volume Control 35
6.16 Double Security 36
6.17 Factory Reset 36
7. Smartphone App 37
7.1 App Installaon 37
7.2 Pairing Smartphone 38
8. Remote Control Baery Change 39
8.1 Baery Removal 39
8.2 Baery Inseron 40
9. Troubleshoong 41
10.1 Limitaons and External Inuences 41
10.2 Cases 41
Limited warranty 44
Federal Communicaons Commission (FCC) Statement 47
5
ENTR® Dead Bolt User Manual
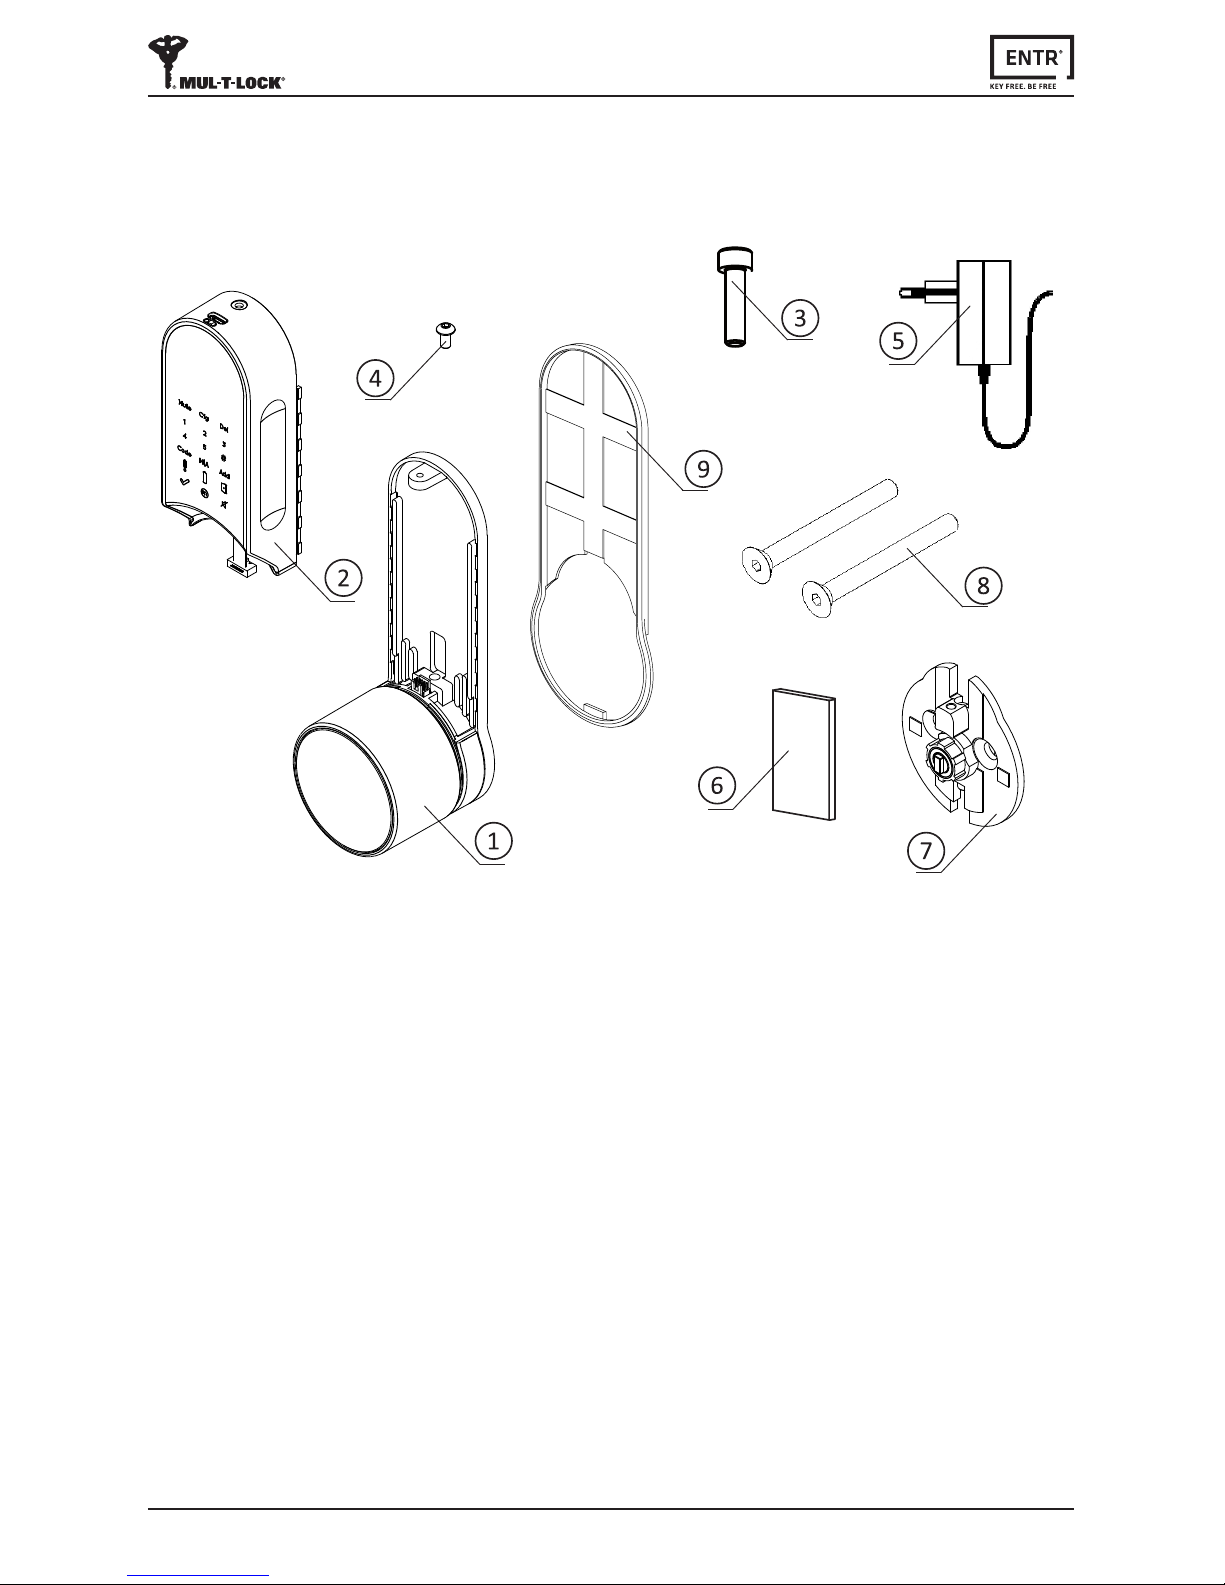
1.1 Package Content
1. Cylinder Installaon
1.2 Tools Requirements
• Small Phillips screwdriver
Note: Do not use power tools or any excessive force to assemble ENTR® parts.
Baerycharger5
Magnet6
Inside drive adapter7
Mounngscrews8
Base plate & Knob1
Electrical unit2
Mounngscrew
3
Panel screw
4
Decoravespacer9Allen key #3
10

6ENTR® Dead Bolt User Manual
1.3 Prior to Installaon
• Priortoinstallaoncheckboltlockingdirecon.
• Verifythattheboltisinopenposion(boltinsidethedoor,unlocked).
• Rotateadaptertail-pieceoppositetotheboltlockingdireconunlstopped(see
belowdrawing#1).
• Verifythatthewideteethispoinngup.Ifnotrotatetheexternalringunlthe
wideteethwillpointup(seebelowdrawing#2).
1.4 Unit Installaon
Warning:Donotaempttooperatetheunitunlassembledintothedoor
• Removeknobscrewusing1/16"Allenkeyandtaketheknobout.
• Useaatscrewdrivertoremovethecover.
• RemovebothAllenscrewsenrelyandremoveinternalmechanism.
Note:Whileremovingtheinternalmechanismsecuretheoutsidecylinderfrom
falling.Considerusingmaskingtapeorsimilar.
Knob
Knob screw
Cover
Boltlockingdirecon
Rotate adapter tail piece opposite
totheboltlockingdirecon
Wide teeth
Drawing#1
Drawing#2
7
ENTR® Dead Bolt User Manual
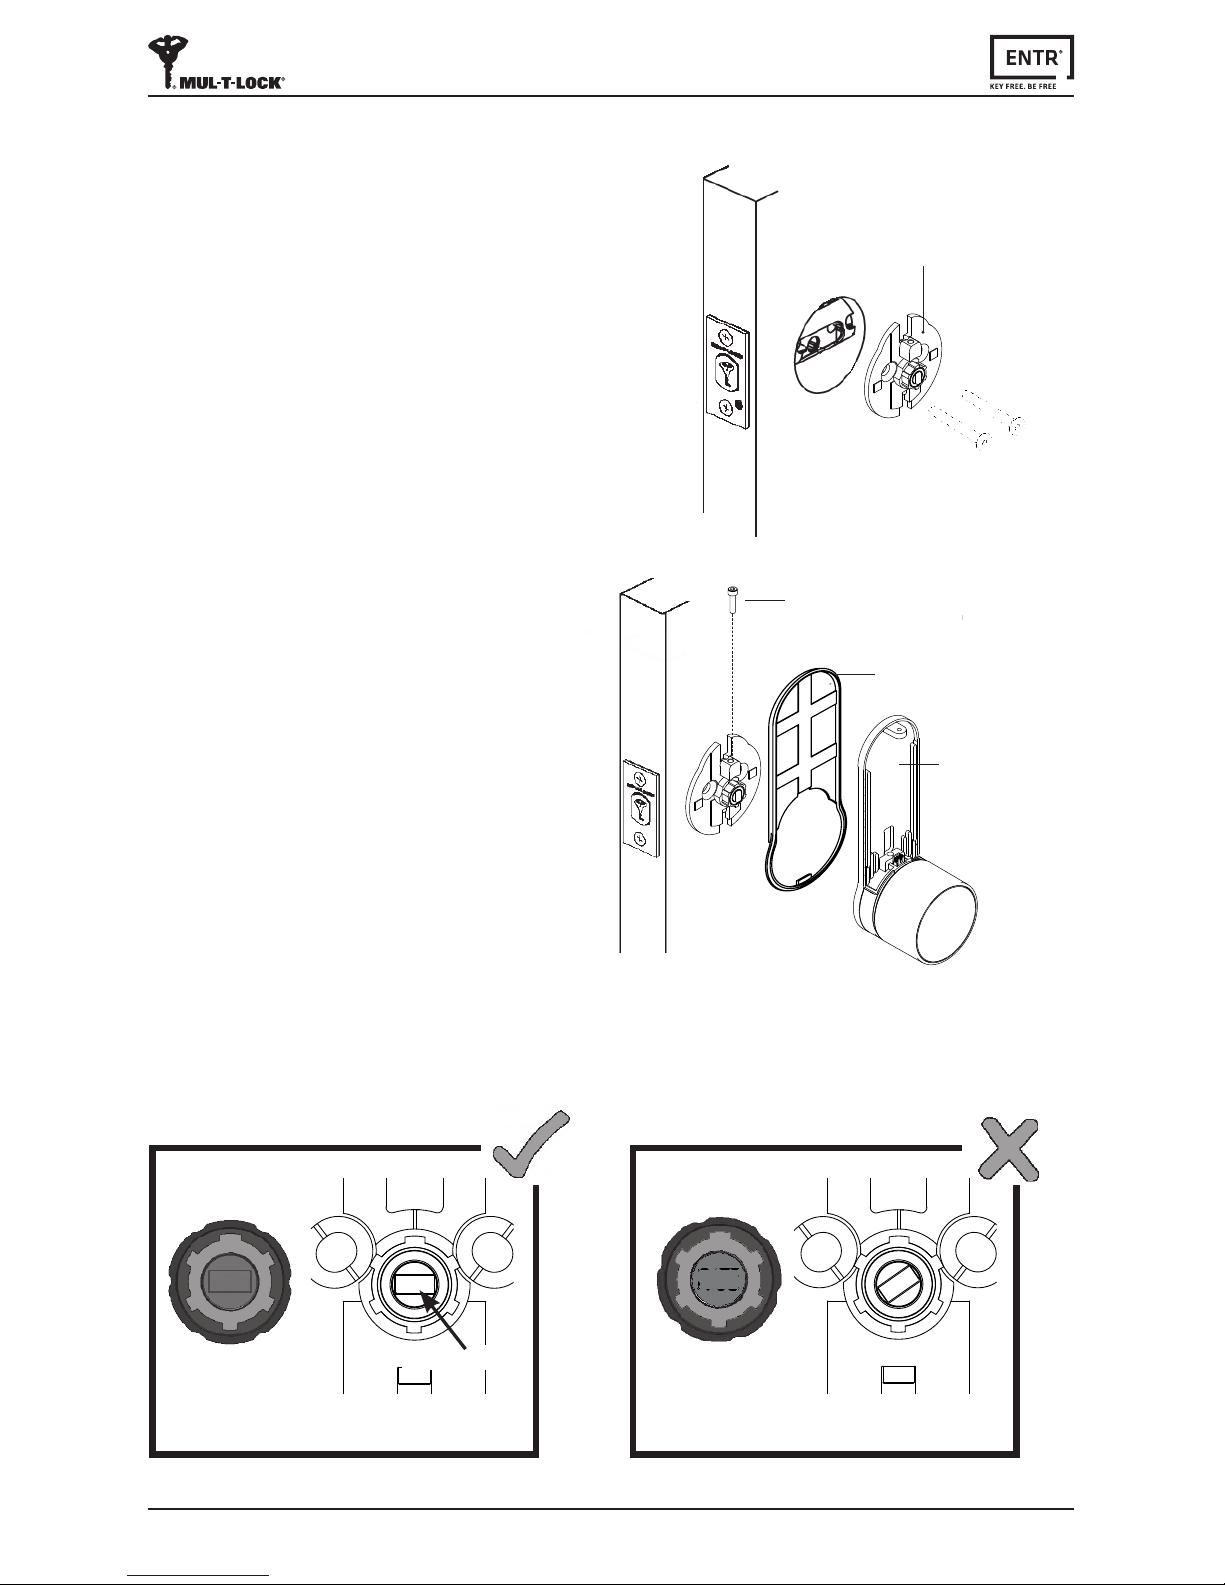
Adapter
• Place the Inside drive adapterandghtenthe
screws.Donotoverghtenthescrewsoruse
power tools.
• Placedecoravespaceroverthe
Inside drive adapter.
• Assemblebaseplate(top
housing&knob).
• Tightencylindermounngscrew.
Note: Incasethe"Malerectangle"ontheadapterisnotalignedwiththe"Female
rectangle"ontheKnob,theunitwillnotengageproperlyandmaycausetomalfuncon.
Femalerectangle
Adapter
Mounngscrew
Base plate
Decoravespacer
Malerectangle Femalerectangle
Adapter

8ENTR® Dead Bolt User Manual
1.5 Magnet Fing
• Carefullyconnectdatacableplug.
• Assembleelectricalunitpanel(baeryhousing).aachetobase
plate(1)andpushdown(2).
• Tightenelectricalunitpanelscrew.
Electrical unit
Datacableplug
1
Panel screw
2
MagnetFing:
• Mountthemagnetontheframe
moldings,ascloseaspossibleto
the lock.
• Thelowerpartofthemagnetshould
alignwiththelowerpointoftheslider
(seeillustraon).
Note:Themagnetareaonframemolding
shouldbecleanandfreefromdust,
peelingpaintetc.Usealcoholifrequired.
Waitunlcompletelydrypriortoscking.
Frame
molding
Magnet
Slider

9
ENTR® Dead Bolt User Manual
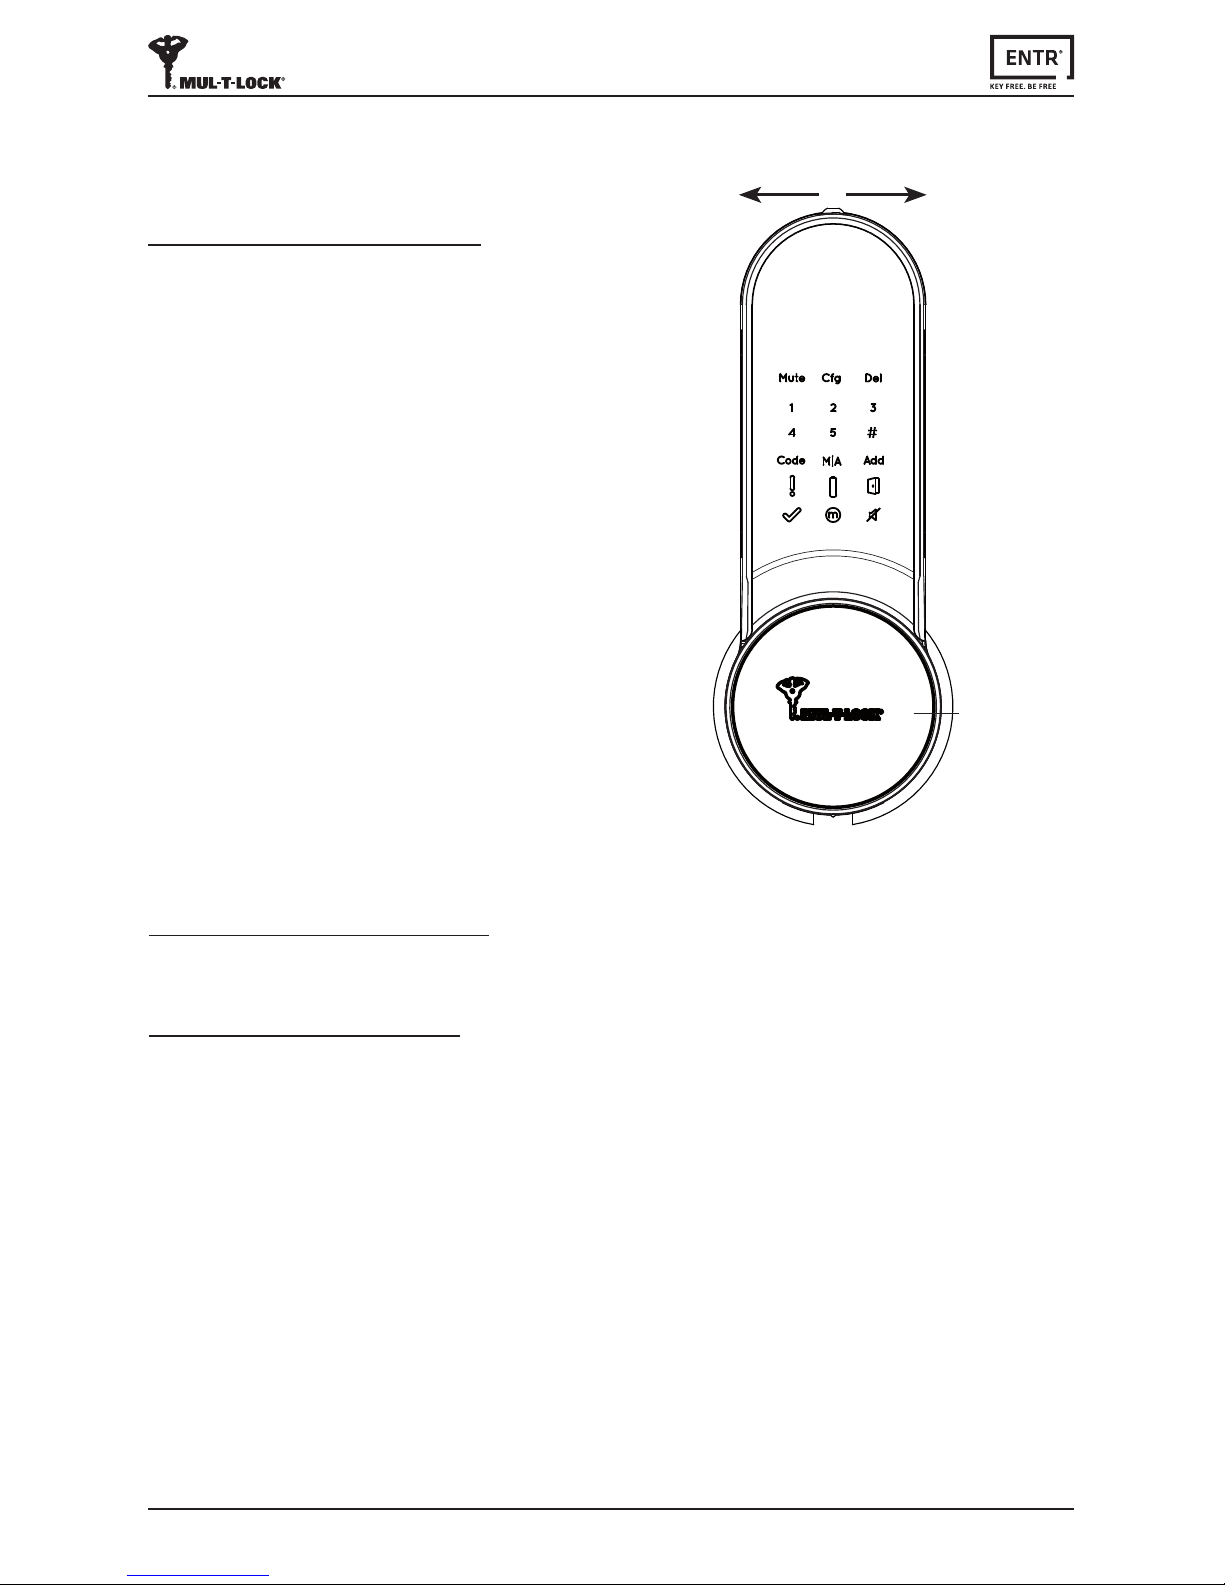
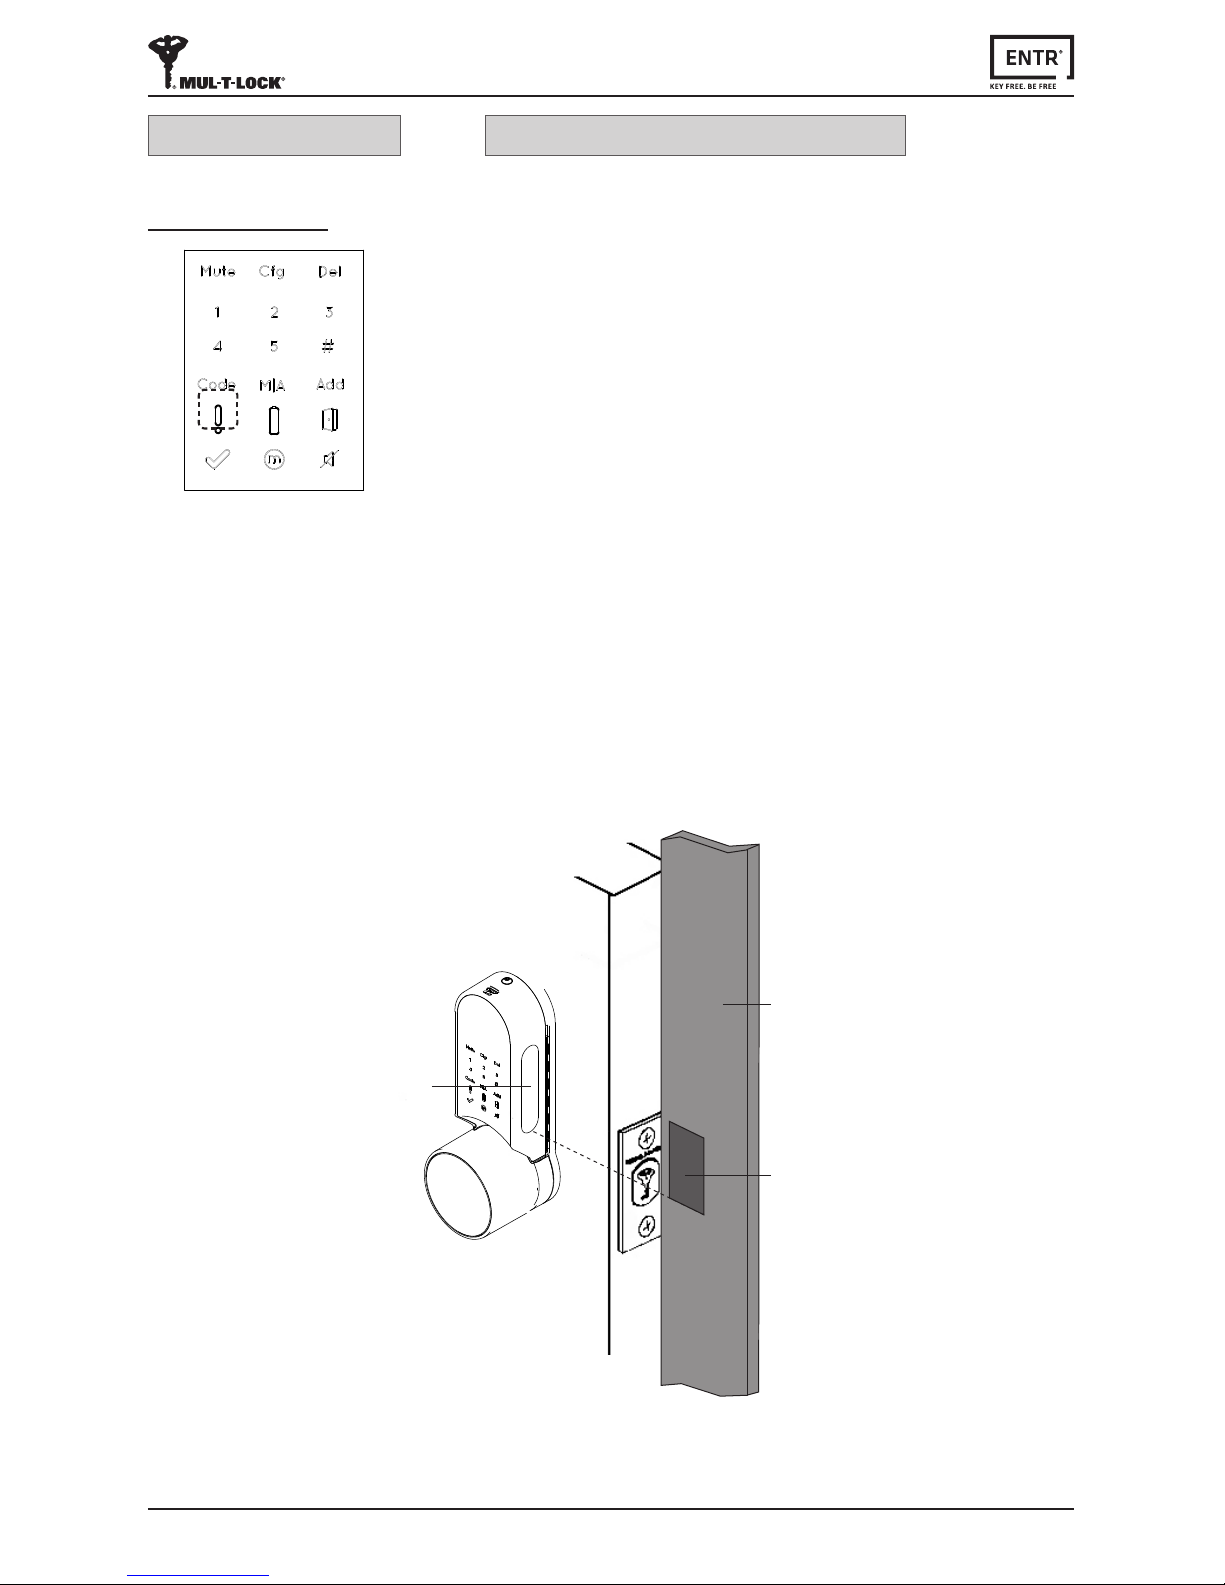
2.2 Indicaons
Error (Red)Baery status (Green/Red)Door not closed (Red)
OK (Green)Manual Mode (Green)Mute (Green)
Knob
ON/OFFswitch
Indicaons
Touchpad
2.1 ENTR® Descripon
2. ENTR® Descripon
10 ENTR® Dead Bolt User Manual
• TurningtheENTR®lockON or OFF.
2.3.1 Switching the ENTR® ON
BeforeturningENTR® ON,verify that the
door is shut.
• Move the switch to the ONposion.
Make sure that the knob is in the zero
posion(seeillustraon).
• Funconandnumericbuonswillall
blink once.
• Hazardbeepsoundwillbeemiedand
errorindicaonwillblinkonce.
• ENTR®isnowinoperang mode.
Note:
• AerturningENTR®ON,avoidtouching
thefrontpanelunlbeepsoundends.
• AerturningENTR®ON,thedoorwillbe
shut but not locked.
2.3 ON/OFF Switch
2.3.2 Switching the ENTR® OFF
• Move the switch to OFFposion.
2.3.3 Low baery indicaon
Baeryredsignalrapidlyblinkingand2longbeepswillbesoundedduringevery
lock/unlockacon,indicangthatthebaeryislowandneedstobecharged.
OFF ON
•
Zeroposion

11
ENTR® Dead Bolt User Manual
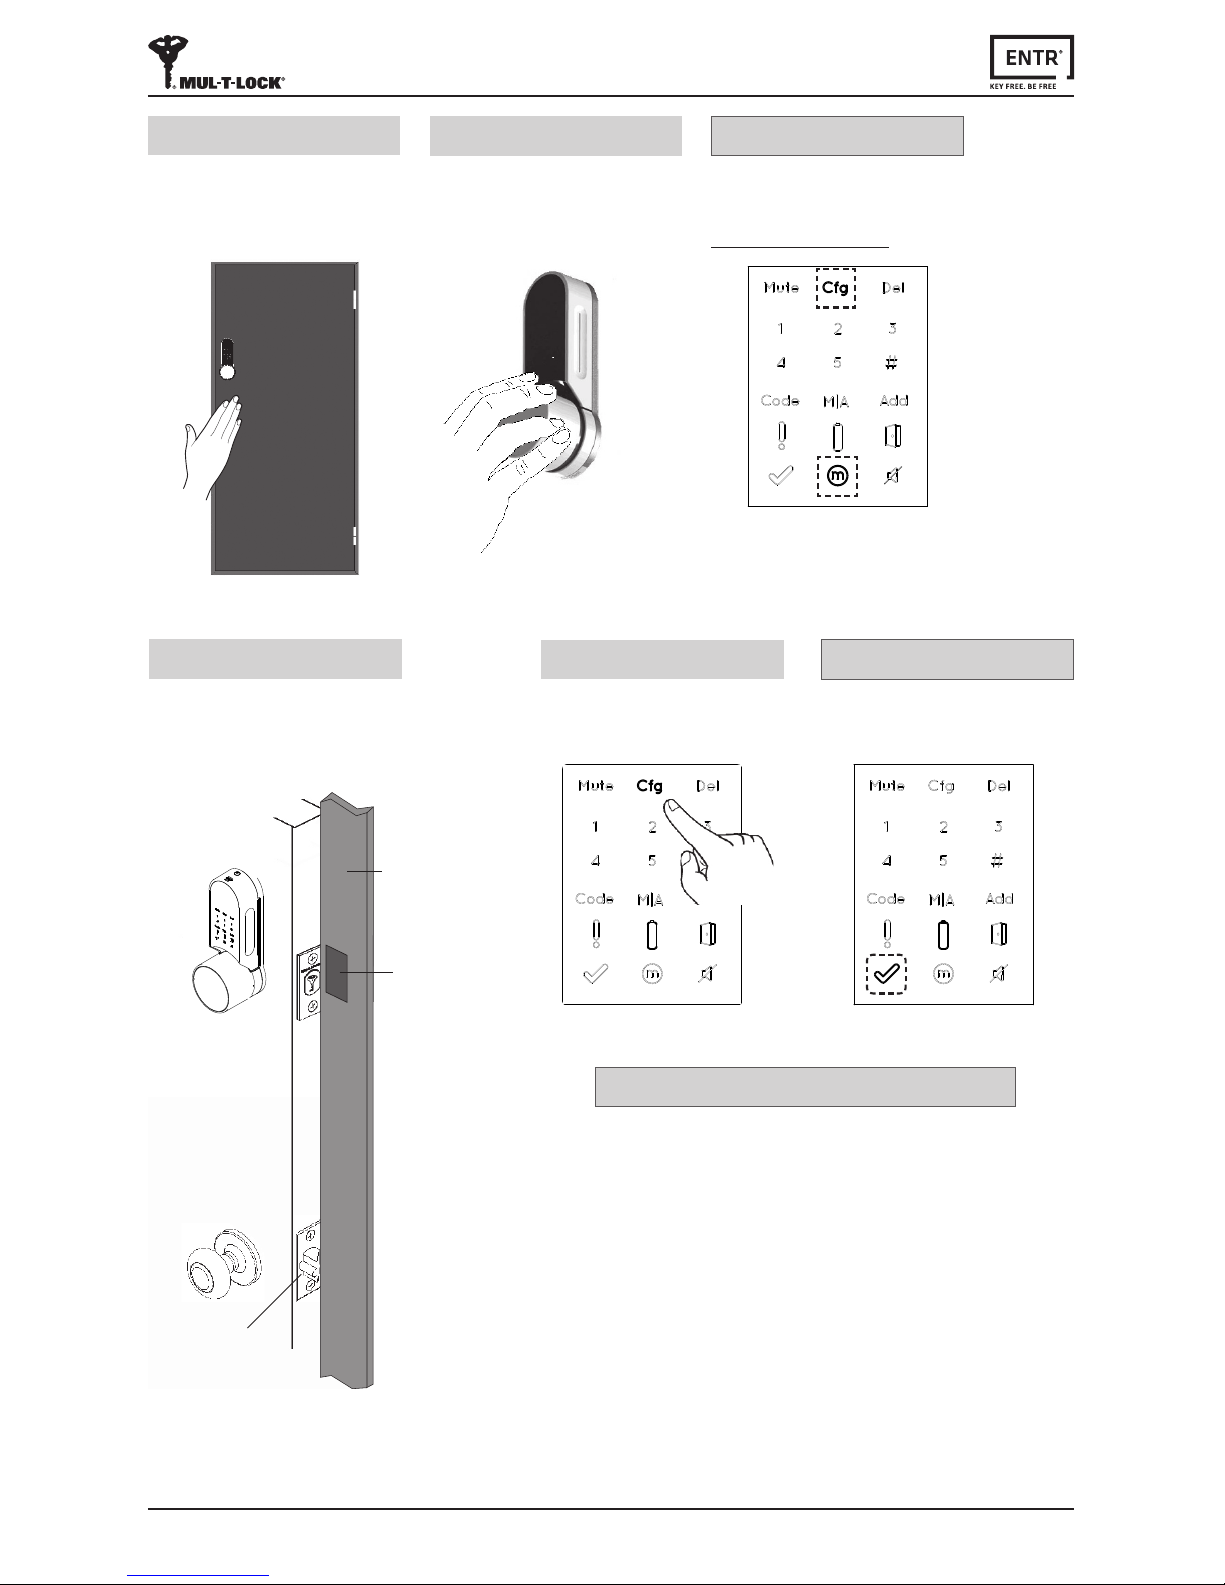
2.4 Inializaon of the Lock
Iniatethelockbytouchingthemiddleofthetouchscreen
withthepalmofyourhandorngersfor3seconds.
• Programingbuonsandbaerystatusindicaonlight
willilluminatefor15seconds,waingforuser'sacon.
• Aer15secondsofinacvity,ENTR®willidle.
2.5 Default PIN Code
The lock's default factory PIN code is: 1 2 3 4 5 #
Please note:
• DefaultPINcodemustbechangedbeforestarngtheconguraonprocess.
• ThePINcodemustconsistof4-10digitsusingnumbers1through5inanysequence.
• Only the Code and MutefunconswilloperateunlthedefaultPINcodeischanged.
Warning:Don'tforget/losethePINcodeoncechanged,otherwiseyouwillbe
locked out. Keep your new PIN code in a safe place.

12 ENTR® Dead Bolt User Manual
3.1 Changing PIN Code
[OK]indicaonilluminated.
2shortbeepemied.
New PIN code is set.
[Error]indicaonilluminated.
2longBeepsemiedfor1second.
ENTR®goestomenumode.
Start the process from stage 1.
Numericbuonsilluminated.
Reenter [New PIN code] [#]
Forexample:1231234#
PIN codes match PIN Code doesn't match
7
3. Operaon
Touchscreenwithpalmorngersfor
3secondstoacve.
Press [Code]
Numericbuonsilluminated.
Type [Default PIN code]
(12345) [#]
1 2 3
Warning:Donotaempttooperatetheunitunlassembledonthedoor.
NumericbuonsilluminatedEnter
[New PIN code](4-10digits) [#]
Forexample:1231234#
[OK]indicaonblinksonce.
1longbeepemied.
Illuminatedbuonsturnso.
[OK]indicaonblinksonce,
1longbeepemied.
Illuminatedbuonsturno.
5 6
4

13
ENTR® Dead Bolt User Manual
3.2 Door Conguraon
Thedoorconguraonprocesssetsyourlockanddoorpreferences.
Thisprocessshouldbedoneaersuccessfulinstallaonofthelock.Itwilltake15-20
seconds to complete.
Press [Cfg]
Numericbuonsilluminated,
Type [PIN code] [#]
1longbeepemied.
Touchscreenwithpalmorngers
for3secondstoacve.
3
4
2
Press [1] or [3]tocongureENTR®
side(seeillustraon).
Press [1]forENTR®onleside.
Press [3]forENTR®onrightside.
5
ENTR® on le
side of the door
Press [1]
ENTR® on right
side of the door
Press [3]
1
Important: Verify that the door is
shut and no key is inserted into the
cylinderduringconguraonsteps.
14 ENTR® Dead Bolt User Manual
Lock conguraon failed
1. Remove the mechanical key from the lock.
2. Checkthatthedoorwasclosedproperlyorif
lockoperaonwasinterfered.
Troubleshoong #1
Press [Cfg]
The lock will carry out the
conguraonprocess.
8
[OK] Indicaonblinksonce.
2shortbeepsemied,
Illuminatedbuonsturno.
Conguraon OK
[Manual] indicaonilluminated.
[Cfg] indicaonblinks.
Note:Iftheconguraonfails
refertotroubleshoong#1
Conguraon OK
Hold the door shut to avoid opening.
The lock will carry out the
conguraonprocess.
Ittake's15-20secondstocomplete.
6
Openthedoorusingthehandle.
Bringthelatchascloseaspossibleto
thedoormolding.
Note: Do not shut the door.
7
Door
moldings
Latch
Magnet
[Cfg] indicaonblinks.
Turn the knob manually to unlock
posionandkeepthedoorclosed.
Push on [Cfg]
7
15
ENTR® Dead Bolt User Manual
[Error]indicaonilluminated,
2longbeepsemied.
Refertotroubleshoong#2
Conguraon failed
Magnet conguraon failed
1. YoucanslloperateENTR®inManualmode(w/oautomaclocking).
2. Removeanyothermagnetsfromthedoor.
3. Placethemagnetaccordingtoinstrucons.
4. ConsultyourinstallerorcontactENTR®TechnicalSupport.
Troubleshoong #2
MagnetFing:
• Mountthemagnetontheframemoldings,ascloseaspossibletothelock.
• Thelowerpartofthemagnetshouldalignwiththelowerpointofthe
slider(seeillustraon).
Frame
moldings
Magnet
Slider

16 ENTR® Dead Bolt User Manual
3.3 Pairing Remote Control
Press [Add]Touchscreenwithpalmorngersfor
3secondstoacve.
Numericbuonsilluminated.
Type [PIN code] [#]
Numericbuonsblinking.
21 3
Remote control
buon
Presstheremotecontrolbuon.
5
Press [1] to add remote control.
Illuminatedbuonsturno.
[OK]indicaonblinksfor15Seconds,
waingforremotecontrolunit
4

17
ENTR® Dead Bolt User Manual
Notes:
• To add more remote control units repeat this procedure.
• Aremotecontrolunitcanbepairedwithonlyonesingledoorunit.
• It is possible to add up to 20 remote control units.
• Only authorized dealer can reset a paired remote.
[OK]indicaonblinksonce,
2shortbeepsemied.
Remote control unit added.
[OK]indicaonblinksfor15seconds,
Nobeepsemied.
Start the process from stage 1.
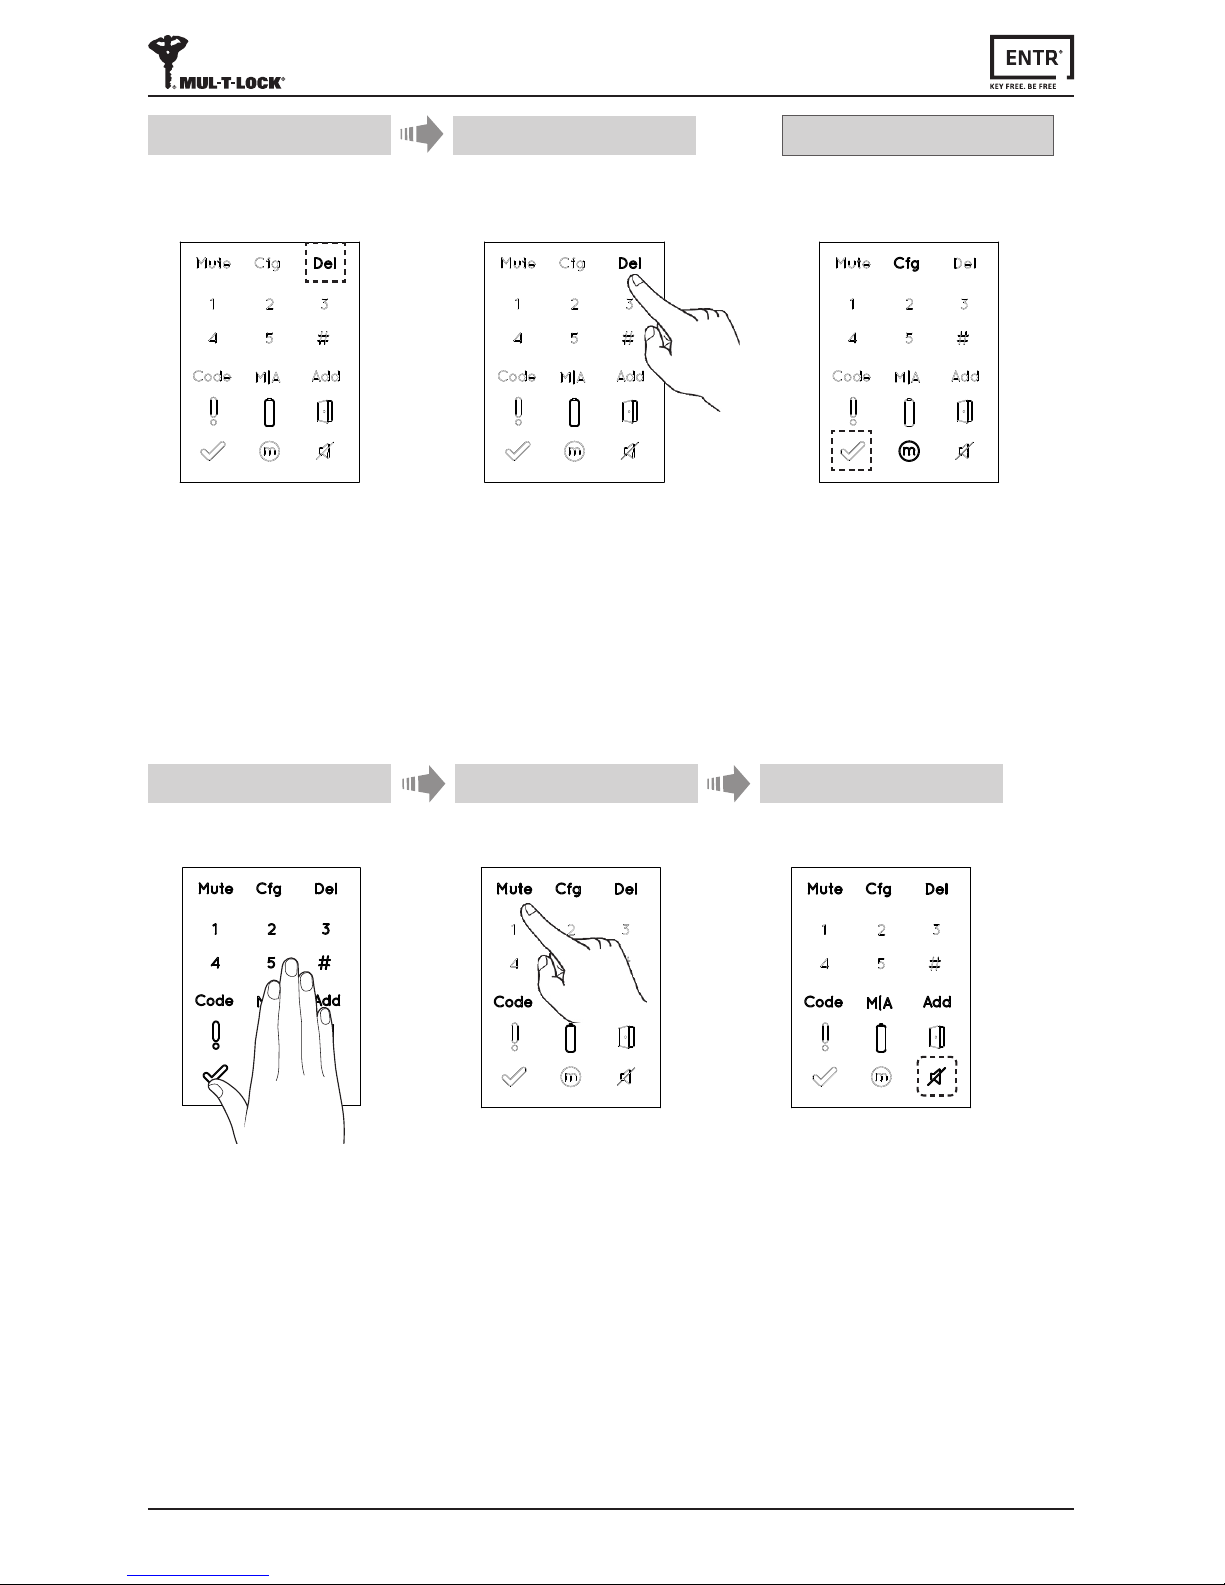
3.4 Deleng Remote Control
Thedelengremotecontrolprocess'willdeleteallremotecontrolunitsincluding
TouchpadandFingerprintreadersdenedwithinthesystem.
1 2
Touchscreenwithpalmorngersfor
3secondstoacve.
Press [Del]
Numericbuonsilluminated.
Type [PIN code] [#]
1longbeepemied.
3
Pairing OK Pairing failed
18 ENTR® Dead Bolt User Manual
5Deleon accomplished
Press [Del]toconrm. [OK]indicaonblinksonce.
2shortbeepsemied,
Illuminatedbuonsturn o.
[Del] blinks for 30 seconds.
4
Note: Wall reader and smartphone connected to the ENTR® lock will not be deleted.
Notes:
• SengtheENTR®locksoundtoOFFwillmutethelockandunlocksounds,and
theopendoorhazardsignal.Itwillnotmutethetouchpad,mechanicaloverride
andlow-baerysounds.
• FollowthesameproceduretoturnthesoundbacktoON.
3.5 Seng Sound Signal
TurnthesoundsignaltoOFF or ON
21
Press [Mute]Touchscreenwithpalmorngersfor
3secondstoacve.
[Mute]indicaonilluminated.
Soundsignaliso.
3
19
ENTR® Dead Bolt User Manual
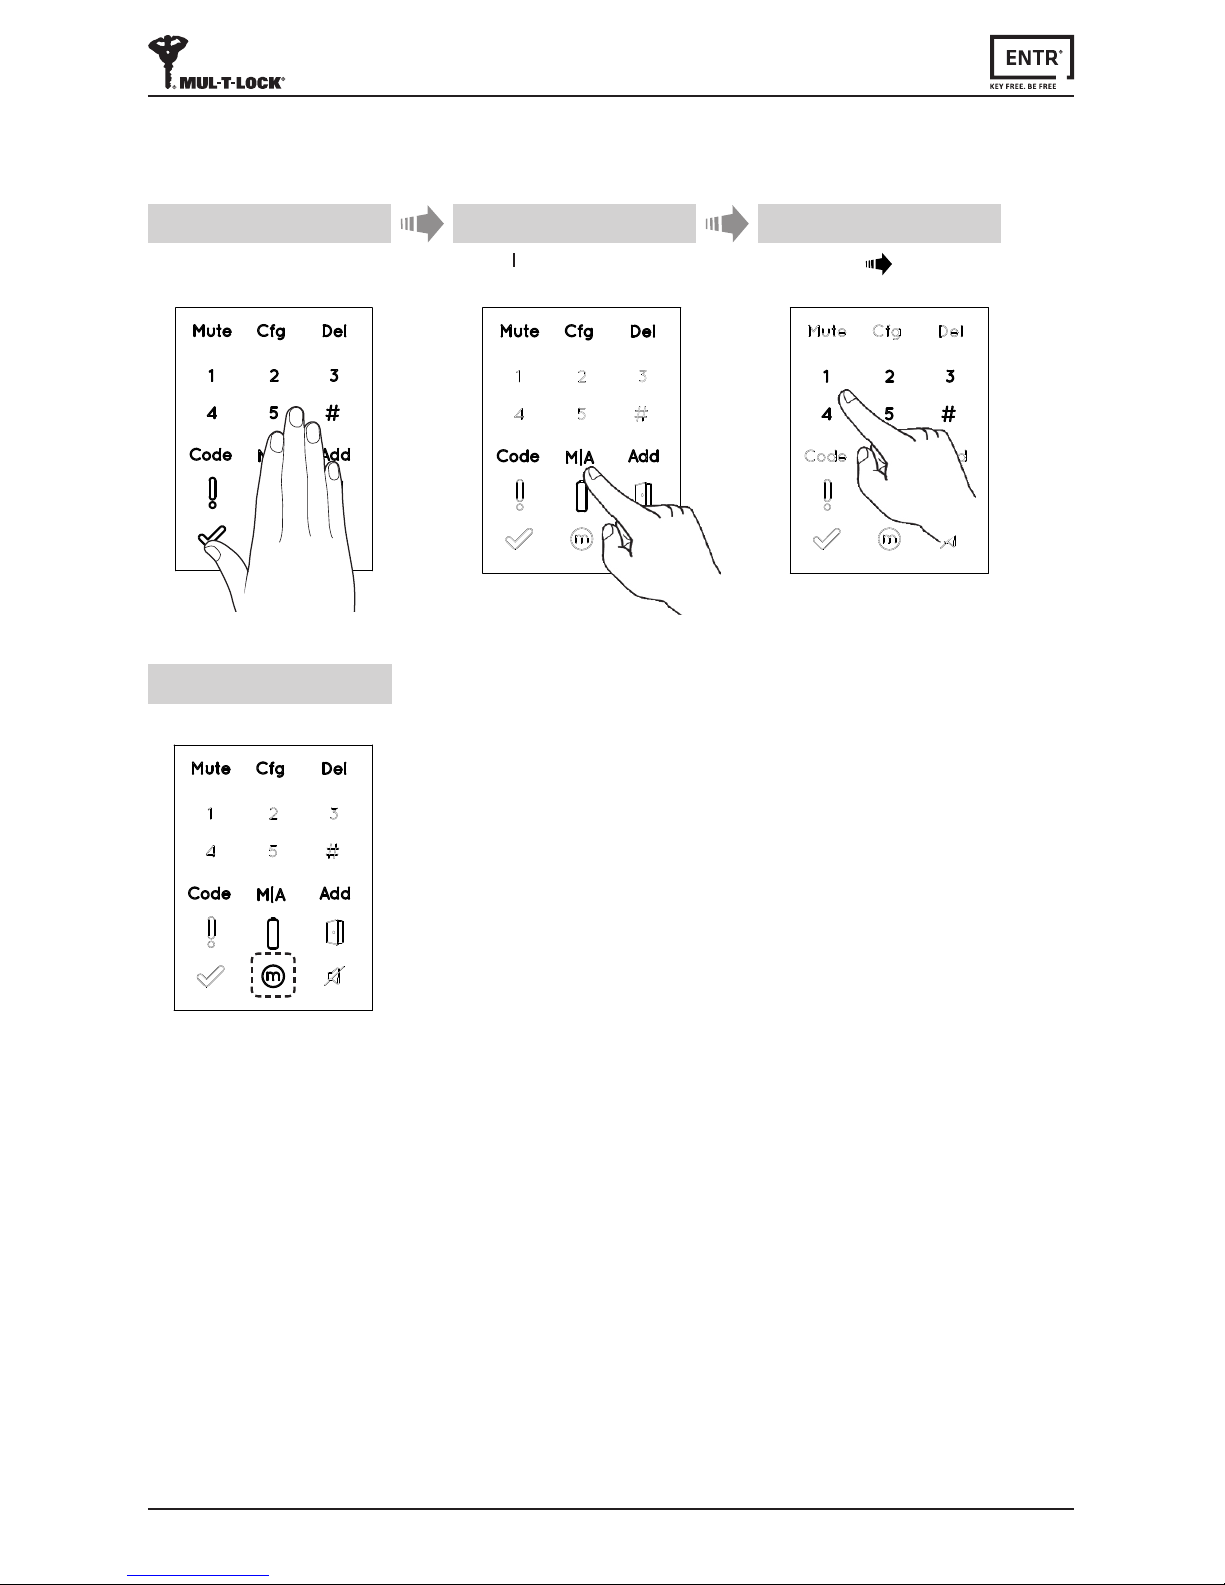
3.6 Seng Locking Mode
TogglebetweenAutomac to Manuallockingmode
Notes:
• SengtheENTR®locktoManualwilldisableautomaclocking.
• FollowthesameproceduretosettheENTR®locktoAutomac locking.
1 2
[Manual]indicaonilluminated.
4
Touchscreenwithpalmorngersfor
3secondstoacve.
Press [M A] Type [PIN code] [#]
3

20 ENTR® Dead Bolt User Manual
3.7 Doorknob Operaon
Turn clockwise or counterclockwise to unlock.
Beepsoundemiedduringdoorknoboperaon.
3.8 Slide Buons Operaon
Slideyourngersontherecessedgroovesonboth
sides of the ENTR® front panel:
• Toopen,slidengersdownwardsontherecessed
groovesonbothsides.
• Tolock,slidengersupwardsontherecessed
groovesonbothsides.
Open
Lock
Important!Whenanacvelockisopenedby
turningoftheknobyoumustre-operateitby
oneofitsautomacmodes(i.eremote,phone,
slidingyourngers,touchpadetc.)orelseitwill
remain UNLOCKED.
Knoboperaonismeantsolelyformechanical
override in the rare event it will not otherwise
unlock.

21
ENTR® Dead Bolt User Manual
4.1 Mounng the Touchpad Reader
SelectthelocaonwheretheTouchpadReaderwillbe
mounted.
• AachtheTouchpadReaderbaseplatetothewall.
• Use4screwsandscrewanchors,ordoublesided
adhesive strip.
4.2 Baery Replacement
1. Release lid screw and open the lid.
2. Putinthebaeries(2xAA)according
tothe"+""-"signs.
3. Closethelidandghtenthescrew.
Notes:
• AerinserngthebaeriestheTouchpad
Readerwillturnonautomacally.
• AshortbeepsoundemiedandGreen
[OK]indicaonilluminatedfor2seconds.
Important:DonottouchtheTouchpadduring
theselftestprocedureandunlthelights
areo.
4.2.1 Low Baery Indicaon
Whenbaeriesneedreplacement,ared
warningsignalwillblinkrapidlyandlongbeep
willsoundduringeverylock/unlockacon.
4. Touchpad Reader
Table of contents
Popular Door Lock manuals by other brands


Command access
Command access ARLP-UL-M-KIT Insert Instructions

Assa Abloy
Assa Abloy Corbin Russwin Access 800 Series installation instructions

FingerTec
FingerTec 6600 manual

PEAKnx
PEAKnx Controlpro and Gira DCS Getting started

Hafele
Hafele Dialock DT 210 R2 installation instructions

SECO-LARM
SECO-LARM SD-997BQ installation manual


