Environics 6202 Manual

Model 6202
Reduced Oxygen Breathing
Device 2
SimulatorAccessory Package
Operator’s Guide
Revision 3
11 MAY 2018
Environics Inc.
69 Industrial Park Road East
Tolland, CT 06084-2805 USA
Phone (860) 872-1111 Fax (860) 870-9333

II
COPYRIGHT
© 2003-2010 Environics Inc. All Rights Reserved. This manual is copyrighted with all
rights reserved.
TRADEMARKS
Environics is a registered trademark of Environics Inc. All other brand names,
company names and product names mentioned are the property of their respective
owners.
WARRANTY
Environics Inc. warrants this product to be free from defects in material and
workmanship for a period of one year from the date of shipment. To exercise this
warranty, contact Environics for assistance and instructions for returning the
products. Repaired or replaced products are warranted for the balance of the original
warranty period or at least 30 days.
LIMITATION OF WARRANTY
This warranty does not apply to equipment gathered and tested by Environics that is
covered under the manufacturer’s warranty. This will include all computers, monitors,
flight control simulator hardware and software, communications equipment, breathing
masks and all associated equipment manufactured outside of Environics. For more
information regarding the warranty of these products please contact the
manufacturer.
This warranty is in lieu of all other warranties, expressed or implied, including any
implied warranty of merchantability or fitness for a particular use. The remedies
provided herein are the buyer’s sole and exclusive remedies.
Neither Environics nor any of its employees shall be liable for any direct, indirect,
special, incidental or consequential damages arising out of the use of its instruments
and software even if Environics has been advised in advance of the possibility of
such damages. Such excluded damages shall include, but are not limited to: costs of
removal and installation, losses sustained as the result of injury to any person or
damage to property.

III
TABLE OF CONTENTS
LIST OF INCLUDED EQUIPMENT iv
OVERVIEW 1
UNPACKING AND ORIENTATION 2
SYSTEMSETUP 3
MASKFITTING 5
MASK ACCESSORRIES 7
INTERCOM AUDIO CONNECTIONS 8
SYSTEMPICTURES 9

I
V
LIST OF INCLUDED EQUIPMENT
Laptop computer with neoprene storage case
19" monitor (size is for portability, larger monitors available at an additional
charge)
X-Plane software
Joystick - throttle package
4 place stereo intercom
Instructor headset with microphone
Student headphones
(2) Oxygen masks* (1 large, 1 medium) with microphones and amplifiers
extended and customized to mate with the ROBD2 and the intercom.
External Speakers for demonstration purposes
Custom shipping case
* oxygen masks may not be available under certain conditions and should be
considered as optional. Mask accessories to connect a mask to the ROBD2 and
intercom are always included.
The ROBD2 is not included with the simulator accessory package and must be
purchased separately.

SIMULATOR ACCESSORY PACKAGE
OPERATOR’S GUIDE MAY 2018
1
OVERVIEW
The second generation Reduced Oxygen Breathing Device (ROBD2) is a
computerized gas-blending instrument. The system mixes air and nitrogen to
produce the sea level equivalent atmospheric oxygen contents for altitudes up to
34,000 feet. The ROBD2 will make the operator hypoxic and the simulation
equipment allows the instructor to make an accurate assessment of the subject
under test (SUT) ability to perform flight related tasks under the stress created by
reduced oxygen.
This manual contains information and guidance for setting up and operating the
Simulator Accessory Package available for use with the ROBD2. It does not include
instructions on operating the X-Plane or any other flight simulator software. The
ROBD2 operating instructions are contained in the instruments user and
programming manuals.
Step by step instructions are provided for connecting power, audio and video
sources, for the SUT, the instructor monitoring the test and additional personnel who
wish to observe.
IMPORTANT: The ROBD2 operator should be certified in first-aid and CPR and
have access to communication in the event of an emergency.
Prior to participation in ROBD2 training or research, the subject under test should
have the equivalent to a FAA physical of any class or military flight physical and
be screened for current health status prior to the run.

SIMULATOR ACCESSORY PACKAGE
OPERATOR’S GUIDE MAY 2018
2
UNPACKING AND ORIENTATION
Transport case unpacking
1. The transport case is provided with the ability to be locked. If a lock has been
added, remove the lock and activate the press to release latches.
2. Remove the equipment from the boxes and read any important instructions or
notes found within.
3. Save and store the boxes and inserts for future use in the event the
equipment needs to be returned or delivered to another site for operation.
4. If an optional larger monitor is requested it will be delivered in a separate
container.
Orientation
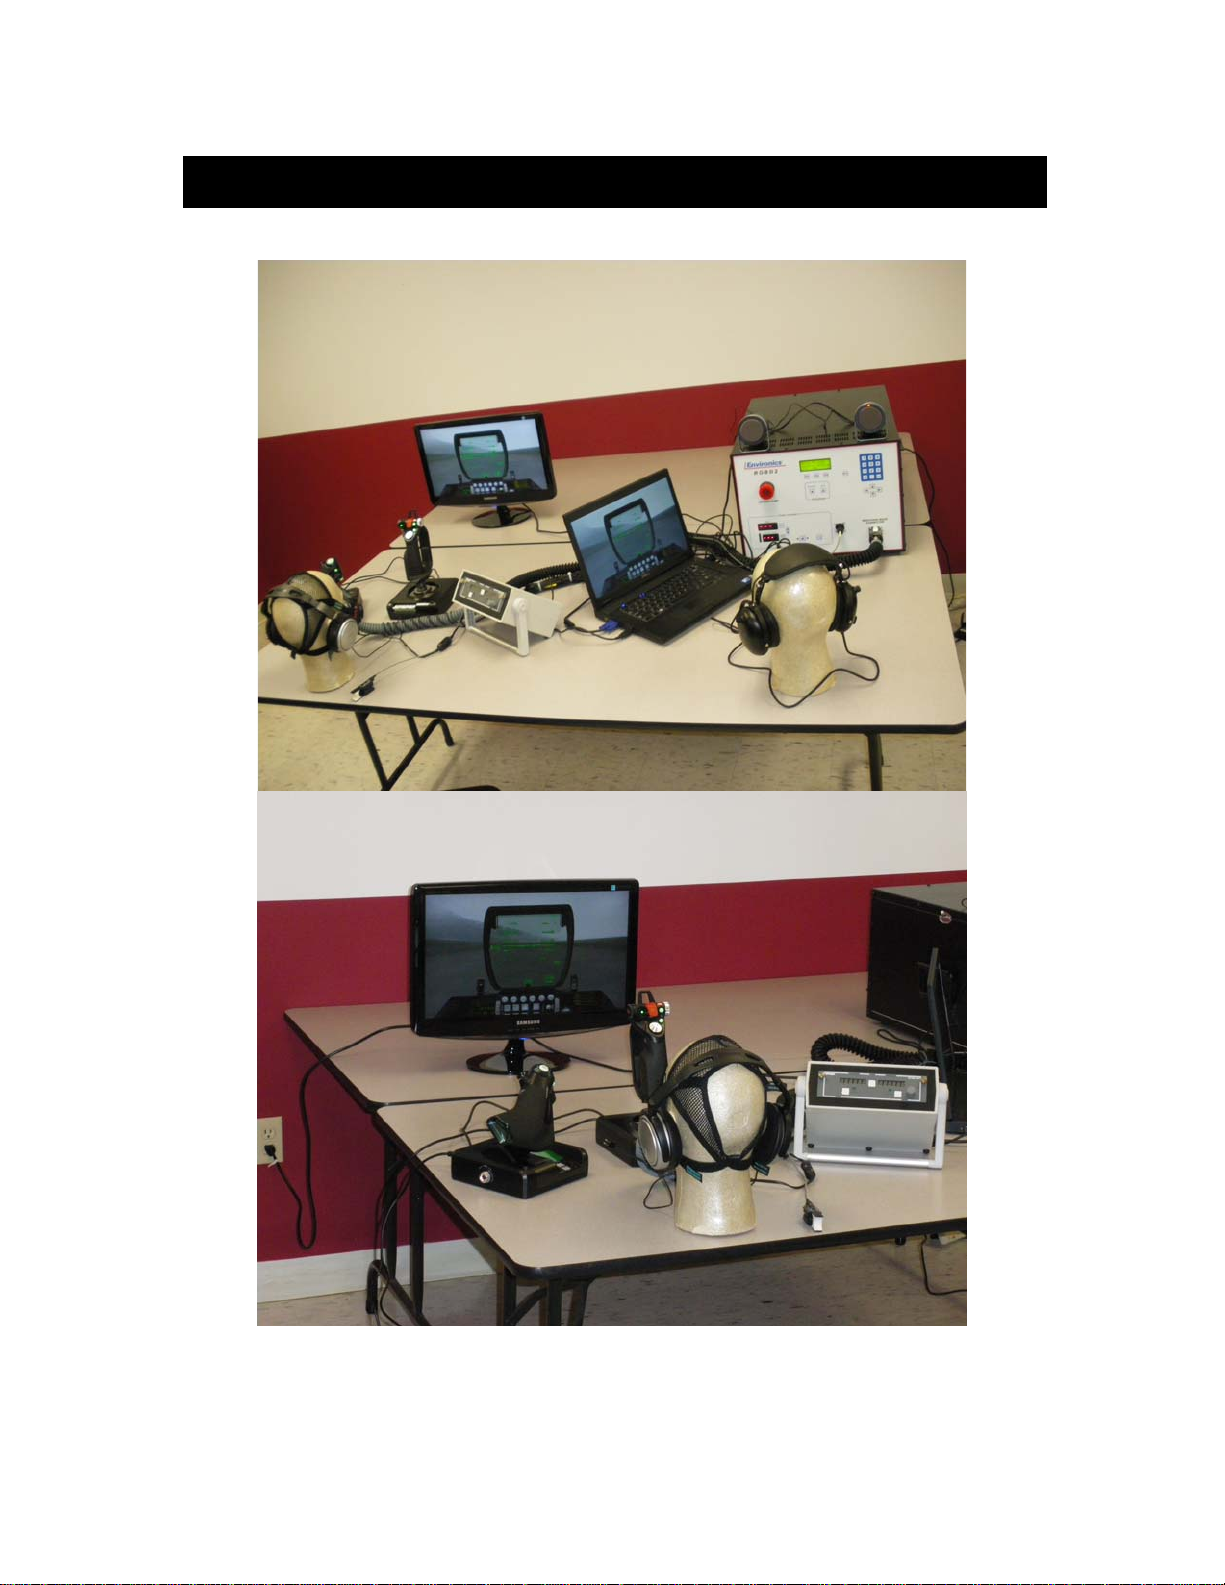
1. Select a suitable location to set up all the equipment associated with the
ROBD2 and simulation package. We recommend a table that is at least eight
foot long and three feet wide.
2. The table should be located a few inches from the wall for clearance of cables
and hoses. Also the high pressure tanks need to be properly secured to the
wall.
3. The equipment should be arranged so the instructor has immediate access to
the ROBD2 front panel and the laptop computer.
4. The SUT will need a clear view of the monitor and easy access to the flight
controls.

SIMULATOR ACCESSORY PACKAGE
OPERATOR’S GUIDE MAY 2018
3
SYSTEM SETUP
Computer
1. LAPTOP - The X-plane software is preinstalled on the laptop. It is ready to
plug in and power up.
2. MONITOR - Connect the video cable directly to the external monitor port on
the laptop and plug the power in.
3. THROTTLE / JOYSTICK – The joystick comes with a cable that plugs into
the throttle and the throttle cable plugs into a USB port on the computer.
4. The computer and flight simulator software should be ready for testing at
this time. The instructor should be thoroughly familiar with the X-plane
operation prior to facilitating the training of students.

SIMULATOR ACCESSORY PACKAGE
OPERATOR’S GUIDE MAY 2018
4
Communications
1. INTERCOM – The pilot PA-400ST controls the routing of audio signals.
It operates on two 9 volt batteries (included) and is used to control
squelch and individual volumes for the Subject Under Test (pilot) and
the Instructor (Co-Pilot). See the intercom audio connections section for
specific connection instructions.
2. LAPTOP – The audio output connector on the laptop may be connected
to the Music/Cell in jack on the intercom if crosstalk is desired during
testing. The X-Plane software provides constant audio crosstalk.
3. INSTRUCTOR HEADSET – Aircraft quality headphones with
microphone attached. The headset should be connected to the CO-
PILOT MIC and HDPH jacks on the intercom. The MIC plug is slightly
thinner than the HDPH jack.
4. PILOT (SUT) MASK & HEADPHONES – Two standard aircrew
breathing masks are included, one is medium size and the other is
large. One set of standard over ear headphones are also included.
These are connected to the pilot MIC & HDPH section of the intercom.
The breathing tube is plugged directly into the breathing port on the
ROBD2. A head net is included with each mask and is used to hold the
mask in place. The mask must fit correctly to work properly, instructions
for donning the mask are given in the mask fitting section of this guide.
5. EXTERNAL SPEAKERS – If desired these are connected to one of the
passenger HDPH jacks on the intercom using the provided adapter.
NOTE: For a pictorial view of the communications setup see the intercom audio
connections section of this guide.
SIMULATOR ACCESSORY PACKAGE
OPERATOR’S GUIDE MAY 2018
5
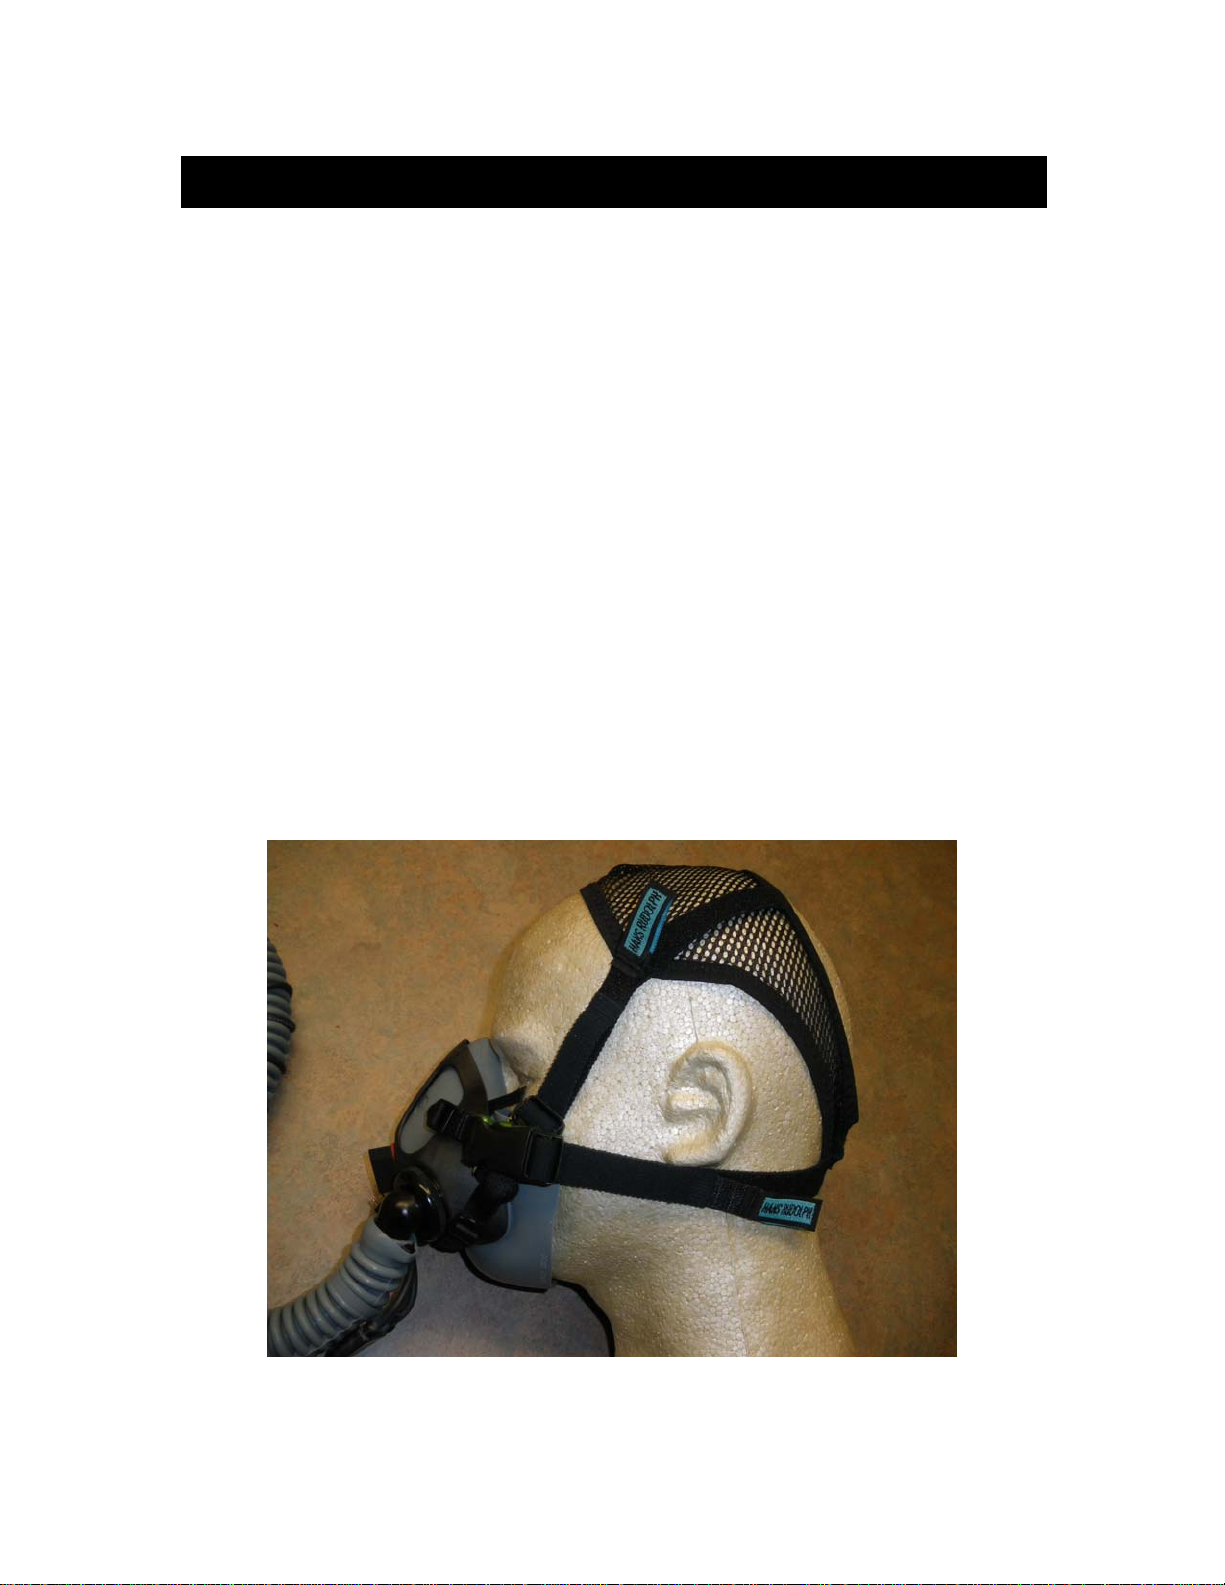
MASK FITTING
1. The mask attaches to the head net with quick release connectors. The
connectors have been color coded for ease of use.
2. The straps on the head net are adjustable to tighten the mask and lock
with a Velcro tab.
3. To don the mask.
A. Leave the yellow and blue quick release connectors connected.
B. Loosen all head net straps slightly
C. Hold the mask over your mouth and nose while holding the net
above your head by the disconnected red and green quick
connects.
D. Lower the net over your head so the red and green quick
connects are hanging at the back of your neck. The mask should
stay in place.
E. Connect the red and green quick connects together. The straps
should cross over your cheeks.
F. Pull the net straps to adjust for comfort and an airtight seal. To
test the seal flatten the breathing tube between your palms, you
should not be able to inhale when the tube is flattened.
G. If the mask is tight and it is not properly sealed then try the other
size mask.
SIMULATOR ACCESSORY PACKAGE
OPERATOR’S GUIDE MAY 2018
6

SIMULATOR ACCESSORY PACKAGE
OPERATOR’S GUIDE MAY 2018
7
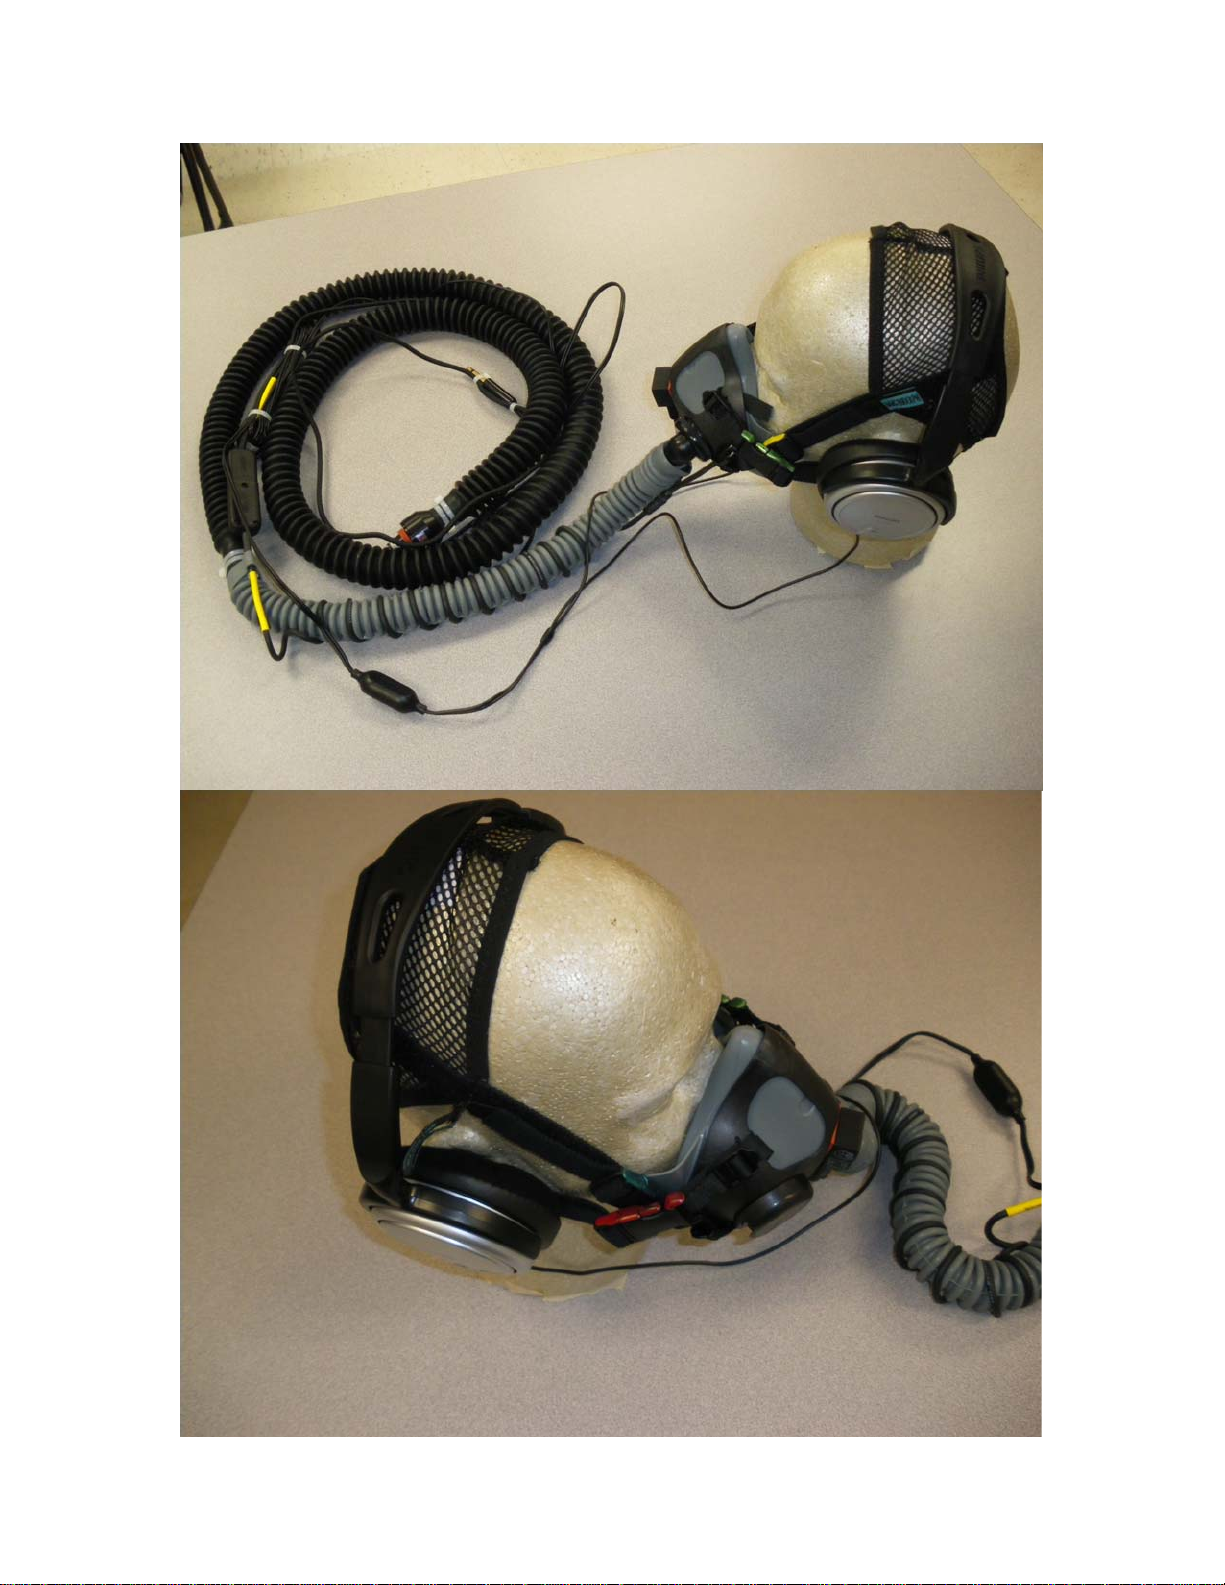
MASK ACCESSORIES
When the mask option is not available or requested the following accessories are
included to adapt an aviation mask for connection to the ROBD2 and intercom. If
the mask is included with the simulator accessory package the following items are
attached at Environics and the mask is ready for use.
1. Extended breathing tube, ROBD2 connector and breathing tube
union fitting. It will be necessary to remove the air fitting from the A/C
end of the breathing mask to connect the mask to the extended
breathing tube.
2. Two different style electrical adapters/extenders are included for the
most common type of aviation mask electrical connectors. Please
note that only the microphone connection from the adapter will plug
into the intercom box when the hair net/headphone option is used.
3. To secure the mask to the SUT a hair net and quick connects are
included. It may be necessary to remove existing bayonet or other
fittings that are normally used to attach the mask to a helmet when
using the hair net. When using the hair net refer back to the mask
fitting section of this manual for proper fit and connections.
SIMULATOR ACCESSORY PACKAGE
OPERATOR’S GUIDE MAY 2018
8
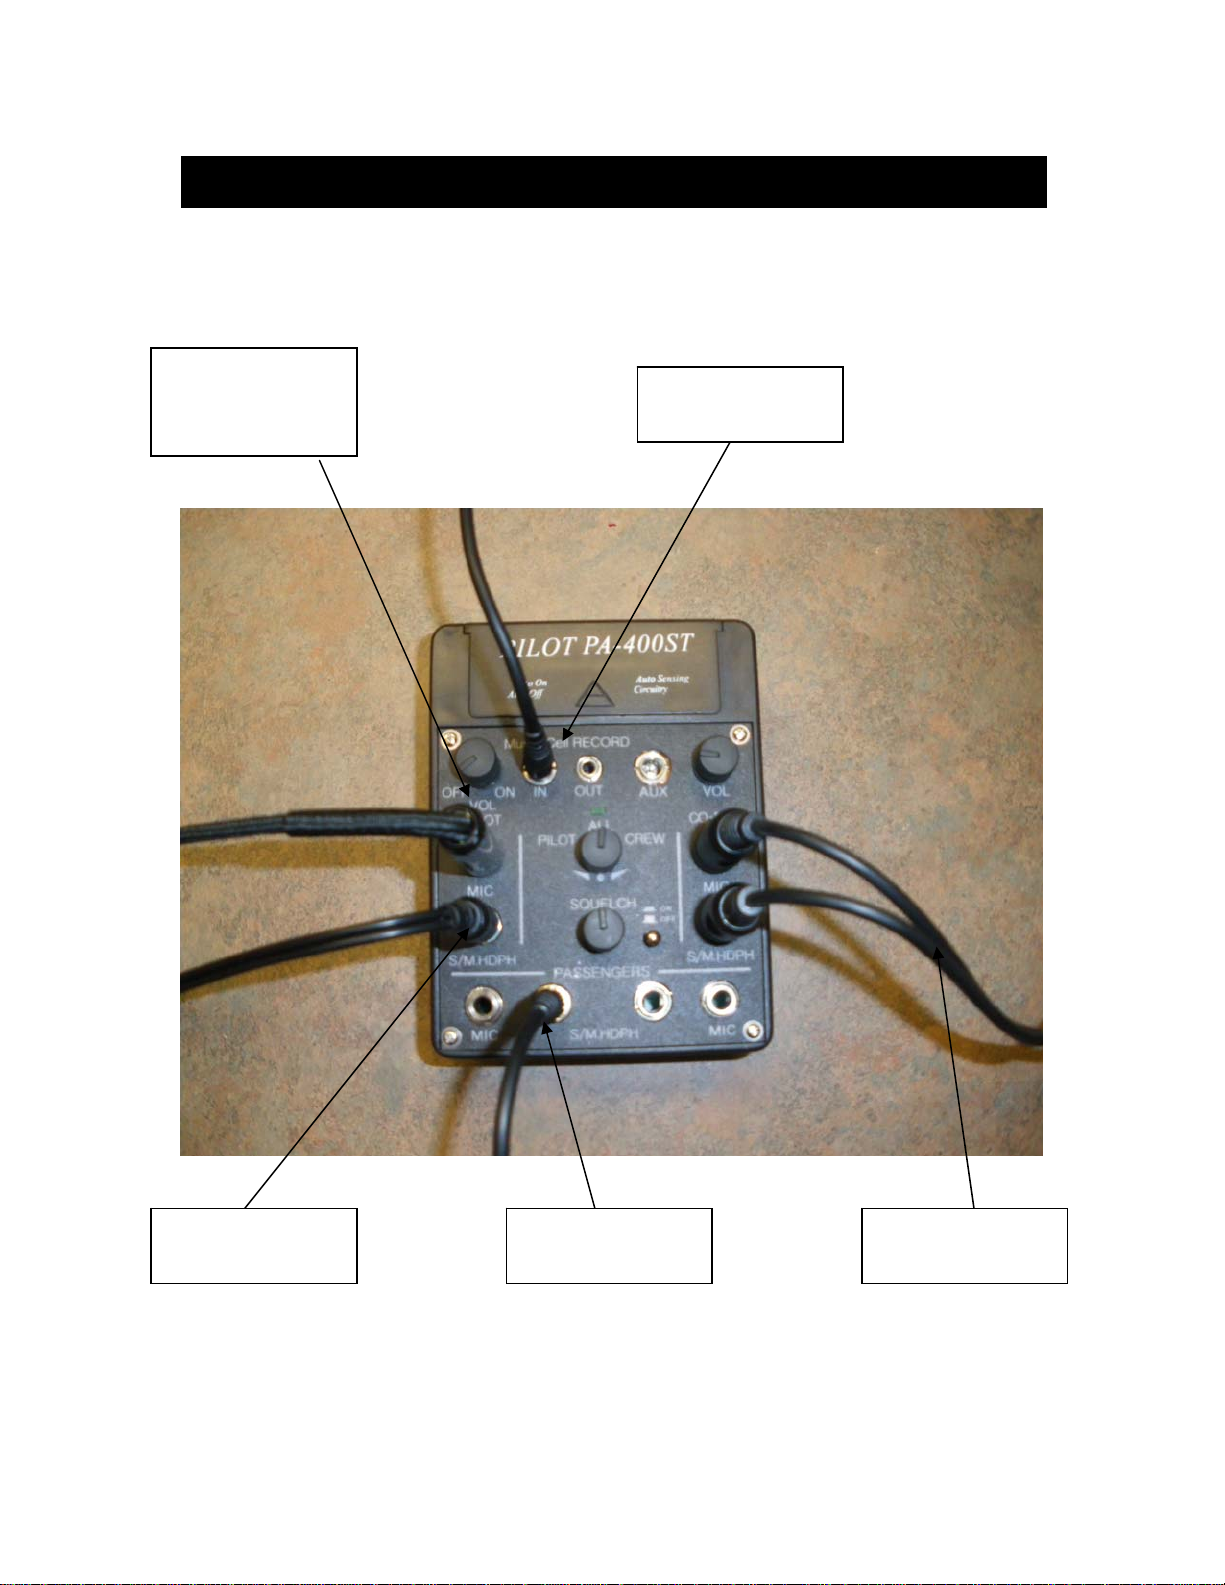
INTERCOM AUDIO CONNECTIONS
SUT MASK
MICROPHONE
OUTPUT
INSTRUCTOR
HEADSET
LAPTOP
AUDIO OUT
EXTERNAL
SPEAKERS
SUT
HEADPHONES
SIMULATOR ACCESSORY PACKAGE
OPERATOR’S GUIDE MAY 2018
9
SYSTEM PICTURES
This manual suits for next models
1
Table of contents
Other Environics Respiratory Product manuals


