3720092 (A3-D-P) 2 / 3
PAS® Colt P18
Combination escape SCBA/airline SAR respiratory protection equipment Instructions for use
ready position until an escape is necessary. Depending on the intended
use, refer to the relevant procedures from the following:
● For combination (escape/airline) use, see Section 3.2.1
● For escape use only, see Section 3.2.2
3.2.1 Combination (escape/airline) use
Putting on the face mask
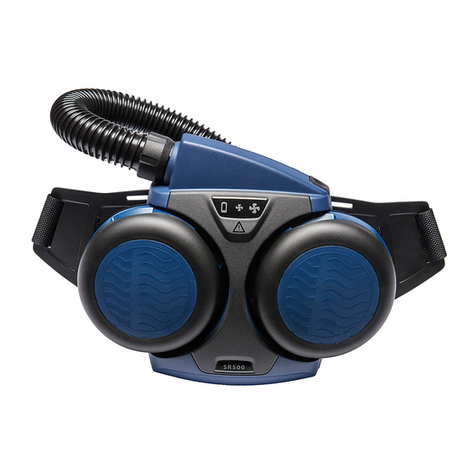
1. Press the reset button (Fig 1, Item 1) of the lung demand valve to
switch off the positive pressure.
2. Connect the independent air supply to the male coupling (Fig 2,
Item 3). If the independent air supply has a shut-off valve, open the
valve.
WARNING
Correct fit of the face mask can only be achieved if the complete face mask
seal makes contact with skin. Head hair, facial hair (including beard stubble
and sideburns), earrings, other facial piercings and normal spectacles will
interfere with the face mask seal and are not permitted in the sealing area.
Additionally, head hair that could affect the face mask fit (buns, pony-tails,
hairpieces, etc.) is not permitted.
NOTICE
Refer also to the face mask instructions for use.
3. Spread the head harness (Fig 5). Place the chin into the chin cup of
the face mask and pull the harness over the head locating the harness
center plate on back of the head.
4. Referring to Fig 6, tighten both lower (1) and then upper straps (2)
evenly towards back of the head. The wearer’s first inhalation after
achieving a face seal will automatically switch on the air supply into the
face mask.
5. Check that the head has a full range of movement without pulling
against the regulator hose. If any resistance to movement is felt,
readjust the hose routing and then recheck. If resistance is still felt, do
not use the breathing apparatus and contact Dräger.
Function check
1. Isolate the independent air supply (close the valve or disconnect) and
breathe normally to empty the system of air. When empty, the face
mask should hold on to the face to indicate a positive seal.
2. Immediately reapply the independent air supply and breathe normally.
3. Inhale and hold your breath – there should be no audible leak. If a leak
is detected, readjust the head harness and retest.
4. Recommence breathing – exhaled air should flow easily out of the
exhalation valve.
5. Momentarily press the purge button (Fig 1, Item 2) to check for
additional airflow.
When the function check has been satisfactorily completed, breathe
normally and proceed to the working area.
Escape procedure (independent air supply failure)
WARNING
During supplied airline respirator (SAR) use, the PAS® Colt cylinder valve
must remain closed. The escape duration starts from the time of opening
the cylinder valve and disconnecting the airline supply.
Dräger strongly advise that the purge button (Fig 1, Item 2) is not used
during an escape. Using the purge button would use air from the cylinder
and reduce the time available for escape.
NOTICE
If the PAS® Colt is fitted with a low-pressure whistle, during airline use the
whistle sounds to indicate that the independent air supply has fallen below
the required pressure. If the whistle sounds and then stops before the
escape procedure is started, the air supply pressure could have been
restored. The wearer must confirm that the correct pressure (87 to
125 psi) is available, or escape as described below.
If the independent air supply fails, breathe normally and immediately
proceed as follows:
1. Open the cylinder valve (counterclockwise) slowly, but fully, and
continue to breathe normally.
2. Disconnect the independent air supply from the PAS® Colt.
3. Immediately leave the hazardous area by the shortest and safest
escape route.
The wearer must be in a safe area before the air cylinder is empty. When
in a safe area, remove the lung demand valve from the face mask if
necessary and continue to breathe normally.
NOTICE
If the PAS® Colt is fitted with a low-pressure whistle, during an escape the
whistle would sound when the cylinder pressure was in the range 72.5 to
58 psi. This is not an end-of-service-time-indicator (EOSTI).
3.2.2 Escape use only (putting on the face mask and escaping)
WARNING
Correct fit of the face mask can only be achieved if the complete face mask
seal makes contact with skin. Head hair, facial hair (including beard stubble
and sideburns), earrings, other facial piercings and normal spectacles will
interfere with the face mask seal and are not permitted in the sealing area.
Additionally, head hair that could affect the face mask fit (buns, pony-tails,
hairpieces, etc.) is not permitted.
NOTICE
Refer also to the face mask instructions for use.
1. Press the reset button (Fig 1, Item 1) of the lung demand valve to
switch off the positive pressure.
2. Open the cylinder valve (counterclockwise) slowly, but fully, to
pressurize the system.
3. Spread the head harness (Fig 5). Place the chin into the chin cup of
the face mask and pull the harness over the head locating the harness
center plate on back of the head.
4. Referring to Fig 6, tighten both lower (1) and then upper straps (2)
evenly towards back of the head. The wearer’s first inhalation after
achieving a face seal will automatically switch on the air supply into the
face mask.
WARNING
The duration of the cylinder air begins from the time of the first-breath
activation of the lung demand valve.
Dräger strongly advise against using the purge button (Fig 1, Item 2) or
the front button (Fig 1, Item 3) during an escape. Using either button
would use air from the cylinder and reduce the time available for escape.
5. Immediately leave the hazardous area by the shortest and safest
escape route.
The wearer must be in a safe area before the air cylinder is empty. When
in a safe area, remove the lung demand valve from the face mask if
necessary and continue to breathe normally.
3.2.3 Drop-down cylinder holster
To release the drop-down cylinder holster:
a. Hold the cylinder valve with the left hand and, with the right hand,
press and hold the red button to open the locking
mechanism (Fig 7).
b. Lift the cylinder and holster clear of the locking mechanism and
then release the red button (Fig 8).
c. Lower the cylinder until it is supported by the harness
straps (Fig 9). The holster is held by two harness straps, one fixed
and one adjustable.
d. Hold the cylinder valve to move the cylinder and holster as
required.
To reconnect the drop-down cylinder holster, align and press the roller on
the holster into the locking mechanism.
3.3 After use
WARNING
Do not remove the equipment until in safe area, clear of hazard.
CAUTION
Do not drop or throw down equipment as damage could occur.
1. Loosen the face mask straps. As the seal between the face mask and
the face is broken, press the reset button (Fig 1, Item 1) to switch off
the positive pressure. Remove the face mask and fully extend all of the
straps of the head harness.
○ After airline use – isolate and disconnect the independent air
supply from the PAS® Colt. Refit the cap on to the airline
connector.
○ After an escape – close the cylinder valve.
2. Press the purge button (Fig 1, Item 2) to fully vent the system.
3. Remove the lung demand valve from the face mask and stow it in the
holder (Fig 2, Item 1).
4. Unbuckle the waist belt, lift the shoulder strap buckle to loosen the
harness and then remove the equipment.
5. Carry out the after use maintenance tasks in the maintenance table
(see Section 5.1).
4 Troubleshooting
The troubleshooting guide shows fault diagnosis and repair information
applicable to breathing apparatus users. Further troubleshooting and
repair information is available in instructions for use supplied with
associated equipment (e.g. face mask).
Contact service personnel or Dräger when the remedy information
indicates a service task, or if the symptom remains after all remedy actions
have been attempted.
5 Maintenance
5.1 Maintenance table
Service and test the breathing apparatus, including out-of-use apparatus,
in accordance with the maintenance table. Record all service details and
testing. Refer also to the instructions for use for the lung demand valve,
face mask and other associated equipment.
Additional inspection and testing may be required in the country of use to
ensure compliance with national regulations.
Symptom Fault Remedy
High-pressure air leak or
failed leak test
Loose or dirty connector Disconnect, clean and
reconnect couplings and
retest
Faulty hose or component Substitute user
replaceable accessories
and retest
Air leak from lung demand
valve
Ice particles on sealing
elements
Press the front button
(Fig 1, Item 3) to allow a
rush of air to pass through
the lung demand valve and
then quickly press the
reset button (Fig 1 Item 1)
to switch off the positive
pressure.
Air leak from medium-
pressure hose connection
at the first-stage regulator
(safety relief valve)
Faulty O-ring, retainer,
spring or first-stage
regulator
Service task
High or low medium
pressure
First-stage regulator fault Service task
Poor sounding whistle (if
fitted)
Whistle dirty Clean whistle flute and
retest
Whistle not functioning
correctly (if fitted)
Activation mechanism fault Service task
Daily check – If the PAS® Colt is held in a ready-for-use condition, check
daily that the pointer of the cylinder pressure indicator is inside the green
area. Charge the cylinder if it is in the red area (see Section 5.2.2).
5.2 Maintenance tasks
5.2.1 Removing the cylinder
WARNING
High-pressure air release may cause injury to the user or other personnel
near the breathing apparatus. Close the cylinder valve and fully vent the
system before attempting to disconnect an air cylinder.
1. Close the cylinder valve and press the purge button (Fig 1, Item 2) to
fully vent the system.
2. Remove the anti-vibration strap from the cylinder valve (Fig 4).
3. Disconnect the cylinder valve from the first-stage regulator.
4. Carefully remove the cylinder from the holster. To prevent damage,
ensure that the hand wheel of the first-stage regulator remains clear of
the cylinder.
5.2.2 Air cylinder charging
WARNING
Air quality for compressed-air cylinders must conform to the minimum
grade requirements for Type 1 gaseous air as defined in CGA (Commodity
Specification for Air) G-7.1 Grade D or higher quality.
If the breathing air moisture content exceeds recommended levels, ice
particles can form, reducing or blocking airflow. Water content of the
breathing air in any container must be checked.
● Refer also to the instructions supplied with the cylinder and the
charging unit for recharging the cylinder.
● Only charge compressed-air cylinders which: conform to national
standards, feature the original manufacturer’s test date and test mark,
have not exceeded the test date indicated on the cylinder by the last
testing station, and are not damaged.
● To prevent ingress of moisture into the cylinder, ensure that the
cylinder valve remains closed until connected to the charging unit.
● Recharge to the rated working pressure of the cylinder. Dräger
recommend a charge rate of 300 psi/minute. Rapid charging will
increase the temperature resulting in an incomplete charge. Recheck
at ambient temperature and top up the charge if required.
● To prevent overcharging of the cylinder, Dräger recommend using a
pressure-limiting device on the charging compressor.
Component/
System Task
Before
Use
After
use
Every
month
Every
year
Every
10
years
Complete
apparatus
Visual inspection (see
Note 1 and Section 3.1.1)
Notes
ODräger recommendations
1. Clean the equipment if it is dirty. If it the equipment has been exposed
to contaminants, disinfect any components that come into direct and
prolonged contact with the skin.
O O O
Functional testing
(see Section 3.1.3)
O O
Breathing cycle and static
tests (see Note 2)
2. These maintenance tasks may only be carried out by Dräger or trained
service personnel. Details of the tests are contained in the Technical
Manual which is issued to service personnel that have attended a
relevant Dräger maintenance course.
O
Lung
demand
valve
Check push-in type
connectors for lubricant
(see Note 3)
3. As a guide, lubricant should be felt on the fingers but not seen. If
relubrication is required, lightly apply Molykote®111 (other lubricants
are not tested and may damage the equipment).
O
First-stage
regulator
Medium-pressure check
(see Note 2)
O
Inspect the sintered filter
(see Note 2 and Note 4)
4. Replace the sintered filter if a drop in first-stage regulator performance
is observed during a flow check or if it is visibly damaged.
O
Inspect the high-pressure
connector O-ring (see
Note 2 and Note 5)
5. Replace the high-pressure connector O-ring if it is found to leak during
functional testing or if the O-ring is visibly damaged.
O
Overhaul. Contact Dräger
for the Repair Exchange
(REX) service (see
Note 6)
6. Where the breathing apparatus is subjected to a high level of use (in
training establishments etc.), reduce the overhaul period for the first-
stage regulator. In these circumstances, Dräger recommend that the
overhaul frequency should be less than 5,000 applications of use. An
application of use is defined as a single use of the fully assembled
breathing apparatus, where the user breathes from the air cylinder. It
does not include system pressurization for pre-operational checks.
O
Cylinder Charge cylinder to correct
working pressure (see
Section 5.2.2)
O
Check charged pressure
(stored cylinders only)
O
Check test date of cylinder
(carbon composite
cylinders over 15 years
old must be retired)
O
Recertification According to national regulations in the
country of use
Cylinder
valve
Overhaul At the time of cylinder recertification
Molykote® is a registered trademark of DDP Specialty Electronic Materials US 9, LLC


