EPA AUGER43 User manual
ITEM # AUGER43
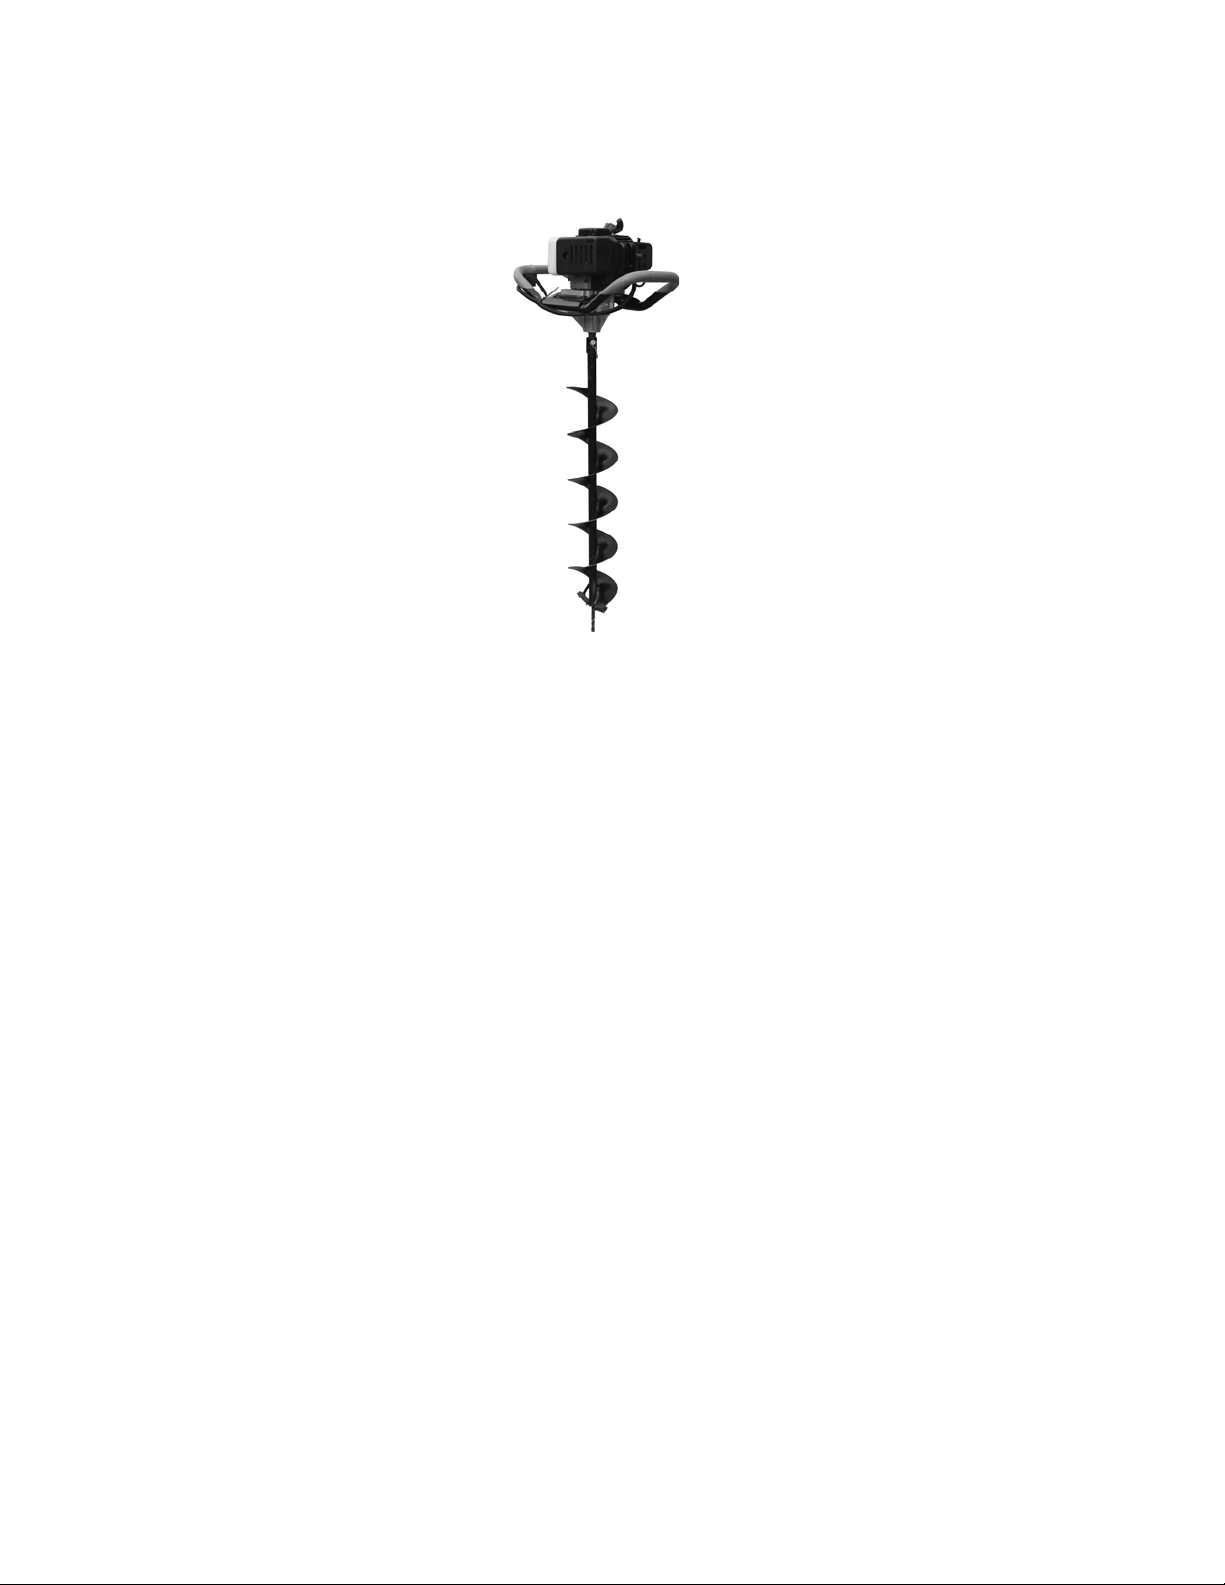
2-CYCLE ENGINE EARTH AUGER
INSTRUCTION MANUAL
READ ALL INSTRUCTIONS AND WARNINGS BEFORE USING THIS PRODUCT.
This manual provides important information on proper operation & maintenance. Every effort has been
made to ensure the accuracy of this manual. These instructions are not meant to cover every possible
condition and situation that may occur. We reserve the right to change this product at any time without
prior notice.
IF THERE IS ANY QUESTION ABOUT A CONDITION BEING SAFE OR UNSAFE,
DO NOT OPERATE THIS PRODUCT!
CALL US FIRST FOR HELP!
If you experience a problem, have questions or need parts for this product, call Customer Service at
1-866-460-9436, Monday-Friday, 8 AM - 4 PM Central Time. A copy of the sales receipt is required.
FOR CONSUMER USE ONLY – NOT FOR PROFESSIONAL USE.
KEEP THIS MANUAL, SALES RECEIPT & APPLICABLE WARRANTY FOR FUTURE
REFERENCE.
CALIFORNIA PROPOSITION 65
WARNING: This product may contain chemicals known to the State of California to cause
cancer and birth defects or other reproductive harm. For more information, view OEHHA's
Proposition 65 webpage: https://www.p65warnings.ca.gov
Q J

Item # AUGER43 Instruction Manual
2
IMPORTANT SAFETY INSTRUCTIONS
Accurate assembly and safe and effective use of the auger is the owner’s responsibility.
Read and follow all safety instructions. Carefully follow all assembly instructions.
Maintain the auger according to directions and schedule included in this operator’s manual.
Ensure that anyone who uses the auger is familiar with all controls and safety precautions.
IMPORTANT SAFETY PRECAUTIONS
Operate the auger according to the safety instructions and recommendations outlined here and inserted throughout the text. Anyone
who uses this auger must read the instructions and be familiar with the controls.
Do not carry the auger power head between holes with the engine running.
The auger should not rotate when the engine is idling. If it does rotate when engine is idling, contact Customer Service for instructions.
Keep hands, feet, hair and loose clothing away from any moving parts on engine and auger.
Do not allow children to operate this power auger. Do not allow adults to operate the auger without proper instruction.
Do not operate any power equipment under the influence of alcohol or drugs.
Engine should be turned off and cool, spark plug wire must be removed from spark plug before any repairs are attempted.
Temperature of muffler and nearby areas may be hot.
Never run engine indoors or in an enclosed area. Engine exhaust contains carbon monoxide, an odorless and deadly gas.
If the earth auger will not turn in a hole, turn engine off and allow to cool before attempting to remove it manually.
Do not let anyone who does not fully understand the manual thoroughly to operate the auger.
When operating the auger, make sure to keep bystanders 50 ft away.
NOTE: Do not use an earth auger in the ice.
CAUTION
CAUTION INDICATES YOU, OR YOUR EQUIPMENT, CAN BE HURT IF THE SAFETY
INSTRUCTIONSTHATFOLLOWTHISSIGNALWORDARENOTOBEYED
IMPORTANT
INDICATES HELPFUL INFORMATION FOR PROPER ASSEMBLY, OPERATION, OR
MAINTENANCEOFYOUREQUIPMENT.
IMPORTANT
THIS ENGINE USES A GAS/OIL MIXTURE. DO NOT RUN ON STRAIGHT GAS ONLY, ENGINE
DAMAGEWILLRESULT.

Item # AUGER43 Instruction Manual
3
ENGINE SAFETY PRECAUTIONS
Warning: Carbon Monoxide Poisoning
All engines contain carbon monoxide in their exhaust. Carbon monoxide is a deadly, colorless, tasteless, odorless gas which may be
present even if you do not smell or see any engine exhaust. Levels of carbon monoxide, which can be deadly, can be present for days
in an enclosed area that has poor ventilation. Any level of carbon monoxide, if inhaled, can cause headaches, drowsiness, nausea,
dizziness, confusion and eventually death. If you experience any of these symptoms, seek fresh air and medical attention immediately.
Preventing Carbon Monoxide Poisoning
Never run engine indoors.
Never try to ventilate engine exhaust indoors. Carbon monoxide can reach dangerous levels very quickly.
Never run engine outdoors where exhaust fumes may be pulled into abuilding.
Never run engine outdoors in a poorly ventilated area where the exhaust fumes maybe trapped and not easily taken away. (Examples
include: in a large hole or areas where hills surround your working area.)
Never run engine in an enclosed or partially enclosed area. (Examples include: buildings that are enclosed on one or more sides, under
tents, carports or basements.)
Always run the engine with the exhaust and muffler pointed in the direction away from the operator.
Never point the exhaust muffler towards anyone. People should always be many feet away from the operation of the engine and its
attachments.
Gasoline Fires or handling Fuel Safely
Fuel and fuel vapors are highly flammable. Never use fuel where a spark or flame may be present. Never use fuel where a potential
source of ignition could occur. (Examples include: hot water or space heaters, clothes dryer, electric motors, etc.)
Keep flames and sparks away from engine and fuel to prevent fires. Fuel fires spread very quickly and are highly explosive.
Prevention of Gasoline Fires
Never fill your fuel tank with fuel indoors. (Examples include: basement, garage, barn, shed, house, porch, etc.)
Always fill fuel tank outside in a well ventilated area.
Never remove the fuel cap or add fuel with the engine running. Stop engine and allow to cool before filling.
Never drain fuel from engine in an enclosed area.
Always wipe up excess (spilled) fuel from engine before starting. Clean up spilled fuel immediately.
Allow spilled fuel to dry, after wiping and before starting.
Allow fuel fumes/vapors to escape from the area before starting engine.
Test the fuel cap for proper installation before starting and using engine.
Always run the engine with fuel cap properly installed on the engine and gas cap vent screw unscrewed.
Replace fuel cap that allows gas to spill or leak.
Never smoke while refilling engine fuel tank.
Prevent fire and explosion caused by static electric discharge. Use only non-metal, portable fuel containers approved by the
Underwriter’s Laboratory (U.L.) or the American Society for Testing & Materials (ASTM).
Do not store engine with fuel in fuel tank indoors. Fuel and fuel vapors are highly explosive.
When storing, screw down gas cap vent screw tightly.
Never pour fuel from engine fuel tank.
Never siphon fuel by mouth to drain fuel tank.
Always have an adult fill the fuel tank.
Never allow an adult or anyone under the influence of drugs or alcohol to fill engine.
Never allow children to fill the engine.

Item # AUGER43 Instruction Manual
4
BURNS AND FIRES
The muffler, muffler guard and other parts of the engine become extremely hot during the operation of the engine. These parts remain
extremely hot after the engine has stopped.
Prevention of Burns and Fires
Never remove the muffler guard from the engine.
Never touch the muffler guard because it is extremely hot and will cause severe burns.
Never touch parts of the engine that become hot after operation.
Always keep materials and debris away from muffler guard and other hot parts of the engine to avoid fires.
PARTS LOCATION:
1. Recoil starter
2. Muffler
3. Sparkplug
4. Choke lever
5. Handle
6. Air filter
7. Transmission complete
8. Pin shaft
9. Auger
10. Fuel tank cap
11. Assembly Trigger
12. Cotter pin
CAUTION
HOT GASES ARE A NORMAL BY-PRODUCT OF A FUNCTIONING CATALYTIC CONVERTER.
FOLLOW ALLSAFETYINSTRUCTIONSTOPREVENTBURNSANDFIRES.
Item # AUGER43 Instruction Manual
5
OPERATION
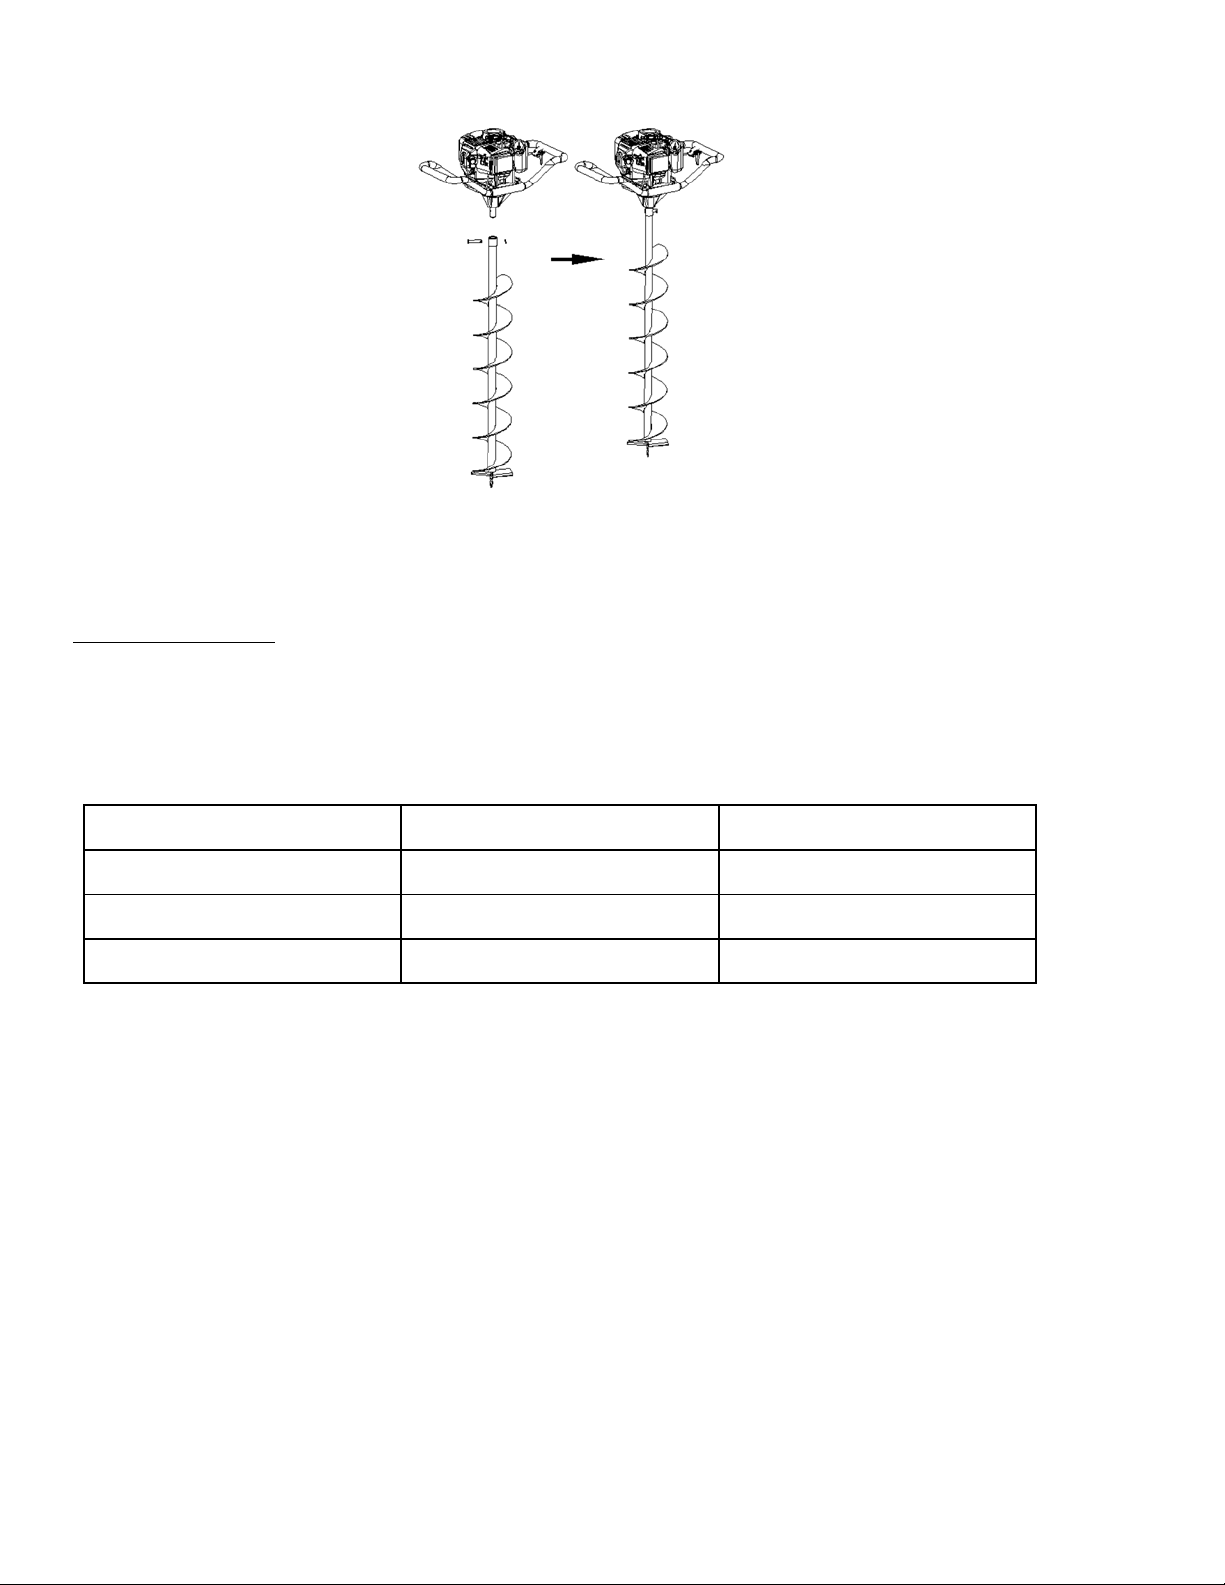
Assembly before use:
1. Set the auger on the output shaft,
then insert the pin shaft, then lock it
with cotter pin.
PREPARING ENGINE FOR STARTING
GAS AND OIL QUALITY
To operate the engine, we recommend using quality 2 cycle oil to ensure that the engine operates correctly throughout the life of the
engine. Use unleaded regular gas only.
Mixture
Run earth auger with a 50:1 ratio
GAS
OIL
RATIO
1 gallon
2.5 ounces
50:1
2 gallons
5 ounces
50:1
5 gallons
13 ounces
50:1

Item # AUGER43 Instruction Manual
6
MIXING FUEL AND FILLING GAS TANK
Mixing Fuel
Fuel must be mixed in a container outside in a well ventilated area.
Fill certified fuel container 1/4 full of recommended fuel.
Add recommended amount of 2 cycle oil.
Screw container cap on straight and tight.
Shake the container to mix fuel and oil.
Unscrew gas cap slowly to vent, add the remainder of fuel requirements.
Wipe away any spilled fuel or oil and allow to evaporate before moving or transporting.
Filling Gas Tank
Shut-off engine and allow engine to completely cool before refilling the gas tank.
Move to a well ventilated area, outdoors, away from flames and sparks.
Clean debris from area around the gas cap.
Loosen gas cap slowly. Carefully add fuel without spilling.
Do not fill gas tank completely full, allow space for fuel to expand.
Immediately replace gas cap and tighten. Wipe off spilled fuel and allow to dry before starting engine.
CAUTION
‘
DO NOTALTER/MODIFYENGINEORAUGER:
AVOID INJURY! NEVER ALTER OR MODIFY THE ENGINE FROM THE FACTORY. SERIOUS
INJURYORDEATHMAYOCCURIFENGINEISMODIFIEDORALTERED.
AVOID INJURY!
WHEN WORKING ON OR REPLACING PARTS FOR THE ENGINE OR AUGER
YOU MUST ALWAYS DISCONNECT SPARK PLUG WIRE FROM THE SPARK PLUG AND KEEP
ITAWAYFROMTHESPARKPLUG.
AVOIDINJURY!ALWAYSWEARHEARINGPROTECTIONWHILEOPERATIONENGINE.
AVOID INJURY! PLEASE DO NOT START YOUR EARTH AUGER UNTIL YOU HAVE READ THE
PREVIOUS SECTION OF THIS MANUAL. IF YOU HAVE READ THESE, FOLLOW THE STEPS
BELOWTOSTARTYOUREARTHAUGER.
AVOID INJURY! NEVER STORE ENGINE WITH GAS IN THE TANK INDOORS. FUEL AND FUEL
VAPORSAREHIGHLYFLAMMABLE.
AVOID INJURY! NEVER MIX FUEL AND OIL DIRECTLY IN ENGINE GAS TANK. USE ONLY
NON-METAL, PORTABLE FUEL CONTAINERS APPROVED BY THE UNDERWRITER’S
LABORATORY(U.L.)ORTHEAMERICANSOCIETYFORTESTIING&MATERIALS(ASTM).
AVOIDINJURY!ANADULT MUSTALWAYSHANDLEANDFILLTHEENGINEWITHFUEL.
AVOID INJURY! ALWAYS HANDLE FUEL IN A WELL VENTILATED AREA, OUTDOORS, AWAY
FROMFLAMESORSPARKS.

Item # AUGER43 Instruction Manual
7
NORMAL OPERATION
The clutch will transfer maximum power after about two hours of normal operation. During this break-in period clutch slippage may
occur. The clutch should be kept free of oil or other moisture for efficient operation.
Drill holes without placing excessive body weight on the unit. The auger operates most efficiently with a shaving action caused by the
weight of the unit itself.
Never run engine indoors. Exhaust fumes are deadly.
To attach auger to power head, align hole at top of auger shaft with the output shaft hole. Insert the pin shaft, then lock it with cotter pin.
NOTE: The ends of the bolt should be flush with the auger collar. Bolt head and thread end should never go beyond earth collar.
USING THE SCREW TYPE, MANUAL VENTING GAS CAP
Your earth auger is equipped with a screw type, manual venting gas cap.
Before starting the engine, turn the screw in the top of the gas cap all the way open (counterclockwise) to its venting position. To ensure
that gas will not spill during use, check that the gas cap is screwed on tightly and the gas cap screw is in the venting position.

Item # AUGER43 Instruction Manual
8
After using the power earth auger and before putting away or transporting it in a vehicle, screw the gas cap screw on (clockwise) tightly.
This will prevent gas from leaking during storage. The gas cap will not leak gas during storage if the gas cap is tight and the screw at
the top is tight.
NOTE: When storing unit in an upright position for pro-longed periods of time in warm weather, vent gas cap to prevent gas from
leaking from carburetor.
STARTING AND STOPPING ENGINE
Move engine to a well ventilated area, outdoors, to prevent carbon monoxide poisoning.
Move to an area away from flames or sparks, to avoid ignition of vapors if present.
Remove all debris from air cleaner holes and gas cap to ensure proper air flow.
COLD ENGINE START
Starting engine for first time or after engine has cooled of after running out of fuel.
Open gas cap vent screw all the way (counterclockwise).
Move choke lever to RUN or OFF position.
NOTE: Choke must be in the RUN or OFF position when pushing or using the primer bulb.
Prime unit until primer hose is filled with gas.
NOTE: When using the primer bulb, allow the bulb to return completely to its original position between pushes.
Move choke lever to CHOKE or ON position.
NOTE: CHOKE position is defined by moving the choke lever as far to the ON position as possible.
Push rocker switch to the ON position. Squeeze throttle control wide open with right hand. Grasp starter handle with left hand and pull
out slowly, until it pulls slightly harder. Without letting starter handle retract, pull rope with a rapid full arm stroke. Let it return to its
original position very slowly until unit fires or runs. Repeat this step every time the starter rope is pulled.
NOTE: If engine fails to start after 5-6 pulls, push primer 1 time and pull starter rope again.
After engine starts running, move choke lever to HALF CHOKE position until unit runs smoothly.
NOTE: HALF CHOKE is defined when the choke lever is between CHOKE and RUN or ON and OFF.
Move choke lever to RUN or OFF position and move throttle to desired speed.
NOTE: Run at full throttle when possible. Do not let unit idle for extended periods of time.
To stop engine, push rocker switch to OFF position.
WARM ENGINE START
Open gas cap vent screw all the way (counterclockwise).
Move choke lever to CHOKE or ON position
NOTE: CHOKE position is defined by moving the choke lever as far to the ON position as possible.
CAUTION
AVOID INJURY! ALWAYS HANDLE FUEL IN A WELL VENTILATED AREA, OUTDOORS, AWAY
FROMFLAMESORSPARKS.
AVOID INJURY! DO NOT START ENGINE IF FUEL IS SPILLED. WIPE OFF EXCESS FUEL AND
ALLOWTODRY.REMOVEENGINEFROMAREAATOAVOIDSPARKS.

Item # AUGER43 Instruction Manual
9
HOT ENGINE START:
Open gas cap vent screw all the way (counterclockwise).
Continue with Cold Engine Starting.
If engine does not fire, refer to Warm Engine Starting.
DO NOT attempt to start engine in the following ways:
DO NOT use starting fluid DO NOT spray flammable liquids or vapors into air cleaner, carburetor or spark plug chamber.
DO NOT remove spark plug and pull on starter rope. Flammable fuel can spray out & ignite from a spark from spark plug.
CAUTION
AVOID INJURY! ALWAYS HANDLE FUEL IN A WELL VENTILATED AREA, OUTDOORS, AWAY
FROMALAMESORSPARKS.
AVOID INJURY! DO NOT START ENGINE IF FUEL IS SPILLED. WIPE OFF EXCESS FUEL AND
ALLOWTODRY.REMOVEENGINEFROMAREATOAVOIDSPARKS.
AVOID INJURY! IF AUGER IS MOUNTED TO ENGINE, ALL SAFETY GUARDS MUST BE
SECURELYONTOAVOIDSERIOUSINJURY.
AVOID INJURY! STARTER ROPE CAN CAUSE AN UNANTICIPATED JERK TOWARDS ENGINE.
PLEASEFOLLOWINSTRUCTIONS TOAVOIDINJURY.
AVOID INJURY! NEVER LEAVE ENGINE RUNNING WHILE UNATTENDED. TURN OFF AFTER
EVERYUSE
AVOID INJURY!NEVER CARRYPOWERHEADANDAUGER BETWEENHOLESWHILEENGINE
ISRUNNING.
WARNING
AVOID INJURY! MAKE SURE THE UNIT IS IN A STABLE POSITION BEFORE PULLING THE
STARTERHANDLE.
AVOID INJURY! WHEN THE UNIT STARTS TO FIRE OR RUN, RELEASE THE THROTTLE
CONTROL MOMENTARILY WITH YOUR RIGHT HAND AND RETURN YOUR LEFT HAND TO
THE HANDLEBAR POSITION TO MAINTAIN CONTROL AND STABILITY OF THE UNIT WITH
BOTHHANDS.

Item # AUGER43 Instruction Manual
10
SPECIFICATION
Model
AUGER43
Engine Model
AUGER43
Engine Type
Forced Air-cooled
2-Stroke
Displacement
43cc
Max. Output
1.1kW
Fuel
Gas/Oil Mixture (50:1)
Fuel Tank Capacity
28.75 ounces
Ignition System
TCI
Starting System
Recoil
Gear Ratio
30:1
Max. Engine Speed
8500 r/min
Clutch Engine Speed
3700 +/- 150 r/min
Idle Engine Speed
3000 +/- 300 r/min
Auger Speed
0-280 r/min
Spark plug type/ model
L6
CARB / EPA
Approved
MAINTENANCE AND STORAGE
AUGER MAINTENANCE
The gear case has 4 oz. of grease installed at the factory. It is recommended that once a year the gear case be split and the grease
level checked. Add grease only if level of grease is below top of the gears. DO NOT OVERFILL.
Keep all screws, nuts, and bolts tight.
For cold weather operation, store the unit in a cool environment. Transferring the unit from a warm to a cold place can cause the
buildup of harmful condensation.
If blade performance decreases, turn unit off and disconnect spark plug wire. Carefully inspect cutting edge of blade for any signs of
wear. If blades show any of these signs, they need to be sharpened or replaced.

Item # AUGER43 Instruction Manual
11
ENGINE MAINTENANCE
Cooling Fins
Cooling fins, air inlets and linkages must be free from any debris before each use.
Air Filter
Never run engine without air cleaner properly installed. Added wear and engine failure may occur if air cleaner is not installed. Service
air cleaner every 3 months or after 20 hours of operation. Clean filter daily in extremely dusty conditions
Steps for Cleaning Air Filter
Wash in warm water with mild soap until dirt and debris are removed. Press filter when washing, do not twist.
Rinse in warm water until soap and dirt are removed.
Dry filter by wrapping in a clean cloth and pressing filter until it is dry.
Apply oil to the entire filter.
Remove excess oil.
Attach the filter and air cleaner cover to the engine.
CAUTION!
AVOID INJURY! ENGINE MUST BE TURNED OFF AND COOL, AND SPARK PLUG WIRE MUST BE REMOVED FROM SPARK
PLUG BEFORE CHECKING AND ADJUSTING ENGINE OR EQUIPMENT.
AVOID INJURY! TEMPERATURE OF MUFFLER AND NEARBY AREAS MAY EXCEED 150F (65C) AVOID THESE AREAS.
AVOID INJURY! CHECK AUGER OFTEN FOR LOSSE NUTS AND BOLTS. KEEP THESE ITEMS TIGHTENED.
AVOID INJURY! NEVER STORE ENGINE WITH FUEL IN THE TANK INSIDE A BUILDING.
POTENTIALSPARKSMAYBEPRESENTFORIGNITIONOFFUELANDFUELVAPORS.
AVOID INJURY! AN ADULT MUST ALWAYS DO MAINTENANCE AND REPAIR ON ENGINE AND AUGER.
AVOID INJURY! ENGINE MUST BE SHUT-OFF, COOL, AND THE SPARK PLUG WIRE REMOVED BEFORE ANY REPAIR OR
MAINTENANCE CAN BE DONE.

Item # AUGER43 Instruction Manual
12
Spark Plug
Recommended spark plug is L6, which cross references to Champion CJ8.
Check spark plug every 50 operating hours. Disconnect the spark plug cap, and clean any debris from around the spark plug area.
Remove spark plug and replace if any of the following occur; pitted electrodes, burned electrodes, cracked porcelain, or deposits
around electrodes.
After analysis, seat spark plug and tighten with spark plug wrench.
Reinstall original spark plug, tighten additional 1/2 turn.
Installing new spark plug, adjust spark plug gap to .030” and tighten additional 1/8–1/4 turn.
NOTE: Loose spark plug may overheat and damage engine. Over tightened spark plug may damage threads in the cylinder head.
Carburetor
Never tamper with factory setting of the carburetor.
TRANSPORTING YOUR AUGER
Never transport engine inside an enclosed space or vehicle. Fuel or fuel vapors may ignite causing serious injury or death.
If fuel is present in the fuel tank, transport it in an open vehicle in an upright position.
If an enclosed vehicle must be used, remove gas into an approved red fuel container. DO NOT siphon by mouth.
Run engine to use up the fuel in the carburetor and fuel tank. Always run engine in a well ventilated area.
Wipe away any spilled fuel from engine and earth auger. Allow to dry.
LONG TERM STORAGE
If your auger will not be used for more than one month, prepare it for long term storage.
Steps for Long Term Storage
Add fuel stabilizer according to manufacturer’s instructions.
Run engine for 10-15 minutes to ensure that the stabilizer reaches the carburetor.
Remove the remainder of the fuel from the gas tank into an approved fuel container.
Remove auger from power head and apply a thin layer of grease to the output shaft.
Store auger and power head (engine) in a vertical position.
Remove all debris from auger and power head (engine).

Item # AUGER43 Instruction Manual
13
TROUBLESHOOTING
PROBLEM
POSSIBLECAUSE
REMEDY/ ACTION
Engine will not start
1. Power switch off
1. Flip switch to ON position
2. Spark plug wire disconnected
2. Connect spark plug wire to spark plug
3. Out of fuel
3. Refuel
4. Spark plug wet, faulty or improperly gapped
4. Clean, replace or gap spark plug
5.Throttle control not held wide open
5. Hold throttle control wide open then pull
recoil handle
6.Fuel line hose not positioned in bottom of gas tank
6. Push fuel line down into fuel in gas tank
Engine runs rough,
1.Dirty air filter
1.Clean or replace air filter
floods
2.Choke partially engaged
2.Turn off choke
3.Carburetor out of adjustment
3.Call customer service
Auger cuts slowly
1. Dull blade
1.Buy new blade, or have blade sharpened at
factory
2. Damaged fish tail point
2.Replace fish tail point

Item # AUGER43 Instruction Manual
14
PROBLEM
POSSIBLECAUSE
REMEDY/ ACTION
Engine is hard to start
1. Stale fuel
1.Drain old fuel and replace with fresh. Use
gas stabilizer at end of season
2. Spark plug wire loose
2.Make sure spark wire is securely attached to
spark plug
3. Dirty carburetor
3.Clean carburetor, use gas stabilizer, new
gas can
4.Throttle control not held wide open
4.Prime unit 3 more times, then hold throttle
wide open when pulling recoil handle
Engine misses or lacks power
1. Clogged gas tank
1.Remove and clean
2. Clogged air filter
2.Clean or replace
3. Carburetor out of adjustment or bad
3.Call customer service
4. Spark plug wet, faulty or improperly gapped
4.Clean, replace or gap spark plug
Engine runs, then quits
1.Gas cap not venting
1.Open manual venting gas cap screw all the
way open (counter clockwise)
2. Plugged fuel filter
2.Clean or replace
3. Carburetor out of adjustment or bad
3. Call customer service
Engine revs too high
1. Carburetor out of adjustment
1. Call customer service
Auger turns at idle
1.Idle speed too high
1. Adjust idle speed lower
2.Broken clutch spring
2. Replace spring
Auger turns, but has no power
1.Choke on
1.Turn off choke after engine is running
2.Carburetor out of adjustment
2. Call customer service
3.Broken transmission
3. Call customer service
4.Worn clutch shoes
4.Replace clutch shoes and spring
5.Worn engine lower seat
5. Call customer service
Auger jumps
1. Blade damaged
1.Replace with new blade

Item # AUGER43 Instruction Manual
15
PARTS DIAGRAM

Item # AUGER43 Instruction Manual
16
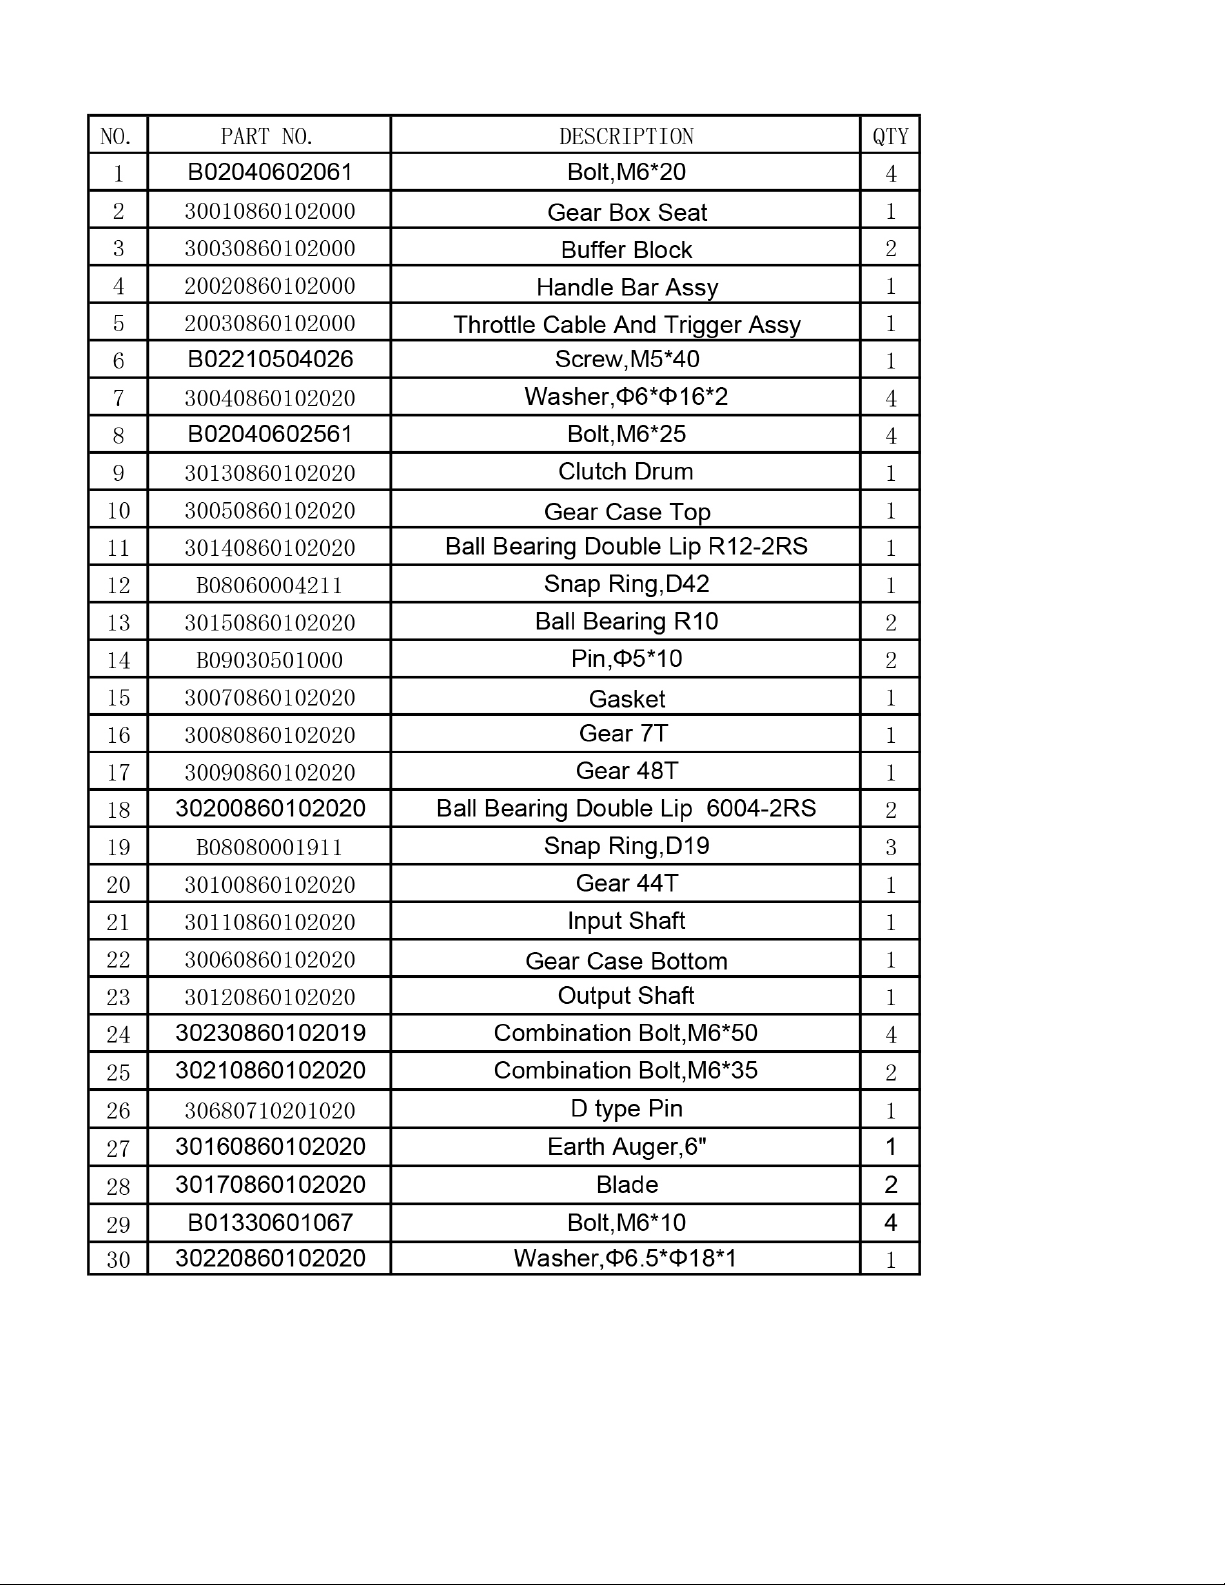
PARTS LIST

Item # AUGER43 Instruction Manual
17
PARTS DIAGRAM
Item # AUGER43 Instruction Manual
18
PARTS LIST

Item # AUGER43 Instruction Manual
19
EMISSION CONTROL SYSTEM WARRANTY
Buffalo Corporation
Your Warranty Rights and Obligations:
The California Air Resources Board, U.S. EPA and Buffalo Corp are pleased to explain the Emission Control System Warranty on your 2018 model year
outdoor power equipment engine.
California
In California, new spark-ignited small off-road equipment engines must be designed, built and equipped to meet the State’s stringent anti-smog
standards.
Other States, U.S. Territories
In other areas of the United States, your engine must be designed, built and equipped to meet the U.S. EPA emission standards for spark-ignited
engines at or below 19 kilowatts.
All of the United States
Buffalo Corp must warrant the emission control system on your power equipment engine for the periods of time listed below provided there has been no
abuse, neglect or improper maintenance of your power equipment engine. Where a warrantable condition exists, Buffalo Corp will repair your power
equipment engine at no cost to you including diagnosis, parts and labor.
Your emission control system may include parts such as: carburetors or fuel injection system, ignition system, catalytic converters, fuel tanks, valves,
filters, clamps, connectors, and other associated components. Also, included may be hoses, belts, connectors, sensors, and other emission-related
assemblies.
Manufacturer’s Warranty Coverage:
The emission control system is warranted for two years. If any emissions-related part on your engine is defective, the part will be repaired or replaced by
Buffalo Corp.
Owner’s Warranty Responsibility
As the power equipment engine owner, you are responsible for the performance of the required maintenance listed in your owner’s manual. Buffalo Corp
recommends that you retain all receipts covering maintenance on your power equipment engine, but Buffalo Corp cannot deny warranty solely for the
lack of receipts or for your failure to ensure the performance of all scheduled maintenance.
As the power equipment engine owner, you should however be aware that Buffalo Corp may deny your warranty coverage if your power equipment
engine or a part has failed due to abuse, neglect, improper maintenance or unapproved modifications.
You are responsible for presenting your power equipment engine to distribution center or service center authorized by Buffalo Corp as soon as the
problem exists. The warranty repairs should be completed in a reasonable amount of time, not to exceed 30 days.
If you have any questions regarding your warranty rights and responsibilities, you should contact
Buffalo Corp customer service representative at 1-866-460-9436 or email customer service: [email protected]
DEFECTS Warranty Coverage:
Adopted by the Air Resources Board, Buffalo Corp warrants to the ultimate purchaser and each subsequent purchaser that the small off-road engine
(SORE) (1) has been designed, built and equipped so as to conform with all applicable regulation; and (2) is free from defects in materials and
workmanship that cause the failure of a warranted part to conform with those regulations as may be applicable to the terms and conditions stated below.
(a) The warranty period begins on the date the engines is delivered to an ultimate purchaser or first placed into service. The warranty period is two
years.
(b) Subject to certain conditions and exclusions as stated below, the warranty on emissions related parts is as follows:
(1) Any warranted part that is not scheduled for replacement as required maintenance in your Owner’s Manual is warranted for the warranty period
stated above. If the part fails during the period of warranty coverage, the part will be repaired or replace by Buffalo Corp according to Subsection (4)
below. Any such part repaired or replaced under warranty will be warranted for the remainder of the period.
(2) Any warranty part that is scheduled only for regular inspection in your Owner’s Manual is warranted for warranty period stated above. Any such part
repaired or replaced under warranty will be warranted for the remaining warranty period.
(3) Any warranted part that is scheduled for replacement as required maintenance in your Owner’s Manual is warranted for the period of time before the
first scheduled replacement date for that part. If the part fails before the first scheduled replacement, the part will be repaired or replaced by Buffalo Corp
according to the Subject (4) below. Any such part repaired or replaced under warranty will be warranted for the remainder of the period prior to the first
scheduled replacement point for the part.
(4) Repair or replacement of any warranted part under the warranty provisions herein must be performed at a warranty station at no charge to the owner.
(5) Notwithstanding the provisions herein, warranty services or repair will be provided at all of our distribution centers that are franchised to service the
subject engines.
(6) The engine owner must not be charged for diagnostic labor that leads to the determination that a warranted part is in fact defective, provided that
such diagnostic work is performed at a warranty station.
(7) Buffalo Corp is liable for damages to other engine components proximately caused by a failure under warranty of any warranted part.
(8) Throughout the engine warranty period stated above, Buffalo Corp will maintain a supply of warranted parts sufficient to meet the expected demand
for such parts.
(9) Any replacement part may be used in the performance of any warranty maintenance or repairs and must be provided without charge to the owner.
Such use will not reduce the warranty obligations of Buffalo Corp.
(10) Add-on or modified parts that are not exempted by the Air Resources Board may not be used. The use of any non-exempted add-on or modified
parts by the ultimate purchaser will be grounds for disallowing a warranty claims. Buffalo Corp will not be liable to warrant failures of warranted parts
caused by the use of a non-exempted add-on or modified part.
(11) The manufacturer issuing the warranty shall provide any documents that describe that manufacturer’s warranty procedures or policies within five
working days of request by the Air Resources Board.

Item # AUGER43 Instruction Manual
20
EMISSION WARRANTY PARTS LIST
(1) Fuel Metering System:
(a) Gasoline carburetor assembly and its internal components
(b) Carburetor gaskets (e) Fuel tank
(c) Fuel line (f) Fuel line fittings
(d) Clamps (g) Pressure regulator (if equipped)
(h) Mixer assembly and its internal components (if equipped)
(2) Air induction system including:
(a) Intake pipe/manifold (b) Air cleaner
(3) Ignition system including:
(a) Spark plug (b) Ignition coil
(4) Catalytic muffler assembly including:
(a) Muffler gasket
201806
(5) Crankcase breather assembly including
(a) Breather connection tube
(6) Fuel tank evaporative emissions control system including:
(a) Purge valves (b) Carbon canister
(c) Canister Mounting Brackets (d) Fuel Cap
(e) Fuel Tank
(7) Miscellaneous items used in above systems including:
(a) Switches (b) Hoses, belts connectors, assemblies
(8) Air injection system
(a) Pulse valve
Table of contents


