5Install Software
Your software works with Windows®2000, XP, and XP Professional x64
Edition and Windows Vista®, and Mac OS®X 10.3.9 to 10.5.x.
Windows
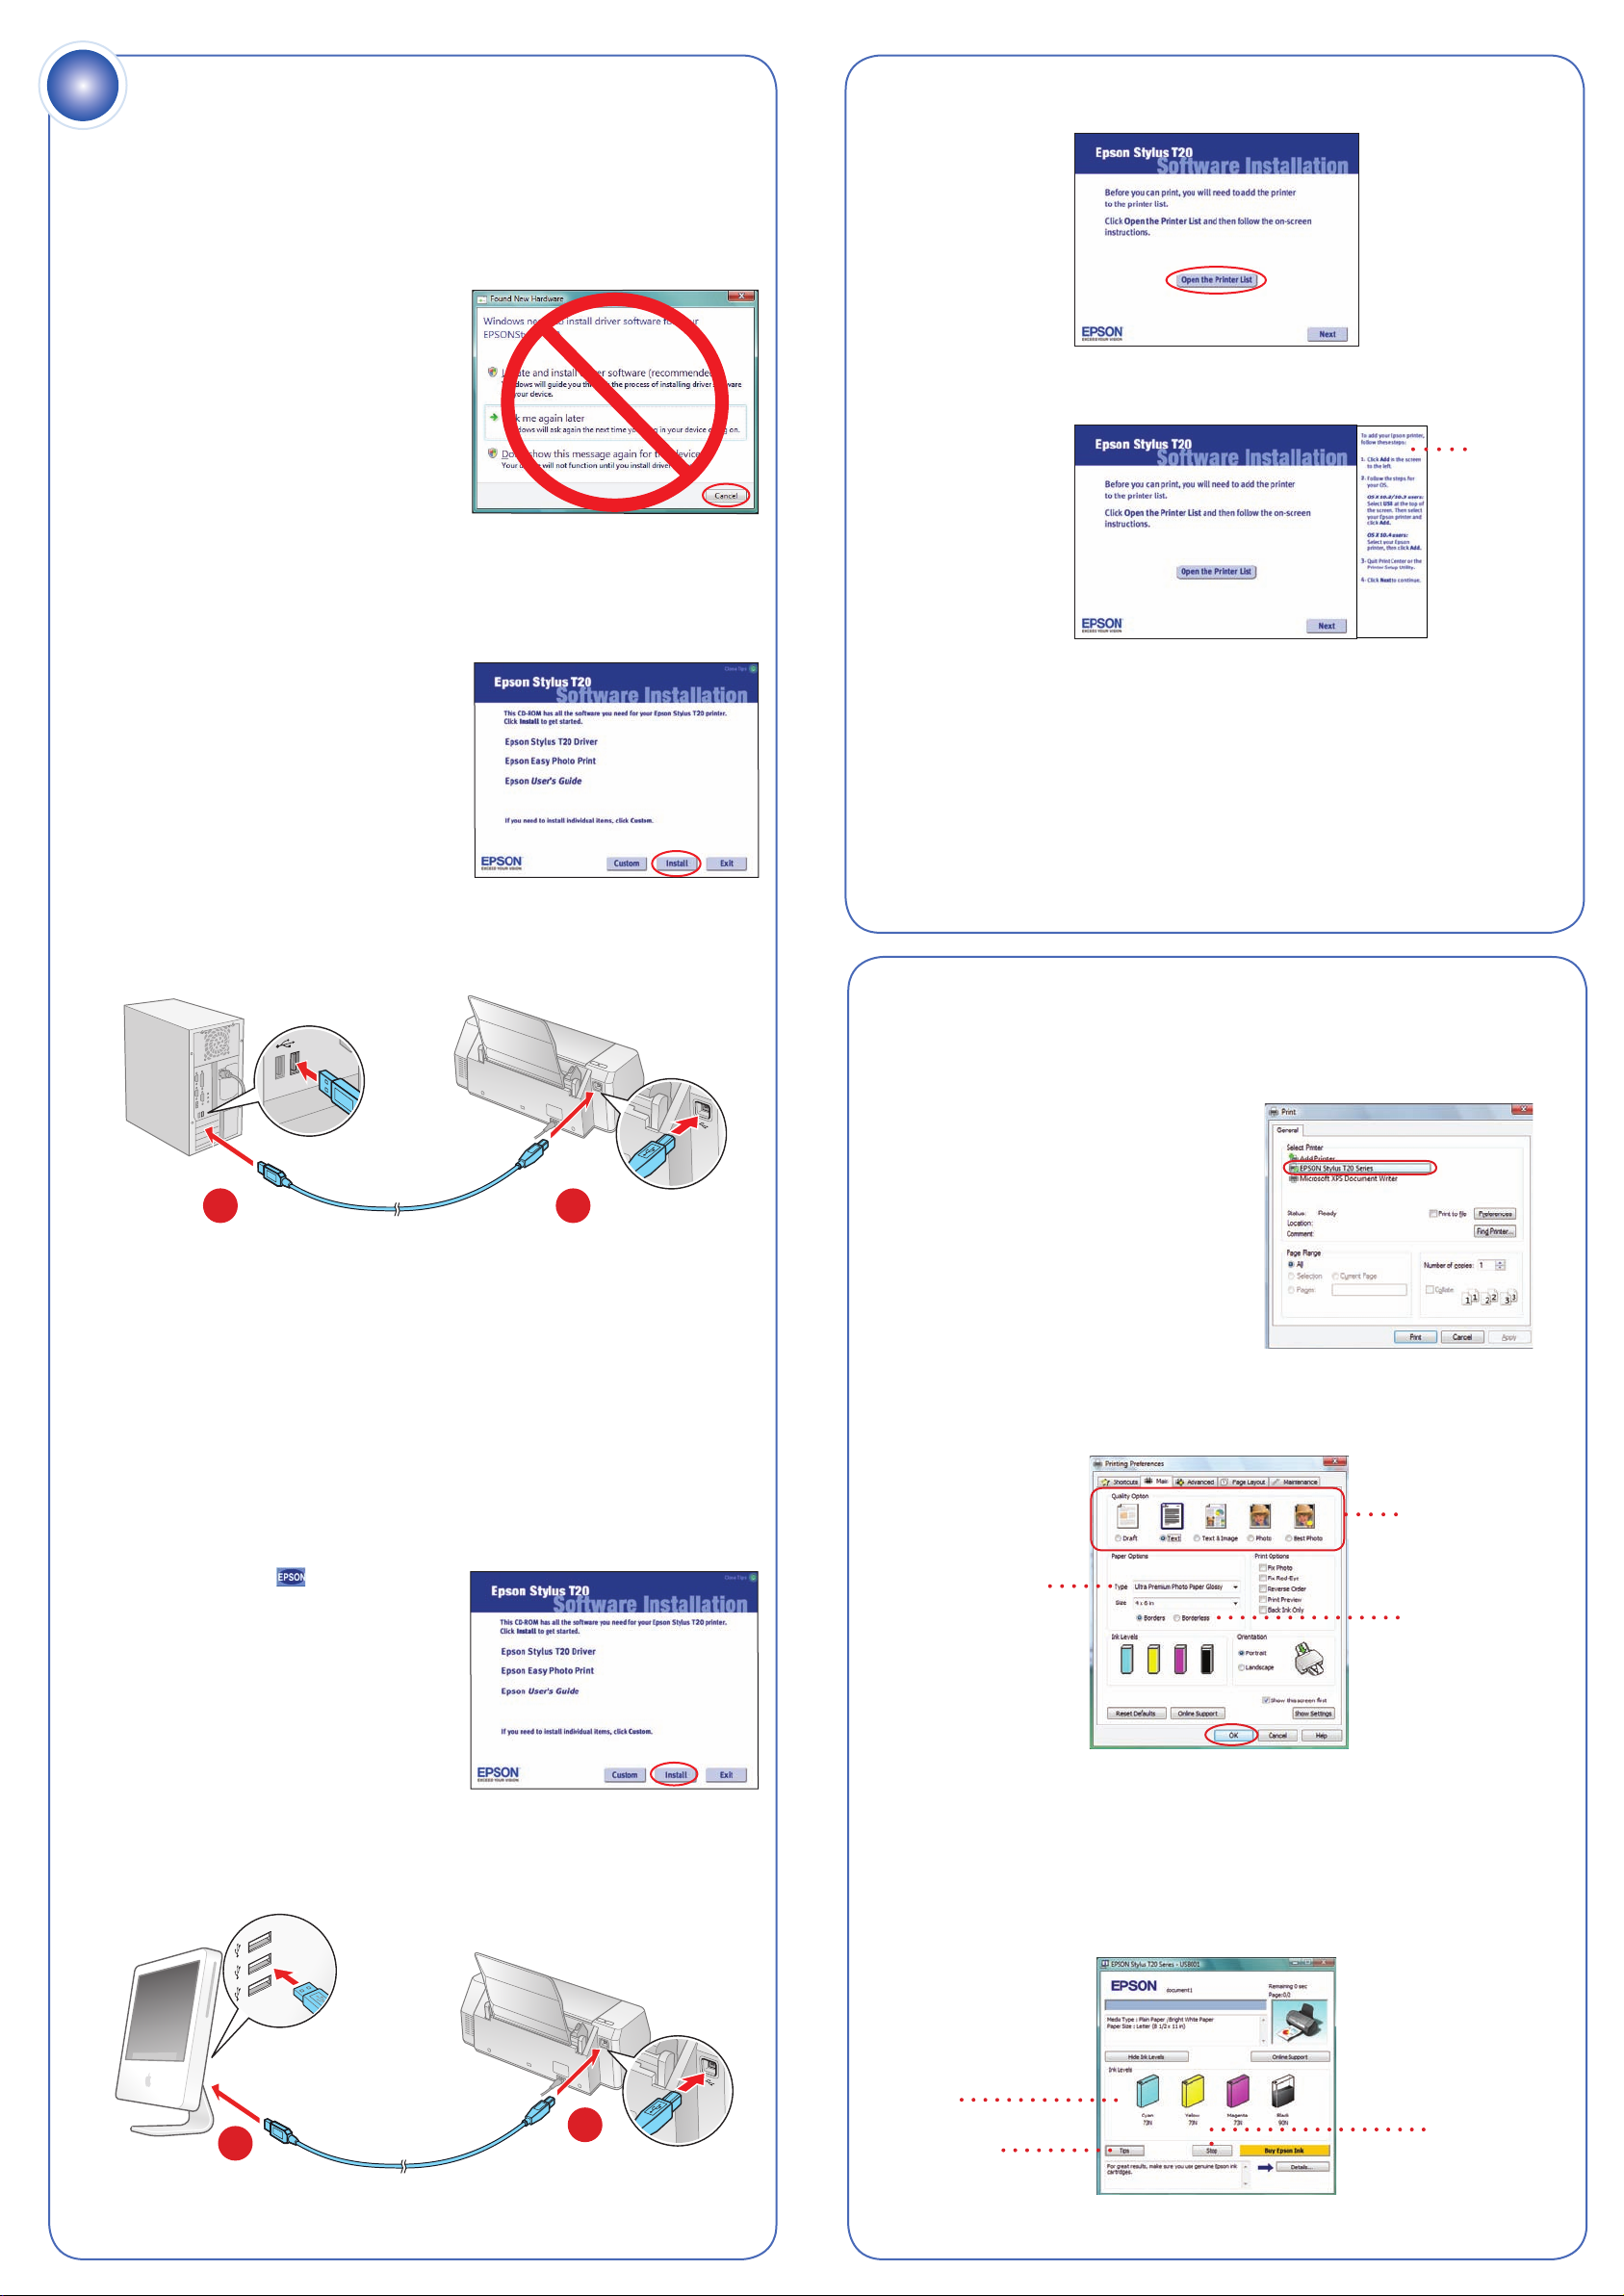
1Make sure your printer is on but NOT
CONNECTED to your computer.
Note: If you see a screen like this,
click Cancel and disconnect the
USB cable. You cannot install your
software that way.
2Insert the Epson Stylus T20 CD.
With Windows 2000 or XP, go to step 4. With Windows Vista, go to
step 3.
3With Windows Vista, if you see
the Auto Play window, click Run
Epsetup.exe. When you see the
User Account Control screen,
click Continue.
4Select English.
5Click Install and follow the
on-screen instructions. Software
installation takes several minutes.
6When prompted, connect the USB cable to the printer and any open
USB port on your computer.
Note: If installation doesn’t continue after a moment, make sure
you securely connected and turned on the printer.
7When you’re done, remove the CD.
You’re ready to print! Follow the instructions in the next column.
Macintosh
1Insert the Epson Stylus T20 CD.
2Double-click the Epson icon.
3When you see the language
selection screen, select English.
4Click Install and follow the
on-screen instructions.
Software installation and
setup take several minutes.
5When prompted, connect the USB cable to the printer and any open
USB port on your computer. Make sure the printer is turned on.
With Mac OS X 10.5.x, go to step 9. With Mac OS X 10.3.9 to 10.4.x,
go to step 6.
6When you see this screen, click Open the Printer List.
7Then follow the tips to the right of the screen to add the printer.
8Click Next again, if necessary.
9Follow the on-screen instructions to install the rest of the software
and print a test page.
10 Eject the CD.
You’re ready to print! Follow the instructions in the next column.
Cut out the card below and keep it with you when
purchasing replacement ink cartridges.
Printing From Windows
1Load plain paper or special Epson®media for the document or photo
you want to print.
2Open your document or photo and
select Print or Print Setup from
the File menu. You see a window
like this:
3Make sure EPSON Stylus
T20 Series is selected.
4Click the Properties or Preferences button. (If you see a Setup, Printer,
or Options button, click it first. Then click Properties or Preferences on
the next screen.) You see the basic print settings window:
5Choose your settings, then click OK.
6Click Print.
After a moment, printing begins and you see this print status window:
Choose your paper
Type and Size
To print borderless,
click here
Select the type of
document
Cancel printing
Current
ink levels
Display tips for
better printing
Look here for answers:
On-screen User’s Guide
Click the T20 User’s Guide desktop shortcut for easy access to
information about your printer.
On-screen help with your software
Select Help or ?when you’re using your software.
Epson Technical Support
www.latin.epson.com
If your country doesn’t appear on the list, contact your nearest Epson
distributor.
Need Paper and Ink?
For the best prints, use genuine Epson ink and paper. Get them from your
local store or contact Epson for dealer referral.
Photo Paper Glossy
Bright, instant-drying paper for great looking photos
and projects. Available in different sizes, with or
without margins.
Genuine Epson Inks
Look for the numbers below to find your cartridges.
It’s as easy as remembering your number!
90N Black 73N Magenta
73N Cyan 73N Yellow
Epson and Epson Stylus are registered trademarks and Epson Exceed Your Vision is a trademark of
Seiko Epson Corporation. DURABrite is a registered trademark of Epson America, Inc.
General Notice: Other product names used herein are for identification purposes only and may be
trademarks of their respective owners. Epson disclaims any and all rights in those marks.
This information is subject to change without notice.
© 2008 Epson America, Inc. 2/08
CPD-25271
Telephone service
Country Telephone number
Argentina (54 11) 5167-0300
Chile (56 2) 230-9500
Colombia (57 1) 523-5000
Costa Rica (50 6) 210-9555
800-377-6627
Country Telephone number
Mexico
Mexico City (52 55) 1323-2052
Other cities 01-800-087-1080
Peru (51 1) 418-0210
Venezuela (58 212) 240-1111
Problems?
If your problem is listed here, try these suggestions. For more information,
see your software Help or your on-screen Epson User’s Guide.
The maintenance light is
on (nothing prints).
You see banding (light
lines) or your printout
is blurry or smeared.
If paper is out, load more paper and press
the maintenance button to resume printing.
If paper is jammed, press the maintenance
button to eject it.
If the paper doesn’t eject, turn off the printer,
open the cover, and pull the paper out from
the front. Then reload paper, turn the printer
on, and press the maintenance button.
The print head nozzles may need cleaning;
see the on-screen User’s Guide for instructions.
The ink cartridges may need replacing. See the
on-screen User’s Guide for instructions.
Make sure the printable side of the paper is
face-up. It’s usually whiter or shinier.
Any Questions?
Printing on a Macintosh
Note: For instructions on printing in Mac OS X 10.5.x, see the on-screen
User’s Guide.
1Load plain paper or special Epson media for the document or photo
you want to print.
2Open the document or photo and select Page Setup from the File
menu. You see the Page Setup window:
3Select Stylus T20 in the Format for menu, and choose your paper size
and document orientation. Then click OK.
4Open the File menu and select Print. You see a window like this one:
5Select Stylus T20 in the Printer menu and open the Print Settings menu:
6Choose your print settings and then click Print.
7 To monitor the progress of your print job in OS X 10.3.9 to 10.4.x, click
the printer icon when it appears in the dock on the bottom of your
desktop.
You see a screen like this:
8 When you’re finished, close the Printer window or Print Center.
Select Stylus T20
Select your Paper Size
Select your document
or image orientation
Select Stylus T20
Select Print Settings
Cancel printing
Select the print job
Pause printing Resume printing
Select Color or Black ink
Select your Media Type
Select higher quality
or faster printing
(if available)
Select Automatic
mode
Select Stylus T20
Tips
Epson®T20 Ink Cartridges
For the best prints, use genuine Epson ink and paper.
73N
73N
73N
73N
73N
73N
90N
90N 90N Black
73N Cyan
73N Magenta
73N Yellow
73N
73N
73N
73N
90N
90N
Printed in XXXXXX
12
12
4113969 Rev.0
1-B C
4113969 Rev.0
1-B M
4113969 Rev.0
1-B Y
4113969 Rev.0
1-B K