6Windows: When you see the Select Your Printer Driver
Type screen, select your desired driver. Then click Next
and follow the instructions on you computer screen.
Mac OS X: The standard Epson driver installs
automatically. If you want to install the PostScript driver,
go to global.latin.epson.com/workforcepro. Then
download and install the file.
Any problems?
The printer makes a loud noise and you see an error
message when you turn it on.
Make sure you remove the protective foam and plastic from
inside the printer.
Network setup was unsuccessful.
• Toprintanetworkstatussheet,pressthe Configurar
button, select Network Settings, then select Confirm
Network Settings. Press the Iniciar Negro or
Iniciar Color button.
• WhenusingTCP/IP,makesureyournetwork’sDHCP
option is enabled.
• IfyouhaveassignedastaticIPaddress,makesureitisnot
being used by another device.
• Trychangingthenetworkcableand/orthenetworkport
connection to your router.
• Disabletherewalltemporarilytoseeifthatmaybe
causing the problem. Contact your firewall manufacturer
for assistance.
The printer’s screen is dark.
Press any button to wake the printer from sleep mode.
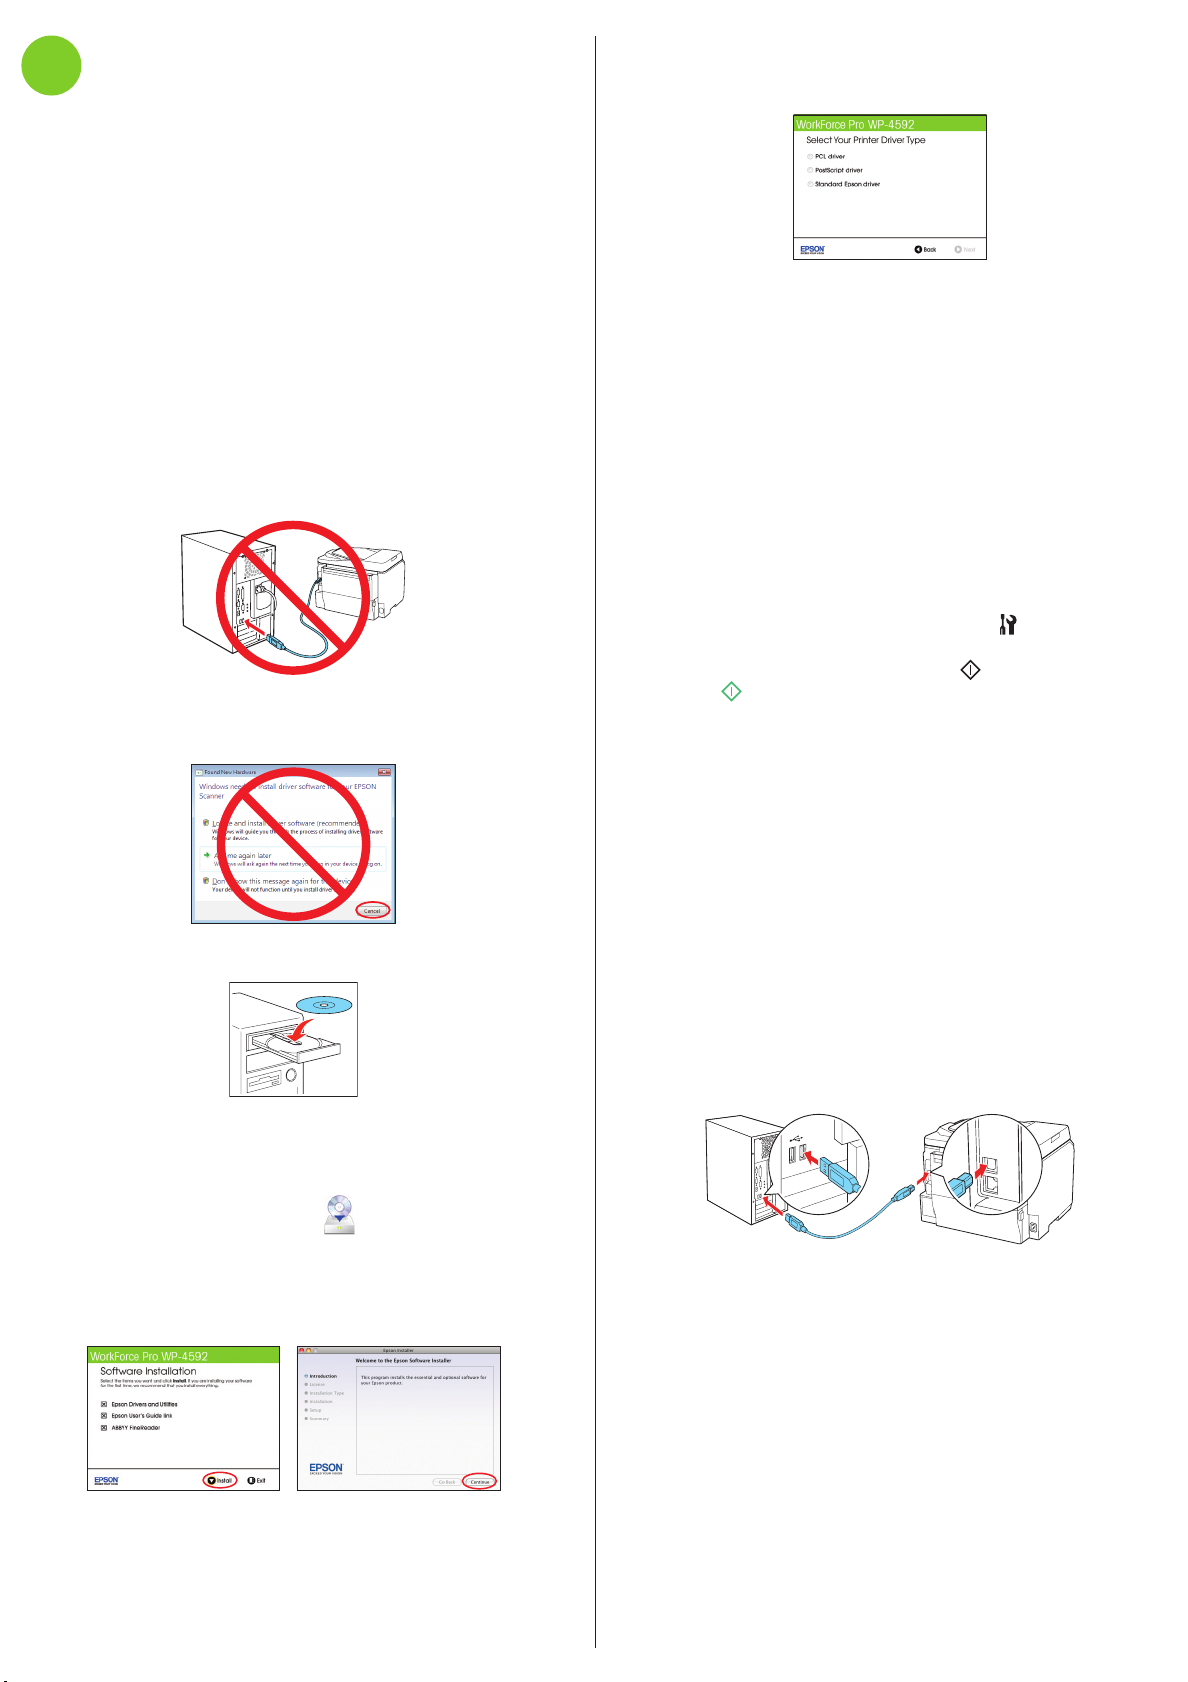
Setup is unable to find my printer after connecting it
with a USB cable.
Make sure it is securely connected as shown:
Printing problems
Printing stops when an ink cartridge is expended. If a
cartridge is expended, you must replace it to continue
printing.
Print quality problems
• Makesureyourpaperisloadedprintablesidedowninthe
cassette (usually the whiter, brighter, or glossy side).
• Ifyounoticelightordarkbandsacrossyourprintoutsor
they are too faint, run a nozzle check to see if the print
head needs cleaning. See the online User’s Guide for more
information.
• Theinkcartridgesmaybelowonink.Checkyourcartridge
levels and replace cartridges, if necessary. See the online
User’s Guide for more information.
Need paper and ink?
Try Epson paper with DURABrite®Ultra Ink for professional
results. For the right supplies at the right time, you can
purchase them from an Epson authorized reseller. To find the
nearest one, contact Epson as described previously or visit
global.latin.epson.com (website available only in Spanish
and Portuguese).
Genuine Epson paper
Epson offers a wide variety of business and photo papers
to meet your needs; visit global.latin.epson.com for
more information (website available only in Spanish and
Portuguese).
Presentation Paper Matte
Smooth, non-glare, instant-drying paper
ideal for reports, newsletters, and graphical
presentations.
Genuine Epson inks
Look for the numbers below to find
your cartridges. It’s as easy as
remembering your number!
WorkForce Pro WP-4592 ink cartridges
Color Standard-capacity High-capacity
Black 677 678
Cyan 677 678
Magenta 677 678
Yellow 677 678
WorkForce, Epson, and DURABrite are registered trademarks, and Epson Exceed Your Vision
is a registered logomark of Seiko Epson Corporation. Designed for Excellence is a trademark
of Epson America, Inc.
General Notice: Other product names used herein are for identification purposes only and
may be trademarks of their respective owners. Epson disclaims any and all rights in those
marks.
This information is subject to change without notice.
© 2011 Epson America, Inc. 11/11 CPD-35708
Printed in XXXXXX
7Install software
If you’re using the product as a laser printer replacement, you
do not need to install any Epson drivers.
Note: To use the Fax Utility and Epson Status Monitor, install the
standard Epson driver. If you want to install multiple drivers, repeat
the software installation process as necessary. For more information,
see your online User’s Guide.
If you want to install any Epson drivers, follow the steps
below.
Note: If a computer does not have a CD/DVD drive, you can
download the software from the Epson website (see “Epson technical
support”).
Caution: Be sure to close any other programs, including any screen
savers and virus protection software, before beginning this software
installation.
1Make sure the printer is NOT CONNECTED to a
computer.
Windows®:IfyouseeaFoundNewHardwarescreen,click
Cancel and disconnect the USB cable. You can’t install your
software that way.
2Insert your product CD.
3Windows: If you see the AutoPlay window, click
Run Setup.exe. If you see the User Account Control
screen, click Yes or Continue.
Mac OS®X: Double-click the Epson icon.
4Select your language, if necessary.
5Click Install (Windows) or Continue (Mac OS X) and
follow the instructions on your computer screen.
Any questions?
On-screen help with your software
Select Help or ?when you’re using your software.
User’s Guide
Click the User’s Guide icon on your desktop (or in the
Applications/Epson Software/Guide folder in Mac OS X)
to access the online User’s Guide and software downloads
(requires an Internet connection). If you don’t have a User’s
Guide icon, you can install it from the CD or go to the Epson
website, as described below.
Epson technical support
Visit global.latin.epson.com/Soporte where you can
download English drivers, view manuals, get FAQs, or e-mail
Epson (website available only in Spanish and Portuguese).
You may also speak with a support specialist by calling:
Argentina (54 11) 5167-0300 Mexico
Bolivia* 800-100-116 Mexico City (52 55) 1323-2052
Chile (56 2) 484-3400 Other cities 01-800-087-1080
Colombia (57 1) 523-5000 Nicaragua* 00-1-800-226-3068
Costa Rica 800-377-6627 Panama* 00-800-052-1376
Dominican Peru
Republic* 1-888-760-0068 Lima (51 1) 418-0210
Ecuador* 1-800-000-044 Other cities 0800-10126
El Salvador* 800-6570 Uruguay 00040-5210067
Guatemala* 1-800-835-0358 Venezuela (58 212) 240-1111
Honduras** 800-0122
Code: 8320
*Contact your local phone company to call this toll free number
from a mobile phone.
**Dial first 7 digits, wait for a message, then enter code.
If your country does not appear on the list, contact your
nearest Epson sales office. Toll or long distance charges may
apply.
Software technical support
ABBYY®FineReader®
(408) 457-9777
www.abbyyusa.com