Printed in Japan
404801400E
03.11-.8A(C05)
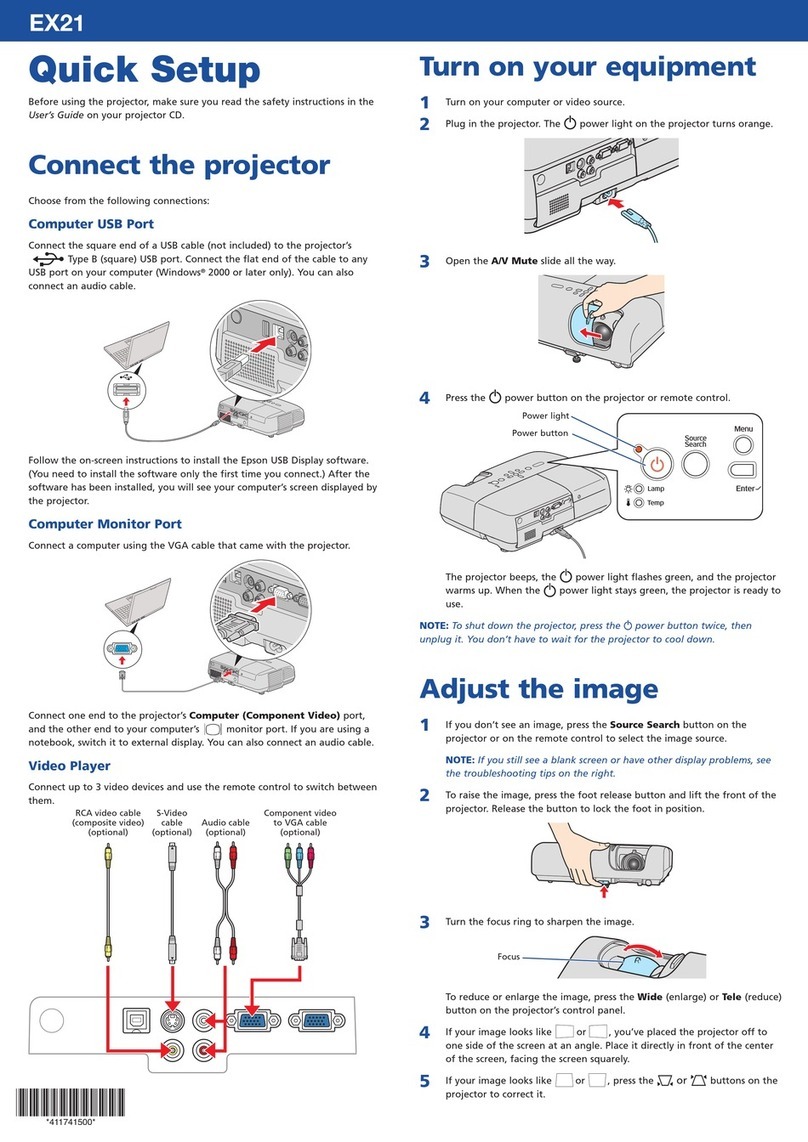
Setup Guide
Turning the power off
Attach the lens cover.
Attach the lens cover when not using the projector in order to
keep the lens free from dust and other foreign objects.
Disconnect the cables that are connecting other
equipment to the projector.
Turn the power off for the signal sources that are connected to the projector.
If the message "The projector is overheating. Make sure
nothing is blocking the air vent, and clean or replace the
air filter." is displayed, press or to turn the power
off, and then do as instructed in the message.
You cannot use the remote control or the projector's control panel during cool-down
(takes approximately 30 seconds).
After cool-down is complete, the indicator changes to steady orange and the
projector goes to standby mode.
The indicator will flash orange and the cool-down period will start.
When the projector will not be used for long time,
disconnect the power cable from the electrical outlet.
Always make sure that the projector is in the standby condition
before disconnecting the plug. After the power plug is
disconnected, the indicator will continue to light for a brief
period and then it will turn off.
If the projector is on a surface such as a tabletop, the surface of the table near the air
exhaust vent will become hot.
1
24
5
3
indicator
Press on the remote control or on the
projector.
If you press , the message shown right will be
displayed, so press again.
You can project a test pattern at times such as when setting up the projector in order
to correct keystone correction and to make line menu adjustments.
If on the remote control is pressed, the pattern selection menu appears.
If you press , the adjustment icon will appear on the image.
Press and to adjust the focus.
Press once more to complete the adjustment.
Zoom adjustment and focus adjustment are performed after the lamp lights.
If you push or once it adjusts one step, and holding it down adjusts
it continuously.
If the projected images are tilted horizontally, use the front adjustable feet to adjust the projector
so that it is horizontal.
When you wish to adjust the projection above or below the range of lens
shift adjustment set the projector at an angle.
When the projector is angled, the projected image may distort into a
trapezoid. In such cases, press ( ) ( ) on the projector's
control panel to adjust the images.
However, the image quality will decrease compared to if the lens shift
function is used.
When the lens is shifted to the left or right, complete keystone correction is
not possible. When making keystone corrections set the lens at the centre
left to right.
This can be used to check whether the projector is
tilted or set up vertically in front of the screen.
Adjusting the projection screen
Correcting projector tilt Correcting keystone distortion (Keystone)
15°
Displaying a test pattern
Use the two lens shift dials to adjust the image position.
Projection image position adjustment (Lens shift)
Fine adjustments to image size (Zoom adjustment)
Focus adjustment
Up
When the lens shift dial is turned, a point of resistance will be felt.
This indicates the approximate centre point for the range of adjustment. In
addition, if the lens shift dial becomes hard to turn further and the image
position stops changing, no further adjustment is possible.
" Setting up" - Lens shift adjustment
Right
Left Down
Cross-hatching
Gray Scale
Selection Menu
If you press , the adjustment icon will appear on the image.
Press and to adjust the zoom.
Press once more to complete the adjustment.
Keystone distortion can be corrected within a
maximum vertical angle of approximately 15°.
Projection image position adjustment
(Lens shift)
Focus adjustment
Clears the test pattern display
When or is pressed, a will be displayed on the screen and
if adjustment is not possible, it means that "Zoom Lock" or "Focus
Lock" is operating.Turn the lock function off if you would like to make
adjustments.
User's Guide: "Configuration Menu Functions"
This is used when adjusting brightness or when
adjusting image quality or colour tone. The adjustment
is made using the line menu. Adjustments other than
brightness are not possible when no image signals
are being input.
Extend Retract Retract Extend
Fine adjustments to
image size
(Zoom adjustment)
Adjustment can also be carried out while the test pattern is displayed.
Adjustment can also be carried out while the test pattern is displayed.
15°
A connected signal
source cannot be
selected.
Press to switch the image source
to Video.
This projector is provided with an Auto Setup function that
automatically adjusts images to the optimum quality when the
input signal from the connected computer is switched.
If a laptop computer or a computer with a LCD screen has been
connected to the projector, you may need to use keyboard or
function settings to change the output destination. While holding
down the key, press (the key with a symbol such as /
on it). After the selection is made, projection will soon start.
Computer documentation
1
3
4
2
This projector has a "Lock Setting" function for
preventing mis-operations.
To turn off the light around the control panel buttons
and characters, set "Button Illumination" to "OFF".
User's Guide: "Configuration Menu Functions"
Turning the power on and projecting images
If the lens cover has been installed, remove it.
Use the accessory power cable to connect the projector to
an electrical outlet.
Turn the power on for the projector.
Turn the power on for the signal source (for a video
source, press the [Play] button to start playback).
If more than one signal source has been connected, or if no images are
projected, use the remote control or the projector's control panel buttons to
select the signal source.
Press the button that has the name of the port on it that the desired signal
source is connected to.
If the signal source is connected to the [D4] port or to the [InputA] or [InputB] port,
press , or to switch the video signals to match the signals from
the video equipment.
Component video: D4 (Auto) (Default setting)
, Component: Auto (Default setting)
If the colours appear unnatural, set to
Component:YCbCr
or
Component:YPbPr
RGB Video: RGB-Video
The setting changes as follows
each time you press .
The source changes as follows
each time or
is pressed.
If there is a problem with projection even though the projector is set up and connected correctly, check the following points.
Signal source cannot be selected / Images
are not projected correctly
Are images being played
back by the signal source?
Do the input signal settings
match the projector settings?
If connected to the
[InputA] or [InputB] port
Has the VCR been connected
using an RGB SCART adapter?
Press , or in accordance with
the video input source and select the format
that matches the signals from that equipment.
Press the [Play] button to start playback on
the video equipment.
Images appear greenish or purplish
Do the input signal settings
match the projector
settings?
If connected to the
[InputA] or [InputB] port
After startup, change the Control Panel
adjustment so that mirroring is active.
NEC
Panasonic
Toshiba
IBM
SONY
Fujitsu
Macintosh
Example of output selection
Selecting the image source
Using the remote control
Selection menu
After a short period, the lamp will turn on and projection will
start.
Has the DVD been connected
using an RGB SCART adapter? Change the setting at the DVD to RGB
output.
1
2
3
2
Selecting image source
4The indicator will flash green.
Light green (during projection)
The area around the control panel buttons and characters light when
the projector's power is turned on. This allows you to operate the
projector in a dark room.
Press , or in accordance with
the video input source and select the format
that matches the signals from that equipment.
4
D4 (Auto)
Component :Auto
D4 (YCbCr)
D4 (YPbPr)
Component :YCbCr
Component :YPbPr
RGB RGB-Video
When you press , the selection menu is
displayed.
Use and to select the signal source.
Press to accept.
If "D4", "Input A" or "Input B" is selected, a menu
for selecting the signal format is displayed.
Select the one that matches the image signal of the
connected equipment.
Selecting using the projector's control panel
If the following points fail to solve the problem, refer to "When the Indicators Provide No Help" in the User’s Guide.
