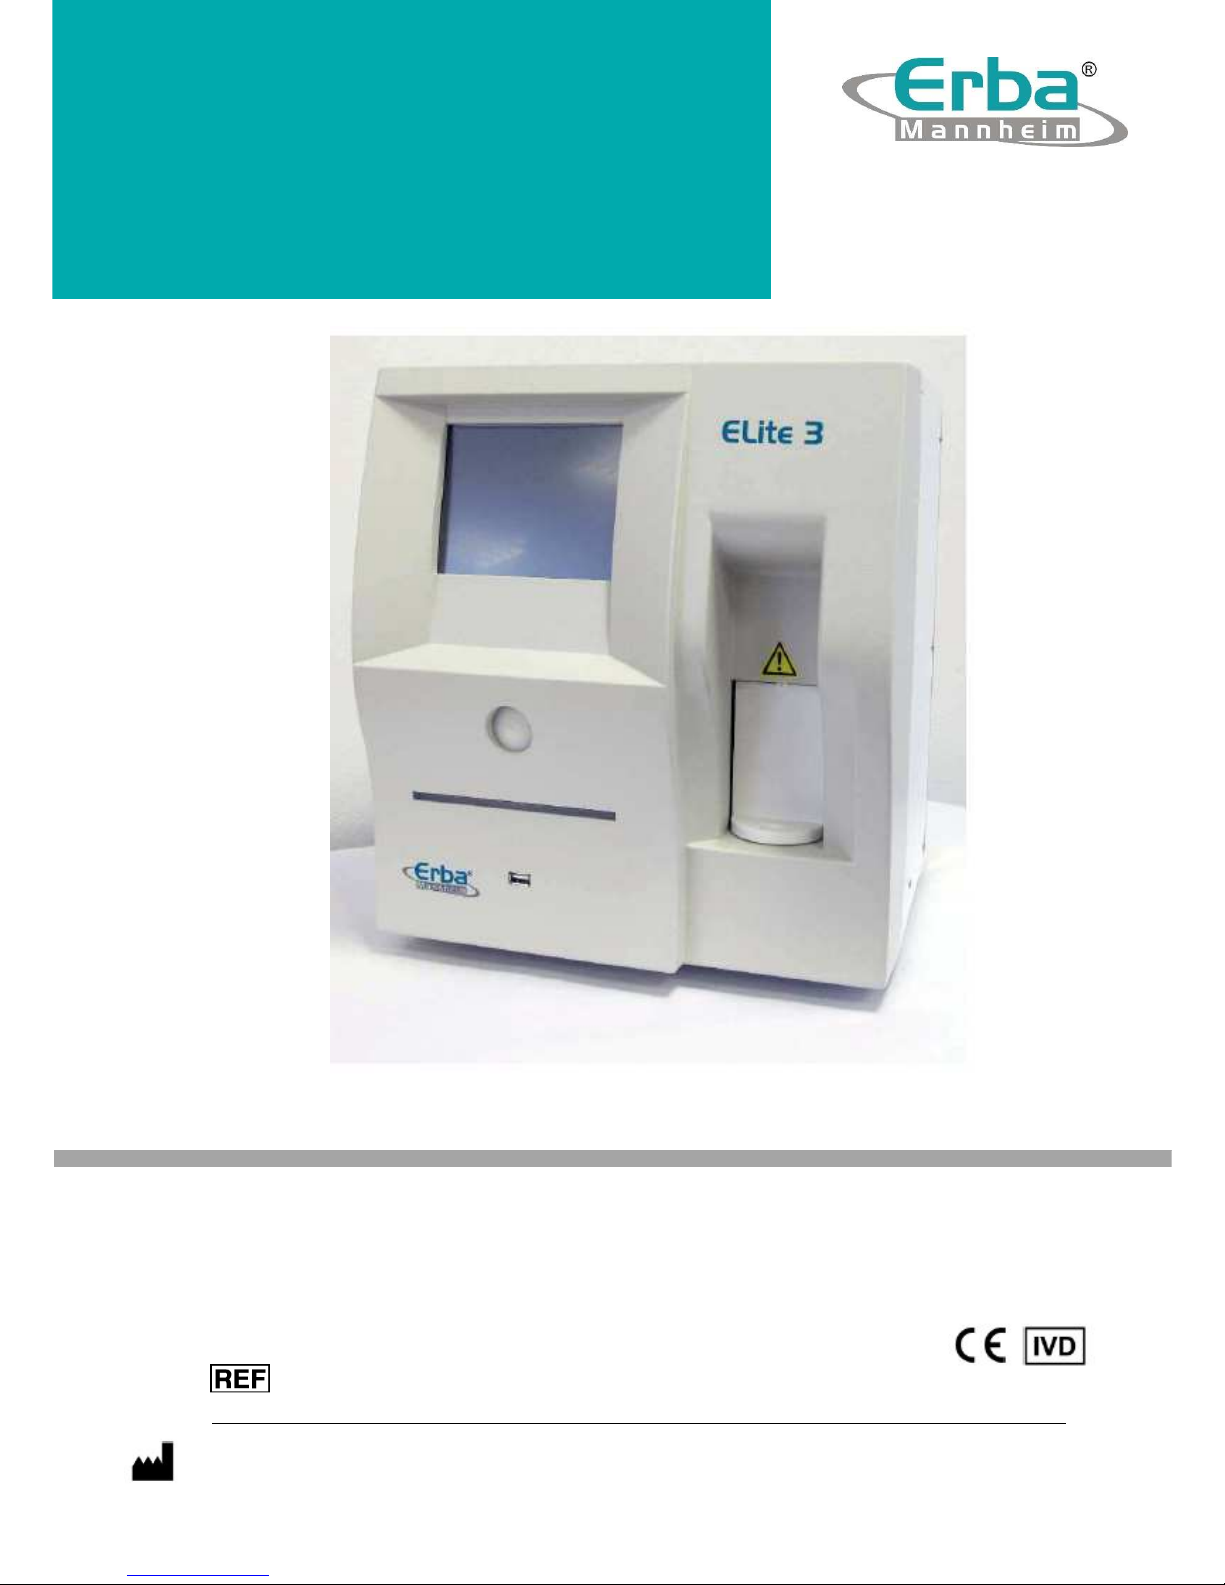
ERBA ELite 3 User manual
Erba Lachema s.r.o., Karásek 2219/1d, 621 00 Brno, CZ
ELite 3
Hematology Analyzer
USER MANUAL
INS00066

Content
Page 2/72
Table of Contents
1.
INTRODUCTION..................................................................................................5
1.1.
Intended Use.................................................................................................5
1.2.
The Instrument..............................................................................................5
1.2.1.
Patient Testing.......................................................................................6
1.2.2.
Reagents ...............................................................................................7
1.2.3.
Technical Operation...............................................................................7
1.2.4.
Calibration..............................................................................................7
1.3.
Instrument features.......................................................................................8
1.4.
Parts of the Analyzer...................................................................................11
1.5.
The measurement process .........................................................................11
1.5.1.
Control Panels .....................................................................................12
1.5.2.
Display.................................................................................................12
1.5.3.
Touch screen.......................................................................................12
1.6.
Control Material...........................................................................................13
1.7.
Accessories.................................................................................................13
1.8.
Specifications..............................................................................................14
2.
INSTALLATION.................................................................................................15
2.1.
General information.....................................................................................15
2.2.
Environmental factors .................................................................................15
2.2.1.
Electrical requirements ........................................................................15
2.2.2.
Space requirements.............................................................................16
2.2.3.
Peripherals...........................................................................................16
2.2.4.
Reagents and waste handling..............................................................17
2.2.5.
Maintenance ........................................................................................17
2.2.6.
Cleaning...............................................................................................17
2.2.7.
General points......................................................................................17
2.3.
Unpacking and installation..........................................................................18
2.3.1.
Turning the Instrument ON, MAIN Menu..............................................20
2.3.2.
Turning the Instrument OFF.................................................................21
2.3.3.
Preparing for shipment.........................................................................21
2.3.4.
Handling in Emergency........................................................................22
2.3.5.
Warning labels on the analyzer............................................................23
3.
MENU SYSTEM.................................................................................................24
3.1.
General Information ....................................................................................24
3.1.1.
Navigating in the Menu System ...........................................................24

Content
Page 3/72
3.1.2.
Touch screen calibration......................................................................24
3.1.3.
Menu structure.....................................................................................25
4.
OPERATING PRINCIPLES ...............................................................................27
4.1.
Impedance Method .....................................................................................27
4.2.
Principle of HGB Measurement...................................................................27
4.3.
Parameters .................................................................................................28
4.4.
Absolute and Linearity Ranges of Parameters............................................29
5.
ROUTINE UTILIZATION and MEASUREMENT ...............................................30
5.1.
Sample handling .........................................................................................30
5.2.
Sample analysis..........................................................................................33
5.2.1.
Sample preparation..............................................................................33
5.2.2.
Running a (new) sample......................................................................33
5.2.3.
Results.................................................................................................36
5.2.4.
Warning flags.......................................................................................37
5.2.5.
Parameter Limits (Normal ranges).......................................................39
5.2.6.
Blank Measurement.............................................................................39
5.2.7.
Using Pre-diluted Mode .......................................................................40
6.
DATABASE.......................................................................................................41
6.1.
Database services.......................................................................................42
6.2.
The Filter / Select function ..........................................................................43
6.3.
Printing records...........................................................................................44
6.4.
Manage records..........................................................................................45
7.
MAINTENANCE.................................................................................................46
7.1.
Cleaning......................................................................................................46
7.2.
Calibration...................................................................................................47
7.2.1.
Calibration with factors.........................................................................48
7.2.2.
Calibration by measurement................................................................48
7.3.
Quality control.............................................................................................50
7.3.1.
References...........................................................................................51
7.3.2.
Measure...............................................................................................51
7.3.3.
Diagram ...............................................................................................51
7.3.4.
Database .............................................................................................52
8.
Diagnostics.......................................................................................................53
8.1.1.
Device Information...............................................................................53
8.1.2.
Self Test...............................................................................................53
8.2.
Reagent status............................................................................................54
8.2.1.
How to empty waste container.............................................................55
8.2.2.
Neutralization of Waste........................................................................55

Content
Page 4/72
9.
Settings.............................................................................................................56
9.1.
Printer settings............................................................................................56
9.2.
General settings..........................................................................................58
9.3.
Measurement..............................................................................................58
9.3.1.
Unit settings.........................................................................................59
9.3.2.
Normal ranges .....................................................................................59
9.3.3.
Profile...................................................................................................60
9.3.4.
Settings................................................................................................60
9.4.
Date and Time ............................................................................................61
9.5.
Multi user mode...........................................................................................62
10.
PRINTING..........................................................................................................65
10.1.
Printouts......................................................................................................65
11.
Troubleshooting...............................................................................................67
11.1.
Regular Troubleshooting Procedures..........................................................67
11.2.
Weekly User Maintenance..........................................................................67
11.2.1.
Cleaning needle washing head............................................................67
12.
Fluidic Schematics...........................................................................................68
13.
Reagent consumption .....................................................................................69
14.
Appendix A.......................................................................................................70
15.
Contact..............................................................................................................71
16.
Appendix- package inserts for reagents and cleaning solutions................72

ELite 3, User Manual
Page 5/72
1. INTRODUCTION
1.1. Intended Use
This hematology analyzer is a fully automated cell counter designed for in vitro
diagnostic use, developed for small clinics and point-of-care lab offices.
1.2. The Instrument
ELite 3 is a fully automated, bench-top hematology cell counter.
It implements the so-called Coulter-method for counting cells passing through a small
aperture, and measures the hemoglobin content of red blood cells.
The analyzer features a color graphical LCD display module with touch screen, and
has a separate START button.
The software allows sending results to an external printer (via USB port), or can have
an optional, 58 mm built-in thermal printer module.
Its internal memory is capable of storing 1000 records with full histograms, and
individual patient data. QC measurements are also stored in separate database. The
software operating the instrument is easy to upgrade using a USB pen-drive. The
instrument allows connecting to a host computer for uploading records stored in the
memory through a USB B (slave) port. Archiving and restoring of records to and from
USB pen-drive is also possible.
NOTE
:
If the equipment is used in a manner different from which the
manufacturer specified, the protection provided by the equipment
may be impaired. Misuse of equipment or use other than its
intended purpose will invalidate conditions of warranty. The
accuracy and precision may also be impaired.

ELite 3, User Manual
Page 6/72
1.2.1. Patient Testing
The analyzer can process 80 samples per hour in 3-part WBC differential mode.
Samples can have individual sample data, and additional parameters.
You can print results to an external or to the optional built-in printer. The user can
customize the report format.
The analyzer determines the following 20 hematology parameters, including 3-part
WBC differential, from a 25 µl whole blood sample:
WBC total white blood cell count
LYM lymphocytes count
MON monocytes count
GRA granulocytes count
LYM% lymphocytes percentage
MON% monocyte percentage
GRA% granulocytes percentage
HGB hemoglobin
RBC red blood cell count
HCT hematocrit
MCV mean corpuscular volume
MCH mean corpuscular hemoglobin
MCHC mean corpuscular hemoglobin concentration
RDWcv red cell distribution width*
RDWsd red cell distribution width*
PLT platelet count
PCT plateletcrit (trombocrit)
MPV mean platelet volume
PDWcv platelet distribution width*
PDWsd red cell distribution width*
* RDW and PDW parameters have two forms of representation: CV and SD.
Both parameters describe the distribution width, but from different aspects.
User can select the units to use for displaying RDW and PDW parameters.

ELite 3, User Manual
Page 7/72
1.2.2. Reagents
Use only reagents supplied by the manufacturer with the analyzer, otherwise
accuracy cannot be guaranteed. All reagents are stabilized and micro-filtered.
Reagents are environmental friendly, azide-free and do not contain harmful
ingredients. Please refer to the MSDS associated with reagent. Store reagents
between +15 and +30°C. Do not use reagent beyond the expiration date printed on
the container label. Discard opened container after 120 days. Do not use reagent
once frozen. These reagents are ready for use and can be applied straight from the
container; no special reagent preparation is necessary. Leave the reagent at room
temperature for at least 12 hours before using.
Cat. No. Product name Volume
HEM00004
Erba Diluent- Diff 20 l
HEM00008
Erba Lyse- Diff 1 l
HEM00001
Erba Cleaner 1 l
Additional cleaning solutions:
HEM00017
Erba Clenz 1 l
HEM00016
Erba Hypoclean 1 l
For package insert for reagents and cleaning solutions please see Appendix
1.2.3. Technical Operation
As the cell counter is a fully automated instrument, operating it requires minimal
training or technical support. Operator interaction is reduced to the following:
•Perform a Blank Measurement in case the instrument is not used for a specific
time
•Enter sample and/or patient data
•Insert the sample to be analyzed into the sample holder
•Print results either one-by-one, or in groups by selecting records from the
database
•Perform simple weekly maintenance, as described later in this description
(7.1.2.).
1.2.4. Calibration
E
EL
Li
it
te
e
3
3
arrives to your laboratory factory-calibrated and ready to use. However,
calibration needs updating whenever you find that the results have slightly changed,
or a different or new control material is used. With each control material you receive
for the instrument, you will find a control sheet listing the parameters the instrument
should match. Perform these calibrations as explained in a later chapter (7.2).

ELite 3, User Manual
Page 8/72
1.3. Instrument features
Figures 1 and 2 show front and rear view of the analyzer, with controls and
connectors.
Figure 1. Front view
Color LCD
touchscreen
START button
Built-in
thermal
printer
Sample holder
with
interchangeable
adapters
Front panel USB
socket
Status indicator

ELite 3, User Manual
Page 9/72
Figure 2. Rear view
nstrument label
(S/N, manuf.data)
Reagent
connectors
Power switch
USB A
connectors
External
grounding
connector
USB B
connector
Built-in
thermal
printer
Reagent Lock
connector
Power source
connector

ELite 3, User Manual
Page 10/72
To replace paper in the printer:
-open the paper lid (pull the lid upwards by the
handle)
-remove central plastic roller of old paper roll
-unwind new paper roll, so that the “starting edge”
is coming from down under towards you
-gently drop the new roll into the holder of the
printer, and hold the “starting edge” with your
hand, and make sure it comes out on the front of
the printer
-close the lid, making sure that the paper is
captured between the lid and the front of the
printer
The analyzer works with an external power supply. The power supply module has a
so-called auto range input, allowing operation on 230V or 115V power system. The
power supply unit complies CE and UL safety certifications.
The input socket is a standard power cable connection and the output is a DC jack.
CAUTION!
Use only the provided power supply with the instrument:
“GlobeTek Electronics Corp.” Model ID: GT-81081-6012-T3

ELite 3, User Manual
Page 11/72
1.4. Parts of the Analyzer
The hematology analyzer is composed of three main units:
Fluidic System: Performs sampling, diluting, mixing, and lysing
functions. Generates the regulated vacuum used for
moving cells through the aperture during the
counting process.
Data Processing System: Counts, measures and calculates blood cell
parameters, generates and stores numerical results
and histograms.
Control Panel: Features an LCD display, touch screen, START
button, status LED, and USB port interfaces.
1.5. The measurement process
For the Schematics of the fluidics system, see Section 13.
Sample aspiration and dilution:
Stages of the blood testing process
a.
25 µl of anti-coagulated (K3-EDTA) whole blood sample is aspirated into the
sampling needle, and mixed with 4 ml of diluent and stored in the chamber
(MIX dilution).
b.
25 µl of the MIX dilution is aspirated into and stored in the needle during WBC
measurement and hemoglobin analysis
c. Lysing reagent is added to the mix dilution held in the WBC chamber for
WBC differential analysis. This amount of lysing reagent is patient type
dependent and the operator can change it.
d.
After WBC counting, HGB reading and washing process, 4 ml of diluent is
added to the second dilution (using the 25 μl of mix dilution stored in the
needle).
e.
This portion is analyzed for RBC count, PLT count and their parameters.
f.
Another washing process prepares the unit for the next analysis.
Table 1.
Dilution rates used: Measurement times:
MIX dilution 1:160 WBC count 12 seconds
RBC dilution 1:32 000 HGB measurement 3 seconds
WBC dilution 1:196
(depends on lyse amount) RBC/PLT count 12 seconds

ELite 3, User Manual
Page 12/72
1.5.1. Control Panels
START button
Pressing and releasing the START button triggers an analysis cycle.
Status indicator
A two-color (red/green) LED (light emitting diode) is located above START button.
Its actual color indicates the status of the analyzer.
LED color Analyzer status
•Green The analyzer is ready to measure sample. Analysis can be
initiated by pressing START button.
∗Red blinking Blood sample can be removed when the LED blinks red 3
times and the instrument beeps 3 times.
•Red The analyzer is currently performing an analysis.
No new measurement can be started.
•Yellow The analyzer is performing a maintenance process.
∗Yellow blinking The instrument is in stand-by and display light is off. Hit the
screen to have SW wake up from stand-by.
1.5.2. Display
The display is 320 x 240 dots, high contrast backlit high-color graphic LCD module,
with integrated touch screen.
1.5.3. Touch screen
The LCD screen has a touch-sensitive foil on the front surface. If the operator
touches the LCD active area gently, the analyzer can recognize it and identify the
position where the screen was pressed. By touching (slightly pressing) one small
spot on the touch screen, the SW will activate the function/menu/key that the
corresponding area represents.
ELite 3, User Manual
Page 13/72
1.6. Control Material
The analyzer allows continuous monitoring of measurement performance with Erba
Hematology Control (Low, Normal, High) - control blood. This must match the types
of samples usually run on the instrument. Specification for this material (assay values
and allowed tolerances along with expiry date) is always packed with the approved
control material.
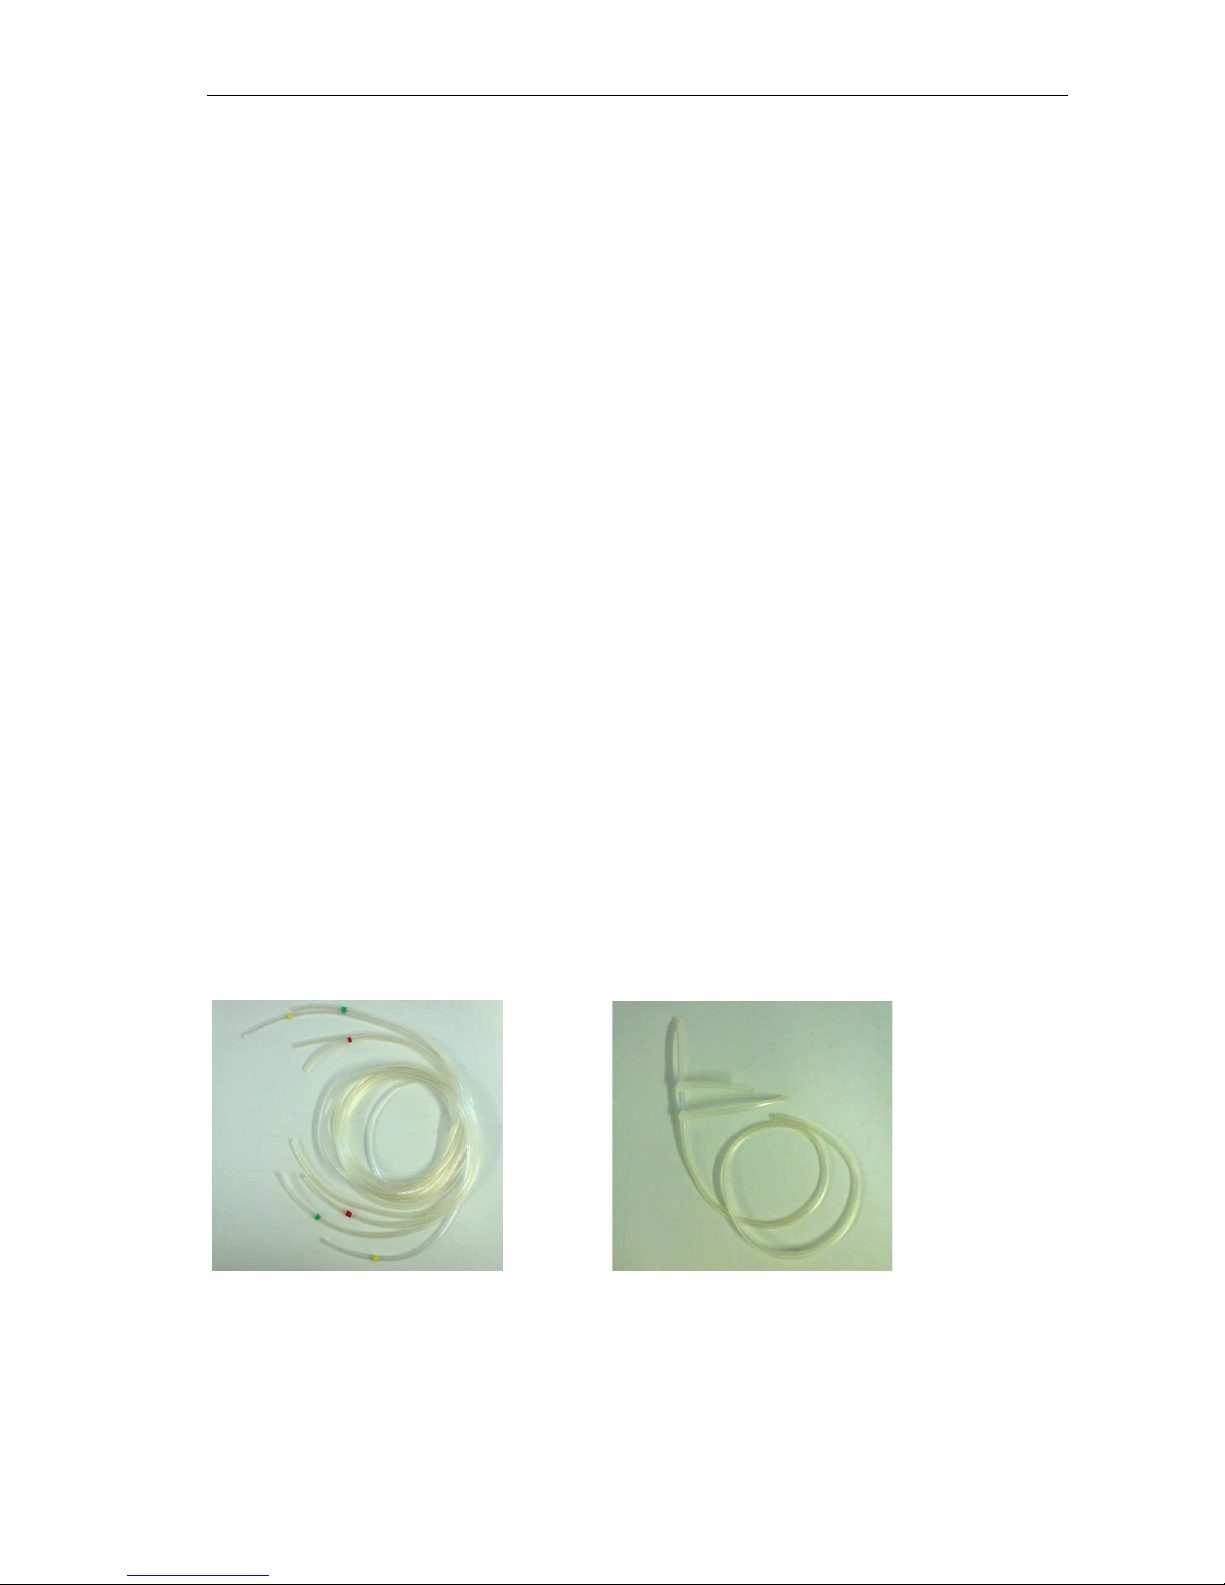
1.7. Accessories
Below is a list of accessories shipped with your analyzer.
This list can also be referred as the “E
EL
Li
it
te
e
3
3
- pack”
E
EL
Li
it
te
e
3
3
Hematology Analyzer
User's Manual (this booklet)
Reagent Tubing kit (with colored tubes)
Diluent tube (green)
Lyse tube (yellow)
Cleaner tube (blue)
Waste tube (red)
Cleaning Tube Kit.
Caps for reagent containers (matching connector colors).
Waste Container (20 L).
External power supply and power cable.
Sample tube adapters.
Optional: spare thermal roll-paper.
Reagent Tubing Kit: Cleaning Tube Kit:

ELite 3, User Manual
Page 14/72
1.8. Specifications
Sample volume 25 μl of whole blood in normal 3-part or non-diff mode
50 μl of whole blood in pre-diluted mode
Chambers 2 counting chambers for diluting whole blood and counting
Reagent system Isotonic Diluent, Lyse, Cleaner
Aperture diameter 70μm (RBC/PLT), 100μm (WBC)
Throughput 80 tests/hour
Characteristics
Parameter: Accuracy Reproducibility
(CV)
Carry-over
sample to
sample Test range Unit
WBC 3% 3% <1% 4.0-20.0 10
3
/μl
RBC 3%
2%
<1% 4.0-15.0 10
6
/μl
HCT 3%
3%
<1% 25.0-50.0 %
MCV 2%
1%
N/A 60-100 fl
HGB 2%
2%
<1% 9-16 g/dl
PLT 5%
5%
<3% or <20 200-900 10
3
/μl
Sampling method Open tube system with automatic sample rotor.
Sample types Human (general), male, female, baby, toddler and child.
Clog prevention High-voltage pulse on aperture in each analysis cycle, chemical cleaning and
high pressure back-flush of the aperture using Cleaner reagent.
Cleaning procedure High-voltage burst of the aperture, high-pressure back-flush, chemical
cleaning of the aperture using Cleaner reagent.
Calibration 1- or more-measurement automatic and manual (factors) calibration of WBC,
HGB, RBC, PLT, MCV (or HCT), RDW, and MPV.
User interface Easy-to-use, menu driven user interface with touch-screen and separate
START button, status LED
Languages available English, Spanish, Portuguese, French, Russian, Indonesian, German, Italian,
Czech
Data capacity 1000 results, with RBC, PLT, and WBC 3-part histogram
Host computer interface USB B port
Data back-up method USB mass storage device
Software upgrade method via USB A port using USB mass storage device
Printer interface USB with support for HP printers (DeskJet, LaserJet, PCL3, PS, LIDIL)
Built-in printer Axiohm thermal printer module, 58 mm wide roll paper, full report with
histograms
Display 320x240 -dots, high-contrast, backlit, color graphics LCD (liquid crystal
display)
User interface Full-LCD Touch-screen + separate START button, red/green state LED
External keyboard USB keyboard via USB A port
Power requirement 12VDC, 5A, 60W max. operating power
Power supply unit External, auto-ranging power unit for 100-120 or 200-240 VAC, 50–60Hz
Operating temperature 59–86 °F (15–30 °C). Optimal temperature is 77 °F (25 °C)
Dimensions (W x D x H) 12.6 x 10.2 x 14.4 in (320 x 260 x 365 mm)
Net weight 12 kg
Storage tempera
ture
3 – 35°C
Transport temperature
5 – 40°C

ELite 3, User Manual
Page 15/72
2. INSTALLATION
2.1. General information
This chapter provides instructions for the installation of E
EL
Li
it
te
e
3
3
hematology analyzer.
The procedures described below must be followed correctly to ensure proper
operation and service. Please carefully read and follow all instructions in this User’s
Manual before operating the analyzer.
This hematology analyzer is a precision instrument: handle with care. Dropping or
other improper handling of the instrument will disturb calibrated mechanic and
electronic components and/or cause damage.
CAUTION: Always handle the instrument with care.
2.2. Environmental factors
Operate E
EL
Li
it
te
e
3
3
within the ambient temperature range of 15 - 30°C and relative
humidity of 45% - 85%. The optimum operating temperature is 25°C.
Avoid using the instrument in areas of extreme high or low temperatures or where it
is exposed to direct sunlight. If kept at a temperature less than 10°C, the instrument
should be allowed to sit for an hour at the correct room temperature before use.
Reagents should be stored at a temperature range of 18 - 30°C.
Place the instrument in a well-ventilated location. Do not place it near potentially
interfering devices capable of emitting radio frequencies (e.g. radio or television
receiver, radars, centrifuge, X-ray devices, fans, etc.).
Operation at an altitude over 3000 meters (9000 ft) is not recommended, because the
throughput will be degraded.
Instrument is safe for transient voltages to INSTALLATION CATEGORY II and
POLLUTION DEGREE 2.
Environmental and electrical characteristics provide accuracy and precision of the
instrument and maintain a high level of operational safety for lab personnel.
2.2.1. Electrical requirements
E
EL
Li
it
te
e
3
3
comes with an approved power cord, appropriate for your power system.
Proper use of the appropriate power cord assures adequate grounding of the system.
WARNING: Improper grounding of the analyzer bypasses important safety
features and may result in electrical hazard.

ELite 3, User Manual
Page 16/72
2.2.2. Space requirements
It is important to install the instrument in a suitable location. A poor location can
adversely affect its performance. Consider the following space requirements:
-Select a location near a power source and close to a suitable drain.
-Place the unit on a clean and level surface.
-Leave at least 0.5m (20in) space on both sides and above the instrument to
access pneumatics and (optional) built in printer. Provide a minimum of 0.2m
(8in) between the rear panel and the wall to allow for heat dissipation and tube
clearance.
-Install the reagents in a suitable place that will make your work easy. The best
place is on the ground, below the supporting desk of the instrument. The
pneumatic system is capable of aspirating reagents from containers being 1m
(3ft) below the reagent inputs. Make sure the reagent tubes are not bent,
broken, twisted or blocked in between the desk the instrument is on and the
wall behind. Such circumstances can result in instrument operation failure.
-DO NOT PLACE the reagents above the instrument, as there can be a risk of
falling and spilling.
WARNING: Install the unit on a table or workbench. If the unit was installed
without a supporting desktop under the unit, there is a possibility
that the analyzer could accidentally fall.
2.2.3. Peripherals
Connect external peripherals only when both the instrument and the peripheral
device are off. Possible peripherals are:
-external printer
-the printer must be recommended by authorized technician
-the printer must be approved and listed
-the printer must have a CE mark
-external keyboard
-the external keyboard must be approved
-the external keyboard must have a USB port or suitable adapter
-link to host computer via USB port
-serial link cable must be approved by technician
-USB B port (linking to host computer) requires a USB A-B cable and
USB driver software (contact service for availability)

ELite 3, User Manual
Page 17/72
2.2.4. Reagents and waste handling
Handle reagents according to national or international regulations.
WARNING! Reagents may cause corrosion and skin irritation. If any of the
liquids leaked onto the cover of analyzer or the furniture, wipe it
off immediately. In case of skin contact, rinse the liquid off with
plenty of water.
Waste generated by the unit is biohazard material. Handling and disposal must
happen according to regulations regarding reagent systems. See Section 7.3.2.
WARNING! Waste contains poisonous substances (because of chemical
content) and human origin substances meaning biohazard. These
substances are representing potential danger to environment. For
this reason, safe handling of the waste liquid is very important.
2.2.5. Maintenance
The user should check the following components weekly:
-bottom of washing head for salt build up – should be wiped off with a damp
cloth or wiper
-tubing system – by opening the side door and look for any liquid leakage. If
you experience leakage, contact authorized technician.
WARNING! The power supply unit and internal electronic boards must NOT be
opened or serviced by the user!
2.2.6. Cleaning
Clean the instrument and its power supply – in off state – on the outside only, using a
damp cloth with a soft detergent. DO NOT let liquids get inside these units.
2.2.7. General points
The manufacturer guarantees work safety reliability and general characteristics under
the following conditions only:
-services and repairs are performed by an authorized technician
-the electrical system of the laboratory follows national and/or international
regulations
-the system is operated according to instructions contained herein

ELite 3, User Manual
Page 18/72
2.3. Unpacking and installation
1. Carefully remove the analyzer from the shipping carton. Inspect the
instrument for any visible signs of damage incurred during shipping. Would
you find any damage, file a claim with the carrier or your distributor
immediately. Check the accessories received against the packing list.
Contact Service if anything is missing.
CAUTION! Prior to initial operation, allow the instrument to reach room
temperature (approx. 2 hours). Rapid temperature changes in an
operating unit can lead to water condensation, which may damage
electronic parts, and cause malfunction.
2. Place the instrument on a firm work surface in the designated work area,
near an appropriate AC electrical outlet. The power outlet connection
MUST be grounded.
NOTE Before making connections: Make sure that all power is in “OFF”
state before connections (printer, external keyboard) are made.
Carefully read all literature accompanying the instrument and its
accessories. Pay particular attention to the operating procedures
for the external printer.
3. Keyboard and external printer
Attach the keyboard cable to one of the USB A ports on the back of the
instrument. Attach both ends of the printer cable to the appropriate ports
on the printer and E
EL
Li
it
te
e
3
3. Attach the AC adapter to the printer (if required)
and plug it into an AC outlet.
4. Host Computer
The instrument has a built-in USB B port that allows connection to a host
computer. You can export results, including histograms. USB B I/O
settings are located in Settings menu.
For installation instructions for communication, please, contact Service.
5. Power supply
Connect the power supply to the instrument. Attach power cord outlet to
the external power supply of E
EL
Li
it
te
e
3
3 and plug the other end into a properly
grounded AC outlet.
WARNING: Do not switch on the analyzer before connecting external power
supply to it and to the AC outlet, as well as before connecting an
external printer or a keyboard to the analyzer.

ELite 3, User Manual
Page 19/72
6. Reagent Containers
Place the reagent containers near the instrument, to an accessible
location. Do not place the containers to a higher position than that of
E
EL
Li
it
te
e
3
3, because would a tube come off its connector, the fluids spill out.
Use the supplied connecting tubes and special bottle caps. Be sure that
the color on each tube and cap match. You can, for example, place the
reagent containers below the desk the analyzer is installed on, as the
instrument has sufficient power to draw the liquids from a lower location.
All containers should be left open (do not block the small air vent hole on
the special container caps) in order to provide free airflow.
Figure 5. Reagent connections
WARNING! Reagents may cause corrosion and skin irritation. If any of liquids
leaked to cover of analyzer or the furniture, wipe it off immediately.
In case of skin contact, rinse the liquid with plenty of water.
ELite 3, User Manual
Page 20/72
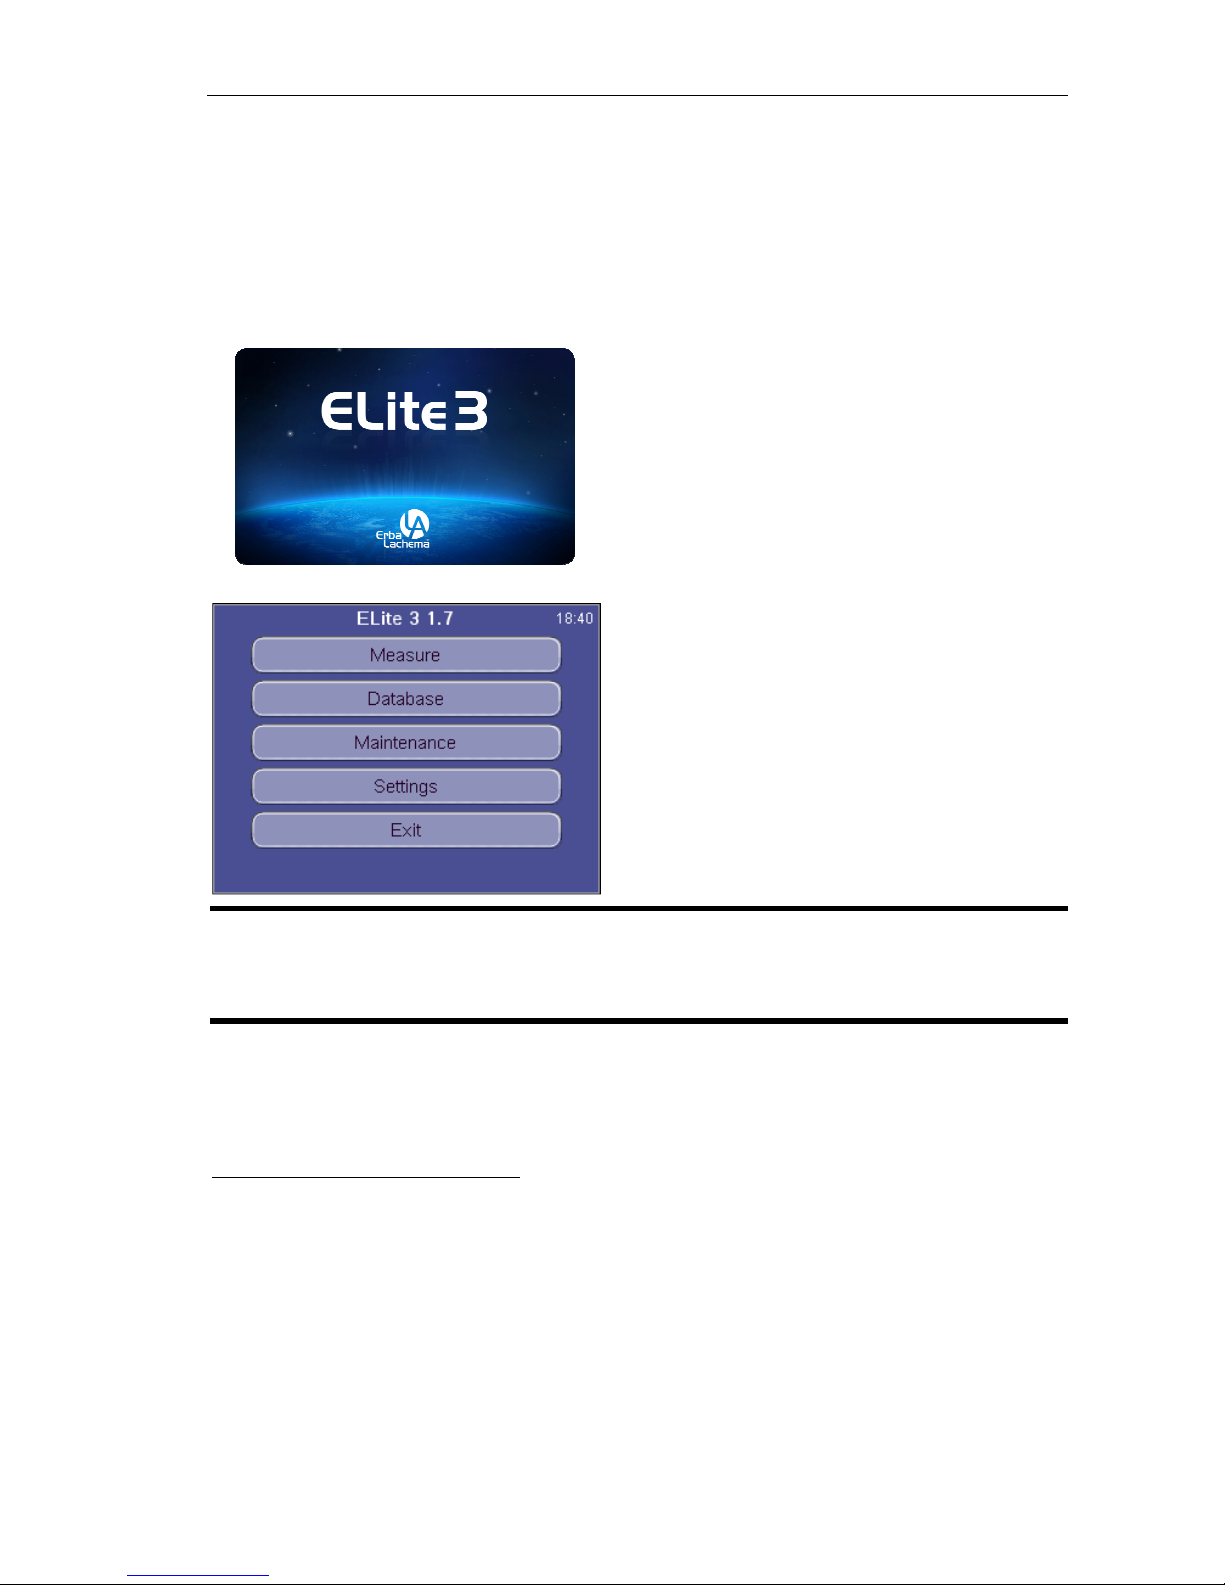
2.3.1. Turning the Instrument ON, MAIN Menu
a. In case you use an external printer (for information, read manual
shipped with the printer) connect it and turn it on.
b. Turn the analyzer on using the power switch on the rear panel. The
‘ON’ position is marked by the ‘I’ symbol.
After turning on power, there will not be LCD
activity for a few seconds, but the status LED
goes on.
During start-up, the following screen is
displayed.
When SW is loaded, Main menu is displayed.
Tap a touch-screen item to go activate the
menu element.
CAUTION! Wait 5 minutes before initiating any measuring process to allow
the instrument to reach the optimal working temperature.
In some cases, a priming cycle is necessary prior to sample introduction. The
instrument will perform priming cycle automatically if additional liquid in the tubing
system is required.
Run a priming cycle in case of:
•installation
•extended time out of use
•replacement of any component related to the Fluidic System
•replacement of reagents with instrument turned on
Table of contents
Popular Measuring Instrument manuals by other brands

Trace2O
Trace2O HydroTest HTTURB instruction manual

ESD SYSTEMS
ESD SYSTEMS SPI Westek 95420 Operation and maintenance manual

Dresser
Dresser DELTA instruction manual

PCE Health and Fitness
PCE Health and Fitness FG Series Operation manual

Bender
Bender PEM735 quick start guide

Keysight Technologies
Keysight Technologies N9029AV01-V15 user guide


