Erbauer ERB337TCB Installation manual

ERB337TCB Original Instructions
ERBAUER 750W TILE CUTTER
SAFETY AND OPERATING MANUAL
WARRANTY
YEARS

ERBAUER 750W TILE CUTTER
GUARANTEE
This product carries a guarantee of 24 months. If your product develops
a fault within this period, you should in the first instance contact the retailer where
the item was purchased.
This guarantee specifically excludes losses caused due to:
- Fair wear and tear
- Misuse or abuse
- Lack of routine maintenance
- Failure of consumable items (such as batteries)
- Accidental damage
- Cosmetic damage
- Failure to follow manufacturer’s guidelines
- Loss of use of the goods
This guarantee does not affect your statutory rights. This guarantee is only valid
in the UK.
For further technical advice, spare parts or repair service (outside of guarantee)
please contact your retailer quoting your Erbauer model number
Congratulations on your purchase of a quality power tool from Erbauer (UK)
Ltd. This product should give you reliable service but for your peace of mind
this power tool does carries a 24-month guarantee, the terms of
which are detailed below.
If this product develops a fault within the guarantee period contact your
retailer.
Please retain this handbook in case you need to refer to safety, care or
guarantee information in the future.

GENERAL SAFETY INSTRUCTIONS
WARNING! Read all instructions Failure to follow all instructions listed
below may result in electric shock, fire and/or serious injury. The term
"power tool" in all of the warnings listed below refers to yourmains operated (corded)
power tool or battery operated (cordless) power tool.
SAVE THESE INSTRUCTIONS
1. keep work area clear. Cluttered areas and benches invite injuries.
2. Consider work area environment Do not expose tools to rain. Do not
use tools in damp or wet locations. Keep work area well lit. Do not use
tools in the presence of flammable liquids or gases.
3. Guard against electric shock Avoid body contact with earthed or grounded surfaces
(e.g. pipes, radiators, ranges, refrigerators).
4. Keep other persons away. Do not let persons, especially children, not involved
in the work touch the tool or the extension cord and keep them away from the
work area.
5. Store idle tools. When not in use, tools should be stored in a dry locked-up place,
out of reach of children.
6. Do not force the tool. It will do the job better and safer at the rate for which it
was intended.
7. Use the right tool. Do not force small tools to do the job of a heavy
duty tool. Do not use tools for purposes not intended; for example do not use
circular saws to cut free limbs or logs.
8. Dress properly. Do not wear loose clothing or jewellery, they can be
caught in moving parts. Non-skilled footwear is recommended when
working out doors. Wear protective hair covering to contain long hair.
9. Use protective equipment. Use safety glasses. Use face or dusk mask if
working operations create dust.
10. Connect dust extraction equipment. If the tool is provided for the connection
of dust extraction and collecting equipment, ensure these are connected and
properly used.
11. Do not abuse the cord.Never yank the cord to disconnect it from the
socket. Keep the cord away from heat, oil and sharp edges.
12. Secure work. Where possible use clamps or a vice to hold the work. It
is safer than using your hand.
13. Do not overreach. Keep proper footing and balance at all times.
14. Maintain tools with care. Keep cutting tools sharp and clean for better
and safer performance. Follow instruction for lubricating and changing
accessories. Inspect tool cords periodically and if damaged have them
repaired by an authorised service facility. Inspect extension cords

ERBAUER 750W TILE CUTTER
periodically and replace if damaged. Keep handles dry, clean and free from
oil and grease.
15. Disconnect tools. When not in use, before servicing and when changing
accessories such as blades, bits and cutters, disconnect tools from the power supply.
16. Remove adjusting keys and wrenches. Form the habit of checking to see that
keys and adjusting wrenches are removed from the tool before turning it on.
17. Aboid unintentional starting. Ensure switch is in “off” p osition when
plugging in.
18. Use outdoor extension leads. When the tool is used outdoors, use only
extension cords intended for outdoor use and so marked.
19. Stay alert. Watch what you are doing, use common sense and do not operate
the tool when you are tired.
20. Stay alert. Check damaged parts. Before further use of tool, it should be
carefully checked to determine that it will operate properly and perform
its intended function. Check for alignment of moving parts, binding of
moving parts, breakage of parts, mounting and any other conditions
that may affect its operation. A guard or other part that is damaged
should be properly repaired or replaced by an authorised service centre
unless otherwise indicated in this instruction manual. Have defective
switches replaced by an authorised service centre. Do not use the tool if
the switch does not turn it on and off.
21. Warning. The use of any accessory or attachment other than one recommended
in this instruction manual may present a risk of personal injury.
22. Have your tool repaired by a qualified person. This electric tool complies
with the relevant safety rules. Repairs should only be carried out by qualified
persons using original spare parts, otherwise this may result in considerable
danger to the user.
ADDITIONAL SAFETY RULES FOR TILE CUTTERS
- The machine must be supplied through a residual current device (RCD) having a
rated residual operating current not exceeding 30 mA.
- Do not use diamond discs which are damaged or deformed.
- Replace table insert when worn.
- Use only diamond discs recommended by the manufacturer.
- Take care that the selection of the diamond discs is suitable for the material to be
cut.
- Wear suitable personal protective equipment when necessary, this could include
hearing protection to reduce the risk of induced hearing loss, respiratory protection
to reduce the risk of inhalation of harmful dust, wear gloves when handling
diamond discs and rough material.
- Never use blades on this machine.
- Use only diamond discs for which the maximum possible speed is not less than

the maximum spindle speed of the tool and the material to be cut.
- Faults in the machine, including guards or diamond discs, should be reported as
soon as they are discovered. Never use the machine without the guard in position.
- Maximum size of working piece should be 1m².
- This tile cutter should be used with limitations on ambient conditions (between
15°C and 30°C).
Wear goggles
Wear ear defenders
Wear a breathing mask
Wear gloves

ERBAUER 750W TILE CUTTER
SYMBOLS
The rating plate on your tool may show symbols. These represent important
information about the product or instructions on its use.
Conforms to relevant safety standards
WARNING – To reduce the risk of
injury,user must read instruction
manual.
Use only non fragmented discs
Hand protection shall be worn
Caution, risk of cuttin
Wear hearing protection.
Wear eye protection.
Wear respiratory protection.
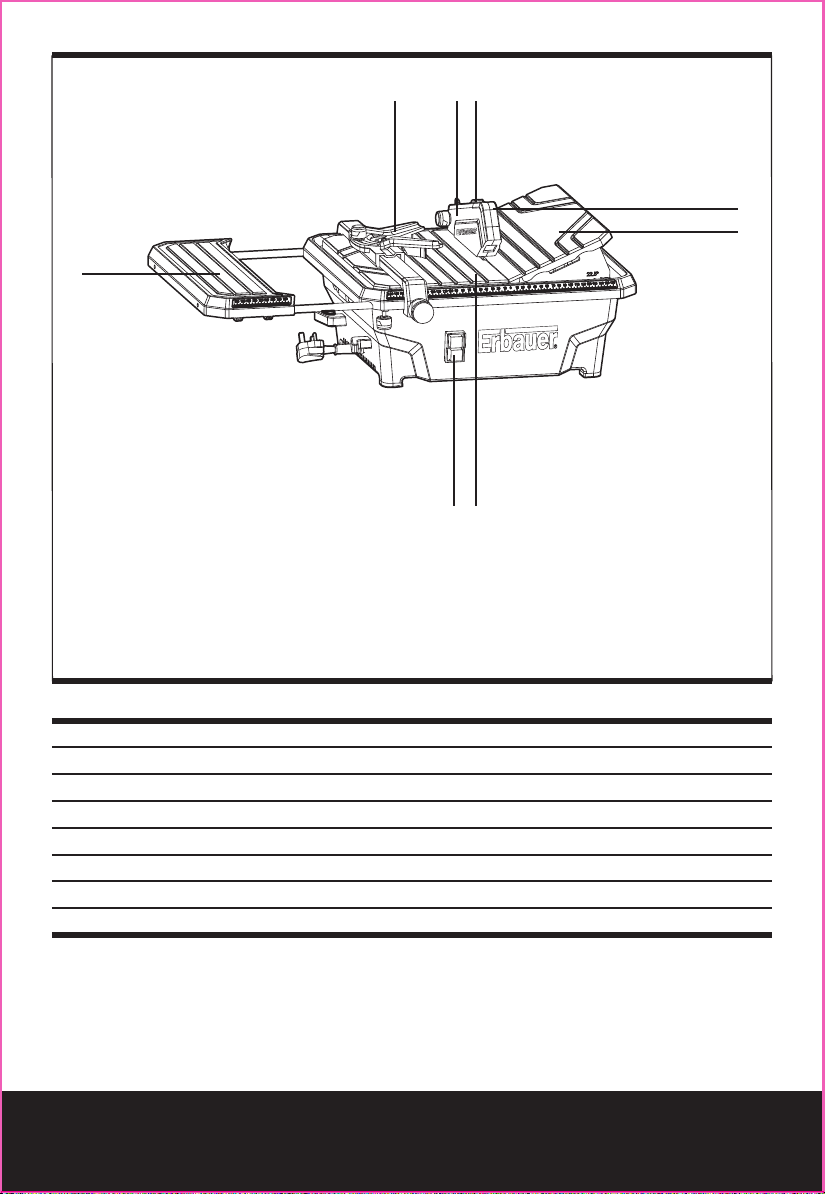
1. Protective guard
2. Laser light On/Off switch
3. Extension table
4. Mitre cutting guide
5. On/Off switch
6. Working table
7. Laser battery box
8. Vertical fence
14 2
7
8
3
5 6

Rated voltage and frequency
Rated power
No load speed
Insulation class
Dimensions of the diamond disc
Weight
Working table size
Working table with extension table size
Maximum cutting depth
Laser Class
Laser wave length
230-240V~50Hz
750W S2:10min
3000/min
Class I
ø180mmx2.4mmxø22.2mm
12.0kg
380x400mm
440x580mm
30mm
II
650nm
CARACTERISTIQUES TECHNIQUES
ERBAUER 750W TILE CUTTER
93.5dB(A)
103.2db(A)
3dB(A)
A weighted sound pressure LpA
A weighted sound power: LwA
Uncertainty
The sound intensity level for the operator may exceed 85dB(A) and sound protection
measures are necessary.
NOISE

ACCESSORIES
The tile cutter is supplied with following accessories:
Mitre cutting guide
Parallel guide
45° vertical fence
Blade
Spanners
Water reservoir plug
Extension work table
1pc
1pc
1pc
1pc
2pc
1pc
1pc

ERBAUER 750W TILE CUTTER
- Unplug the tile cutter from the mains supply.
- Remove the cover (45° vertical fence) of the
water reservoir.
- Remove the two screws and washers from the
top of the deck, slide the metal bracket into the
desired position (Fig 1) and then fix in place
re-using the two screws and washers. Ensure the
bracket is perpendicular to the deck and
positioned inline with the blade. Loosening these
screws allows some minor adjustment to ensure
the bracket does not foul the tile when cutting, or
if the laser needs slight re-alignment.
- Put the cover (45° vertical fence) back into position.
This tile cutter shall be used only to cut tiles to a
required size or shape. It shall not be used to cut
inflammable, explosive or toxic materials. Other
uses for the machine will lead to the damage of
the machine and a series of dangers to the
operator.This appliance is for private and
household use, not for professional or industrial
ones. Only identical accessories as the ones
provided with the tile cutter are authorised.
Never use the appliance in the rain or other wet
conditions.
The tool is packed complete in one carton. When
unpacking and checking the contents of the
carton, separate all the parts from the packing
material and check each one against the pack
contents shown below to make sure that all
items are accounted for. If any parts are missing,
do not attempt to assemble, or use the tile cutter
until the missing parts are obtained and installed
correctly. Any missing parts should be reported
immediately to the store from which you
purchased the tool.
2. ASSEMBLY
INSTALLATION OF THE METAL BRACKET
1. UNPACKING
OPERATION INSTRUCTIONS
Fig 1

INSTALLATION OF THE DIAMOND DISC
- Unplug the tile cutter from the mains supply.
- Remove the cover (45° vertical fence) of the water
tank.
- Insert the inner flange, the diamond disc and the
outer flange on the spindle (Fig 2) then tighten
the bolt clockwise with the two spanners provided
(Fig 3).
- Insert the blade lower guard with the chain into
the notches then tighten the screw (Fig 4).
- Put the metal cover back into position.
INSTALLATION OF THE PROTECTIVE
GUARD
- Unplug the tile cutter from the mains supply.
- Place the guard onto the metal bracket and fix in
place using the screw and washer (Fig 5). Push
the cover cap over the nut.
- Cover the diamond disc with the guard.
- Ensure that protective guard can move freely
and that it cannot touch the disc.
- Do not over tighten the protective guard when
fixing it.The guard should be free to rise and fall
as the workpiece is pushed towards the disc.
Fig 2
Fig 3
Fig 4
Fig 5

ERBAUER 750W TILE CUTTER
Fig 10
NSTALLATION OF THE PARALLEL GUIDE
- Unplug the tile cutter from the mains supply.
- Insert spring, clamp, washer and knob to the bolt
of parallel guide (Fig 6), then tighten the knob to
fix this part in parallel (Fig 7).
- Put the parallel guide onto the work table and fix
it using the plastic securing knob (Fig 8).
- Mitre cutting can be performed by using the
mitre cutting guide.The angle can be adjusted
from 0° to 45° by unscrewing the plastic screw
(Fig 9).
-To perform 22.5° or 45° bevel cutting, raise one
side of the table, lever out the support and locate
the tabs into the corresponding holes in the deck
(Fig 10). Ensure that the deck is correctly
secured before working.
Fig 6
Fig 7
Fig 8
Fig 9

Fig 11
Fig 12
EXTENSION OF THE WORKING TABLE
- Unplug the tile cutter from the mains supply.
- Pull out the table extension to the required length
and then secure using the screw shown in (Fig
11).
FILLING THE WATER TANK
Before cutting, the tank must be filled with water:
- Unplug the tile cutter from the mains supply.
- Remove the metal cover from the working table
- Fill the tank with water in order to just cover the
disc edge (ensure that no more than ¼ of the disc
is submerged in water).
- When you have finished cutting, remove the plug
inside the tank to drain the water (Fig 12).
WARNING: Do not add chemicals or detergents
to the water.
LASER LINE GENERATOR
The laser line generator emits an intense narrow
beam of pure red light to guide you as you cut. It
improves operator cutting vision, enables faster
set up, increase accuracy and improves safety.To
fit the 2 LR03 (AAA) 1.5V batteries (not supplied).
First remove the lid to battery box. Place the batteries
in the box , taking care to note the correct polarity
and replace the lid.
To turn on the laser, slide the laser light on/off
switch (2) up.To turn off the laser, slide the laser light
on/off switch (2) down.
Should the laser line not line-up with the blade
cutting path some re-adjustment is possible by
slackening the screws holding the guard assembly
in place (photo 1).
Ensure the screws are re-tightened after adjustment.
WARNING: Always switch the laser off when it is
not being used.We also recommend that you
remove the batteries from the compartment when
the saw is not used for extended periods.
CONNECTION TO THE ELECTRICAL SUPPLY
Before switching on, make sure that the voltage of
the mains supply is the same as indicated on the
rating plate.This product is designed to operate on
230-240V~50Hz. Connecting it to any other power
source may cause damage.
This appliance must be earthed. If in doubt, please

ERBAUER 750W TILE CUTTER
3. OPERATION
WARNING! Before switching the tile cutter
on, make sure that you have read and
understood all of the safety instructions. Make sure
also that the machine has been correctly assembled
and adjusted. Make sure that the mains is
disconnected from the supply when the tile cutter
is not being used or adjustments are being made.
Put the tile cutter on a clean, stable and flat surface.
consult a qualified electrician.
The mains supply shall be fed via a 10A fuse min.
This machine must be supplied through a residual
current device (RCD).
WARNING! This machine must be supplied
through a residual current device (RCD).
- Plug the mains cable into the mains supply.
- Press the green switch marked I.
-The machine will now start. Always allow the disc
to reach full speed before performing any cutting
operations.
-To switch off the machine, push the red switch
marked 0.The tile cutter will now stop.
WARNING! The disc will continue to rotate
for a few seconds after the machine has been
switched off.Wait for the disc to stop before removing
the workpiece or making any adjustments.
MAKING A STRAIGHT CUT
Adjust the parallel guide to the desired width. Use
the securing knob to loosen or adjust the guide.
Position the tile firmly against the parallel guide
and through the blade in a smooth action.
Hold the edges of the tile and press down firmly
to prevent the tile lifting during the cut.
MAKING A MITRE OR DIAGONAL CUT
Follow the same procedure for a straight cut but
use the mitre cutting guide in conjunction with the
parallel guide.
The mitre cutting guide simply clips onto the
parallel guide.
Make sure that the tile is held firmly in the guide
before making the cut.
Stop the machine immediately if there is undue
vibration or some other fault. If this situation
continues, check the machine to find the origin of
the fault.

CUTTING AN ANGLE OR BEVEL
Use the 45° vertical fence if you wish to cut an
angle or bevel on the tile edge. lift the 45° vertical
fence inserting the plastic tabs into the
corresponding holes on the table.Then make the
cut as before.
Internal or external bevel cuts can be made by
turning the tile face up or down (internal - eg.wall
corner; external - eg. window reveal).
MAINTENANCE
Ensure that appliance is disconnected from
supply before installation, before cleaning and
maintenance operations.
Apart from diamond discs there are no other user
serviceable parts inside this tile cutter.Refer to
qualified service personnel if internal maintenance
is required. Any worn, or damaged parts should
be replaced immediately by qualified personnel.
Keep discs in good condition. Poor condition or
worn discs can increase the noise level emitted.
Do not allow dust to accumulate inside, or on the
product. After use, clean all excess dust from the
table and the area around the table.Frequently
clean the machine using a soft brush or vacuum
cleaner.
If the supply cable is damaged, it should be
replaced by the same type of cable as the one
provided and recommended by the manufacturer
(H05 VV-F 3G0.75 mm²).The supply cord of the
tool and any extension cord used should be
checked frequently for damage. If damaged, have
the cordset replaced by an authorised service
facility. Replace the extension cord if necessary.
Fig 13
Green & Yellow E(Earht)
Blue
(neutral)
N
5amp fuse
approved to
BS1362
Brown
(live)
L
Cable grip
Outer sleeve
5amp
PLUG REPLACEMENT
If you need to replace the fitted plug then follow
the instructions below.
IMPORTANT: The wires in the mains lead are
coloured in accordance with the following code:
Blue – Neutral
Brown – Live
Green/Yellow – Earth
As the colours of the wires in the mains lead of
this appliance may not correspond with the
coloured markings identifying the terminals in
ERBAUER 750W TILE CUTTER
ENVIRONMENTAL PROTECTION
Waste electrical products should not be
disposed of with household waste.
Please recycle where facilities exist.
Check with your Local Authority or retailer
for recycling advice. For further information
visit www.recyclemore.co.uk
your plug, proceed as follows.The wire, which is
coloured blue, must be connected to the terminal
which is marked with an N or coloured black.The
wire, which is coloured brown, must be connected
to the terminal which is marked with an L or
coloured red.The wire, which is coloured green/
yellow, must be connected to the remaining
terminal which is marked with an E or
WARNING: Never connect live or neutral wires
to the earth terminal of the plug. Only fit an
approved 3 Amp BS1363/A plug and the correct
rated fuse.
NOTE: If a moulded plug is fitted and has to be
removed take great care in disposing of the plug
and severed cable, it must be destroyed to prevent
engaging into a socket.
Declaration of Conformity
Machine Directive 2006/42/EC
and/or Low voltage directive 2006/95/EC
EMC directive 2004/108/EC
EN61029-1(2009)
EN 55014-1(2006)
EN 55014-2(1997)+A1(2001)+A2(2008)
EN 61000-3-2(2006)
EN61000-3-3(2008)
Erbauer (UK) LTD BA22 8RT
Authorised Signatory and technical file holder
ERBAUER 750W TILE CUTTER
ERB337TCB
We, Importer
Declare that the product
Complies with the following Directives:
Date: 14/06/10
Signature:
Name: Peter Harries
Erbauer (UK) Ltd
Quality Manager 2010
Standards and technical specifications referred to:
2002/95/EC Restrictions of the Use of Certain Hazardous Substances in
Electrical and Electronic Equipment
2002/96/EC and 2003/108/EC Waste Electrical and Electronic
Equipment (WEEE)

ERBAUER 750W TILE CUTTER
Other manuals for ERB337TCB
1
Table of contents
Other Erbauer Cutter manuals


Popular Cutter manuals by other brands

Napa
Napa Carlyle Tools 6-3802A instruction manual

HUAYUAN
HUAYUAN SLG-200HF Manual instruction

Würth
Würth EMS 350-SL COMPACT Translation of the original operating instructions

EFA
EFA Z079 Operating and maintenance instructions, Sparepart list

Bush Hog
Bush Hog 2515 Specifications

Dolmar
Dolmar EC-2414 instruction manual


