Ercolina TB100 User manual
– 1 –
TB100 and TB130 Top Benders
Non-Mandrel Pipe, Tube and Prole Bending Machine
Operator’s Manual
TB100/TB13003/2015
WARNING!
BEFORE USE, BE SURE EVERYONE USING THIS MACHINE READS AND
THOROUGHLY UNDERSTANDS ALL SAFETY AND OPERATING INSTRUCTIONS IN THIS MANUAL

– 2 –
TB100 and TB130 Top Benders
Non-Mandrel Pipe, Tube and Prole Bending
Congratulations on your purchase of an Ercolina® bending machine from CML USA, Inc.
Ercolina® machines are designed and manufactured to deliver years of trouble-free bending
performance. Please take a moment to complete and mail the warranty registration card or
submit the information online at http://ercolina-usa.com/warranty-form/. Doing so validates
machine warranty period and ensures prompt service if needed. Thank you for selecting
products from CML USA, Inc. Ercolina®.
Table of Contents
Important safety instructions 4-5
Special instructions 5
TB100 and TB130 Top Bender features, capacities and specifications 6
Top Bender components 7
Before you begin 8
Standard equipment 8
Wiring instructions and transformer configuration 8
General assembly, machine setup and preparation
• Powering machine on 9
• Bending terminology 10
• Material selection 10
• Choosing and installing hex shaft 11
• Installing center former and counterbend die 12-13
• Loading workpiece 14
• Axis explanation 15
• Referencing "x axis" counterbend die position 16
• Tie bar 17
• Control operating areas 18
Manual bending
• Manual mode - without pressure die control 19-22
• Manual mode - with pressure die control 23-25
Programming
• Programming (including entering and editing values) 26-30
• Editing a part program, entering bend angle 31-32
• Save a program on USB 33
• Program list (how to read programs stored on USB key) 34-37
• Load a program from USB 38
03/2015TB100/TB130

– 3 –
_____________________________________________________
CML USA Ercolina® reserves the right to make improvements and
modications to design without prior notice.
_____________________________________________________
Automatic bending
• Automatic mode - without pressure die control 39-40
Automatic menu selection
(determining and entering proper springback value for bend angles) 41-45
• Automatic mode - with pressure die control 46-48
Automatic menu selection
(determining and entering proper springback value for bend angles) 49-53
MDA mode
• Manual selection of bend angle within a program 54
Services
• Selecting unit of measure 55
• Alarm list display and overview 56-57
• Changing language 58
• Accessing protected area 59
Diagnostics and Accessories:
• Referencing "C axis" position 60-61
• Grounding and wiring schematics 62-73
• Electrical parts list 74-76
• Gear case schematic 77-78
• Material length required for rotary bends in pipe (tube and pipe information) 79
• Conversion tables - mm to inches and inches to mm 80
• Minimum distance between bends by center line radius, pipe and tube kits 81
• Tooling for pipe 82
• Tooling for tube 83-84
• Non-mandrel bending troubleshooting 85
• Routine maintenance & grease information 86
• Terms and conditions of sale 87
• Warranty 88
• Ercolina tube, pipe, profile benders and angle rolls 89-90
TB100/TB13003/2015

– 4 –
Important Safety Instructions
When using electric tools, basic safety precautions should always be followed to reduce risk of re, shock
and personal injury.
1. Keep Work Area Clean
Cluttered areas and benches invite injuries.
2. Consider Work Area Environment
Do not expose power tools to rain.
Do not use power tools in damp or wet locations.
Keep work area well lit.
Do not use a tool in presence of ammable liquids or gases.
3. Guard Against Electric Shock
Prevent body contact with grounded surfaces. For example; pipes radiators, ranges,
refrigerator enclosures.
4. Keep Children Away
Do not let visitors contact tool or extension cord.
All visitors should be kept away from work area.
5. Store Idle Tools
When not in use, tools should be stored in a dry and high or locked-up place out of
reach of children.
6. Do Not Force Tool
It will do the job better and safer at the rate for which it was intended.
7. Use The Right Tool
Do not force small tool or attachment to do the job of a heavy-duty tool.
Do not use the tool for purpose not intended, for example; do not use a circular saw for
cutting tree limbs or logs.
8. Dress Properly
Do not wear loose clothing or jewelry; they can be caught in moving parts.
Rubber gloves and non-skid footwear are recommended.
9. Use Safety Glasses
Also use face mask or dust mask if operation is dusty.
10. Do Not Abuse Electric Cord
Never yank electrical cord.
Keep electric cord from heat, oil and sharp edges.
11. Do Not Overreach
Maintain proper footing and balance at all times.
12. Maintain Tools With Care
Keep clean for better and safer performance.
Follow instructions for lubricating and changing accessories.
Inspect tool cords periodically and if damaged, have repaired by authorized service facility.
Inspect electrical cords periodically and replace if damaged.
Keep handles dry and clean and free from oil and grease
WARNING!
03/2015TB100/TB130

– 5 –
13. Disconnect Tools
Disconnect machine from power source when not in use, before servicing and changing
accessories.
14. Remove Adjusting Keys and Wrenches
Form a habit of checking to see that keys and adjusting wrenches are removed from machine
before turning it on.
15. Avoid Unintentional Starting
Always disconnect from power source before moving.
16. Stay Alert
Watch what you are doing. Use common sense, do not operate tool when you are tired.
(Do not use when taking medications that may cause drowsiness.)
17. Check Damaged Parts
Before further use of the machine, guard or other part that is damaged should be carefully
checked to determine that it would operate and perform its intended function.
Check alignment of moving parts, binding of parts, breakage of parts mounting and any
other conditions that may affect its operation. A guard or other part that is damaged should
be properly repaired or replaced by an authorized service center. Do not use this machine
if switches do not turn it on and off. Have defective switches replaced by authorized service
center.
Special Instructions
1. Read and follow operators manual thoroughly. If you require an additional manual please contact
2. Due to size and weight, it is recommended that qualied professionals transport, position and
install bending machine. Use proper equipment for installation including lift truck safety straps,
chains binders and bars. Machine must be balanced evenly at all times.
3. Never place hands, nger gloves or clothing near rotation machine parts.
4. Always disconnect machine from power source before changing accessories.
5. Always use eye and hearing protection.
6. Never wear loose clothing, gloves or jewelry when working near machine.
7. Stand in a safe position when operating machine.
8. Always wear safety approved steel toe footwear.
9. Make provision for safe handling of heavy and/or awkward materials.
10. Use only proper tooling, keep tooling securely fastened.
11. Keep machine and tooling free and clear of chips and debris.
12. Keep all safety features functioning and working properly.
13. Do not alter or modify machine. Use only OEM approved parts and accessories.
TB100/TB13003/2015

– 6 –
TB100 and TB130 Top Bender Features
● Ideal for producing consistent quality bends in pipe, tube, squares, solids and other
profiles
● Touch screen control offers easy access to auto and manual operating modes,
programming (inch or metric), system diagnostics and multiple language capability
● Quick-change tooling system with multiple radii available
● Digital display of bend angle
● Bend any angle to 180° with independent material springback compensation for each
bend
● Hand-held control of bend, return and emergency stop functions
● Swing away counterbending die vise for easy material handling
● Counterbending die vise position monitored electronically for accuracy and repeatability
● Two axis positioning table for multiple and sequential bends available on special request
● Heavy-duty steel gear case
● No hydraulic components
TB100 and TB130 Top Benders
Capacities and Specifications
TB100 TB130
Tube (Min.) ¼″ ¼″
(Max.) 4″ 5″
Pipe (Max.) 3″ Sch. 40 4″ Sch. 40
Centerline Radius(Min.) 2 x Ø 2 x Ø
(Max.) 17″ 27½″
Degree of Bend 0-210° 0-210°
Bending Speed Variable to 1.3 RPM Variable to .75 RPM
Programming Touch screen Touch screen
Unlimited storage with USB Unlimited storage with USB
(12) bends per program (12) bends per program
Material Positioning Table Consult factory Consult factory
Voltage 220V or 440V 3ph 220V or 440V 3ph
Length, Width, Height 20″ x 34″ x 47″ 34″ x 34″ x 47″
Weight 1,030 lbs. 1,330 lbs.
All capacities based on A53 grade A 48,000 psi tensile materials; heavy wall and high tensile materials reduce machine capacity.
Consult supplier for material specifications.
03/2015TB100/TB130

– 7 –
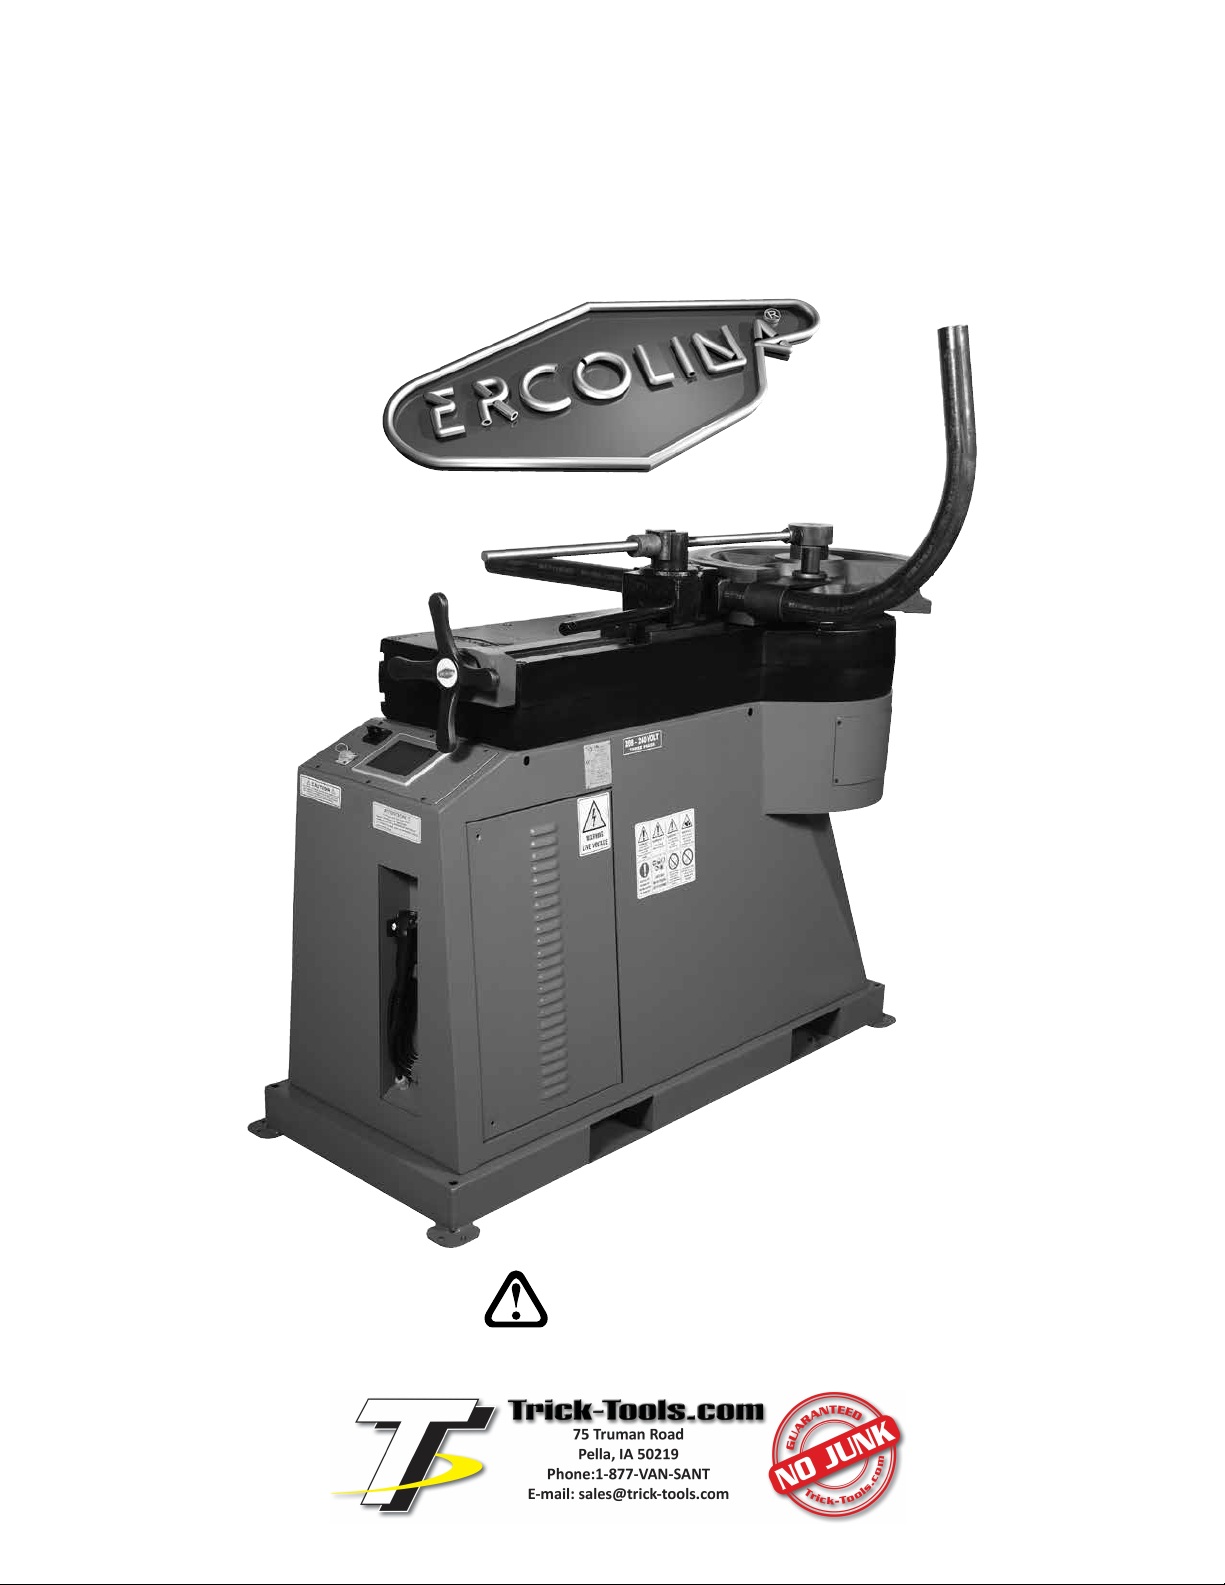
Top Bender Components
Shown below are basic components of a TB100 or TB130 bending machine.
Please take a moment to review this illustration for reference.
8 - Center former
die
1. Hand-held control 6. Counterbending die
2. USB for unlimited program storage 7. Hex shaft
3. Touch screen control 8. Center former die
4. Counterbend die hand wheel 9. Access panel
5. Counterbend die vise 10. Tie bar
9 - Access panel
3 - Touch screen
control
4 - Counterbend die
hand wheel
7 - Hex shaft
6 - Counterbending
die
5 - Counterbend
die vise
2 - USB for unlimited
program storage
1 - Hand-held control
10 - Tie bar
TB100/TB13003/2015

– 8 –
Before you Begin
Inspect machine to confirm receipt of the following equipment and no damage occurred during shipment. If
machine was purchased with a tube or pipe tooling kit, refer to tables at the bottom of page 81 for included
formers and counterbending dies.
Standard Equipment
TB100 Top Bender TB130 Top Bender
Hand wheel Hand wheel
Tie bar Tie bar
40mm hex shaft 40mm hex shaft
50mm hex shaft 50mm hex shaft
80mm hex shaft 80mm hex shaft
110mm hex shaft
Wiring Instructions
Attention! This machine must be wired for specific voltage. Have a qualified electrician connect
this machine according to the following instructions on an isolated circuit. CML USA Ercolina® is not respon-
sible for damage that may occur from improper installation.
1. Determine location of machine installation (with machine disconnected from power source).
2. Measure incoming line voltage at power source. Note: the TB100 and TB130 Top Benders utilize an in-
verter drive system to deliver power to control board and drive motor. It is highly recommended a proper
dedicated circuit is used, failure to do so will result in erratic machine performance.
3. Conrm the rated voltage matches the measured incoming line voltage.
Transformer Conguration
Attention! Never reposition outgoing secondary wires.
4. Close and secure access panel. Connect machine to power source.
03/2015TB100/TB130

– 9 –
- Turn “On” safety circuit-
1. Turn main switch “ON”. 2. Wait for Main screen display to appear.
3. Select Services Menu. 4. From Services Menu press RESET button to
activate motor & safety circuit.
5. RESET button will illuminate to conrm motor 6. Press HOME button to return to main menu.
is on.
TB100/TB13003/2015

– 10 –
Bending Terminology
OD: Outside diameter of pipe or tube.
ID: Inside diameter of pipe or tube.
Wall thickness: Pipe wall thickness is measured in terms of schedule (i.e. 5, 10, 40). Tube wall thickness
is measured in terms of gauge (i.e. 16 gauge = .065).
Center Line Radius (CLR): Exact measured distance from centerline of tooling to centerline of material’s
neutral axis.
Degree of bend angle: Number of degrees required in a bend - right angle requires 90° of bend.
Springback: A material’s tendency to return to its original shape after bending.
Ovality: Amount of distortion created in the cross section of pipe or tube from a normal round shape.
Tangent points: The two points at which bend starts and ends.
Distance between bends: Straight section between two tangent points of bends.
Tensile strength: Point at which material is stretched beyond yield strength.
Center former: Forming tool with a specic prole and CLR designed to allow workpiece to form around
edge to desired angle.
Counterbending die: Tool designed to apply counter pressure to workspace and secure workpiece against
center former.
Rotary draw bending: Material drawn through stationary counterbending die onto xed radii former tooling
to desired bend angle.
Material Selection
Before bending any material you should know the following:
1. Outside and inside physical dimensions
2. Wall thickness
3. ASTM specications
4. Desired CLR radius
5. Degree of bend
6. Minimum distance between bends
7. Number of bends required per day
03/2015TB100/TB130

– 11 –
Choosing & Installing Hex Shaft
- Install tooling -
1. Install main shaft according to bend die (40, 50, 80). (110) included with TB130 only.
No tooling needed
1
2
3
TB100/TB13003/2015

– 12 –
Installing Standard Center Former
and Counterbend Die
1 2 3
- Proper Tooling Selection -
Refer to pages 82-84 for recommended centerline bend radius for the material to be bent. If your application
requires a CLR or prole that is not shown CML USA Ercolina® can quote special tooling on request. As a
general guide when bending tubing and pipe, the heavier the wall thickness the tighter the centerline radius
can be without distortion. Therefore when bending thin wall tube select the largest possible radius for best
bend quality. Material requiring CLR smaller than two times diameter should bent with a mandrel support,
consult CML USA Ercolina® for more details. Standard counterbending dies are brass to accommodate
a variety of material without conict. Counterbending dies are also available in steel for heavy usage or
polymer for applications in which the workpiece nish is a factor. Note: When bending heavy wall material
or solids a special roller style counterbending die is recommended.
1. Install center former on hex shaft
“0” mark on shaft must line up to “0” mark on bend die
- Mounting center former -
Ercolina® center formers are manufactured with an offset hex design ensuring proper installation. When
mounted, the center former’s gripper arm should face right side of machine.
Note: Lift points are provided on larger tools.
03/2015TB100/TB130

– 13 –
- Mounting counterbending die -
Ercolina® counterbending dies are designed for quick installation and
removal. Insert male dovetail located on back of counterbend die
into slot on counterbending die vise. Installed properly, the “Ercolina®”
logo will be facing the operator (see gure).
Counterbending dies are wear items - Replace as necessary to ensure bend quality. Counterbending die
should never contact center former when material is in former and tooling is in starting position.
- Counterbending die lubrication -
For best results counterbending dies should be kept well-lubricated with Ercolina® spray grease - #810.
Proper lubrication extends counterbend die life and improves bend quality.
Warning! When bending heavy wall proles and solids, standard counterbend die and vise must
be removed and replaced with a roller counterbend die. Attention: Failure to use roller style die on
heavy proles may result in machine damage.
- Mounting “roller” counterbending die -
When bending heavy wall proles or solid materials a roller counterbending die must be used. Remove
counterbend die vise assembly and place roller die onto machine tool post. With material in center former
advance roller die inward until material rests rmly between former and roller. Retract roller die approximately
2½″ from material (refer to FIG. 1 on next page). Warning: Never use roller die ush against material
– doing so will damage machine.
TB100/TB13003/2015

– 14 –
Machine Settings
- Loading workpiece -
1. Slide workpiece into gripper arm and groove of center former
2. Using hand wheel advance counterbending die forward until material rests securely between former
and die (see FIG. 1).
3. Properly adjusted vise and counterbending die assembly should be perpendicular to workpiece and
swing freely counterclockwise to release workpiece (see FIG. 2).
Note: If vise assembly pivots away from material at beginning of bend, reduce pressure on vise. Proper
counterbending die adjustment ensures satisfactory bends.
(FIG. 1)
(FIG. 2)
Gripper arm Large radius former
Hand wheel
Standard tool shown
03/2015TB100/TB130

– 15 –
Axis Explanation
- Coordinate systems -
Right-handed, rectangular coordinate systems are used for machine tools. Such systems
describe the movements of the machine as a relative direction between tool and work piece.
Specication of the axis directions to one another ►
C axis bend angle is between 0° and 180°
- C axis bend angle coordinate system -
TB100/TB13003/2015

– 16 –
Referencing “X axis” Counterbend Die Position
To maintain proper counterbending die pressure, adjust “X axis” starting position.
The TB100 and TB130 are equipped with an encoder on the X axis. The encoder displays the position of
the X axis which helps maintain consistent and repeatable bends. This encoder can be turned on or off
depending on user preference.
Vise assembly (X axis) negative direction Vise assembly (X axis) positive direction
- Turning encoder on -
1. From Main menu select Services button
Main menu
2. From the Services menu press "PD" button to toggle on or off.
Services menu
OFF ON
03/2015TB100/TB130

– 17 –
Tie Bar
The TB100 and TB130 are equipped with a Tie Bar. It is recommended the tie bar be used at all times.
- Mounting tie bar -
1. With tooling mounts and material in position, attach the tie bar eyelet to the top of the hex shaft
making sure that the threaded rod rests on the vise mount.
2. Adjust and tighten locking nuts on threaded rod securing tie par in position.
Note: Apply grease to eyelets of tie bar.
TB100/TB13003/2015

– 18 –
Main screen
Explanation of keys
- Operating areas -
The basic functions of the NC control are grouped into the following operating areas:
Operating areas
Rep KEY FUNCTION
1 MANUAL Go to manual mode for manual motions
2 AUTOMATIC Go to Automatic mode
3 SERVICES Go to Service area
4 PROGRAM Go to Programming area
Control Operating Areas
03/2015TB100/TB130
MANUAL AUTOMATIC SERVICE PROGRAM
- Jog mode
- Refpoint set
- Automatic mode
- MDA mode
- Set up
- Turning on
- Error messages
- Set language
- Set unit
- Reserved area
- Program edit
- Load program
- Save program
1 2
3 4

– 19 –
Manual Mode Without Pressure Die Control
In Manual mode you can manually move every part of the machine individually. This mode is appropriate
for tool changing and operation setup.
- Operating sequences -
From Main menu
- Manual mode without pressure die control -
1 - Press the function key MANUAL in the Main menu to display the Manual screen.
Main menu
Manual menu
MANUAL
TB100/TB13003/2015
Rep FUNCTION
1 Return to previous menu
2 Go to Manual 1 screen
3 Hand-held control display
4 Axis C current position (degrees)
5 Actual machine load (in %) from 0 to 100%
45
1
3
2

– 20 –
2 - Bending in manual mode without pressure die encoder
a - Select the desired direction pushing either button or button
on the hand-held control according to the table below.
Note: select for bending
Note: select for return
b - After selecting direction, press center of hand-held control to move C axis
Note: releasing button stops C motion
Note: fully depressing button activates emergency stop
+-
C axis positive bending direction
C axis negative return direction
+
-
03/2015TB100/TB130
This manual suits for next models
1
Table of contents


