ErgoAV ERDS1-01G User manual

Model: ERDS1-01G
Electric Standing Desk Instruction Manual
(A)
English pages 02-12 French pages 13-23 Spanish pages 24-34
THANK YOU FOR CHOOSING THIS ERGOAV PRODUCT!
At ErgoAV, we want to add value to your AV experience by providing the highest
quality products and services in the industry. If you have any concerns or
comments, please contact us.
ErgoAV Customer Care
phone (877) 419-7832
email: [email protected]
website: www.ergoav.com
address: 9501 Louisiana Ave N, #200, Brooklyn Park, MN 55445
Scan the QR code to download
the APP to control the desk.

NOTE
We have packaged this standing desk into two separate parcels. Please
make sure to receive both parcels before assembling the desk.
Adjustable Height Legs
Box 2 of 2
Standing DesktopBox 1 of 2
Standing Desktop
Adjustable Height Legs
02 03 04 05 06 07 08 09 10 11 12

Important Safety Information
• Please carefully read all instructions before attempting installation. If you do not
understand the instructions or have any concerns or questions, please contact our
Technical Support line at (877) 419-7832 or Customer Service at
CAUTION: Use with products heavier than the maximum weights indicated may
result in instability causing possible injury.
• Please check whether the packaging contents are intact or damaged before assem-
bly.
• Check whether the appearance and wires of the product are damaged. If there is any
damage, please do not assemble or operate the product.
• Ensure that the product is not connected to a power source during the assembly
process.
• Ensure that there are no unnecessary obstacles near the assembly area.
• Do not soak any parts in liquid, only use a dry cloth or a slightly wet cloth to clean
product parts.
• Do not place any wires on a heat source.
• Be careful to avoid electric shock when plugging in the power.
• Please do not operate the desk continuously for more than two minutes to prevent
damage to the motor.
If your products weighs more,
do not use this product.
DO NOT exceed the maximum weight indicated. This
desk is intended for use only within the maximum weight
indicated. Use with products heavier than the maximum
weight indicated may result in failure of the desk and its
accessories, causing damage and or injury.
WARNING
Weight Restrictions
MAX
176.4 lbs /
80 kg
Supplied Parts and Hardware
Warning: This product contains small items that could be a choking hazard if swallowed.
Before starting assembly, verify all parts are included and undamaged. Do not use
damaged or defective parts. lf you require replacement parts, please contact our
Technical Support line at (877) 419-7832 or Customer Service at [email protected]
• Please note: Not all hardware included in this package will be used.
02 03 04 05 06 07 08 09 10 11 12

Supplied Parts and Hardware
Step 1
Place the Desktop [01] assembly on a clean and flat ground, arrange it according to
the diagram, and remove the covers on the left and right sides.
01
x2
04
Feet
x8
A
Bolts M6 x 16
x1
B
Allen Wrench
x1
01
Desktop
x1
02
Left Leg
x1
03
Right Leg
02 03 04 05 06 07 08 09 10 11 12

Step 2
The Legs [02]&[03] are pre-tilted according to the view, and the grooves on both
sides of the rear end are used to snap into the protruding parts on both sides of the
side plate. Rotate and press the legs downward. After the legs are installed, connect
the power cable as shown.
Snap into the protruding parts
on both sides of the side plate.
HEAVY! You may need assistance for this step.
When pressing down the power cable, you need a assistance to hold the table leg.
01
03
02
Before installing the left leg, press
down the power cable first.
02 03 04 05 06 07 08 09 10 11 12

Step 3
Step 4
The power cords from the left and right legs should be connected to the power cords
on both sides of the desktop. Then connect the plug of the spring cable to the
desktop.
After installing the Legs, insert the left and right cover sleeves, which will be attract-
ed to the magnetic surface at the bottom.
~
02 03 04 05 06 07 08 09 10 11 12

Step 6
Step 5
Tighten the Bolts [A] with a Allen Wrench [B] to install the Feet [04] onto the Legs
[02]&[03].
After the installation of the table is completed, it needs to be flipped over. It is
necessary to flip it from the other side of the controller to avoid damaging the
controller under pressure.
02
03
A
A
04
04
B
HEAVY! You may need
assistance with this step.
02 03 04 05 06 07 08 09 10 11 12

For Grommet Mounting
CAUTION!
For the Galaxy Glass Standing Desk, we have also provid-
ed a Desktop Protector Pad. When you need to install a
monitor stand on top of the desk, please refer to the
illustration below to install the Desktop Protector Pad to
prevent potential damaging that may occur during the
installation process of a monitor stand.
Desktop Protector Pad
For C-Clamp Mounting
02 03 04 05 06 07 08 09 10 11 12

Using the Wireless Charging and USB Charger
C1 C2 A
C1+C2 Output: 60W Max + 40W Max
C1/C2 Output: 100W Max
A Output: 22.5W Max
C1+A Output: 80W Max + 18W Max
C2+A Output: 60W Max + 22.5W Max
C1+C2+A Output:
45W Max + 30W Max + 18W Max
Use Two PortsUse One Port Use Three Ports
Power Distribution of C1/C2/A Ports
After placing the mobile phone on the wireless
charging module, the module rises 60° and rotates
30° clockwise horizontally, and the mobile phone
automatically detects charging. When the mobile
phone is removed, the wireless charging module
returns to its original position.
Light Sensing Area
When you wave your hand
over this area, the light of
the USB port will turn on.
02 03 04 05 06 07 08 09 10 11 12

Using the Control Panel
Controller
Sedentary Reminder Key
(Left Key)
M Key
(Right Key)
• Sedentary Reminder Function
Method of setting: Press and hold the M key for 5 seconds. After appears, enter the main
menu. Toggle the control panel up or down to locate sedentary reminder function. After locat-
ing the sedentary reminder interface with , press the M key to enter the corresponding
submenu. Toggle the control panel up or down to set the sedentary reminder time. Once
confirming the sedentary reminder time, a confirmation icon will be displayed.
After setting the sedentary reminder time, press the button on the left side of the control
panel to turn on or off the sedentary reminder function. The sedentary reminder function will
not be timed when the desk height is above 39.3 inches. The sedentary reminder function will
be timed when the desk height is 39.3 inches or below. After the sedentary time ends, the
interface alternately displays and at 1.5-second intervals. Prompting you
to raise the desk to your desired height. The sedentary reminder function can also be set on
the APP.
• Low-Power Function
If there is no operation for 10 seconds, it will enter low-power mode, and the hand controller
will display before turning off the screen and going to sleep.
• Memory Key Function
Method of setting: Press the M button located on the right-hand side of the control panel,
and will appear. When the desk is above 35.5 inches, press and hold for M button
1 second, will appear on the screen and the current position will be saved. When
the desk is below or equal to 35.5 inches, press and hold for 1 second, will appear
on the screen and the current position will be saved.
- - -
- - 1
- - 2
There are two presets for the memory function. One for heights greater than 35.5” and one
for lower than 35.5”. After setting the memory function, double push/pull on the control panel
will adjust the table to either memory height 1 or 2.
NOTE: If you don't understand the introduction of the standing desk control-
ler's functions, you can scan the QR code to download the APP. The APP
can also control the standing desk, giving you a smarter experience. Before
using this app on Samsung phones, you need to turn off the built-in Bixby.
02 03 04 05 06 07 08 09 10 11 12

After setting the upper and lower limit function, when you pull the control panel up to reach
the set upper limit, the desk will stop rising. When you push the control panel down to reach
the set lower limit, the desk will stop descending once limit is reached.
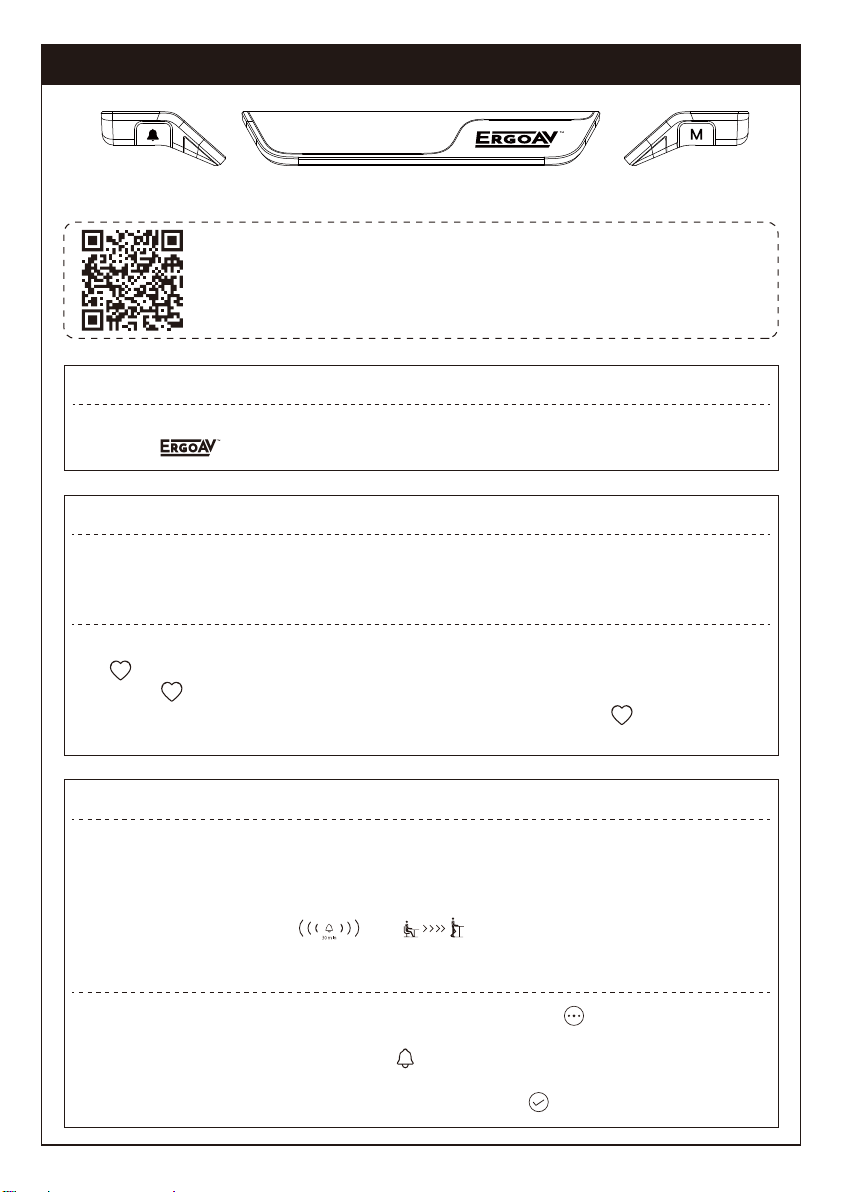
• Upper and Lower Limit Function
Method of setting: Press and hold the M key for 5 seconds. Enter the main menu. Toggle the
control panel to reach Upper and Lower Limit Function interface with , press the M key to
enter the corresponding submenu. Use the control panel to toggle up or down to the page.
Once on page, select the current position as the upper or lower height limit. After
setting a height limit, if you want to adjust the desk to the other preferred limit, re-enter the
menu and repeat the process.
The control panel lock function is designed to prevent accidental adjustments of the desk
height through the control panel. Once the function is activated, the height of the standing
desk cannot be adjusted through the control panel, but only through the APP. The control
panel can be used again for adjustments after unlocking by following the steps below.
• Control Panel Lock Function
Method of setting: Press and hold the M button for 5 seconds to enter the main menu
interface. Toggle the control panel up and down to display the control panel lock interface
and press the M button to enter the corresponding submenu. Choose to turn on the control
panel lock or turn it off .
When the control panel lock function is set successfully, the control panel will enter the lock
mode after 10 seconds of inactivity. After pressing any button, the illustration appears.
Follow the button unlocking sequence in the illustration to return to the height display screen.
After resetting the control pad any error message on the display screen will be cleared. Once
reset, the desk will be at the highest position due to reset instructions and will not return to
its original height unless manually done. All previous settings (memory positions, upper and
lower limit, etc.) will not be reset.
• Reset Function
Method of setting: When an error occurs, please refer to the attachment of the manual for
troubleshooting (Error Code Solutions). Then press the control pad downwards for 5 seconds,
until the screen displays . Once is shown, the desk is in a reset state. Once in the reset
state, release the control panel. After releasing it, press the control panel downwards again to
start the reset. During the reset, the desk will rise to its highest position. After reaching the
highest point, the reset is complete, and the screen will display the value of the desk's
highest/current position.
02 03 04 05 06 07 08 09 10 11 12

Protection Mode Error Codes
Abnormal Code SolutionAbnormal Description
E01
E02
E03
E04
E05
E06
E07
E08
E09
E10
E11
E12
E13
H01
M1 Over Current Protection
M2 Over Current Protection
M3 Over Current Protection
M4 Over Current Protection
M5 Over Current Protection
M6 Over Current Protection
M1 Hall Fault
M2 Hall Fault
M3 Hall Fault
M4 Hall Fault
M5 Hall Fault
M6 Hall Fault
The height difference between
the two legs of the controller
exceeds the set value and is
not synchronized.
Overheat Protection
(Work Mode Protection)
Check if the load is too heavy or if there
is any object blocking the rise and
lowering motion of the desk.
If the issues from above mentioned are
worked out, long-press the down button
to reset, and after the reset is completed,
continue using it.
Check if the legs are tightened, after
eliminating the anomaly, long-press the
down button to reset, and after the reset
is completed, continue using it.
Check if the connector between the A and
B controllers is disconnected. After
eliminating the anomaly, long-press the
down button to reset, and after the reset
is completed, continue using it.
Check if the legs are tightened, after
eliminating the anomaly, long-press the
down button to reset, and after the reset
is completed, continue using it.
The controller needs to rest for a while.
After the temperature drops, it can
continue to be used.
Communication interruption
between controller A and B.
02 03 04 05 06 07 08 09 10 11 12

Remarque
Nous avons emballé ce bureau debout dans deux colis distincts.
Assurez-vous de recevoir les deux colis avant d'assembler le bureau.
Pieds ajustables en hauteur
Boîte 2 sur 2
Bureau debout
Boîte 1 sur 2
Bureau debout
Pieds ajustables en hauteur
13

Consignes de sécurité importantes
• Veuillez lire attentivement toutes les instructions avant de tenter l'installation. Si les
instructions ne vous semblent pas claires ou si vous avez des questions, veuillez
contacter notre service d'assistance technique au (877) 419-7832 ou notre service
clientèle à l'adresse [email protected].
ATTENTION : L'utilisation avec des produits plus lourds que les poids maximums
indiqués peut entraîner une instabilité et des blessures possibles.
• Veuillez vérifier si le contenu de l'emballage est intact ou endommagé avant l'assem-
blage.
• Vérifier si l’apparence est normale et les fils du produit sont endommagés. Si le
produit est endommagé, ne l'assemblez pas et ne l'utilisez pas.
• Veillez à ce que le produit ne soit pas connecté à une source d'énergie pendant le
processus d'assemblage.
• Veillez à ce qu'il n'y ait pas d'obstacles inutiles à proximité de la zone de montage.
• Ne trempez pas les pièces dans du liquide, utilisez seulement un chiffon sec ou
légèrement humide pour nettoyer les pièces du produit.
• Ne placez aucun fil sur une source de chaleur.
• Veillez à éviter tout choc électrique lorsque vous branchez l'appareil.
• Ne faites pas fonctionner le bureau continuellement pendant plus de deux minutes
afin d'éviter d'endommager le moteur.
Si votre produit pèse plus
lourd, n'utilisez pas ce produit.
NE PAS dépasser le poids maximum indiqué. Ce bureau
est destiné à être utilisé uniquement dans la limite des
poids maximums indiqués. L'utilisation de produits plus
lourds que les poids maximaux indiqués peuvent
entraîner une défaillance du bureau et de ses acces-
soires, ce qui peut causer des dommages ou des
blessures.
AVERTISSEMENT
Restrictions de poids
MAX
176.4 lbs /
80 kg
Pièces et matériel fournis
Avertissement : Ce produit contient des petits objets susceptibles de présenter un
risque d'étouffement en cas d'ingestion.
Avant de commencer l'assemblage, vérifiez que toutes les pièces sont incluses et en bon
état. Les pièces endommagées ou défectueuses ne doivent pas être utilisées. Si vous avez
besoin de pièces de rechange, veuillez contacter notre service d'assistance technique au
(877) 419-7832 ou notre service clientèle à l’adresse [email protected].
14

Pièces et matériel fournis
Étape 1
Placez l'ensemble du bureau [01] sur un sol propre et plat, arrangez-le selon le
schéma et retirez les couvertures sur les côtés gauche et droit.
01
x2
04
Pieds
x8
A
Boulons M6 x 16
x1
B
Clé Allen
x1
01
Bureau
x1
02
Pied gauche
x1
03
Pied droit
15

Étape 2
Les jambes [02]&[03] sont pré-inclinées selon la vue, et les rainures des deux côtés
de l'extrémité arrière sont utilisées pour s'enclencher dans les parties saillantes des
deux côtés de la plaque latérale. Tournez et appuyez les jambes vers le bas. Une fois
les pieds installés, connectez le câble d'alimentation comme indiqué.
Enclencher les rainures dans
les parties saillantes des deux
côtés de la plaque latérale.
LOURD! Vous aurez peut-être besoin d'aide pour cette étape.
Lorsque vous appuyez sur le câble d'alimentation, vous avez besoin d'aide pour
tenir le pied de la table.
01
03
02
Avant d'installer le pied gauche,
enfoncez le câble d'alimentation.
16

Étape 3
Étape 4
Les cordons d'alimentation des jambes gauche et droite doivent être connectés aux
cordons d'alimentation des deux côtés du bureau. Branchez ensuite la prise du câble
à ressort au bureau.
Après avoir installé les jambes, insérez les manchons de protection gauche et droit,
qui seront attirés par la surface magnétique en bas.
~
17

Étape 6
Étape 5
Serrez les boulons [A] à l'aide d'une clé Allen [B] pour installer les pieds [04] sur les
jambes [02]&[03].
Une fois l'installation de la table terminée, elle doit être retournée. Il est nécessaire
de le retourner de l'autre côté du contrôleur pour éviter d'endommager le contrôleur
sous pression.
02
03
A
A
04
04
B
LOURD ! vous aurez peut-être
besoin d'aide pour cette étape.
18

Montage à l'aide d'un passe-fil
ATTENTION!
Pour le bureau debout Verre Galaxie, nous avons égale-
ment fourni un tapis de protection de bureau. Lorsque
vous devez installer un support d'écran sur le dessus du
bureau, veuillez vous référer à l'illustration ci-dessous
pour installer le tapis de protection de bureau afin
d'éviter les dommages potentiels pouvant survenir
pendant le processus d'installation du support d'écran.
Tapis de protection
de bureau
Montage à l'pince de serrage en C
19

Utilisation du chargement sans fil et du chargeur USB
C1 C2 A
Sortie C1+C2 : 60W Max + 40W Max
Sortie C1/C2 : 100W Max
Sortie A : 22.5W Max
Sortie C1+A : 80W Max + 18W Max
Sortie C2+A : 60W Max + 22.5W Max
Sortie C1+C2+A :
45W Max + 30W Max + 18W Max
Utiliser deux portsUtiliser un port Utiliser trois ports
Distribution de courant aux ports C1/C2/A
Après avoir placé le téléphone portable sur le
module de chargement sans fil, le module s'élèvera
de 60° et tournera horizontalement de 30° en sens
horaire, et le téléphone portable détectera automa-
tiquement le chargement. Après avoir retiré le
téléphone portable, le module de chargement sans
fil se réinitialisera.
Zone de détection de lumière
Lorsque vous agitez votre
main sur cette zone, la
lumière du port USB s'allume.
20
Table of contents
Languages:
Other ErgoAV Indoor Furnishing manuals