Errebi COMPACT KS10 User manual
KNIVES AND SCISSORS SHARPENING MACHINE
(by Fazzini Technology
USE AND MAINTENANCE
MANUAL
MODEL COMPACT KS10
SERIAL NUMBER
ERREBI S.p.A.
Via Pianezze, 42-49
32040 CIBIANA DI CADORE - ITALY
Te . 0435-542500 Fax 0435-542522
www.errebispa.com

PRELIMINARY INSTRUCTIONS
We thank you for your purchase of the COMPACT KS10 knives and scissors sharpener .
This manual contains general data and information about the machine use and maintenance. The
manual must be always available for the operators . Before operating the unit please read this manual
and mantain it for future referral .
For any communication concerning the machine, please always indicate the serial number contained
in this manual and on the label applied on the machine side.
All machines are factory tested before shipment.
A different use of the machine as that foreseen in this manual is forbidden. The company Errebi Spa
disclaims all responsibility for the improper use of the machine.
INDEX
1. Machine description and installation 3
1.1 Machine description
1.2 Technical data
1.3 Installation and starting
2. Instructions 9
2.1 General instructions
2.2 User obligations
2.3 Maintenance instructions
2.4 Personnel – training
3. Use instructions 11
3.1 Operations and controls - use instructions
3.1.1 First starting of the machine
3.1.2 Starting of the machine
3.1.3 Start and stop the safety device
3.1.4 Sharpening instructions
4. Maintenance 19
4.1 Routine maintenance
4.2 Special maintenance
4.3 Operations and personnel in charge
5. Declaration of conformity 23
6. Electrical diagram 24
7. Symbols 24
6. Warranty 25
ERREBI S.p.A.
Sharpener mode COMPACT KS10
Use and maintenance manua Version 01-2013
2

1. MACHINE DESCRIPTION AND INSTALLATION
1.1 Machine description ( FIG. 1.1 – FIG. 1.2 – FIG. 1.3- FIG. 1.4 – FIG. 1.5
This sharpener has been designed to simp y and effective y so ve the prob em of sharpening knives and
scissors .
It consists of a a uminium structure (5) , a painted stee basement (15) containing the e ectric system and a
front paitend stee structure (14) containing the whee s (1-2-3 ) . The contro button and the emergency stop (
22-21 ) are p aced on the basement (15) on the eft side (FIG. 1.3) . On the back of the basement (15) there
is a cab e with a socket for the power supp y .
The structure (5) supports 3 C40 stee shafts (7) p aced horizonta y and supported by 6 bearings (18). Two
he icoida C.B.N.-coated whee s are p aced on the 2 centra shafts in order to sharpen knives ( 1-2 ). A
cy indrica C.B.N.-coated whee is mounted on the right shaft to sharpen scissors (3) .The whee -ho ding
shafts are moved by a system consisting of 4 toothed pu eys ( 8-10-12 ) and a doub e toothing be t ( 17 ) ,
p aced in the basement (15).
The knives sharpening whee s (1-2) are penetrating and form a constant ang e. The knives sharpening
whee s turn upwards opposing each other so that they are opposed to the edge of the b ade to be
sharpened .The scissors sharpening whee (3) turns antic okwise. On the structure is mounted a reference
inc ined surface for scissors sharpening ( 4 ) ( FIG. 1.2 ).
A connection to insert the vacuum c eaner tube is mounted on the right side of the front structure (14).
The machine can be provided by a system ( Optiona ) that a ows to keep the b ade of the knife in the right
position during the sharpening operation ( Right Position System ) ( FIG. 1.5 ) .
The machine was designed and constructed to sharpen only metal knives ans scissors . The
sharpening of any other cutting and/or working tool is forbidden.
The following blades can be sharpened: knives : flat blades with straight or convex edge ;
scissors : flat blades and straight edge .
The following blades cannot be sharpened: deformed or non-flat blades, broken or splintered blades,
blades with concave edge, hook-shaped blades, too long and thick blades (max. thickness 4 mm,
max. length 400 mm , serrated blades , blades with hardness < 50 Hrc , cleavers , heavy butcher
knives , half heavy butcher knives .
ERREBI S.p.A.
Sharpener mode COMPACT KS10
Use and maintenance manua Version 01-2013
3
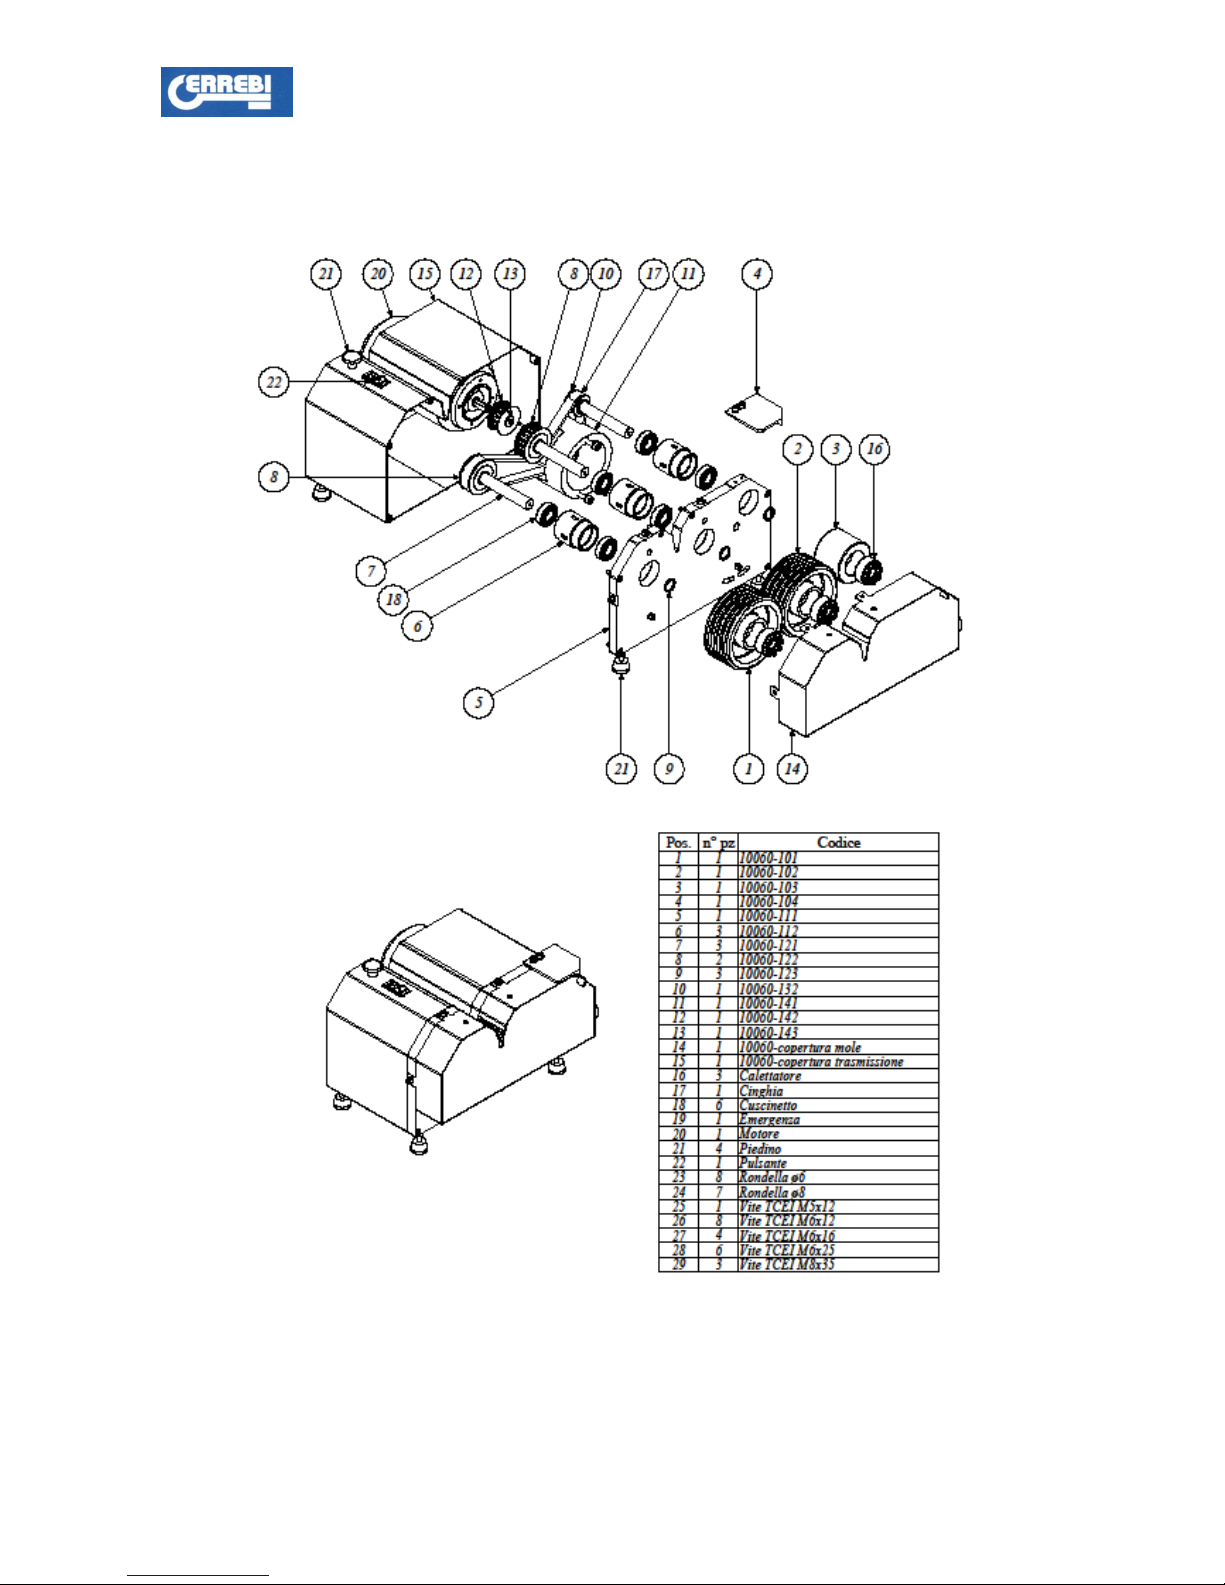
FIG. 1.1
ERREBI S.p.A.
Sharpener mode COMPACT KS10
Use and maintenance manua Version 01-2013
4

FIG. 1.2
FIG. 1.3
ERREBI S.p.A.
Sharpener mode COMPACT KS10
Use and maintenance manua Version 01-2013
5

1.2 TECHNICAL DATA
PERFORMANCES :
Sharpening : knives and scissors
Whee s tip speed : 8,21 m/sec
MOTOR :
Power : 0,37 kw
Revo utions : 1400 rev/min
ELECTRICAL VOLTAGE / FREQUENCY :
Vo tage : 230 Vo t
Frequency : 50 Hz
HELICOIDAL WHEELS FOR KNIVES :
Diameter : 140 mm
C.B.N.grit : B107
Ang e of the edge : 27°
CYLINDRICAL WHEEL FOR SCISSORS :
Diameter : 80 mm
C.B.N.grit : B107
Ang e of the edge : 80°
DIMENSIONS AND WEIGHT :
Wight : 410 mm
Leght : 390 mm
Height : 270 mm *
Weght : 32 Kg **
* with R.P.S. : 410 mm 500 mm
** with R.P.S. : 32,400 Kg
SOUND EMISSION :
Leq dBA machine on : 80,5 dB
Leq dBA sharpening : 81,8 dB
Data taken at 10 cm from the ear of the operator . Height of the operator 173 cm .
ERREBI S.p.A.
Sharpener mode COMPACT KS10
Use and maintenance manua Version 01-2013
6

1.3 Installation and starting ( Fig. 1.4 – 1.5
WARNING : Carefully read this manual before installing and using the machine and carrying
out maintenance operations. Respecting the instructions indicated in this manual it is possible to
obtain better performances and to guarantee the personnel safety.
WARNING : Do always handle and store the machine in a careful manner paying attention to
the fingers .
Unpack the machine and check that it was not damaged during transport.
P ace the machine at approx. 90 cm on a stab e working surface checking that it ays on the four ower
supports .
WARNING : Failure to properly ground this power tool can cause serious electrical shock. It
is absolutely necessary that the machine is connected to a power grid equipped with suitable
earthing. The power supply should be equipped with protection fuses ( 6 Amp. .
Check that the ine vo tage and frequency correspond to the connection vo tage and frequency of the
machine motor.
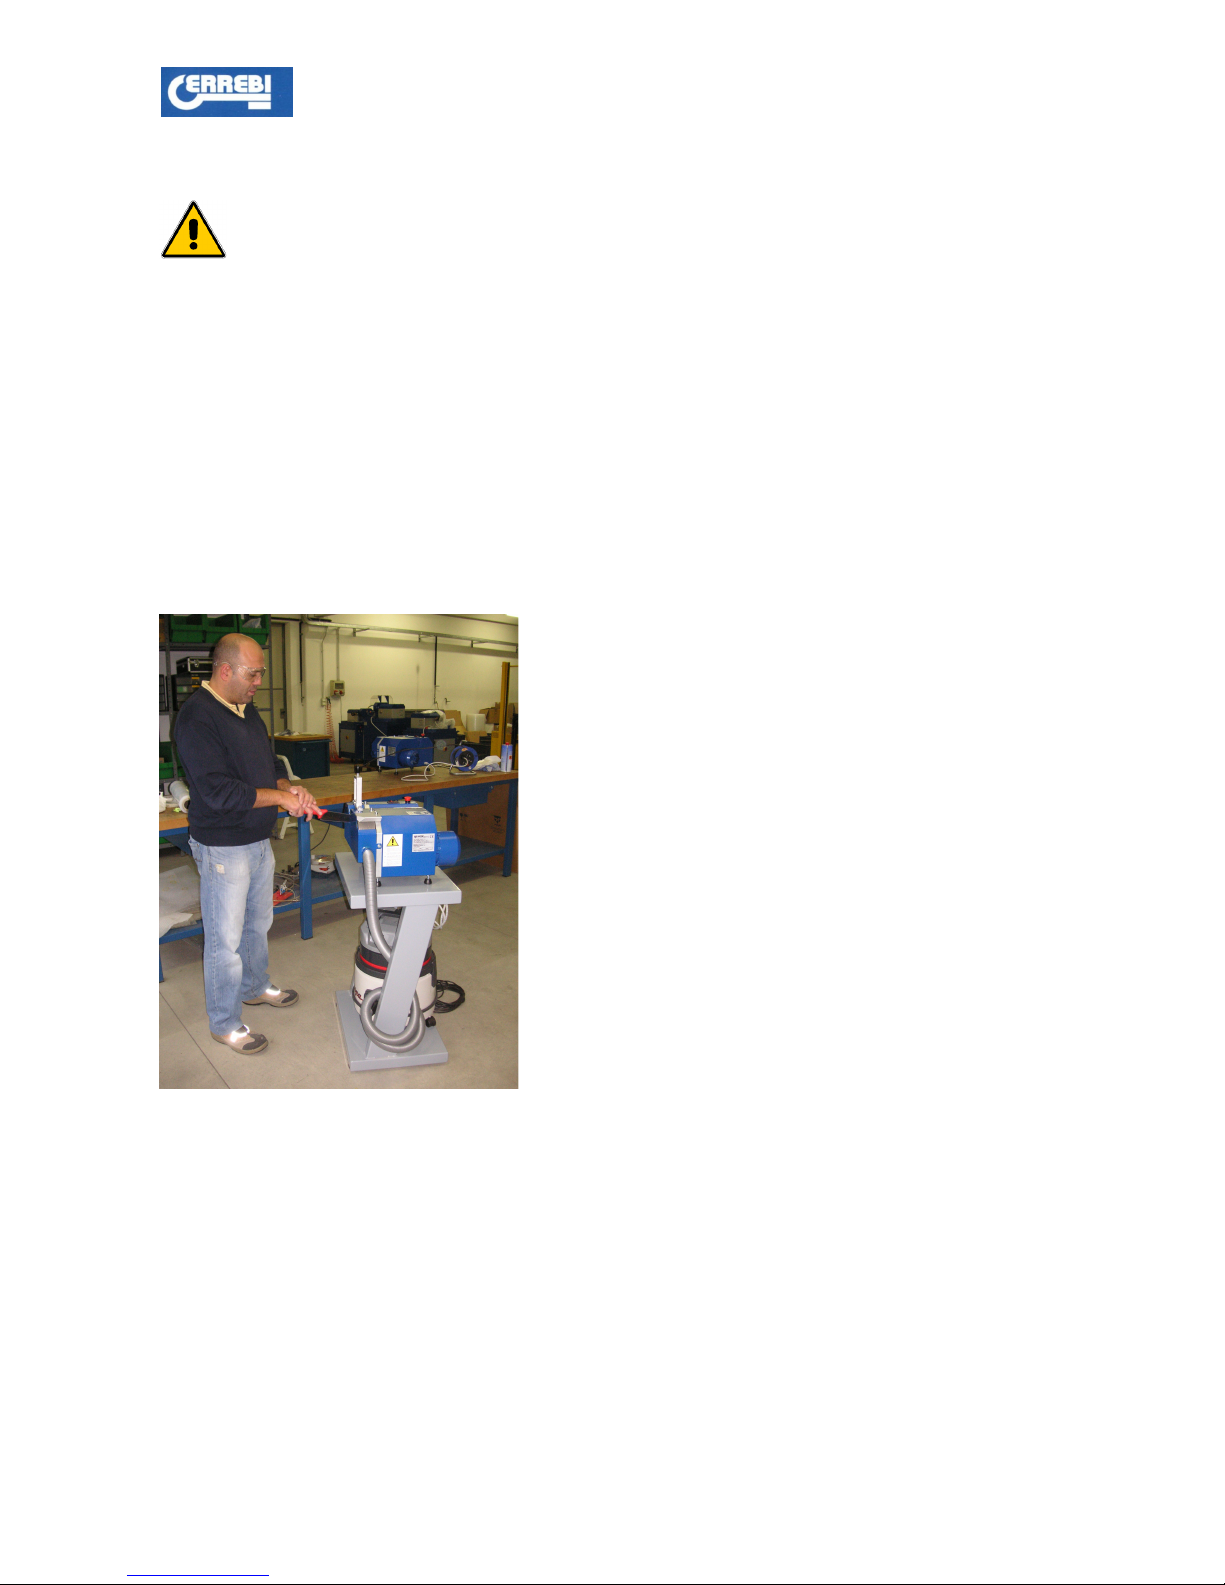
Dust control ( Fig. 1.4
WARNING : Grinding generates dust. Most of the dusts generated when grinding are from
the material being ground. Excessive dust inhalation may affect the breathing function. To avoid
breathing impairment always employ dust controls . Contact the department responsible personnel
concerning the safety regulations in force and the accident preventing devices .
The vacuum c eaner must be :
-in conformity with safety regu ations ;
-with a power minimum of 1000 watts .
Connect the vacuum c eaner tube to the connection and verify that the ine vo tage and frequency
correspond to the vo tage and frequency connection .
Connect the out et to the power supp y socket.
Right Position System ( R.P.S. ( Fig. 1.5
If the machine it is provided by the R.P.S. , it is necessary assemb e it on the front structure . P ace it in the
perfect centre and before to start the machine verify manua y that the R.P.S. do not touch the whee s .
ERREBI S.p.A.
Sharpener mode COMPACT KS10
Use and maintenance manua Version 01-2013
7

FIG. 1.4
FIG. 1.5
ERREBI S.p.A.
Sharpener mode COMPACT KS10
Use and maintenance manua Version 01-2013
8

2. INSTRUCTIONS
2.1 User obligations
WARNING : Carefully read this manual before installing and using the machine and carrying
out maintenance operations. Respecting the instructions indicated in this manual it is possible to
obtain better performances and to guarantee the personnel safety .
WARNING : It is forbidden to carry out any operation when the machine is moving . Stop the
machine, disconnect it from the electrical power supply and wait that the wheels stand still before
carrying out any operation .
1. p ace the machine in a venti ated p ace;
2. the working area shou d be suitab y i uminated in order to guarantee a perfect visibi ity;
3. avoid the presence of exp osive substances, f ammab e or harmfu iquids and gases;
4. any tampering and/or change is forbidden;
5. p ace the machine in a suitab e environment, since it is not made of rust preventing materia and may
re ease meta powder. The machine shou d not be p aced in the fo owing environments:
rooms containing food ;
humid or co d room ;
6. personne and working environment shou d be equipped with suitab e protections;
7. a ways keep the operating instructions handy at p ace of use.;
8. it is forbidden to make any change to the machine .
2.2 USER OBLIGATIONS
WARNING : Contact the department responsible personnel concerning the safety regulations
in force and the accident preventing devices.
1. it is very important to know a machine performances;
2. before using the machine avoid a dangerous conditions, check that the machine functions correct y
and that it is operated by authorized personne on y;
3. the department responsib e personne shou d be informed about any irregu arity;
4. the personne using the machine shou d not wear g oves, beard, moustache or ong hair. Long hair
shou d be put up. Do not wear oose c othes such as ties, scarfs, c othes with wide s eeves, torn or
unbottoned c othes; do not wear neck aces, brace ets, rings, watches or any other kind of jewe that
can be entang ed in moving parts;
5. the machine can sharpen on y b ades showing suitab e dimensions, shape and materia (see par.
1.1). Otherwise, meta part sp itting can occur. Alway use approved safety glasses . Safety
glasses should have side shields.
6. the mechanica or e ectrica safety devices shou d not be removed or changed;
7. do not put fingers or other body parts into the moving whee s;
8. the machine and the sorrounding area shou d be a ways free from foreign objects, especia y if they
are not suitab y fixed;
9. pay attention during sharpening, avoid inattention and hurried operations;
10. the machine shou d be stopped after the sharpening operations;
11. check that the machine sorrounding area is not s ippery;
12. rags soaked in f ammab e or harmfu iquids shou d not be kept near the machine;
13. c ean the b ades before sharpening. Dirty b ades wou d cause deposits that endanger the whee
effectiveness;
14. after sharpening c ean the b ades with a c ean rag paying attention to the cutting edge;
15. do not c ean the machine with humid rags and do not wet it with water or any other iquid. The
machine shou d be c eaned on y with a dry c oth and/or a vaccum c eaner;
16. keep the machine c ean ;
ERREBI S.p.A.
Sharpener mode COMPACT KS10
Use and maintenance manua Version 01-2013
9

17. always employ dust controls appropriate to the materials being ground . The vacuum cleaner
must be with a power minimum of 1000 watts ;
18. keep guards in place , safety guards must be kept in p ace and in working order .
2.3 MAINTENANCE INSTRUCTIONS
WARNING : It is forbidden to carry out any operation when the machine is moving . Stop the
machine, disconnect it from the electrical power supply and wait that the wheels stand still before
carrying out any operation .
1. do not carry out any operation when the machine is switched on and/or moving;
2. do not carry out any operation before the whee s stand sti ;
3. the machine shou d be disconnected before carrying out any operation;
4. the machine cannot be connected if a protection screws are not tightened.
2.4 PERSONNEL – TRAINING
The working and maintenance operations shou d be carried out by suitab e and qua ified personne . The use
instructions shou d a ways be avai ab e and must be respected.
Suitab e and qua ified personne shou d show the fo owing characteristics:
the personne shou d know the machine functioning and the re ated dangers;
it shou d be in fu possession of its physica and menta facu ties;
it shou d not show a terations caused by medicines, drugs and a coho ;
it shou d be psychica y ba anced;
it shou d be aware that the b ade can be dangerous if it is not hand ed correct y.
Unauthorized personnel cannot work with the machine and/or carry out any operation.
ERREBI S.p.A.
Sharpener mode COMPACT KS10
Use and maintenance manua Version 01-2013
10
3. USE INSTRUCTIONS
WARNING : Carefully read this manual before installing and using the machine and carrying
out maintenance operations. Respecting the instructions indicated in this manual it is possible to
obtain better performances and to guarantee the personnel safety .
WARNING : CHECK VOLTAGE! Compare electrical data of machine with those of your power
supply.
3.1 Operations and controls - use instructions
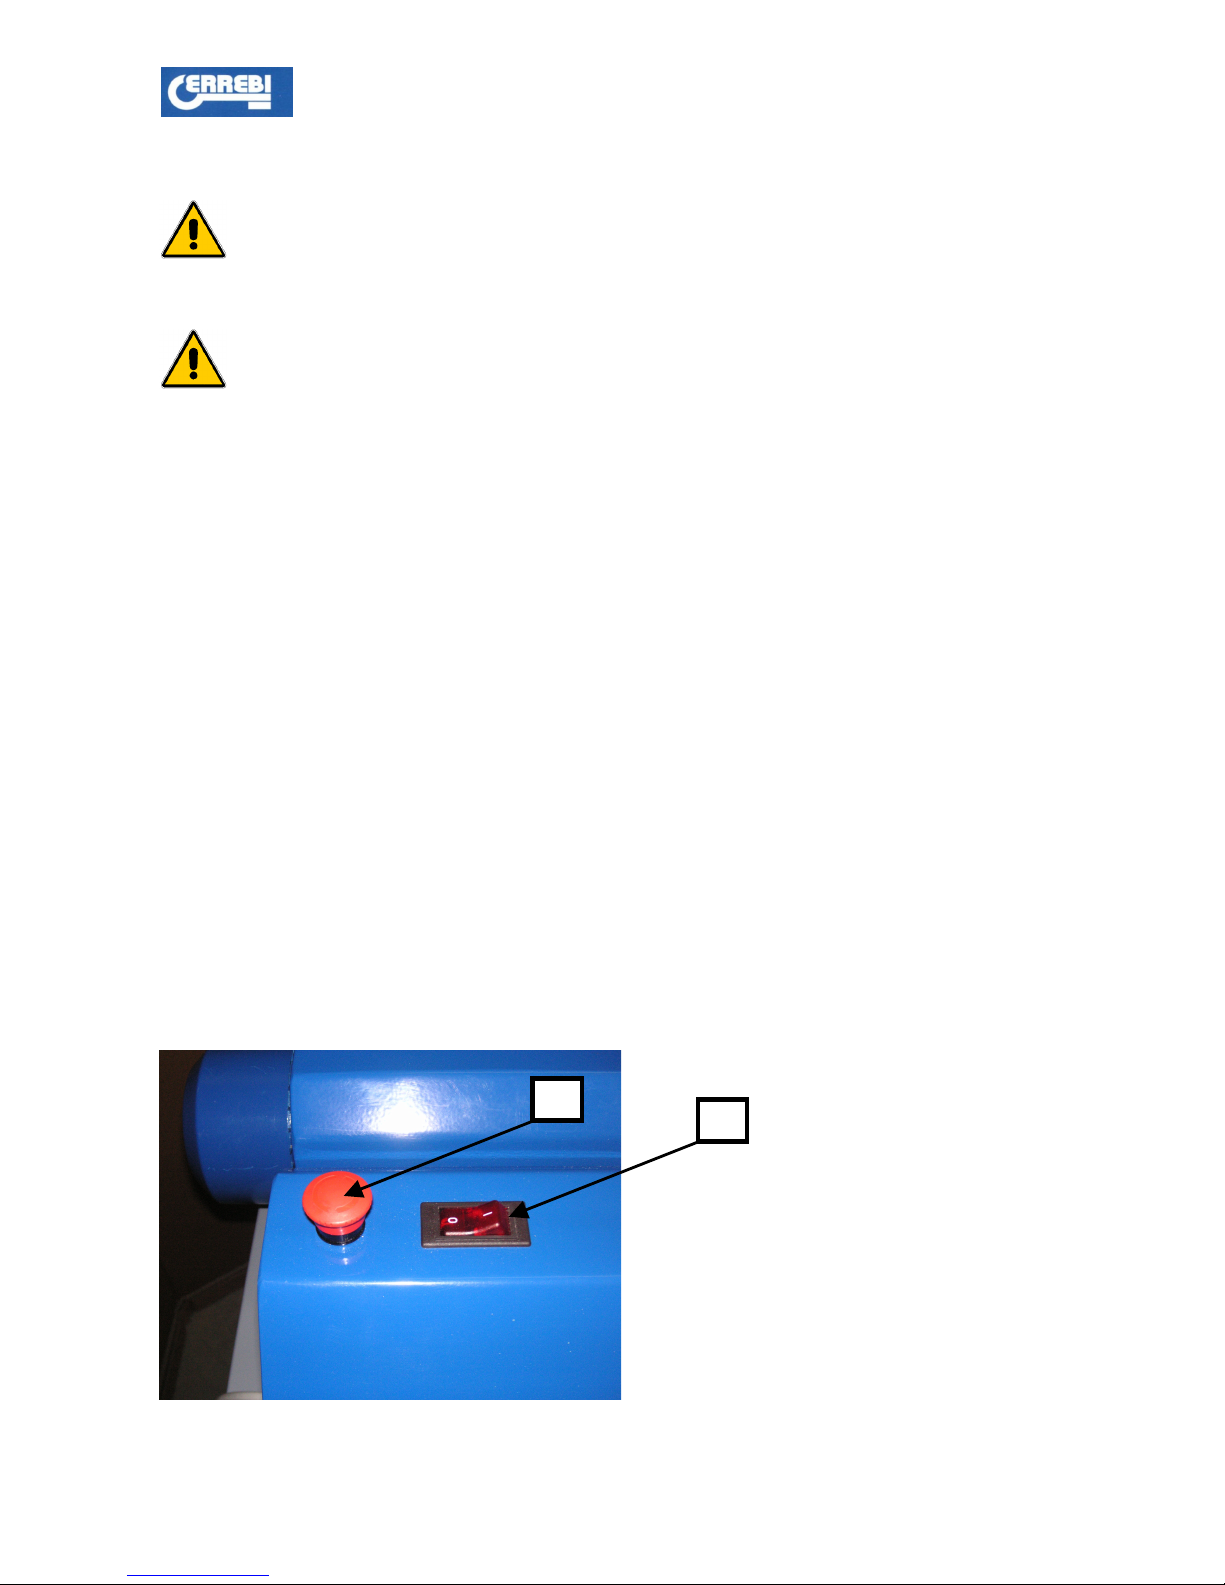
3.1.1 First starting of the machine ( FIG. 3.1
Carry out the fo owing operations when first starting the machine:
check that the machine has been correct y insta ed ;
check that the safety device (21) is off ;
push the bottom switch ( I ) (22) ;
check that the machne does’nt make any anoma ous noise
3.1.2. Starting of the machine ( FIG. 3.1
Push the start bottom - I (22).
Before the sharpening operation wait for 3-4 seconds .
3.1.3 Machine stop ( FIG. 3.1
To stop the machine push the bottom ( O ) (22) .
3.1.4 Start and stop the safety device - Turn off ( FIG. 3.1
The machine is equipped by a safety device ( 21 ), which can be easi y pushed under a possib e anoma ous
or dangerous conditions.
To deactivate the safety device it is necessary to turn it as indicated on the bottom .
FIG. 3.1
ERREBI S.p.A.
Sharpener mode COMPACT KS10
Use and maintenance manua Version 01-2013
11
A
B
3.1.5 Sharpening instructions
WARNING : Improper use may cause serious injury . The machine was designed and
constructed to sharpen only metal knives and scissors . The sharpening of any other cutting and/or
working tool is forbidden. Sharpen only blades showing suitable dimensions, shape and material
(see par. 1.1 . Otherwise, metal part splitting can occur. Alway use approved safety glasses . Safety
glasses should have side shields.
Do not wet the whee s with any iquid or other materia . The machine must be operated with dry functioning
without using any kind of materia .
C ean the b ades before sharpening. Dirty b ades wou d cause deposits that endanger the whee
effectiveness
KNIVES SHARPENING
OPERATOR’S POSITION ( FIG. 3.2
The figure 3.2 shows the correct position of the operator during the knife sharpening .
FIG. 3.2
ERREBI S.p.A.
Sharpener mode COMPACT KS10
Use and maintenance manua Version 01-2013
12

SHARPENING ( FIG. 3.3 – 3.4 – 3.5 – 3.6 – 3.7 – 3.8 – 3.9
Carry out the fo owing operations to obtain a satisfactory resu t :
Blades with straight and smooth edge (Figure 3.3 – 3.4 :
1. take the knive by the hand e and p ace the b ade para e y to the horizonta surface keeping the tip
foreward;
2. approach the b ade to the midd e of the he icoida whee s and keep it as straight as possib e;
3. move the b ade backward and foreward three times or more pressing it s ight y .
4. remove the knive by ifting it;
5. check the obtained resu t ;
6. repeat the operation unti obtaining the required edge.
WARNING : Light pressure works best , let the grinding wheels do its job . Extra pressure will
reduce the wheels and knife life . Extra pressure may cause a machine block .
Blades with convex and smooth edge (Figure 3.5 – 3.6 :
1. take the knife by the hand e and p ace the b ade with a s ope of about 10 degrees with respect to the
horizonta surface and keep the tip foreward ;
2. approach the b ade to the midd e of the he icoida whee s without damaging the tip. Keep the tip as
straight as possib e ;
3. move the b ade backward and foreward three times or more pressing it s ight y. Fo ow the b ade
profi e avoiding a too steep s ope of the knive and pay attention not to damage the tip;
4. remove the knive by ifting it ;
5. check the obtained resu t by vertica y cutting a piece of paper ;
6. repeat the operation unti obtaining the required edge.
WARNING : Light pressure works best , let the grinding wheels do its job . Extra pressure will
reduce the wheels and knife life . Extra pressure may cause a machine block .
Right Position System ( R.P.S. ( Optional ( FIG. 3.9
The R.P.S. a ows to keep the b ade of the knife in the right position during the sharpening operation . The
sharpening operation shou d be done in the same way as exp ained eaning the reference of the R.P.S. on
the back side of the b ade . In this case the free hand can be leaned on the top part of the R.P.S. , but
without any pressing . During the sharpening operation the R.P.S. wi fo ow the movement .
ERREBI S.p.A.
Sharpener mode COMPACT KS10
Use and maintenance manua Version 01-2013
13

After sharpening the knive it is advisab e to remove the featheredge by running the edge on both sides on a
fine grain sharpening stee . The b ade shou d form an ang e of max. 20 degrees with respect to the
sharpening stee axis.
WARNING : At the end of the downward movement the blade tip should be moved away form
the sharpening steel so that it does not touch the handle in order to avoid dangers.
Take the sharpening stee vertica y with one hand. With the other hand seize the knive hand e and ay the
b ade on the sharpening stee tip without exceeding the suggested 20 degree ang e. S ide the b ade on the
sharpening stee a ong the edge performing an arched movement.
It is of great importance that the sharpening stee has a very fine grain. The common y used sharpening
stee s are not suitab e for this operation.
We suggest the use of the ceramic-coated sharpening stee produced by our company (art. FR300-300) .
ERREBI S.p.A.
Sharpener mode COMPACT KS10
Use and maintenance manua Version 01-2013
14

FIG. 3.3
FIG. 3.4
FIG. 3.5
FIG. 3.6
ERREBI S.p.A.
Sharpener mode COMPACT KS10
Use and maintenance manua Version 01-2013
15
CORRECT
CORRECT
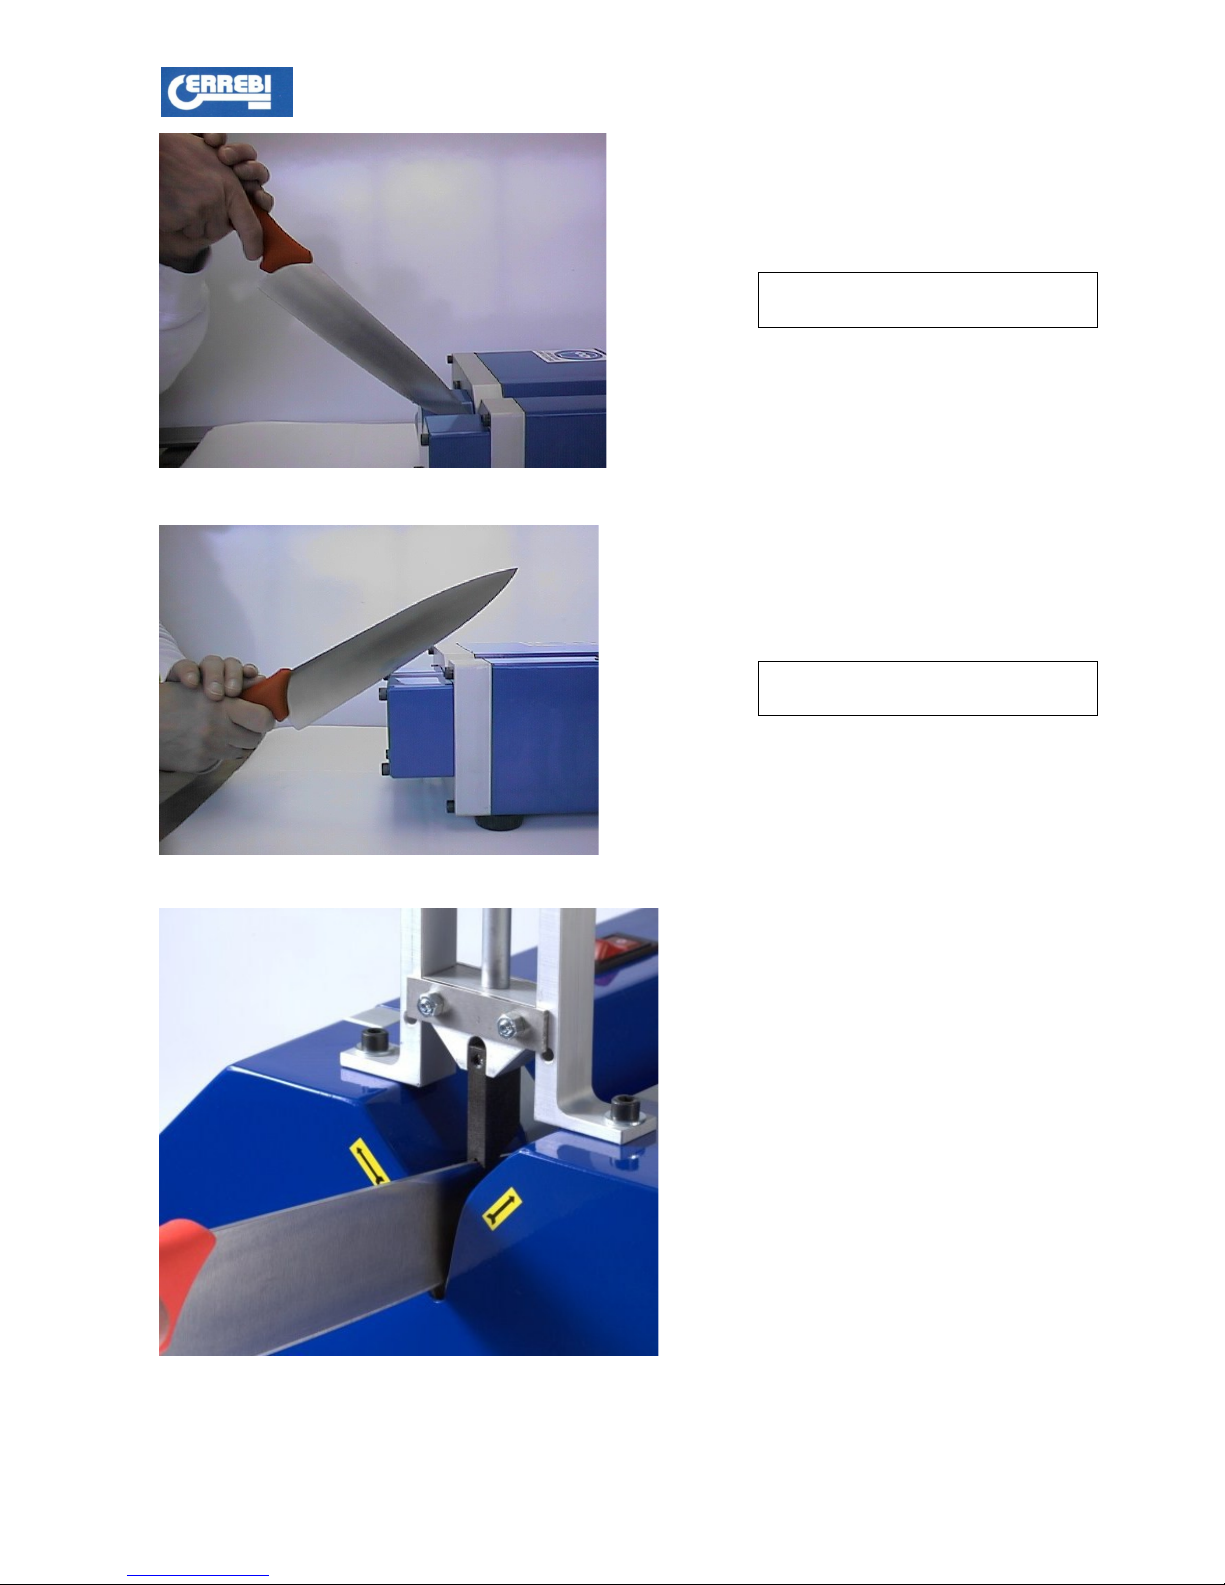
FIG. 3.7
FIG. 3.8
FIG. 3.9
ERREBI S.p.A.
Sharpener mode COMPACT KS10
Use and maintenance manua Version 01-2013
16
NOT CORRECT
NOT CORRECT

SCISSOR SHARPENING
OPERATOR’S POSITION ( FIG. 3.10
The figure 3.10 shows the correct position of the operator during thescissors sharpening .
WARNING : The cylindrical C.B.N. coated wheel mounted on the right shaft allows to
sharpen scissors. The sharpening of any other cutting and/or working tool is forbidden.
WARNING : Avoid any fitting of the blade between wheel and reference . Otherwise, metal
part splitting can occur and the machine will be damaged . Alway use approved safety glasses .
Safety glasses should have side shields.
SHARPENING ( FIG. 3.11 – 3.12
Carry out the fo owing operations to obtain a satisfactory resu t:
1. open the scissors, seize the hand e of the b ade to be sharpened and ay the inner side of the
scissors b ade on the reference inc ined surface of the cy indrica whee ;
2. press the b ade s ight y towards the whee and s ide it backward and foreward 2 or 3 times keeping
the inc ined surface as a reference ;
3. turn the scissors and sharpen the other b ade;
4. repeat the operation unti obtaining the required edge.
FIG. 3.10
ERREBI S.p.A.
Sharpener mode COMPACT KS10
Use and maintenance manua Version 01-2013
17
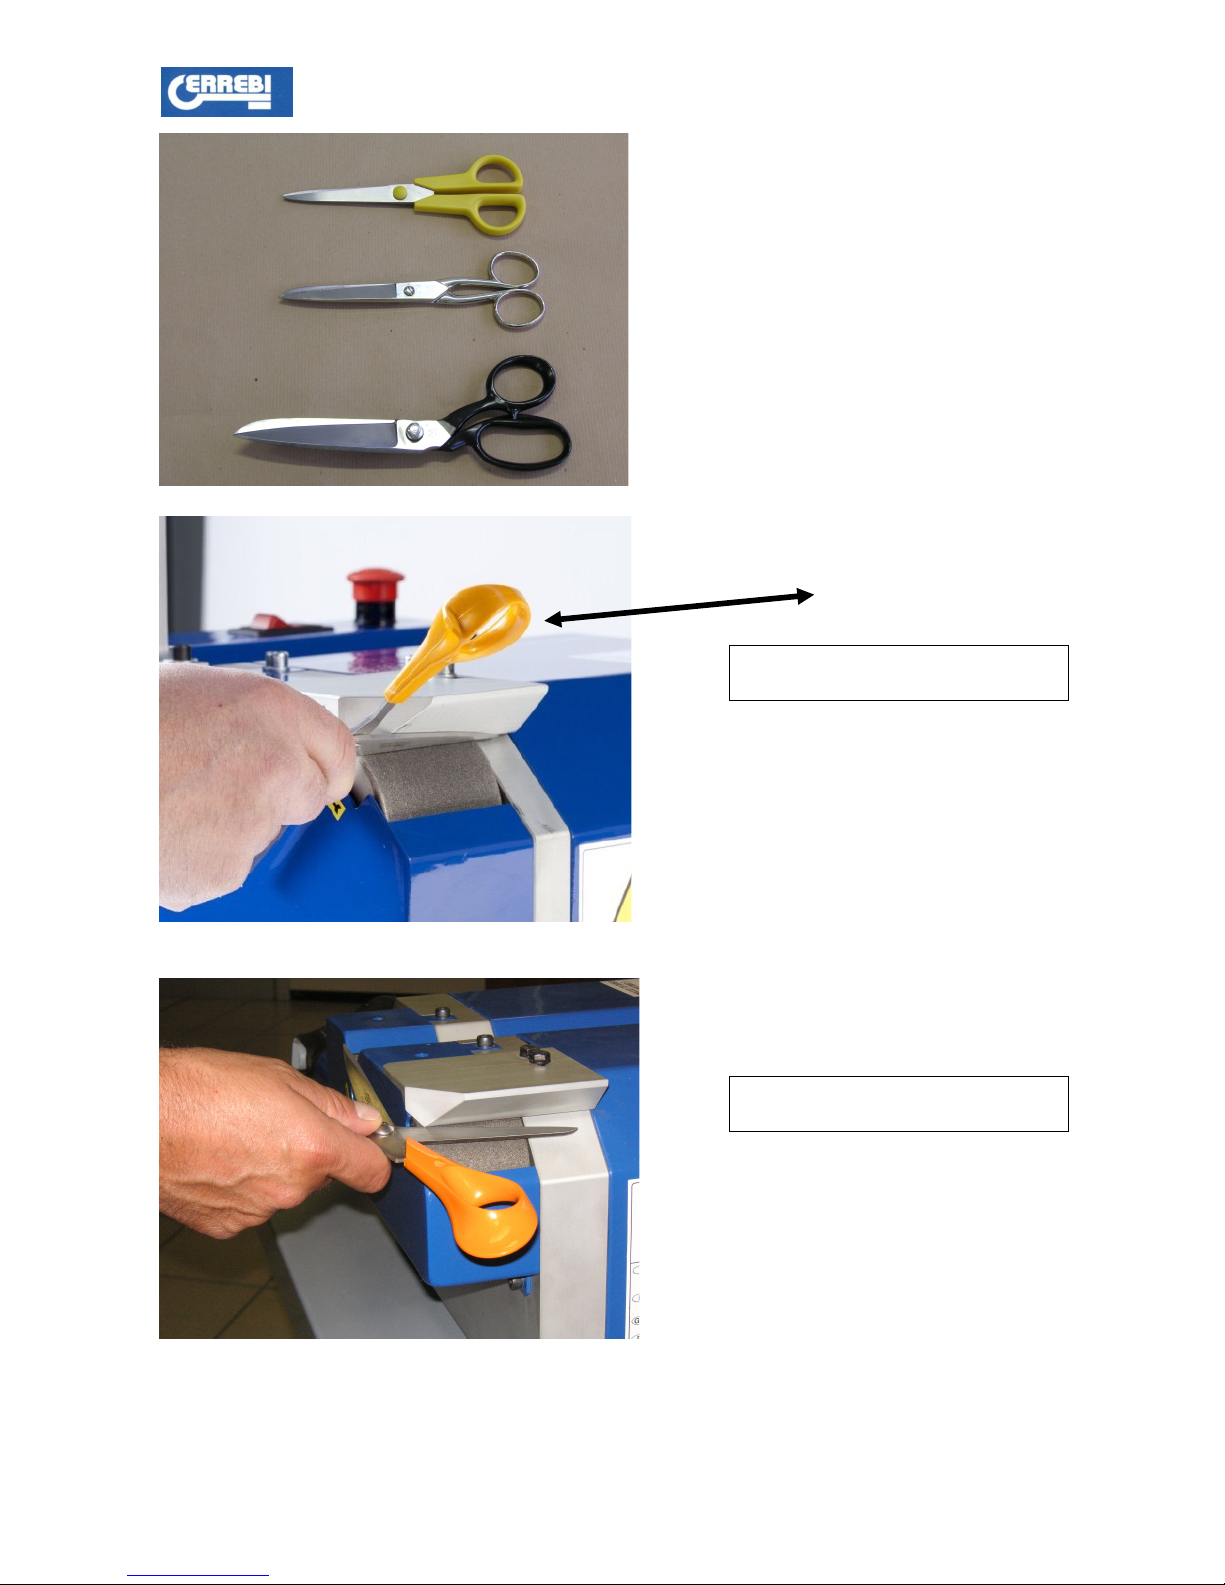
Fig. 3.11
FIG. 3.12
FIG. 3.13
ERREBI S.p.A.
Sharpener mode COMPACT KS10
Use and maintenance manua Version 01-2013
18
CORRECT
NON CORRECT

4. MAINTENANCE ( FIG. 1.1
WARNING : It is forbidden to carry out any operation when the machine is moving . Stop the
machine, disconnect it from the electrical power supply and wait that the wheels stand still before
carrying out any operation .
4.1 Routine maintenance
WHEELS
WARNING : The wheels should be handled carefully at all times .
Each use inspect whee qua ity. If damage has occurred on the whee profi e the whee s shou d be changed .
SAFETY DEVICES
Each use check the efficiency of the protections and the safety systems .
EXTERNAL CLEANING OF THE MACHINE
Dai y c ean the machine working surface and the upper protection using a dry rag or a vaccum c eaner to
avoid meta powder deposits .
INTERNAL CLEANING OF THE MACHINE ( Fig. 1.1
Carry out the following operations montly or every 50 hours of use :
FRONT STRUCTURE
1. remove the screws of the front structure (14) ;
2. check that in the whee compartment there is no meta powder. If necessary, c ean it by a dry rag or
the vaccum c eaner ;
3. check that the vacuum c eaner connection is not c ogged. If necessary c ear and c ean it using a dry
rag or the vacuum c eaner ;
4. empty the dust contro and check its functioning ;
5. assemb e the front structure (14 ) .
STEEL BASEMENT
1. remove the screws of the stee basement (15) ;
2. check that in the compartment there is no meta powder. If necessary, c ean it by a dry rag or the
vaccum c eaner ;
3. check status of be t and pu ey ;
4. assemb e the stee basement (15) .
4.2 Special maintenance
The specia maintenance inc udes a repairs caused by fai ures or wear of components except the whee s.
WARNING : Before carrying out any special maintenance operation, contact the
manufacturer.
ERREBI S.p.A.
Sharpener mode COMPACT KS10
Use and maintenance manua Version 01-2013
19
4.3 Operations and personnel in charge
WHEEL REPLACEMENT (FIG. 4.1
When the whee efficiency decreases the whee meta becomes visib e or the sharpened b ade is overheated.
In this case it is necessary to rep ace the whee s.
WARNING : use only wheels supplied by the manufacturer , the removed wheels should be
disposed of as scrap and not in the environment .
Wheel disassembly:
1. remove the screws from the machine front side (14);
2. insert a 7/8 mm diameter pin into the 10 mm ho e on the he icoida whee (1). The pin shou d be
inserted into the ho e on the a uminium structure;
3. un oose the eight M6 socket head screws of the whee fixing system (16) ;
4. repeat the same operation on the fixing system of the whee (2) ;
6. mantaining the pin into the whee (2) it is possib e un oose the eight M6 socket head screw of the
fixing system of the whee (3) ;
6. remove the two he icoida whee s from the shafts.
Wheel assembly:
WARNING : Before assembling check the status of the new wheels , if damage has occorred
on the wheel profiles the wheels should be changed . Otherwise metal part splitting can occur .
WARNING : The wheel marked with D/R must be mounted on the right side shaft , the wheel
marked with S/L must be mounted on the left side shaft , the profile of the wheels will move in the
opposite direction of the operator . Wrong assembling the profile will move towards the operator
creating a dangerous situation , approacing the sharpening with the tip the knife could be ejected .
Clean the wheels housing and lubricate the shafts before the wheels assembly . Check that both
parts (7 are in correct position .
1. p ace the two he icoida whee s (1-2) on the shaft . The whee screws shou d fit one into the other.
ATTENTION : The wheel marked with D/R must be mounted on the right side shaft , the wheel
marked with S/L must be mounted on the left side shaft ;
2. insert the 7/8 mm pin into the 10 mm ho e on the he icoida whee (1). The pin shou d be inserted into
the ho e on the a uminium structure;
3. the wheel (1 should be fixed correctly; simultaneously tighten the 8 socket head screws of
the wheel fixing system pushing the pulley and keeping the wheel against the shaft end ;
when fixed it must be any movement to the shaft direction ;
4. remove the 7/8 mm pin and insert it into the he icoida whee (2). Turn the fixed whee (1) so that the
screw crest of one whee is in the midd e of the other screw. It is very important to avoid any contact
between the screws. Repeat the same operations did before ( see point 3) ;
5. mantaining the pin into the whee (2) it is possib e oose the eight socket head screw of the fixing
system of the whee (3) ;
6. remove the 7/8 mm pin from the whee (2) ;
7. check the rotation of the whee s manua y , any contact shou d be between the whee s ;
8. assemb e the front structure (14) and the basement (15).
ERREBI S.p.A.
Sharpener mode COMPACT KS10
Use and maintenance manua Version 01-2013
20
Table of contents


