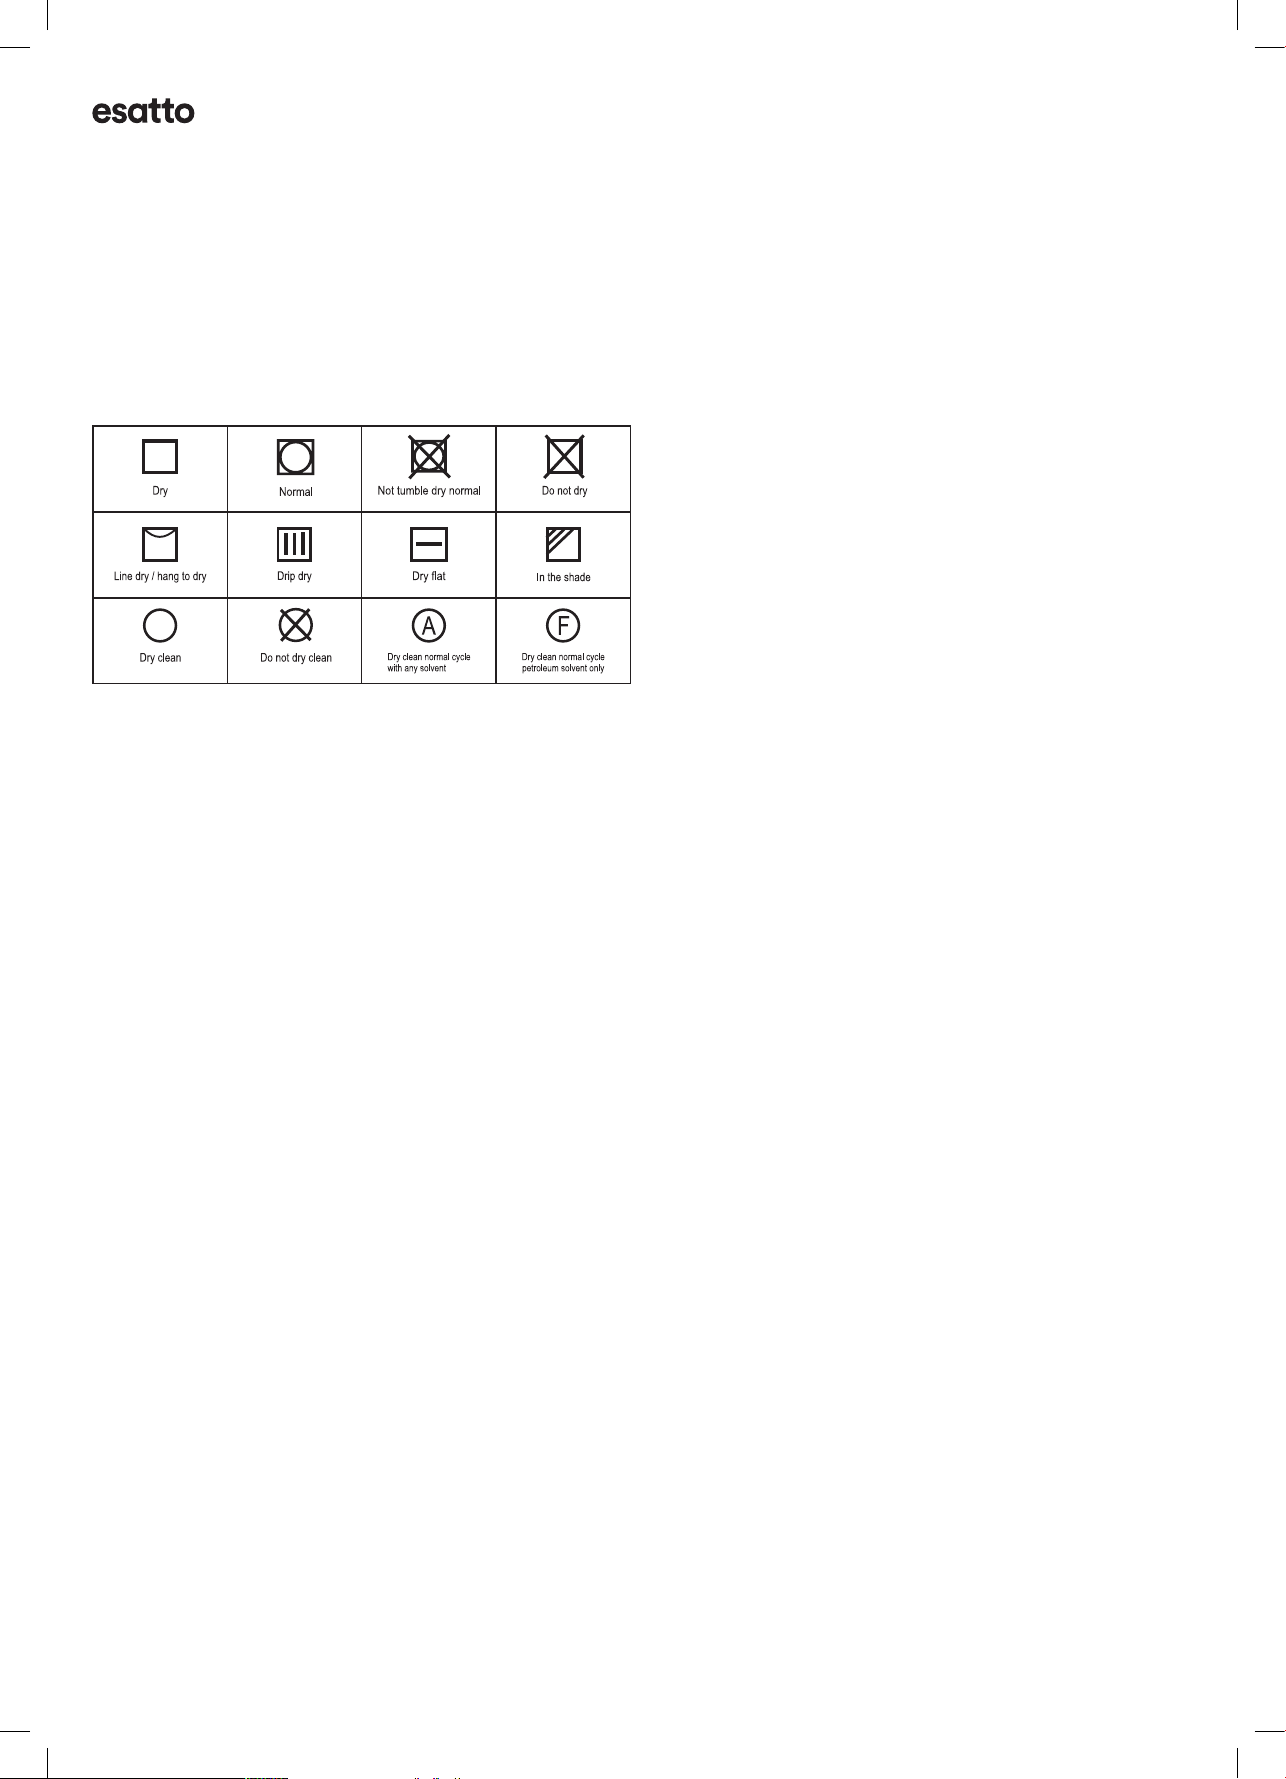
Esatto ECD80W User manual

Version
V1.0 0423
Everything you need
for your 8kg Condenser
Clothes Dryer is in this
User Mnul
Model/s
ECD80W

User Manual
2
everything
you need

esatto.house
3
Pge 5
Welcome
Pge 6
Sfety Wrnings
Pge 8
Your Dryer
Pge 9
Instlltion
Pge 10
Control Pnel
Pge 11
Operting
Instructions
Pge 15
Clening
Mintennce
Pge 17
Technicl
Specictions
Pge 18
Troubleshooting
Pge 20
Purchse Detils
Pge 21
Your Receipt
Pge 22
Wrrnty
Informtion
Contents

User Manual
4
THIS PAGE HAS BEEN LEFT
INTENTIONALLY BLANK

esatto.house
5
Congratulations on purchasing your new Esatto appliance. The Esatto brand is proudly
distributed within Australia by Residentia Group Pty Ltd.
Please refer to the warranty card at the rear of this manual for information regarding
your product’s parts and labour warranty, or visit us online at: www.residentia.group
At Residentia Group, we are customer obsessed and our Support Team are there to
ensure you get the most out of your appliance. Should you want to learn more about
your clothes dryer such as the various drying modes or importantly taking care
of the appliance, our Support Team are here to help.
You can use our online Support Centre at anytime by visiting:
http://support.residentiagroup.com.au
Or you can contact us via phone by dialing: 1300 11 HELP (4357).
It is important that you read through the following use and care manual thoroughly to
familiarise yourself with the installation and operation requirements of your appliance
to ensure optimum performance.
Again, thank you for choosing an esatto appliance and we look forward to being of
service to you.
Kind Regards,
The Residentia Team
Residentia Group
—
Head Office
165 Barkly Avenue
Burnley, Victoria
Australia 3121
—
ACN
600 546 656
—
Online
residentia.group
www.esatto.house
@esatto.house
—
Postage
PO Box 5177
Burnley, Victoria
Australia 3121
—
Telephone
1300 11 4357
Welcome

User Manual
6
DRYER CARE SYMBOLS
Plese py ttention to use the drying mchine if the
mterils of your clothes cn not be dried by it or contin
the symbols s follows:
IMPORTANT!
CAUTION: RISK OF FIRE!
To prevent ny dmges to your nd others’ life or property,
you hve to follow the sfety notes.
• This product belongs to the ctegory of electricl
pplinces, nd only for drying textiles which hve been
wshed with wter in the household.
Plese py ttention to the sfety of power use during
the opertion!
• The power source with relible erthing must be
used. Its erth wire must be buried under the ground
nd shll not be connected with the public utilities
such s city wter pipe or gs pipe etc. The erth wire
nd null wire shll be distinguished nd shll not be
connected together.
• The mximum mss of dry textile mteril is 8 kilogrms
to be used in the pplince.
• Tht the tumble dryer is not to be used if industril
chemicls hve been used for clening.
• Do not dry unwshed items in the tumble dryer.
• Adequte ventiltion hs to be provided to void
the bck ow of gses into the room from pplince
burning other fuels, including open res
• WARNING: never stop tumble dryer before the end
of the drying cycle unless ll items re quickly removed
nd spred out so tht the het is dissipted.
• The exhust ir must not be dischrged into ue
which is used for exhusting fumes from pplince
burning gs or other fuels.
• The pplince must not be instll behind lockble
door, sliding door or door with hinge on the
opposite side to tht of the tumble dryer. In such wy
tht full opening of the tumble dryer door is restricted.
• Keep pets wy from this pplince.
• Oil-ected items cn ignite spontneously, especilly
when exposed to het sources such s in tumble dryer.
The items become wrm, cusing n oxidtion rection
in the oil. Oxidtion cretes het. If the het cnnot
escpe, the items cn become hot enough to ctch re.
Piling, stcking or storing oil-ected items cn prevent
het from escping nd so crete re hzrd.
• If it is unvoidble tht fbrics tht contin vegetble
or cooking oil or hve been contminted by hir cre
products be plced in tumble dryer they should rst
be wshed in hot wter with extr detergent-this will
reduce, but not eliminte, the hzrd.
• The pplince should not be overturned during norml
use or mintennce.
• If the power cble is dmged, it must be replced by
the mnufcturer, its service gent or similrly qulied
persons in order to void hzrd.
• This pplince is for indoor use only.
• The openings must not be obstructed by crpet.
• Children of less thn 3 yers should be kept wy
unless continuously supervised. If the pplince
pper high temperture bnormlly, plese drw
the mil plug immeditely.
• The pplince is not intended for use by persons
(including children) with reduced physicl, sensory
or mentl cpbilities, or lck of experience nd
knowledge, unless they hve been given supervision
or instruction concerning use of the pplince by
person responsible for their sfety. Children should be
supervised to ensure tht they do not ply with
the pplince.
• Alwys close the door fter use. In this wy you will
void the dnger of children nd pets (or smll nimls)
climbing onto or into the dryer or hiding things in it.
To ensure your nd your fmily’s sfety, plese mke
improvement immeditely if ny power use t your
home does not meet the bove-mentioned requirement.
ELECTRIC SHOCK HAZARD
• The pplince corresponds to protection clss I nd
my only be connected to plug with protective
conductor tht hs been instlled properly. When
connecting the pplince to the mins, mke sure
tht the mins voltge is correct. You cn nd more
informtion bout this on the rting plte.
• The electricl sfety of this tumble dryer cn only be
gurnteed when correctly erthed. It is essentil tht
this stndrd sfety requirement is met. If in ny doubt,
plese hve the household wiring system tested by
qulied electricin. The mnufcturer cnnot be held
lible for the consequences of n indequte erthing
system (e.g. electric shock).
• Before connecting the tumble dryer, ensure tht the
connection prmeter on the rting plte (fuse rting,
voltge nd frequency) mtch the mins electricity
supply. If in ny doubt, consult qulied electricin.
• The electricl sfety of this tumble dryer cn only be
gurnteed when correctly erthed. It is essentil tht
this stndrd sfety requirement is met. If in ny doubt,
plese hve the household wiring system tested by
Sfety Instructions

esatto.house
7
qulied electricin. The mnufcturer cnnot be held
lible for the consequences of n indequte erthing
system (e.g. electric shock).
• Do not pull the power cord forcefully. Plese grsp the
mins plug insted
• Do not drw the power cord forcefully to pull out
the mins plug.
• Do not bend, clmp or dmge the power cord
nd the power plug.
• If the power cble is dmged, it must be replced by
the mnufcturer, its service gent or similrly qulied
persons in order to void hzrd.
• Plese do not plug/drw the mins plug with wet hnds.
• Wrning: The pplince must not be supplied through
n externl switching device, such s timer, or
connected to circuit tht is regulrly switched on nd
o by utility.
• Do not connect the pplince to the mins electricity
supply by n extension led, multi-socket dpter
or similr.
• The ccessibility of the plug must lwys be ensured, in
order to disconnect the tumble dryer from the mins.
• If the pplince pper high temperture bnormlly,
plese drw the mil plug immeditely.
INJURY DANGER
• The pplince must not be instlled behind lockble
door, sliding door or door with hinge on the
opposite side to tht of the tumble dryer, in such wy
tht full opening of the tumble dryer door is restricted.
• Do not disssemble nd instll the dryer under no
instruction or supervision.
• Do not stck this dryer on wshing mchine without
stcking kits. If wnt stcking on wshing mchine,
plese purchse the Independent prts nd it must
be instlled by the mnufcturer, its service gent or
similrly qulied persons in order to void hzrd.
• Do not len on the opened door of the dryer.
• Do not put ny objects on the dryer, such s cndle or
electric cooker.
• Condensed wter is not drinking wter.
It cn cuse helth problems in both people nd
nimls if consumed.
DAMAGE DANGER
• Do not dry over the rted cpcity.
• Do not operte the dryer without the lint lter.
• Do not dry the clothes before being spun.
• Do not expose the dryer directly under the sun, nd
indoor use only.
• Do not instll the dryer in the humid nd wet/drenching
environment.
• During clening nd mintennce, plese do remember
to pull out the power plug nd do not directly wsh the
dryer with wter.
EXPLOSION & FIRE DANGER
• Plese do not dry the clothes with some mmble
substnces such s the col oil, lcohol or there will be
the explosion.
• The tumble dryer is not to be used if industril
chemicls hve been used for clening.
• Do not dry unwshed items in the tumble dryer.
• Items tht hve been soiled with substnces such s
cooking oil, cetone, lcohol, petrol, kerosene, spot
removers, turpentine, wxes nd wx removers should
be wshed in hot wter with n extr mount of
detergent before being dried in the tumble dryer.
• Items such s fom rubber (ltex fom), shower cps,
wterproof textiles, rubber bcked rticles nd clothes
or pillows tted with fom rubber pds should not be
dried in the tumble dryer.
• The nl prt of tumble dryer cycle occurs without
het (cool down cycle) to ensure tht the items re left
t temperture tht ensures tht the items will not be
dmged.
• Oil-ected items cn ignite spontneously, especilly
when exposed to het sources such s in tumble dryer.
• The items become wrm, cusing n oxidtion rection
in the oil. Oxidtion cretes het. If the het cnnot
escpe, the items cn become hot enough to ctch re.
Piling, stcking or storing oil-ected items cn prevent
het from escping nd so crete re hzrd.
• Remove ll objects from pockets such s lighters
nd mtches.
• If it is unvoidble tht fbrics tht contin vegetble
or cooking oil or hve been contminted by hir cre
products be plced in tumble dryer they should rst
be wshed in hot wter with extr detergent. This will
reduce, but not eliminte, the hzrd.
• WARNING: Never stop tumble dryer before the end
of the drying cycle unless ll items re quickly removed
nd spred out so tht the het is dissipted.
• Openings must not be obstructed.
• The lint lter hs to be clened frequently nd lint must
not to be llowed to ccumulte round the dryer.
DISPOSAL OF PACKAGING
• The pckging is designed to protect the pplince
from dmge during trnsporttion. The pckging
mterils re environmentlly friendly nd should be
recycled. Recycling the pckging cn reduce the use
of rw mterils in the mnufcturing process nd the
mount of wste in lndll sites.

User Manual
8
NOTE!
The imges in this user mnul re for reference only. Your pplince my pper dierently.
ACCESSORIES
The following prts re necessry
if you wish to use the drin hose to
drin the wter externlly. Plese
follow the instructions below to do this.
Your Dryer
INSTALLATION
9
Accessories
Product Description
Note: The actual model you purchased might differ. Please see the product you purchased in kind prevail.
Installation
Connector
Hose holder
Drain hose joint
Pull up the drain
hose joint
Pull up the upper drain hose Connect the external
drain hose to the water
pump
Put the external drain hose
into the floor drain
(be careful not to bend the
external drain hose)
Power cord
Door filter
Water container
Door
Control panel
Air inlet
Maintenance cover
Drum
Top board
The following parts are necessary for this model to avoid the question of the housing drawer
is easy to fill full.
Please wear gloves to install them as per the instruction below.
Power Cord
Top Pnel
Wter Continer
Drying Drum
Lint Filter
Mintennce Cover
Air Inlet
Door
Control Pnel
INSTALLATION
9
Accessories
Product Description
Note: The actual model you purchased might differ. Please see the product you purchased in kind prevail.
Installation
Connector
Hose holder
Drain hose joint
Pull up the drain
hose joint
Pull up the upper drain hose Connect the external
drain hose to the water
pump
Put the external drain hose
into the floor drain
(be careful not to bend the
external drain hose)
Power cord
Door filter
Water container
Door
Control panel
Air inlet
Maintenance cover
Drum
Top board
The following parts are necessary for this model to avoid the question of the housing drawer
is easy to fill full.
Please wear gloves to install them as per the instruction below.
Hose Holder
Condensing Drin Hose
Connector
1. Use pir of pliers to
remove the drin hose
from the hose connector
2. Insert the externl
dringe hose
3. Put the hose holder in the wshing bsin or ny other sink.
Be creful not to bend the externl drin hose.
INSTALLATION
10
Use a pliers to remove
the drain hose from
the hose connector.
Insert the
external
drainage hose.
Max.120cm
200cm
Put the hose holder in the washing
basin or any other sink.
Transport
Move cautiously. Do not grasp any salient parts of machine. The machine door cannot
be used as the handle for transport.
Risk of injury and damage!
Improper handling of the appliance may result in injury.
• The appliance is very heavy. Never transport or carry the appliance alone; always
with the assistance of another person.
• Remove all obstacles on the transport route and from the installation location, e.g.
open doors and clear away objects lying on the floor.
• Do not use the open door as a handhold.
• Remove all package material before using the appliance.
• Before setting up the tumble dryer, check it for any externally visible damage.
Do not install or use a damaged tumble dryer.
• Do not install the tumble dryer in a room where there is a risk of frost occurring.
At temperatures around freezing point the tumble dryer may not be able to operate
properly. There is a risk of damage if the condensed water is allowed to freeze in the
pump and hoses.
Installation Position
Warning!
!!
• Children can become entangled in the packaging film or swallow small parts and
suffocate. Do not allow children to play with the packaging.
• The appliance must not be installed behind a lockable door, a sliding door or a door
with a hinge on the opposite side to that of the tumble dryer, in such a way that a
full opening of the tumble dryer door is restricted.

esatto.house
9
Instlltion
IMPORTANT!
If the power cord is dmged, it must be replced by Residenti Group or one of it’s uthorised service representtives.
Plese contct 1300 11 HELP (4357) nd ensure the pplince is completely disconnected from the power supply.
TRANSPORT
Move cutiously. Do not grsp ny slient prts of mchine. The mchine door cnnot be used s the hndle for trnsport.
Risk of injury nd dmge! Improper hndling of the pplince my result in injury.
• The pplince is very hevy. Never trnsport or crry the pplince lone;
lwys with the ssistnce of nother person.
• Remove ll obstcles on the trnsport route nd from the instlltion loction, e.g. open doors nd cler wy objects
lying on the oor.
• Do not use the open door s hndhold.
• Remove ll pckge mteril before using the pplince.
• Before setting up the tumble dryer, check it for ny externlly visible dmge.
Do not instll or use dmged tumble dryer.
• Do not instll the tumble dryer in room where there is risk of frost occurring. At tempertures round freezing point
the tumble dryer my not be ble to operte properly. There is risk of dmge if the condensed wter is llowed to
freeze in the pump nd hoses.
INSTALLATION POSITIONING
• Children cn become entngled in the pckging lm or swllow smll prts nd suocte. Do not llow children to
ply with the pckging.
• The pplince must not be instlled behind lockble door, sliding door or door with hinge on the opposite side
to tht of the tumble dryer, in such wy tht full opening of the tumble dryer door is restricted.
• Do not restrict the oor clernce through deep pile crpets, strips of wood or similr. This might cuse het built-up
which would interfere with the opertion of the pplince.
1. It is recommended tht, for your convenience, the mchine is positioned close to your wshing mchine.
2. Do not stck this dryer on wshing mchine without stcking kits. (If you wnt to stck this dryer on wshing
mchine, plese purchse the independent prts. Instlltion shll be done by the mnufcturer, its service gent or
similrly qulied persons to void ny hzrds.)
3. The tumble dryer must be instlled in clen plce, where dirt does not ccumulte. Air must be ble to circulte
freely round the pplince. Do not obstruct the front ir inlet or the ir intke grilles t the bck of the mchine.
4. To keep vibrtion nd noise within minimum level when the dryer is in use, it must be plced on rm nd
level surfce.
5. The feet must never be removed.
LEVEL ADJUSTING
Once in its permnent operting position, check tht the dryer is bsolutely level with the id
of spirit level. If it is not, djust the feet by hnd or using tool.
POWER SUPPLY CONNECTION
1. Mke sure tht the voltge of the power supply is the sme s the electric speciction.
2. Do not connect the dryer with the power connection bord, universl plug or socket,
do not use multi-plug dpters nd extension cbles.
11
INSTALLATION
Level Adjusting
Once in its permanent operating position, check that
the dryer is absolutely level with the aid of a spirit level.
If it is not, adjust the feet by hand or using a tool.
Power Supply Connection
4. To keep vibration and noise within minimum level when the dryer is in use, it must
be placed on a firm and level surface.
5. The feet must never be removed.
1.Make sure that the voltage of the power supply is the same as the electric specification.
2.Do not connect the dryer with the power connection board, a universal plug or socket,
do not use multi-plug adapters and extension cables.

User Manual
10
17
OPERATION
My Cycle
Used to define and save your favourite programme, which is used frequently.
1.Select the desired programme and other drying functions.
2.Press and hold the【Time】button for 3 seconds until the beep sounds and the desired programme has been saved.
3. Turn the programme selector to the 【My Cycle】position, then you can start your favorite programme.
If you want to change the 【My Cycle】settings, repeat the steps 1 and 2.
My Cycle
Child Lock
1.This machine incorporates a special child safety lock, which can prevent children from carelessly pressing
buttons or making faulty operation.
2.When the drying cycle is running, press the【Anti-Crease】button for 3seconds to activate the
child lock function.
3.When child lock function is set, the display will show the child lock icon and all button are deactivated, except
【On/Off】button.
4.To deactivate the child lock function, the【Anti-Crease】button shall be pressed for 3 seconds.
Child Lock
Display
Delay
Remaining Time indicator/Error message
Clean filter (warning)
Empty water container (warning)
Intensity
Anti-crease
My cycle
Child lock
YOUR CONTROL PANEL
1. On/O
2. Strt/Puse
3. Additionl Function Buttons
4. LED Disply Screen
5. Progrm control dil
DISPLAY SCREEN SYMBOLS
Control Pnel
1
2
5
Dely
Child Lock
Time Remining Indictor /Error Messge
Clen Filter (Wrning)
Anti-crese
Intensity
Empty Wter Continer (Wrning)
3
4
My Cycle

esatto.house
11
Operting Instructions
BEFORE FIRST USE
Before rst use, plese use some soft fbric to clen the inside drum.
1. Put some clen rgs into the drum
2. Plug the power, press On/O
3. Select the Refresh Progrm, press Start/Pause button
4. After nishing this progrm, plese refer to the “Mintennce nd Clening” section to clen the door lter.
Note: During drying, the compressor nd the wter will generte some noise which is completely norml.
BEFORE DRYING
1. Before drying, thoroughly spin the lundry in wshing mchine. High spin speed shortens the drying time nd
sves energy.
2. For uniform drying result, sort the lundry ccording to fbric type nd select the pproprite drying progrm.
3. Before drying, plese close zips, hooks nd eyelets, button, tie fbric belts, etc.
4. Remove ll objects from pockets such s lighters nd mtches.
5. Sew in or remove under wiring from brs.
6. Close duvet covers nd pillow cses to prevent smll items from being rolled up inside them.
7. Leve jckets open nd undo ny long zips so tht textiles dry evenly.
8. Do not over dry the clothes, becuse over dried clothes cn esily get creses.
9. Do not dry the rticles contining rubber or similr elstic mterils.
10. Keep the re round the tumble dryer clen. Col dust or our my cuse n explosion.
11. The door shll be opened only fter the progrm of the tumble dryer is nished to void being sclded by hot
stem or over heted drying mchine.
12. Clen the lint lter nd empty wter continer fter ech use to void extension of drying time nd increse of
energy consumption.
13. Do not dry clothes fter dry-clen process.
APPROXIMATE WEIGHTS OF DRY CLOTHES
Note: Do not put more clothing in the dryer thn the rted cpcity.
Do not dry dripping wet lundry, it my dmge the lundry.
Only dry lundry suitble for tumble drying. Regrd the lundry cre lbels:
Suitble for tumble drying
Norml drying process: Drying in the tumbler is possible under norml lod nd temperture 80°C.
Mild drying process: Cution is pproprite when tumble drying.
Select mild process with reduced therml ction.
Do not tumble dry: Articles unsuitble for drying in the tumbler.
14
OPERATION
Do not put more load than rated.
• Do not dry dripping wet laundry. The dryer might get damaged
•
Note!
The reference weight of dry clothes (weight per item)
Sweater
(mixed 800g)
Jacket
( 800g ) cotton
Jeans
(800g)
Bath Towel
( 900g )cotton
Single bedsheet
( 600g )cotton
T-Shirt
( 180g )cotton
Work clothes
( 1120g)
Underwear
( 70g )cotton
Pyjamas
( 200g)
Socks
( 50g )mixed-weave
Shirt
( 300g )cotton
Only dry laundry suitable for tumble drying. Regard the laundry care labels:
Suitable for tumble drying
Normal drying process: Drying in the tumbler is possible under normal load and
temperature 80°.
Mild drying process: Caution is appropriate when tumble drying. Select mild
process with reduced thermal action.
Do not tumble dry: Articles unsuitable for drying in the tumbler.
14
OPERATION
Do not put more load than rated.
• Do not dry dripping wet laundry. The dryer might get damaged
•
Note!
The reference weight of dry clothes (weight per item)
Sweater
(mixed 800g)
Jacket
( 800g ) cotton
Jeans
(800g)
Bath Towel
( 900g )cotton
Single bedsheet
( 600g )cotton
T-Shirt
( 180g )cotton
Work clothes
( 1120g)
Underwear
( 70g )cotton
Pyjamas
( 200g)
Socks
( 50g )mixed-weave
Shirt
( 300g )cotton
Only dry laundry suitable for tumble drying. Regard the laundry care labels:
Suitable for tumble drying
Normal drying process: Drying in the tumbler is possible under normal load and
temperature 80℃ .
Mild drying process: Caution is appropriate when tumble drying. Select mild
process with reduced thermal action.
Do not tumble dry: Articles unsuitable for drying in the tumbler.

User Manual
12
QUICK START
CAUTION!
• Prior to using the dryer, ensure tht it is correctly instlled.
AFTER DRYING
The pplince will sound n lert nd the disply with show "00:00" fter the drying cycle is complete.
NOTE!
The imges in this user mnul re for reference only. Your pplince my pper dierently.
DRYING START
The drum will rotte fter the progrm strts. The cycle phse LED in the disply will light up nd the remining
progrm time will be displyed.
DRYING END
1. The drum will stop rotting fter the progrm ends. The disply will show "0:00", lso the cycle phse
LED showing "End" nd relted LED will illuminte. The dryer will strt Anti-Crese function if user doesn't
remove the lod.
2. Plese press On/O button fter unloding the tumble dryer to cut o power nd pull out the plug.
OPERATION
12
After Drying
Drying
Buzzer beep and " :00"on display.0
1 2 3 4 5
open the door and
take out laundry
pull out the
container
pour out
condensate water
clean the filter power off
Quick Start
Before using, make sure the tumble dryer is installed correctly.
Note!
1
plug in
2
load
3
close the door
start
on select program select function
or default
• If the socket with a switch is used, please press the switch to turn off the power
directly.
Note!
Before Drying
Plug in Lod lundry Close the door
OPERATION
12
After Drying
Drying
Buzzer beep and " :00"on display.0
1 2 3 4 5
open the door and
take out laundry
pull out the
container
pour out
condensate water
clean the filter power off
Quick Start
Before using, make sure the tumble dryer is installed correctly.
Note!
1
plug in
2
load
3
close the door
start
on select program select function
or default
• If the socket with a switch is used, please press the switch to turn off the power
directly.
Note!
Before Drying
Press On Select desired
progrm Select ny
desired dditionl
progrms
Press Strt
OPERATION
12
After Drying
Drying
Buzzer beep and " :00"on display.0
1 2 3 4 5
open the door and
take out laundry
pull out the
container
pour out
condensate water
clean the filter power off
Quick Start
Before using, make sure the tumble dryer is installed correctly.
Note!
1
plug in
2
load
3
close the door
start
on select program select function
or default
• If the socket with a switch is used, please press the switch to turn off the power
directly.
Note!
Before Drying
Open the door
nd tke out
the lundry
Pull out the
continer Pour out the
condenste
wter
Clen the
lter
Power o
OPERATION
12
After Drying
Drying
Buzzer beep and " :00"on display.0
1 2 3 4 5
open the door and
take out laundry
pull out the
container
pour out
condensate water
clean the filter power off
Quick Start
Before using, make sure the tumble dryer is installed correctly.
Note!
1
plug in
2
load
3
close the door
start
on select program select function
or default
• If the socket with a switch is used, please press the switch to turn off the power
directly.
Note!
Before Drying
Operting Instructions (Continued)

esatto.house
13
USING THE ADDITIONAL FUNCTIONS
DELAY FUNCTION
This function is used for delying the strt of the drying progrm up to 24 hours. When the delyed progrm strts,
the time strts to countdown on the disply nd the dely icon blinks.
1. Lod your lundry nd mke sure the mchine door is closed.
2. Press the On/O button,then use the progrm selector knob to select the desired progrm.
3. You cn dditionlly select the Anti-Crease function ccording to your need.
4. Press the Delay button.
5. Repetedly to press the Delay button to select the desired dely time.
6. Then press the Start/Pause button nd the dryer will be in stndby nd the dely time will strt counting down.
The drying procedure will be utomticlly performed when the dely time is over.
7. If you press the Start/Pause button gin, the dely function will be pused.
8. If you wnt to cncel the “Dely” function, plese press the On/O button.
TIME
When the Time progrm is selected, the Time button cn be used to djust the drying time in 10 minute increments.
ANTICREASE FUNCTION
At the end of the drying cycle, the nti-crese opertion time is utomticlly set to 30 minutes or 120 minutes if you
select it. Press the Anti-crease button to select the time. If you do not wnt to use this function simply remove your
lundry t the end of the cycle.
This function prevents the lundry from creses. The lundry cn be removed during the nti-crese phse.
Except Cool, Wool nd Refresh, ll the other progrms hve this function.
INTENSITY
You cn djust the dryness level of the lundry by pressing the Intensity button.
1. The intensity function cn be ctivted only before the progrm strts.
2. Except the Cotton Iron, Delicte, Wool, Refresh, Cool nd Wrm progrms, ll the other progrms cn be
djusted
with the Intensity function.
MY CYCLE
Used to dene nd sve your fvourite progrm, so you cn use it frequently with the press of button.
1. Select the desired progrm nd other drying functions.
2. Press nd hold the Time for 3 seconds until the beep sounds nd the desired progrm settings hve been sved.
3. Next time you dry, turn the progrm selector to the My Cycle position, then you cn strt your fvourite
progrm. If you wnt to chnge the My Cycle settings, repet the steps (1) nd (2).
CHILD LOCK
This mchine incorportes specil child sfety lock, which cn prevent children from crelessly pressing buttons
nd doing dmge to themselves or the pplince.
1. When the drying cycle is running, press the Anti-Crease button for 3 seconds to ctivte the child lock function.
2. When child lock function is set, the disply will show Child lock icon nd ll button re dectivted,
except the On/O button.
3. To dectivte the child lock function, press the Anti-Crease button for 3 seconds.

User Manual
14
DRYING PROGRAMS TABLE
PROGRAM MAX LOAD RECOMMENDED USE/ PROPERTIES DELAY TIME
Cotton
Extr
8.0kg
For single or multi lyered cotton lundry to be dried
completely for immedite storge. Y NStndrd
Iron For single lyered cotton lundry to remin dmp for ironing.
Delicte - 1.0kg For delicte lundry tht is suitble for drying or lundry
dvised to be hnd wshed t low temperture. Y N
Mix - 3.5kg For mixed fbrics from cotton nd synthetics. Y N
Synthetics
Extr
3.5kg
For thick or multi-lyer synthetic fbrics to be
dried completely Y N
Stndrd To dry thin synthetic textiles, which re not ironed, such s
esy cre shirts, bby cloths or socks.
Wool - 1.0kg To refresh you wool items nd mke them more
fresh nd uy. Y N
Specil
Jens 6.0kg To dry jens or denim clothes tht re spun t high speed in
the wshing mchine.
Y N
Bed Linen 4.0kg To dry bed linen, bed sheets or other lrge items.
Sports 3.0kg To dry sportswer nd thin fbrics from polyester, which re
not ironed.
Shirts 3.0kg
For esy cre lundry such s shirts nd blouses equipped
with nti-crese functionlity to minimise the ironing eort.
Plce clothes loosely in the dryer. Once dried, remove quickly
nd hng it on clothes hnger.
My Cycle - - Dene nd sve your fvourite progrm settings. Y -
Time
Wrm -
To dry individul items or complete the drying process
of multi-lyer fbrics with dierent drying behviour,
such s jckets, pillows or voluminous items.
Min. 10 minutes — Mx. 120 minutes. Y Y
Cool - To ir items without heting.
Min. 10 minutes — Mx. 30 minutes.
Refresh 1.0kg To refresh clothes kept t closed environment for long time
or to remove odors. Min. 20 minutes — Mx. 150 minutes.
Note:
• Test progrmme in ccordnce with Regultion 392/2012/EU for energy lbelling, mesured in ccordnce with
EN 61121 nd suitble for drying norml cotton lod t rted lod cpcity.
• Thick or multi-lyered fbrics,e.g. bedlinen, jens, jckets etc, re not esy to dry.
We recommend the Cotton Extr progrmme for these instnces.
• As the uneven mteril, thick nd multi-lyered clothes re not esy to dry, it is better to choose the pproprite time
drying progrmme to dry them if some prts of the clothes still dmp fter progrmme nished.
• All dt re mesured in ccordnce with SASO-2883. The ctul consumption my dier from the vlues given in the
tble, depending on the mount of the lundry, type of fbric, residul moisture nd ny dditionl functions selected.
MODEL PROGRAM MAX LOAD SPIN SPEED RESIDUAL HUMIDITY DELAY
ECD80W
Cotton Stndrd 8.0kg 1000RPM 60% 168min
Cotton Stndrd 4.0kg 1000RPM 60% 97min
Synthetic Stndrd 3.5kg 800RPM 40% 57min
Operting Instructions (Continued)

esatto.house
15
Clening Mintennce
CLEANING AND CARE
EMPTYING THE WATER CONTAINER
WARNING!
Empty the wter continer fter ech use. Once the wter continer is lled completely, the progrm will be pused
nd the " FUL " icon will light. After the continer is emptied, the dryer cn be restrted by pressing Start/Pause button.
• Do not drink the condenste wter.
• Do not use the dryer without the wter continer.
CLEANING THE LINT FILTER
Mke sure you clen the door lter fter ech cycle.
1. Open the door.
2. Tke out the lint lter.
3. Open the lter nd remove the u on the lter.
You cn use running wter to help clen it.
4. Dry the lter door thoroughly before reinstlling it.
Note: Tke notice of the correct orienttion
of the lter before inserting it bck.
WARNING!
• The u ccumulted on the lter will block the ir
circultion. Not clening the lter regulrly will increse
drying time nd energy consumption.
• Disconnect the power cord before clening!
• Do not operte the dryer without the lter!
Note:
• The lint ccumulted on the lter will block the ir circultion, which will cuse
the extension of drying time nd increse energy consumption. Therefore the lint lter
shll be clened fter ech use.
• Tke notice of the correct orienttion before to insert the lint lter.
• Do not operte the dryer without the lint lter!
• Clen the lint lter fter ech use to prevent lint ccumultion inside the dryer
MAINTENANCE
21
Empty the water container
Clean the filter door
1. Pull out and hold the water container
with two hands.
2. Tilt the water container, pour out the
condensate water into the basin.
3. Install the
water container.
Clean the filters
Cleaning and Care
This dryer has a primary door lint filter and a base filter in front of the heat exchanger
for additional protection. Make sure you clean the door filter after each cycle.
The base filter need to be cleaned after each fifth drying programme.
1. Open the door.
2. Take out the filter.
3. Open the filter and remove the fluff on
the filter, You can clean it in water.
4. Dry the filter thoroughly before
installing it back.
door
running
door
• Take notice of the correct orientation
before to insert the door filter.
Note!
Door Filter
• Empty the water container after each use. Once the water container is filled
completely, the programme will be paused and the " " icon will light. After
the container is emptied, the dryer can be restarted by pressing
【Start/Pause】button.
• Do not drink the condensate water.
• Do not use the dryer without the water container.
Warning!
!!
Pull out the wter
continer nd keep
level with two hnds.
Tilt the wter continer
to pour out condenste
into the bsin.
MAINTENANCE
21
Empty the water container
Clean the filter door
1. Pull out and hold the water container
with two hands.
2. Tilt the water container, pour out the
condensate water into the basin.
3. Install the
water container.
Clean the filters
Cleaning and Care
This dryer has a primary door lint filter and a base filter in front of the heat exchanger
for additional protection. Make sure you clean the door filter after each cycle.
The base filter need to be cleaned after each fifth drying programme.
1. Open the door.
2. Take out the filter.
3. Open the filter and remove the fluff on
the filter, You can clean it in water.
4. Dry the filter thoroughly before
installing it back.
door
running
door
• Take notice of the correct orientation
before to insert the door filter.
Note!
Door Filter
• Empty the water container after each use. Once the water container is filled
completely, the programme will be paused and the " " icon will light. After
the container is emptied, the dryer can be restarted by pressing
【Start/Pause】button.
• Do not drink the condensate water.
• Do not use the dryer without the water container.
Warning!
!!
Reinstll the wter
continer once empty.
MAINTENANCE
21
Empty the water container
1. Pull out and hold the water container
with two hands.
2. Tilt the water container, pour out the
condensate water into the basin.
3. Install the
water container.
Clean the lint filter
Cleaning and Care
1. Open the door.
2. Take out the filter.
3. Open the filter and remove the fluff on
the filter, You can clean it in water.
4. Dry the filter thoroughly before
installing it back.
• The lint accumulated on the filter will block the air circulation, which will
cause the extension of drying time and increase energy consumption. Therefore
the lint filter shall be cleaned after each use.
• Take notice of the correct orientation before to insert the lint filter.
• Do not operate the dryer without the lint filter!
• Clean the lint filter after each use to prevent lint accumulation inside the dryer.
Note!
• Empty the water container after each use. Once the water container is filled
completely, the programme will be paused and the "FUL" icon will light.
After the container is emptied, the dryer can be restarted by pressing
【Start/Pause】button.
• Do not drink the condensate water.
• Do not use the dryer without the water container.
Warning!
!!

User Manual
16
CLEANING THE HEAT EXCHANGER
WARNING! Do not touch the het exchnger with your hnd s it my cuse injury.
Let the dryer to cool down rst.
Residul wter my lek out, plce n bsorbent cloth under the mintennce cover.
• Unlock the mintennce cover.
• Completely open mintence cover.
• Turn both locking levers towrds ech other.
• Pull out the het exchnger.
• Flush the het exchnger with wter to remove lint; let the wter drin properly.
• Clen the sels.
• Re-insert the het exchnger, the hndle t the bottom.
• Turn both locking levers.
• Close the mintennce cover until it locks into position.
WARNING! Do not dmge the het exchnger!
• Clen the het exchnger without pplying ny pressure. Otherwise the het exchnger could
be dmged. The dryer will not dry if the cooling ns re dmged or bent.
• Clen s necessry, pprox. once every 3 months, remove the u from the het exchnger
using vcuum clener with dusting brush ttched.
• Clen with wter only; do not use hrd/shrp-edged objects!
MAINTENANCE
WARNING!
• Disconnect the power cord before clening.
• Clen the dryer with clen dmp cloth only.
• Do not use solvents, brsive cleners, glss cleners or ll-purpose cleners.
These could dmge plstic surfces nd other prts.
• Plese wer gloves when clening.
CLEANING YOUR DRYER
• Prepre clen dmp cloth using clen wter.
• Clen the door, especilly the inside window.
• Clen the seling round the door opening.
• Clen the humidity sensor inside the drum.
• Tke out the lter, clen the seling nd ir ow openings.
• Before strting the dryer, dry ll prts with soft cloth.
Clening Mintennce (Continued)
MAINTENANCE
22
Cleaning the heat exchange
Leave the dryer to cool down.
Residual water may leak out, place an absorbent
cloth under the maintenance cover.
1. Unlock the maintenance cover.
2. Completely open maintenace cover.
3. Turn both locking levers towards each other.
4. Pull out the heat exchanger.
5. Flush the heat exchanger with water to remove lint;
let the water drain properly.
6. Clean the seals.
7. Re-insert the heat exchanger, the handle at the bottom.
8. Turn both locking levers.
9. Close the maintenance cover until it locks into position.
Please clean the heat exchanger approximately, once every
3 months if frequently used.
Do not damage the heat exchanger!
• Clean with water only; do not use hard/sharp-edged objects!
Do not operate the dryer without the heat exchanger!
Warning!
!!
Trouble Shooting
“ ”E32
“ ”E33
Display Reason Solutions
Humidity sensor error
Temprature sensor error
P lease contact your local service
center
if the problem persists.
Many malfunctions and faults that might occur in daily operation can be easily
remedied. Time and money will be saved because a service call won't be needed.
The following guide may help you to find the reason for a malfunction and correct it.
• Only authorised technicians can carry out repairs.
• If the LED displays other prompt and the dryer does not work, please call the service.
Warning!
!!

esatto.house
17
Technicl Specictions
Below outlines the technicl specictions for your Estto Condenser Dryer.
Model ECD80W
Size 595W 615D 845H (mm)
Net Weight 40kg
Rted Input Power 2200W
Ambient temperture +5°C ~ +35°C
Rted Cpcity 8.0kg
Rted Voltge 220–240V~
Rted Frequency 50Hz
Note:
• The rted cpcity is the mximum cpcity, mke sure tht
the dry clothes which re loded to the pplince do not exceed
the rted cpcity.
• Do not instll the tumble dryer in room when there is risk of frost
occurring. At tempertures round freezing point the tumble dryer my
not be ble to operte properly.
• There is risk of dmge if the condenste wter is llowed to freeze in
the pump, hoses nd / or condenste wter continer.

User Manual
18
Troubleshooting
OPERATION IN CASE OF EMERGENCY
In the event of n emergency you should:
• Switch o ll controls.
• Switch the wshing mchine o t the power point or t the fuse box.
• Cll the Residenti Support Tem on 1300 11 HELP (4357).
Some minor fults cn be xed by referring to the instructions given in the Troubleshooting section
below. There is lso self-help section online t https://support.residentigroup.com.u/
DESCRIPTION SOLUTION
Disply is not on
• Check if the power supply works.
• Check if the mins plug is inserted.
• Check the selected progrm.
• Press the On/O button.
"FUL" Displys
• Check the wter continer. If it's full, plese pour out the condenste wter
nd restrt the dryer.
• If the continer is not full, plese restrt the dryer.
• If the “FUL“ icon is still lit fter you hve nished the rst two steps, plese
contct the fter sles service tem.
" " Displys • Clen the lint lter.
Dyer does not strt
• Connect the dryer to the mins.
• Turn on the tumble dryer.
• Check the door is closed.
• Check the progrm is set.
• Press the Strt/Puse button.
Degree of dryness ws
not reched or drying time
too long
• Clen lint lter.
• Empty the wter continer.
• Check the drin hose.
• Check instlltion plce is pproprite.
• Keep the ir inlet clen.
• Use higher drying intensity level progrm or time progrm.
The dryer switches o
t the end of the progrm
• This is norml opertion.
The dryer will switch o utomticlly for energy sving
18
OPERATION
Child lock
Remaining Time indicator/Error message
Clean filters (warning)
Intensity
My Cycle
Display
Delay
Anti-crease

esatto.house
19
ERROR MESSAGES AND SOLUTIONS
WARNING! Never dismntle the dryer.
INDICATION REASON SOLUTION
"E32" displys Humidity sensor error. Plese contct the Residenti Group support
term on 1300 11 HELP (4357).
"E33" displys Temperture sensor error.
"FUL" displys Wter Continer is full. Empty the wter continer.
WARNING!
• Only uthorised technicins cn crry out repirs.
• If the LED displys other prompt nd the dryer does not work, plese turn o the mchine
nd cll the Residenti Group support tem.

User Manual
20
Purchse Detils
For future reference, plese record the following informtion which cn be found
on the rting plte nd the dte of purchse which cn be found on your sles invoice.
STORE DETAILS
STORE NAME
|
ADDRESS
|
TELEPHONE
|
PURCHASE DATE
|
PRODUCT DETAILS
MODEL NO.
|
SERIAL NO.*
|
Other manuals for ECD80W
1
Table of contents
Other Esatto Dryer manuals

Esatto
Esatto EVD700W User manual

Esatto
Esatto EVD7 User manual

Esatto
Esatto EVD7 User manual

Esatto
Esatto EVD4 User manual

Esatto
Esatto EHPD80 User manual

Esatto
Esatto EVD6 User manual

Esatto
Esatto VDE45W User manual

Esatto
Esatto VDE45W User manual

Esatto
Esatto ECD7 User manual

Esatto
Esatto EVD700W User manual