Eschenbach BP-2268 User manual

1 | P a g e
User Manual for Eschenbach Chameleon LED Table Lamp
Thank you for purchasing the Eschenbach Chameleon LED table lamp. This lamp is designed with unique low vision
user features/functions and provides superior optimal light quality, offering a selectable range of light color
temperatures and brightness levels. It improves text contrast when reading and has very high Color Rendering
Index (CRI) when looking at pictures. Additionally, it includes eye health protection and vison comfort technology
to reduce glare hazards. The benefits are particularly ideal for people who spend long regular hours using close
proximity lighting or who have low vision conditions such as age related Macular Degeneration and other eye
conditions. It is also ideal for children because children have very sensitive eyes.
Operating Elements
(1) Eschenbach Chameleon LED table lamp
(2) Power plug and cable
(3) Wireless remote control

2 | P a g e
Control Panel Buttons and Features
Control Panel Buttons
Touch button for switching power ON / OFF
Power button OFF = green LED ON, Power button ON = green LED OFF
Touch button for increasing color temperature (CCT) of lamp light output
C1 = 2700˚K, C2 = 4300˚K, C3 = 5500˚K, C4 = 6500˚K, C5 = 7200˚K (degrees Kelvin)
Touch button for decreasing color temperature (CCT) of lamp light output
C5 = 7200˚K, C4 = 6500˚K, C3 = 5500˚K, C2 = 4300˚K, C1 = 2700˚K (degrees Kelvins)
Touch button for increasing / decreasing brightness of lamp light output
B1 = 20%, B2 = 40%, B3 = 60%, B4 = 80%, B5 = 100% (brightness)
Touch button for alarm clock
A1 = Blue LED ON when alarm ON
Touch button for night light
N1 = Blue LED ON when night light ON

3 | P a g e
Starting up
(a) Place the metal base safely on the surface of the table and then insert the control panel box into the metal
base slot until the control panel box is firmly in place so that the power pin is fully inside the control panel box.
(b) Next, take the supplied power plug and cord and insert the power pin into the power pin hole located at the
back of the metal base.
(c) Now, insert the power plug into a properly wired electrical outlet.

4 | P a g e
Operating the Control Panel Buttons
Touch button : Switching power ON / OFF
Gently tap the power touch button to turn the lamp ON or OFF. By default the lamp is switched OFF with
the green LED lit. The button will make a beep sound each time it is touched.
Power button OFF = green LED ON, Power button ON = green LED OFF.
NOTE
•The lamp will automatically turn off after 10 hours of use for safety and economy reasons. The 10 hour
auto off will happen in main or night light mode.
Touch button : Increases gradually the color temperature of the light from the lamp head.
Gently tap repeatedly the color temperature touch button to select the required light color in 5 steps. The
lamp then cycles through each of the 5 color temperatures in increasing value as indicated by each of the 5 LEDs
on the control panel (C1,C2,C3,C4,C5). The button will make a beep sound each time it is touched.
LED
Position
Color
Temperature
Equivalent Sky Color
C1
2700˚K
Warm yellow white light (approximates to sunrise or sunset)
C2
4300˚K
Slightly yellow-ish white light (approximates to mid-afternoon sunlight)
C3
5500˚K
Near theoretical white light (approximates to daylight - summer sun at noon)
C4
6500˚K
Blue-ish cool white light (approximates daylight overcast sky)
C5
7200˚K
Blue white light (approximates to shade from partly cloudy sky)
NOTES
•Each LED light (C1,C2,C3,C4,C5) on the control panel has the same approximate matching color light with
the corresponding light color from the lamp head. There is no need to look directly at light source to see the
light color.
•The next time the desk lamp is switched ON, the last used color temperature is set again and held in memory.
•DO NOT LOOK DIRECTLY AT THE LED LIGHT SOURCE AS THIS MAY DAMAGE YOUR EYES
Touch button : Decreases color temperature of the light from the lamp head.
Gently tap repeatedly the color temperature touch button to select the required light color in 5 steps. The
lamp then cycles through each of the 5 color temperatures in decreasing value as indicated by each of the 5
LEDs on the control panel (C5, C4,C3,C2,C1). The button will make a beep sound each time it is touched.
NOTES
•Each LED light (C1,C2,C3,C4,C5) on the control panel has the same approximate matching color light with
the corresponding light color from the lamp head. There is no need to look directly at light source to see the
light color.
•The next time the desk lamp is switched ON, the last used color temperature is set again and held in memory.
•DO NOT LOOK DIRECTLY AT THE LED LIGHT SOURCE AS THIS MAY DAMAGE YOUR EYES

5 | P a g e
Touch button : Increases / decreases brightness of the light from the lamp head.
Gently tap repeatedly the brightness touch button to select the required brightness. The brightness increases
in 5 steps as indicated by the LEDs on the control panel (B1,B2,B3,B4,B5). The button will make a beep sound
each time it is touched.
LED Position
B1
B2
B3
B4
B5
Brightness Level
20%
40%
60%
80%
100%
NOTES
•Each LED light (B1,B2,B3,B4,B5) on the control panel has the same approximate matching brightness level
with the corresponding brightness from the lamp head. There is no need to look directly at light source to
see light brightness.
•The next time the desk lamp is switched ON, the last used brightness level is set again and held in memory.
•DO NOT LOOK DIRECTLY AT THE LED LIGHT SOURCE AS THIS MAY DAMAGE YOUR EYES
Touch button : Timer ON / OFF
(blue LED is ON when timer function ON)
Tap the timer touch button to enable the timer mode. The timer is active when the blue control LED is lit,
refer to page 2 - control panel diagram- symbol A1.
NOTE
•After one hour, will sound with five beeps. After another hour, one beep and the table lamp switches OFF
automatically.
Touch button : Night light ON / OFF (blue LED is ON when night light function ON)
Tap the night light touch button to enable the night light mode. The night light is active when the blue
control LED is lit, refer to page 2 - control panel diagram- symbol N1.
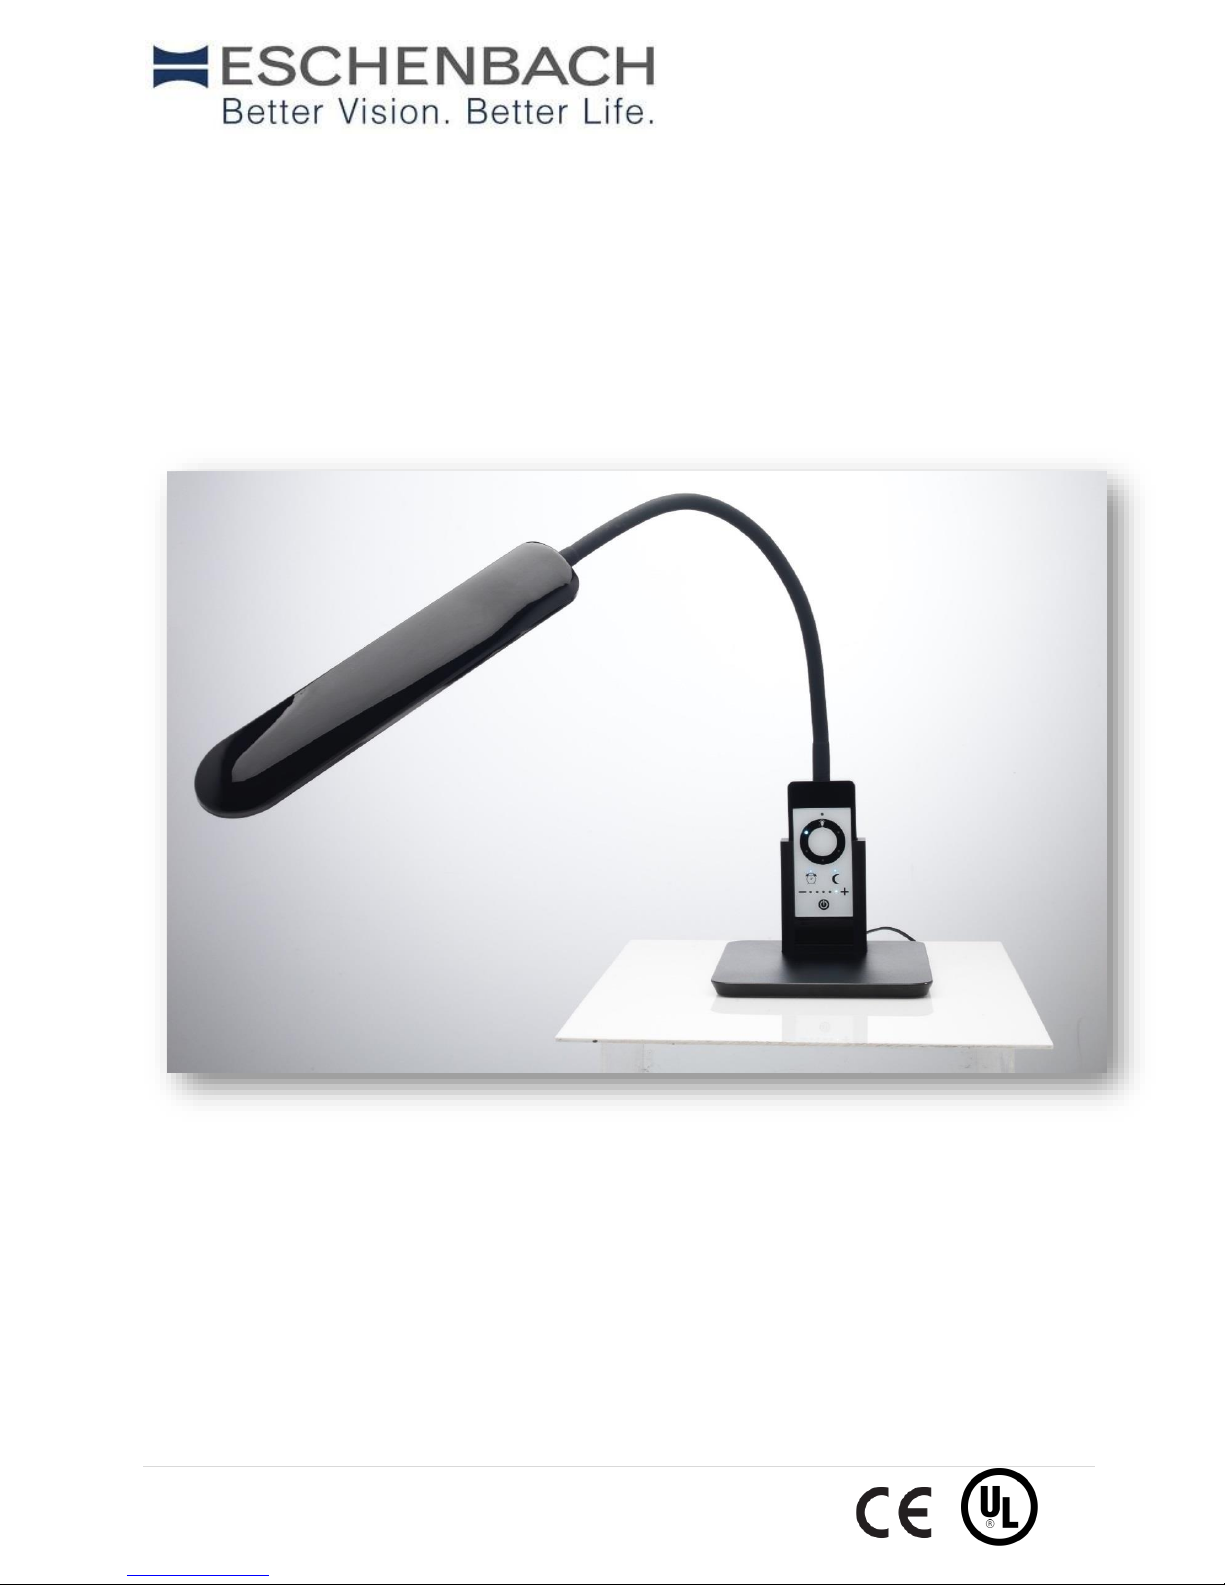
USB Port
At the back of the metal base is a
USB port which lights up blue when
the lamp is switched on, so it can be
easily seen and located. This USB
port can charge any mobile device.
Simply insert the mobile cable USB
plug into the USB port at the back of
the metal base.
NOTE: For safety, do not excessively
overcharge your mobile device.

6 | P a g e
Wireless Remote Control
Power button: switches ON / OFF lamp power.
Brightness button: increases lamp brightness in 5 steps.
Brightness button: decreases lamp brightness in 5 steps.
Color temperature button: increases color temperature in 5
steps.
Color temperature button: decreases color temperature in 5
steps.
The remote control wirelessly communicates with the sensor located on the lamp control panel, refer to page 2
- control panel diagram- symbol R1.
NOTES:
•The remote control requires 2 x AA batteries.
•The remote control has large easy-to-see symbols.
•The remote control needs to be pointed at the control panel of the lamp.
•The remote control has a relatively long range and can be used at a fairly wide angle to the sensor on the
control panel.
Care Instructions
Always unplug the desk lamp from the power supply before cleaning!
Do not use soap solutions containing plasticisers, alcoholic solvents or abrasive cleaners!
Safety Instructions
•Risk of dazzling and eye injury! Do not look directly at the LED light source, particularly for long periods!
•Protect your desk lamp from impact or shock, moisture and excessive heat!
•Never place your desk lamp near a heat source or in direct sunlight.
•Do not use the desk lamp near containers filled with water!
•Risk of tripping! Make sure that the power cord is not posing a danger!
•Do not wrap the power cord around the table lamp!
•Ensure that other people, particularly children, are aware of these risks!

7 | P a g e
Technical Specifications
•Rotation of lamp head approx. 270 °
•Maximum neck reach: 70 cm (28 in.)
•Input voltage: 100-240VAC
•Output power: 18 W
•Output voltage: 12VDC
•Maintenance-free LED technology with a service life of up to 50,000 hours
•Ingress Protection: IP65 water-resistant control panel only
•Heat sink: High efficiency heat sink for low lamp head temperature
•Color Rendering Index (CRI): 94
•Illuminance and luminous flux values per Correlated Color Temperature (CCT) are as follows:
Color Temperature
Lux value at 20 cm
Lux value at 30 cm
Lumens
2700˚K
1550 lx
628 lx
170 lm
4300˚K
2450 lx
995 lx
265 lm
5500˚K
3460 lx
1412 lx
370 lm
6500˚K
4610 lx
1872 lx
450 lm
7200˚K
6030 lx
2272 lx
515 lm
NOTES
•Illuminance is the total luminous flux incident on a surface, per unit area. The SI unit of illuminance is the
lux (lx)
•Luminous flux or luminous power is the measure of the perceived power of light. The SI unit of luminous
flux is the lumen (lm)
Warranty
Within the parameters of the applicable statutory provisions, we provide a warranty for the functioning of the
product described in this manual with regard to faults arising in connection with manufacturing defects or
material defects. In event of damage due to improper handling, including damage from a fall or impact, no
warranty claims can be made. Warranty claims are only accepted upon presentation of the sales receipt!
Table of contents