Esperia KRH-M202 User manual
Thank you for purchasing ESPERIA product.
Please read this owner’s manual carefully before operating this unit.
Store it in safe place with this manual.
Memorizing radio station to the memory
1. Select the desired band FM1, FM2, FM3, or MW.
2. Then search the desired station by the seek or the manual tuning.
3. Press any button (from ①to ⑥) for 3 seconds or longer.
4. The preset channel number will be indicated on the display.
5. ON each band ( FM1, FM2, FM3, and MW ), 1station can be put on the memory on each of the button
from ①to ⑥.
Auto Store Memory (SCAN)
During the radio mode, by pressing and releasing SCAN Button will automatically store a strong signal station
in memory from the channel 1 to the channel 6.
NOTE :
By this operation, the current data in the memory will be erased.
When the expected radio station is not be able to store in the memory by the SCAN function, Please store
the radio station in the memory manually.
Owner’s manual
KRH-M202
12/24V Bluetooth®/USB/MP3/WMA
AM/FM Stereo Radio USB
24V/12V
MP3/WMA
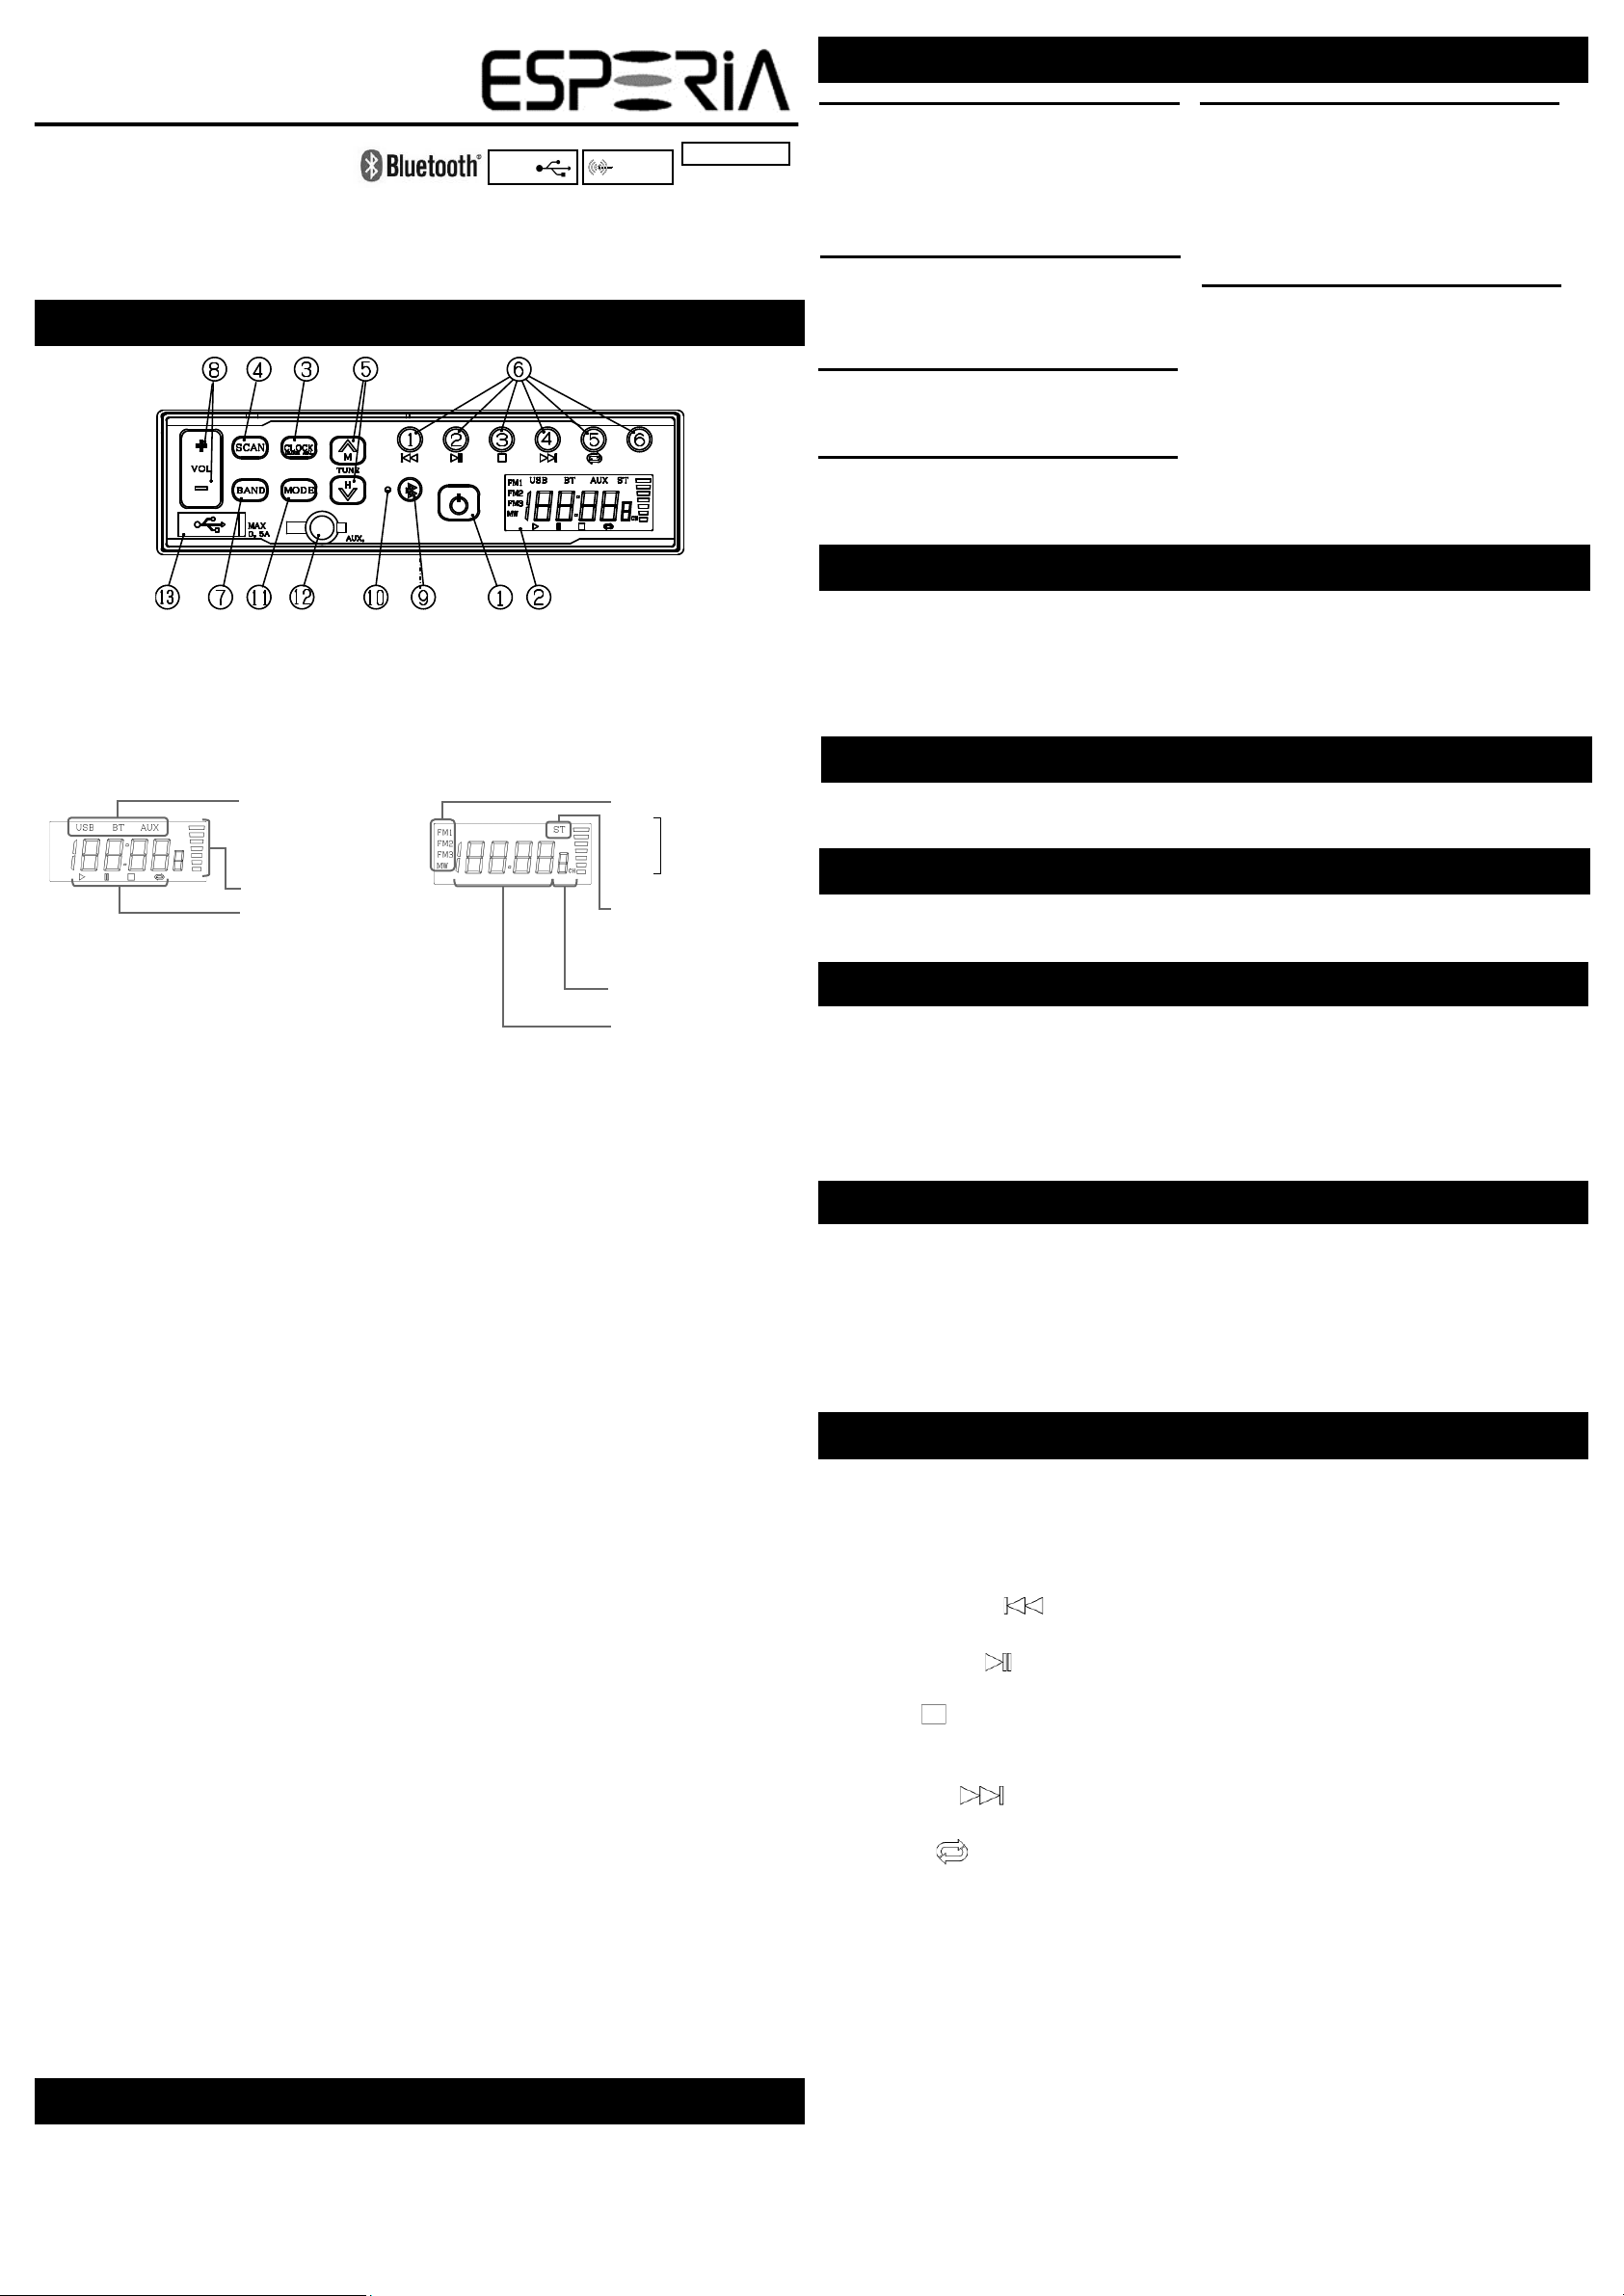
Operational Panel
②LCD (Liquid Crystal Display)
The receiving band and frequency or the current time will be indicated on the display.
④Scan (SCAN) Button
By pressing and releasing the button the scan tuning will start automatically and the strong signal are
memorized on memory.
③Clock (CLOCK) Button
On the Radio Mode, pressing this button will indicate the current time and pressing it again will
resume frequency display.
After 3 seconds, the time display will automatically change to the frequency display.
Press and hold to enter in Clock Adjustment Mode.
⑤Tuning Buttons (TUNE∧,∨)
By pressing TUNE∧ or TUNE∨ button the receiving frequency will be up or down.
By pressing the button more than 2 second, the seek tuning will start.
When the strong signal station is received the seek will stop.
Please press the button again if you want to stop the seek tuning.
①Power Button
Press the Button to power ON. Press again to power OFF.
⑥Preset Memory Button(①~⑥)
On each band (FM1,FM2,FM3 AND MW), One station is memorized on the memory from the channel 1
to the channel 6.
Refer to the section “Memorizing radio station to the memory”
⑦Bands Select Button
By pressing the button, the receiving band will be selected as shown.
FM1→FM2→FM3→MW
The receiving band and frequency will be indicated on the display.
⑧Volume Control Button (VOL+,-)
By pressing the VOL+ button, the sound volume will increase.
By pressing the VOL–button, the sound volume will decrease.
⑨Bluetooth Button (B)
By pressing the Bluetooth Button to connect to the paired Bluetooth device.
Press and Hold the button for 2 seconds or longer to disconnect the Bluetooth device, and
enter to the "pairing mode".
⑪ Mode Select Button (MODE)
Pressing the button, a source will be selected as shown.
If USB memory is not connected, USB mode will skip after any seconds.
FM or MW →USB →Bluetooth →AUX
⑫AUX-IN Jack(Auxiliary Audio In Put)
Open the rubber cap and connect the portable audio device by the cable the stereo mini plug(3.5mm)
Please cover the AUX-IN jack with the rubber cap dustproof or waterproof, when you do not need
to connect the portable audio device.
Setting the Clock
Press and hold to enter in Clock Adjust Mode and the display flashes.
Pressing the TUNE button ∧ to adjust hour.
Pressing the TUNE button ∨ to adjust minute.
⑬USB Input Terminal
Open the rubber cap and connect a USB storage device.
Please cover the USB input terminal with the rubber cap for dustproof or water proof, when you
do not need to connect the USB storage device.
Listening the radio
1. Press MODE Button to Radio mode.
2. Select the desired band FM or MW by the BAND Button.
3. Select the desired station by a ① to ⑥button or a TUNE Button.
4. Adjust the desired volume level by the VOL+ or VOL–Button.
Manual tuning
SEEK tuning
Press the TUNE∧ or TUNE∨ Button, the received frequency shifts one step.
Pressing the TUNE Button for 2 second or longer, the seek tuning will be start and stop at the available
frequency.
Specifications
General
Power Source :DC12V~24V
Power Consumption :Less than 2A
Rated Output Power :16W + 16W(4Ω)
Normal Output Power:14W + 14W(10%TDH,4Ω)
Dimension :179(w)×50(H)×91(D)mm
FM section
Receiving Frequency Range:87.5~108.0MHz(EU)
87.9~108.0MHz(USA)
Usable Sensitivity :3µV(S/N 30dB)
S/N Ratio :50dB
MW section
Receiving Frequency Range:531~1602kHz(EU)
530~1710kHz(USA)
Usable Sensitivity :20µV(S/N 20dB)
AUX section
AUX IN :Stereo mini jack(φ3.5),
Rated Input Power :1V
Normal Input Power :90mV
Bluetooth
Specification :Ver2.1+EDR
Bluetooth Class:Class2
(Maximum Distance 10m)
Frequency Range:2.4GHz~2.48GHz
Profile :HFP V1.5,A2DP V1.2,AVRCP V1.0
USB
Specifications:USB2.0/1.0
Support Format
・MP3:MPEG1,2,2.5
Audio Layer 2,3
・WMA:Windows Media TM Audio
Support File System
:FAT16/FAT32 File system
Maximum Current Supply:0.5A
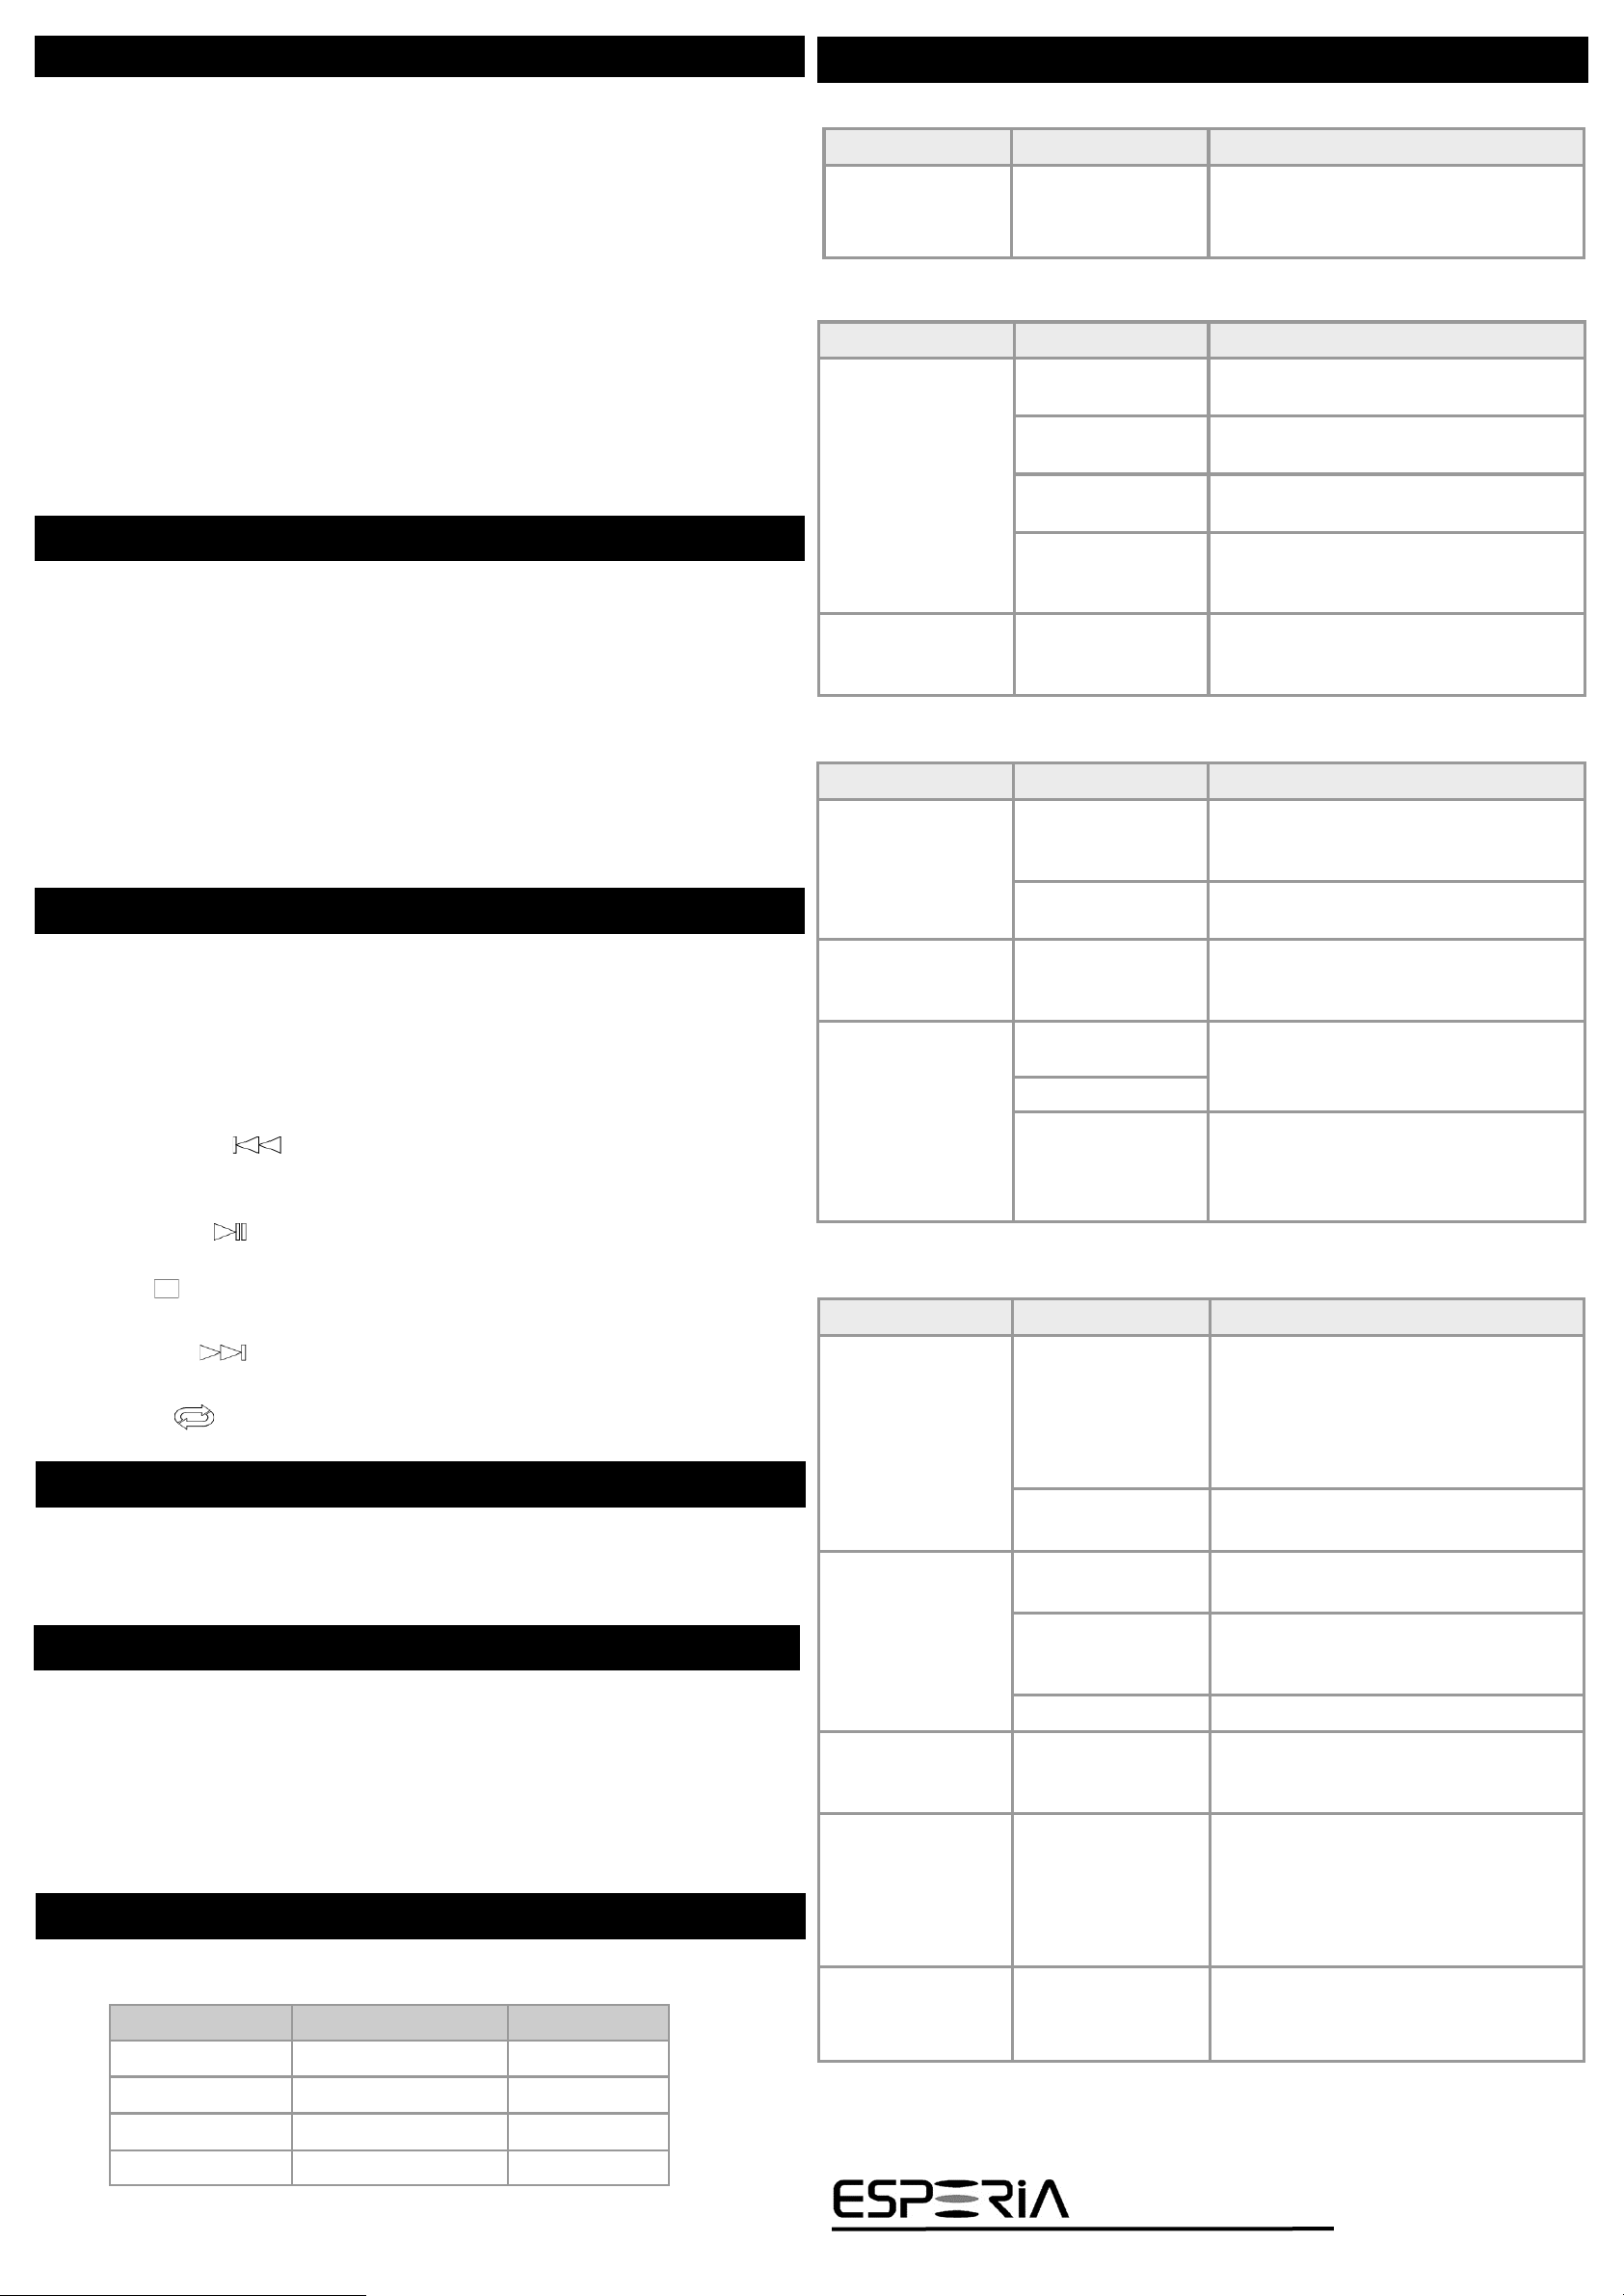
FM Mode
※Preset the frequency
by each 6ch.
Preset Memory Channel
It is displayed while receiving in stereo.
■General
USB :USB Playback Mode
BT :Bluetooth Mode
AUX :AUX Mode
※For USB Mode or Bluetooth Mode only
Volume Level
Audio Operation
■Radio mode
Radio function
FM1
FM2
FM3
MW :AM mode
Stereo
Frequency / Clock
Function
USB Operations
Connect a USB storage device to USB socket on the this unit.
Press the MODE Button and select the USB Playback Mode.
During the USB Playback Mode. “USB”will be indicated on the display.
During playback, follow the instruction below to control playback.
NOTE : ・Please connect/uncomment the USB storage device in a other than USB mode.
・ESPERIA does not guarantee compatibility with all USB storage device
・Be sure to use the extension cable for the USB socket.
・Please do not connect other than USB memory device. Can not charge the smartphone.
・ESPERIA cannot be liable for any data loss or damage and improper access of USB storage
device.
①Previous Track()Button
Skip to the previous track. Press and hold this button to rewind fast-rewind.
②Play/Pause( ) Button
Pause or resume playback.
③ Stop ( ) Button
Stop playback.
Press the Play Button, playback starts at the top of current track
④ Next Track( )Button
Skip to the next track. Press and hold this button to rewind fast-forward.
⑤Repeat ( ) Button
Repeat the current track and Press the Repeat Button again, turn off the
Repeat Mode.
⑩Bluetooth LED
When this LED lights up, the Bluetooth device is connected. Flashes in pairing standby mode.
AUXIN
Pairing Bluetooth devices
When connecting a Bluetooth devicesfor the first time, mutual registration is required.
Pairing enables this unit and other devices to recognize each other.
※Please first enable Bluetooth function of the Bluetooth device before pairing.
For details, please refer to the manual of Bluetooth device.
1.Press the MODE Button to select the function Bluetooth mode.
2.Enable Bluetooth on the Bluetooth device.
3.Press and hold the Bluetooth Button until the sounds connected. (tow beep sounds)
4.Select "CAR RADIO" with Bluetooth device.
※Only one pair of Bluetooth devices can be paired with this unit. If you want to pair other
devices, repeat steps 1 to 4 again.
Play audio of Bluetooth device
If you are already paired with a Bluetooth device, press the BT button to connect the Blue-
tooth device and this unit, and the Bluetooth LED lights up.
Press the MODE Button and select the Bluetooth Mode,
During the Bluetooth Mode, “BT” will be indicated on the display.
A beep sounds once after the Bluetooth starts tone and the Bluetooth device is connected.
When connecting a Bluetooth device, you can operate with the ① - ⑤ buttons.
①Previous Track()Button
Return to the beginning of the current track.
Press the button again to skip to the previous track.
②Play/Pause( ) Button
Pause or resume playback.
③Stop ( ) Button
Music that is playing stops.
④ Next Track( )Button
Skip to the next track.
⑤Repeat ( ) Button
invalid in Bluetooth mode.
Trouble shooting
Problem Cause Measure
Can not connect a Blue-
tooth device
Bluetooth connection is not
established
Depending on your Bluetooth device, some items that
takes time to connect may not be automatically re-
connected.
Please check that the Bluetooth LED,
if it does not turn on the light on time, please pair
again according to "Pairing Bluetooth devices".
Another Bluetooth devices
is connected.
If another Bluetooth device is connected, pair it again
according to "Pairing Bluetooth device".
AVRCP profile is not con-
nected
Please disconnect all connected Bluetooth devices and
pair it again according to "Pairing Bluetooth device".
Cannot remotedly control
Bluetooth devices.
The connection link be-
tween devices may be
broken
Again according to "Pairing a Bluetooth device".
does not support AVRCP Please check the support profile of Bluetooth device..
No sound heard Bluetooth device volume is
low
The volume of the Bluetooth device will be affected.
Please set the volume of the Bluetooth device to an
appropriate value.
Can not talk on the phone This unit does not support
Bluetooth calling.
Depending on the model of
the mobile phone, you may
connect to this unit with
the call profile.
Please change the microphone setting from this unit to
the mobile phone microphone on the call screen ac-
cording to the instruction manual of your mobile phone.
Bluetooth audio playback
stops after incoming call
Audio may not resume after
phone interrupt.
After the call ends, please again according to "Pairing
Bluetooth device".
Resetting the radio
In case of the irregular frequency displayed or no function, it is possible to reset the this unit
to the Follow "Operation" in the table to restore factory settings.
NOTE: The radio station data in memory is saved even if the connecting cable to the vehicle
is removed.
・This radio has an AUX input jack for portable device.
・Be sure to use the cable stereo mini plug(3.5mm)for the AUX-IN jack.
AUX Function
・Pressing the MODE Button and select the AUX mode.
・During the AUX mode, “AUX” will be indicated on the display.
・The volume controls of portable device should be adjusted approximately same as currently portable audio
device should be adjusted approximately same as currently listening radio sound volume level.
・Volume control buttons are able to control the sound with this unit
Using Bluetooth wireless technology
Mobile phones and audio devices that support Bluetooth can be connected to use with
this unit.
You will be notified that there is an incoming call by connecting the mobile phone.
※This unit will not support calls for the reason of No microphone is installed.
In order to use Bluetooth devices must be able to match certain profiles. this unit is compat-
ible with following profiles.
Incoming mobile phones
HFP(Hands-Free Profile)
Bluetooth audio
A2DP(Advanced Audio Distribution Profile)
AVRCP(Audio/Video Remote Contorol Profile)
Note:
The Bluetooth word mark and logos are owned by the Bluetooth SIG, inc. and any use of
such marks by ESPERIA Co.,Ltd Is under licensed. Other trademarks and trade names are
those of their respective owners.
Problem Cause Measure
Nothing happens when
buttons are pressed.
display is not accurate.
CPU malfunction due to
noise etc.
Reset this unit according to "Resetting the radio".
After resetting, preset memory etc. all disappear,
please set again.
General
Problem Cause Measure
Sound is noisy It is not on the frequency
of the broadcasting station
Please adjust to the correct frequency.
Antenna does not extend
(when using pillar antenna)
When using a radio, please use with the pillar antenna
extend.
The antenna is not ground-
ed or not installed properly
Please consult your dealer.
Antenna power supply not
connected
The booster built-in antenna needs to connect the
power supply to the antenna.
For details, please consult your dealer.
Display unusual frequencies CPU malfunction due to
noise etc.
Reset this unit according to "Resetting the radio".
After resetting, preset memory etc. all disappear,
please set again.
USB Playback
Problem Cause Measure
No sound heard The USB storage device
contains no MP3/WMA
files.
Record MP3/WMA files properly to the USB storage
device.
The files are not proper
MP3/WMA format.
Use only properly encoded MP3/WMA files.
Sound is
Interrupted or has noise.
The MP3/WMA
Files are improperly
Encoded.
Use only properly encoded MP3/WMA files.
The device isn’t
recognized
The device is Damaged. Disconnect the USB storage device and reconnect. If
the device is still not recognized, try replacing with a
different device.
Connectors are loose.
The USB memory is not
formatted with FAT32 /
FAT16
Format the USB storage device with the FAT32 /
FAT16 file system and write the MP3 / WMA file.
Be sure to back up the USB memory before format-
ting.
Radio
Bluetooth
46-202-001-4 2017/04 EN
Co.,ltd.
2-8-85,YOSHINODAI,KAWAGOE-CITY SAITAMA-PREF.,JAPAN
Bluetooth device incoming call
If the Bluetooth device has already been connected (Bluetooth LED is lit), this unit is in
standby mode for incoming calls.
When receiving a call, "CALL" appears on the liquid crystal display, the volume of the car
stereo automatically mutes, and the ringing tone of the phone is played from the speaker.
AREA OPERATION DISPRAY
North America SCAN + MODE + ③US
Japan SCAN + MODE + ④JP
Asia, Oceania SCAN + MODE + ⑤CH
Europa SCAN + MODE + ⑥EU
English:
Declaration of conformity
We use this model KRH-M202
In accordance with the provisions of the 1999/5 / EC
and 2011/65 EU directive, we have established basic
requirements and other relevant rules.
Italiano:
Dichiarazione di conformità
Noi siamo questo modello KRH-M202
1999/5 / CE e 2011/65 in conformitàcon le disposizioni
della direttiva europea, che definiscono i requisiti di base e
di altri regolamenti pertinenti.
Eesti::
vastavusdeklaratsioon
Me oleme seda mudelit KRH-M202
1999/5 / EÜja 2011/65 vastavalt sätetele Eu-
roopa Liidu direktiivi, millega määratletakse põhilised
nõuete ja teiste asjakohaste määrustega.
Deutsch:
Konformitätserklärung
Wir sind dieses Modell KRH-M202
1999/5 / EG und 2011/65 mit den Bestimmungen der
EU-Richtlinie in Einklang, die grundlegenden Anforderungen
und den anderen relevanten Vorschriften zu definieren.
Nederlands:
verklaring van overeenstemming
We zijn dit model KRH-M202
1999/5 / EG en 2011/65 in overeenstemming met de
bepalingen van de EU-richtlijn, het definiëren van de fun-
damentele eisen en andere relevante voorschriften.
Ελληνικά:
δήλωση συμμόρφωσης
Είμαστε αυτό το μοντέλο ΚΚΗ-M202
1999/5 / ΕΚ και 2011/65 σύμφωνα με τις
διατάξεις της οδηγίας της ΕΕ, που
καθορίζει τις βασικές απαιτήσεις και
άλλες σχετικές διατάξεις.
Hrvatska:
Izjava o sukladnosti
Mi smo ovaj model KRH-M202
1999/5 / EZ i 2011/65, u skladu s odredbama direktive
EU, definiraju osnovne zahtjeve i druge relevantne propise.
Svenska:
Försäkran om överensstämmelse
Vi är den här modellen KRH-M202
1999/5 / EG och 2011/65 i enlighet med bestäm-
melserna i EU-direktivet, som definierar de grundläggande
kraven och andra relevanta bestämmelser.
Español:
Declaración de conformidad
Somos este modelo KRH-M202
1999/5 / CE y 2011/65 de conformidad con las dis-
posiciones de la directiva de la UE, que definen los requisi-
tos básicos y otras regulaciones relevantes.
Slovenskú:
vyhlásenie o zhode
My sme tento model KRH-M202
1999/5 / ES a 2011/65 v súlade s ustanoveniami
smernice EÚ, ktorédefinujúzákladnépožiadavky a inérel-
evantnépredpisy.
Slovenski:
izjava o skladnosti
Mi smo ta model KRH-M202
1999/5 / ES in 2011/65 v skladu z določbami direktive
EU, ki opredeljuje osnovne zahteve in druge ustrezne
predpise.
Český:
prohlášenío shodě
My jsme tento model KRH-M202
1999/5 / ES a 2011/65 v souladu s ustanoveními směr-
nice EU, kterédefinujízákladnípožadavky a dalšírelevant-
nípředpisy.
dansk:
overensstemmelseserklæring
Vi er denne model KRH-M202
1999/5 / EF og 2011/65 i overensstemmelse med
bestemmelserne i EU-direktivet, som definerer de
grundlæggende krav og andre relevante bestemmelser.
Français:
Déclaration de conformité
Nous sommes ce modèle KRH-M202
1999/5 / CE et 2011/65, conformément aux disposi-
tions de la directive européenne, définissant les exigences
de base et d'autres règlements pertinents.
Magyar:
Megfelelőségi nyilatkozat
Mi ez a modell KRH-M202
1999/5 / EK és a 2011/65 a rendelkezéseivel
összhangban az uniós irányelv, amely meghatározza az
alapvetőkövetelményeinek és egyéb vonatkozóelőírás-
oknak.
suomi:
vaatimustenmukaisuusvakuutus
Olemme tätämallia KRH-M202
1999/5 / EY ja 2011/65 mukaisesti määräysten EU-
direktiivin, jossa määritellään perusvaatimukset ja muut
asiaankuuluvat määräykset.
Български:
Декларация за съответствие
Ние сме този модел KRH-M202
1999/5 / ЕО и 2011/65 в съответствие с
разпоредбите на директивата на ЕС, които
определят основните изисквания и другите
приложими разпоредби.
Polski:
Deklaracja zgodności
Jesteśmy ten model KRH-M202
Jeden tysięcy dziewięćset dziewięćdziesiąt dziewięć
piątych / WE i 2011/65 zgodnie z przepisami dyrektywy
UE, określająca podstawowe wymagania oraz inne istotne
przepisy.
Português:
declaração de conformidade
Nós somos este modelo KRH-M202
1999/5 / CE e 2011/65, em conformidade com as dis-
posições da directiva da UE, definindo os requisitos bási-
cos e outros regulamentos relevantes.
Latvijas:
atbilstības deklarācija
Mēs esam šis modelis KRH-M202
1999/5 / EK un 2011/65 saskaņā ar ES direktīvas
noteikumiem, kuros noteiktas pamatprasības un citus būti-
skus noteikumus.
Lietuvių:
akes deklaracija
Mes šis modelis KRH-M202
1999/5 / EB ir 2011/65 pagal ES direktyvos nuostatų,
apibrėžiančių pagrindinius reikalavimus ir kitus susijusius
teisės aktus.
Română:
declaraţie de conformitate
Suntem acest model de KRH-M202
1999/5 / CE și 2011/65, în conformitate cu dispozițiile
directivei UE, care definesc cerințele de bazăși alte regle-
mentări relevante.
Icelandic:
Samræmisyfirlýsing
Viðerum þetta líkan KRH-M202
1999/5 / EB og 2011/65 ísamræmi viðákvæði til-
skipunar ESB, sem skilgreina grunnkröfur og aðrar viðei-
gandi reglugerðir.
Norsk:
samsvars~~POS=TRUNC
Vi er denne modellen KRH-M202
1999/5 / EC og 2011/65 i samsvar med bestem-
melsene i EU-direktiv, som definerer de grunnleggende
kravene og andre relevante bestemmelser.
Türkçe:
uygunluk Beyanı
Bu modelin KRH-M202 vardır
1999/5 / EC ve 2011/65 temel gereksinimleri ve diğer
ilgili düzenlemeleri tanımlayan AB direktif hükümlerine uy-
gun olarak.
Seapáinis:
dearbhúcomhréireachta
Támuid an múnla KRH-M202
1999/5 / CE agus 2011/65 i gcomhréir le forálacha na
treorach AE, lena sainmhínítear na ceanglais bhunúsacha
agus rialacháin ábhartha eile.
Ġappuniż:
dikjarazzjoni ta 'konformità
Aħna dan il-mudell KRH-M202
1999/5 / KE u 2011/65 skond id-dispożizzjonijiet tad-
Direttiva tal-UE, li jiddefinixxu r-rekwiżiti bażiċi u rego-
lamenti relevanti oħra.
Co.,ltd.
2-8-85,YOSHINODAI,KAWAGOE-CITY SAITAMA-PREF.,JAPAN
TEL:+81-49-226-9120 FAX:+81-49-226-9136

2
FCC 15B ClassB
CAUTION
Changes or modicaons not expressly approved by the party responsible for compli-
ance could void the user’s authority to operate the equipment.
Note: This equipment has been tested and found to comply with the limits for a Class B
digital device, pursuant to part 15 of the FCC Rules. These limits are designed to provide
reasonable protecon against harmful interference in a residenal installaon. This
equipment generates, uses and can radiate radio frequency energy and, if not installed
and used in accordance with the instrucons, may cause harmful interference to radio
communicaons. However, there is no guarantee that interference will not occur in a
parcular installaon. If this equipment does cause harmful interference to radio or tele-
vision recepon, which can be determined by turning the equipment o and on, the user
is encouraged to try to correct the interference by one or more of the following
measures:
—Reorient or relocate the receiving antenna.
—Increase the separaon between the equipment and receiver.
—Connect the equipment into an outlet on a circuit dierent from that to which the re-
ceiver is connected.
—Consult the dealer or an experienced radio/TV technician for help.
IC
(EN)
This device complies with Industry Canada’s licence-exempt RSSs. Operaon is subject to
the following two condions:
(1) This device may not cause interference; and
(2) This device must accept any interference, including interference that may cause un-
desired operaon of the device.
(FR)
Le présent appareil est conforme aux CNR d’Industrie Canada applicables aux appareils
radio exempts de licence. L’exploitaon est autorisée aux deux condions suivantes;
1) l’appareil ne doit pas produire de brouillage;
2) l’appareil doit accepter tout brouillage radioélectrique subi, même si le brouillage est
suscepble d’en compromere le fonconnement.
SAR test
(EN)
This equipment complies with FCC/IC radiaon exposure limits set forth for an uncon-
trolled environment and meets the FCC radio frequency (RF) Exposure Guidelines and
RSS-102 of the IC radio frequency (RF) Exposure rules. This equipment has very low lev-
els of RF energy that it deemed to comply without maximum permissive exposure evalu-
aon (MPE). But it is desirable that it should be installed and operated keeping the radi-
ator at least 20cm or more away from person’s body (excluding extremies: hands,
wrists, feet and ankles).
(FR)
Cet équipement est conforme aux limites d’exposion aux rayonnements énoncées pour
un environnement non contrôlé et respecte les règles les radioélectriques (RF) de la FCC
lignes directrices d'exposion et d’exposion aux fréquences radioélectriques (RF) CNR-
102 de l’IC. Cet équipement émet une énergie RF très faible qui est considérée conforme
sans évaluaon de l’exposion maximale autorisée. Cependant, cet équipement doit
être installé et ulisé en gardant une distance de 20 cm ou plus entre le disposif rayon-
nant et le corps (à l’excepon des extrémités : mains, poignets, pieds et chevilles).
Co.,ltd.
2-8-85,YOSHINODAI,KAWAGOE-CITY SAITAMA-PREF.,JAPAN
TEL:+81-49-226-9120 FAX:+81-49-226-9136 2017/06
Table of contents
Other Esperia Radio manuals


