manuals.online logo
Brands
  1. Home
  2. •
  3. Brands
  4. •
  5. essential
  6. •
  7. Toilet
  8. •
  9. essential Lily EC1015 User manual

essential Lily EC1015 User manual

Technical Data Sheet
Lily Raised Height Open Back WC Pack
EC1015
www.essentialfromideal.com
Available
Lily WC
www.essentialfromideal.com
EC1003 WC Pack ( No Seat )
[01] x 1
Push button
(Pre-fitted)
[02] x 1
Push button cover
(Pre-fitted)
[03] x 1
Fixing nut
(Pre-fitted)
[11] x 2
Sealing washer
(Pre-fitted)
[15] x 2
Wing nut
(Assembled)
[16] x 1
Inlet Dummy
(Pre-fitted)
[17] x 1
Dummy Rubber
(Pre-fitted)
[12] x 4
Flat Rubber washer
(Assembled)
[13] x 4
Flat washer
(Assembled)
[14] x 2
Nut
(Pre-fitted)
[07] x 1
Rubber
Doughnut
[08] x 1
Inlet Valve
(Pre-fitted)
[09] x 1
Inlet Rubber washer
(Pre-fitted)
[10] x 1
Back nut
(Pre-fitted)
[04] x 1
Flush valve
(Pre-fitted)
[05] x 1
Rubber washer
(Pre-fitted)
[06] x 1
Fixing nut
(Pre-fitted)
2
Lily WC
[18] x 1
Back Nut
(Pre-fitted)
[19] x 1
Cistern lid
[20] x 1
Cistern
[25] x 2
Plastic Bushes
[26] x 2
Chrome Plated
Cap
[30] x 2
Pan to Seat Fixings
[31] x 2
Pan & Seat
Fitting Covers
[32] x 2
Plastic Bushes
(Assembled)
[27] x 1
Toilet Seat Lid
[28] x 1
Toilet Seat Ring
(Assembled)
[29] x 2
Soft Close Barrels
(Assembled)
[21] x 1
Pan
[22] x 2
L-shape Bracket
[23] x 2
Fixing Plug
[24] x 2
Washer
3
[33] x 2 Bolt(Pre-fitted)
(10 x 65mm)
[35] x 2 Screw
(5 x 45mm)
[34] x 2 Bolt
(11 x 65mm)
Lily WC
L
R
Things to check before you start
Before you start
4
Getting started...
Lily WC
Please note:
Check the pack and make sure you have all the parts
listed above. If not, contact your local showroom, who will
be able to help you.
When you are ready to start, make sure that you have the
right tools to hand, plenty of space and a clean, dry area
for assembly.
although these instructions are
comprehensive, it is always recommended that a
technically competent installer should undertake
installation.
Please read the instruction before you start.
Please inspect the WC for any damages before installation.
Retain the instruction for future use.
Tools required (not supplied)
Tools required (supplied)
Parts required (not supplied)
5
[37] x 1
Straight Adjustable
Connector
(Or)
[38] x 1
90 L Bend
o
[36] x 1
Flexible connection
Hose 1/2” - 30cm.
8-4mm
Before you start
Lily WC
Safety
Safety
6
Getting started...
Lily WC
CAUTION:
CAUTION:
CAUTION:
CAUTION: Care should always be taken when drilling into
wall and floor to avoid any sunken wires or pipes.
DO NOT over tighten the fixings otherwise it
may damage the product.
Fragile – handle the product with care. This
product may cause personal injury, property damage or
break easily if not handled, positioned and installed with
care.
Always ensure the product is securely
installed before use.
When the installation is complete, turn the water supply
on and check for leaks around the toilet, cistern, inlet and
waste connection points.
Failure to follow these instructions may result in personal
injury, damage to the product and property damage.
Do not strike the WC with hard or pointed items.
Shut off Water
For Domestic use only
The 12 golden rules for care
Care & Maintanance
7
moreIn detail...
Lily WC
1
2
3
4
5
6
7
8
9
10
11
12
WARNING
Use of metal brush will create a metal marks in the
bowl.
To facilitate cleaning of the product, the toilet seat and
cover may be removed before cleaning.
: Do not use cistern cleaners containing
chlorine (calcium hypochlorite). These can seriously
damage the product.
Do not forcefully open or close the toilet seat and
cover. This may cause injury or damage to the
product.
Avoid the sudden introduction of hot water to a cold
toilet. This may damage the toilet.
Never stand on the toilet rim, seat or cover. Standing
on the toilet, seat or cover may result in serious
product damage and personal injury.
Lighted cigarettes should not be placed on the seat or
cover.
Do not drop any hard objects on the toilet, seat or
cover. Damage may result with cracks and leaks.
If the toilet or seat is damaged and cracked
discontinue use immediately and replace the unit.
Failure to do so may result in serious injury or
property damage.
It is recommended to check all fittings for security and
tightness at regular intervals.
Use warm soapy water and a soft cloth to clean the
surface of the product.
Never use any solvent, scourers, abrasives, bleach,
acids, strong detergents, aggressive chemical
cleaners.
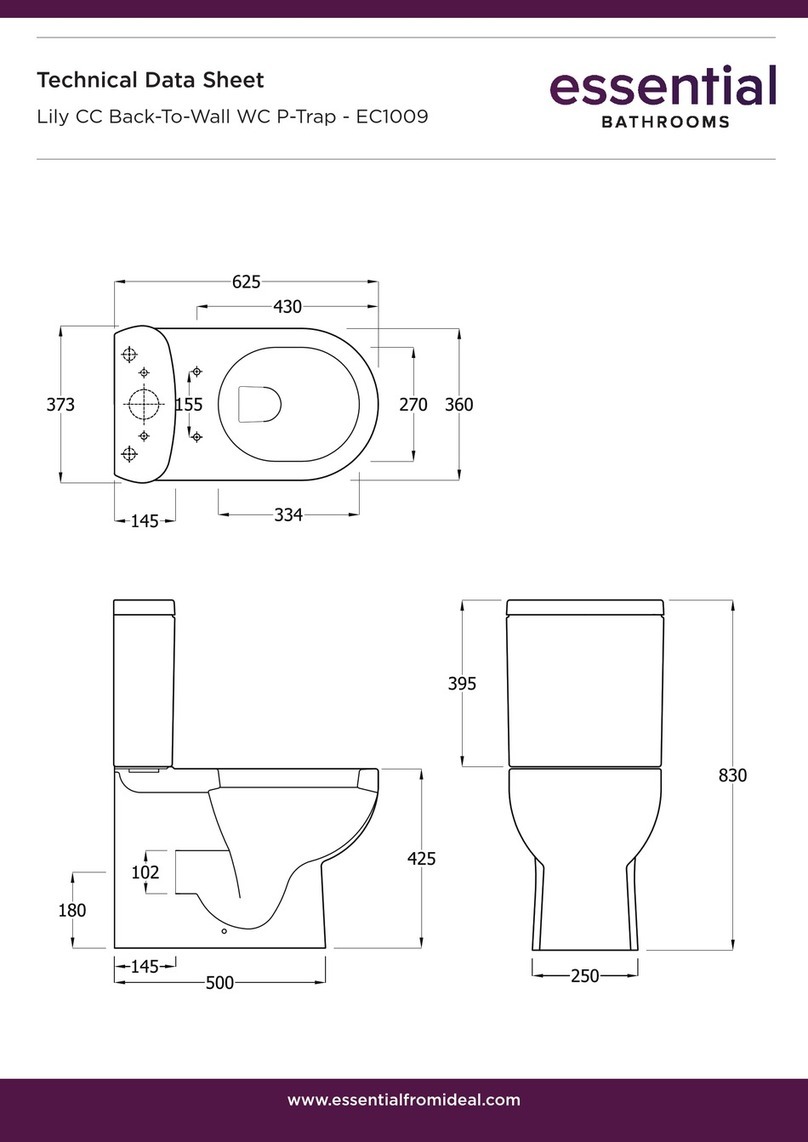
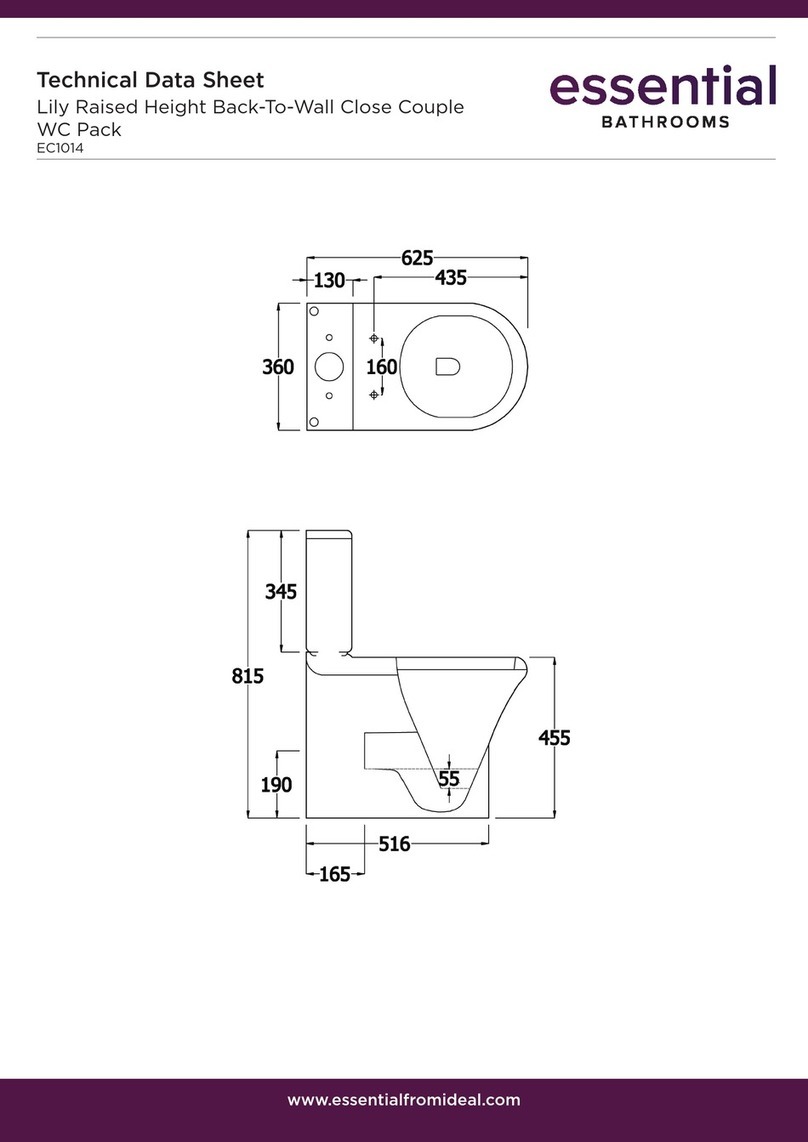
All Dimension in MM
360
625
425
102
180
430
395
140
155 360
373
145
830
8
Lily WC
Installation
Lily WC
03
04
[ 16 ]
[ 16 ]
[ 17 ]
[ 17 ] [ 18 ]
[ 18 ]
[ 33 ]
[ 33 ] [ 13 ]
[ 13 ]
[ 13 ]
[ 11 ] [ 11 ]
[ 12 ]
[ 12 ]
[ 14 ]
[ 14 ]
9
Note: The Inlet Dummy is reversible, This can be removed and fixed to the other side
WARNING: If repositioning the inlet dummy the nut must only be done up finger
tight. If the nut is over tightened this will deform the domed bolt head which may
cause leaks.

Note: Pre-fitted
Note: Pre-fitted
Installation
06
05
[ 08 ]
[ 08 ]
[ 09 ]
[ 09 ]
[ 10 ] [ 10 ]
[ 04 ]
[ 01 ]
[ 02 ] [ 03 ]
[ 05 ] [ 06 ]
10
Note : Pre-fitted
Note : Pre-fitted
[ 04 ]
[ 01 ]
[ 02 ]
[ 03 ]
[ 05 ]
[ 06 ]
Installation
Lily WC
08
07
[ 36 ]
[ 12 ]
[ 13 ]
[ 15 ]
[ 07 ]
11
[ 12 ]
[ 13 ]
[ 15 ]
[ 36 ]
[ 07 ]
Installation
10
(or)
09
[ 34 ]
[ 37 ]
[ 38 ]
[ 34 ]
[ 24 ]
[ 24]
[ 22 ]
[ 22 ]
[ 23 ]
[ 23 ]
12
Lily WC
45mm.
Installation
13
Lily WC
Installation
12
11
[ 26 ]
[ 30 ]
[ 30 ]
[ 31 ]
[ 31 ]
[ 35 ]
[ 25 ]
14
Lily WC
[ 26 ]
[ 35 ]
[ 25 ]
15

This manual suits for next models

2

Other essential Toilet manuals

essential Lily EC1009 User manual

essential

essential Lily EC1009 User manual

essential Lily EC1003 User manual

essential

essential Lily EC1003 User manual

essential Iris EC2001 User manual

essential

essential Iris EC2001 User manual

essential Lily EC1014 User manual

essential

essential Lily EC1014 User manual

essential Orchid EC3003 User manual

essential

essential Orchid EC3003 User manual

Popular Toilet manuals by other brands

Satellite PolyPortables TUFWAY POP RIVET Assembly instructions

Satellite PolyPortables

Satellite PolyPortables TUFWAY POP RIVET Assembly instructions

DXV AT200 LS SpaLet installation manual

DXV

DXV AT200 LS SpaLet installation manual

Toto Maris CT486FG quick start guide

Toto

Toto Maris CT486FG quick start guide

DURAVIT SensoWash Classic 613000 01 2 00 4300 Mounting instructions

DURAVIT

DURAVIT SensoWash Classic 613000 01 2 00 4300 Mounting instructions

Swiss Madison SM-WT442 installation instructions

Swiss Madison

Swiss Madison SM-WT442 installation instructions

Laufen ILBAGNOALESSI ONE Series installation manual

Laufen

Laufen ILBAGNOALESSI ONE Series installation manual

Dometic CT 4050 Short Operating Manual

Dometic

Dometic CT 4050 Short Operating Manual

SPX FLOW Johnson Pump AquaT Silent Electric Compact instruction manual

SPX FLOW

SPX FLOW Johnson Pump AquaT Silent Electric Compact instruction manual

bioBidet BB-1700 user manual

bioBidet

bioBidet BB-1700 user manual

Ecoflo Separera mini user manual

Ecoflo

Ecoflo Separera mini user manual

Etac Swift Commode manual

Etac

Etac Swift Commode manual

Etac Hi-Loo 8030 1065 Assembly instruction

Etac

Etac Hi-Loo 8030 1065 Assembly instruction

Delta Riosa Series Installation

Delta

Delta Riosa Series Installation

Delta Prelude C41101 Series Installation

Delta

Delta Prelude C41101 Series Installation

Roca IN-WASH INSIGNIA A803104001 manual

Roca

Roca IN-WASH INSIGNIA A803104001 manual

Toto CW542HME5UNW1 installation guide

Toto

Toto CW542HME5UNW1 installation guide

TRONE GANZA II instruction manual

TRONE

TRONE GANZA II instruction manual

Raritan 2500RFK manual

Raritan

Raritan 2500RFK manual

manuals.online logo
manuals.online logoBrands
  • About & Mission
  • Contact us
  • Privacy Policy
  • Terms and Conditions

Copyright 2025 Manuals.Online. All Rights Reserved.