Axent COLIN User manual

USER MANUAL
COLIN

THANK YOU
Thank you for selecting an AXENT Switzerland product. To ensure proper installation, please review these instructions carefully before use. Care-
fully unpack and examine the intelligent toilet before installation. For any questions, contact us at 1-800-769-4857. Thank you again for choosing
AXENT.
BEFORE YOU BEGIN
CAUTION!
Risk of personal injury or product damage
Handle with care. Vitreous china can break or chip if handled carelessly.
All installation procedures should comply with applicable local plumbing
and building codes.
INSTALLATION BY A PROFESSIONAL, LICENSED PLUMBER OR
CONTRACTOR IS HIGHLY RECOMMENDED.

2
USER MANUAL
COLIN
Safety 3
Introduction 6
Operation 9
Maintenance 17
Troubleshooting 20
Technical Data 23
Guarantee 24

3
SAFETY SYMBOLS
The following symbols in the manual will highlight hazardous situations and their severities.
DANGER! High Risk, Lethal Hazards, Severe Injuries
WARNING! Medium Risk, Severe Injuries
CAUTION! Low Risk, Minor Injuries
NOTE! Damage to Property
NORMAL USAGE
The intelligent toilet’s spray arm attachment should only be used for
the rear wash and front wash cleaning functions. The product may
also be used as a normal toilet seat. This product is meant for indoors
usage only.
Any other usage will not be deemed as normal usage. AXENT under-
takes no liability for abnormal usage.
AXENT is not liable or responsible for damage to other electronics
connected to the same power line while the intelligent toilet is in use.
IMPORTANT SAFEGUARDS
READ ALL INSTRUCTIONS BEFORE USING
SAVE THESE INSTRUCTIONS
A copy of the instructions can also be downloaded from https://axentbath.us.
When using electrical products, especially when children are present, basic safety precautions should always be taken, including the following:
DANGER!
To reduce the risk of electrocution
Do not reach for any electrical components of the intelligent
seat that have fallen into water. Unplug toilet immediately.
Unplug product if not in use for extended periods of time.
Do not use while wet after bathing.
Do not place or store product where it can fall or be pulled into a tub or sink.
Do not place or submerge the intelligent toilet or it’s components into
water or other liquids.
WARNING!
To reduce the risk of burns, electrocution, fire, or injury to
persons
Children or disabled persons may require supervision during use.
Use this product only for its intended use as described in this manual.
Do not use attachments not authorized by the manufacturer.
Never operate this product if it has a damaged cord or plug, if it is not
working properly, if it has been dropped or damaged, or dropped into
water. Return the product to a service center for examination and repair.
SAFETY

4
Keep the cord away from heated surfaces.
Do not block the air vents on this product. Do not place the toilet on or by
objects such as long window curtains that could potentially obstruct the air
vents during normal usage. Keep air vents free of lint, hair, and other debris.
Never use while sleepy or drowsy.
Never drop or insert any object into any openings or hoses.
Do not use outdoors or operate where aerosol (spray) products are
being used or where oxygen is being administered.
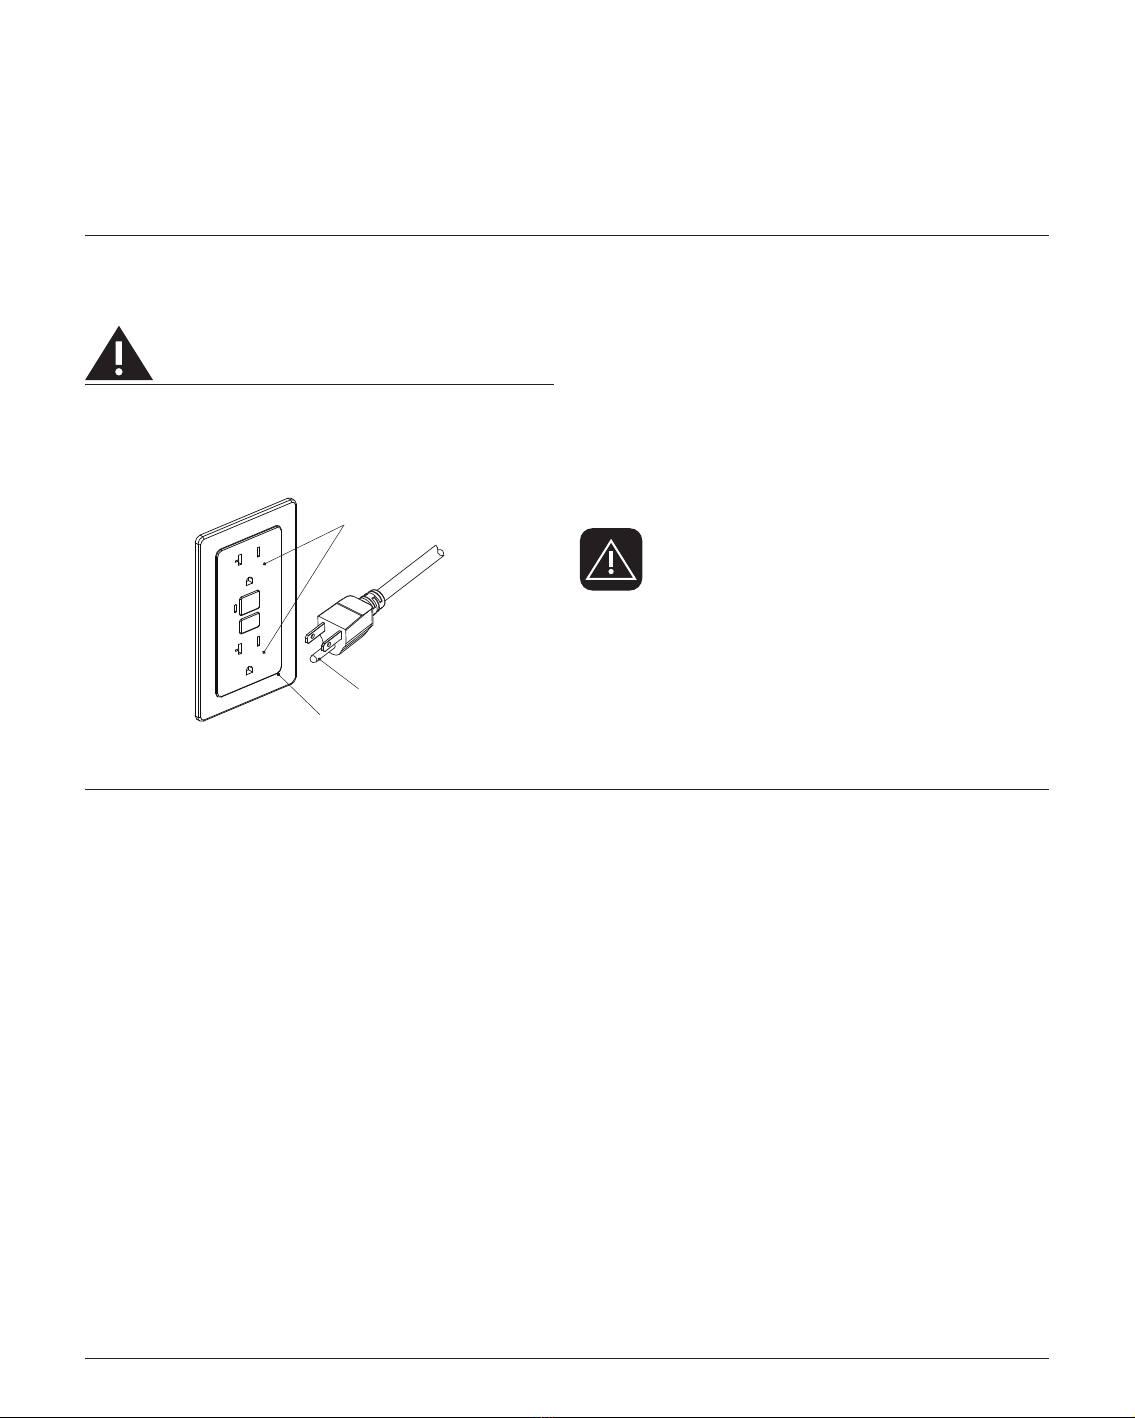
Connect this product to a properly grounded outlet only. See Section
« GROUNDING INSTRUCTIONS » on page 5.
Unplug this product before filling water. Fill (reservoir) with water only
unless otherwise specified by manufacturer. Do not overfill.
SAFETY INSTRUCTIONS
Carefully read and observe the following safety instructions!
Information for the user
Children or persons with limited physical/mental capabilities may re-
quire supervision or proper instructions/guidance prior to or during use.
Ensure that children cannot play with intelligent toilet.
Avoid malfunctions and damage to the product as a result of
improper use
If intelligent toilet is moved from a cold location to a warm location,
condensation may form. Leave the unit switched o for a few hours.
Do not install the intelligent toilet in rooms where the temperature will
be less than 4 °C ( 39 °F ).
Do not place open flames, candles, cigarettes, or similar objects on or
by the toilet.
Do not reuse old hoses or water lines. Please use new water lines
when installing.
Do not install the intelligent toilet next to items that would potentially
expose the toilet to a large amount of water.
Do not climb on or stand on the product.
Do not place any heavy objects on the lid.
Do not open or close the lid or seat with force.
Do not deliberately soil, spray or block the spray arm.
Repairs must only be carried out by a person with the neces-
sary expertise
Do not carry out modifications, tamper with, install additional equip-
ment, or attempt to repair the intelligent toilet.
Improperly performed repairs can lead to accidents, injuries, or dam-
age to the product.
Only use the device when it is fully functional
Make sure the power cable is not damaged before use. Do not allow
the power cable to be severely pinched, bent, or kinked.
Keep the power cable away from hot surfaces and sharp edges.
Do not handle the power cord or plug with wet hands.
Do not use the product if it is not working properly. In case of malfunc-
tion, disconnect the power immediately. Close the water cut-o valve
to interrupt the water supply. Contact your installer.
Information on the use of batteries
Keep batteries out of the reach of small children. Batteries can be
life-threatening if swallowed. If a battery has been swallowed, seek
medical assistance immediately.
Do not attempt to recharge non-chargeable batteries for use with unit.
Always remove empty batteries from the remote control immediately.
They may leak and cause damage.
Do not insert new and old batteries together in the remote control.
Clean the battery and contacts before inserting the battery. Make sure
the batteries are oriented properly.
Remove the batteries if the remote control will not be used for an ex-
tended period of time.
Do not expose the batteries to hot surfaces or direct sunlight to reduce
the risk of battery leakage.
If battery acid has leaked, avoid contact with skin, eyes and mucous
membranes. In case of contact with the acid, flush the aected areas
with large amounts of clean water and seek medical assistance im-
mediately.
SAFETY

5
GROUNDING INSTRUCTIONS
This product must be grounded when plugged in. The power cord on
this product has a grounding plug and must be plugged into an outlet
with a properly grounded grounding plug.
DANGER!
Improper use of grounding plug can result in a risk of electric
shock
For safety, the intelligent toilet should be plugged into a standard 3
prong GFCI outlet.
Grounding pin
Grounded outlet
Grounded outlet box
Wiring Diagram (NOT FOR INSPECTOR’S USE)
If repair or replacement of the power cord or plug is necessary, do not
connect the grounding wire to either flat blade terminal.
This product is not to be used with extension cords.
This product is factory equipped with a specific electric cord and plug
to permit proper connection. No adapters should be used with this
product. Do not modify the power cord on the toilet. If the power cord
will not fit the outlet, have the proper outlet installed by a qualified elec-
trician. If the product must be reconnected for use on a dierent type of
electric circuit, the reconnection should be made by qualified service
personnel.
Please unplug unit immediate and contact for service if cord becomes
damaged. Do not use a bidet seat with a damaged cord.
NOTE!
Actual installation may dier slightly from the diagram.
FCC INSTRUCTIONS
Please note that changes or modifications not expressly approved by
the party responsible for compliance could void the user’s authority to
operate the equipment.
Note: This equipment has been tested and found to comply with the
limits for a Class B digital device, pursuant to part 15 of the FCC Rules.
These limits are designed to provide reasonable protection against
harmful interference in a residential installation. This equipment gener-
ates, uses and can radiate radio frequency energy and, if not installed
and used in accordance with the instructions, may cause harmful
interference to radio communications. However, there is no guarantee
that interference will not occur in a particular installation. If this equip-
ment does cause harmful interference to radio or television reception,
which can be determined by turning the equipment off and on, the
user is encouraged to try to correct the interference by one or more of
the following measures:
- Reorient or relocate the receiving antenna.
- Increase the separation between the equipment and receiver.
- Connect the equipment into an outlet on a circuit dierent from that
to which the receiver is connected.
- Consult the dealer or an experienced radio/TV technician for help.
SAFETY

6
INTRODUCTION
OVERVIEW
Colin E006-0331
Model
Remote Control

7
INTRODUCTION
REMOTE CONTROL
Activate the remote control by inserting the batteries.
The remote is ready anytime someone is seated on the intelligent toilet.
INDICATOR
| | |
Blue Green Red
When power supplied, POWER indicator on.
When Power Saving is activated, SAVE INDICATOR on and HEAT indicator o.
When Power Saving is deactivated, SAVE indicator o.
When heater is on, HEAT indicator on.

8
INTRODUCTION
Manual Flush
Sensing Area
Control Knob
MANUAL FLUSH
The Manual Flush button is located on the top right side of the toilet tank. This
flush requires no electrical power and can be used at any time to flush the toilet.
SENSING AREA
The intelligent toilet has a safety sensor to prevent accidental misuse or discharge
of the bidet wand. The user must be seated over this sensor to enable all functions
of the intelligent toilet.
CONTROL KNOB
This intelligent toilet is fitted with a bidet function. It can easily be operated with the
control knob on the right side.
Please make sure the knob clicks into place and is fully returned to the STOP po-
sition when not in use.

9
OPERATION
REAR WASH
Rotate the Control Knob clockwise after being seated to start the rear wash.
- Rotate the Control Knob clockwise to increase the water volume,
- Rotate the Control Knob counter clockwise to reduce the water volume.
Rotate the Control Knob counter clockwise to the STOP position to stop the Rear Wash.
FRONT WASH
Rotate the Control Knob counter clockwise after being seated to start the Front Wash.
- Rotate the Control Knob counter clockwise to increase the water volume,
- Rotate the Control Knob clockwise to reduce the water volume.
Rotate the Control Knob clockwise to the STOP position to stop the Front Wash.

10
OPERATION
WAND OSCILLATING
The washing wand can oscillate during use of the Rear Wash and Front Wash.
OPERATION WITH THE CONTROL KNOB
While the knob is in either the Rear Wash or Front Wash setting, press the button in the middle of the
knob to activateor deactivate oscillating wand mode.
Oscillating
Nozzle forward
Nozzle backward
Stop
Water temp Seat temp
Temp setting
Dry temp
Flush Dry
Power saving
Light
OPERATION WITH THE REMOTE CONTROL
Oscillating
Press « Oscillating » during wash to activate or deactive Oscillating wand.

11
OPERATION
DRY
OPERATION WITH THE CONTROL KNOB
Press the button on the knob after you are seated.
Press on the button again to stop the dryer.
The dryer will automatically stop after being unseated for more than 5 seconds. Note that the air is
heated.
Oscillating
Nozzle forward
Nozzle backward
Stop
Water temp Seat temp
Temp setting
Dry temp
Flush Dry
Power saving
Light
OPERATION WITH THE REMOTE CONTROL
Dry
Press « Dry » after being seated to start.
Stop
Press « Stop » to stop the Dry.
The Dry will automatically stop after being unseated for more than 5 seconds. Note that
the air is heated.
For your safety, the dryer will not have heated air after 5 minutes of continuous usage.

12
OPERATION
FLUSH
The toilet may be flushed with the flush button, control knob, remote control, or automatically.
MANUAL FLUSH
Press the Manual Flush button to start the Flush.
This flush requires no electrical power and can be used at any time to flush the toilet.
OPERATION WITH THE CONTROL KNOB
Hold down the button on the knob for 3 seconds to flush.
Oscillating
Nozzle forward
Nozzle backward
Stop
Water temp Seat temp
Temp setting
Dry temp
Flush Dry
Power saving
Light
OPERATION WITH THE REMOTE CONTROL
Flush
Press « Flush » to start.
AUTOMATIC FLUSH
The toilet will flush automatically after someone has been unseated for about 5 seconds.

13
OPERATION
NIGHT LIGHT
OPERATION WITH THE CONTROL KNOB
While unseated, press the button on knob to turn on or o.
Oscillating
Nozzle forward
Nozzle backward
Stop
Water temp Seat temp
Temp setting
Dry temp
Flush Dry
Power saving
Light
OPERATION WITH THE REMOTE CONTROL
Light
While unseated, press « Light » to turn on or o.

14
OPERATION
Oscillating
Nozzle forward
Nozzle backward
Stop
Water temp Seat temp
Temp setting
Dry temp
Flush Dry
Power saving
Light
POSITION
The nozzle position can be controlled during use of the Rear wash and Front wash.
OPERATION WITH THE REMOTE CONTROL
Nozzle
forward
Press « Nozzle forward » to move the nozzle forwards while washing.
Nozzle
backward
Press « Nozzle backward » to move the nozzle backwards while washing.
The position indicator on the remote control will indicate the selected nozzle position.
Oscillating
Nozzle forward
Nozzle backward
Stop
Water temp Seat temp
Temp setting
Dry temp
Flush Dry
Power saving
Light
TEMPERATURE ADJUSTMENT
OPERATION WITH THE REMOTE CONTROL
Water temp
Press « Water temp » to adjust the water temperature.
Water temp on the screen of remote control indicates the selected level.
Seat temp
Press « Seat temp » to adjust the seat temperature.
Seat temp on the screen of remote control indicates the selected level.
Dry temp
Press « Dry temp » to adjust the dry temperature.
Dry temp on the screen of remote control indicates the selected level.
There are 4 levels of temperature.
The lowest level turns the heating function o.

15
OPERATION
Oscillating
Nozzle forward
Nozzle backward
Stop
Water temp Seat temp
Temp setting
Dry temp
Flush Dry
Power saving
Light
POWER SAVING
Turning on the Power Saving mode will turn o the water heater until someone is seated.
OPERATION WITH THE REMOTE CONTROL
Power saving
Press « Power saving » for 3 seconds to activate or deactivate the Power Saving mode.

16
OPERATION
Oscillating
Nozzle forward
Nozzle backward
Stop
Water temp Seat temp
Temp setting
Dry temp
Flush Dry
Power saving
Light
ADDITIONAL SETTINGS MODE
PROFILE SETTING MODE ALLOWS YOU TO ADJUST THE TWO FOLLOWING SET
TINGS
- Deodorizer setting ON / OFF
- Auto flush setting ON / OFF
ACTIVATE ADDITIONAL SETTINGS MODE
Oscillating
Press « Oscillating » for 3 seconds. All icons on the remote will appear.
DEODORIZER SETTING ON / OFF
Factory setting: Deodorizer is ON
Stop
You are in the Additional Settings mode,
- Press « Stop » to turn ON/OFF.
AUTO FLUSH SETTING ON / OFF
Factory setting: Auto flush is ON
Seat temp
You are in the Additional Settings mode,
- Press « Seat temp » to turn ON/OFF.
DEACTIVATE ADDITIONAL SETTINGS MODE
Oscillating
Press « Oscillating » again.
All the settings will be reset in the event of a power outage.
Replacing the batteries in the remote control will reset the water temperature, seat temperature, and
power saver settings.

17
MAINTENANCE
EMPTY CISTERN DURING VACATION
If this product will not be in use for an extended period of time, please disconnect the electrical power.
- Disconnect the electrical power.
- Shut o the Inlet Valve.
- Press Manual Flush button.
WINTERIZATION
Please ensure water temperatures will not drop below 39 °F. Frost or frozen water will damage the sys-
tem and may lead to leakage.
If the water or ambient temperature drops below 39 °F , please discontinue use of product. Additionally,
if the intelligent toilet is moved from a cold location to a warm location, condensation may form. Leave
the unit switched o for a few hours before use.
- Disconnect the electrical power.
- Shut o the Inlet Valve.
- Disconnect the inlet hose from the angle stop and drain out the residual water in the hose.
- Press the manual flush button.
- Empty the internal heater cistern by unscrewing the knob shown on the side. Dump the water into
the bowl.
FAILURE TO DRAIN SYSTEM MAY RESULT IN DAMAGE TO SYSTEM AND LEAKAGE OR
FLOODING.

18
MAINTENANCE
REPLACING THE ACTIVE CARBON FILTER
Replace the active carbon filter approximately every 6 months.
- Open the cover of the filter on the side of the toilet seat.
- Relace the active carbon.
- Reassemble back all parts.
SPRAY ARM CLEANING
- Pull the Spray Arm out.
- Clean the Spray Arm with a small brush and clean cloth.
- Push the Spray Arm back in.

19
MAINTENANCE
2
Coin or Similar
Inlet Valve
Filter
FILTER CLEANING
The filter screen will need to be cleaned frequently. If the unit does not fill up properly, starts to lose pres-
sure, or does not function normally, please clean the filter first.
DO NOT use the product without the filter. Otherwise the product may not be warranty.
The water inlet valve must be shut o during the entire filter cleaning process.
The filter may be reinserted in reverse after cleaning.
CLEANING INSTRUCTIONS FOR SEAT, LID AND BACK COVER
Use a mild soap solution to clean the seat and please ensure that the seat and hinges are not left damp. Dry o any residual water or cleaning
agents with a soft cloth. Avoid contact with abrasive, corrosive, or chlorine based cleaners on the seat and hinges as this may lead to damage or
rusting. When cleaning the bowl, ensure that the seat and cover are kept upright until all cleaning solutions have been flushed away.
DISCONNECT THE MAIN PLUG BEFORE CLEANING THE PRODUCT.
For cleaning do NOT use any scouring equipment (e.g. scouring sponge) tools or any aggressive cleaning agents.
The toilet seat is firmly connected to the unit and cannot be removed.
CLEANING CERAMIC APPLIANCES
Under no circumstances should you use harsh or abrasive cleaning substances such as abrasive cleansers, scouring powder, or drain cleaner on
your ceramic surfaces. Do not use steam cleaners.
These steps ensure the performance of the AXENT Easy Clean finish for many years. Recommended cleaners for sanitary ceramic surfaces
include acidic cleaners with a pH value between 1 and 4. Cleaners with a pH value between 5 and 8 are not always eective. AXENT strong rec-
ommends against alkaline cleaners with a pH value between 9 and 12.
Other manuals for COLIN
1
Table of contents
Other Axent Toilet manuals

Axent
Axent PRIMUS User manual

Axent
Axent PRIMUS Manual

Axent
Axent One User manual

Axent
Axent ONE C User manual

Axent
Axent AXENT.ONE PLUS User manual

Axent
Axent COLIN User manual

Axent
Axent AXENT.ONE C PLUS E314 User manual

Axent
Axent AXENT.ONE User manual

Axent
Axent ONE C User manual

Axent
Axent PRIMUS W331 User manual
Popular Toilet manuals by other brands

Kohler
Kohler Veil Comfort Height K-5401-0 Homeowner's guide

Separett
Separett Villa 9210 installation instructions

Glacier bay
Glacier bay N2428R Use and care guide

Crosswater
Crosswater MPRO SENSE US-US-PRO6005CW manual

MSW Motor Technics
MSW Motor Technics MSW-M-PT-13L-20L user manual

Kohler
Kohler C3-129 Homeowner's guide