Estella 348EMIX8 User manual
01/2020
348EMIX8
COUNTERTOP MIXER
WITH PROGRAMMABLE CONTROLS
USER MANUAL
Replacement
2

1
Overview ..........................................................2
Safety Precautions.................................................2
Specifications ......................................................3
Installation.........................................................4
Location
Electrical Connections
Installation Diagram
Controls............................................................5
Speed Indicator Bar
Digital Displays
Buttons
Operation ....................................................... 6-8
Power On and Power Off
Start and Stop the Mixer
How to Record and Set the Program
Clear the Saved Programs
Countdown Timer and Reminder
Power Off Memory
Maintenance.......................................................8
Accessories ........................................................9
Troubleshooting .................................................10
Mixing Capacity..................................................10
Equipment Warranty ............................................11
INDEX
NOTE: Save these instructions for future reference.

2
OVERVIEW
SAFETY
PRECAUTIONS
• 8 Qt. mixer has 600 Watts of power to allow mixing stiffer dough and larger batches
• Heavy duty 4/5 HP commercial motor
• Professionally designed metal body and counter-top style
• Shafts are mounted in ball bearing and 100% steel gears drive
• Electronic 5-speed control allows for non-stop shifting speed
• Slow start feature allows the addition of raw ingredients without splashing
• Planetary mixing action and digital timer ensures perfect results
• Simple hand lift is ideal for changing bowl and attachments
• Automatically powers off when overloaded to protect the motor and electrical elements
• Clear safety guard (sold seperately) available as an added precaution
• 6 programmable options allow for consistency on your most popular batches
• Comes with stainless steel flat beater, wire whip and dough hook (included)
• Meat grinder and pasta accessory kit available (sold seperately)
When using this machine, always make sure the following conditions or operations are in
effect. Failure to do so may cause accidents.
• Keep hand & clothing away from bowl and attachments when in operation.
• Keep rigid objects away from bowl and attachments when in operation.
• To protect against risk of electrical shock, do not immerse mixer in water or other
liquid.
• Use the machine only with the electrical service specifications listed on its nameplate.
• Disconnect the machine from its power source before carrying out any maintenance.
• Do not disable or remove the safety mechanisms included with the machine.
• Do not leave the machine in operation unattended.
• Observe maintenance and safety inspection schedules.
• Maximum bread dough capacity 3.3 lbs. on basis of 60 percent water.
• Mixer will run without a safety guard - as extra precaution a clear safety is available
(sold separately).
• Mixer will not run if the bowl lift is not raised and engaged.
• The mixer will run without the bowl if the bowl handle is engaged in the 'up' position -
this makes using the HUB easier. Make sure to be aware of the moving planetary head
while no bowl is attached.

3
SPECIFICATIONS
MOTOR: 4/5 HP, 600 Watt
ELECTRICAL: 110-120V single phase
SWITCH & TIMER: All-in-one digital control panel
CORD AND PLUG: 5-15P
TRANSMISSION: Transmission gears are made of heat-treated alloy steel and are coated
with a special lubricant to assure a long life.
SPEED: The mixer has five speeds: 100RPM-500RPM
SAFETY GUARD: Clear guard that easily rotates to open and reveal a micro switch which
immediately shuts off power
DIMENSION: 18" x 13.5" x 20.5"
NET WEIGHT: 44 lbs.
ATTACHMENTS: (1) Stainless Steel Bowl
(1) Dough hook
(1) Flat beater
(1) Wire Whip
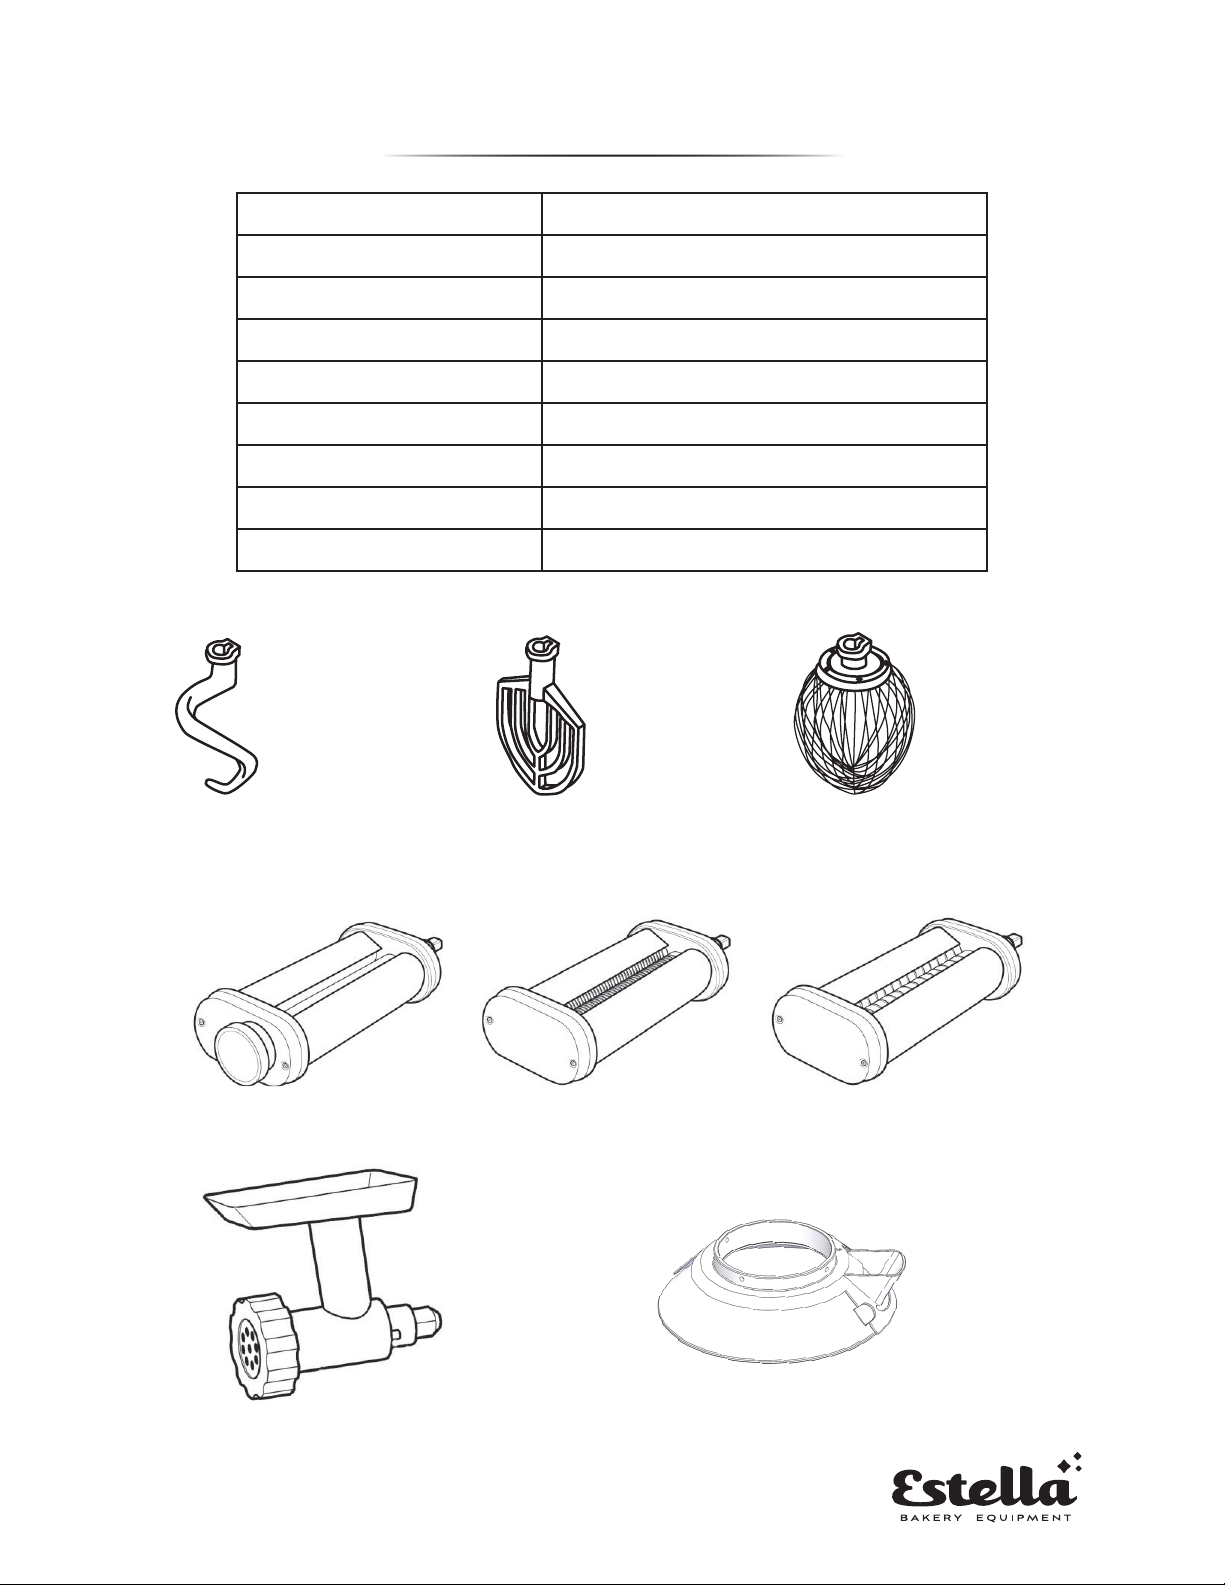
Flat Beater
Wire Whip
Dough Hook
(optional)
Control Panel
Bowl Lift Handle
Column Cover
Bowl Support
Locating Pins
SS Bowl
Upper Lid
Programmable Buttons
Bowl Handle
4
BEFORE INSTALLING YOUR MIXER, CHECK TO BE SURE THAT YOUR ELECTRICAL
SERVICE SPECIFICATIONS MATCH THOSE OF YOUR MIXER AS PRINTED ON THE
MIXER'S NAMEPLATE.
LOCATION
Place the mixer in its operating location. Bench should be placed on a sturdy level surface.
There should be adequate space around the mixer for the user to operate the control and
install and remove bowls.
ELECTRICAL CONNECTIONS
WARNING: THE PROVIDED ELECTRICAL CORD ON THIS MACHINE IS A THREE-
PRONG GROUNDING CORD. IT IS IMPERATIVE THAT THE MACHINE IS PLUGGED
INTO A PROPERLY GROUNDED OUTLET.
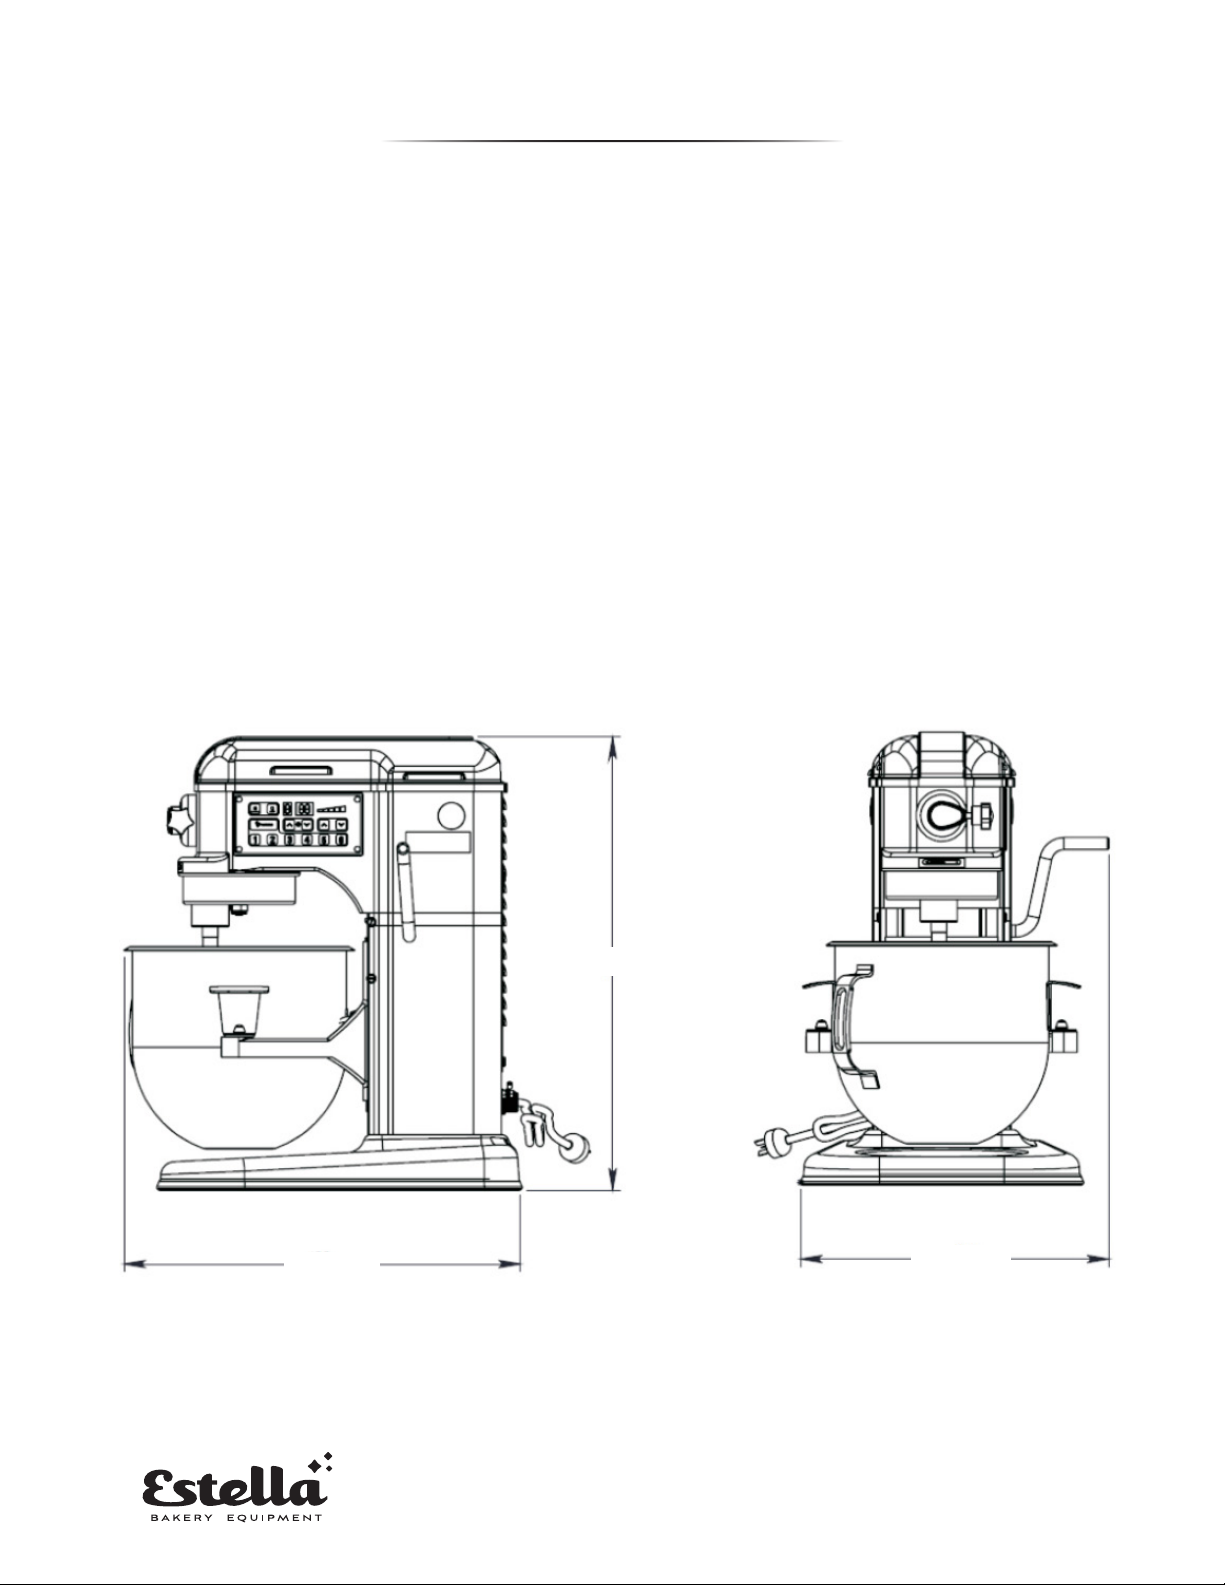
INSTALLATION
18"
20.5"
13.5"
5
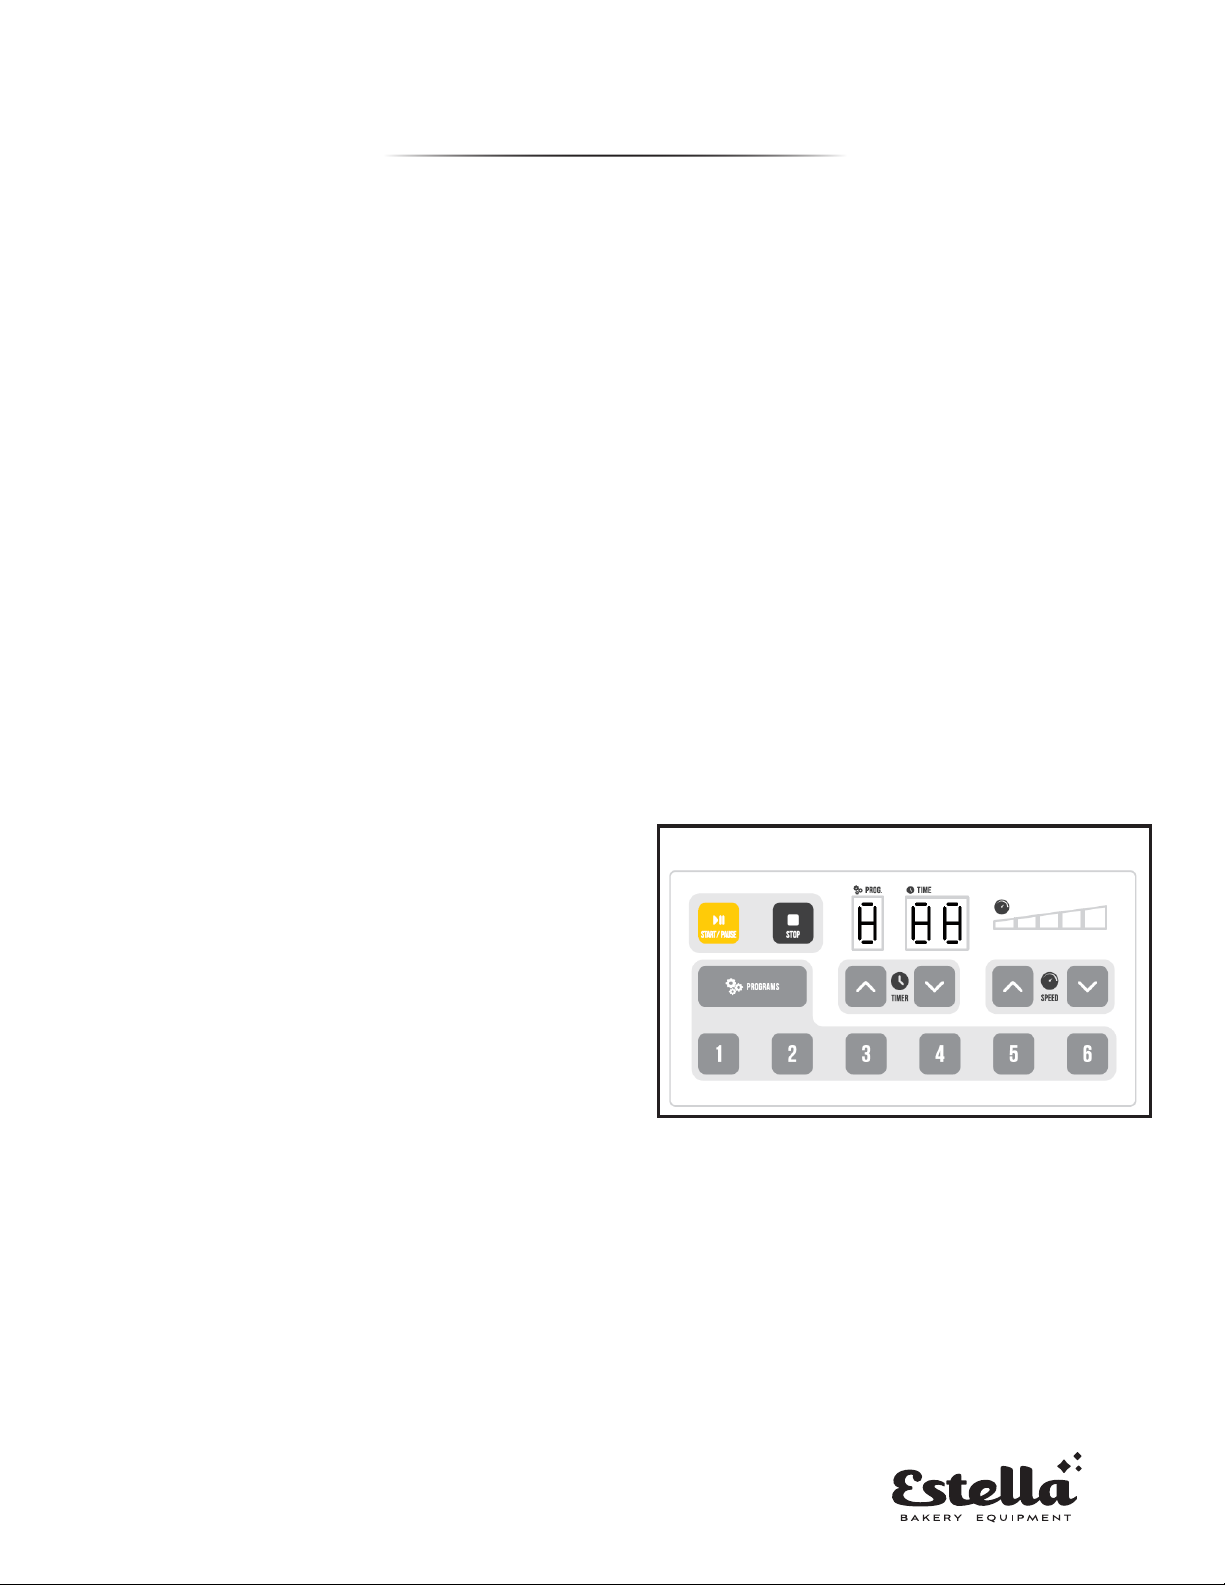
SPEED INDICTOR BAR: The speed indicator bar displays which speed (1-5) the mixer is currently set to.
If the mixer senses that there is an uneven load in the mixer bowl, a notification will flash on the display.
DIGITAL DISPLAY: The digital displays are divided into two sections. The left single-digit display is the
program display area, which is used to display the current set program number. The right two-digit
display is the time display, which is used to show the time in minutes, or in seconds if the timer is less
than 1 minute. If the time is shown in minutes, a dot on the timer display will flash to signify that it is still
counting. If a program is not selected and the timer is not set, it will count up from 0 and the program
display will show 0. If the timer is above 99, the program display will show "-", indicating a countdown
If a program is selected the program display area will display the current program number (1-6) and the
time display area will display the remaining time that corresponds to the specific program. The timer will
always count down based on the program that is selected
BUTTONS: The buttons on the control panel are as follows:
Start/Pause – Begins or pauses the mixer’s motor
Stop – Stops the mixer’s motor
Timer Up Arrow – Increases the amount of time on
the timer
Timer Down Arrow – Decreases the amount of time
on the timer
Speed Up Arrow – Increases the speed of the motor
Speed Down Arrow – Decreases the speed of the
motor
Programs – Used to create or select from preset programs
Program Selection Numbers (1-6) – Chooses the program that corresponds to the respective program
number
CONTROLS
NOTE: New mixer bowls and agitators (beaters, whip, and doughhook) should be thoroughly washed
with hot water and a mild soap solution, rinsed with either a mild soda or vinegar solution, and
thoroughly rinsed with clean water BEFORE being used. This cleaning procedure should also be
followed for bowls and agitators before whipping egg whites or whole eggs.
CONTROL PANEL

6
POWER ON AND POWER OFF
After powered on, all of the indicators and the digital display will flash on, and the buzzer will sound for
1 second. If the device was normally shut down before powered off last time, it will enter a standby state
after 1 second. The digital displays will all display 0, and the indicator will display speed level 1. If the
motor was running when last powered off, the state before the unit was powered off will be restored
after 1 second, but the motor will change from a running state to a paused state. In case of a shutdown,
please stop the motor first and then unplug the power.
START AND STOP THE MIXER
Before starting the mixer, make sure the bowl is attached and the lift is engaged in the “up” position,
then press the start/stop button to start the motor. Whether the motor is started or not, you can adjust
the speed by pressing the up and down speed button arrows. You can also adjust the timer by pressing
the up or down timer arrows on the display.
If the timer is adjusted after the mixer is started, the adjustment time will not be remembered and
will only be effective for this operation. If the timer is not set to 0, the countdown will start again
immediately.
After the mixer is started, press the Start/Pause button in order to temporarily pause the running of
the motor. When the motor is paused, the timer will also stop until the Start button is pressed again, at
which time it will start again.
To return to the standby state, press the Stop button when the mixer is running or suspended.
HOW TO RECORD AND SET THE PROGRAM
1. Press the Start/Pause button to start the machine. Once this is pressed, the machine will begin
recording your actions.
2. Use the up and down arrows to select your speed preference.
3. If you’d like your speed to change mid-mix, adjust speed at your desired time (for example: changing
from speed 1 to speed 2 at 30 seconds, just press the up arrow to the second speed indicator at the
30 second mark). There is no need to pause or stop the mixer to change speed.
4. If you want the mixer to pause to add ingredients, press the Start/Pause button, and lower the bowl
lever (Error E2 will show in the display, disregard as that error just means the bowl is down). This will
tell the program to pause itself at the desired time. (For example – if you want the mixer to pause at
60 seconds, press the Start/Pause button, lower the bowl, add ingredients, raise the bowl and press
the Start/Pause Button to begin again. This will be a saved function in your program.)
OPERATION

7
5. When you are finished with the recording, press the Stop button.
6. To save the program, hold the Programs button and the program number button (1-6)
simultaneously (approximately 3 seconds). For example, if you want to save it as program number 3,
press the Programs button and the 3 at the same time.
7. The display will show the program number and time duration once it is saved.
8. To choose a saved program, press the corresponding program number and then press the Start/
Pause button to begin the program.
*Any current program can be reprogrammed by saving over the program number at any time without needing to
clear it.
CLEAR THE SAVED PROGRAMS
In order to clear out the saved programs in the mixer, simultaneously hold down the Program and the
Stop keys for 5 seconds. The digital display will flash, “--“, and then return to the normal display after 3
seconds. This is a signifier that all saved programs have been cleared from the unit.
COUNTDOWN TIMER AND REMINDER
When the countdown is less than 15 seconds, the alarm will sound to notify the user every 2 seconds
until the timer reaches 0. The motor will stop running automatically and the digital display will flash to
show “00”. Once the timer reaches zero, the alarm will sound once every 10 seconds for 1 minute.
POWER OFF MEMORY
If the motor loses power during operation, the controller will restore the program and the remaining
running time before losing power next time when the motor is powered on, but the motor will change to
the suspended state
MIXER SPEEDS:
Speed 1: Slow Mixing/Beating – For slow beating, mashing and kneading yeast dough.
Speed 2: Medium Mixing – For mixing cookie and cake batters.
Speed 3: Medium Beating – For beating , creaming and medium fast whipping.
Speed 4: Fast Beating – For whipping heavy cream, egg whites and boiled frostings.
Speed 5: Fast Whipping – For whipping small amounts of heavy cream and egg whites.
HOW TO INSTALL A BOWL
The bowl must be installed before the agitator. To install the bowl, fully lower the bowl support. Position
the bowl so the alignment bracket on the back of the bowl is in the bowl retainer and the locating pin on
the front of the bowl support fits in the holes on the sides of the bowl.
8
HOW TO INSTALL AN ATTACHMENT
To install an attachment, the bowl must be installed and fully lowered. Place the attachment in the
bowl, push it up on the attachment shaft, and turn it clockwise to seat the shaft pin to the slot of the
attachment shank. Disconnect the power connection before installing the accessories.
• There are 2, #5 hub grinder plates included. One with 3/16" hole diameter and the other with 5/16"
• The pasta roller attachment can roll dough into thicknesses between 1/64" & 3/32"
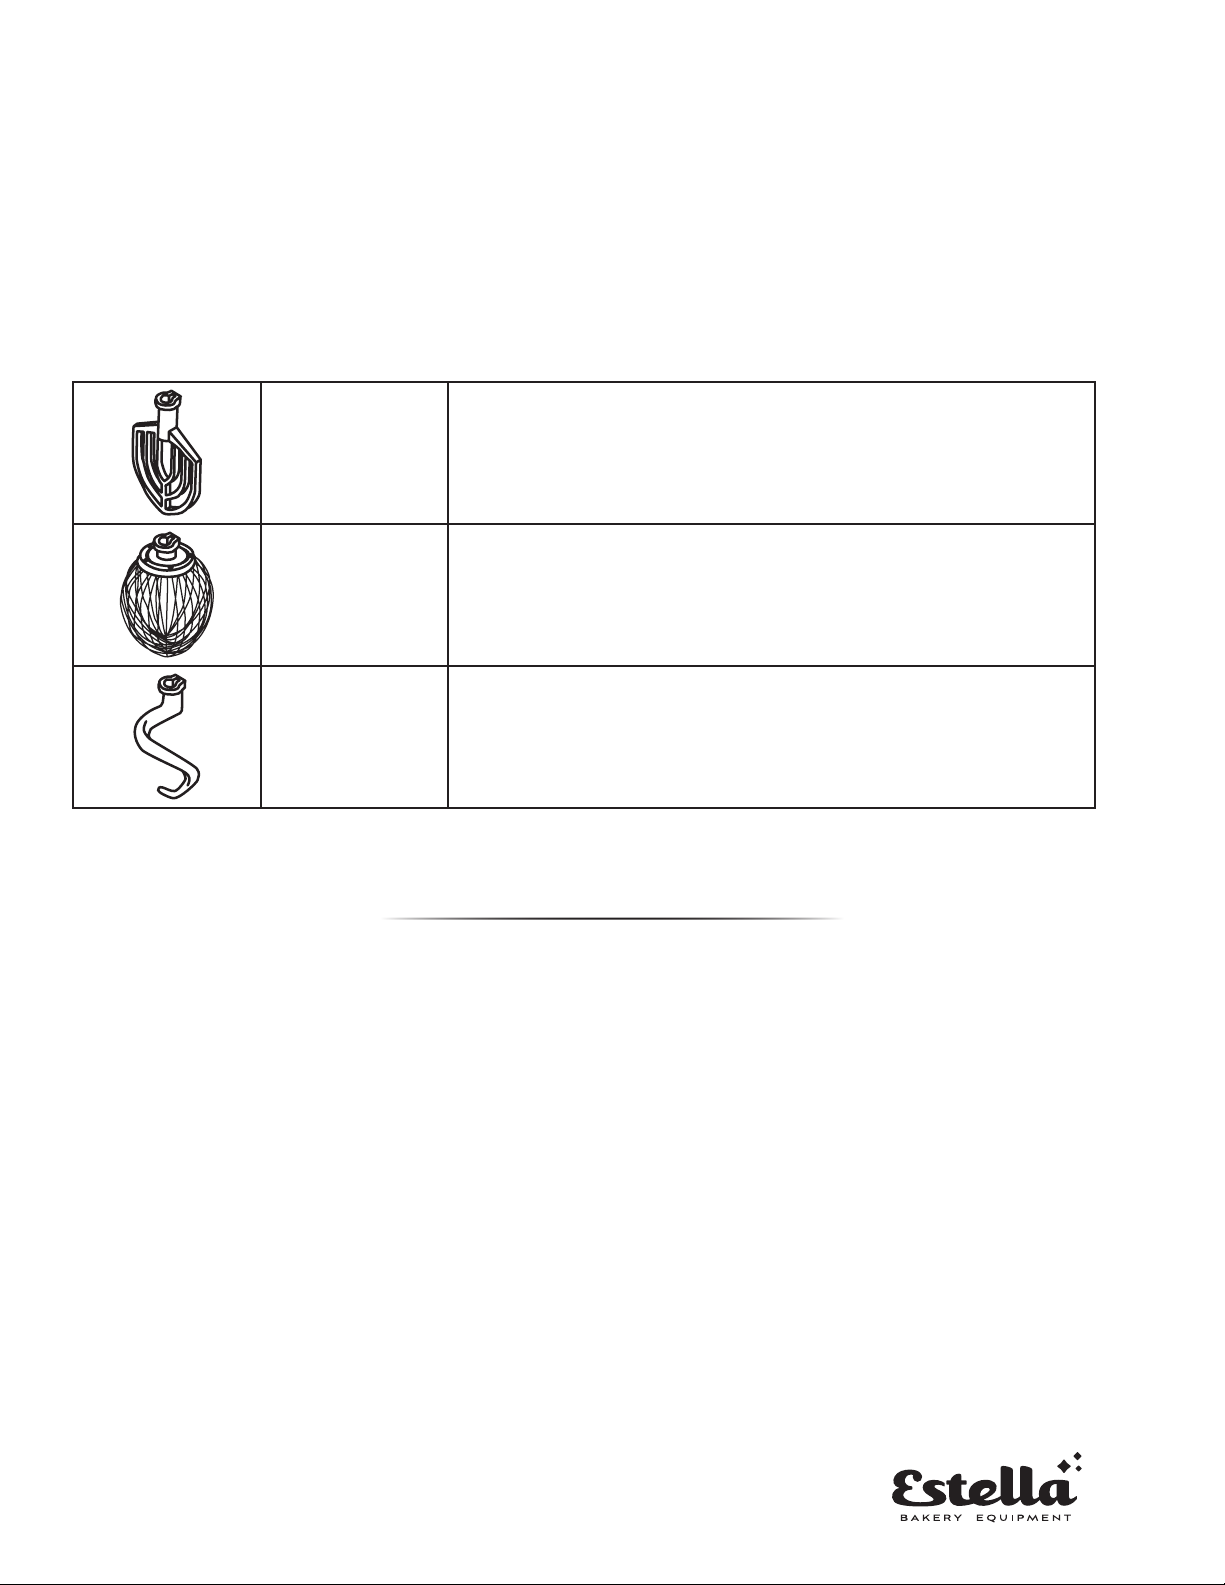
USING YOUR ESTELLA ATTACHMENTS
Flat Beater
Use to make normal to heavy mixtures:
Cakes, biscuits, creamed frostings, quick breads, candies,
meat loaf, cookies, mashed potatoes, pie pastry
Wire Whip
Use to make mixtures that need to have air incorporated:
Eggs, sponge cakes, egg whites, angel food cakes, heavy
cream, mayonnaise, boiled frostings, some candies
Dough Hook Use to mix and knead yeast doughs:
Breads, coffee cakes, rolls, buns
MAINTENANCE
NOTE: ALL MAINTENANCE WORK SHOULD BE DONE ONLY AFTER THE UNIT HAS BEEN
DISCONNECTED FROM ELECTRICAL POWER AND GROUNDING.
• Never use a metal or stiff brush to clean the mixer. Never clean the mixer with a water hose or any
fluid pressure.
• The mixer should be thoroughly cleaned after each use.
• Bowls and agitators should be removed from the mixer and cleaned.
• The transmission case and planetary gears are filled with special lubricant that will last for several
years. When lubricant is needed for replacement, it should be ordered from our authorized service
representative.
• If the attachment strikes the bowl, stop the mixer.
• If your mixer should malfunction or fail to operate, check the following:
• Is the mixer plugged in?
• Is the fuse in the circuit to the mixer in working order? If you have a circuit breaker box, be sure
the circuit is closed.
• If the problem is not due to one of the above items, please contact your original seller.
9
ACCESSORIES
ITEM # DESCRIPTION
348EMIX8XBL Stainless Steel Bowl
348EMIX8XDH Dough Hook
348EMIX8XFB Flat Beater
348EMIX8XWW Wire Whip
348EMIX8XG Clear Bowl Guard
348EMIX8XMG Meat Grinder
348EMIX8XP Pasta 3pc kit
348EMIX8XMGP Meat Grinder and Pasta 3pc kit
Spaghe CuerPasta Roller Feuccine Cuer
MINCER/GRINDER
(348MIX8XMG)
BOWL GUARD
(348MIX8XG)
PASTA 3PC KIT (348MIX8XP)
FLAT BEATER
(348MIX8XFB)
WIRE WHIP
(348MIX8XWW)
DOUGH HOOK
(348MIX8XDH)
10
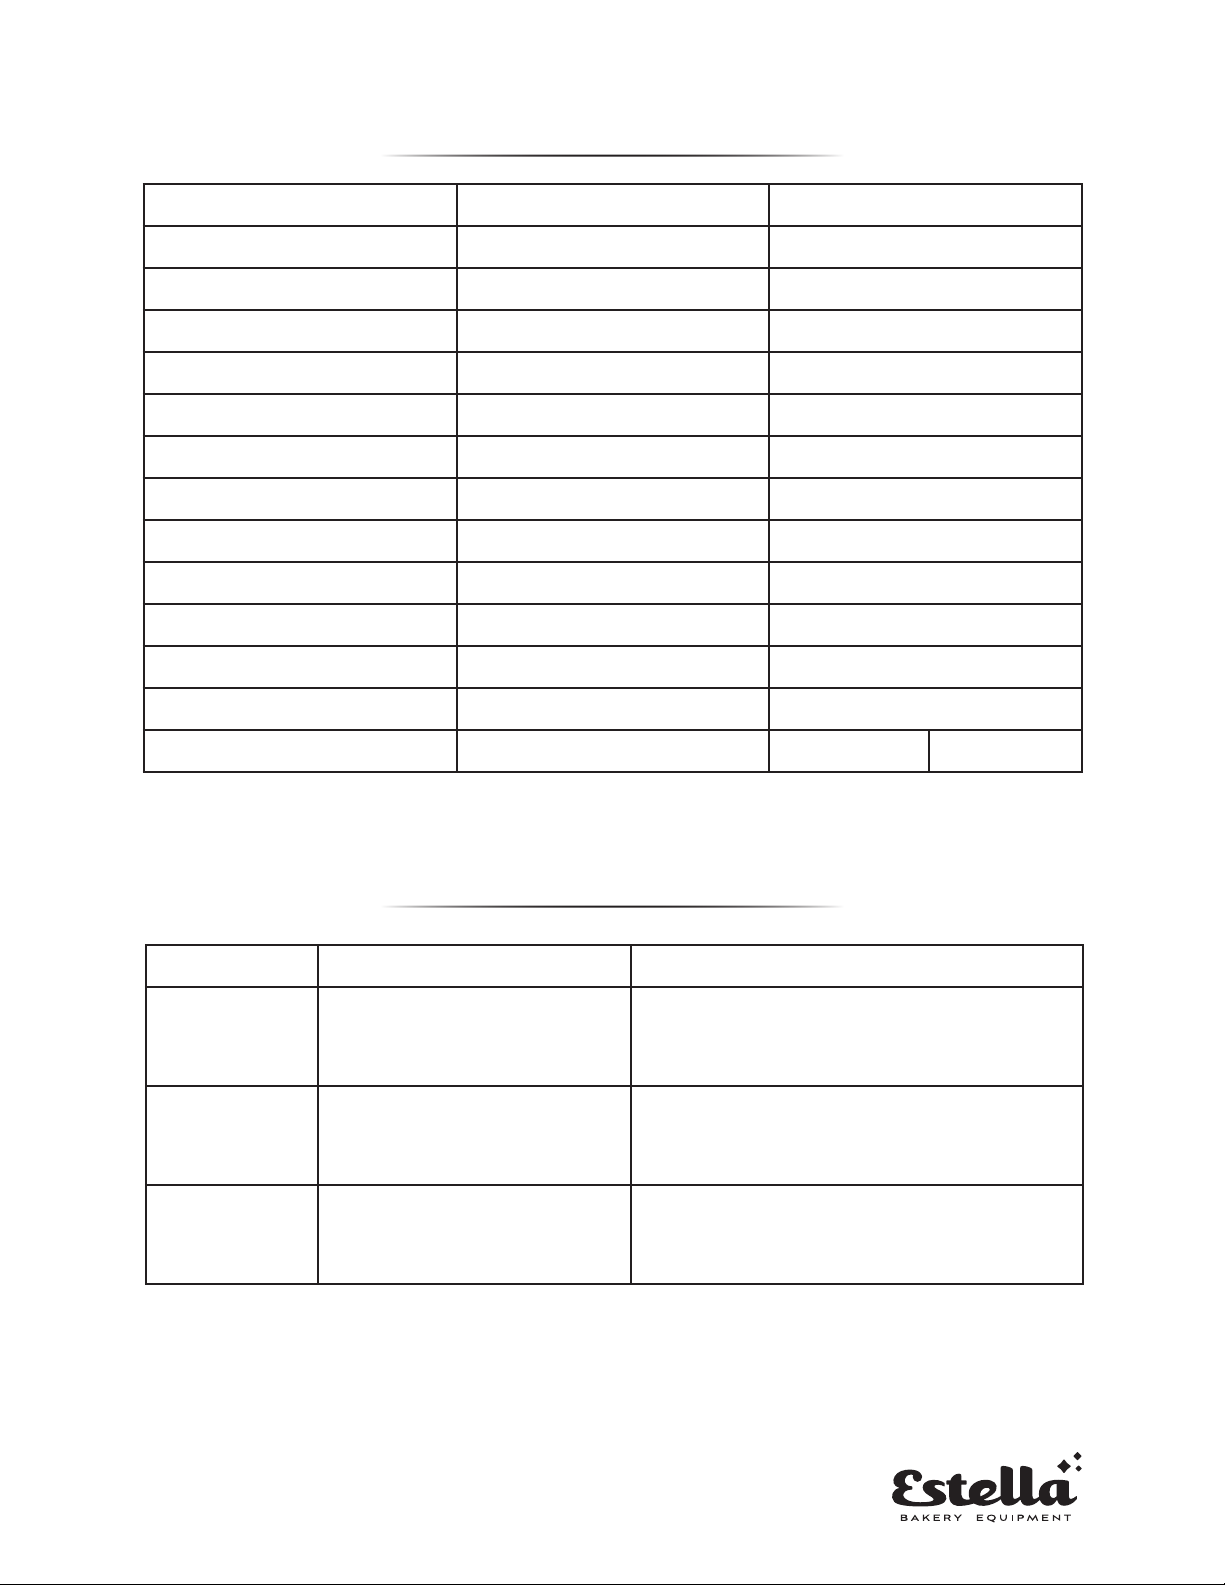
MIXING CAPACITY
INGREDIENT TOOL BOWL
Egg Whites Whip 1.5 lb
Mashed Potatoes Beater 6¼ cups
Mayonnaise (Qts. Oil) Beater 12¾cups
Meringue (Qts. Water) Whip 4¼ cups
Wafe/Pancake Batter Beater 8½ cups
Whipped Cream Whip 12¾cups
Sheet Cake Batter Beater 4.4 lb
Layer Cake Beater 5.5 lb
Pound Cake Beater 5.5 lb
Sugar Cookie Beater 5.5 lb
Sponge Cake Whip 2.2 lb
Dough, Pie Beater 3.3 lb
Bread or Roll Dough Hook, 1 speed Water 1.1 lb Flour 1.8 lb
TROUBLESHOOTING
ERROR CODE PROBLEM POSSIBLE SOLUTION
E2 Level Lifting Error Lift the bowl up, check the switch by the
back of the machine or the circuit board
E8 Overheating, High
electricity, Overworking
Unplug and wait for about 30 minutes
E9 Motor/Bowl Overload or
Blocked, 800g powder
Remove ingredients

11
EQUIPMENT
LIMITED WARRANTY
TO MAKE A WARRANTY CLAIM:
For Warranty Inquiries contact the location where you purchased the product:
• WebstaurantStore.com: Contact help@webstaurantstore.com. Please have your order number ready.
• The Restaurant Store: If you purchased this unit from your local store, please contact your store directly.
• TheRestaurantStore.com: Online purchases, call 717-392-7261. Please have your order number ready.
Failure to contact the designated location prior to obtaining equipment service may void your warranty.
Estella makes no other warranties, express or implied, statutory or otherwise, and HEREBY DISCLAIMS ALL
IMPLIED WARRANTIES, INCLUDING THE IMPLIED WARRANTIES OF MERCHANTABILITY AND OF FITNESS
FOR A PARTICULAR PURPOSE.
This Limited Warranty does not cover:
• Equipment sold or used outside the Continental United States
• Estella has the sole discretion on wearable parts not covered under warranty
• Equipment not purchased directly from an authorized dealer
• Equipment used for residential or other non-commercial purposes
• Equipment that has been altered, modied, or repaired by anyone other than an authorized service agency
• Equipment where the serial number plate has been removed or altered.
• Damage or failure due to improper installation, improper utility connection or supply, and issues resulting from
improper ventilation or airow.
• Defects and damage due to improper maintenance, wear and tear, misuse, abuse, vandalism, or Act of God.
Any action for breach of this warranty must be commenced within 2 year of the date on which the breach occurred.
No modication of this warranty, or waiver of its terms, shall be effective unless approved in a writing signed by the
parties. The laws of the Commonwealth of Pennsylvania shall govern this warranty and the parties’ rights and duties
under it. Estella shall not under any circumstances be liable for incidental or consequential damages of any kind,
including but not limited to loss of prots.
Estella warrants its equipment to be free from defects in material and workmanship for a period of 2 years. This is
the sole and exclusive warranty made by Estella covering your Estella brand equipment. A claim under this warranty
must be made within 2 years from the date of delivery of the equipment. Only the equipment’s original purchaser may
make a claim under this warranty. Estella reserves the right to approve or deny the repair or replacement of any part or
repair request. The warranty is not transferable. Estella Equipment installed in/on a food truck or trailer will be limited
to a period of 30 days from the original date of delivery.
Table of contents
Other Estella Mixer manuals


