Estella 348SM20 User manual

07/2020
348SM20
20 Qt.
348SM40
40 Qt.
348SM30
30 Qt.
348SM50
50 Qt.
348SM60
60 Qt.
SPIRAL MIXERS
WITH GUARDS
USER MANUAL

Important Safety Information .....................................2
Operation ..........................................................3
Specifications & Capacities ........................................3
Cleaning ...........................................................5
Parts Diagram......................................................6
Part Numbers ......................................................7
Circuit Diagram ....................................................7
Troubleshooting ...................................................8
Limited Warranty ..................................................9
INDEX
1.

When using electrical appliances, basic safety precautions should always be followed,
including the following:
1. Keep the working around surrounding the machine clean and organized.
2. Consider environmental conditions surrounding the machine. Do not use the machine in humid,
wet or poorly lit environments. Do not use the machine close to flammable liquids or gas.
3. Keep machine away from children and non-authorized personnel. Do not permit them to go near
the machine or its working area.
4. Do not touch the switch or cable with wet hands.
5. Only utilize the machine with the correct voltage to achieve optimum results.
6. Do not wear low-hanging clothing or items that may get caught in the machine. Wear non-slip
shoes while working with the machine. For hygiene and safety, keep hair tied back and wear
protective gloves.
7. Do not tug on the cable to remove the plug from the outlet. Do not leave the cable near sharp
objects, water or solvents.
8. Remove the plug when you are cleaning the machine or need to move the machine.
9. Check that the machine is not damaged prior to each use. Carefully check that all safety devices
are working, that the removable parts are not blocked, there are no parts damaged, that all the
parts have been set up correctly and that all conditions that could influence the regular function
of the machine are in working order.
10. If the machine is damaged or there are issues during its use, turn off the machine immediately
and contact the manufacturer for assistance or repair. Repairs should only be made by qualified
technicians, using the correct manufacturer parts. Non-compliance with these rules may void
the warranty.
NOTE: Save these instructions for future reference.
SAFETY
2.

3.
1. Before use, check whether the power supply voltage matches the operating voltage of the machine,
and whether the grounding wire is firm and reliable. Empty machine test run, all functions are
normal, no abnormal noise.
2. After cleaning the machine, put in the right amount of water, then put the flour, cover the protective
cover, you can start the machine to start and mix.
3. Start-up steps:
a. Put on the bowl guard and set the time (generally 12-15 minutes);
b. The right-hand red switch pops up;
c. Press the green button to start the slow speed dough,
d. After the water and flour are basically evenly mixed, press the red stop button, and then press
the yellow button to start quick mixing. The machine will automatically stop when it reaches the
set time.
OPERATION
STOP
SLOW HIGH
TIMER
LOW SPEED START BUTTON HIGH SPEED START BUTTON
STOP BUTTON
EMERGENCY STOP BUTTON
TIMER
Instructions:
1. Cover the safety guard and turn right to pop up the emergency stop button;
2. The setting time is generally 12-15 minutes to mix the dough;
3. Press the low-speed start button to start the machine;
4. When the flour and water are evenly mixed, press the stop button, and then press the
high-speed start button to start fast mixing, and when the set time is reached, the machine
will automatically stop working.
5. When the machine is working, open the safety guard and the machine will automatically
stop working; you need to press the high-speed start button or low-speed start button again
to start the machine.
LOW SPEED
START BUTTON
HIGH SPEED
START BUTTON
TIMER
STOP
BUTTON EMERGENCY
STOP BUTTON
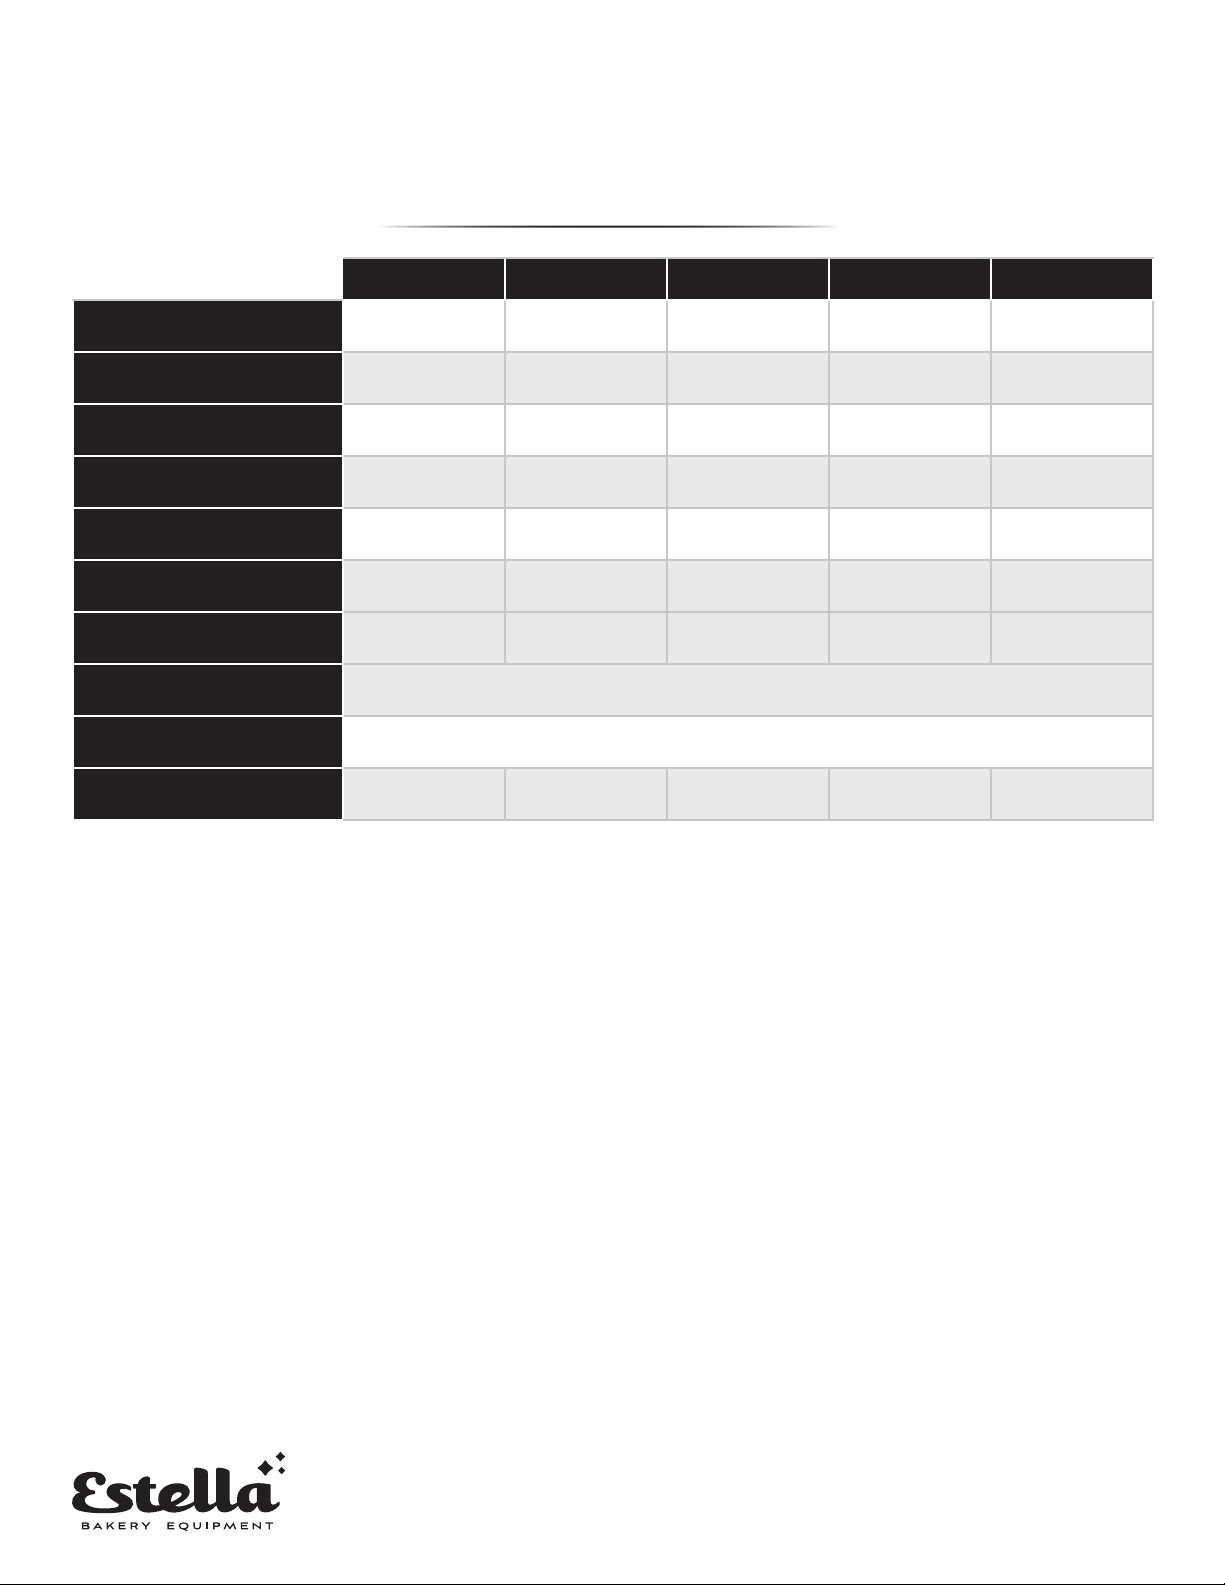
4.
SPECIFICATIONS
& CAPACITIES
348SM20 348SM30 348SM40 348SM50 348SM60
Bowl Capacity 20 QT. 30 QT. 40 QT. 50 QT. 60 QT.
Flour Capacity 17.5 LB. 27.5 LB. 35 LB. 44 LB. 55 LB.
Dough Capacity (60% AR)* 32 LB. 55 LB. 65 LB. 80 LB. 100 LB.
Voltage 120V 120V 220-240V 220-240V 220-240V
Wattage 1500W 1500W 2200W 3000W 3000W
Horsepower 2HP 2HP 3HP 4HP 4HP
Phase Single Single Single Single Single
Mixing Speed (Low) 112 RPM
Mixing Speed (High) 198 RPM
Machine Weight 198 LB. 220 LB. 342 LB. 375 LB. 397 LB.
*When mixing dough (pizza, bread, or bagels), check your "AR" absorption ratio - water weight divided
by flour weight. The above capacities are based on 12% flour moisture at 70°F water temperature.
If high gluten flour is used, reduce above dough batch size by 10%.
Example: If recipe calls for 6 lb. of water and 10 lb. of flour, then 6 divided by 10 = 0.6 (60% AR).
5.
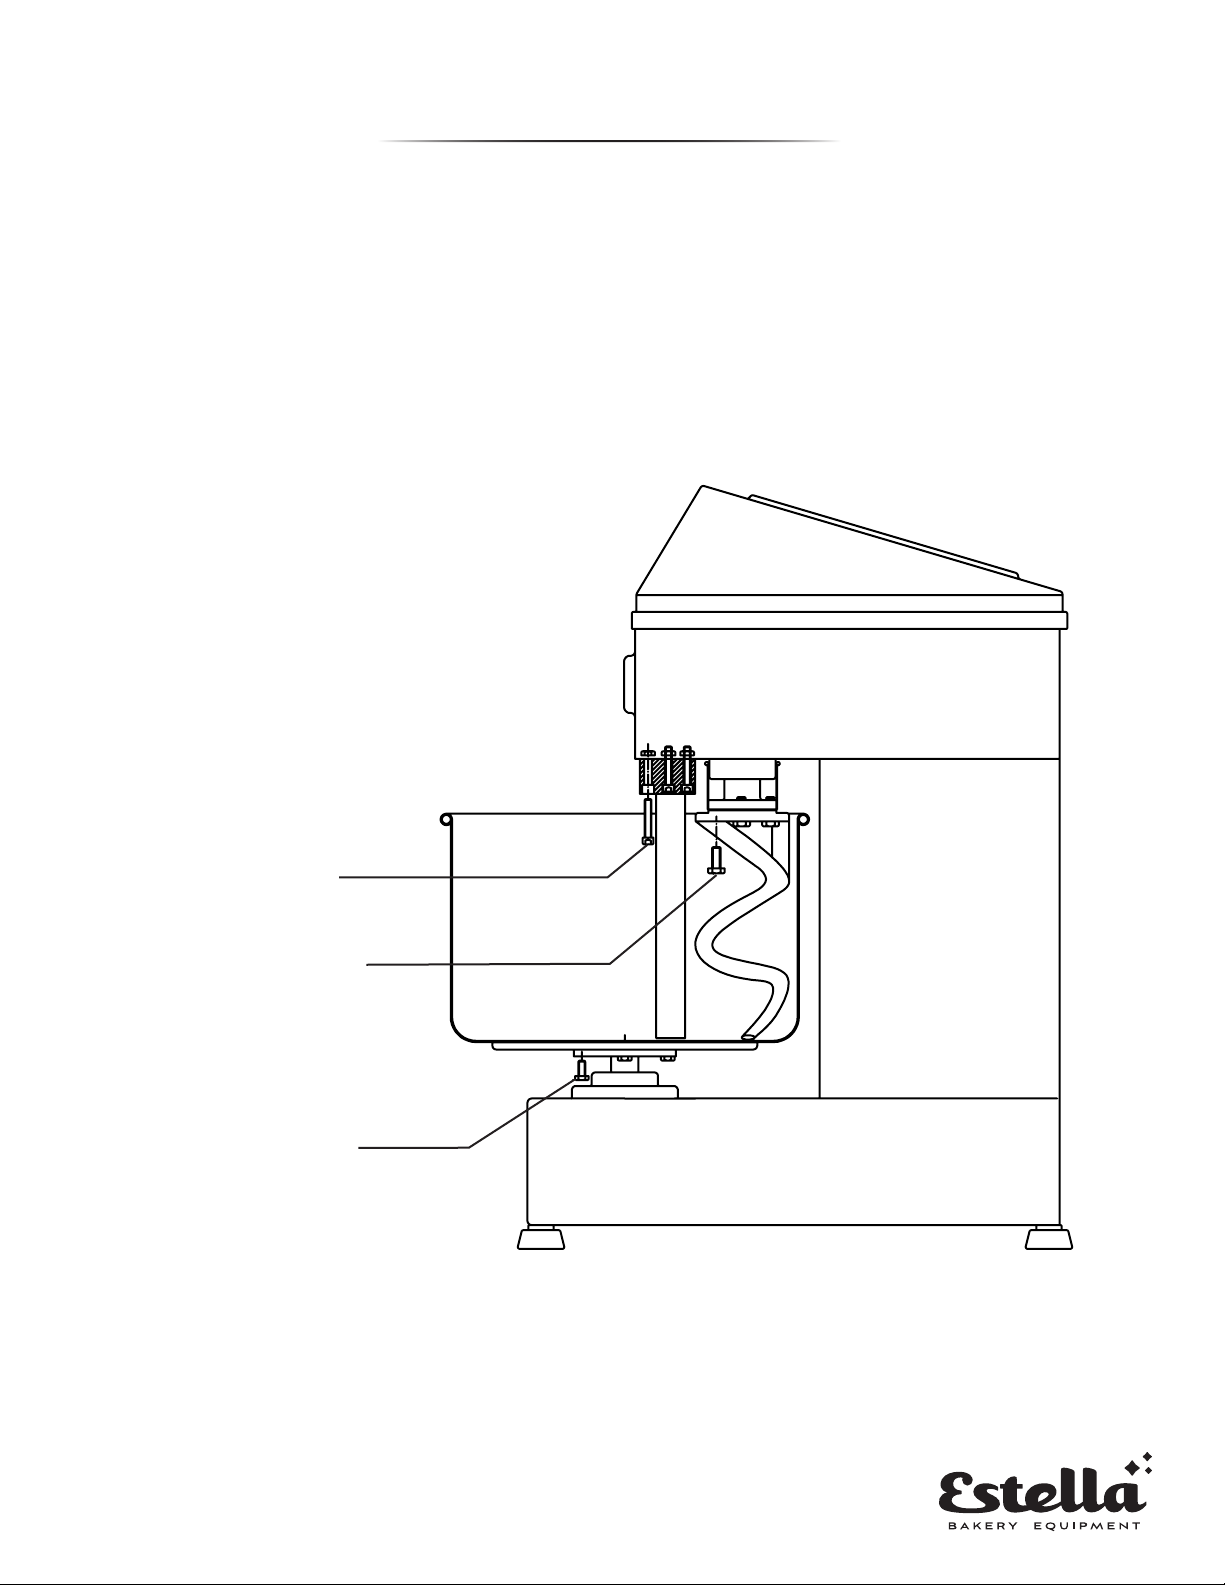
CLEANING
1. Remove the mixer bowl and any attachments. (diagram below)
2. Wash mixer bowl and attachments with soap and warm water.
3. Rinse thoroughly and dry.
NOTE: Cleaning should be done at the end of every work day and when switching between batches
of product.
1. Unscrew those three
pcs M8 hexagon socket
bolts and remove the
auxiliary rod.
2. Unscrew these
three pcs M10 outer
hexagonal bolts and
remove the dough hook.
3. Unscrew these
six pcs M8 outer
hexagonal bolts and
take off the bowl.
REMOVING THE ATTACHMENTS
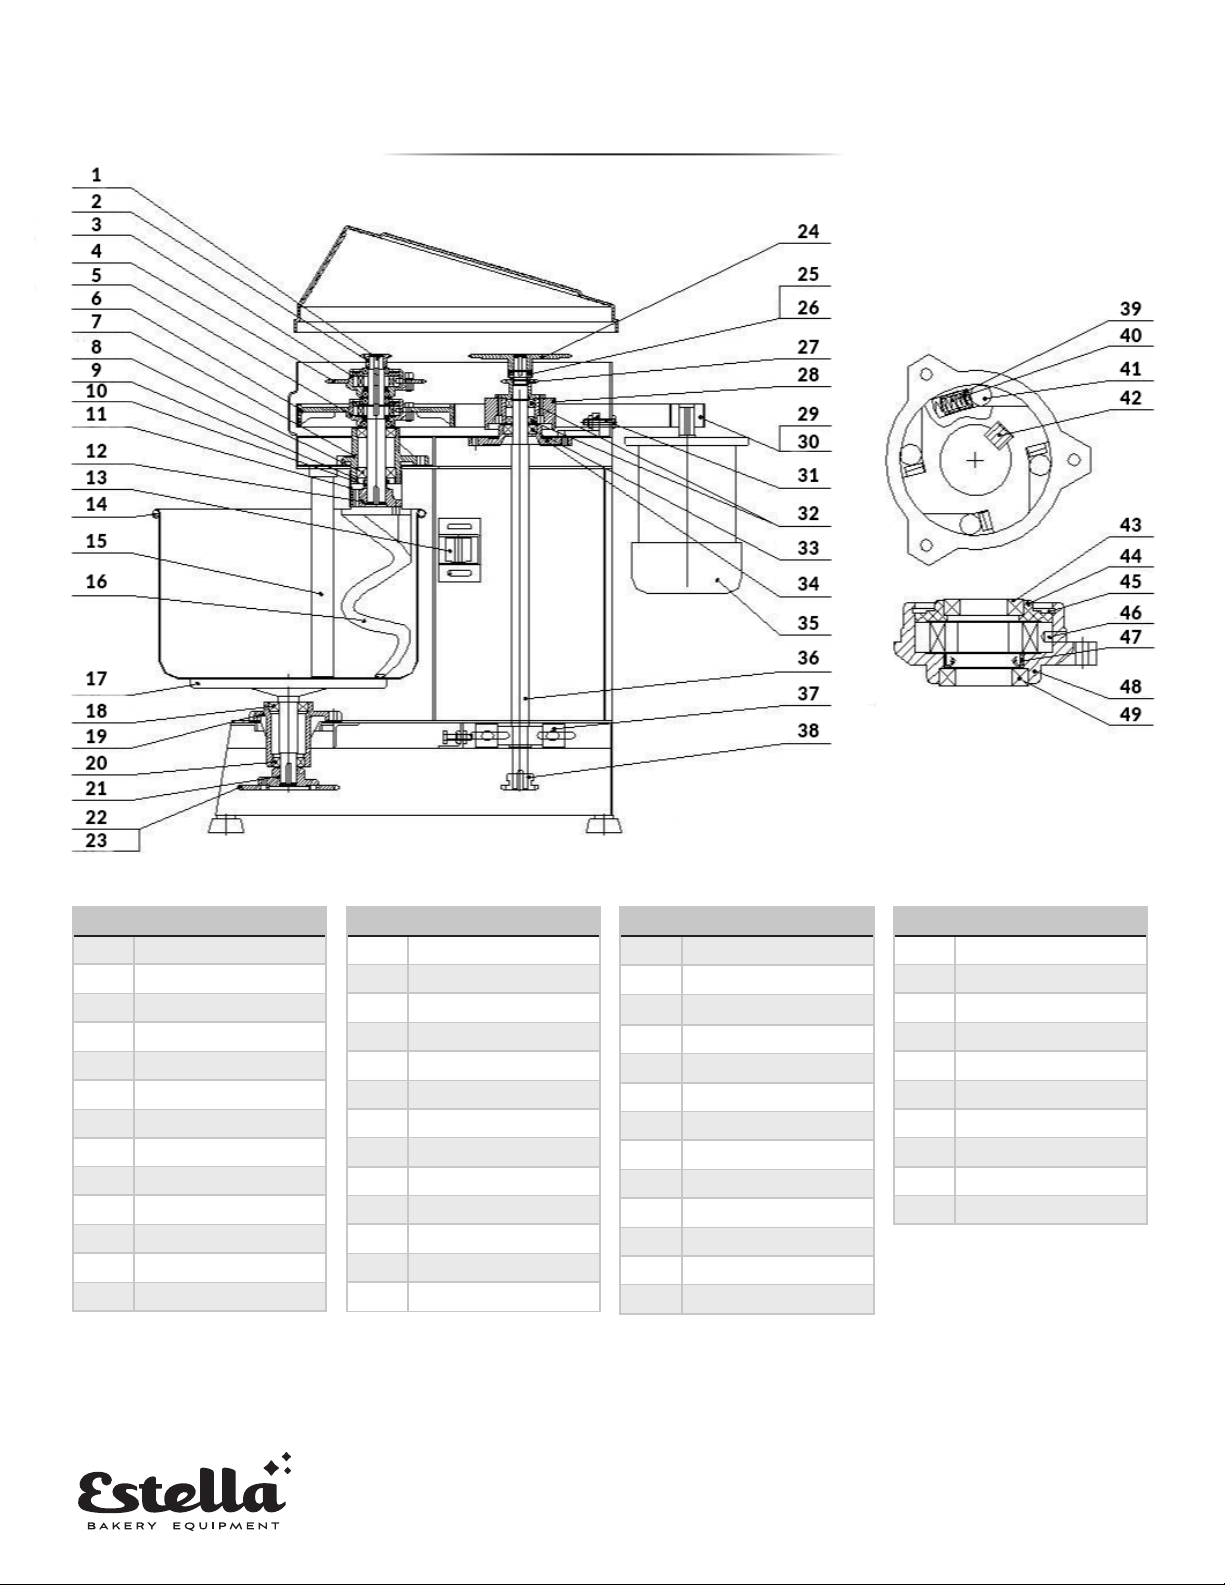
PARTS DIAGRAM
NO. DESCRIPTION
1 Principal Axis
2 Minor Sprocket
3 Upper Clutch Assembly
4 Main Biggish Sprocket
5 Lower Clutch Assembly
6 Big belt wheel
7 Up bearing pedestal
8 Bearing 206
9 Oil seal
10 Oil seal sleeve
11 Oil cup
12 Dough Mixing Flange
13 Guide wheel
NO. DESCRIPTION
14 Dough mixing barrel
15 Poling
16 Dough hook
17 Barrel Chassis
18 Bearing 206
19 Bearing Support
20 Bearing 205
21 Sprocket sprcket
22 Lower biggish sprocket
23 Chain
24 Middle biggish sprocket
25 Bearing
26 bearing pad
NO. DESCRIPTION
27 Middle Minor sprocket
28 Middle belt wheel
29 Small belt wheel
30 Strap
31 Adjustment pull-rod
32 Bearing
33 Bearing
34 Bearing pedestal
35 Motor (110V60HZ)
36 Major axis
37 Bearing UCP205
38 Minor sprocket
39 Tip cover
NO. DESCRIPTION
40 Spring
41 Roller
42 Key
43 bearing
44 Clutch cover
45 Snap ring
46 Driving pin
47 Oil seal
48 Clutch support
49 Bearing
UPPER CLUTCH ASSEMBLY
LOWER CLUTCH ASSEMBLY
6.

CIRCUIT DIAGRAM
ITEM # COMPATIBLE ITEM # PART DIAGRAM #
348PSM20BOWL 348SM20 #14
348PSM30BOWL 348SM30 #14
348PSM40BOWL 348SM40 #14
348PSM50BOWL 348SM50 #14
348PSM60BOWL 348SM60 #14
348PSM23HOOK 348SM20 & 348SM30 #16
348PSM40HOOK 348SM40 #16
348PSM56HOOK 348SM50 & 348SM60 #16
348PSM23GRD 348SM20 & 348SM30 #A07
348PSM40GRD 348SM40 #A07
348PSM50GRD 348SM50 #A07
348PSM60GRD 348SM60 #A07
348PSM23POL 348SM20 & 348SM30 #15
348PSM456POL 348SM40, 348SM50 & 348SM60 #15
PART NUMBERS
7.
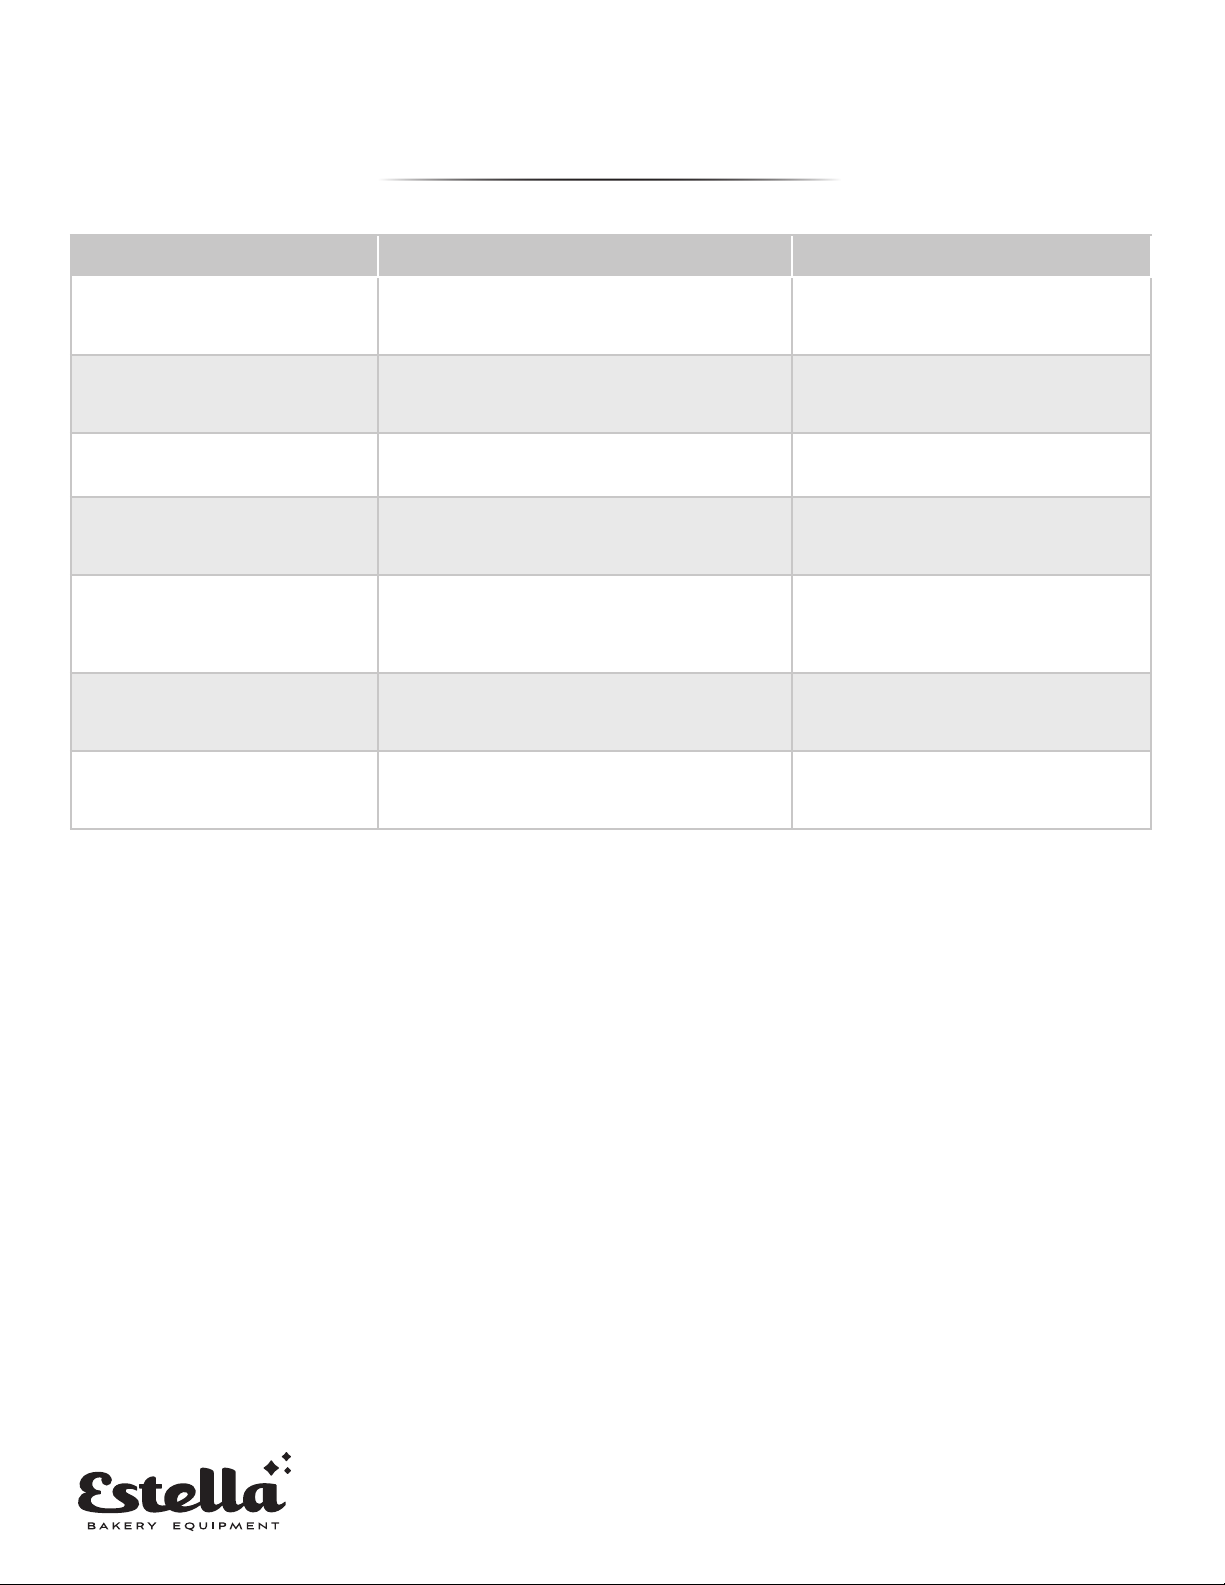
TROUBLESHOOTING
Issue Cause Solution
The axles can't work when
operating the machine
Poor contact of the electrical
equipment
Check that the plug is securely
tted into the outlet
The mixing bowl is out of
position Moving direction is not correct Check to see that everything is
aligned correctly
Leaks oil Sealing washer is damaged Replace the sealing washer
Difcult to move the bowl
up and down Slideway is dirty or rusted Clean and lubricate the slideway
The motor is overheated
and the speed is down
The voltage is not high enough, or
the incorrect speed is set for the
thickness of dough
Check the voltage or use a
lower speed
Noisy and overheating Poor lubrication Add or change lubrication to
moving parts
Mixer touches bowl The mixing device or bowl is
deformed
Repair or change the bowl or
mixing device
8.

EQUIPMENT
LIMITED WARRANTY
TO MAKE A WARRANTY CLAIM:
For Warranty Inquiries contact the location where you purchased the product:
• The Restaurant Store: If you purchased this unit from your local store, please contact your store directly.
• TheRestaurantStore.com: Online purchases, call 717-392-7261. Please have your order number ready.
Failure to contact the designated location prior to obtaining equipment service may void your warranty.
Estella makes no other warranties, express or implied, statutory or otherwise, and HEREBY DISCLAIMS ALL
IMPLIED WARRANTIES, INCLUDING THE IMPLIED WARRANTIES OF MERCHANTABILITY AND OF FITNESS
FOR A PARTICULAR PURPOSE.
This Limited Warranty does not cover:
• Equipment sold or used outside the Continental United States
• Use of unltered water (if applicable)
• Estella has the sole discretion on wearable parts not covered under warranty
• Equipment not purchased directly from an authorized dealer
• Equipment used for residential or other non-commercial purposes
• Equipment that has been altered, modied, or repaired by anyone other than an authorized service agency
• Equipment where the serial number plate has been removed or altered.
• Damage or failure due to improper installation, improper utility connection or supply, and issues resulting from
improper ventilation or airow.
• Defects and damage due to improper maintenance, wear and tear, misuse, abuse, vandalism, or Act of God.
Any action for breach of this warranty must be commenced within 6 months of the date on which the breach
occurred. No modication of this warranty, or waiver of its terms, shall be effective unless approved in a writing
signed by the parties. The laws of the Commonwealth of Pennsylvania shall govern this warranty and the parties’
rights and duties under it. Estella shall not under any circumstances be liable for incidental or consequential damages
of any kind, including but not limited to loss of prots.
Estella warrants its equipment to be free from defects in material and workmanship for a period of 1 year. This is the
sole and exclusive warranty made by Estella covering your Estella brand equipment. A claim under this warranty must
be made within 1 year from the date of purchase of the equipment. Only the equipment’s original purchaser may
make a claim under this warranty. Estella reserves the right to approve or deny the repair or replacement of any part or
repair request. The warranty is not transferable. Estella Equipment installed in/on a food truck or trailer will be limited
to a period of 30 days from the original date of purchase.
9.
Other manuals for 348SM20
1
This manual suits for next models
4
Table of contents
Other Estella Mixer manuals


Popular Mixer manuals by other brands

Farberware
Farberware SELECT FSM126E Use & care instructions

Velleman
Velleman PROMIX400US user manual

Beko
Beko HMM-6420 user manual

Imer Group
Imer Group MIX 360 Operating, maintenance, spare parts manual

AUSTRALIAN MONITOR
AUSTRALIAN MONITOR MX81 Installation and operation manual

Alesis
Alesis MULTIMIX 8 USB FX user guide

Jay-Lor
Jay-Lor 5425TM owner's manual

Fagor
Fagor RT-1255MA Instructions for use

KitchenAid
KitchenAid K5SSWH - Heavy Duty Series Stand Mixer Instructions and recipes

Radial Engineering
Radial Engineering SUBMIX 500 Series user guide

Linea 2000
Linea 2000 DOMO DO9206M Instruction booklet

ABS
ABS ABSFBM-120T owner's manual


