Estella 348SM40 User manual

01/2021
348SM40
40 Qt.
348SM50
50 Qt.
348SM60
60 Qt.
SPIRAL MIXERS
WITH GUARDS
USER MANUAL

Important Safety Information .............................. 2
Operation ............................................... 3
Specifications & Capacities ................................ 4
Cleaning ................................................ 4
Circuit Diagram .......................................... 5
Troubleshooting.......................................... 5
Limited Warranty......................................... 6
INDEX
1.

When using electrical appliances, basic safety precautions should always be followed,
including the following:
1. Keep the working around surrounding the machine clean and organized.
2. Consider environmental conditions surrounding the machine. Do not use the machine in humid,
wet or poorly lit environments. Do not use the machine close to flammable liquids or gas.
3. Keep machine away from children and non-authorized personnel. Do not permit them to go near
the machine or its working area.
4. Do not touch the switch or cable with wet hands.
5. Only utilize the machine with the correct voltage to achieve optimum results.
6. Do not wear low-hanging clothing or items that may get caught in the machine. Wear non-slip
shoes while working with the machine. For hygiene and safety, keep hair tied back and wear
protective gloves.
7. Do not tug on the cable to remove the plug from the outlet. Do not leave the cable near sharp
objects, water or solvents.
8. Remove the plug when you are cleaning the machine or need to move the machine.
9. Check that the machine is not damaged prior to each use. Carefully check that all safety devices
are working, that the removable parts are not blocked, there are no parts damaged, that all the
parts have been set up correctly and that all conditions that could influence the regular function
of the machine are in working order.
10.If the machine is damaged or there are issues during its use, turn off the machine immediately
and contact the manufacturer for assistance or repair. Repairs should only be made by qualified
technicians, using the correct manufacturer parts. Non-compliance with these rules may void
the warranty.
NOTE: Save these instructions for future reference.
SAFETY
2.
3.
OPERATION
1. Before use confirm the power supplied to the unit is correct. Run the machine empty
for a few seconds to confirm that no moving parts are colliding and there is no abnormal
noise. Failure to do so may cause damage to your machine and void the warranty.
2. In a clean bowl first add water, then flour. Return the protective cover to the closed and
locked position.
3. Startup steps:
a. Once the bowl guard is in place, set the time (12-15 minutes is recommended for
most applications).
b. The emergency stop button will pop up. Do not operate the machine if the emergency
stop button does not function.
c. Press the green button to start slow speed mixing.
d. After the water and flour are incorporated, press the red stop button followed by
the yellow button to start high speed mixing. The machine will automatically stop
when the timer runs out.
NOTE: As a safety feature, the bowl guard must be down in position in order for the dough mixer
being able to operate. If the guard is lifted up, the mixer will not run.
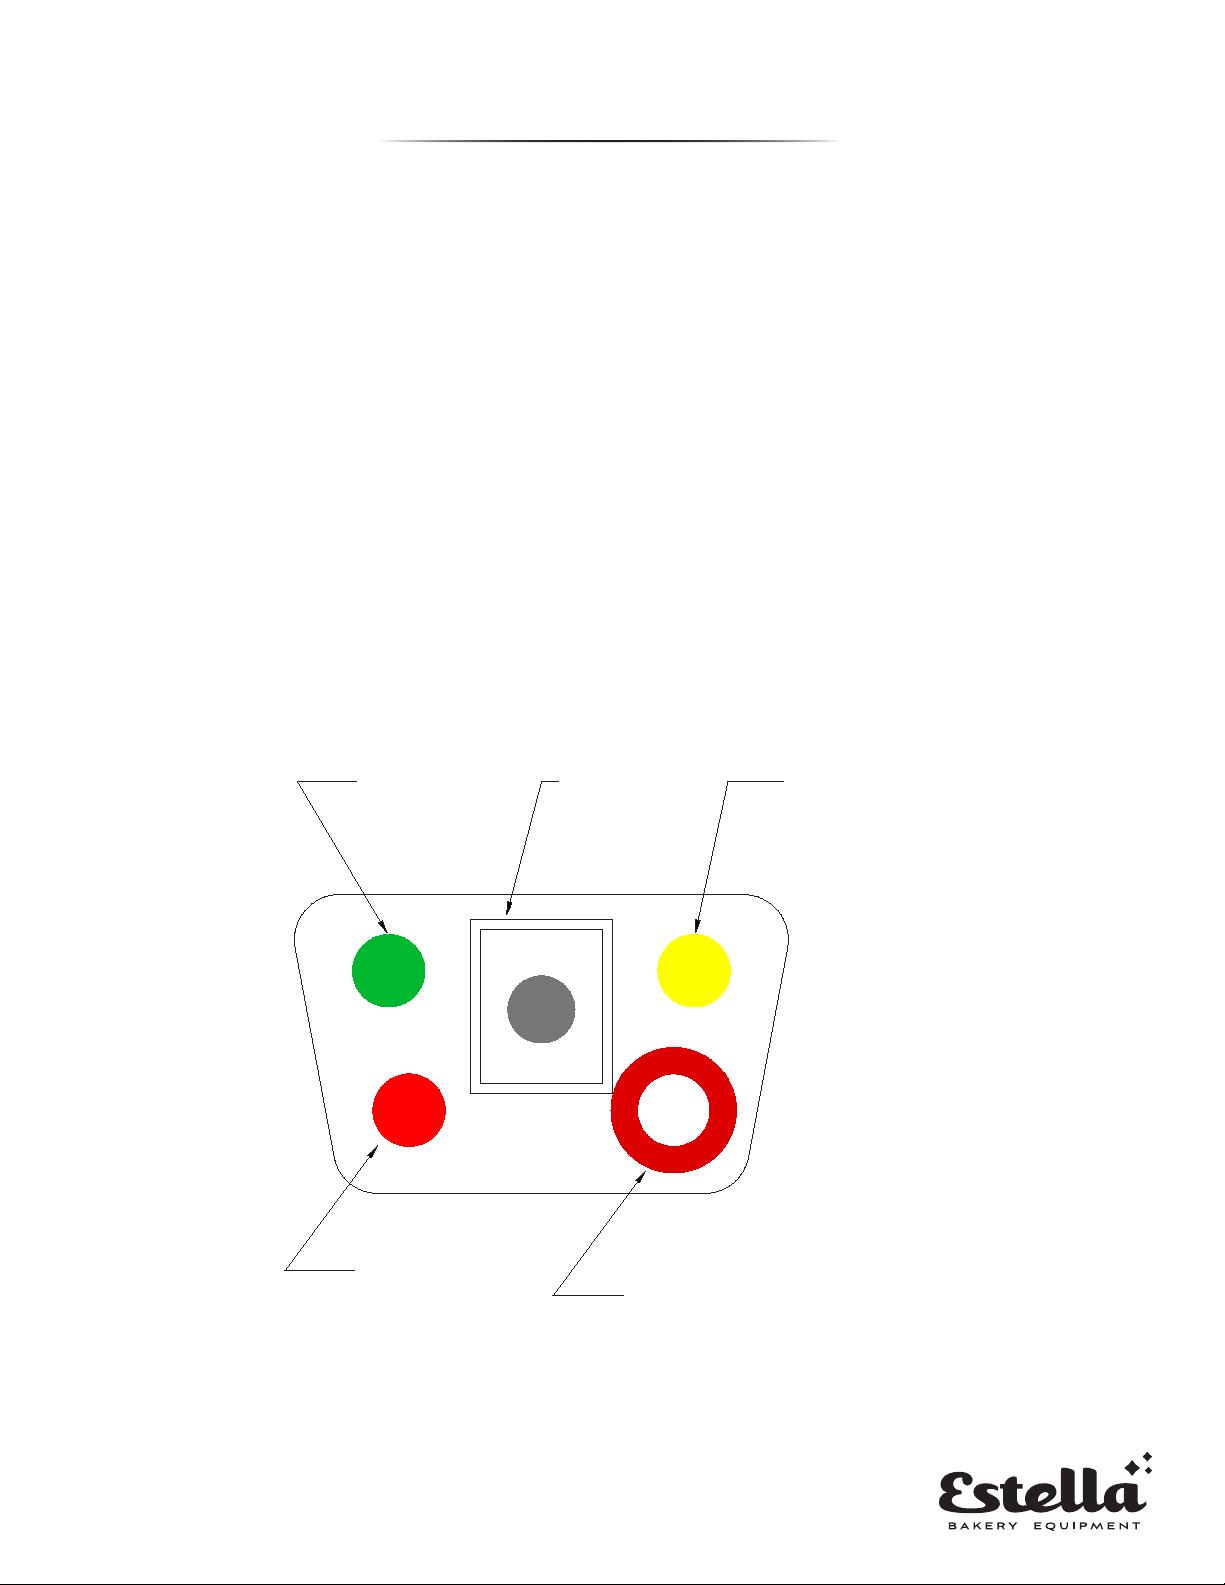
STOP
SLOW HIGH
TIMER
LOW SPEED START BUTTON HIGH SPEED START BUTTON
STOP BUTTON
EMERGENCY STOP BUTTON
TIMER
Instructions:
1. Cover the safety guard and turn right to pop up the emergency stop button;
2. The setting time is generally 12-15 minutes to mix the dough;
3. Press the low-speed start button to start the machine;
4. When the flour and water are evenly mixed, press the stop button, and then press the
high-speed start button to start fast mixing, and when the set time is reached, the machine
will automatically stop working.
5. When the machine is working, open the safety guard and the machine will automatically
stop working; you need to press the high-speed start button or low-speed start button again
to start the machine.
LOW SPEED
START BUTTON
HIGH SPEED
START BUTTON
TIMER
STOP
BUTTON EMERGENCY
STOP BUTTON

4.
SPECIFICATIONS
& CAPACITIES
348SM40 348SM50 348SM60
Bowl Capacity 40 QT. 50 QT. 60 QT.
Flour Capacity 35 LB. 44 LB. 55 LB.
Dough Capacity (60% AR)* 65 LB. 80 LB. 100 LB.
Voltage 240V 240V 240V
Waage 2200W 3000W 3000W
Horsepower 3HP 4HP 4HP
Phase Single Single Single
Mixing Speed (Low) 112 RPM
Mixing Speed (High) 198 RPM
Machine Weight 250 LB. 275 LB. 290 LB.
*When mixing dough (pizza, bread, or bagels), check your "AR" absorption ratio - water weight divided
by flour weight. The above capacities are based on 12% flour moisture at 70°F water temperature.
If high gluten flour is used, reduce above dough batch size by 10%.
Example: If recipe calls for 6 lb. of water and 10 lb. of flour, then 6 divided by 10 = 0.6 (60% AR).
CLEANING
1. After removing dough from the bowl, turn off the power and unplug the machine
2. Use a cloth with a mild detergent and warm water to clean the inside of the bowl. Make sure to
clean the spiral hook and auxiliary rod.
3. Use a clean cloth soaked in warm water to rinse the inside of the bowl. Try to avoid getting excess
amounts of water inside the bowl.
4. Use a dry clean cloth to remove excess water and dry the machine.
NOTE: Cleaning should be done at the end of every work day and when switching between batches
of product.
NOTE: It is NOT advised to remove the attachments from this unit.

5.
CIRCUIT DIAGRAM
TROUBLESHOOTING
Issue Cause Soluon
The axles can't work when
operang the machine
Poor contact of the electrical
equipment
Check that the plug is securely
ed into the outlet
The mixing bowl is out of
posion Moving direcon is not correct Check to see that everything is
aligned correctly
Leaks oil Sealing washer is damaged Replace the sealing washer
Dicult to move the bowl
up and down Slideway is dirty or rusted Clean and lubricate the
slideway
The motor is overheated
and the speed is down
The voltage is not high enough, or
the incorrect speed is set for the
thickness of dough
Check the voltage or use a
lower speed
Noisy and overheang Poor lubricaon Add or change lubricaon to
moving parts
Mixer touches bowl The mixing device or bowl is
deformed
Repair or change the bowl or
mixing device
EQUIPMENT
LIMITED WARRANTY

6.
EQUIPMENT
LIMITED WARRANTY
TO MAKE A WARRANTY CLAIM:
In order to make a claim against this warranty, please contact Ready Kitchen Warranty.
• Phone: 717-381-4844 Please have your model number, serial number, and proof of purchase ready before calling.
• Email: help@readykitchenwarranty.com Please include your name, model number, serial number, proof of purchase,
and a brief descripon of the issue in your email. Including clear pictures of the issue will help expedite the process.
Failure to include one or more of these things will extend processing me.
This Limited Warranty does not cover:
• Equipment sold or used outside of the conguous United States.
• Equipment purchased used, or sold by an unauthorized reseller.
• Equipment that has been improperly installed, used, or maintained.
• Equipment that has been subject to abuse, misuse, harsh chemical acon, modicaons made without the approval of
Estella, damage caused by ood, re, or other acts of God.
• Equipment missing a serial number or proof of purchase.
• Equipment that has been serviced outside of the warranty, or by an unauthorized technician, without the approval of
Ready Kitchen Warranty.
• Equipment that was damaged as part of shipping and handling. Please contact your authorized retailer for assistance.
• Equipment that has been changed, modied, or repaired with parts not authorized by Estella.
• Any adjustments, calibraons, leveling, ghtening of fasteners, etc.
• Damage caused by unqualied operators. Estella products are designed for use by professionally trained bakers only.
• Any parts determined to be wearable items, such as belts, by Ready Kitchen Warranty or Estella.
This warranty provides the exclusive remedy against Estella relang to Estella products, whether in contract or in tort or
under any other legal theory, and whether arising out of warranes, representaons, instrucons, installaons or defects
from any cause. Estella shall not be liable, under any legal theory, for loss of use, revenue or prot, or for substute use or
performance, or for incidental, indirect, or special or consequenal damages or for any other loss of cost of similar type.
The laws of some jurisdicons limit or do not allow the disclaimer of consequenal damages. If the laws of such a
jurisdicon apply to any claim by or against Estella, NO limitaons and disclaimers contained here shall be the greatest
extent permied by law. Estella and Ready Kitchen Warranty shall not be liable for more than the purchase price of the
equipment, inclusive of applicable freight and sales tax.
If required by Estella, customer shall return to Estella for examinaon any failed product or part to conrm that the part has
failed as a result of material or workmanship.
COVERED EQUIPMENT:
This warranty is valid on:
Bread Slicer Models: 348BSLICE1, 348BSLICE12, 348BSLICE34, 348BSLICE58
Dough Sheeter Models: 348DSC67, 348DSC78, 348DSF78, 348DSF94, 348EDS12D, 348EDS12S, 348EDS18D, 348EDS18S
Spiral Mixer Models: 348SM40, 348SM50, 348SM60, 348SM80, 348SM100
Select Estella Spiral Mixers, Dough Sheeters, and Bread Slicers are backed by a 1 year parts and labor warranty provided
by Ready Kitchen Warranty. These select Estella products are warranted only to be free from defects in material and
workmanship for a period of 1 year from the date of delivery. Proof of purchase is required to obtain warranty service.
This warranty is only valid to the original purchaser and only to equipment installed in the conguous United States.
Estella and Ready Kitchen Warranty will only cover regular rate labor (no overme or holiday hours) and travel up to 100
miles round trip.
This manual suits for next models
2
Table of contents
Other Estella Mixer manuals


