Etaluma LS620 User manual

LS620, LS560, LS460 Microscopes
Operator’s Manual
With
Etaluma’s Lumaview Software
For assistance, please call 760-298-2355 or email support@etaluma.com.
Etaluma, Inc.
Carlsbad, California
www.etaluma.com
Lumaview™ is the trademark of Etaluma, Inc.
™2009-2021 All rights reserved.
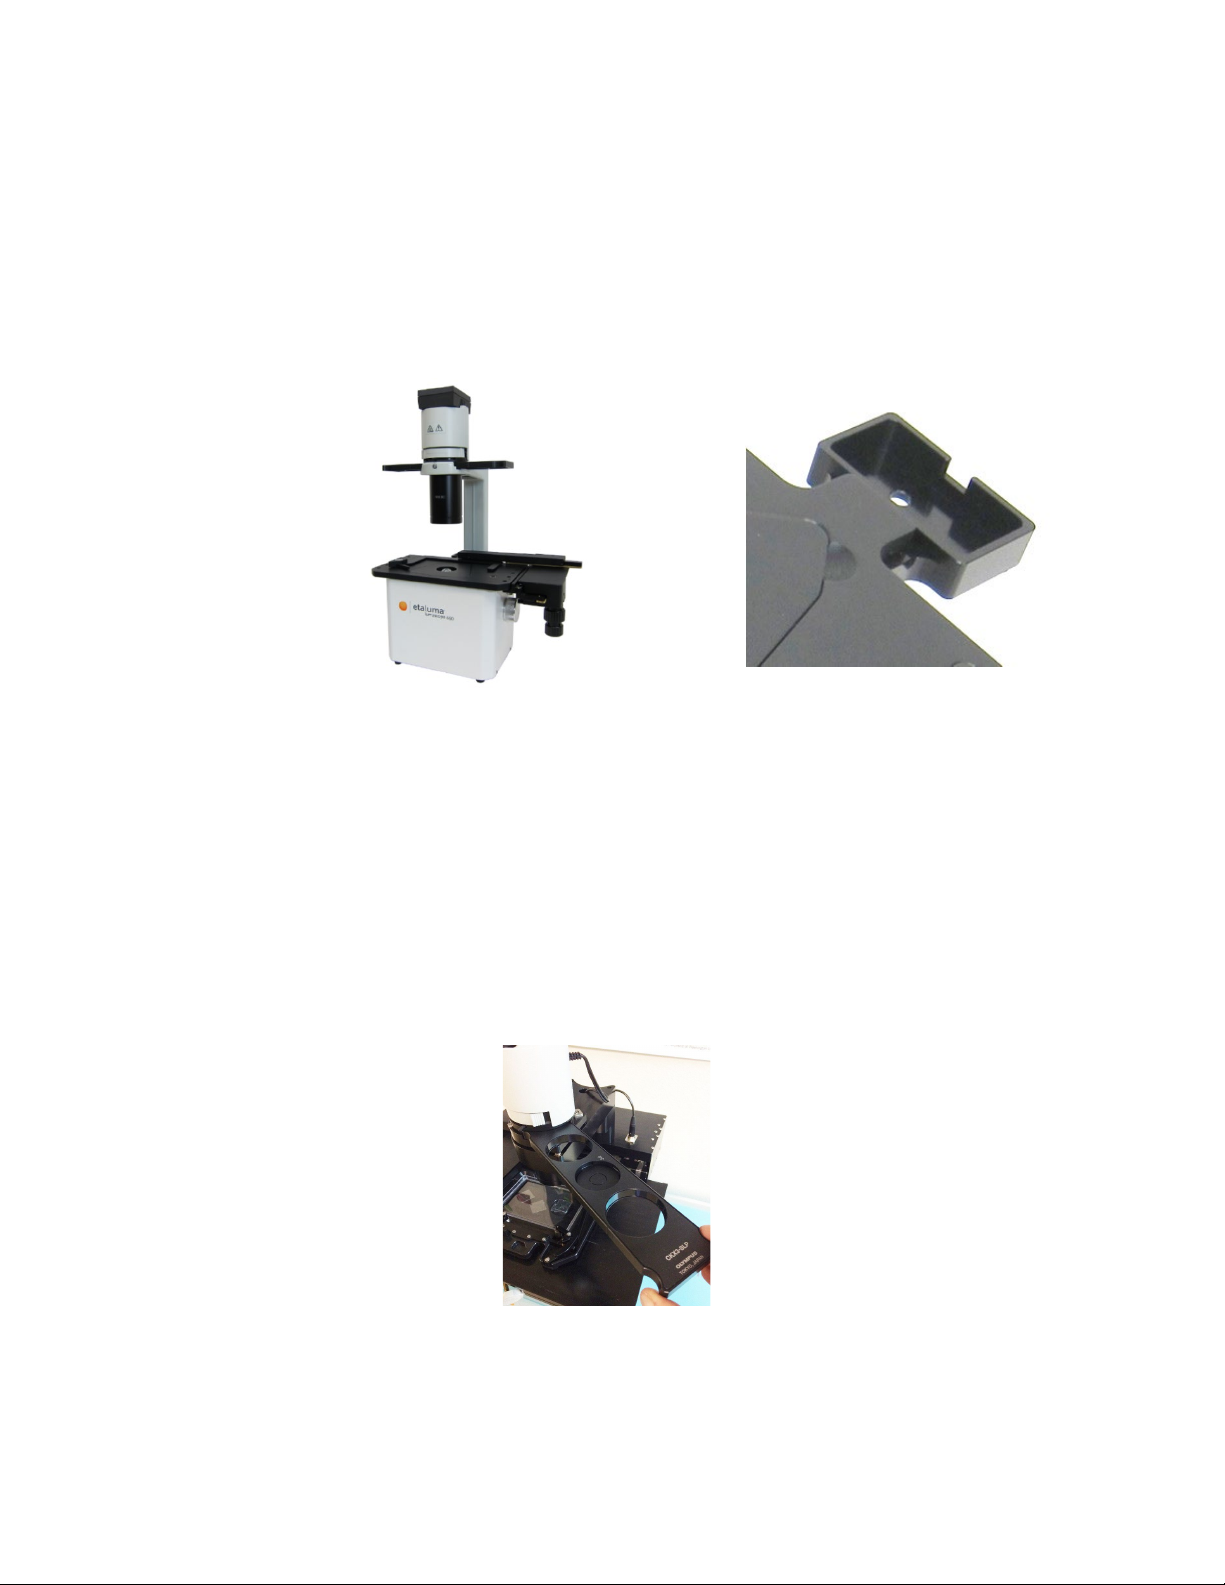
LS560/LS460 (with Phase Contrast
Accessory and Manual XY Stage, both
optional and ordered separately)
LS620 (with Phase Contrast Accessory
and Manual XY Stage, both optional
and ordered separately)

2
LS Manual Microscope Startup Manual 2021.5.1
Table of Contents
I.
Setting Up the LS Microscope
A. Items Included With Each LS Microscope
B. Optional Accessories (purchased separately)
C. Recommended Computer Specifications
D. Connecting the Cables
E. Phase Contrast
F. Brightfield
G. Installing Objectives
H. About Lumaview
I. Downloading and Installing Lumaview
J. Connecting the LS Microscope
II.
Software: Getting Started with Lumaview
A. Starting Conditions
B. Launching Lumaview
C. Instrument Setup
D. Finding a Live Image
E. Focusing
F. Snapping Images
G. Auto-Generation of Single Composite Images
H. Live Video
I. Writing and Using Protocols
J. Run Protocol
K. Placing the Lumascope Microscope in an Incubator
L. Creating Videos
III.
Appendices
A. Windows Configuration and Driver Conflicts Troubleshooting
B. How to Disinfect Lumascopes for Incubator Placement
C. Setting up Windows10 for Uninterrupted Time-Lapse

3
LS Manual Microscope Startup Manual 2021.5.1
This document is available for download at https://etaluma.com/products/downloads.
Any steps specific for a particular LS model are noted in italics.
I.
SETTING UP THE LUMASCOPE MICROSCOPE
A.
Items Included With Each LS Microscope
1. LS620 and LS560
•Brightfield Illuminator (Unless you ordered Phase Accessory)
•USB power/communication cable
•Fluorescence shroud (black microplate lid)
•External power supply/cord with country-specific plug
2. LS460
•Brightfield
•USB power/communication cable
B.
Optional Accessories (purchased separately)
•Phase Contrast Accessory (Olympus)
•Manual XY Stage
•Labware Holders
■
Holder for 35 mm Petri dishes, fits inside Holder for 60 mm Petri dishes
■
Holder for 60 mm Petri dishes & Terasaki plates, SBS outer dimensions
■
Holder for microscope slides & 50 mm Petri dishes, SBS outer dimensions
■
Holder for 4 microscope slides in parallel, SBS outer dimensions
•Light Hood
•Lumaquant, image analysis software
•Microvolution, deconvolution software
C.
Recommended Computer Specifications
All LS Microscopes with Lumaquant: Windows 10; Core i7 or better processor; 500 GB to 1 TB SSD
hard drive, 4 Gb minimum RAM(8 Gb min. Lumaquant); single 4K monitor or two with 1080p HD
resolution. Windows must have Service Pack 2.0 with .NET version 4.5.2.
Microvolution deconvolution plugin for ImageJ/Fiji: A GPU is required; the most powerful NVidia
chip running CUDA that can be afforded is recommended for the best performance.
D.
Connecting the Cables
1. Wait to connect the USB cable from the LS Microscope to the computer until Lumaview is
installed.
2. (LS620 and LS560 only). For almost all fluorescence imaging applications, power from the
computer via the USB cable to the LS Microscope will be sufficient. If higher levels of
illumination are required,e.g., with very dim samples or for photo bleaching(FRAP), insert the

4
LS Manual Microscope Startup Manual 2021.5.1
small round plug of the external power supply/cord into the round port labeled
SUPPLEMENTAL POWER on the back of the LS Microscope and the electrical plug into an AC
outlet. You should see an increase in the Illumination level beyond the 40% limit as indicated
on the Illumination slider in Lumaview with USB only.
E.
Phase Contrast
1. If using the Phase Contrast Accessory, ensure that the Phase Accessory adaptor is attached to the
rear tab of the LS Microscope Deck. Attach the Phase Accessory by inserting the base of the arm
into the Phase Accessory adaptor. Ensure it is fully seated and tighten the thumb screw on the
bottom of the adaptor.
Phase accessory adaptor
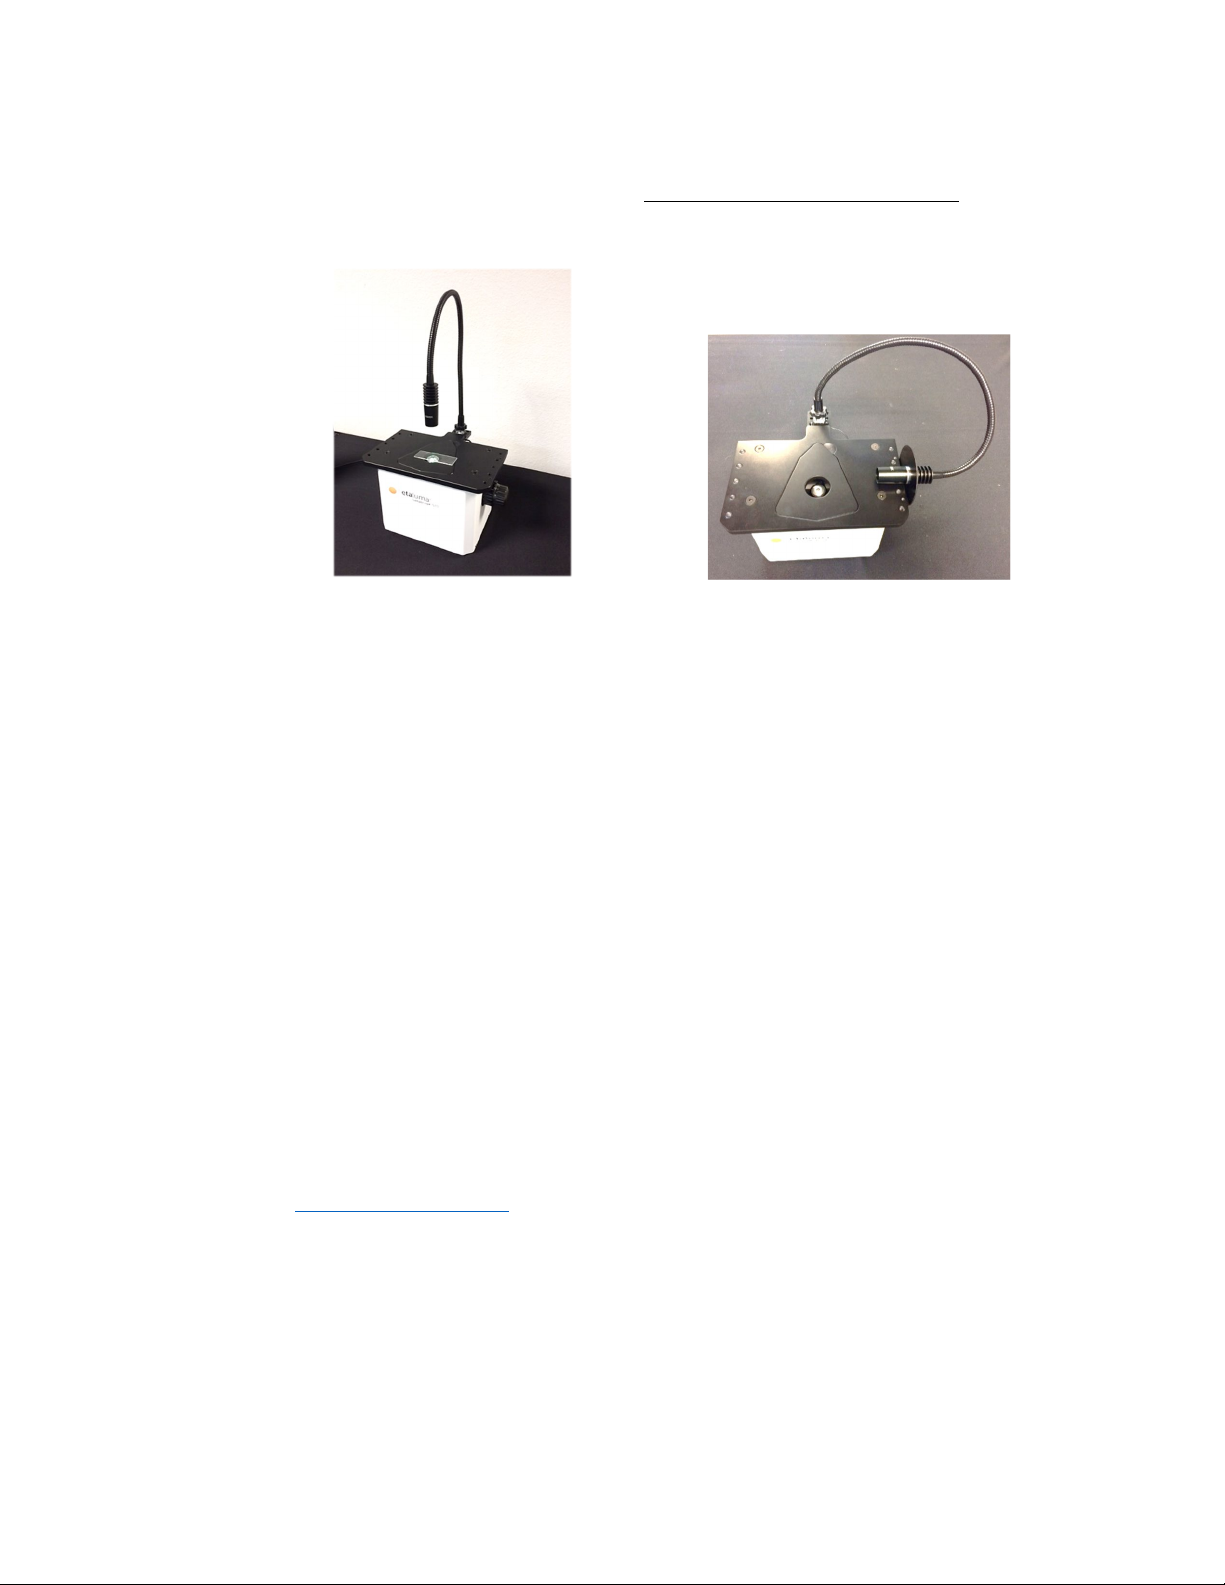
Phase setup attached to Lumascope
2. Connect the free end of the Phase Accessory communication cable to the round port on the LS
Microscope back panel (left side) labeled External Lamp Power Out. This allows the Phase
Accessory to be controlled by Lumaview.
3. Insert the phase contrast Slider (pre-centered version included with Phase Accessory) into
the slot going through the condenser. Of the 3 positions in the Slider, the phase ring is
present in the middle position. A short lever on the front of the phase condenser controls the
iris. The iris should be fully open (to the left) for phase contrast.

5
LS Manual Microscope Startup Manual 2021.5.1
F.
Brightfield
1. A flexible LED light source is provided if no Phase accessory is purchased. This
illumination allows direct and many oblique illumination setups.
2. For optimal brightfield, use the Phase Accessory with the included Slider in an
open position (no phase ring) and the iris closed down (fully right). The Phase
Accessory, which provides collimated light, is directly connected to the LS
Microscope, allowing it to be controlled by Lumaview. Transmitted light images
will be in gray scale due to the monochromatic CMOS camera.
3. Ambient light in a typically lit area can often be used. The light should be as
uniform as possible to prevent shadows or other dark or light areas. Overhead
fluorescent lighting can cause ballast interference -- a striped pattern on the
image is observed.Turn off the fluorescent lights or move the Lumascope to
another room.
G.
Installing Objectives
1. Remove the triangular insert in the deck. Unscrew the black cap (or previously
installed objective) on top of the inside optics block and screw in the new objective.
Do not overtighten. Return the removable insert to the deck.
3. When installing or changing an objective, carry out the insertion quickly to
minimize dust falling onto the mirrored dichroic filter. A small amount of dust
will not affect imaging. However, if dust is significant and it appears to affect
quality of the live image or snapped images, contact Etaluma by email
(support@etaluma.com) to discuss possible methods for cleaning.
IMPORTANT: Using compressed air can result in an oily liquid being sprayed
onto the dichroic, which may damage it.
H.
About Lumaview
1. LS Microscopes are controlled by the Lumaview software program. The latest
Lumaview version is downloadable from Etaluma’s website and must be
installed prior to connecting your computer for the first time to the LS
Microscope.

6
LS Manual Microscope Startup Manual 2021.5.1
2. Lumaview runs on Windows 10. Both desktop computers and laptops can be
used, but the best visualization correlates with monitor resolution equal to the
sensor resolution (up to 1900 x 1900 pixels for the LS620).
3. Note: The monitor does not affect image resolution unless the monitor is of such
low quality that it affects your ability to judge focus.
The computer should have Windows .NET Framework 4.5.2 or higher installed;
see https://msdn.microsoft.com/en-us/library/bb822049%28v=vs.110%29.aspx
for more information. If your computer does not have .NET Framework 4.5.2 or
higher installed, downloading Lumaview may automatically take you to the
Microsoft .NET download page. Scroll down the page to find the correct download.
This will not require a purchase. Contact Etaluma with any questions.
I.
Downloading and Installing Lumaview
1. To download Lumaview, go to https://etaluma.com/products/downloads (under
the Resources tab). Click on Lumaview - ZIP link to start the download and save
the folder when prompted. Go to your Downloads folder and click to extract, then
open the Lumaview.zip file.
Alternatively, the same Lumaview.zip file can be copied from the flash drive that
comes with the Lumascope Microscope. Verify that this file is the latest version as
posted on the Etaluma website.
2. If your computer has an older version of Lumaview, installing the newest Lumaview
will overwrite the older version but retain all user data and information.
If there is a need to revert to an older version Lumaview, it will be necessary to
first uninstall the current version through Windows.
3. To install Lumaview, right click on the .zip file and Open with Windows Explorer.
Double click on the .msi installer file to start the installation. If a Windows
warning box about an unrecognized App appears, click More… then Run anyway.
You will be asked about the location; note that the default is a new Etaluma
folder inside the Program Files (x86) folder.
During installation, a Device Driver Installation Wizard will open. Click to
continue and finish (twice) installing the two drivers. Installation of
Lumaview will then finish. After installation, a Lumaview shortcut (orange circle
icon) convenient for launching the software will be present on the desktop.
J.
Connecting the LS Microscope
1. If connecting with a computer that has been off, turn the computer on. Make sure the
computer is connected to its monitor(s). Insert the standard USB-A end of the
supplied USB cable into a USB port on your computer and the other square USB-B
end into the square port labeled TO COMPUTER on the back of the LS620, LS560 and
LS460. It is important to connect the LS Microscope directly to the computer USB
port and not use a USB hub.

7
LS Manual Microscope Startup Manual 2021.5.1
2. If Lumaview has not been run previously, it is important that the LS Microscope and
computer be connected using the USB cable before launching Lumaview. This is
because Windows needs to load the USB drivers before Lumaview can run. After the
first time, the program can be launched before connecting the LS Microscope and
computer. In the latter case, only the Outer Main Window will open. Connecting the
LS Microscope and computer with the USB cable will result in opening of the Live
Image Window as well.
II. SOFTWARE: GETTING STARTED WITH LUMAVIEW
The following sections give instructions for getting started with Lumaview on the LS620, LS560 and
LS460 and are intended as a Startup Manual only. Not all options are given and not all features may
be explained in any particular section. The complete User Guide for Lumaview is contained in the
Help Section of Lumaview. Click on Help in the Title Bar to open the pull down menu and click
Contents, or simply Click F1 to open the Help Section. Becoming familiar with the complete Help
Section is a must for using LS Microscopes optimally and taking advantage of the many features of
these Microscopes and accompanying software.
A.
Starting Conditions
1. Lumaview has been downloaded and installed on the computer.
2. The LS Microscope is connected to the computer via the UBS cable.
3. Sample to be imaged is present on the LS Microscope stage and objective is installed.
4. LS620 or LS560: Fluorescence shroud (black microplate lid) is over sample if imaging in
fluorescence.
B.
Launching Lumaview
Launch the Lumaview software from the desktop icon (or other chosen location) and allow
the LS Microscope to be discovered. This may take many seconds the first time.
Lumaview is installed with the Configuration set to a Lumascope model LS720 by default.
The following ERROR message will appear indicating that the software has not found the

8
LS Manual Microscope Startup Manual 2021.5.1
automated LS720 model and thus this will need to be changed to your respective model in
the Configuration>Instrument Settings Menu seen below. Click OK, change the model
selection and restart Lumaview.
Two windows will open on your monitor: Live Image Window inside the larger Main
Window. “Live Image Window” will be in the title bar when the Window is not maximized.
When Live Image Window is maximized, [Live Image Window] transfers to the end of the
Main Window title bar. The Live Image Window status bar at the bottom shows
communication with the camera sensor via continuous display of several useful metrics:
current frame rate, data transfer rate, number of frames collected thus far in the session,
frame size, and session date and time start.
Note: A variety of Windows configuration errors can
be displayed at this point. Please consult Appendix A.

9
LS Manual Microscope Startup Manual 2021.5.1
The Live Image Windows includes a Left Toolbar with the following commands:
Select Channel, optimize settings
Snap Image
Composite
Video Record (toggles on and off)
Protocol
Zoom
Shortcut to Last Image file location
When Lumaview is open, the icon that resides in your task bar appears as a document with an
arrow.
C.
Instrument Setup
1. Click on Configuration in the File Menu bar to
open the drop-down menu and select
Instrument Setup to open its dialog box.
2. Check the Lumaview version to make sure it
is the most recently posted version on the
Etaluma website
(www.etaluma.com/products/downloads/).
Ensure that the LS Microscope being used is
checked. If it is necessary to change the LS
Microscope model number that is checked,
you will be prompted to restart the program.
Be sure to restart so that all functions work
correctly.
3. Confirm the current model is selected.
4. Click the Objective button to open its dialog box
(called Objective Lens Selection). Select the desired
objective to highlight it. Note that other fields about
the objective and image automatically fill based on
magnification and a frame size of 1200 x 1200 pixels.
Click OK. Once selected, the same information
automatically fills in Instrument Setup.

10
LS Manual Microscope Startup Manual 2021.5.1
5. Click the Frame Size button to open its dialog box. Using the pull-down menu, select
frame size desired (frame size will be the number times itself because it is square).
Note: If larger Frame Sizes are used, there will be some darkening in the corners.
If faster frame rates are needed, use smaller frame sizes, e.g., 800 x 800 pixels.)
If the Frame Size is changed, there will be a prompt to
restart Lumaview. Click OK to close the prompt and then
shut down Lumaview. Upon restarting Lumaview, the
frame size in the lower status bar will be the new size. If not
restarted, the new frame size may show in Instrument Setup
but it may not actually be different. Always check the lower
left status bar of Live Image Window to see the actual frame
size.
6. Continue to review and adjust the various settings in Instrument Setup. For Root,
enter desired file name root for all images in this imaging session. Select the file format
desired (Tiff is recommended).
7. The Time-lapse folder path default is given but can be changed if desired. Time-lapse
is set up under Protocol as described below. Note that the folder name Lumaview720
is the current default name and is used for images snapped on the other Lumascope
Microscopes as well unless a different folder is chosen.

11
LS Manual Microscope Startup Manual 2021.5.1
8. Select the time in seconds for each LED to be on before image snap. Recommended time for
fluorescence is 0.6 seconds (do not go below this time). Check Auto Composite (LS720 and
LS620 only) to have images in multiple channels automatically composited and saved in the
Composites folder. Check Individual Channel Folders to have images from multiple channels
in a Protocol saved in separate folders (e.g., for compiling time-lapse videos in single
channels).
Of the next 6 features listed on the left, check those desired:
•Time/date label will be displayed in the lower left corner of each image.
•Hot pixel removal. Check if desired and then complete Instrument Setup. (To start this
feature,click Utilities in the title bar and from the pull-down menu select Detect Hot Pixels
to open its dialog box. Information on next steps is available in the Help section.)
•Pseudo color FL channels (all LS Microscopes except LS460) results in live and snapped
fluorescent images colored with the channel color and according to signal intensity.
•“Click” sound for manual image snap results in a “camera shutter-like” sound whenever a
manual image is snapped.
•Manual Image Autosave results in images being saved
automatically without the Save As dialog box opening
each time. When checked, each image is numbered
according to DOYHHMMSSmm where DOY is day of
year, HH is hour in 24 hour time, MM is minutes, SS is
seconds, and mm is milliseconds.
Thus each image number is unique and in numerical order.
Not checking Manual image autosave will result in the Save
As dialog box opening every time the camera icon is clicked
and the image has been snapped. In this case, the image file
name desired must be entered before clicking Save.
•On the right side of Instrument Setup, checking Display scale bar results in a scale bar in the
lower right corner of live and snapped images. If checked, click Select Color to choose color,
check Display objective power if desired, and select Scale bar width.
After all settings have been selected, click OK to save the settings before exiting
Instrument Setup

12
LS Manual Microscope Startup Manual 2021.5.1
D.
Finding a Live Image
•Install the desired objective and sample labware. Manual XY
movement of SBS labware (microplate footprint) is facilitated
by Etaluma’s Manual XY Stage (optional). For labware that is
not SBS, use a labware holder such as the Multi-Slide Holder for
1-4 microplate slides. Remember to update Objective in
Instrument Setup as needed and click OK.
•Click on the Manual Image icon in the Left Toolbar (top icon) to
open its dialog box. LS560 dialog box contains only the Green
and Brightfield controls; LS460 dialog box contains only the
Brightfield controls. If desired, move dialog boxes to the sides
of the Live Image Window. If closed and then reopened, they
will open in the same locations prior to closing.
•In Manual Image, select the channel to use. For fluorescence, the included Shroud (or other
protection from light) must be placed over the labware. Start with Exposure at maximum and
Gain as low as possible. Increase Illumination gradually to the desired brightness. For dim
samples, if Illumination is at maximum, increasing the Gain can be used to increase signal but it
will also increase the background. LS620 and LS560:Illumination can also be increased by using
the external power supply/cord.
•For brightfield using ambient light, start with Gain as low as possible and adjust Exposure from
0 up, until a mid-gray tone is seen in the Live Image Window.
For brightfield using the Phase Contrast Accessory (use open position in Slider), check Brightfield
in Manual Image and move the iris on the front of condenser to the right so only a low level of
light is transmitted. Set Gain to minimum, Illumination (%) to 10-20%, and adjust Exposure from
0 up until a mid-gray tone is seen in Live Image Window.
•For phase contrast using the Phase Contrast Accessory (use appropriate Slider phase ring for
objective), check Brightfield in Manual Image and turn the phase condenser iris (on front of
condenser) to the left to the fully open position. Turn Exposure and Gain to very low. Increase
Illumination (%) until a mid-gray tone is seen in the Live Image Window.

13
LS Manual Microscope Startup Manual 2021.5.1
E.
Focusing
•Unless approximate sample focus level is known, it is best to initially raise objective to maximum
height (without hitting sample) and then turn focus knob counter-clockwise until sample comes
into focus. Ensure you are focusing on correct sample plane and not another surface, for
example, back side of a microscope slide. If uncertain, place a similar but easy to focus sample on
stage, focus, and then switch to new sample.
•To facilitate the focusing process, click on the Zoom icon on the Left Tool Bar (second from
bottom). The Zoom feature toggles between displaying the entire image fitted to the Live Image
Window and displaying the image matched 1:1 with the monitor resolution (pixel: pixel). If the
monitor resolution in pixels is less than the frame size, the image will be enlarged (zoomed). The
Live Image Window will now show a center portion of the entire image. Click the Zoom icon again
to fit the image to the Live Image Window. If necessary, adjust Illumination and/or Gain as
needed.
F.
Snapping Images
•When the desired field has been illuminated and focused in Live Image Window, click the
Camera icon in the Left Tool Bar (third from the top) to snap the image. If the Zoom function
was used to focus, the image captured will include the entire field of view (FOV) observable
with the Zoom off. If “Click” sound for manual image snap was checked in Instrument Setup, a
shutter-like sound occurs when each image is snapped.
•If Manual Image Autosave was checked in Instrument Setup, images will be saved automatically
usingthe time-based numbering system. If Manual Image Autosave was not checked, a Save As
dialog box will open after the image was snapped. Images will be saved in the Etaluma folder
formed automatically whenever Lumaview is downloaded and installed.
•Images are captured and saved as seen by the camera, i.e., from the bottom.
•To view the last image snapped, click the Folder icon in the Left Tool Bar (bottom icon) to
launch Windows Explorer and open the most recently used Destination Folder.
G.
Auto-Generation of Single Composite Images (LS620 only)
•Click the Composite icon in the Left Tool Bar (fourth from the top) to open its dialog box. Check
the channels desired. To use values optimized previously in Manual Image (Section above),
click Use Manual Settings to upload the settings. Values can also be entered manually.
•Click OK to start the snapping of individual images in progression. Each LED will turn on
for thepre-snap interval and then flash when the image is snapped. If “Click” sound for

14
LS Manual Microscope Startup Manual 2021.5.1
manual imagesnap was checked in Instrument Setup, the shutter-like sound will be heard
for each image.
•The fluorescence composite image will appear automatically in the Main Window
matched 1:1 with the monitor resolution (pixel:pixel) and with its Title Bar showing the
full path where it is located.
•Composites including phase contrast or brightfield (LS620, LS560) Note: this is a hack
•In Instrument Setup, make sure Auto Composite is checked.
•Configure a Protocol with the channels desired. In the Acquisition tab, select Time-
Lapse and set both Interval and Duration to 1 sec. Click Run and after the images
are snapped, click the Last File icon in the Left Tool Bar (lowest icon). The folder
containing the individual images plus the Composite image will open.
H.
Live Video
•When a desired field has been illuminated and focused in Live Image Window, click the
Video Record icon in the Left Tool Bar (fifth from the top) to open its dialog box. Select
parameters requested and also those in Instrument Setup such as file format. Images
captured will be saved to the Video folder inside the Manual folder.
•Click OK and image capture will begin. To stop image capture, click the Record Video icon
in the Left Tool Bar again.
I.
Writing and Using Protocols
•To configure an automated microscopy run, including
time-lapse on the manual LS620, LS560, and LS460, the
Protocol feature is utilized. Click the “P” icon in the Left
Tool Bar.
•Information and values will be added on the various tabs. Be sure to click Save before leaving any
Protocol.
•In the first tab named Information, click the Load Existing button
to bring up a previously saved Protocol. If the desired Protocol is
present, click OK. Click the Clear Existing button if values have
been entered on any of the tabs and saving is not desired or a
previous Protocol is displayed and you want to start a new one. If
unsaved entries are being cleared, a Save Protocol File dialog box
will open asking if you want to save the current Protocol. If Yes,
click OK.
•If not previously saved, enter the new desired Protocol name in the Filename field and
click OK. Or click on an existing File name to overwrite and a File Overwrite Alert will
open; click Yes. You are now ready to create a new Protocol.

15
LS Manual Microscope Startup Manual 2021.5.1
•On the Information tab, if you enter User Notes, they will become part of the new
Protocol. You can also enter User Notes for a previously saved Protocol in this tab.
•Click on the Acquisition tab to select Time-Lapse Mode. Enter the Interval and Duration
information.
IMPORTANT: Before initiating a time-lapse run, it is critical to
change your computer power and Windows update settings so they
cannot interfere with scheduled image captures.
See Appendix C for details.

16
LS Manual Microscope Startup Manual 2021.5.1
•Click on the Image tab to select the channels to be
used in the Protocol and adjust their settings. If
settings were previously determined in Manual
Image, transfer the values into the current Protocol
by clicking the “Use Manual Settings” button. The
desired values can also be entered manually. Note
that this dialog box cannot be used to optimize the
image settings because it is not interactive with Live
Image Window.
If optimization of any of the Channel settings has not been done or is still needed, click on the
Manual Image icon on the Left Toolbar (top icon) to open its dialog box and fine tune the settings
with a representative sample. When settings are satisfactory, click the “Use Manual Settings”
button in the Image tab to upload them into the Protocol.
J.
Run Protocol
After entering all information and saving the Protocol, it is ready to be run.

17
LS Manual Microscope Startup Manual 2021.5.1
K. Placing the Lumascope inside an Incubator
1. Prior to imaging in an incubator, place the Lumascope Microscope inside for at least
6 hours and preferably overnight to allow thermal equilibration. Before transferring
to the incubator, disinfect the LS Microscope using any of the suggested procedures
in Appendix B. Condensation on the microscope, including on the objective, will
form in the first minutes but will evaporate as thermal equilibrium is achieved.
Focus levels may change during this equilibration as materials expand.
2. Pass the communication and optional power cable through the incubator port, which is often
located in the upper back wall. A plug or filtered stopper may be present. Every LS Microscope
comes with a foam plug that can be used to seal around the cable(s) going through the port. Or the
existing plug can be adapted. Make sure there is enough slack in the cables inside the incubator for
sliding the shelf out. Place the computer to be used on a flat and stable surface near to the
incubator and within the 3 M USB cable provided.
WARNING: Do not extend the USB cable or use another USB cable other than that
supplied, particularly a longer one, as communication issues will arise.
3. Place the sample on the microscope, adjust focus and close the incubator door. Check the focus
after 60 min to confirm it is still good. If the focus has changed, refocus and repeat. For higher
magnification objectives (40x and above), a focus drop of a few microns may occur, which can be
compensated for by over-focusing to a height above the focal plane equal to the expected drop. In
this case, the focus will drop to the correct level within a few minutes.
4. The system is now ready for live cell imaging.
L.
Creating Videos from Time-Lapse and Live Video
Several options are available for compiling videos from sets of time-lapse and live video images:
A) The optional Lumaquant software offered by Etaluma (see Lumaquant Startup Guide for
compiling images into video). The Lumaquant Startup Guide can be downloaded from
Etaluma’s website (www.etaluma.com/products/downloads/).
B) Other video compiling software such as ImageJ, Fiji, Windows Video Editor, iMovie.

18
LS Manual Microscope Startup Manual 2021.5.1
Appendix A
Windows Configuration Troubleshooting and Driver Conflicts
(may require Administrator status)
You may encounter installation error messages such as the following:
Dotnet Service Pack 2 Upgrade:
or
This error which will be presented as one of these two messages and can be solved by going to the
Microsoft download page here:
https://www.microsoft.com/en-us/download/details.aspx?id=21.Searching for “Dotnet SP2 upgrade
download” should yield a Microsoft download page in your country if the above link is inappropriate.
After downloading and installing (should be automatic), restart Lumaview to confirm it has been
upgraded successfully.
Occasionally the upgrade will already be present but needs to be enabled and you will see this message
when you try to upgrade.

19
LS Manual Microscope Startup Manual 2021.5.1
In this case, it must be enabled in Windows features as seen below.
Driver Conflicts
Occasionally conflicts can occur between the drivers used by Lumaview and other Windows drivers,
preventing communication between the LS Microscope and the connected computer. Often this occurs
after a Windows Update or after installing another instrument software, especially camera-based
instruments.
Generally this results in a blank Lumaview screen and one of the following messages in the upper left
corner of Lumaview is observed.
These error messages may also be presented:

20
LS Manual Microscope Startup Manual 2021.5.1
Restarting Lumaview, unplugging and replugging in the USB cable, or restarting the PC and relaunching
Lumaview may resolve the issue. If not, removing an interfering driver and updating it with the
Lumascope driver may be required and is described below.
1. Open the Device Manager.
2. With the computer connected to the LS Microscope, in Device Manager click the View tab. In the
pull-down menu, click Show hidden devices. Verify that libusbK Usb Devices is present in the list.
If it is, then it is most likely not a Driver issue.
3. If “libusbK Usb Devices” is not present in the list, you will need to Repair the current version of
Lumaview which re-installs the correct drivers. From the download loca
ti
on on your computer
(e.g., in the Downloads folder), double click the L
uma
v
i
e
w.msi
file to start the install. The
Lumaview Setup Wizard dialog box will open; select Repair Lumaview720 and click Finish. The
installation will proceed, including the opening twice of the Device Driver Installation Wizard
(click Continue and Finish each time).
4. Disconnect and then reconnect the USB cable from the computer to the LS Microscope. Repeat
Step 2 (above) to verify libusbK Usb Devices is now present.
5. If this does not result in the driver appearing in the Device Manager then in the same Device
Manager dialog box, scroll to the bottom of the device list and click on Universal SerialBus
controllers to expand the list. Look for specific controller names (not the nonspecific such as
USB Root Hub or Standard Open HCD Host Controller). Examples of conflicting drivers
identified thus far that might be there include: BodeVib, Holdtescs, Cypress, NDTech.
This manual suits for next models
2
Table of contents
Other Etaluma Laboratory Equipment manuals
Popular Laboratory Equipment manuals by other brands

Domino
Domino DPX3500 product manual

Bego
Bego Miditherm 200 MP Translation of the original instructions

Analytik Jena
Analytik Jena CyBio Well vario OL3381-25-300 operating manual

Discus
Discus NV Microlaser user manual

Mi Swaco
Mi Swaco 414 Installation, operation & maintenance manual

ibidi
ibidi 12110 instruction manual

Mecmesin
Mecmesin MultiTest-i Series Assembly and installation

Hettich
Hettich ROTANTA 460 manual

Drinkpod
Drinkpod 1000 Pro Series Use & care guide

physa
physa PHY-DHS-3 user manual

Harvard Bioscience
Harvard Bioscience Multi Channel Systems Smart Ephys... System manual

Thermo Scientific
Thermo Scientific 75007202 instruction manual