Eterna CLWW1 Setup guide

SAFETY AND INSTALLATION INSTRUCTIONS
111027-SM
HELPLINE:
• T: 01933 673 144
• F: 01933 678 083
• E: [email protected]
Visit our website:
www.eterna-lighting.co.uk
These instructions are provided as a guideline to assist you.
PLEASE READ THESE INSTRUCTIONS BEFORE USING YOUR NEW FITTING
PLEASE RETAIN FOR FUTURE REFERENCE
Model:
CLWW1
1W LED Surface / Recessed Cabinet Light
LAMP REPLACEMENT:
LED product is a sealed and non replaceable.
EVENTUALLY, YOU MAY WANT TO REPLACE THIS PRODUCT:
When your product comes to the end of its life or you choose to update or upgrade it by replacing
it, please do not dispose of it with your normal household waste and please recycle where facilities
exist. When you need to dispose of this fitting you can check with your retailer or local authority
for suitable options. New regulations require the recycling of Waste from Electrical and Electronic
Equipment (European “WEEE Directive” effective August 2005—UK WEEE Regulations effective 2nd
January 2007). Environment Agency Registered Producer: WEE/GA0248QZ.
IF YOU EXPERIENCE PROBLEMS:
If your product is defective or develops a fault, please return it to the place where you bought it.
You can call our helpline for advice. The helpline will gladly give advice on any aspect of any Eterna
Lighting product but may not be able to give specific instructions regarding individual installations.
If in doubt, consult a qualified electrician.
Pack contents:
1 x 1W LED cabinet light
c/w 2m lead
FOR USE
WITH
ETERNA
DRIVER
(CLDR9)
General Information & Cleaning: Installation:
READ THIS FIRST:
Check the pack and make sure you have all of
the parts listed on the front of this booklet. If
not, contact the outlet where you bought this
product.
As the buyer, installer and/or user of this product
it is your own responsibility to ensure that this
fitting is fit for the purpose for which you have
intended it. Eterna Lighting cannot accept any
liability for loss, damage or premature failure
resulting from inappropriate use.
If in any doubt, consult a qualified
electrician.
Switch off the mains before commencing
installation and remove the appropriate circuit
fuse or lock off MCB.
Use only with the recommended Eterna’s CLDR9
driver (as shown below), do not connect lights
directly to the mains.
Do not overload the driver; check that the total
wattage does not exceed the maximum wattage
stated.
This unit is suitable for indoor use only.
This product is designed for permanent
connection to fixed wiring: this must be a
suitable circuit (protected with the appropriate
MCB or fuse).
This product is suitable for installation on
surfaces with normal flammability e.g. wood,
plasterboard and masonry. It is not suitable
for use on highly flammable surfaces (e.g.
polystyrene, textiles).
The chosen location of your new fitting should
allow for the product to be securely mounted
and safely connected to the mains supply
(lighting circuit).
Do not cover the fitting and / or driver with any
insulating materials.
The driver should be placed where it cannot
come into contact with water or moisture.
This product is double insulated; do not connect
any part to earth or the blue/brown wires to the
earth terminal.
You are advised at every stage of your
installation to double-check any electrical
connections you have made. After you have
completed your installation there are electrical
tests that should be carried out, these tests are
specified in the current IEE wiring and building
regulations. If in doubt, consult a qualified
electrician.
CLEANING:
Clean this product only with a soft dry cloth.
Disconnect the power and clean the exterior
only of this fitting with a moist (not wet) cloth.
Do not use any chemical or abrasive cleaners.
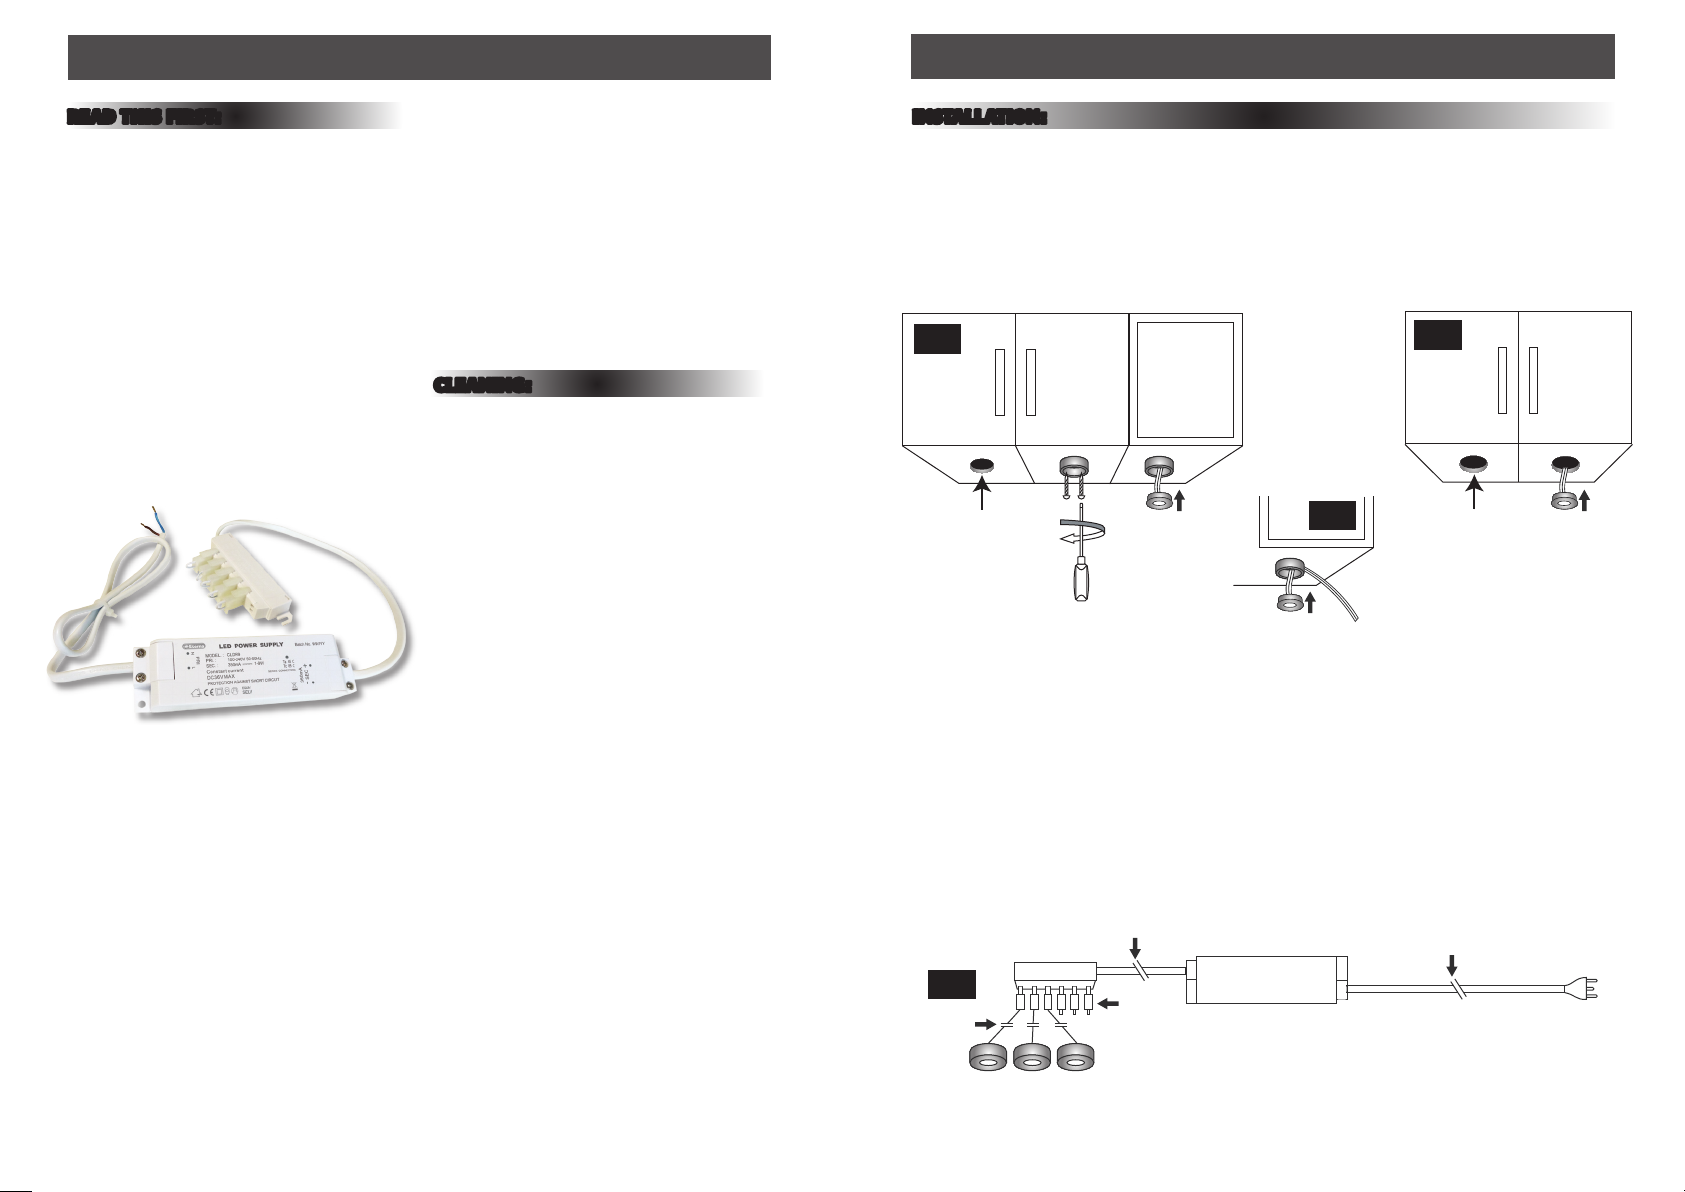
INSTALLATION:
1) Choose the location for the new fitting taking the above points into consideration.
2) Prepare the route for the cables between the lights and driver.
3) Select the best method of mounting your LED cabinet downlight.
i) Surface mounting (cable visible) – Mark the locations of your cabinet light. Eject the light from
surface mount housing, make a cable clearance via pre-cast recess, fix and secure housing with
suitable screws (checking they are not too long). See fig. 2 below.
ii) Surface mounting (cable hidden) – Mark the locations of your cabinet light and then drill a 15mm
diameter hole. Eject the light from surface mount housing fix and secure housing with suitable
screws (checking they are not too long). See fig. 1 above.
iii) Flush mounting - Mark the locations of your cabinet light and then drill a 27mm diameter hole. See
fig. 3 above.
4) Secure and make tidy the visible cable or for the other options feed your plug and power cable
through the respective holes and plug into the distribution block.
5) Snap in the light head into the housing/hole. Repeat this process for required number of cabinet
lights up to maximum of six lights per driver. NB. If less then six lights are used, the linked plugs
must remain in the distribution block; otherwise the circuit connection will not be made. See fig. 4
below.
6) Restore power and switch on.
CLDR9
Fig 1
Fig 4
Fig 2
Fig 3
Other Eterna Lantern manuals


