manuals.online logo
Brands
  1. Home
  2. •
  3. Brands
  4. •
  5. Eterna
  6. •
  7. Lantern
  8. •
  9. Eterna VECOFBK User manual

Eterna VECOFBK User manual

INSTALLATION INSTRUCTIONS
A guide for qualied electricians
EVENTUALLY, YOU MAY WANT TO
REPLACE THIS PRODUCT:
Regulations require the recycling of Waste from
Electrical and Electronic Equipment (European
“WEEE Directive” eective August 2005—UK
WEEE Regulations eective 2nd January 2007).
Environment Agency Registered Producer: WEE/
GA0248QZ.
WHEN YOUR PRODUCT COMES TO THE END OF
ITS LIFE OR YOU CHOOSE TO REPLACE IT, PLEASE
RECYCLE IT WHERE FACILITIES EXIST  DO NOT
DISPOSE WITH HOUSEHOLD WASTE.
IF YOU EXPERIENCE PROBLEMS:
If you believe your product is defective, please return
it to the place where you bought it. Our Technical
Team will gladly advise on any Eterna Lighting
product, but may not be able to give specic
instructions regarding individual installations.
874/2012
MODELNO.
VECOFBK
Email: [email protected]o.uk / t[email protected].uk
Visit our website: www.eterna-lighting.co.uk Made in ChinaIssue 0318
Model:
VECOFBK
LED Economy Full Lantern
These instructions are provided as a guideline to assist you.
PLEASE READ THESE INSTRUCTIONS BEFORE INSTALLATION
AND RETAIN FOR FUTURE REFERENCE
Pack contents:
• Full lantern
• Mounting xtures
LED LAMP SPECIFICATIONS:
Lumens total ux 420 lm
Rated Wattage 7W
Nominal life time of the lamp 35,000 hrs
Colour temperature 3100K
Number of switching cycles
before premature lamp
failure
≥15,000
Warm-up time up to 60 % of
the full light output Instant full light
Dimmable No
Nominal beam angle 120°
Rated power 7W
Rated lamp lifetime 35,000 hrs
Lamp power factor >0.5s
Lumen maintenance factor at
end of nominal life ≥0.70
Starting time <0.1s
Colour rendering ≥80
Colour consistency Within 6 step
Macadam ellipse
Rated peak intensity 110cd
Rated beam angle 120°
Voltage / Frequency 240V~50Hz
Not suitable for accent lighting
READ THIS FIRST:
Check the pack and make sure you have all of the
parts listed on the front of this booklet. If not,
contact the outlet where you bought this product.
This product must be installed by a competent
person in accordance with the current building and
IEE wiring regulations.
As the buyer, installer and/or user of this product it
is your own responsibility to ensure that this tting
is t for the purpose for which you have intended
it. Eterna Lighting cannot accept any liability for
loss, damage or premature failure resulting from
inappropriate use.
This light tting must be installed in accordance with
the Building Regulations.
Switch o the mains before commencing installation
and remove the appropriate circuit fuse or lock o
MCB.
Suitable for outdoor use.
This product is suitable for installation on surfaces
with normal ammability, e.g. wood, plasterboard,
masonry. It is not suitable for use on highly
ammable surfaces (e.g. polystyrene, textiles).
Before making xing hole(s), check that there are no
obstructions hidden beneath the mounting surface
such as pipes or cables.
The chosen location of your new tting should allow
for the product to be securely mounted and safely
connected to the mains supply (lighting circuit).
If the location of your new tting requires the
provision of a new electrical supply, the supply
must conform with the requirements of the Building
Regulations.
This product is designed for permanent connection
to xed wiring: this should be either a suitable
lighting circuit (protected with a 5 or 6 Amp MCB or
fuse) or a fused spur (with a 3 Amp fuse) via a fused
connection unit. We recommend that the supply
incorporates a switch for ease of operation.
Make connections to the electrical supply in
accordance with the following code:
Live - Brown or Red
Neutral - Blue or Black
This tting is double insulated. DO NOT CONNECT
ANY PART TO EARTH.
You are advised at every stage of your installation to
double-check any electrical connections you have
made. After you have completed your installation
there are electrical tests that should be carried out:
these tests are specied in the Wiring Regulations
(BS7671) referred to in the Building Regulations.
LAMP REPLACEMENT:
INSTALLATION:
01) Undo the nuts on the backplate of the tting and
detach.
02) Using the back of the tting as a template, mark
the location of the xing holes.
03) Pierce the rubber grommet in the back of the
tting. Make the hole as small as possible so that
a good watertight seal is maintained when the
cable has been threaded through.
04) Thread the cable through the grommet.
05) Secure the tting to the wall using xings.
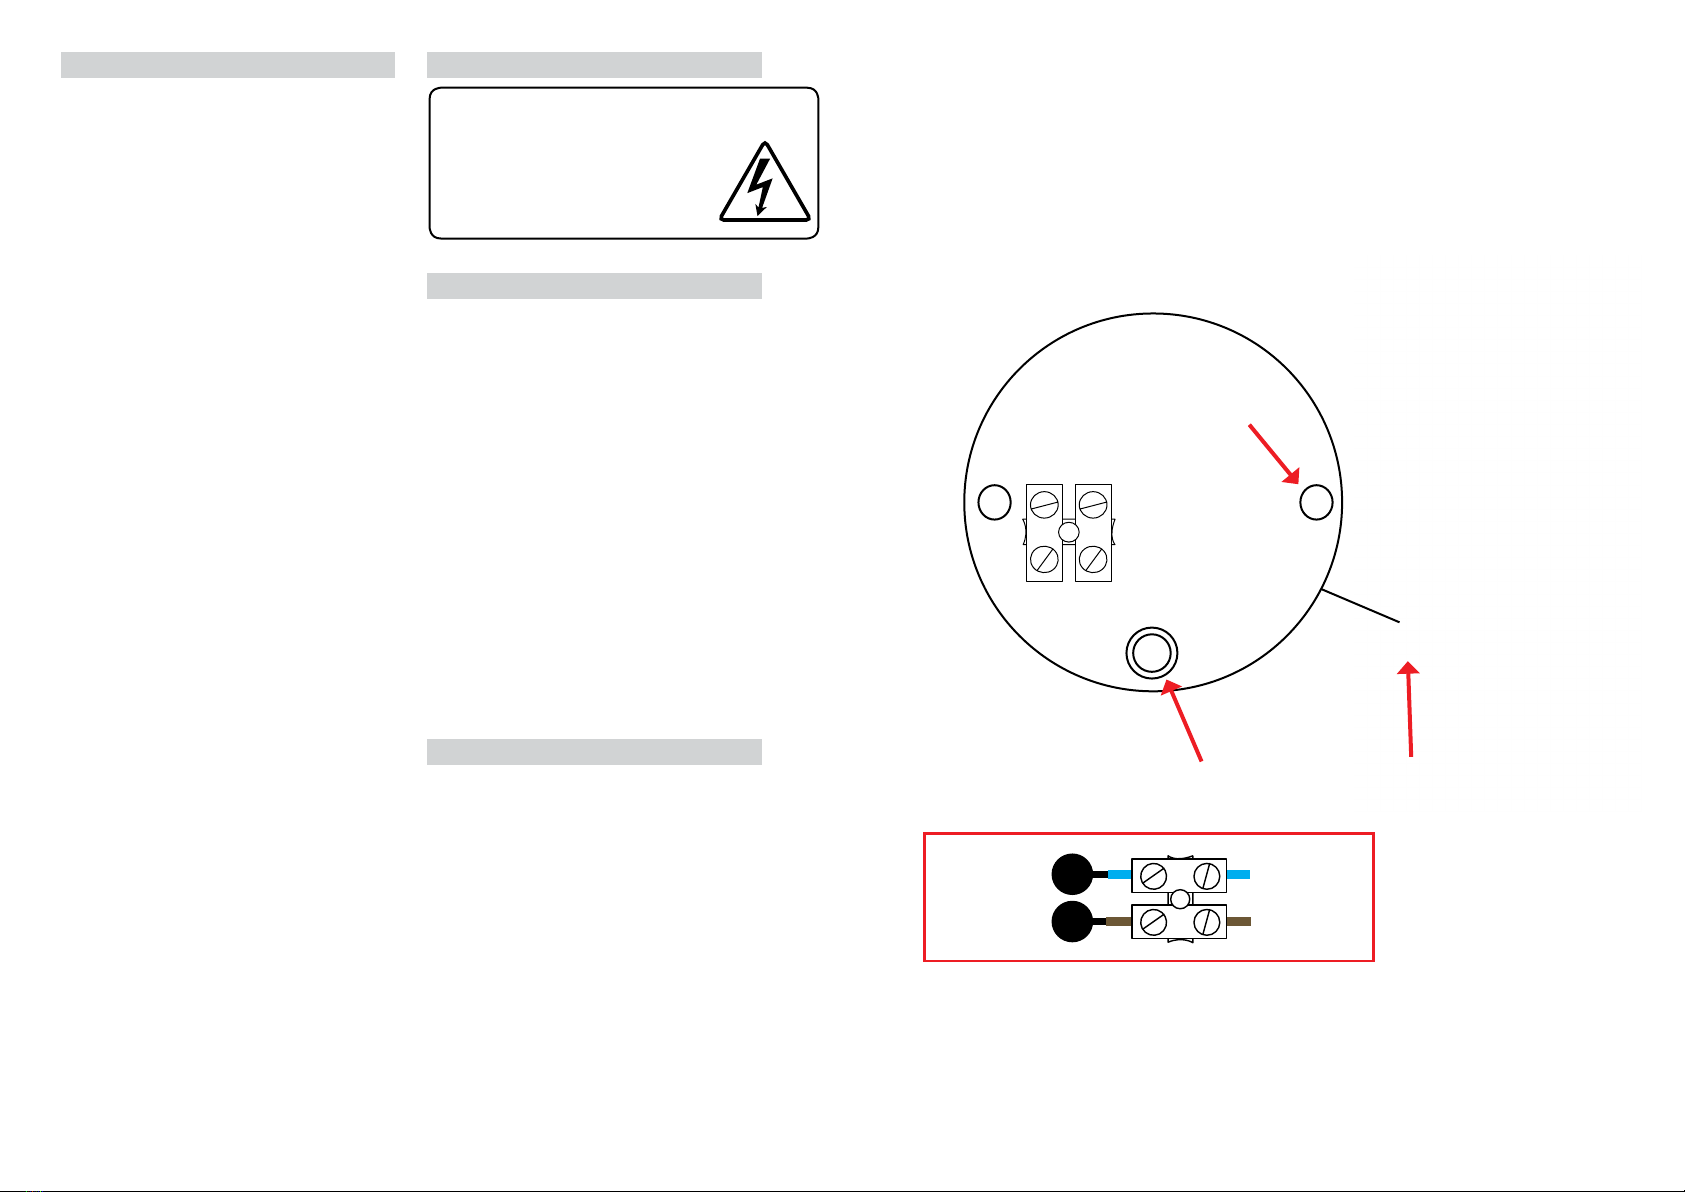
06) Make the connections to the terminal block
according to the colour code. Connect the cable
from the main body of the tting observing the
colour code.
07) Oer the main body on to the back plate, and
tighten nuts to secure, ensuring the two gaskets
are in place.
08) Restore the power and switch on.
CLEANING:
Clean this tting only with a soft dry cloth.
Do not use any chemical or abrasive cleaners.
Backplate
nut
Backplate
nut
Back of tting
Rubber
grommet
LN
Blue
(Power Cable)
Brown
(Power Cable)
Blue
(Power Cable)
Brown
(Power Cable)
LN
The light source contained in this luminaire
shall only be replaced by the manufacturer,
service agent or a similar qualied person.
CAUTION, RISK OF ELECTRIC SHOCK.
The light source is designed to last the lifetime of the
luminaire.

Other Eterna Lantern manuals

Eterna HL60B User manual

Eterna

Eterna HL60B User manual

Eterna MODERNOBK Operation and maintenance manual

Eterna

Eterna MODERNOBK Operation and maintenance manual

Eterna WP51SDEM3 User manual

Eterna

Eterna WP51SDEM3 User manual

Eterna HALFPIRBK User manual

Eterna

Eterna HALFPIRBK User manual

Eterna CLWW1 Setup guide

Eterna

Eterna CLWW1 Setup guide

Popular Lantern manuals by other brands

WE-EF ETC330-GB LED Installation and maintenance instructions

WE-EF

WE-EF ETC330-GB LED Installation and maintenance instructions

NORTHCLIFFE LSW LED Series Installation instruction

NORTHCLIFFE

NORTHCLIFFE LSW LED Series Installation instruction

WAGNER SIDNEY manual

WAGNER

WAGNER SIDNEY manual

NVC ARLINGTON PRO instructions

NVC

NVC ARLINGTON PRO instructions

Coleman 2600 Series Instructions for use

Coleman

Coleman 2600 Series Instructions for use

Winsome house WHSL433 Instruction, Use & Care Manual

Winsome house

Winsome house WHSL433 Instruction, Use & Care Manual

Hess CAMPO Installation and operating instructions

Hess

Hess CAMPO Installation and operating instructions

Flair 6746179 Assembly instructions

Flair

Flair 6746179 Assembly instructions

Selecon Studio Panel Manual addendum

Selecon

Selecon Studio Panel Manual addendum

Eurotops 41919 instruction manual

Eurotops

Eurotops 41919 instruction manual

Green Lighting GL2362LU Assembly & fitting instructions

Green Lighting

Green Lighting GL2362LU Assembly & fitting instructions

BEGA 84 326 Instructions for use

BEGA

BEGA 84 326 Instructions for use

Sunjoy S-CH671PST-A owner's manual

Sunjoy

Sunjoy S-CH671PST-A owner's manual

Endon Atlas instruction manual

Endon

Endon Atlas instruction manual

GOAL ZERO Lighthouse Mini user manual

GOAL ZERO

GOAL ZERO Lighthouse Mini user manual

TECHLIGHTING 700FJBRK Series installation instructions

TECHLIGHTING

TECHLIGHTING 700FJBRK Series installation instructions

LIVARNO LUX 43174 Operation and safety notes

LIVARNO LUX

LIVARNO LUX 43174 Operation and safety notes

GOAL ZERO Lighthouse 400 user manual

GOAL ZERO

GOAL ZERO Lighthouse 400 user manual

manuals.online logo
manuals.online logoBrands
  • About & Mission
  • Contact us
  • Privacy Policy
  • Terms and Conditions

Copyright 2025 Manuals.Online. All Rights Reserved.