ETNA T 3301 User manual

7

2
DIMENSIONS POUR ENCASTREMENT
FITTING DIMENSIONS
fig. 1
Abb. 1
70
550 min.
560
560
545
589
2,5
540
20
595
595
70
Fig. 2
Abb. 2
560
589
70
min. 8
550 min.
595
540
20
2.5
595
545
FR MODE DEMPLOI
INSTRUCTIONS GENERALES
Lire attentivement les instructions contenues dans cette brochure; elles fournissent dimportantes indications
sur la sécurité dinstallation, demploi et dentretien, ainsi ue uel ues conseils pour la meilleure utilisation
possible du four. Conserver cette brochure avec soin pour toute consultation ultérieure. Après avoir enlevé
lemballage, contrôler lintégrité de lappareil.
Les éléments de lemballage (feuilles en plasti ue, polystyrène expansé, etc.) peuvent constituer des
sources de danger et ne doivent donc pas être laissés à la portée des enfants.
IMPORTANT: ne pas utiliser la poign e de la porte du four pour effectuer des op rations de
mouvement, y compris lop ration n cessaire pour enlever lappareil de lemballage.
ATTENTION
De par sa nature, le four se r chauffe, en particulier au niveau de la porte en verre. Il est donc n cessaire dempêcher que les enfants
puissent sen approcher quand il fonctionne, en particulier quand on utilise le gril.
La première fois ue lon allume le four, il peut se produire une fumée âcre provo uée par le premier réchauffement du collant des panneaux disolation
enveloppant le four. Il ne sagit ue dun phénomène absolument normal et, au cas où cela se produirait, attendre ue la fumée cesse avant denfourner
les aliments. Ne pas cuire les aliments sur la base du four.
IMPORTANT
Cet appareil ne doit servir ue pour lemploi pour le uel il a été expressément projété, pour la cuisson des aliments.
Tout autre emploi (par exemple chauffage ambiant) doit être considéré comme impropre et donc dangereux.
Le constructeur ne peut sassumer aucune responsabilité en cas de dommages dérivants demplois impropres, incorrects et peu raisonnables.
Lemploi de tout appareil électri ue exige ue soient observées uel ues règles fondamentales, en particulier:
- toute opération dentretien ou de nettoyage doit être effectuée avec lappareil débranché du réseau électri ue.
- ne pas tirer le fil dalimentation pour débrancher la prise de courant;
- ne pas toucher lappareil avec les pieds ou les mains humides ou mouillés;
- ne pas utiliser lappareil pieds nus;
- ne pas permettre aux enfants ou aux handicapés dutiliser lappareil sans sourveillance;
- en cas dutilisation négligente en proximité des charnieres de la porte de four, il existe le danger de se blesser les mains;
- en cas de panne et/ou de mauvais fonctionnement de lappareil, léteindre et ne pas le démonter.
Pour toute réparation éventuelle, sadresser à un centre dassistance techni ue autorisé et exiger lutilisation de pièces de rechange originales.
Le non-respect de ce ui précède peut compromettre la sécurité de lappareil.
CARACTERISTIQUES
Les fours sont prévus pour fonctionner avec du courant alternatif monophasé de 230V 50Hz. Avant toute installation de lappareil, on conseil toutefois de
contrôler toujours ces données sur la pla ue signaléti ue appli uée dans la partie extérieure arrière.
Cette appareil est, dans ses parties destinées à entrer en contact avec des substances alimentaires, conforme à la prescription de la Dir. CEE 89/109.
En plus cet appareil est conforme aux Directives Européennes 89/336/CEE, 73/23/CEE et modifications successives.
AVERTISSEMENT POUR
LENVIRONNEMENT
Emballage à liminer
Ne pas jeter lemballage de votre appareil
aux ordures, mais sélectionner les différents
matériaux (par ex. tôle, carton, polystyrène)
selon les prescriptions locales pour
lélimination des déchets.
INBOUWMATEN
ABMESSUNGEN FÜR EINBAUGERÄTE
12

3
INSTALLATION
Linstallation doit être effectuée suivant les instructions par du personnel professionnellement ualifié.
Une installation incorrecte peut provo uer des dommages aux personnes, animaux ou choses, vis-à-vis des uels le constructeur ne peut assumer aucune
responsabilité.
INSERTION DE LAPPAREIL
Enfiler lappareil dans le logement du meuble (suspendu ou en colonne). Lancrage se fait par 4 vis à travers les trous de lencadrement, visibles en ouvrant
la porte.
Pour permettre une meilleure aération du meuble, les fours doivent être encastrés conformément aux mesures et distances indi uées dans la figure 1-2
page 2.
Pour garantir une bonne a ration, liminer la paroi arrière, en plus le plan dappui doit avoir une ouverture arrière dau
moin 70 mm.
N.B.: pour les fours à combiner à des plaques de cuisson, il est indispensable de respecter les instructions contenues dans la brochure
jointe à lappareil à combiner.
IMPORTANT
Pour garantir le bon fonctionnement de lappareil à encastrer, le meuble doit avoir les caractéristi ues appropriées. Les panneaux du meuble contigue
au four doivent être en matériau résistant à la chaleur. En particulier dans le cas de meubles en bois pla ué, les colles doivent pouvoir résister à une
température de 120°C; les matières plasti ues ou collantes ne résistant pas à cette température provo uent des déformations ou des décollages.
Conformément aux normes de sécurité, une fois lappareil encastré, aucun contact ne doit être possible avec les parties électri ues. Toutes les parties
ui assurent la protection doivent être fixées de façon à ne pas pouvoir être enlevées sans outil.
Fig. 3
A
A
A
Fig. 4 Fig. 5
70
70
70
Fig.6
TYPE ET SECTION CÂBLE ALIMENTATION
230V~
H05RR-F 3 x 1,5 mm2
ENTRETIEN DU FOUR
AVANT DE PROCEDER A LENTRETIEN DU FOUR, DEBRANCHER
TOUJOURS LA FICHE DE LA PRISE DE COURANT OU DEBRANCHER
LE COURANT DE LA LIGNE DALIMENTATION A TRAVERS
LINTERRUPTEUR GENERAL DE LINSTALLATION ELECTRIQUE.
BRANCHEMENT A LALIMENTATION
LAPPAREIL DOIT ETRE RACCORDE SELON LES NORMES ACTUELLEMENT
EN VIGUEUR ET SEULEMENT PAR UN INSTALLATEUR ELECTRIQUE
AUTORISE.
Vérifier si le débit électri ue de linstallation et des prises de courant est adapté
à la puissance maximum de lappareil indi uée sur la pla uette.
Brancher la fiche dans une prise de courant é uipée dun troisième contact
correspondant à la prise de terre ui doit être connectée dune façon efficiente.
Pour les modèles dépourvus de fiche, monter sur le fil une fiche normalisée
capable de supporter la charge indi uée sur la pla uette. Le conducteur de
mise à la terre est indentifi par les couleurs jaune et verte.
En cas dincompatibilité entre la prise et la fiche de lappareil, faire remplacer
la prise par une autre dun type approprié par du personnel professionnellement
ualifié. Ce dernier devra en particulier sassurer ue la section des fils de la
prise est adaptée à la puissance absorbée par lappareil.
On peut également effectuer le branchement au réseau en interposant entre
lappareil et le réseau un interrupteur omnipolaire avec une distance minimum
entre les plots de 3 mm, dimensionné en fonction de la charge et conforme aux
normes en vigueur.
Le fil de terre jaune et vert ne doit pas être interrompu par linterrupteur.
La prise et linterrupteur omnipolaire utilisés pour le branchement doivent être
facilement accessibles une fois lappareil électro-ménager installé.
Important: en cours dinstallation, mettre le fil dalimentation en position de façon
uen aucun point sa température ne dépasse de 50°C la température ambiante.
La sécurité électri ue de cet appareil nest assurée ue sil est correctement
branché à une installation de mise à la terre efficace, comme prévu par les
normes de sécurité électri ue en vigueur.
Important: Le constructeur ne peut être retenu responsable de tout dommage
résultant du man ue de mise à la terre de linstallation.
L
N

1
7


6
- Convention naturelle
Faire chauffer le four pendant 10 à 15 minutes, huiler la viande avec un peu dhuile, la placer sur la lèche-frite et mettre tout rapidement au four.
- Gril
Faire chauffer le gril pendant 5 minutes (jus uà ce ue la résistance prenne une couleur rouge vif), préparer la viande, nature ou huilée et arômatisée, sur la
grille puis la placer sur le rayon le plus près du grill; enfiler immédiatement en dessous de la grille la lèche-frite avec un peu deau pour récupérer les jus de
cuisson. Le grill peut aussi servir à gratiner et à dorer les aliments après une cuisson normale.
CUISSON AVEC VENTILATEUR
- D cong lation
Les aliments à décongeler posés sur une assiette et encore enveloppés dans leur protection (feuille de polythène, daluminium, etc.) sont placés sur la grille
au centre du four. La porte du four doit être fermée.
- Four ventil
Il nest pas nécessaire de faire chauffer le four, sauf pour les cuissons très brèves et pour les aliments humides (ex. tartes aux fruits) pour éviter la condensation.
On peut effectuer des cuissons multiples en plaçant les aliments de même nature ou de différentes natures sur 2 rayons ou plus, sans mélanger les saveurs
et les odeurs.
Il est important de combiner des aliments ui cuisent à la même température, même si les temps diffèrent; en effet, on peut enfourner et retirer les aliments en
des temps différents, et ce sans inconvénients puis ue la perte de chaleur provo uée par louverture des portes se récupère rapidement grâce au ventilateur.
Les températures de cuisson sont inférieures à celles du four à convention naturelle (de 20 à 30°C pour la pâtisserie et de 30 à 40°C pour la viande), tandis
ue les temps sont un peu plus longs (50°C - 10 minutes).
- Grill
Le chauffage préalable est superflu. La cuisson peut se faire à porte close et les aliments doivent être placés par rapport au gril en fonction des résultats ue
lon désire obtenir:
- plus près pour les aliments rissolés en surface et saignants
- plus loin pour les aliments bien cuits à lintérieur.
La lèche-frite pour la récupération des jus doit être placée sur le premier rayon en partant du bas.
DIVERS
La viande hachée et sans os cuit plus rapidement; le degré de cuisson peut être contrôlé en appuyant sur la viande avec une fourchette: si elle ne cède pas,
elle est cuite à point. Avant denlever la viande, attendre au moins 15 minutes pour donner au jus le temps de se stabiliser. Si la viande doit être lardée ou
enveloppée dans du bacon ou du jambon, ne pas la cuire à une température trop élevée pour éviter de trop salir le four.
La pâte brisée doit cuire dans le moule pendant 2/3 du temps avant dêtre garnie. La période dachevement de la cuisson dépend du type de garniture (fruit,
confiture).
La pâte battue ne doit pas être excessivement fluide, ce ui pourrait prolonger inutilement le temps de cuisson.
Ne pas poser les casseroles directement sur le fond du four, la chaleur venant du bas ne pouvant pas sortir ris uerait de provo uer la rupture ou le fendillement
de lémail.
TEMPS ET TEMPERATURES APPROXIMATIFS DE CUISSON AU FOUR STATIQUE
Q.tés Plats à cuisiner Température Niveau dintroduction Temps de cuisson
de four en °C de la grille à partir du bas en minutes
PATISSERIE
Pâtes molles: Fougace 175 1 Niveau 40-50
Génoise 170 1 Niveau 30
Pâte brisée: Tarte aux fruits 180-190 1 Niveau 20-30
Pâte à levure: Gâteau mousseline 160 1 Niveau 40-45
Gâteau de Savoie 160 1 Niveau 40-45
Gâteau au chocolat 160 1 Niveau 25-35
Gâteau au blanc doeufs Meringues 100 1 Niveau 90
Pâte feuilletée: Vol au vent 200 1 Niveau 20
Bouchées 200 1 Niveau 20
VIANDES:
1,5 kg. Roast-beef 190 1 Niveau 90
1 kg. Rôti de veau 150-160 1 Niveau 120-150
2 kg. Ragoût de veau 170-190 1 Niveau 60-90
1,5 kg. Rôti dagneau 150-160 1 Niveau 60-75
1,5 kg. Rôti de chevreau 150-160 1 Niveau 50-60
1,5 kg. Gigot de chevreuil 200 1 Niveau 90
1,5 kg. Gigot de sanglier 190 1 Niveau 120
VOLLAILLE:
Pigneous rôtis 150-160 1 Niveau 45
2 kg. Dinde 150 1 Niveau 180-240
4 kg. Oie 160 1 Niveau 240-270
2,5 kg. Canard 175 1 Niveau 90-150
1,5 kg. Poulet 170 1 Niveau 60-80
2,5 kg. Chapon 170 1 Niveau 120-150
POISSON:
Truite 200 1 Niveau 15-25
1 kg. Morue 190 1 Niveau 50
DIVERS:
Lasagne 200 1 Niveau 40
Soufflés 180-200 1 Niveau 20
Choux 200 1 Niveau 20
Pizza 200 1 Niveau 20

TEMPS ET TEMPERATURES APPROXIMATIFS DE CUISSON AU FOUR VENTILE
Q.tés Plats à cuisiner Température Niveau dintroduction Temps de cuisson
de four en °C de la grille à partir du bas en minutes
PATISSERIE
Pâte molles: Fougace 175 2 Niveau 45
Génoise 170 2 Niveau 35
Gâteau 170 2 Niveau 40
Pâte brisée: Tarte aux pommes 200 2 Niveau 35
Tarte 200 3 Niveau 30
Pâte à levure: Fougace 170 2 Niveau 35
Savarin et natte 170 2 Niveau 40
Biscuits 180 2 Niveau 25
Gâteau au blanc doeufs: Meringues 110 1 e 2 Niveau 35
Pâte feuilletée Petits vol au vent 200 2 Niveau 20
VIANDES
Viande de porc:
1 kg. Rôti 220 2 Niveau 90
1 kg. Côtolet à lécarlate 200 1 Niveau 60
1 kg. Filet 200 1 Niveau 60
1,5 kg. Gigot 200 1 Niveau 90
1 kg. Rouleau de viande hachée 180 2 Niveau 85
1,5 kg. Saucisse 170 1 Niveau 45
Viande de boeuf:
1 kg. Pieds 220 1 Niveau 95
1 kg. Filet 220 1 Niveau 75
1 kg. Roast-beef 240 2 Niveau 45
1 kg. Pommes de terre rôties 230 1 Niveau 45
Viande de veau:
1 kg. Gigot 200 1 Niveau 95
1 kg. Rôti 180 2 Niveau 90
2 kg. Jarret 180 1 Niveau 100
1 kg. Poitrine 180 1 Niveau 60
Viande dagneau:
1 kg. Gigot 200 2 Niveau 95
1 kg. Palette 175 1 Niveau 70
Viande de mounton:
1 kg. Palette 180 1 Niveau 85
1,5 kg. Gigot 200 1 Niveau 90
1,5 kg. Poitrine 180 1 Niveau 70
Gibier:
1 kg. Faisan rôti 200 1 Niveau 70
2 kg. Lièvre rôti 175 1 Niveau 75
Lapin 175 1 Niveau 75
Vollaille:
1,5 kg. Blanc de dinde 180 2 Niveau 70
1 kg. Pintade 180 2 Niveau 65
2 kg. Canard 180 1 Niveau 90
1 kg. Poulet 175 2 Niveau 75
1 kg. Poulet grillé 200 1 Niveau 75
POISSON
1,5 kg. Dentex 180 1 Niveau 45
1 kg. Sole gratinée 200 1 Niveau 25
DIVERS
Lasagne 200 2 Niveau 40
Cannelloni 200 2 Niveau 40
Pizza 200 1 et 2 Niveau 45
Flan au maras uin 175 1 Niveau 45
Choux 175 2 Niveau 20
Soufflés 175 1 Niveau 35
Pommes au four 180 1 Niveau 60
7

HORLOGE «LED»
Caract ristiques
Horloge 24 heures avec programmation automati ue et compte-minutes.
Fonctions
Durée de cuisson, fin cuisson, position manuelle, horloge, compte-minutes, temps réglables jus uà 23 heures et 59 minutes.
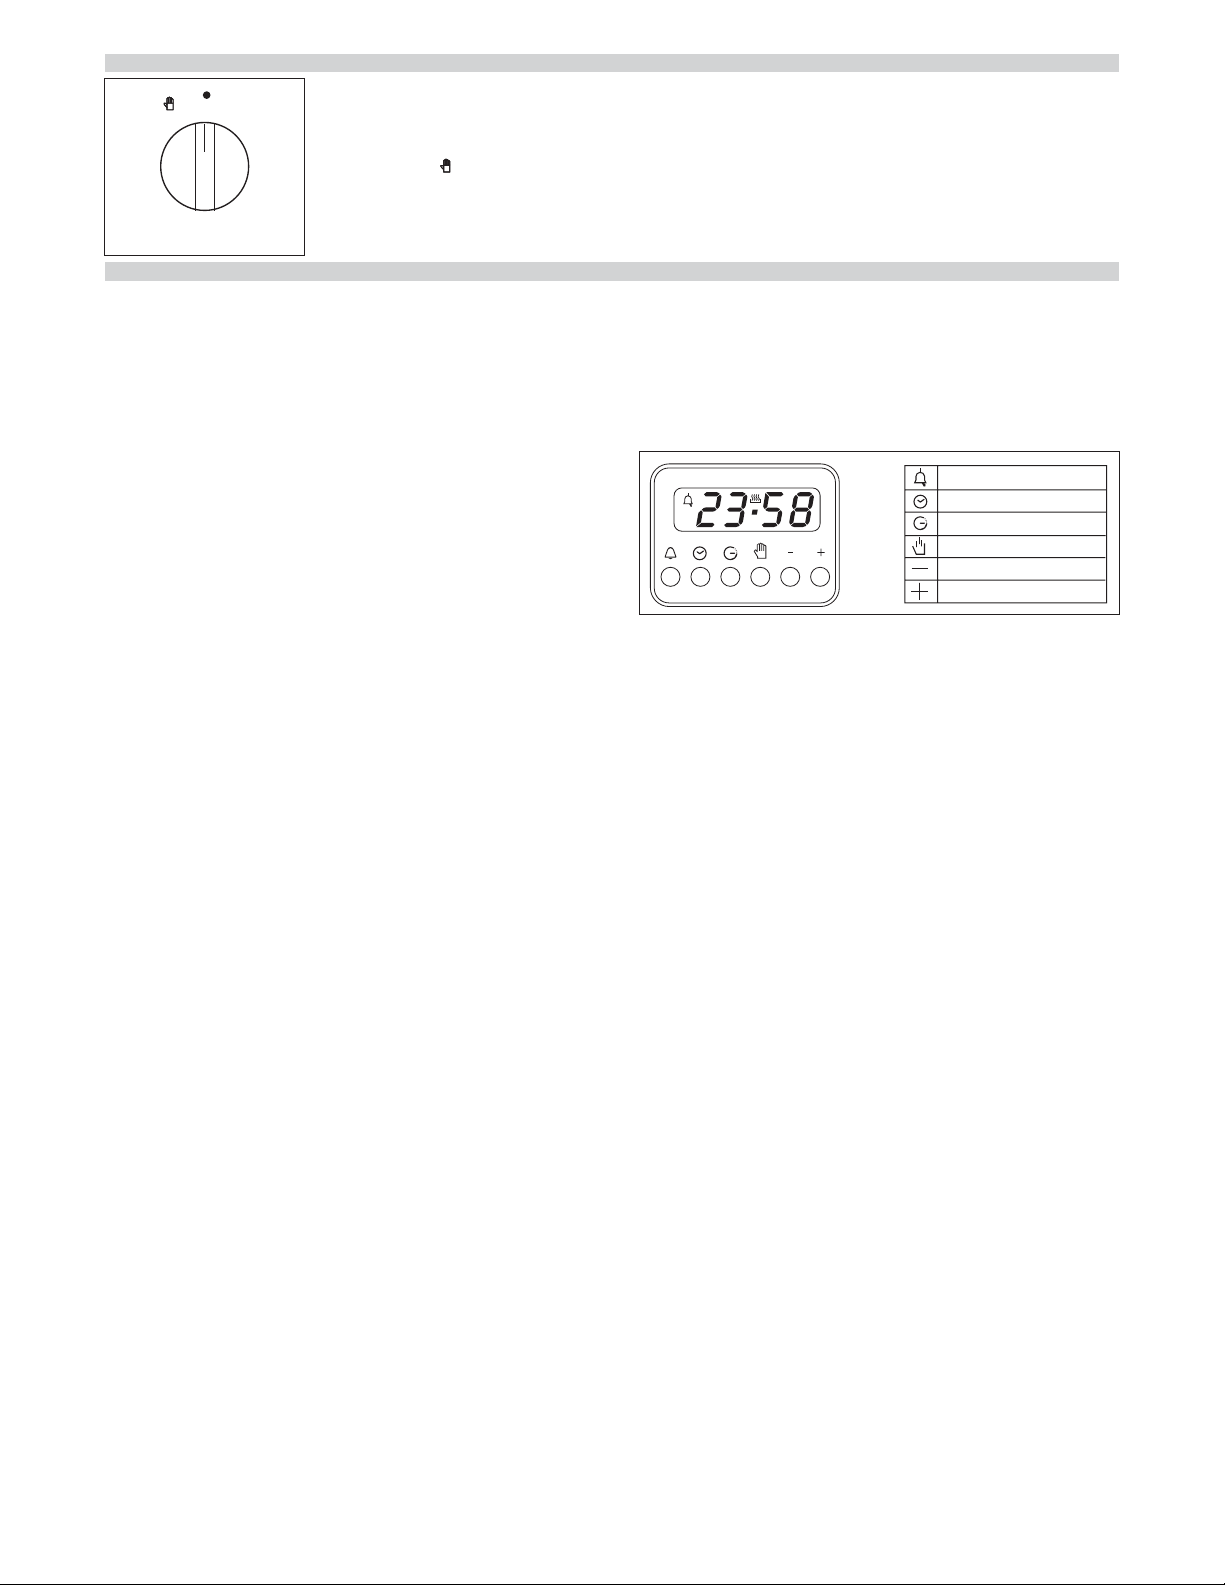
Affichage des fonctions
Affichage lumineux à 4 chiffres de 7 segments pour indi uer lheure et les temps de cuisson.
Durée de cuisson et fonction manuelle = symbole de la casserole
Fonction automati ue = AUTO
Compte-minutes = symbole de la cloche
Une fonction est sélectionnée lors ue le symbole correspondant est affiché.
Programmation
La programmation seffectue en appuyant sur le bouton de la fonction désirée.
Après avoir relâché ce bouton, il est suffisant de programmer le temps avec +
et - entre 5 secondes.
Boutons + et -
En appuyant sur les boutons + et - le temps augmente ou diminue à une vitesse variable selon la durée de la pression sur le bouton.
R glage de lheure
Pour régler lheure désirée, appuyer en même temps sur deux boutons uelcon ues (durée de cuisson, fin cuisson, compte-minutes). Par cette opération,
tous programmes précédents sont éliminés, les contacts sont débranchés, et le symbole AUTO clignote.
Fonctionnement en manuel
En appuyant sur le bouton de manuel, les contacts du relais se branchent, le symbole AUTO séteint, le symbole de casserole apparaît. Le fonctionnement
manuel a lieu seulement à la fin de la programmation automati ue ou après ue celle-ci a été éliminée.
Fonctionnement automatique
En appuyant sur le bouton de durée ou de fin cuisson, le programmateur se commute automati uement de la fonction manuelle à la fonction automati ue.
Fonctionnement semi-automatique avec dur e de cuisson
Appuyer sur le bouton de durée de cuisson et programmer le temps désiré avec + ou -. Le symbole AUTO et de durée de cuisson apparaissent en
permanence. Le relais se branche immédiatement. Quand le temps de fin de cuisson correspond à lheure, le relais et le symbole de durée de cuisson
se débranchent, la sonnerie retentit, et le symbole AUTO clignote.
Fonctionnement semi-automatique avec fin de cuisson
Appuyer sur le bouton de fin cuisson. Lheure apparaît sur laffichage lumineux. Sélectionner le temps de fin cuisson désiré avec le bouton +. Les symboles
AUTO et durée de cuisson apparaissent en permanence. Les contacts du relais se débranchent.
Quand le temps de fin cuisson correspond à lheure, le relais et le symbole de durée de cuisson se débranchent. Une fois le temps de cuisson écoulé,
le symbole AUTO clignote, la sonnerie retentit, le symbole de durée de cuisson et le relais séteignent.
Fonctionnement automatique avec dur e et fin de cuisson
Appuyer sur le bouton de durée et sélectionner la durée de cuisson désirée avec + ou -. Les symboles AUTO et durée apparaissent en permanence. Le
relais se branche. Appuyer sur le bouton de fin de cuisson. Le temps de fin cuisson le plus proche apparaît sur laffichage lumineux. Sélectionner le temps
de fin cuisson désiré à travers le bouton +. Le relais et le symbole de durée se débranchent. Le symbole sallume de nouveau uand lheure correspond
au temps de début de cuisson. Une fois le temps de cuisson écoulé, le symbole AUTO clignote. La sonnerie retentit et le symbole de durée et le relais
séteignent.
Compte-minutes
Appuyer sur le bouton compte-minutes et sélectionner le temps de cuisson désiré avec le bouton + ou -.
Pendant le fonctionnement du compte-minute le symbole de la cloche apparaît. À la fin du temps choisi, la sonnerie retentit et le symbole de la cloche
séteint.
Signal acoustique
Le signal acousti ue se met en marche à la fin dune programmation ou de la fonction compte-minutes et il a une durée de 15 minutes. Pour larrêter,
appuyer sur un bouton uelcon ue des fonctions.
D but programme et contrôle
Les programmes démarrent à peu près 4 secondes après leur programmation.
Il est possible de vérifier à tout moment le programme en cour en appuyant sur le bouton concerné.
Erreur de programmation
Il y a un erreur de programmation si lheure indi uée par lhorloge est comprise entre lheure de début cuisson et lheure de fin cuisson. Lerreur de
programmation peut être corrigé, en changeant la durée ou le temps de fin cuisson. Quand il y a un erreur de programmation les relais se débranchent.
Élimination dun programme
On peut éliminer un programme en appuyant sur le bouton de durée cuisson et puis sur le bouton - afin ue lindication 00 00 apparaisse sur laffichage
lumineux. À la fin dun programme, ce-ci séliminera automati uement.
8
Pour un fonctionnement manuel, tourner le bouton dans le sens contraire des aiguilles dune montre en correspondance
du symbole ; pour programmer la durée de la cuisson, tourner dans le sens des aiguilles dune montre et fixer
le temps de cuisson avec le bouton (max.120 minutes) . Une fois le temps écoulé, le four sarrêtera automati uement.
PROGRAMMATEUR FIN CUISSON
Compte-minutes
Temps de cuisson
Fin cuisson
Manual
Diminution du temps
Augmentation du temps
A
U
T
O
stop
10
20
30
40
50
80
90
110
120
100
70 60
0

Moules et vaisselle
Dans le four, vous ne pouvez utiliser ue des éléments résistant à la chaleur et capables de supporter une température de 300°C; moules en métal, feuilles
daluminium, verre spécial four, cérami ue, vitr-cérami ue et poteries résistant à la chaleur du four.
Le type daccessoires culinaires utilisés peut influencer le résultat final: par exeple, des moules de couleur foncée permettent de donner une coloration
brune plus prononcée et plus rapide aux gâteaux ue les moules de couleur claire.
Le diff rentes niveax du four
Les différents niveaux du four sont repris dans lillustration A. La première latte représente la position la plus basse et la 5ème latte la position plus haute.
Les accessoires du four
Selon le modèle, votre four peut être é uipé des accesoires suivants:
Le grill: (illustration B)
Vouz pouvez y placer des gâteaux et des plats devant aller au four ui se trouvent dans un moule ou dans un plat à four. Parfois, il est également possible
de placer de la viande à griller directement sur le grill.
Plat à bec verseur: (illustration C)
Ce plat est utilisé pour la cuisson de la viande, du gibier, de la voilaille ou du poisson. Le plat à bec verseur peut également être utilisé en cas de cuisson
ou de grillade pour servir à récupérer la graisse ui pourrait couler.
ENTRETIEN ET NETTOYAGE
Avant de procéder au nettoyage, attendre ue lappareil refroidisse; puis débrancher la prise de courant ou actionner linterrupteur général de linstallation.
Laver les parties émaillées, peintes ou chromées avec de leau tiède et du savon ou du détersif li uide non corrosif.
Pour les parties en inox, utiliser de lalcool ou les solution prévues pour cela disponibles dans le commerce.
Pour les panneaux ou les profilés en aluminium, utiliser du coton ou des chiffons imbibés dhuile de vaseline ou dhuile végétale. Nettoyer puis faire un passage avec de
lacool. Pendant le nettoyage, ne jamais utiliser de matériaux abrasifs, de détersifs corrosifs, deau de javel ou dacides.
Ne pas laisser de substances acides ou corrosives (jus de citron, vinaigre, etc.) sur les parois émaillées, peintes ou en inox.
D montage de la porte du four (fig.21)
Pour faciliter le nettoyage intensif du four, démonter la porte en suivant les instructions:
placer le crochet A (fig.21) dans le secteur charnière B. Placer la porte en position semi-
ouverte et tirer vers soi des deux mains jus uà ce uelle se détache de la fixation.
Pour remonter la porte, opérer en sens inverse en prenant soin dintroduire correctement
les deux secteurs C.
Panneaux (fig.23)
Le cadre supportant les grilles est blo ué par trois pivots; il suffit de le comprimer un
peu vers le bas pour lextraire.
Lampe du four (fig.24)
La lampe utilisée dans le four est dun type spécial résistant aux hautes températures.
Pour la remplacer, opérer de la façon suivante: débrancher le four ou couper lélectricité
avec linterrupteur général de linstallation électri ue, démonter le verre de protection
(A) et remplacer la lampe brûlée avec une autre du même type, puis remonter le verre
de protection.
Important: si lon devait décider de ne plus utiliser le four, il est recommandé de
le rendre inopérant en coupant le fil dalimentation après lavoir débranché de la
prise de courant. Il est recommandé de rendre inoffensives les parties de lappareil
pouvant constituer un danger, spécialement pour les enfants ui pourraient se
servir de lappareil électri ue hors dusage pour jouer.
Pour faciliter les grandes opérations de nettoyage du four, il convient de
démonter la porte en suivant les instructions ci-après :
Ouvrir la porte en grand; exercer une légère pression vers le bas (fig.21 B) de
sorte ue les crochets "A" de la charnière aillent se positionner à l'intérieur
de lentaille "B" (fig.21 B1).
Tirer la porte vers soi avec les deux mains jus uà ce uelle se détache du
four.
Pour remonter la porte, procéder dans lordre inverse.
D montage de la porte du four ( point d'appui fix fig. 21B/B1 ) .
B
A
A
Fig.21 B
Fig.21 B1
A
BC
Fig. 21
Fig. 23
A
T300°C
25W
A
5
4
3
2
1
A B C
9
Fig. 24

GENERAL WARNINGS
Read carefully all the instructions contained in this booklet. It provides you with important information
regarding the safe installation, use and maintenance of the appliance as well as useful advice for getting
the best out of your oven. Keep this booklet in a safe place for future reference. After removing the packing,
check that the appliance is not damaged in any way.
Be careful not to leave the packing materials (plastic sheeting, expanded polystyrene etc.) where children
can get at them, as they can be dangerous.
IMPORTANT: do not use the oven door handle to move the appliance, such as to remove it from
the packaging.
ATTENTION
The oven is an appliance which, for its nature, becomes hot, especially in correspondence of the glass door.
It is therefore a good rule that children do not approach the oven when it is functioning, particularly when the grill in used.
The first time you switch the oven on, acrid smelling smoke may appear. This is caused by the heating of the adhesive used on the insulation panels
surrounding the oven. There is nothing unusual about this. If it happens, simply wait untill the smoke disappears before putting any food in the oven.
Never roast or bake on the oven base.
IMPORTANT
This appliance must be used exclusively for cooking food and not for any other purpose.
Any other use of the appliance (such as heating a room) is improper and therefore dangerous.
The manufacturer will not accept responsibility for any damage caused by the improper and unreasonable use of the appliance.
There are certain basic rules which must be observed when using any electrical appliance, i.e.:
- disconnect the appliance from the electric mains supply before carrying out any cleaning or maintenance operation.
- never try to remove a plug from the mains supply socket by pulling on the cable
- never touch an appliance if your hands or feet are wet or damp
- never operate an appliance if you are barefoot
- never allow children or incompetent people to use the appliance unsupervised.
- in case of negligent use near the oven door hinges, you could hurt your hands
- if the appliance breaks down and/or does not work properly, switch off and do not tamper with it.
All repairs should be carried out only by an approved service agent. You should insist that only original spare parts are used.
Failure to follow the above advice can affect the safety of your appliance.
SPECIFICATION
The ovens are designed to operate with a monophase alternating current of 230V 50Hz. Anyway, before the installation of the appliance, we suggest you
to check always these specifications on the rating label applied on the outside rear part.
The parts of this appliance that may come into contact with foodstuffs comply with the provisions of EEC Directive 89/109.
Moreover this appliance complies with european directives 89/336/CEE, 73/23/CEE and following changes.
ENVIRONMENTAL WARNING
Waste packsging
Do not throw the packaging of your
appliance into the dustbin, but pick out
the different materials (e.g. foil,
paperboard, polystyrene) according to
the local rules for rubbish elimination.
GB USER INSTRUCTIONS
INSTALLING THE APPLIANCE
Installation should be carried out according to the instructions by a professionally ualified person.
The manufacturer declines all responsibility for any damage to persons, animals or things due to a wrong installation.
FITTING THE APPLIANCE
Fit the appliance into its surround (beneath a work-top or above another appliance) by inserting screws into the 4 holes that can be seen in the frame of
the oven when the door is open.
Fig. 3
A
A
A
10

For the most efficient air circulation, the oven should be fitted according to the dimensions shown in fig.1-2 of page 2.
The rear panel of the cabinet must be removed so that air can circulate freely. The panel to which the oven is fitted should have a gap of at least 70 mm
at the rear.
NB: where ovens are to be matched with hobs, it is essential to follow the instructions contained in the booklet supplied with the other
appliance.
IMPORTANT
For a built-in oven to work well the cabinet must be of the right type.
The panels of the adjoining furniture should be heat resistant. Particularly when the adjoining furniture is made of veneered wood, the adhesives should
be able to withstand a temperature of 120°C. Plastic materials or adhesive which cannot withstand this temperature will become deformed or unstuck.
To comply with safety regulations, once the appliance has been fitted it should not be possible to make contact with the electrical parts.
All parts which offer protection should be fixed in such a way that they cannot be removed without the use of a tool.
Fig. 4 Fig. 5
70
CONNECTION TO THE MAINS SUPPLY
THE APPLIANCE MUST BE CONNECTED IN ACCORDANCE WITH THE RULES CURRENTLY IN FORCE, AND ONLY BY AN AUTHORIZED
ELECTRICAL INSTALLER.
WARNING:THIS APPLIANCE MUST BE EARTHED
Check that the power rating of the mains supply and of the sockets are suitable for the maximum power of the appliance as indicated on the specification
plate. Fit the plug into a socket fitted with a third contact which corresponds with the earth connection. This should be properly connected. If the appliance
does not come already fitted with a plug, fit a regulation plug to the cable which is capable of taking the power indicated on the specification plate.
The earth wire is yellow/green. If the plug fitted to the appliance, and the socket, are incompatible, get a profesionnally ualified person to fit the correct
type of plug. The same person should have also make sure that the thickness of the cable is suitable for the power absorbed by the appliance. Mains
connection can also be made by fitting a monophase switch with a minimum gap between the contacts of 3 mm, proportionate to the load and complying
with the regulations in force.
The yellow/green earth wire should not be controlled by the switch.
The plug or monophase switch used for mains supply connection should be easy to get at, once the appliance is in position.
Important: position the mains supply cable so that it is never subjected to a temperature which is more than 50°C above ambient temperature.
The electrical safety of the appliance can only be guaranteed when it has been correctly connected to an efficient earthed power supply, as laid down in
the regulations for electrical safety.
Important: the manufacturer cannot be held responsible for any damage to persons or objects due to the lack of an earth connection.
OVEN MAINTENANCE
ALWAYS UNPLUG THE PLUG FROM THE CURRENT SOCKET OR SWITCH OFF THE CURRENT ON THE
POWER SUPPLY LINE BY MEANS OF THE MAINS CIRCUIT SWITCH, BEFORE CARRYING OUT ANY
MAINTENANCE ON THE OVEN.
Fig.6
TYPE AND SECTION OF SUPPLY CABLE
70
70
230V~
H05RR-F Ø 3 x 1,5 mm2
11
L
N

1
7

2

- Natural convection
Preheat the oven for 10-15 minutes. Grease the meat with a little oil, put it on the drip-tray and place everything uickly into the oven.
- Grilling
Preheat the grill for about 5 minutes (till the heating element becomes red).
Prepare natural or aromatized meat and place it on the grill pan. Place on the shelf near the top. Place the drip-tray with a little water underneath for
collecting the cooking juices.
The grill can be used to gratinate and brown after normal cooking.
COOKING WITH FAN
- Defrosting
To defrost food, place it still wrapped up in its aluminium or polythene sheet protection on a dish.
Place everything on the grid in the oven centre.
The door must be closed.
- Fan oven
It is not necessary to preheat the oven, except for very short cooking times or food with considerable uantity of li uid (e.g. fruit tartes) to avoid condensation.
In case of batch cooking, you can introduce food with approximately e ual cooking temperatures (even if the length of time differs) on two or more shelves
without mixing tastes and flavours.
It is possible to put food into the oven or to take it out of it without heat losses caused by the door opening. Heat will be uickly recovered by means of
the fan.
Cooking temperatures are lower than those of the convectional oven (from 20 to 30°C for pastries and from 30 to 40°C for meats) whereas times are longer
(50° - 10 minutes).
- Fan assisted grill
It does not need preheating. Cooking must be operated with the door closed. The distance between grill and food should be proportionate to the re uired
results:
- nearer for undone meat brown on its surface
- far from it for food perfectly baked inside.
The drip-tray with a little water for collecting meat juices has to be placed on the first shelf underneath.
MISCELLANEOUS
Marinated meat and boneless meat cook uicker than other sorts; cooking progress can be checked by pressing the meat with a fork; if it does not yield,
it is properly cooked.
Before slicing the meat wait at least 15 minutes, to allow the juice to settle.
If the meat is larded or covered by bacon, it should not be cooked at too high temperatures to avoid splattering.
Pastry cakes should be cooked blind for 2/3 of the cooking time before being filled. The remaining cooking time depends on the garnishing (fruit, jam).
Beaten doughs should not be too much fluid, as this could only extend cooking times.
Do not place pans directly on to the oven base as the heat which comes from below cannot escape. This may cause breakage or cracking of the enamelling.
INDICATIVE TIMINGS AND TEMPERATURES FOR COOKING WITH CONVECTIONAL OVEN
Q.ty Dish Oven temperatures Shelf position Cooking time
in °C from the bottom in minutes
PASTRY:
Soft dough: Cake 175 1st shelf 40-50
Sponge cake 170 1st shelf 30
Short bread: Fruit tart 180-190 1st shelf 20-30
Leaven dough: Paradise cake 160 1st shelf 40-45
Margareth cake 160 1st shelf 40-45
Chocolate cake 160 1st shelf 25-35
lbumes sweet: Meringue 100 1st shelf 90
Puff pastry: «Vol au vent» 200 1st shelf 20
Puff pastry 200 1st shelf 20
MEAT
1 1/2 kg. Roast beef 190 1st shelf 90
1 kg. Roast veal 150-160 1st shelf 120-150
2 kg. Veal stew 170-190 1st shelf 60-90
1 1/2 kg. Roast lamb 150-160 1st shelf 60-75
1 1/2 kg. Roast kid 150-160 1st shelf 50-60
1 1/2 kg. Leg of roe-buck 200 1st shelf 90
1 1/2kg. Leg of wild boar 190 1st shelf 120
POULTRY:
Roast pigeon 150-160 1st shelf 45
2 kg. Turkey 150 1st shelf 180-240
4 kg. Goose 160 1st shelf 240-270
2 1/2 kg. Duck 175 1st shelf 90-150
1 1/2 kg. Chicken 170 1st shelf 60-80
2 1/2 kg. Capon 170 1st shelf 120-150
FISH:
Trout 200 1st shelf 15-25
1 kg. Cod-fish 190 1st shelf 50
VARIOUS:
Lasagne 200 1st shelf 40
Soufflés 180-200 1st shelf 20
Cream puff (beignets) 200 1st shelf 20
Pizza 200 1st shelf 20
14

INDICATIVE TIMINGS AND TEMPERATURES FOR COOKING WITH FAN OVEN
Q.ty Dish Oven temperature Shelf position from Cooking time
in °C the bottom in minutes
PASTRY:
Soft doughs: Cake 175 2nd shelf 45
Sponge cake 170 2nd shelf 35
Tart 170 2nd shelf 40
Short bread: Apple pie 200 2nd shelf 35
Tart 200 3rd shelf 30
Leaven doughs: Cake 170 2nd shelf 35
Ring-shaped cake 170 2nd shelf 40
Biscuits 180 2nd shelf 25
lbumes sweet: Meringue 110 1st and 2nd shelf 35
Puff pastry: Small «vol au vent» 200 2nd shelf 20
MEAT
Pork:
1 kg. Roast 220 2nd shelf 90
1 kg. Cutlet 200 1st shelf 60
1 kg. Filet 200 1st shelf 60
1 1/2 kg. Leg 200 1st shelf 90
1 kg. Meat-roll 180 2nd shelf 85
1 1/2 kg. Sausage 170 1st shelf 45
Beef:
1 kg. Spit 220 1st shelf 95
1 kg. Filet 220 1st shelf 75
1 kg. Roast beef 240 2nd shelf 45
1 kg. Roast potatoes 230 1st shelf 45
Veal:
1 kg. Leg 200 1st shelf 95
1 kg. Roast 180 2nd shelf 90
2 kg. Hock 180 1st shelf 100
1 kg. Breast 180 1st shelf 60
Lamb:
1 kg. Leg 200 2nd shelf 95
1 kg. Shoulder 175 1st shelf 70
Mutton:
1 kg. Shoulder 180 1st shelf 85
1 1/2 kg. Leg 200 1st shelf 90
1 1/2 kg. Breast 180 1st shelf 70
Game:
1 kg. Roast pheasant 200 1st shelf 70
2 kg. Roast hare 175 1st shelf 75
Rabbit 175 1st shelf 75
Poultry:
1 1/2 kg. Turkey 180 2nd shelf 70
1 kg. Guinea-fowl 180 2nd shelf 65
2 kg. Duck 180 1st shelf 90
1 kg. Chicken 175 2nd shelf 75
1 kg. Devil chicken 200 1st shelf 75
FISH:
11/2 kg. Dentex 180 1st shelf 45
1 kg. Gratinated sole 200 1st shelf 25
VARIOUS:
Lasagne 200 2nd shelf 40
Cannelloni 200 2nd shelf 40
Pizza 200 1 e 2nd shelf 45
Maraschino pudding 175 1st shelf 45
Cream puff 175 2nd shelf 20
Soufflés 175 1st shelf 35
Baked apples 180 1st shelf 60
15

«LED» PROGRAMMER
Features
24 hours clock with automatic programme and minutes counter.
Functions
Cooking time, cooking end time, manual position, clock, minutes counter, times to be set up to 23 hours 59 minutes.
Display
4-figures, 7-segments diplay for cooking times and time of day.
Cooking time and manual function = saucepan symbol
Automatic function = AUTO
Minutes counter = bell symbol
The symbols light up when the corresponding functions are selected.
Setting
To set, press and release the desired function, and within 5 seconds set the
time with + and - buttons.
Tasto + e -
+ and - buttons.
The + and - buttons increase or decrease the time at a speed depending on how long the button is pressed.
Setting the time
Press any two buttons (cooking time, end time, minutes counter) at the same time, and + or - button to set the desired time. This deletes any previously
set programme. The contacts are switched off and the AUTO symbol flashes.
Manual use
By pressing the manual button the relay contacts switch on, the AUTO symbol switches off and the saucepan symbol lights up.
Manual operation can only be enabled after the automatic programme is over or it has been cancelled.
Automatic use
Press the cooking time or end time button to switch automatically from the manual to the automatic function.
Semi-automatic use with cooking time setting
Press the cooking time button and set the desired time with + or -. The AUTO and cooking time symbols light up continuously. The relay switches on
immediately. When the cooking end time corresponds to the time of day, the relay and cooking time symbol switch off, the sound signal rings and the
AUTO symbol flashes.
Semi-automatic use with end time setting
Press the end time button. The time of day appears on the display. Set the cooking end time with + button. The AUTO and cooking time symbols light up
continuously. The relay contacts switch on. When the cooking end time corresponds to the time of day, the relay and the cooking time symbol switch off.
When the cooking time is up, the AUTO symbol flashes, the sound signal rings and both the relay and the cooking time button switch off.
Automatic use with cooking time and end time setting
Press the cooking time button and select the length of the cooking time with + or - button. The AUTO and cooking time symbols light up continuously.
The relay switches on. By pressing the cooking end time button the next cooking end time appears on the display. Set the cooking end time with + button.
The relay and the cooking time symbol switch off. The symbol lights up again when the time of day corresponds to the cooking start time. When the cooking
time is up, the AUTO symbol flashes, the sound signal rings, the cooking time symbol and the relay switch off.
Minutes counter
Press the minutes counter button and set the cooking time with + or - button.
The bell symbol lights up when the minutes counter is operating. When the set time is up, the sound signal rings and the bell symbol switches off.
Sound signal
The sound signal starts at the end of a programme or of the minutes counter function and it lasts for 15 minutes.
To stop it, push any one of the functions buttons.
Start programme and check
The programme starts 4 seconds after it has been set. The programme can be checked at any time by pressing the corresponding button.
Setting error
A setting error is made if the time of day on the clock falls within the cooking start and end times. To correct the setting error, change the cooking time or
cooking end time. The relays switch off when a setting error is made.
Cancelling a setting
To cancel a setting, press the cooking time button and then press the - button untill 00 00 appears on the display. A set programme will automatically
cancel on completion.
16
For a manual operation of the programmer, turn the knob anticlockwise to .
Adjust the cooking time by turning the knob clockwise. Select the cooking time with the relevant knob (max.120 min.).
The oven will switch off automatically when the cooking is up.
Minutes counter
Cooking time
End time
Manual
Subtract time
Add time
A
U
T
O
PROGRAMMER WITH COOKING END TIME
stop
10
20
30
40
50
80
90
110
120
100
70 60
0

Baking tins and utensils
Only heat-resistant cooking utensils able to withstand a temperature of at least 300°C may be used in the oven: metal baking tins, aluminium foil, ovenproof
glass, ceramic, glass ceramic and ovenproof earthenware.
The type of utensil used can have an effect on the end result; for instance, cakes and pastries brown better and more uickly in dark-coloured baking
tins than in light-coloured tins.
Shelf heights
The various shelf heights are shown in Figure A. The first slot is the lowest shelf height and the fifth slot the highest.
5
4
3
2
1
A B C
Oven accessories
Depending on the model, your oven can be supplied with the following accessories:
Shelf (fig. B)
Cakes and dishes coked in a baking tin or casserole are placed on this shelf for cooking. Food such as meat for grilling can also be laid directly on this
shelf.
Baking tray (fig. C)
This is used for baking biscuits, profiteroles, pizzas and all oher sorts of food wich are not placed in a baking tin for cooking. To ensure good heat distribution
the baking tray must be placed in the oven with the long side toward the back.
17
CLEANING AND MAINTENANCE
Wait until the appliance has cooled down before attempting to clean it.
Disconnect it from the power supply, either by pulling the plug out or switching off the power supply at the mains. Clean enamelled, chromed or painted parts with warm
water and soap, or non-corrosive li uid detergent.
Clean stainless steel parts using methylated spirit of a suitable commercially produced solution.
Clean aluminium panels or edges with cotton wool or with a cloth soaked in vaseline or a seed-based oil. Clean and then go over it with methylated spirit. Never use abrasives,
corrosive detergents, bleaches or acids for cleaning the oven.
Do not leave corrosive or acidic substances (lemon juice, vinegar, etc.) on enamelled, painted or stainless steel parts.
Removal of oven door (Fig.21)
To make cleaning easier, remove the oven door as follows: insert hook A (fig.21) in
hinge slot B. Half open the door and, using both hands, pull the door towards you untill
it becomes unhooked. To refit the door, carry out the same operation in reverse, taking
care to introduce the two sectors C correctly.
Panels (fig.23)
The shelves holder frame is hooked on to three catches. Simply press the catches down
slightly to remove the frame.
Oven light (fig.24)
The oven bulb is a special kind which is resistant to high temperatures. Replace it in
the following way: disconnect the oven from the power supply, either by pulling the plug
out or by switching off the power supply at the mains; remove the protective glass (A)
and replace the burnt out bulb with one of the same type. Replace the protective glass.
Important: if you decide not to use the oven any more, it should be made inoperable
by cutting the power supply cable, after unplugging it from the power supply.
Disused appliances can be a safety risk as children often play with them. For this
reason it is advisable to make the oven safe.
In-depth cleaning of the oven becomes more convenient if the door is removed
following the instructions below:
Completely open the door and press it down gently (fig. 21 B ) to allow the
hooks "A" of the hinge to locate inside the cavity "B" (fig. 21 B1).
Using both hands, pull the door towards you until it comes off the oven.
To replace the door, reverse the above procedure.
Removal of oven door ( fixed fulcrum Fig.21 B/B1 )
Fig. 24
B
A
A
Fig.21 B
Fig.21 B1
A
BC
Fig. 21
Fig. 23
A
T300°C
25W
A

18
Fig. 3
A
A
A
ALGEMENE WAARSCHUWINGEN
Lees alle instructies in dit boekje aandachtig. Het boekje bevat belangrijke informatie over het veilig
installeren, gebruiken en onderhouden van het apparaat, evenals nuttige tips om het beste uit uw oven
te halen. Bewaar dit boekje op een veilige plaats om het in de toekomst te kunnen raadplegen. Controleer,
nadat u de verpakking verwijderd heeft, of het apparaat niet beschadigd is.
Houd de verpakkingsmaterialen (plastic bekleding, polystyreenschuim) buiten bereik van kinderen.
BELANGRIJK: gebruik de ovendeurhendel niet om het apparaat te verplaatsen of uit de verpakking
te halen.
LET OP
Ovens worden per definitie heet, vooral de glazen deur.
Zorg er daarom altijd voor dat kinderen niet in de buurt komen van de oven wanneer deze aanstaat en vooral wanneer de grill wordt
gebruikt.
Wanneer u de oven voor de eerste keer aanzet, kan er scherpriekende rook ontstaan. Dit wordt veroorzaakt doordat de kleefstof op de isolatiepanelen
rondom de oven verhit worden. Het is normaal dat dit gebeurt. Wacht in dit geval totdat de rook is verdwenen voordat u voedsel in de oven zet.
Grill of bak nooit op de ovenplaat.
BELANGRIJK
Dit apparaat mag uitsluitend worden gebruikt voor het bereiden van voedsel.
Ieder ander gebruik van het apparaat (zoals het verwarmen van een ruimte) is ongeschikt en daardoor gevaarlijk.
De fabrikant is niet aansprakelijk voor schade die ontstaat door onjuist en onredelijk gebruik van het apparaat.
De volgende basisregels dienen in acht te worden genomen bij het gebruik van elektrische apparatuur:
- haal de stekker van het apparaat uit het stopcontact voordat u het apparaat reinigt of onderhoudt.
- trek nooit aan het snoer wanneer u de stekker uit het stopcontact wilt halen.
- raak een apparaat nooit aan wanneer uw handen of voeten nat of vochtig zijn.
- bedien een apparaat nooit wanneer u blootsvoets bent.
- laat kinderen of gehandicapten het apparaat nooit zonder toezicht gebruiken.
- in geval van onachtzaam gebruik van de ovendeurscharnieren kunt u uw handen bezeren.
- wanneer het apparaat kapotgaat en/of niet goed werkt het apparaat uitschakelen en er verder niet aanzitten.
Reparaties dienen uitsluitend door een erkende reparateur uitgevoerd te worden. Zorg ervoor dat uitsluitend originele reserveonderdelen worden gebruikt.
Wanneer het bovenstaande advies niet wordt opgevolgd kan de veiligheid van het apparaat worden aangetast.
SPECIFICATIE
De ovens zijn ontworpen voor gebruik met een eenfasige wisselstroom van 230V 50 Hz. Wij raden u echter aan om, voordat u het apparaat installeert,
deze specificaties op het etiket op de achterzijde van het apparaat altijd te controleren.
De onderdelen van dit apparaat die in contact kunnen komen met voedingsmiddelen zijn conform de bepalingen van de EEG-richtlijn 89/109. Bovendien
is dit apparaat conform de Europese richtlijnen 89/336/CEE, 73/23/CEE en volgende veranderingen.
WAARSCHUWING MET BETREKKING
TOT HET MILIEU
Verpakkingsafval
Gooi de verpakking van uw apparaat niet in
de vuilnisbak, maar scheid de verschillende
materialen (bijv. folie, karton, polystyreen)
volgens de plaatselijke regels voor
HET APPARAAT INSTALLEREN
De installatie dient volgens de instructies uitgevoerd te worden door een vakkundige. De fabrikant kan op geen enkele manier aansprakelijk worden gesteld
voor schade aan personen, dieren of zaken die te wijten is aan een onjuiste installatie.
HET APPARAAT MONTEREN
Plaats het apparaat in zijn omgeving (onder een werkblad of op een ander apparaat) door schroeven te plaatsen in de 4 gaten die in het frame van de
oven te zien zijn wanneer de ovendeur openstaat.
NL GEBRUIKSAANWYZING INBOUWOVEN

19
Voor de meest efficiënte luchtcirculatie dient de oven gemonteerd te worden volgens de afmetingen die getoond worden in fig. 1-2 op pagina 2.
Het achterpaneel van de kast dient verwijderd te worden, zodat de lucht vrij kan circuleren. Het paneel waarop de oven wordt gemonteerd dient
aan de achterkant een tussenruimte van ten minste 70 mm te bevatten.
N.B.: aangezien ovens op kookplaten worden afgestemd, is het noodzakelijk om de instructies op te volgen in het boekje dat geleverd
wordt bij het andere apparaat.
BELANGRIJK
Een inbouwoven kan alleen goed werken wanneer de kast van het juiste type is.
De panelen van de aangrenzende meubels dienen hittebestendig te zijn. Vooral wanneer de aangrenzende meubels gemaakt zijn van fineerhout, dienen
de kleefstoffen bestand te zijn tegen een temperatuur van 120 °C. Plastic materialen of kleefstoffen die niet bestand zijn tegen deze temperatuur zullen
vervormen of loslaten.
Wanneer het apparaat gemonteerd is mag het, gezien de veiligheidsvoorschriften, niet mogelijk zijn om contact te maken met de elektrische onderdelen.
Alle beschermende onderdelen dienen zodanig te zijn bevestigd dat zij slechts met behulp van gereedschap verwijderd kunnen worden.
Fig. 4 Fig. 5
70
Fig. 6
TYPE EN DOORSNEDE TOEVOERKABEL
70
70
230V~
H05RR-F Ø 3 x 1,5 mm2
AANSLUITING OP HET ELEKTRICITEITSNET
HET APPARAAT DIENT VOLGENS DE GELDENDE REGELS EN UITSLUITEND DOOR EEN ERKENDE INSTALLATEUR AANGESLOTEN TE
WORDEN.
WAARSCHUWING: DIT APPARAAT DIENT GEAARD TE ZIJN
Controleer of het nominale vermogen van de elektriciteitsaansluiting en de stopcontacten geschikt is voor het maximumvermogen van het apparaat zoals
aangegeven is op het specificatieplaatje. Steek de stekker in een stopcontact dat voorzien is van een derde contact dat correspondeert met de aardverbinding.
Deze dient juist aangesloten te zijn. Wanneer het apparaat niet met een stekker wordt geleverd, monteer dan een voorgeschreven stekker op het snoer
die het vermogen dat op het specificatieplaatje vermeld wordt aankan. De massadraad is geel/groen. Wanneer de stekker die op het apparaat is
gemonteerd en het stopcontact incompatibel zijn, laat een vakkundige dan het juiste type stekker monteren. Deze persoon dient er ook voor te zorgen
dat de dikte van het snoer geschikt is voor het vermogen dat door het apparaat wordt geabsorbeerd. De aansluiting op het elektriciteitsnet kan ook
plaatsvinden door een eenfasige schakelaar met een minimale tussenruimte tussen de contacten van 3 mm te monteren, evenredig met de belasting en
conform de geldende voorschriften. De geel/groene massadraad mag niet bestuurd worden door de schakelaar.
De stekker of de eenfasige schakelaar die gebruikt wordt voor de elektriciteitsaansluiting dient gemakkelijk bereikbaar te zijn, wanneer het apparaat
eenmaal op zijn plaats staat.
Belangrijk: plaats het elektriciteitssnoer zo dat dit nooit wordt blootgesteld aan een temperatuur die hoger is dan 50 °C boven de omgevingstemperatuur.
De elektrische veiligheid van het apparaat kan alleen worden gegarandeerd wanneer het apparaat juist is aangesloten op een efficiënt geaarde elektrische
voedingsbron, zoals vermeld wordt in de voorschriften voor elektrische veiligheid.
Belangrijk: de fabrikant kan niet aansprakelijk worden gesteld voor enige schade aan personen of zaken die te wijten is aan het ontbreken van een
aardverbinding.
ONDERHOUD VAN DE OVEN
HAAL ALTIJD DE STEKKER UIT HET STOPCONTACT OF SCHAKEL DE STROOM VAN DE ELEKTRICITEITSLEIDING UIT MET BEHULP VAN DE
HOOFDSCHAKELAAR VOORDAT U ONDERHOUDSWERKZAAMHEDEN AAN DE OVEN UITVOERT.
LET OP: Uw fornuis kan met exstra beveiligingsvoorziening om het contact met de ovendeur mee te voorkomen, worden uitgerust. Dit hulpstuk wordt
aanbevolen als er kleine kinderen zijn en kan rechtstreeks bij ons bedrijf worden besteld onder vermelding van: KIT deurbeveiliging model:(zie typeplaatje
on het apparaat).
De montage-instructies worden samen met de Kit geleverd.
L
N

1
7
This manual suits for next models
3
Table of contents
Languages:
Other ETNA Oven manuals

ETNA
ETNA A3911RVS User manual

ETNA
ETNA T7400 User manual

ETNA
ETNA OM916MZ/E04 User manual

ETNA
ETNA OM165ZT User manual

ETNA
ETNA OM470RVS User manual

ETNA
ETNA OM670Ti/E02 User manual

ETNA
ETNA OP670 Series User manual

ETNA
ETNA OM670 Series User manual

ETNA
ETNA OM971RVS User manual

ETNA
ETNA OM990RVS User manual
Popular Oven manuals by other brands

diLUSSO
diLUSSO SO633WWFS Installation and operating manual

VIVO HOME
VIVO HOME VH861 instruction manual

Bartscher
Bartscher Snackjet 200 Original instruction manual

Alto-Shaam
Alto-Shaam Halo Heat 750-TH/III Specifications

Alto-Shaam
Alto-Shaam Combitherm 4.10ESi Operation manual

Alto-Shaam
Alto-Shaam COMBITOUCH SERIES 6 10ESG Technical & service manual