EUFAB 16411 User manual

1
Art.-Nr.: 16411
Fahrrad-Deckenlift
Bedienungsanleitung .......................................... 3
Article number 16411
Bicycle ceiling lift
Operating instructions ......................................... 4
Réf. 16411
Élévateur plafonnier pour vélo
Manuel de l‘opérateur ......................................... 5
Cod. art. 16411
Portabici da sotto con carrucola
Istruzioni per l‘uso ............................................... 6
Art.-nr. 16411
Fiets-plafondlift
Gebruiksaanwijzing ............................................. 7
© EAL GmbH, 16411, 11. 2020
Nr art.: 16411
Wieszak sutowy na rower
Instrukcja obsługi ................................................ 8
Č. výr.: 16411
Stropní výtah pro jízdní kola
Návod k obsluze .................................................. 9

2

3
WARNUNG
Lesen Sie die Bedienungsanleitung vor
Inbetriebnahme sorgfältig durch und beachten Sie
alle Sicherheitshinweise!
Nichtbeachtung kann zu Personenschäden, Schäden
am Gerät oder Ihrem Eigentum führen!
Bewahren Sie die Originalverpackung, den Kaufbeleg
sowie diese Anleitung zum späteren Nachschlagen
auf! Bei der Weitergabe des Produkts geben Sie auch
diese Anleitung weiter.
Prüfen Sie vor Inbetriebnahme den Inhalt der
Verpackung auf Unversehrtheit und Vollständigkeit!
1. BESTIMMUNGSGEMÄSSER GEBRAUCH
Der Fahrrad- Deckenlift dient zum platzsparenden Verstauen eines
Fahrrades an der Raum- oder Garagendecke.
3. SPEZIFIKATIONEN
INHALT
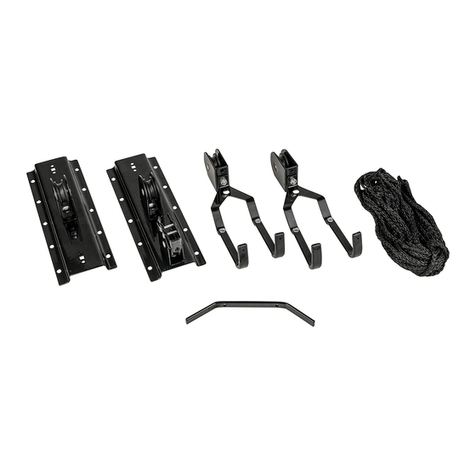
Fahrrad-Deckenlift
2. LIEFERUMFANG
• Halten Sie Kinder fern und lassen Sie Kinder dieses Gerät
nicht bedienen!
• Benutzen Sie dieses Produkt nur für die dafür vorgese-
heneVerwendung!
• Manipulieren oder zerlegen Sie das Gerät nicht!
• Verwenden Sie zu Ihrer eigenen Sicherheit
ausschließlich Zubehör oder Ersatzteile, die in der
Anleitung angegeben sind, oder deren Verwendung
durch den Hersteller empfohlen wird!
• Kontrollieren Sie das Seil vor jeder Benutzung des
Fahrrad-Deckenlifts. Ein beschädigtes oder verschlisse-
nes Seil darf nicht verwendet und muss ersetzt werden.
• Kontrollieren Sie die Scharniere der Seilsperre vor
jeder Benutzung auf Leichtgängigkeit. Bei festsitzenden
Scharnieren ist die Funktion als Absturzsicherung nicht
mehr gegeben. Die Scharniere müssen instandgesetzt
werden.
4. SICHERHEITSHINWEISE
5. BEDIENUNGSANLEITUNG
5.1 MONTAGE DES FAHRRADDECKENLIFTS
Wählen Sie an einer geeigneten Decke den Ort aus, an dem Sie Ihr Fahrrad
verstauen möchten. Markieren Sie dort die Stellen für Lenker und Sattel,
achten Sie dabei auf einen ausreichenden Abstand zur Wand. Befestigen
Sie nun die Deckenhalter anhand der Markierungen an der Decke mit
je vier Dübeln und Schrauben. Befestigen Sie das Seil an dem einfachen
Deckenhalter mit einem sicheren Knoten. Führen Sie nun das freie Seilende
durch die Rollen und die Seilsperre, wie auf den Abbildungen dargestellt.
Befestigen Sie die Seilklampe an einer geeigneten, gut zugänglichen Stelle
mit zwei Dübeln und Schrauben an der Wand.
5.2 HOCHZIEHEN DES FAHRRADES
Hängen Sie den Lenker und den Sattel in die Haken des Deckenlifts ein.
Heben Sie das Fahrrad durch Ziehen am freien Seilende auf die gewünschte
Höhe an. Machen Sie das Seilende an der Seilklampe mit einem sicheren
Knoten fest.
1. BESTIMMUNGSGEMÄSSER GEBRAUCH 3
2. LIEFERUMFANG 3
3. SPEZIFIKATIONEN 3
4. SICHERHEITSHINWEISE 3
5. BEDIENUNGSANLEITUNG 3
5.1 MONTAGE DES FAHRRADDECKENLIFTS 3
5.2 HOCHZIEHEN DES FAHRRADES 3
6.WARTUNG UND PFLEGE 3
7.HINWEISE ZUM UMWELTSCHUTZ 3
8. KONTAKTINFORMATIONEN 3
Haken
Seil ist
blockiert
Seil ist
frei
Haken
1 x Deckenhalter mit Rolle
1 x Deckenhalter mit Rolle und Seilsperre
2 x Haken mit Rolle
1 x Seilklampe
1 x Nylonseil
10 x Dübel, 8 mm
10 x Schrauben
Eigengewicht: ca. 1,650 kg
Material: Stahlblech, 1,4 mm
maximale Belastung: 20 kg
Seillänge: 15 m
Seildurchmesser: 6 mm
maximale Deckenhöhe: 4 m
6.WARTUNG UND PFLEGE
Kontrollieren Sie das Seil vor jeder Benutzung des Fahrrad-Deckenlifts.
Ein beschädigtes oder verschlissenes Seil darf nicht verwendet und muss
ersetzt werden.
Kontrollieren Sie die Scharniere der Seilsperre vor jeder Benutzung auf
Leichtgängigkeit. Bei festsitzenden Scharnieren ist die Funktion als
Absturzsicherung nicht mehr gegeben. Die Scharniere müssen instandge-
setzt und mit einem leichten Öl abgeschmiert werden, z. B. mit Fahrradöl.
7.HINWEISE ZUM UMWELTSCHUTZ
Bitte entsorgen Sie dieses Gerät über die Wertstotonne oder
die öentlichen/kommunalen Sammelstellen.
Die Materialien sind recycelbar. Durch Recycling, stoiche
Verwertung oder andere Formen der Wiederverwendung von
Altgeräten leisten Sie einen wichtigen Beitrag zum Schutz
unserer Umwelt!
8. KONTAKTINFORMATIONEN
EAL GmbH
Otto-Hausmann-Ring 107
42115 Wuppertal, Deutschland
+49(0)202 42 92 830
+49 (0) 202 42 92 83 – 160
info@eal-vertrieb.com
www.eal-vertrieb.com

4
WARNING
Read the operating instructions through carefully
prior to initial use and observe all of the safety notes!
Store the original packaging, the receipt and these
instructions so that they may be consulted at a later
date!
Not observing such may lead to personal injury,
damages to the device or your property!
Prior to initial use check the contents of the packa-
ging to ensure that they are in perfect condition and
complete!
1.PROPER USE OF THE PRODUCT
The bicycle ceiling lift is designed to ensure space-saving storage of a
bicycle on the ceiling of a room or garage.
3. SPECIFICATIONS
CONTENT
Bicycle ceiling lift
2. SCOPE OF DELIVERY
• Keep children away and do not permit children to use
this device!
• Only use this product for the intended use!
• Do not manipulate or disassemble the device!
• For your own safety, only use accessories or
replacement parts specied in the instructions or that
the manufacturer has recommended!
• Check the rope before each use of the bicycle ceiling
lift. A damaged or worn rope may not be used and
must be replaced.
• Check the hinges of the rope lock for ease of
operation prior to each use. If the hinges are sti, the
functionality of the fall prevention mechanism is no
longer ensured. The hinges must be maintained.
4. SAFETY NOTES
5.OPERATING INSTRUCTIONS
5.1 INSTALLATION OF THE BICYCLE CEILING LIFT
Select theplace youwish tostoreyour bicycleonasuitable ceiling.Mark the
positions for handlebars and saddle, make sure to leave a sucient gap to
the wall. Using the markings, now attach the ceiling mount to the ceiling
using four dowels and screws. Secure the rope to the single ceiling mount
with a secure knot. Now guide the free end through the pulleys and the
rope lock as shown on the diagrams. Secure the rope clamp to a suitable,
easily accessible location on the wall using two dowels and screws.
5.2 RAISING THE BICYCLE
Hang the handlebars and saddle on the hooks of the ceiling lift. Lift the
bicycle by pulling on the free end of the rope and raising it to the required
height. Secure the end of the rope on the rope clamp with a secure knot.
1.PROPER USE OFTHE PRODUCT 4
2. SCOPE OF DELIVERY 4
3. SPECIFICATIONS 4
4. SAFETY NOTES 4
5.OPERATING INSTRUCTIONS 4
5.1 INSTALLATION OF THE BICYCLE CEILING LIFT 4
5.2 RAISING THE BICYCLE 4
6.CARE AND MAINTENANCE 4
7.NOTES FOR ENVIRONMENTAL PROTECTION 4
8. CONTACT INFORMATION 4
Hook
Rope is
blocked
Rope is
free
Hook
1x Ceiling mount with pulley
1x Ceiling mount with pulley and rope lock
2x Hooks with pulley
1x Rope clamp
1x Nylon rope
10x Dowels, 8 mm
10x Screws
Dead weight: approx. 1.650 kg
Material: Steel plate, 1,4 mm
Maximum load: 20 kg
Rope length: 15 m
Rope diameter: 6 mm
Maximum ceiling height:4 m
6. CARE AND MAINTENANCE
Check the rope before each use of the bicycle ceiling lift. A damaged or worn
rope may not be used and must be replaced.
Check the hinges of the rope lock for ease of operation prior to each use. If
the hinges are sti, the functionality of the fall prevention mechanism is no
longer ensured. The hinges must be maintained and lubricated with a light
oil, for example, bicycle oil.
7.NOTES FOR ENVIRONMENTAL PROTECTION
Please dispose of this device via the recycling facilities or
public/community collection points.
The materials can be recycled. By recycling, reuse of materials
or other forms of reuse of old devices, you make an important
contribution to the protection of our environment!
8. CONTACT INFORMATION
EAL GmbH
Otto-Hausmann-Ring 107
42115 Wuppertal, Deutschland
+49(0)202 42 92 830
+49 (0) 202 42 92 83 – 160
info@eal-vertrieb.com
www.eal-vertrieb.com

5
AVERTISSEMENT
Lisezattentivement le mode d‘emploi avant la miseen
service et respectez toutes les consignes de sécurité!
Conservez l‘emballage d‘origine, la preuve d‘achat
ainsi que ces instructions pour consultations
ultérieures! Le non-respect de ces consignes peut
entraîner des dommages corporels, endommager
l‘appareil ou vos biens! Vériez l‘intégrité et l‘intégra-
lité du contenu de l‘emballage!
1. UTILISATION CONFORME
L‘élévateur plafonnier pour vélo sert au rangement peu encombrant d‘un
vélo au plafond du garage ou d‘une autre pièce.
3. SPÉCIFICATIONS
SATISFAIRE
Élévateur plafonnier pour vélo
2.CONTENU DE LIVRAISON
• Tenez les enfants à distance et ne les laissez pas
opérer cet appareil!
• Utilisez cet appareil uniquement pour l‘usage auquel
il a été prévu!
• Ne manipulez ni ne démontez l‘appareil!
• Pour votre sécurité, utilisez exclusivement des
accessoires ou pièces de rechange indiqués dans les
instructions ou dont l‘usage est recommandé par le
fabricant!
• Assurez-vous de l‘état du câble avant chaque
utilisation de l‘élévateur plafonnier pour vélo. Un
câble endommagé ou usé ne peut être utilisé et doit
être remplacé.
• Contrôler le fonctionnement du verrouillage de câble
avant chaque utilisation. Une fois les charnière xées,
la fonction sécurité anti-chute n‘est plus disponible.
Les charnières doivent être réparées.
4.CONSIGNES DE SÉCURITÉ
5. MODE D‘EMPLOI
5.1 MONTAGE DE L‘ÉLÉVATEUR PLAFONNIER POUR VÉLO.
Choisissez un endroit approprié où vous pourrez ranger votre vélo.
Marquezl‘endroitoùvoussouhaitezplacerleguidonetlaselle,veillezàgarder
susamment de distance par rapport au mur. Fixez maintenant le sup-
port de plafond à l‘aide des marquages au plafond avec les quatre chevilles
et vis. Fixez le câble au support de plafond avec un nœud solide. Faites
passer l‘extrémité du câble par la roue et le verrouillage comme indiqué sur
l‘illustration. Fixez le taquet à un endroit adapté et accessible du mur à
l‘aide de deux chevilles et vis.
5.2 ÉLÉVATION DU VÉLO
Suspendez le guidon et la selle aux crochet du support de plafond.
Élevez le vélo à la hauteur souhaitée en tirant sur l‘extrémité du câble. Fixez
l‘extrémité du câble au taquet à l‘aide d‘un nœud solide.
1. UTILISATION CONFORME 5
2. CONTENU DE LIVRAISON 5
3. SPÉCIFICATIONS 5
4.CONSIGNES DE SÉCURITÉ 5
5. MODE D‘EMPLOI 5
5.1 MONTAGE DE L‘ÉLÉVATEUR PLAFONNIER POURVÉLO. 5
5.2 ÉLÉVATION DU VÉLO 5
6. ENTRETIEN ET MAINTENANCE 5
7.CONSIGNES POUR LA PROTECTION DE L‘ENVIRONNEMENT 5
8. CONTACTS 5
Crochet
Câble
bloqué
Câble
débloqué
Crochet
1x Support de plafond avec roues
1x Support de plafond avec roues et verrouillage de câble
2x Crochets avec roues
1x Taquet
1x Câble en nylon
10x Chevilles, 8 mm
10x Vis
Poids net : env. 1,650 kg
Matériau : Tôle d‘acier, 1,4 mm
Charge maximale : 20 kg
Longueur du câble : 15 m
Diamètre du câble : 6 mm
Hauteur de plafond maximale :4 m
6.ENTRETIEN ET MAINTENANCE
Assurez-vous de l‘état du câble avant chaque utilisation de l‘élévateur
plafonnier pour vélo. Un câble endommagé ou usé ne peut être utilisé et
doit être remplacé.
Contrôlez le fonctionnement du verrouillage de câble avant chaque
utilisation. Une fois les charnière xées, la fonction sécurité anti-chute n‘est
plus disponible. Les charnières doivent être réparées et lubriées avec une
huile légère, de l‘huile à vélo par exemple.
7.CONSIGNES POUR LA PROTECTION DE L‘ENVIRONNEMENT
Veuillez vous débarrasser de cet appareil au moyen de bacs
pour matériaux recyclables ou des points de rassemblements
publics/communaux.
Les matériaux sont recyclables. Grâce au recyclage,
l‘utilisationdematièreoud‘autresformesderéutilisationdevieux
appareils, vous contribuez favorablement à la protection de
notre environnement!
8. CONTACTS
EAL GmbH
Otto-Hausmann-Ring 107
42115 Wuppertal, Deutschland
+49(0)202 42 92 830
+49 (0) 202 42 92 83 – 160
info@eal-vertrieb.com
www.eal-vertrieb.com

6
AVVERTENZA
Leggere attentamente le istruzioni per l‘uso prima
della messa in funzione e osservare le avvertenze di
sicurezza!
Conservare la confezione originale, la prova d‘acquisto
e queste istruzioni come riferimento futuro!
La mancata osservanza di queste istruzioni può
provocare lesioni a persone, danni al dispositivo o alla
vostra proprietà!
Vericare l‘integrità e la completezza del contenuto
della confezione prima della messa in funzione!
1. USO CONFORME
Il portabici da sotto con carrucola è destinato allo stivaggio di una
bicicletta, sul sotto di un locale o di un garage.
3. SPECIFICHE
CONTENTO
Portabici da sotto con carrucola
2.VOLUME DI CONSEGNA
• Tenere lontano dalla portata dei bambini e vietarne
l‘utilizzo!
• Utilizzare questo prodotto solo per l‘impiego previsto!
• Non manomettere né smontare il prodotto!
• Per la propria sicurezza, utilizzare solo gli accessori e i
pezzi di ricambio indicati nelle istruzioni o consigliati
dal produttore!
• Controllare la fune prima di utilizzare il portabici da
sotto. Una fune danneggiata non può essere utiliz-
zata e deve essere sostituita.
• Prima dell‘uso, vericare ogni volta la scorrevolezza
delle cerniere del blocco fune. Se le cerniere sono
bloccate, la protezione contro la caduta non è più
garantita. Le cerniere devono essere riparate.
4.AVVERTENZE DI SICUREZZA
5.ISTRUZIONI PER L‘USO
5.1 MONTAGGIO DEL PORTABICI DA SOFFITTO CON CARRUCOLA
Scegliere un punto del sotto, adatto alla stivaggio della propria
bicicletta.Segnareipuntiperilmanubrioelasella,badandodimantenereuna
distanza idonea dalla parete. Fissare il supporto in base ai punti
contrassegnati su sotto, utilizzando i quattro tasselli e le relative viti.
Fissare la fune al supporto a sotto semplice con un nodo sicuro. Ora
condurre l‘estremità libera della fune attraverso le carrucole e il blocco
fune, come illustrato in gura. Fissare la galloccia alla parete, in un punto
facilmente accessibile, utilizzando i due tasselli e le relative viti.
5.2 SOLLEVAMENTO DELLA BICICLETTA
Agganciare il manubrio e la sella al portabici. Sollevare la bicicletta tirando
l‘estremità libera della fune, no all‘altezza desiderata. Fissare l‘estremità
della fune alla galloccia con un nodo sicuro.
1. USO CONFORME 6
2.VOLUME DI CONSEGNA 6
3. SPECIFICHE 6
4. AVVERTENZE DI SICUREZZA 6
5. ISTRUZIONI PER L‘USO 6
5.1 MONTAGGIO DEL PORTABICI DA SOFFITTO CON CARRUCOLA 6
5.2 SOLLEVAMENTO DELLA BICICLETTA 6
6.MANUTENZIONE E CURA 6
7.AVVERTENZE SULLA TUTELA AMBIENTALE 6
8. CONTATTI 6
Gancio
La fune
è bloccata
La fune
è libera
Gancio
1x supporto a sotto con carrucola
1x supporto a sotto con carrucola e blocco fune
2x ganci con carrucola
1x galloccia
1x fune di nylon
10x tasselli da 8 mm
10x viti
Peso a vuoto: ca. ,650 kg
Materiale: lamiera d‘acciaio da 1,4 mm
Portata massima: 20 kg
Lunghezza fune: 15 m
Diametro fune: 6 mm
Max. altezza sotto: 4 m
6.MANUTENZIONE E CURA
Controllare la fune prima di utilizzare il portabici da sotto. Una fune
danneggiata non può essere utilizzata e deve essere sostituita.
Primadell‘uso, vericareogni voltala scorrevolezza delle cerniere del blocco
fune. Se le cerniere sono bloccate, la protezione contro la caduta non è più
garantita. Le cerniere devono essere riparate e lubricate con poco olio, ad
es. olio per biciclette.
7.AVVERTENZE SULLA TUTELA AMBIENTALE
Smaltire questo prodotto gettandolo nel bidone per il riciclo o
consegnandolo ai punti di raccolta pubblici/comunali.
I materiali sono riciclabili. Con il riciclo, il recupero del
materialeealtreformediriutilizzodiprodottiusatisifornisceun
contributo importante per la protezione del nostro ambiente!
8. CONTATTI
EAL GmbH
Otto-Hausmann-Ring 107
42115 Wuppertal, Deutschland
+49(0)202 42 92 830
+49 (0) 202 42 92 83 – 160
info@eal-vertrieb.com
www.eal-vertrieb.com

7
WAARSCHUWING
Lees de gebruiksaanwijzing vóór ingebruikname
zorgvuldig door en neem alle veiligheidsinstructies
in acht! Bewaar de originele verpakking, de kassa-
bon en deze handleiding om later te raadplegen!
Veronachtzaming kan tot lichamelijke letsels, bescha-
digingenaanhetapparaatofaanuweigendomleiden!
Controleer vóór ingebruikname de inhoud van de
verpakking op ongeschondenheid en volledigheid!
1.DOELMATIG GEBRUIK
De ets-plafondlift dient voor een plaatsbesparende berging van een ets
aan een plafond van een kamer of garage.
3. SPECIFICATIES
OVERZICHT
Fiets-plafondlift
2.IN HET LEVERINGSPAKKET INBEGREPEN
• Houd kinderen op een veilige afstand en laat kinderen
dit toestel niet bedienen!
• Gebruik dit product uitsluitend voor de daarvoor
voorziene toepassing!
• Manipuleer of demonteer het toestel niet!
• Gebruik omwille van uw eigen veiligheid uitsluitend
toebehoren of wisselstukken die in de handleiding
aangegeven zijn of waarvan het gebruik door de
fabrikant aanbevolen wordt!
• Controleer de kabel telkens vóór gebruik van de ets-
plafondlift. Een beschadigde of versleten kabel mag niet
gebruikt en moet vervangen worden.
• Controleer de scharnieren van de kabelblokkering
telkens vóór gebruik op lichtlopendheid. Bij vastzittende
scharnierenis dewerkingvan het valbeveiligingsmecha-
nisme niet meer gegarandeerd. De scharnieren moeten
gerepareerd worden.
4. VEILIGHEIDSINSTRUCTIES
5. GEBRUIKSAANWIJZING
5.1 MONTAGE VAN DE FIETSPLAFONDLIFT
Montage van de ets-plafondlift
Kies aan een geschikt plafond de plaats uit, waar u uw ets wenst op te
bergen. Markeer daar de punten voor stuur en zadel, let daarbij op voldoen-
de afstand tot de wand. Bevestig nu de plafondhouder aan de hand van
de markeringen aan het plafond met telkens vier pluggen en schroeven.
Bevestig de kabel aan de enkele plafondhouder met een veilige knoop.
Breng nu het vrije kabeluiteinde door de wieltjes en de kabelblokkering,
zoals in de afbeeldingen weergegeven. Bevestig de kabelklamp op een
geschikte, goed toegankelijke plaats met twee pluggen en schroeven aan
de wand.
5.2 OMHOOGTREKKEN VAN DE FIETS
Hang het stuur en het zadel in de haken van de plafondlift.Til de ets tot op
de gewenste hoogte op doordat u aan het vrije kabeluiteinde trekt. Maak
het kabeluiteinde aan de kabelklamp met een veilige knoop vast.
1. DOELMATIG GEBRUIK 7
2.IN HET LEVERINGSPAKKET INBEGREPEN 7
3. SPECIFICATIES 7
4.VEILIGHEIDSINSTRUCTIES 7
5. GEBRUIKSAANWIJZING 7
5.1 MONTAGEVAN DE FIETSPLAFONDLIFT 7
5.2 OMHOOGTREKKENVAN DE FIETS 7
6. ONDERHOUD ENVERZORGING 7
7.AANWIJZINGENTER BESCHERMINGVAN HET MILIEU 7
8. CONTACTINFORMATIE 7
Haak
Kabel is
geblok
keerd
Kabel is
vrij
Haak
1x Plafondhouder met wieltje
1x- Plafondhouder met wieltje en kabelblok kering 2 Haken met wieltje
1x Kabelklamp
1x Nylonkabel
10x Pluggen, 8 mm
10x Schroeven
Eigen gewicht: ca. 1,650 kg
Materiaal: plaatstaal, 1,4 mm
Maximale belasting: 20 kg
Kabellengte: 15 m
Kabeldiameter: 6 mm
Maximale plafondhoogte: 4 m
6.ONDERHOUD EN VERZORGING
Controleer de kabel telkens vóór gebruik van de ets-plafondlift. Een
beschadigde of
versleten kabel mag niet gebruikt en moet vervangen worden.
Controleer de scharnieren van de kabelblokkering telkens vóór
gebruikoplichtlopendheid.Bijvastzittendescharnierenisdewerkingvanhet
valbeveiligingsmechanisme niet meer gegarandeerd. De scharnieren
moeten gerepareerd en met een lichte olie, bv. met etsolie, doorgesmeerd
worden.
7.AANWIJZINGEN TER BESCHERMING VAN HET MILIEU
Gelieve dit toestel via een afvalcontainer of via de openbare/
gemeentelijke inzamelpunten af te voeren.
De materialen zijn recyclebaar. Door recycling, stoelijke
verwerking of andere vormen van het hergebruik van
oude toestellen levert u een belangrijke bijdrage aan de
escherming van ons milieu!
8. CONTACTINFORMATIE
EAL GmbH
Otto-Hausmann-Ring 107
42115 Wuppertal, Deutschland
+49(0)202 42 92 830
+49 (0) 202 42 92 83 – 160
info@eal-vertrieb.com
www.eal-vertrieb.com

8
OSTRZEŻENIE
Przed pierwszym uruchomieniem uważnie przeczytać
instrukcję obsługi i przestrzegać wskazówek bezpie-
czeństwa! Ich nieprzestrzeganie może doprowadzić
do szkód osobowych, do uszkodzenia urządzenia lub
Twojej własności! Oryginalne opakowanie, dokument
zakupu oraz niniejszą instrukcję obsługi należy za-
chować do wykorzystania w przyszłości! Przekazując
produkt innej osobie do dalszego użytkowania, należy
także przekazać niniejszą instrukcję.
Przed uruchomieniem sprawdzić, czy opakowanie nie
jest uszkodzone i jest kompletne!
1.UŻYTKOWANIE ZGODNE Z PRZEZNACZENIEM
Wieszak sutowy na rower służy do oszczędzającego przestrzeń w roweru
przymocowanego do sutu w pomieszczeniu lub garażu.
3. SPECYFIKACJE
SPIS TREŚCI
Wieszak sutowy na rower
2. ZAKRES DOSTAWY
• Trzymać dzieci z dala, nie pozwalać dzieciom na obsługę
urządzenia!
• Produkt użytkować zgodnie z przeznaczeniem!
• Przy urządzeniu nie manipulować, urządzenia nie
• demontować!
• Dla własnego bezpieczeństwa korzystać tylko z wyposa-
żenia i części zamiennych, które podano w instrukcji, lub
które zaleca producent!
• Skontrolować linkę przed każdym użyciem wieszaka
sutowego na rowery. Uszkodzonej lub zużytej linki nie
używać, trzeba ją wymienić.
• Przed każdym użyciem sprawdzić lekkobieżność zawia-
sów blokady linki. Jeśli zawiasy są zapieczone, to nie
jest sprawna funkcja zabezpieczenia przed upadkiem.
Zawiasy należy naprawić.
4. WSKAZÓWKI BEZPIECZEŃSTWA
5. INSTRUKCJA OBSŁUGI
5.1 MONTAŻ WIESZAKA SUFITOWEGO NA ROWER
Wybrać odpowiednie miejsce do zamontowania wieszaka sutowego na
rower. Oznaczyć pozycję kierownicy i siodła z wystarczającą odległością od
ściany. Teraz przymocować uchwyty sutowe do sutu za pomocą czterech
kołków i śrub. Przymocować linkę do pojedynczego uchwytu sutowego za
pomocą bezpiecznego węzła. Teraz poprowadzić wolny koniec linki przez
rolki i blokadę linki, jak pokazano na ilustracjach. Przymocować uchwyt
ścienny linki do ściany w odpowiednim, łatwo dostępnym miejscu za po-
mocą dwóch kołków rozporowych i śrub.
5.2 PODCIĄGANIE ROWERU
Zawiesić kierownicę i siodełko na hakach wieszaka sutowego na rower.
Podnieść rower na żądaną wysokość ciągnąc za swobodny koniec linki.
Przymocować koniec linki do uchwytu ściennego zawiązując bezpieczny
węzeł.
1.UŻYTKOWANIE ZGODNE Z PRZEZNACZENIEM 8
2. ZAKRES DOSTAWY 8
3. SPECYFIKACJE 8
4.WSKAZÓWKI BEZPIECZEŃSTWA 8
5. INSTRUKCJA OBSŁUGI 8
5.1 MONTAŻ WIESZAKA SUFITOWEGO NA ROWER 8
5.2 PODCIĄGANIE ROWERU 8
6. KONSERWACJA I PIELĘGNACJA 8
7.WSKAZÓWKI EKOLOGICZNE 8
8. INFORMACJE KONTAKTOWE 8
Haki
Linka jest
zabloko-
wana
Linka jest
swobodna
Haki
1 x uchwyt sutowy z rolką
1 x uchwyt sutowy z rolką i blokada linki
2 x hak z rolką
1 x uchwyt ścienny do linki
1 x linka nylonowa
10 x kołki rozporowe, 8 mm
10 x śruby
Ciężar własny: 1,650 kg
Materiał: blacha stalowa, 1,4 mm
maksymalne obciążenie: 20 kg
Długość linki: 15 m
Średnica linki: 6 mm
maksymalna wysokość sutu: 4 m
6.KONSERWACJA I PIELĘGNACJA
Skontrolować linkę przed każdym użyciem wieszaka sutowego na rowery.
Uszkodzonej lub zużytej linki nie wolno używać, trzeba ją wymienić.
Przed każdym użyciem sprawdzić lekkobieżność zawiasów blokady linki.
Jeśli zawiasy są zapieczone, to nie jest sprawna funkcja zabezpieczenia
przed upadkiem. Zawiasy należy naprawić i nasmarować rzadkim olejem,
np. olejem do rowerów.
7. WSKAZÓWKI EKOLOGICZNE
Zużyte urządzenie należy wyrzucić do pojemnika na surowce
wtórne lub przekazać do publicznego/komunalnego punktu
zbiórki odpadów. Materiały nadają się do recyklingu. Przez re-
cykling, wykorzystanie materiałów wtórnych i inne formy uty-
lizacji zużytych urządzeń przyczyniasz się do ochrony naszego
środowiska naturalnego!
8. INFORMACJE KONTAKTOWE
EAL GmbH
Otto-Hausmann-Ring 107
42115 Wuppertal, Deutschland
+49(0)202 42 92 830
+49 (0) 202 42 92 83 – 160
info@eal-vertrieb.com
www.eal-vertrieb.com

9
VAROVÁNÍ
Před uvedením do provozu si pozorně přečtěte návod k
obsluze a dodržujte všechna bezpečnostní upozornění!
Nedodržování pokynů a upozornění může vést k pora-
nění osob, škodám na přístroji nebo vašem majetku!
Uschovejte si originální balení, doklad o koupi a tento
návod pro použití v budoucnosti! Při postoupení vý-
robku odevzdejte i tento návod.
Před uvedením do provozu zkontrolujte, zda není ba-
lení poškozené a zda je obsah balení kompletní!
1.POUŽÍVÁNÍ DLE URČENÍ
Stropní výtah pro jízdní kola se používá za účelem úsporného uskladnění
jízdního kola na strop místnosti nebo garáže.
3. SPECIFIKACE
OBSAH
Stropní výtah pro jízdní kola
2. ROZSAH DODÁVKY
• Přístroj uschovejte mimo dosah dětí a nedovolte, aby ho
děti obsluhovaly!
• Tento produkt používejte pouze v souladu s účely, pro
které je určený!
• Se zařízením nemanipulujte ani ho nerozebírejte!
• Kvůli vlastní bezpečnosti používejte pouze příslušenství
nebo náhradní díly, které jsou uvedeny v návodu, nebo
jejichž používání výrobce doporučuje!
• Před každým použitím stropního výtahu pro jízdní kola
zkontrolujte lano. Poškozené nebo opotřebované lano se
nesmí používat a musí se vyměnit.
• Před každým použitím zkontrolujte lehký chod závěsů
na zámku lana. Pokud jsou závěsy zaseknuté, nefunguje
zajištění proti pádu. Závěsy se musí opravit.
4. BEZPEČNOSTNÍ UPOZORNĚNÍ
5.NÁVOD K OBSLUZE
5.1 MONTÁŽ STROPNÍHO VÝTAHU PRO JÍZDNÍ KOLA
K provedení montáže vyberte vhodný strop, kde si přejete uskladnit své
jízdní kolo. Tam označte polohy řidítek a sedadla a dbejte na dostatečnou
vzdálenost od stěny. Následně připevněte každý stropní držák pomocí zna-
ček na stropě čtyřmi hmoždinkami a šrouby. Připevněte lano k jednodu-
chému stropnímu držáku pomocí bezpečného uzlu. Poté veďte volný konec
lana skrz kladky a zámek lana tak, jak je znázorněné na obrázcích. Lanovou
průvlačnici připevněte na vhodné, snadno dostupné místo pomocí dvou
hmoždinek a šroubů.
5.2 VYTÁHNUTÍ JÍZDNÍHO KOLA
Zavěste řidítka a sedlo na háky stropního výtahu. Vytáhněte jízdní kolo do
požadované výšky zatažením za volný konce lana. Konec lana přivažte na
lanové průvlačnici pomocí bezpečného uzlu.
1.POUŽÍVÁNÍ DLE URČENÍ 9
2. ROZSAH DODÁVKY 9
3. SPECIFIKACE 9
4. BEZPEČNOSTNÍ UPOZORNĚNÍ 9
5. NÁVOD K OBSLUZE 9
5.1 MONTÁŽ STROPNÍHO VÝTAHU PRO JÍZDNÍ KOLA 9
5.2VYTÁHNUTÍ JÍZDNÍHO KOLA 9
6.ÚDRŽBA A OŠETŘENÍ 9
7.POKYNYTÝKAJÍCÍ SE ŽIVOTNÍHO PROSTŘEDÍ 9
8. KONTAKTNÍ INFORMACE 9
Hák
Lano je
blokováno
Lano je
volné
Hák
1 x stropní držák s kladkou
1 x stropní držák s kladkou a zámkem lana
2 x hák s kladkou
1 x lanová průvlačnice
1 x nylonové lano
10 x hmoždinka, 8 mm
10 x šrouby
Vlastní hmotnost: 1,650 kg
Materiál: ocelový plech, 1,4 mm
Maximální nosnost: 20 kg
Délka lana: 15 m
Průměr lana: 6 mm
Maximální výška stropu: 4 m
6.ÚDRŽBA A OŠETŘENÍ
Před každým použitím stropního výtahu pro jízdní kola zkontrolujte lano.
Poškozené nebo opotřebované lano se nesmí používat a musí se vyměnit.
Před každým použitím zkontrolujte lehký chod závěsů na zámku lana.
Pokud jsou závěsy zaseknuté, nefunguje zajištění proti pádu. Závěsy musí
být opravené a namazané lehkým olejem, např. olejem pro jízdní kola.
7.POKYNY TÝKAJÍCÍ SE ŽIVOTNÍHO PROSTŘEDÍ
K likvidaci odevzdejte tento přístroj do veřejné/komunální
sběrny nebo zlikvidujte prostřednictvím kontejneru pro cenné
suroviny. Materiály jsou recyklovatelné. Recyklováním, zhod-
nocováním látek nebo jinými formami opětovného zhodnocení
použitých přístrojů významně přispíváte k ochraně našeho
životního prostředí!
8. KONTAKTNÍ INFORMACE
EAL GmbH
Otto-Hausmann-Ring 107
42115 Wuppertal, Deutschland
+49(0)202 42 92 830
+49 (0) 202 42 92 83 – 160
info@eal-vertrieb.com
www.eal-vertrieb.com

EAL GmbH
Otto-Hausmann-Ring 107
42115Wuppertal
Deutschland
+49 (0)202 42 92 83 0
+49 (0) 202 42 92 83 – 160
info@eal-vertrieb.com
www.eal-vertrieb.com
Other manuals for 16411
1
Table of contents
Languages:
Other EUFAB Lifting System manuals
Popular Lifting System manuals by other brands

JLG
JLG 1930ES Service maintenance manual

JLG
JLG 600SC Operation and safety manual

Braun
Braun Century NCL Series Service manual

Jema Autolifte
Jema Autolifte JA3500F Installation, operation and maintenance manual

Titan Lifts
Titan Lifts HD2P-9000AF Installation, operation & maintenance manual

Ravaglioli
Ravaglioli KPN235WEK manual