EUFAB 16411 User manual

Art.-Nr. 16411 Fahrrad-Deckenlift
DE GB F NL I
EAL GmbH, Otto-Hausmann-Ring 107, D-42115 Wuppertal

2
Seil ist
blockiert
Seil ist
frei
Haken
Haken
Übersicht
Bestimmungsmäßiger
Gebrauch
Lieferumfang
Spezifikationen
Sicherheitshinweise
Bedienungsanleitung
Wartung und Pflege
Kontaktinformationen
WARNUNG
Lesen Sie die Bedienungsanleitung vor Inbetriebnahme sorgfältig durch und beachten Sie alle
Sicherheitshinweise!
Bewahren Sie die Originalverpackung, den Kaufbeleg sowie diese Anleitung zum späteren
Nachschlagen auf!
Nichtbeachtung kann zu Personenschäden, Schäden am Gerät oder Ihrem Eigentum führen!
Prüfen Sie vor Inbetriebnahme den Inhalt der Verpackung auf Unversehrtheit und Vollständigkeit!
Bestimmungsmäßiger Gebrauch
Der Fahrrad- Deckenlift dient zum platzsparenden Verstauen eines Fahrrades an der Raum- oder
Garagendecke.
Lieferumfang
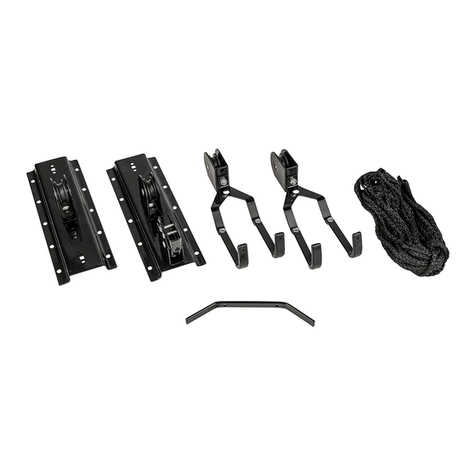
1 Deckenhalter mit Rolle
1- Deckenhalter mit Rolle und Seilsperre
2 Haken mit Rolle
1 Seilklampe
1 Nylonseil
10 Dübel, 8 mm
10 Schrauben
Spezifikationen
Eigengewicht: 1,650 kg
Material: Stahlblech, 1,4 mm
maximale Belastung: 20 kg
Seillänge: 15 m
Seildurchmesser: 6 mm
maximale Deckenhöhe: 4 m
Sicherheitshinweise
1. Halten Sie Kinder fern und lassen Sie Kinder dieses Gerät nicht bedienen!
2. Benutzen Sie dieses Produkt nur für die dafür vorgesehene Verwendung!
3. Manipulieren oder zerlegen Sie das Gerät nicht!
4. Verwenden Sie zu Ihrer eigenen Sicherheit ausschließlich Zubehör oder Ersatzteile, die in der Anleitung
angegeben sind, oder deren Verwendung durch den Hersteller empfohlen wird!
5. Kontrollieren Sie das Seil vor jeder Benutzung des Fahrrad-Deckenlifts. Ein beschädigtes oder
verschlissenes Seil darf nicht verwendet und muß ersetzt werden.
6. Kontrollieren Sie die Scharniere der Seilsperre vor jeder Benutzung auf Leichtgängigkeit. Bei festsitzenden
Scharnieren ist die Funktion als Absturzsicherung nicht mehr gegeben. Die Scharniere müssen
instandgesetzt werden.
Bedienungsanleitung
Montage des Fahrrad-Deckenlifts
Wählen Sie an einer geeigneten Decke den Ort aus, an dem Sie Ihr
Fahrrad verstauen möchten. Markieren Sie dort die Stellen für
Lenker und Sattel, achten Sie dabei auf einen ausreichenden
Abstand zur Wand. Befestigen Sie nun die Deckenhalter anhand
der Markierungen an der Decke mit je vier Dübeln und Schrauben.
Befestigen Sie das Seil an dem einfachen Deckenhalter mit einem
sicheren Knoten. Führen Sie nun das freie Seilende durch die
Rollen und die Seilsperre, wie auf den Abbildungen dargestellt.
Befestigen Sie die Seilklampe an einer geeigneten, gut
zugänglichen Stelle mit zwei Dübeln und Schrauben an der Wand.
Hochziehen des Fahrrades
Hängen Sie den Lenker und den Sattel in die Haken des Deckenlifts ein. Heben Sie
das Fahrrad durch Ziehen am freien Seilende auf die gewünschte Höhe an. Machen
Sie das Seilende an der Seilklampe mit einem sicheren Knoten fest.

3
Rope is
blocked
Rope is
free
Hook
Hook
Wartung und Pflege
Kontrollieren Sie das Seil vor jeder Benutzung des Fahrrad-Deckenlifts. Ein beschädigtes oder verschlissenes
Seil darf nicht verwendet und muß ersetzt werden.
Kontrollieren Sie die Scharniere der Seilsperre vor jeder Benutzung auf Leichtgängigkeit. Bei festsitzenden
Scharnieren ist die Funktion als Absturzsicherung nicht mehr gegeben. Die Scharniere müssen instandgesetzt
und mit einem leichten Öl abgeschmiert werden, z. B. mit Fahrradöl.
Hinweise zum Umweltschutz
Bitte entsorgen Sie dieses Gerät über die Wertstofftonne oder die öffentlichen/kommunalen Sammelstellen.
Die Materialien sind recycelbar. Durch Recycling, stoffliche Verwertung oder andere Formen der
Wiederverwendung von Altgeräten leisten Sie einen wichtigen Beitrag zum Schutz unserer Umwelt!
Kontaktinformationen
EAL GmbH
Otto-Hausmann-Ring 107
42115 Wuppertal
Deutschland
Telefon: +49 (0)202 42 92 83 0
Telefax: +49 (0)202 2 65 57 98
Internet: www.eal-vertrieb.de
E-Mail: info@eal-vertrieb.com
GB Item number 16411 bicycle ceiling lift
Overview
Intended use
Scope of delivery
Specifications
Safety notes
Operating instructions
Care and maintenance
Contact information
WARNING
Read the operating instructions through carefully prior to initial use and observe all of the safety
notes! Store the original packaging, the receipt and these instructions so that they may be
consulted at a later date! Not observing such may lead to personal injury, damages to the device
or your property! Prior to initial use check the contents of the packaging to ensure that they are in
perfect condition and complete!
Intended use
The bicycle ceiling lift is designed to ensure space-saving storage of a bicycle on the ceiling of a room or
garage.
Scope of delivery
1 Ceiling mount with pulley
1- Ceiling mount with pulley and rope lock
2 Hooks with pulley
1 Rope clamp
1 Nylon rope
10 Dowels, 8 mm
10 Screws
Specifications
Dead weight: 1.650 kg
Material: Steel plate, 1,4 mm
Maximum load: 20 kg
Rope length: 15 m
Rope diameter: 6 mm
Maximum ceiling height: 4 m
Safety notes
1. Keep children away and do not permit children to use this device!
2. Only use this product for the intended use!
3. Do not manipulate or disassemble the device!
4. For your own safety, only use accessories or replacement parts specified in the instructions or that the
manufacturer has recommended!
5. Check the rope before each use of the bicycle ceiling lift. A damaged or worn rope may not be used and
must be replaced.
6. Check the hinges of the rope lock for ease of operation prior to each use. If the hinges are stiff, the
functionality of the fall prevention mechanism is no longer ensured. The hinges must be maintained.
Operating instructions
Installation of the bicycle ceiling lift
Select the place you wish to store your bicycle on a suitable ceiling.
Mark the positions for handlebars and saddle, make sure to leave a
sufficient gap to the wall. Using the markings, now attach the ceiling
mount to the ceiling using four dowels and screws. Secure the rope
to the single ceiling mount with a secure knot. Now guide the free
end through the pulleys and the rope lock as shown on the
diagrams. Secure the rope clamp to a suitable, easily accessible

4
location on the wall using two dowels and screws.
Raising the bicycle
Hang the handlebars and saddle on the hooks of the ceiling lift. Lift the bicycle by
pulling on the free end of the rope and raising it to the required height. Secure the end
of the rope on the rope clamp with a secure knot.
Care and maintenance
Check the rope before each use of the bicycle ceiling lift. A damaged or worn rope may not be used and must
be replaced.
Check the hinges of the rope lock for ease of operation prior to each use. If the hinges are stiff, the functionality
of the fall prevention mechanism is no longer ensured. The hinges must be maintained and lubricated with a
light oil, for example, bicycle oil.
Notes for environmental protection
Please dispose of this device via the recycling facilities or public/community collection points.
The materials can be recycled. By recycling, reuse of materials or other forms of reuse of old devices, you make
an important contribution to the protection of our environment!
Contact information
EAL GmbH
Otto-Hausmann-Ring 107
42115 Wuppertal
Germany
Telephone: +49 (0)202 42 92 83 0
Fax: +49 (0)202 2 65 57 98
Internet: www.eal-vertrieb.de
Email: info@eal-vertrieb.com
F Réf. Art. 16411 Élévateur plafonnier pour vélo
Vue d'ensemble
Utilisation conforme
Contenu de livraison
Spécifications
Consignes de sécurité
Mode d'emploi
Entretien et maintenance
Contacts
AVERTISSEMENT
Lisez attentivement le mode d'emploi avant la mise en service et respectez toutes les consignes
de sécurité! Conservez l'emballage d'origine, la preuve d'achat ainsi que ces instructions pour
consultations ultérieures! Le non-respect de ces consignes peut entraîner des dommages
corporels, endommager l'appareil ou vos biens! Vérifiez l'intégrité et l'intégralité du contenu de
l'emballage!
Utilisation conforme
L'élévateur plafonnier pour vélo sert au rangement peu encombrant d'un vélo au plafond du garage ou d'une
autre pièce.
Contenu de livraison
1 Support de plafond avec roues
1 Support de plafond avec roues et verrouillage de
câble
2 Crochets avec roues
1 Taquet
1 Câble en nylon
10 Chevilles, 8 mm
10 Vis
Spécifications
Poids net : 1,650 kg
Matériau : Tôle d'acier, 1,4 mm
Charge maximale : 20 kg
Longueur du câble : 15 m
Diamètre du câble : 6 mm
Hauteur de plafond maximale :4 m
Consignes de sécurité
1. Tenez les enfants à distance et ne les laissez pas opérer cet appareil!
2. Utilisez cet appareil uniquement pour l'usage auquel il a été prévu!
3. Ne manipulez ni ne démontez l'appareil!
4. Pour votre sécurité, utilisez exclusivement des accessoires ou pièces de rechange indiqués dans les
instructions ou dont l'usage est recommandé par le fabricant!
5. Assurez-vous de l'état du câble avant chaque utilisation de l'élévateur plafonnier pour vélo. Un câble
endommagé ou usé ne peut être utilisé et doit être remplacé.
6. Contrôler le fonctionnement du verrouillage de câble avant chaque utilisation. Une fois les charnière fixées,
la fonction sécurité anti-chute n'est plus disponible. Les charnières doivent être réparées.

5
Câble
bloqué
Câble
débloqué
Crochet
Crochet
Mode d'emploi
Montage de l'élévateur plafonnier pour vélo.
Choisissez un endroit approprié où vous pourrez ranger votre
vélo. Marquez l'endroit où vous souhaitez placer le guidon et la
selle, veillez à garder suffisamment de distance par rapport au
mur. Fixez maintenant le support de plafond à l'aide des
marquages au plafond avec les quatre chevilles et vis. Fixez le
câble au support de plafond avec un nœud solide. Faites
passer l'extrémité du câble par la roue et le verrouillage comme
indiqué sur l'illustration. Fixez le taquet à un endroit adapté et
accessible du mur à l'aide de deux chevilles et vis.
Élévation du vélo
Suspendez le guidon et la selle aux crochet du support de plafond. Élevez le vélo à
la hauteur souhaitée en tirant sur l'extrémité du câble. Fixez l'extrémité du câble au
taquet à l'aide d'un nœud solide.
Entretien et maintenance
Assurez-vous de l'état du câble avant chaque utilisation de l'élévateur plafonnier
pour vélo. Un câble endommagé ou usé ne peut être utilisé et doit être remplacé.
Contrôlez le fonctionnement du verrouillage de câble avant chaque utilisation. Une
fois les charnière fixées, la fonction sécurité anti-chute n'est plus disponible. Les charnières doivent être
réparées et lubrifiées avec une huile légère, de l'huile à vélo par exemple.
Consignes pour la protection de l'environnement
Veuillez vous débarrasser de cet appareil au moyen de bacs pour matériaux recyclables ou des points de
rassemblements publics/communaux.
Les matériaux sont recyclables. Grâce au recyclage, l'utilisation de matière ou d'autres formes de réutilisation
de vieux appareils, vous contribuez favorablement à la protection de notre environnement!
Contacts
EAL GmbH
Otto-Hausmann-Ring 107
42115 Wuppertal
Allemagne
Téléphone : +49 (0)202 42 92 83 0
Fax : +49 (0)202 2 65 57 98
Internet : www.eal-vertrieb.de
Courriel : info@eal-vertrieb.com
NL Art.-nr. 16411 Fiets-plafondlift
Overzicht
Doelmatig gebruik
In het leveringspakket inbegrepen
Specificaties
Veiligheidsinstructies
Gebruiksaanwijzing
Onderhoud en verzorging
Contactinformatie
WAARSCHUWING
Lees de gebruiksaanwijzing vóór ingebruikname zorgvuldig door en neem alle
veiligheidsinstructies in acht! Bewaar de originele verpakking, de kassabon en deze handleiding
om later te raadplegen! Veronachtzaming kan tot lichamelijke letsels, beschadigingen aan het
apparaat of aan uw eigendom leiden! Controleer vóór ingebruikname de inhoud van de
verpakking op ongeschondenheid en volledigheid!
Doelmatig gebruik
De fiets-plafondlift dient voor een plaatsbesparende berging van een fiets aan een plafond van een kamer of
garage.
In het leveringspakket inbegrepen
1 Plafondhouder met wieltje
1- Plafondhouder met wieltje en kabelblokkering
2 Haken met wieltje
1 Kabelklamp
1 Nylonkabel
10 Pluggen, 8 mm
10 Schroeven

6
Kabel is
geblok-
keerd
Kabel is
vrij
Haak
Haak
Specificaties
Eigen gewicht: 1,650 kg
Materiaal: plaatstaal, 1,4 mm
Maximale belasting: 20 kg
Kabellengte: 15 m
Kabeldiameter: 6 mm
Maximale plafondhoogte: 4 m
Veiligheidsinstructies
1. Houd kinderen op een veilige afstand en laat kinderen dit toestel niet bedienen!
2. Gebruik dit product uitsluitend voor de daarvoor voorziene toepassing!
3. Manipuleer of demonteer het toestel niet!
4. Gebruik omwille van uw eigen veiligheid uitsluitend toebehoren of wisselstukken die in de handleiding
aangegeven zijn of waarvan het gebruik door de fabrikant aanbevolen wordt!
5. Controleer de kabel telkens vóór gebruik van de fiets-plafondlift. Een beschadigde of versleten kabel mag
niet gebruikt en moet vervangen worden.
6. Controleer de scharnieren van de kabelblokkering telkens vóór gebruik op lichtlopendheid. Bij vastzittende
scharnieren is de werking van het valbeveiligingsmechanisme niet meer gegarandeerd. De scharnieren
moeten gerepareerd worden.
Gebruiksaanwijzing
Montage van de fiets-plafondlift
Kies aan een geschikt plafond de plaats uit, waar u uw fiets wenst
op te bergen. Markeer daar de punten voor stuur en zadel, let
daarbij op voldoende afstand tot de wand. Bevestig nu de
plafondhouder aan de hand van de markeringen aan het plafond
met telkens vier pluggen en schroeven. Bevestig de kabel aan de
enkele plafondhouder met een veilige knoop. Breng nu het vrije
kabeluiteinde door de wieltjes en de kabelblokkering, zoals in de
afbeeldingen weergegeven. Bevestig de kabelklamp op een
geschikte, goed toegankelijke plaats met twee pluggen en
schroeven aan de wand.
Omhoogtrekken van de fiets
Hang het stuur en het zadel in de haken van de plafondlift. Til de fiets tot op de
gewenste hoogte op doordat u aan het vrije kabeluiteinde trekt. Maak het
kabeluiteinde aan de kabelklamp met een veilige knoop vast.
Onderhoud en verzorging
Controleer de kabel telkens vóór gebruik van de fiets-plafondlift. Een beschadigde of
versleten kabel mag niet gebruikt en moet vervangen worden.
Controleer de scharnieren van de kabelblokkering telkens vóór gebruik op lichtlopendheid. Bij vastzittende
scharnieren is de werking van het valbeveiligingsmechanisme niet meer gegarandeerd. De scharnieren moeten
gerepareerd en met een lichte olie, bv. met fietsolie, doorgesmeerd worden.
Aanwijzingen ter bescherming van het milieu
Gelieve dit toestel via een afvalcontainer of via de openbare/gemeentelijke inzamelpunten af te voeren.
De materialen zijn recyclebaar. Door recycling, stoffelijke verwerking of andere vormen van het hergebruik van
oude toestellen levert u een belangrijke bijdrage aan de bescherming van ons milieu!
Contactinformatie
EAL GmbH
Otto-Hausmann-Ring 107
42115 Wuppertal
Deutschland (Duitsland)
Telefoon: +49 (0)202 42 92 83 0
Telefax: +49 (0)202 2 65 57 98
Internet: www.eal-vertrieb.de
E-mail: info@eal-vertrieb.com

7
La fune
è
bloccata
La fune
è libera
Gancio
Gancio
I Cod. art. 16411 Portabici da soffitto con carrucola
Panoramica
Uso previsto
Volume di consegna
Specifiche
Avvertenze di sicurezza
Istruzioni per l'uso
Manutenzione e cura
Contatti
AVVERTENZA
Leggere attentamente le istruzioni per l'uso prima della messa in funzione e osservare le
avvertenze di sicurezza! Conservare la confezione originale, la prova d'acquisto e queste
istruzioni come riferimento futuro! La mancata osservanza di queste istruzioni può provocare
lesioni a persone, danni al dispositivo o alla vostra proprietà! Verificare l'integrità e la
completezza del contenuto della confezione prima della messa in funzione!
Uso conforme
Il portabici da soffitto con carrucola è destinato allo stivaggio di una bicicletta, sul soffitto di un locale o di un
garage.
Volume di consegna
1 supporto a soffitto con carrucola
1 supporto a soffitto con carrucola e blocco fune
2 ganci con carrucola
1 galloccia
1 fune di nylon
10 tasselli da 8 mm
10 viti
Specifiche
Peso a vuoto: 1,650 kg
Materiale: lamiera d'acciaio da 1,4 mm
Portata massima: 20 kg
Lunghezza fune: 15 m
Diametro fune: 6 mm
Max. altezza soffitto: 4 m
Avvertenze di sicurezza
1. Tenere lontano dalla portata dei bambini e vietarne l'utilizzo!
2. Utilizzare questo prodotto solo per l'impiego previsto!
3. Non manomettere né smontare il prodotto!
4. Per la propria sicurezza, utilizzare solo gli accessori e i pezzi di ricambio indicati nelle istruzioni o consigliati
dal produttore!
5. Controllare la fune prima di utilizzare il portabici da soffitto. Una fune danneggiata non può essere utilizzata
e deve essere sostituita.
6. Prima dell'uso, verificare ogni volta la scorrevolezza delle cerniere del blocco fune. Se le cerniere sono
bloccate, la protezione contro la caduta non è più garantita. Le cerniere devono essere riparate.
Istruzioni per l'uso
Montaggio del portabici da soffitto con carrucola
Scegliere un punto del soffitto, adatto alla stivaggio della propria
bicicletta. Segnare i punti per il manubrio e la sella, badando di
mantenere una distanza idonea dalla parete. Fissare il supporto in
base ai punti contrassegnati su soffitto, utilizzando i quattro tasselli
e le relative viti. Fissare la fune al supporto a soffitto semplice con
un nodo sicuro. Ora condurre l'estremità libera della fune attraverso
le carrucole e il blocco fune, come illustrato in figura. Fissare la
galloccia alla parete, in un punto facilmente accessibile, utilizzando
i due tasselli e le relative viti.
Sollevamento della bicicletta
Agganciare il manubrio e la sella al portabici. Sollevare la bicicletta tirando l'estremità
libera della fune, fino all'altezza desiderata. Fissare l'estremità della fune alla galloccia
con un nodo sicuro.
Manutenzione e cura
Controllare la fune prima di utilizzare il portabici da soffitto. Una fune danneggiata non
può essere utilizzata e deve essere sostituita.
Prima dell'uso, verificare ogni volta la scorrevolezza delle cerniere del blocco fune. Se
le cerniere sono bloccate, la protezione contro la caduta non è più garantita. Le cerniere devono essere riparate
e lubrificate con poco olio, ad es. olio per biciclette.

8
Avvertenze sulla tutela ambientale
Smaltire questo prodotto gettandolo nel bidone per il riciclo o consegnandolo ai punti di raccolta
pubblici/comunali.
I materiali sono riciclabili. Con il riciclo, il recupero del materiale e altre forme di riutilizzo di prodotti usati si
fornisce un contributo importante per la protezione del nostro ambiente!
Contatti
EAL GmbH
Otto-Hausmann-Ring 107
42115 Wuppertal
Germania
Telefono: +49 (0)202 42 92 83 0
Fax: +49 (0)202 2 65 57 98
Internet: www.eal-vertrieb.de
E-mail: info@eal-vertrieb.com
EAL GmbH, ©16411Ma2015
Other manuals for 16411
1
Table of contents
Languages:
Other EUFAB Lifting System manuals
Popular Lifting System manuals by other brands

Atlas
Atlas BP10000X Installation & operation manual

Atlas
Atlas BP10000 Installation & operation manual

Bend-Pak
Bend-Pak HD-7ZM Installation and operation manual

Dino lift
Dino lift DINO XT II 160 operating instructions

Bend-Pak
Bend-Pak XPR-10AS-168-LP Service manual

SmartMetals
SmartMetals 052.7400-65 product manual