EUFY T8501 User manual

Anker Innovations Limited.All rights reserved. eufy Security and eufy Security Logo
are trademarks of Anker Innovations Limited, registered in the United States and other
countries.All other trademarks are the property of their respective owners.
Model:T8501
51005002334 V02

USER MANUAL
Smart Lock Wi-Fi

English 01
Español 23
Français 44

English 01
TABLE OF
CONTENTS
What's Included 02 18 Basic Operations
Product Overview 03 19 !"#$%&$'(%)*+
Getting Started 04 20 Troub les hoo tin g
Installing the Smart Lock Wi-Fi 07 21 Important Safety Instructions
Setting up the Smart LockWi-Fi 14 21 Notice

02 English
WHAT'S INCLUDED
For Smart Lock Wi-Fi Installation

English 03
PRODUCT OVERVIEW
Front View
Micro USB Port
LED
Buttons
Cylinder
Rear View
Battery Cover
Setup Button
Thumbturn
Screw Hole
QR Code Serial Number

04 English
GETTING STARTED
Download eufy Security App
Download the eufy Security app from the App Store (iOS devices running version
10.2 and later versions) or Google Play (Android devices running version 5.0 and later
versions).
Sign up for a eufy Security account and add the Smart Lock Wi-Fi to the device list.
Remove the battery cover and scan the QR code on the back of the device to view the
Smart Lock Wi-Fi installation video.
Note: The Smart Lock Wi-Fi is embedded with an encryption chip. Bluetooth data is
all encrypted, so user information is secure and cannot be accessed by others.
Connect to the Network via Wi-Fi
Featuring a built-in Wi-Fi module, the Smart Lock Wi-Fi can be connected to the network
via your home router.

English 05
Follow the on-screen instructions in the WiFi Settings section on the eufy Security app
to connect and pair your phone with Smart Lock Wi-Fi. Once successfully paired, you can
operate the Smart Lock Wi-Fi even when you're outside your home.
Note: Make sure you add Smart Lock Wi-Fi to the device list on the eufy Security
app before pairing it with your phone via Wi-Fi.
Works with the Google Assistant / Amazon Alexa
The Smart Lock Wi-Fi can work with the Google Assistant / Amazon Alexa app. With
Google Home or Amazon Alexa devices at home, you can lock the door using voice
commands.
Note:
• Make sure you’ve downloaded the Google Assistant or Amazon Alexa app on
your phone.
• Make sure your Google Home or Amazon Alexa devices are connected to the
network.

06 English
Prepare Door for Installation
1. Make sure that the following criteria are met so that the Smart Lock Wi-Fi can be
installed properly:
①Check the door status. Make sure the doorframe is aligned with the door.
②There are no obstructions stuck in the doorframe.
③Leave enough space for the deadbolt to extend into the doorframe when the
door is locked.
2. ,-#$./0)12/3))2/4/52'6#/3%6#*+%)*+/()/6'.#/+12#/(-'(/(-#0/&(/(-#/5)77)8%*9/
measurements:
• The cross bore diameter (2 '' / 54 mm or 1½'' / 38 mm)
• Backset (2 '' / 60 mm or 2¾'' / 70 mm)
• Diameter of the door hole (1'' / 25 mm)
• Door thickness (1 '' / 35 mm - 2 '' / 55 mm)
or
Cross bore
diameter
2 !" or 54mm
Cross bore
diameter
1 ½" or 38 mm
Backset
2#" / 60 mm or
2¾" / 70 mm
Door hole
diameter
1" or 25 mm
1#" / 35 mm -
2 !" / 55 mm
Door thickness

English 07
3. If you have an existing lock, remove it, including the bolt.
INSTALLING THE SMART LOCK WI-FI
Step 1:Install the Deadbolt
To install the deadbolt:
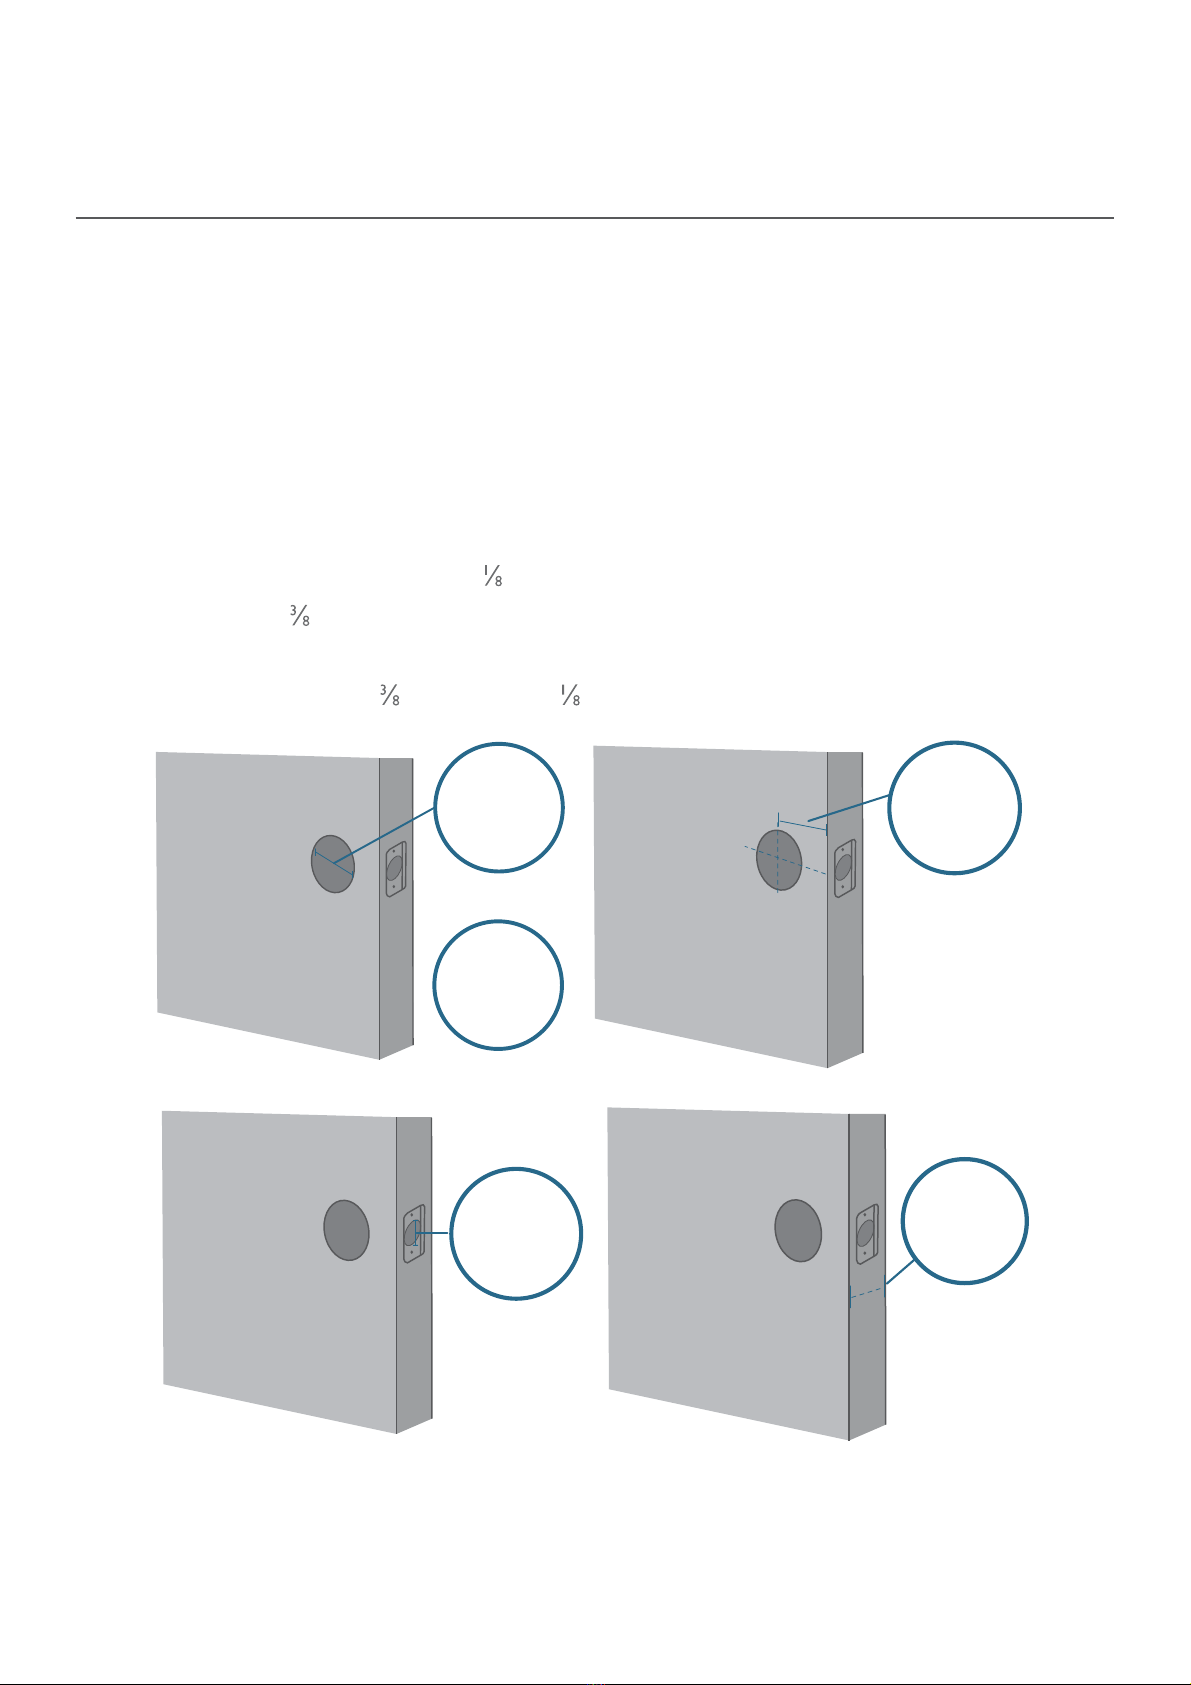
1. Measure your door’s backset dimension: whether it is 2¾'' / 70 mm or 2 '' / 60 mm.
2. If your door’s backset dimension is 2 '' / 60 mm, use the provided deadbolt to install.
If your door’s backset is 2¾'' / 70 mm, turn the faceplate 180° and pull to extend
simultaneously until the deadbolt locks in position as the illustration shows below.
2-3/8 2-3/4
180°
3. Insert the deadbolt into the doorframe and make sure the word “TOP” faces up as
indicated on the deadbolt.
4. Screw into the doorframe with a screwdriver (not provided).

08 English
What is required: Deadbolt, Deadbolt Screws, Screwdriver (not provided)
Deadbolt Deadbolt Screws Screwdriver
Step 2: Install the Strike Plate
If you have an existing strike plate installed, skip this step.
To install the strike plate:
1. Align the strike plate with the center hole of the deadbolt.
2. Secure the strike plate with strike screws. Make sure the plate is placed in the correct
direction.
<)/#*-'*$#/(-#/+#$12%(0=/0)1/*##3/()/&2+(/%*+('77/(-#/+(2%.#/2#%*5)2$#2>//
Attach the strike reinforcer on the doorframe and tighten the reinforcement screws with
a screwdriver (not provided).

English 09
What is required: Strike Plate, Strike Screws, Strike Reinforcer (optional),
Reinforcement Screws (optional), Screwdriver (not provided)
Strike Plate Strike Screws Strike Reinforcer
(optional)
Screwdriver Reinforcement
Screws
Note: This step is only necessary if you want to maintain BHMA Grade 2 security, or
you can install strike plate directly.

10 English
Step 3: Install the Exterior Assembly
To install the exterior assembly into the doorframe:
1. Measure your cross bore dimension and determine the installation steps accordingly.
• If the diameter of your cross bore is 2 '' / 54 mm, use the provided spacer to
assist in installing the exterior assembly.
• If you have a 1½'' / 38 mm crossbore, remove the spacer.
1
2. Route the cable connected on the exterior assembly under the deadbolt.
3. Align the tailpiece with the center hole of the deadbolt, and insert it into the center
hole.
What is required: Exterior Assembly
2 3

English 11
Step 4: Install the Mounting Plate
1. Route the cable through the mounting plate.
2. Fix the mounting plate onto the interior doorframe using the mounting plate screws.
Make sure the screws go through the holes of the deadbolt and the mounting plate,
and lock into place.
• ?"(%)*/@A/B5/(-#/6)1*(%*9/"7'(#/&(+/"#25#$(70/8%(-/(-#/3))2=/9)/()/!(#"/C>
• Option B: If the mounting plate is not fastened tightly to the door, use an
additional screw.
What is required: Mounting Plate, Mounting Plate Screws, Deadbolt Screw / Strike
Screw, Screwdriver (not provided)
Deadbolt Screw /
Strike Screw
Mounting Plate Screwdriver
Mounting Plate
Screws
1 2 Option B

12 English
Step 5: Install the Interior Assembly
To install the Interior Assembly:
1. Remove the battery cover.
2. Match the wire connector from the circuit board with the one from the interior
assembly as illustrated.The wire connector can only be plugged into the socket in one
way. Make sure you match the dot on the connector with the pin on the circuit board
correctly.
3. Align the tailpiece with the key cylinder.
4. Secure the provided screws into the interior assembly.
5. Turn the thumbturn to check whether the deadbolt is retracted. If the deadbolt does
not work smoothly, adjust the screws and install the mounting plate again.
6. Use the plug to cover the screw hole at the bottom of the Smart Lock Wi-Fi.
What is required: Interior Assembly, Interior Assembly Screws, Screwdriver (not
provided)
Screwdriver
Interior Assembly Interior Assembly
Screws

English 13
12 3
Note: Check carefully whether the wire is stuck or tangled. If the wire is stuck,
re-install the Interior Assembly.
45 6

14 English
Step 6: Install Batteries
Insert four AA batteries into the battery compartment matching the polarity (+/-)
indicated.
You are all set! Follow the in-app instructions to set up the Smart Lock Wi-Fi.
Note: Do not close the battery cover. This is to make sure you can scan the QR
code in order to access information about Smart Lock Wi-Fi, as well as easily
access the Setup button.
SETTING UP THE SMART LOCK WI-FI
Pair Your Phone with Smart Lock Wi-Fi
Note: The lock will not lock automatically before the setup has completed.To avoid
being locked outside, pair your phone with the Smart Lock Wi-Fi and set an
access code for unlocking the door.
To pair your phone with Smart Lock Wi-Fi:
1. Scan the QR code on the back of the Smart Lock Wi-Fi to get Bluetooth information
of the Smart Lock Wi-Fi. Follow the on-screen instructions to complete the setup.

English 15
2. Pair your phone with the Smart Lock Wi-Fi via Bluetooth.Your phone will search for
the Smart Lock Wi-Fi’s Bluetooth and then connect.
• D'%(%*9/()/"'%2A/<-#/EFG/%*3%$'()2/H'+-#+/I71#>/
• Paired: the LED indicator turns steady blue for 5 seconds.
Note:
• The user that is paired is the only administrator and can authorize other users
to use the lock.
• Press and hold the Setup button again the lock will return to default settings.
All the settings will be erased and need to be reset. DO NOT press and hold
the button if unnecessary.
Calibrate Smart Lock Wi-Fi
Once the Smart Lock Wi-Fi is successfully paired with your phone, the eufy Security app
will prompt you to calibrate the door lock.
To calibrate the Smart Lock Wi-Fi, follow the on-screen instructions to complete the
process.
• Successfully calibrated:The button LED turns white for 2 seconds and then off.
The voice prompt “calibration complete” can be heard.
• Fail to calibrate:The button and status LED turn solid red for 2 seconds and then
off.The voice prompt “The deadbolt is stuck. Please return to the installation, and
try again.” can be heard.
Note: If the eufy Security app fails to calibrate the lock, check whether the door has
been installed correctly and try again.

16 English
Set Access Code
After the lock is calibrated, the eufy Security app will prompt you to name your Smart
Lock Wi-Fi and set an access code. Follow the on-screen instructions to complete the
process.The access code should be 4 to 8 characters.
Note: If you do not set the passcode and click “Return”, a message “initialization
unsuccessful” will appear. Click the card to enter the Smart Lock Wi-Fi page.
The message “Continue or remove the device” will appear.
Set Scramble Passcode
A scramble passcode is a series of random numbers that you can input to prevent
others from spying on your actual access code. It is ideal for those living in a condo with
neighbors passing by all the time.
To set a scramble passcode, go to Settings on the eufy Security app. The scramble
passcode should be no more than 12 digits in total.
Example
Access Code: 123456
Scramble Passcode Method:
1:
2:
3:
1 2 3 4 5 6 X X X X X X
X X X X X X 1 2 3 4 5 6
X X X 1 2 3 4 5 6 X X X

English 17
Other Settings
The Smart Lock Wi-Fi supports many features that you can configure using the eufy
Security app.The features are listed as follows:
• Add up to 100 users
• Set language: English
• Synchronize time for lock with the time on your phone
• Customize voice volume for the Smart Lock Wi-Fi
• Customize the time duration for automatic door-locking. You can set the
countdown duration to be up to 3 minutes.
• Enable or disable sound effect
• Automatically record door opening and locking log
• Failsafe mode:After 5 consecutive failed attempts to input the access code, access
code cannot be used.
• Check device information
OTA Update (Optional)
If your device requires an OTA update, the app will force you to update OTA. Follow the
on-screen instructions to complete the process. If no OTA update is required, the app
will automatically skip this process and enter “the setup complete” page.
Note:
• When the battery power level is lower than 25%, OTA update is not allowed.
• After OTA is successfully updated, wait for 1 minute and then reboot the
Smart Lock Wi-Fi.
Table of contents
Languages:
Popular Door Lock manuals by other brands

ACO
ACO INS-ZS-ACC Operating and installation instructions

ikonic
ikonic 697460 Assembly instructions

Dormakaba
Dormakaba Junior Mounting instructions

Windsor
Windsor 5327 Fitting instructions

Yale
Yale T1L Installation and programming instructions

Assa Abloy
Assa Abloy effeff MAGAC-L Series Mounting instructions

Hipac
Hipac 3S-56-729C quick start guide

CRP Securities
CRP Securities CAL-ROYAL Grade1 Installation and programming instructions

hager
hager 4500 Series installation instructions

Detex
Detex Advantex 10 Series Nstallation instructions

MachPower
MachPower SM-DLCB-006 user manual

M-TI
M-TI DOOR/DRAWER LOCK product manual