EURO ED12DEW User manual

ED12DEW/ED12DES
euro
To review the section on Troubleshooting Tips
will help you to solve some common problems
by yourself and not need to ask for the help of
professional technicians.
Dear Costumer,
Please read this User Information carefully and keep it
to refer to at a later date.
Pass it on to any subsequent owner of the appliance.
This manual contains sections of Safety Instructions,
Operating Instructions,
Installation Instructions and Troubleshooting Tips etc.
Carefully reading it before using the dishwasher will help
you to useand maintain the dishwasher properly.
The manufacturer, following a policy of constant
development and up-dating of the product,may
make modifications without giving prior notice.
Control Panel......................................................2
Dishwasher Features...........................................2
Rinse Aid.........................................................3, 4
Detergent........................................................ 5
Not suitable for the dishwasher............................8
At the end of the wash cycle ................................9
Wash Cycle Table...............................................10
Turning on the Appliance.................................... 11
Change the Programme................. ............. 11........
Filtering System..................................................12
Caring for the Dishwasher..........................12,13, 14
Before calling for service...............................17, 18
Error codes.......................................................18
....................................... 19Technical information
Forget to add a Dish................. ...................12........
How to use the 3in1 programme........................... 6
Water Connection...............................................15
Connection of drain hoses.................................... 15,16
Start of dishwasher 16...........................................

Under certain conditions, Hydrogen gas may be produced in a hot-water system that has not been used for two
weeks or more. HYDROGEN GAS IS EXPLOSIVE.If the hot-water system has not been used for such a period,
before using the dishwasher turn on all hot-water faucets and let the water flow from each for several minutes.
This will release any accumulated hydrogen gas. As the gas is flammable, do not smoke or use an open flame
during this time.
•
•
•
•
•
•
•
•
•
•
•
•
•
•
Do not abuse, sit on, or stand on the door or dish rack of the dishwasher
Do not touch the heating element during or immediately after use
Do not operate your dishwasher unless all enclosure panels are properly in place. Open the door very
carefully if the dishwasher is operating. There is a risk of water squirtingout.
Do not place any heavy objects on the door when it is open, or the appliance could tip forward.
When loading items to be washed:
Locate sharp items so that they are not likely to damage the door seal;
Load sharp knives with the handles up to reduce the risk of cut-type injuries;
Warning: knives and other utensils with sharp points must be loaded in the basket with their points down
or placed in a horizontal position.
When using your dishwasher, you should prevent plastic items from contacting with heating element.
Check that the detergent receptacle is empty after completion of the wash cycle.
Do not wash plastic items unless they are marked dishwasher safe or the equivalent. For plastic items not
so marked, check the manufacturer's recommendations.
Use only detergent and rinse additives designed for an automatic dishwasher. Never use soap, laundry
detergent, or hand washing detergent in your dishwasher.
Keep children away from detergent and rinse aid, keep children away from the open door of the dishwasher,
there could still be some detergent left inside.
Young children should be supervised to ensure that they do not play with the appliance.
The appliance is not intended for use by young children or infirm persons without supervision.
Dishwasher detergents are strongly alkaline. They can be extremely dangerous if swallowed. Avoid contact
with skin and eyes and keep children away from the dishwasher when the door is open.
The door should not be left in the open position since this could present a tripping hazard.
This dishwasher is designed fornormal household and indoor use.
o
o
o
•
•
•
•
•
•
•
If the supply cord is damaged, it must be replaced by the manufacturer or its service agent or a similarly
qualified person in order to avoid a hazard.
Please dispose ofpacking materialsproperly.
Use the dishwasher only for its intended function.
During installation, the power supply mustnot be excessively or dangerously bent or flattened.
Do not tamper with controls.
The appliance is to be connected to the water mains using new hosesets and the old hose-sets should not
be reused.
This appliance is not intend for use by persons(include children) with reduced physical , sensory or mental
capabilities, or lack of experience and knowledge, unless they have been given supervision or instruction
concerning use of the appliance by a person responsible for their safety
Please unplug before cleaningthe appliance.
•
•
1

To get the best performance from your dishwasher,read all operating instructions before using it for the
first time.
11
12
Back View
Main Filter
5
Detergent Dispenser
6
Cup Shelf
7
Silverware Basket
8
Coarse Filter
9
Rinse Aid Dispenser
10
Inlet pipe connector
12
Drain pipe connector
11
Lower Basket
3
Spray Arms
2
Upper Basket
1
4
Tray ass.
10
Front view
2
5 Rinse Aid Warning Light : To come on when the
rinse aid dispenser needs to be refilled.
6 Door Handle: Pull it to open the door.
7
8 Washing Program Selector: Turn the knob to select wash
cycles.
9 Start / Reset Button: Press this button to start or pause the
dishwasher, the one of the program lights will blink when
starting.
Program indicator light: when you select washing
program, the correspond light will display.
1 ON/OFF Button: To turn ON/OFF the power supply.
2 Power Light : To come on when the ON/OFF Button is
pressed down.
3 Half washing key-press : To select the half washing.
(It means that the lower spray arm does not run , so
you should load the upper basket only ).
4 Half washing Light : To come on when half washing.
2
3
7
1
6
4
9
5
8
1
2
3
4
5
6
7
8
9
Before using your dishwasher for the first time:
A. Fill the rinse aid dispenser
B. Function of detergent
3
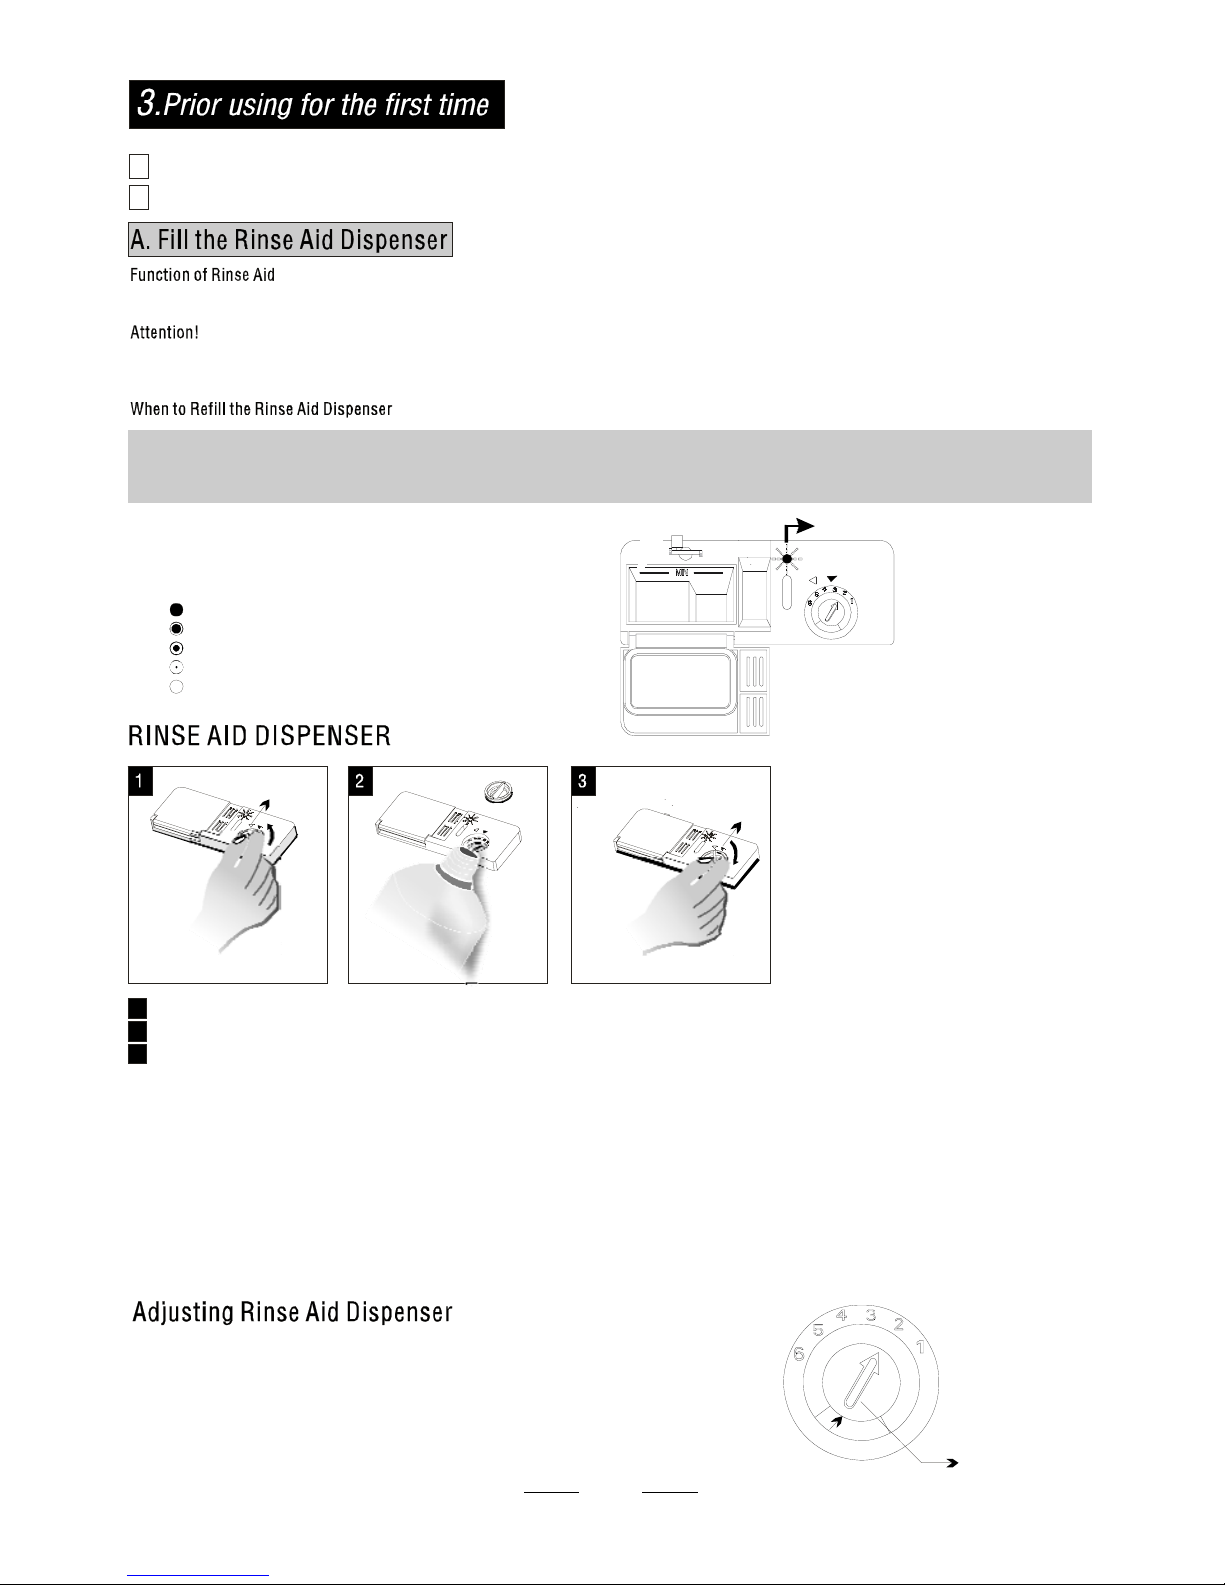
Rinse aid is automatically added during the last rinse, ensuring thorough rinsing, spot
and streak free drying.
Only use branded rinse aid for dishwasher. Never fill the rinse aid dispenser with any
other substances (e.g. dishwasher cleaning agent, liquid detergent). This would damage
the appliance.
As the rinse aid diminishes, the size of the black dot
on the rinse aid level indicatorchanges, as illustrated right.
Full
3/4full
1/2full
1 / 4 full - Should refill to eliminate spotting
Empty
If there is no rinse-aid warning light in the control panel, youcan judge the amount of rinse-aid by the color of the optical level
indicator "D" located next to the cap. When the rinse-aid container is full, the whole indicator will be dark . As the rinse-aid
diminishes, the size of the dark dot decreases. You should never let the rinse aid get below 1 / 4 full.
D(Rinse-Aidindicator)
OPEN
CLOSE
To open the dispenser, turn the cap to the "open" (left) arrow and lift it out.
Pour the rinse aid into the dispenser, being careful not to overfill.
Replace the cap by inserting it aligned with "open" arrow and turning it to the closed (right) arrow.
The rinse aid is released during the final rinse to prevent water from forming dr opl ets on your dishes
that can leave spots and streaks. It also improves drying by allowing water to sheet off the dishes.
Your dishwashers are designed to use liquid rinse aids. The rinse aid dispenser is located inside the
door next to the detergent dispenser. To fill the dispenser, open the cap and pour the rinse aid into
the dispenser until the level indicator turns completely black. The volume of the rinse aid container
is about 140ml.
Be careful not to overfill the dispenser, because this could cause over sudsing. Wipe away any spills
with a damp cloth. Don't forget to replace the cap before you close dishwasher door.
Attention!
Clean up any rinse aid split during filling with an absorbent cloth to avoid excess foaming
during the next wash.
1
2
3
The rinse aid dispenser has six or four settings. Always start with the dispenser set on
“2”. If spots and poor drying are problems, increase the amount of rinse aid dispensed
by removing the dispenser lid and rotating the dial to “3”. If the dishes still are not
drying properly or are spotted, adjust the dial to the next higher number unti l your dishes
are spot-free. We suggest you to set on “4”(Factory value is “4”)
NOTE:
Increase the dose if there are drops of water or lime spots on the dishes after washing.
Reduce it if there are sticky whitish streaks on the dishes or a bluish film on glassware or
knife blades.
Adjust lever
(Rinse)
MAX
This manual suits for next models
1
Table of contents
Other EURO Dishwasher manuals


