EURO EDS845SX User manual

EDS845SX
10 place settings
euro

Compartment A:
Witheachwashcycle.
Compartment B:
For programmes with pre-wash only.
(Follow the !)User Manual
Mechanical indicator C.
Electric indicator on control panel (if provided).
Check the rinse aid level
Load the baskets
Select a programme
Turn on the water tap and press the . The machine will start working
after about 10 seconds.
Start/Pause Button
Running the dishwasher
Switch off the appliance
Turn off the water tap,
unload the baskets
Fill the detergent dispenser
Warning: wait a few minutes (about 15 minutes) before unloading the dishwasher to avoid handling
the dishes and utensils while they are still hot and more susceptible to break.
They will alsodry better.Unload the appliance, starting from the lower basket.
Changing theprogramme
Add forgottendishes in the
dishwasher.
Scrape off any large amount of leftover food. Soften remnants of burnt food in pans,
then load the baskets. Refer to the dishwasher loading instructions.
Close the door,press the Programme Button until the selected programme lights up.
( See the section entitled Operation instruction )“”
When the working cycle has finished, the buzzer of the
dishwasher will sound 8 times, then stop.
Turn off the appliance using the On/Off Button.
If the appliance is switched
off during a wash cycle.
Open the door carefully.
Hotsteam may escape
when the doorisopened!
If the appliance is switched off during a wash cycle, when switched
on again, please re-select the washing cycle and operate the dishwasher
according to the original Power-on state.
Switch on the appliance Press the On/Off button to switch on the appliance, Open the door.
For detailed operating method read the corresponding content on the instruction manual.
1. Arunning cycle canonly be modified if it has been running for a short time. Otherwise the detergent
may have already been released and the water already drained. If this is the case, the detergent
dispenser must be refilled.
2.
Press the Start/Pause button, press the program button for more than three seconds,the
machine will be in standby state, then you can change the program to the desired cycle setting
1.Press the Start/Pause Button to stop the washing.
2.Open the door a little .
3.After the spray arms stop working, you can open the door
completely.
4.Add forgotten dishes.
5.Close the door.
6.Press the Start/Pause Button, the dishwasher will run
after 10 seconds.
ABC
To review the section on troubleshooting Tips
will help you tosolve some common problems
by yourself .
Dear Customer,
Please carefully readthismanualbeforeusingthe
dishwasher,it will help you touse and maintainthe
dishwasher properly.
Pass it on toany subsequent owner ofthe appliance.
Thismanual contains sections on safety Instructions,
Operating Instructions, InstallationInstructions and
Troubleshooting Tips, etc.
The manufacturer, following a policy of constant
development and updating of the product, may
make modifications without giving prior notice.
Keep it as a referin the later days.
If you can not solvethe problems by yourself ,
please ask for the help of professional technicians.
This appliance is intended tobe used in household
andsimilar applications suchas:
-staff kitchen areas in shops,offices and other
working environments;
-farm houses;
-byclients inhotels,motels and otherresidential
type environments;
-bed and breakfast type environments.
Dishwasher Features.................................... ...2
AttentionbeforeorafterloadingtheDishwasher
Baskets..........................................................6
Filtering System.............................................10
Caring forthe Dishwasher..................... .........11.
A Fill the RinseAid Dispenser............. .. ..3、..... ...
B Functionof Detergent .........................4、........
...........7
The Method of Loading Normal Dishware
Wash CycleTable...........................................8
Turning on theAppliance................................9
Change the Programme.............. ................9....
At the end of the Wash Cycle...........................9
PositioningtheAppliance................... ..........12..
Water Connection.................................. .......13.
AboutPowerConnection........................ .......12.
Startof dishwasher................................ ......14..
Before calling for service........................... .....15.
Errorcodes.................................... ..............16.
Technical information.............................. .....17..
Control Panel...................................................2

This appliance must be grounded. In the event of a
malfunction or breakdown, grounding will reduce
the risk of anelectric shock by providing a path of
least resistance of electric current. This appliance
is equipped with a cord having an equipment-
grounding conductor and a grounding plug.
The plug must be plugged into an appropriate outlet
that is installed and grounded in accordance with
all local codes and ordinances.
Keep children away from detergent and rinse aid, keep
child away from the open door of the dishwasher,
there could still be some detergent left inside.
ren
Donotabuse,siton,orstandonthedoorordish
rack of the dishwasher.
Do not touch the heating element during or
immediately after use.
(This instruction is only applicable to machines
with a visual heating element.)
Do not wash plastic items unless they are marked
dishwasher safe or the equivalent. For plastic items
not so marked, check the manufacturer's
recommendations.
Use only detergent and rinse additives
designed for an automatic dishwasher.
Never use soap, laundry detergent, or hand
washing detergent in your dishwasher. Keep
these products out of the reach of children.
During installation, the power supply must not
be excessively or dangerously bentor flattened.
Do not tamper with controls.
Do not place any heavy objects the
door when it is open. The appliance could tip
forward.
on or stand on
When loading items to be washed:
1) Locate sharp items so that they are not likely
to damage the door seal;
2 Warning: Knives and other utensils with
sharp points mustbe loaded inthe basket
with their pointsdown orplacedin a
horizontalposition.
)
When using your dishwasher, youshould
prevent plastic items from coming into contact
with the heating element.(This instruction is only
applicable to machines with a visual heating
element.)
Ifthesupply cordisdamaged, it must bereplaced
bythemanufactureroritsserviceagentora
similarly qualified person in order to avoid a
hazard.
Pleasedispose ofpackingmaterials properly.
Use the dishwasher only for its intended function.
Remove the door to the washing compartment when
removing an old dishwasher from service or discarding it.
Dishwasher detergents are strongly alkaline, they
can be extremely dangerous if swallowed.Avoid
contact with skin and eyes and keep children away
from the dishwasher when the door is open.
Check that the detergent comparment isempty
after completion of thewash cycle.
Theappliance is to be connected to the water
mainsusingnewhose sets and thatold hose-sets
should not be reused.
The maximum number of place settings to be
washedis10.
The maximum permissible inlet water pressure is
1Mpa.
The minimum permissible inlet water pressure is
0.04Mpa.
Children should be supervised to ensure that they do
not play with the appliance.
This appliance is not intended for use by persons
(including children with reduced physical, sensory or
mental capabilities, or lack of experience and
knowledge ,unless they have been given supervision
or instruction concerning use of the appliance by a
person responsible for their safety.
)
When using your dishwasher, follow the precautions listed below:
The door should not be left open,
since this could increasethe risk of tripping.
Improper connection of the equipment-grounding
conductor can result in the risk of an electric shock.
Check with a qualified electrician or service
representative if you are in doubt whether the
appliance is properly grounded. Do not modify the
plug provided with the appliance; If it does not fit
the outlet. Have a proper outlet installed by a
qualified electrician.
Do not operate your dishwasher unless all
enclosure panels are properly in place. Open
the door very carefully if the dishwasher is
operating, there is a risk of water squirting out.
The dishwasher must always be connected to
the water system using new hose sets.
If the appliance is installedon a carpet floor,
take care that the openings in its base are not obstructed.

beforeusing it forthe first time.
To get the best performance from yourdishwasher,read all operating instructions
10 11
Back View
1
2
3
4
5
6
7
89
Front view
Lower basket
Dispenser
Cupshelf
Spray arms
Filter assembly
Inletpipeconnector
Drain pipe
Upperbasket
Cutlery rack
Topspray arm
1
Inner pipe
5
6
7
8
9
11
10
3
24
8.Extra Drying indicator:
Extradrying:An increasedtemperature duringthefinal
rinse to increase drying well. There is a slight increase
intheenergyconsumption.
2.DelayButton : Pressthebutton to add thedelay time.
1.On/Off Button: to switch On/Off the appliance.
6.Display screen: to show the remaining timeand
thestate(running state, delay time, etc)errorcodes
3.Half load and Extra dry functions Button: To select
Half-load function or Extra Dry function.
4.ProgramButton :To Pressthe button to select
appropriate Program.
5.Start /Pause button: To start the selected
washing program orpause the washing program
when the machine is working.
7.Haft loadindicator : To show when you select the
haft load function. If you have only about orless than
half of full loaddishes of the dishwasher, you can select
the half load function and yourdesiredprogram
accordingto the dishescontaminated degree (The rapid
programs can t select this function). Aprogram select
the half load function, it cansave time, energy, and water
compare tothe program hasn t selectthe half load
function.After the halfload function is selected,all the
sprayarmsare running, you canload allthebaskets.
’
’
9.Program indicators: To show which program you have
chose.
10.Otherindicators:
RinseAid indicator:
Indicates whenthe dispenser needs to be refilled.
Child lock indicator:
Water faucet indicator:
To show when the water faucet isforgot to open.
Attention:
Child lock function: press Delay button and Half load/Exra
dry buttonsimultaneously to lock the program, the same
waytounlocktheoperation.

Before using your dishwasher for the first time:
A. Fill therinse aiddispenser
B. Fill in detergent
Therinse aid isreleasedduringthe finalrinseto prevent water from forming dropletson your dishes, which can
leave spots and streaks. It also improvesdryingby allowing water to rolloff thedishes. Your dishwasheris
designed to useliquidrinse aids.The rinseaid dispenser is locatedinsidethe door next to thedetergent dispenser.
To fillthe dispenser,open thecap and pour the rinse aidinto thedispenser untilthe levelindicatorturns completely
black.Thevolume ofthe rinseaid containeris about 110ml.
RinseAid Dispenser
Function of RinseAid
Rinse aid is automaticallyadded during the last rinse, ensuring thoroughrinsing, and spot and streakfree drying.
Attention!
Only use brandedrinse aid for dishwasher. Never fill the rinse aid dispenser with any other substances
(e.g. Dishwasher cleaning agent,liquid detergent). This woulddamage the appliance.
As the rinseaid diminishes, the size of the black dot
on the rinse aidlevel indicator changes, as illustrated below.
Full
3/4full
1/2full
1/4full-Shouldrefilltoeliminatespotting
Empty
If there is no rinse-aid warning light in the control panel, you can judge the amount of rinse-aid by the color of the
optical level indicator "C" located next to the cap. When the rinse-aid container isfull, the wholeindicator willbe
dark .As the rinse-aid diminishes, the size of the dark dot decreases. You should never let the rinse aid get below
1/4full.
When to Refill the RinseAid Dispenser
RINSEAID DISPENSER
To open the dispenser, turn the cap to the "open" (left) arrow and lift it out.
Pour the rinse aid into the dispenser, being careful not to overfill.
Replace the cap by inserting italignedwith "open" arrow and turning it tothe closed (right) arrow.
Be careful not tooverfillthe dispenser, because thiscould cause over sudsing. Wipe away anyspills
witha damp cloth. Don'tforget toreplace the cap before you close the dishwasher door.
Attention!
Clean up any rinse aid spilt during fillingwith an absorbent cloth toavoidexcess foaming
during the nextwash.
1
2
3

Adjusting RinseAid Dispenser
The rinse aid dispenser has six or four settings.Always start with the dispenser
set on "4". If spots and poor drying are a problem, increase the amount of rinse
aiddispensedby removing thedispenser lidandrotatingthedialto"5". Ifthe
dishes are still not drying properly or are showing spots, adjust the dial to the next
higher leveruntil your dishes are spot-free.The recommended setting is "4".
(Factory value is "4".)
Increase the dose if thereare drops of water or lime spots on the dishes after washing.
Reduce itif there are sticky whitish stains on your dishes or a bluish film on glasswareor
knifeblades.
Detergents with its chemical ingredients are necessary toremove dirt, crush dirt andtransport it out of the dishwasher.
Most of the commercial quality detergents are suitablefor thispurpose.
Detergents
There are 3 sorts of detergents
1.With phosphate and withchlorine
2.With phosphate and without chlorine
3.Without phosphate and without chlorine
Based on their chemicalcomposition, detergentscan be split in two basic types:
Theuseof normal washing programs in combination with concentrated detergents
reducespollutionand is goodforyour dishes;these washprograms are specificallymatched
to the dirt-dissolving properties of theenzymes of the concentrated detergent. For this reason
normal washprograms inwhich concentrated detergents are used can achieve the same
results that can otherwise only be achieved using intensive programs.
“”
“”
“”
Detergent tablets of different brands dissolve at different speeds. For this reason some
detergent tabletscannotdissolve anddevelop their full cleaning power during short
programs. Therefore please use long programs when using detergent tablets, to
ensurethe completeremovalof detergentresiduals.
The dispenser must be refilled before the start of each wash cycle followingthe instructions
provided in the washcycle table . Your dishwasher uses less detergent and rinse aid than
Conventional dishwasher. Generally, only onetablespoon of detergent is needed for
a normal wash load.More heavilysoiled items need more detergent.Always add the
detergent just before starting thedishwasher, otherwise it could get damp and will not
dissolve properly.
Concentrated Detergent
DetergentTablets
DetergentDispenser
conventional,alkalinedetergents with caustic components
low alkaline concentrated detergents with natural enzymes
Normally new pulveriseddetergent is without phosphate.Thus thewater softener function of
phosphate is not given. In this case we recommend to fill salt in the salt container even when
thehardness ofwater is only6 dH. Ifdetergentswithout phosphate are used inthecase ofhardwater
often whitespots appearon dishes and glasses. In this case please add more detergent to reach
better results. Detergents without chlorine doonlybleacha little. Strong and coloured spots will not
be removedcompletely.In thiscase please choose aprogramwitha higher temperature.
°
Amount of DetergenttoUse
ProperUseofDetergent
Use only detergent specifically made for the usein dishwashers. Keep your detergent fresh and dry.
Don't put powdereddetergent into the dispenser untilyou're ready to wash dishes.
Dishwasher detergent is corrosive! Take care to keepitoutof reach of children.
Always add the detergentjustbefore starting eachwash cycle.
Only use branded detergent and rinse aid for dishwasher.
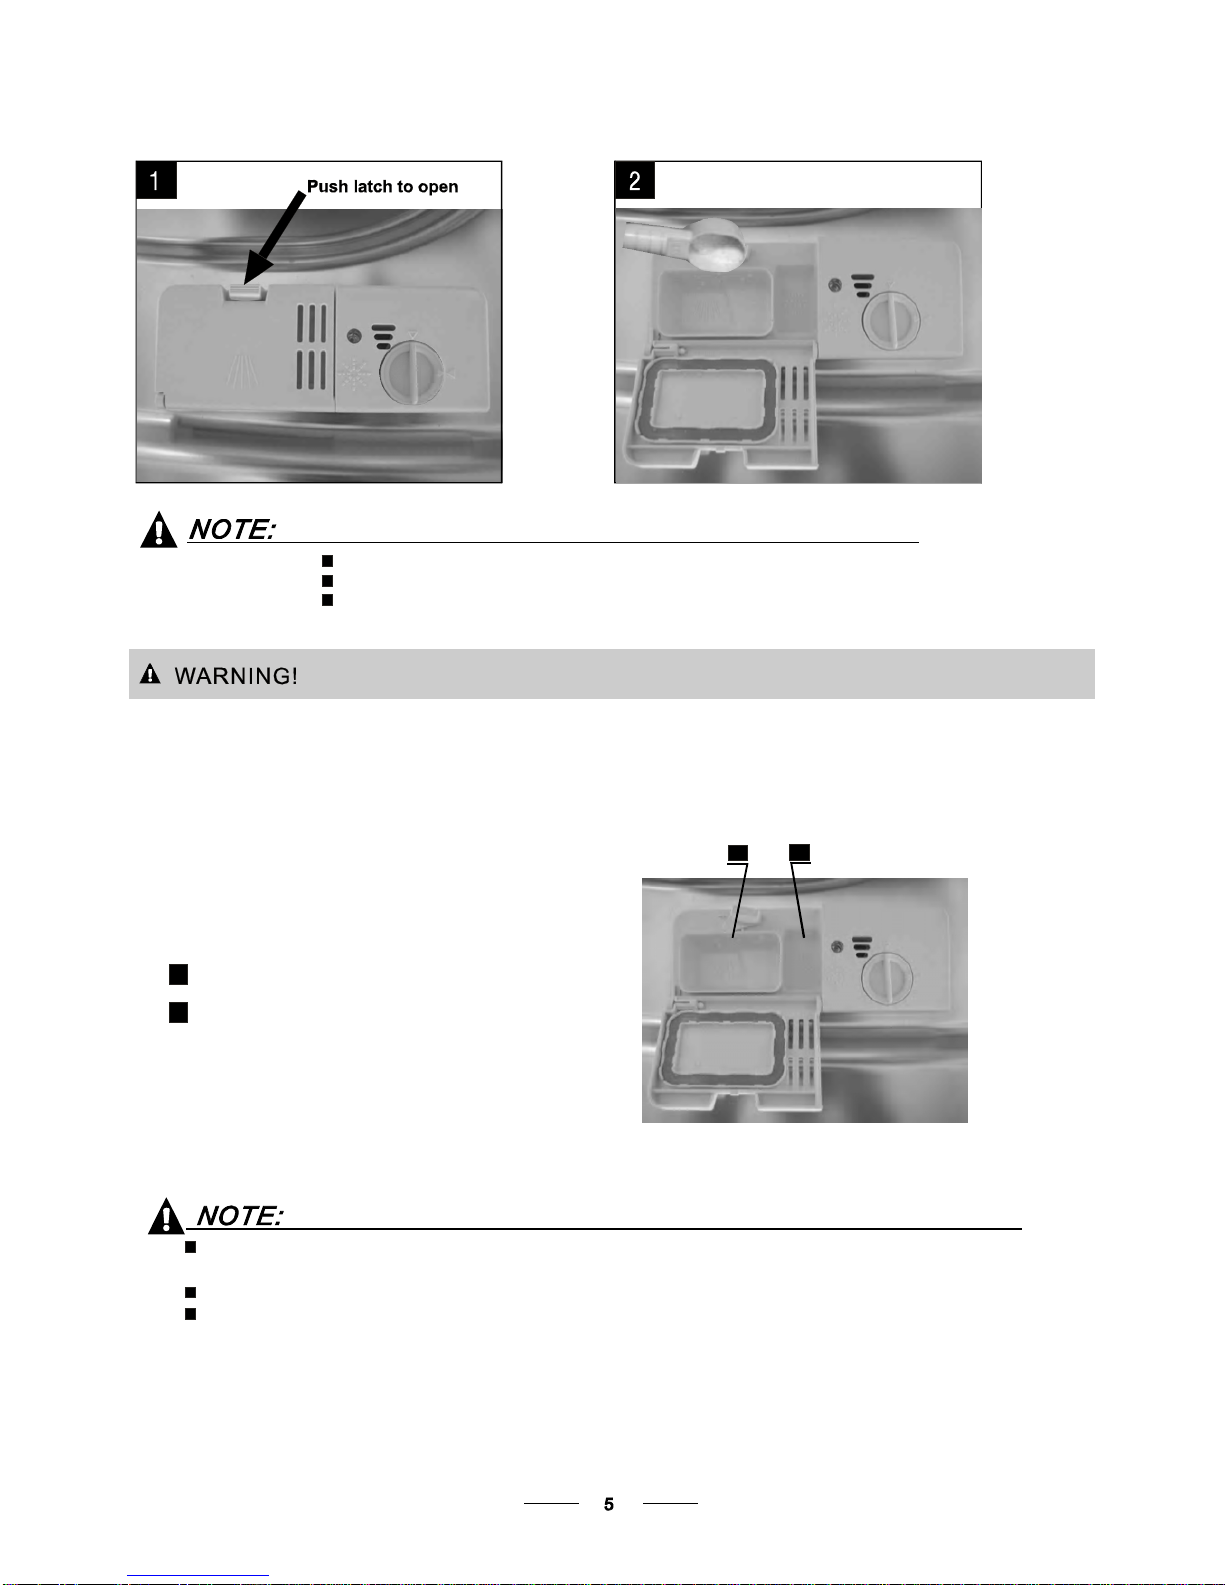
If the lid is closed: press release button. The lid will spring open.
Fill the detergent dispenser with detergent.
Themarkingindicatesthedosing levels ,as
illustratedontheright:
The place for main wash cycle detergent.
The placefor pre -wash cycle detergent.
Please observe the manufacturers dosing andstorage
Recommendations as stated on the detergent packaging.
Close the lid and press until itlocks inplace.
Ifthedishesare heavily soiled, placean additional
detergent dose in the pre-wash detergent chamber. This detergent will takeeffect during the pre-wash phase.
A
B
Fill in Detergent
The information about the amountof detergentfor the singleprogramme please refer to the Wash Cycle
Tableon the page 8.
Please beaware, thataccording tothe level soiling and the specific hardness of water differences are possible.
Please observe the manufacturer'srecommendations on the detergent packaging.
AB

Cutlery withwooden, horn china or
mother-of-pearl handles
Plastic items that are not heat resistant
Older cutlery with glued partsthat are not
temperatureresistant
Bonded cutlery items or dishes
Pewter or cooper items
Crystal glass
Steel items subject to rusting
Wooden platters
Items madefromsynthetic fibres
Some types of glasses can become
dull aftera large number of washes
Silver and aluminum parts have a
tendencyto discolourduring washing
Glazed patterns may fade if machine
washed frequently
Are not suitable Are oflimited suitability
Dishes and itemsof cutlery mustnot lie insideoneanother, or cover each other.
To avoid damage to glasses, theymust not touch.
Load large items which are most difficult to cleanintothe lower basket.
The upper basket isdesigned to hold more delicate and lighter dishware such as glasses, coffee
andtea cups
Long bladed knives stored in an upright positionare a potential hazard!
Long and/or sharp itemsof cutlery such as carving knives must be positioned
horizontallyin the upperbasket.
Please do not overload your dishwasher. This is important forgood resultsandfor
reasonable consumption of energy.
Load hollow items such as cups, glasses, pans etc. With the opening facing downwardsso that
water cannot collect in the container or a deep base.
Consider buyingutensils which are identifiedas dishwasher-proof.
Usea mild detergent thatisdescribedas 'kind to dishes'.If necessary, seek further
information fromthedetergent manufacturers.
Forparticular items,select aprogramwithaslow atemperature aspossible.
To prevent damage, do not take glass andcutlery out of the dishwasher immediately
after the programme has ended.
(For best performance of the dishwasher, follow theseloading guidelines.
Features and appearance of baskets and cutlery basketsmay vary from your model.)
Scrape off any largeamounts ofleftover food.Soften remnants ofburnt food inpans.
It is not necessary torinse the dishes under running water.
Place objects inthe dishwasher in the following way:
1.Items such as cups, glasses, pots/pans, etc. are faced downwards.
2.Curved items, or ones with recesses, should be loaded aslant so that water can run off.
3.All utensils are stacked securely and can not tipover.
4.All utensils are placed in the way that the spray arms can rotatefreely during washing.
Very small items should not be washed in the dishwasher as they could easily fall out of the basket.
To prevent water dripping from the upperbasket into the lower basket, we recommend that you
empty the lower basket first and thenthe upper basket.

The upper basket is designed to hold more delicate
and lighter dishware such as glasses, coffee and
teacups and saucers, aswell asplates,small bowls
andshallow pans (as long asthey arenot toodirty).
Positionthedishes andcookwareso thatthey will
notgetmoved bythespray ofwater.
We suggest that you place large items and the most
difficult tocleanitemsareto be placedintothelower
basket: such as pots, pans, lids, serving dishes and
bowls, as shown in the figure below. It is preferable to
place serving dishes and lids on the side of the racks
in order to avoid blocking the rotation of the top spray
arm.
Pots,servingbowls,etc,mustalwaysbeplacedtopdown.
Deep pots should be slanted to allow water to flow out.
Please be reminded that:
The Bottom Basket features folding spikes so that larger or more pots and pans can be loaded.
Folding Spikes of Lower Basket
For better stacking of pots and pans,
the spikes can be folded down as
show in the picture right.
Adjusting the Upper Basket
The height ofthe upper basket can be adjusted in order to
create more space for largeutensilsboth for the upper
/lowerbasket. The height of the upper basket can be
adjusted byplacingthewheels on differentheight of the
rails. Long items, serving cutlery, salad servers and knives
shouldbeplacedontheshelfsothat they donotobstruct
therotationofthesprayarms..
Folding back the cup shelives
For better stacking of pots and pans,
the spikes can befolded down as
show in the picture right.
Cutleryshouldbe placed inthecutlery rackseparately
from each other in the appropriate positions, and do
make sure the utensils do not nest together, this may
causebadperformance.
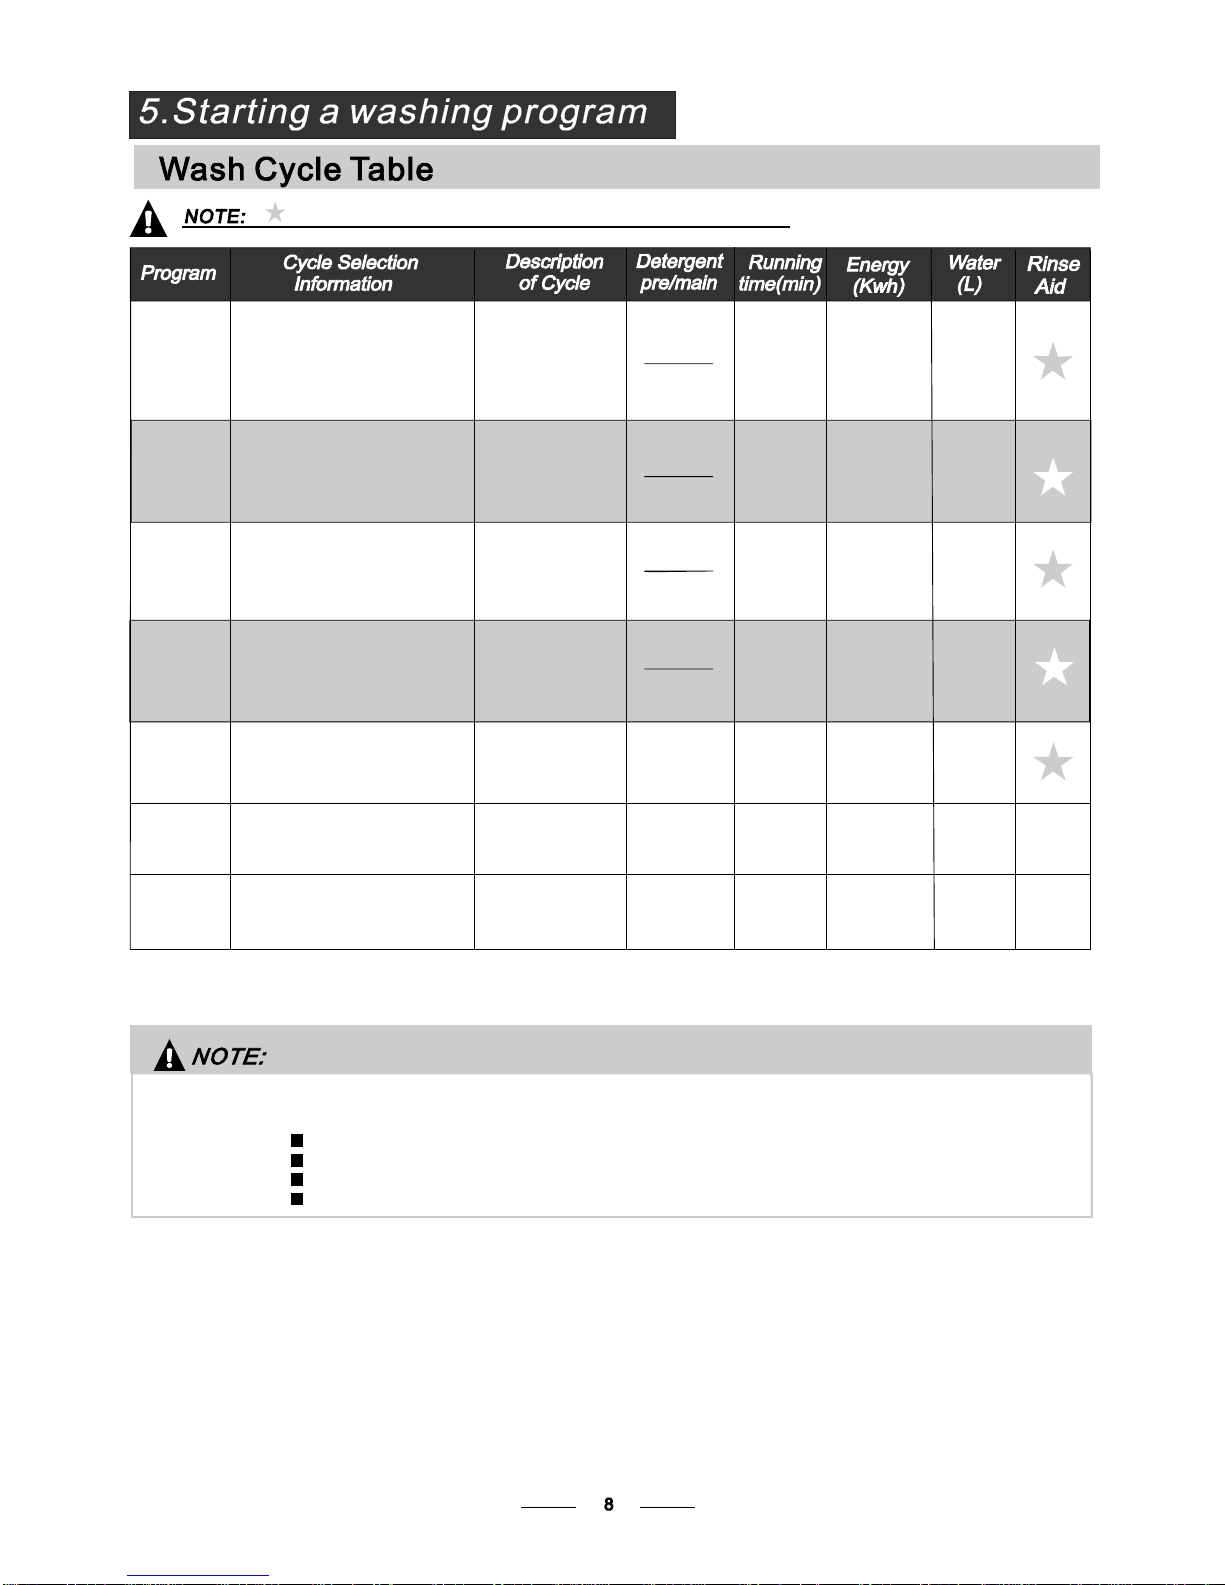
* : This programis the testcycle.Theinformationfor comparabilitytest
in accordance with , as follows:
AS/NZS 2007.1
AS/NZS 2007.1
Capacity: 10setting
Position Upper basket: upper wheels on rails
Rinse aid setting: 6
Open the door slightly 50mm to assist indrying of the dishes after every wash
Means: need to fill rinse into the Rinse-AidDispenser.
()
5/22.5g
Pre-wash(50 )
wash (65 )
Rinse
Rinse
Rinse(65 )
Drying
℃
℃
℃
Pre-wash(45 )
Wash (55 )
Rinse
Rinse (65 )
Drying
℃
℃
℃
Wash (50 )
Rinse
Drying
Pre-wash
Rinse(50 )
℃
℃
Wash (40 )
Rinse
Rinse(45 )
℃
℃
155
130
135
40
1.05
0.61
1.2
0.45
16
13
12.2
10
Wash(65 )
Rinse(60 )
Rinse (65 )
Drying
℃
℃
℃
90 10.5
1.1
20g
Intensive
For heaviest soiled crockery,
and normallysoiled pots
pans dishesetc withdried
onsoiling.
、
、
Fornormallysoiled loads
thatneed quick wash.
Ashorter wash for lightly
soiled loads that do not
need drying.
For lightlysoiled loads,
such as glasses,
crystal and fine china.
Pre-wash
wash(40 )
Rinse
Rinse(60 )
Drying
℃
℃
110
0.7 13
Rapid
90 Min
Glass
For heavilysoiled loads,
such as pots, plates, glasses
and lightly soiled pans.
Normal
Standard daily cycle for
normally soiled loads, such
as pots plates glasses.、、
Heavy
(*AS/NZS 2007.1)
(OrAll )in1
5/22.5g
(OrAll )in1
5/22.5g
(OrAll )in1
5/22.5g
(OrAll )in1
Soak
80.013.5
Torinsedishesthatyouplan
towashlaterthatday
.
Pre-wash
27.5g

It is dangerous to open the door when washing, becausethe hot water may scald you.
When the working cycle has finished, the buzzer of the dishwasher will sound for 8 seconds, then stop.Turn off
the appliance using the Power switch button, shut off the water supply and open the door of the dishwasher.
Wait for afew minutes before unloading thedishwasher toavoidhandlingthe dishes and utensils while they
are still hot and more susceptible to breakage. Theywill also dry better.
Switch Off the Dishwasher
The program light is on but is not blinking, only in this case the programme has ended.
Power1.Switch off the dishwasher by pressingthe button.
2.Turnoffthewater tap.
Open the door carefully.
Hot dishes are sensitive to knocks. The dishes should therefore be allowed to cool down around 15 minutes
before removingfromthe appliance.
Open the dishwasher door,leave it ajar and wait a few minutes before removing the dishes. In this way they
will be cooler andthe drying will be improved.
Unloading thedishwasher
It is normal that the dishwasher is wet inside.
Empty thelower basket firstand then the upper one. This will avoid water dripping from the upper Basket onto
the dishes in the lower one.
If you openthedoor , the machine will pause. The programlight will
stop blinking and the buzzer will be every minute unless you close the door . After
you close the door ,the machinewillkeeponworking after 10seconds.
during a wash cycle
beeping
Premise:
Acycle that is underway can only be modified if it has only been running for a short time. Otherwise, the
detergent may havealready been released, and the appliance may have already drained the wash water.
If this is the case, the detergent dispenser must be refilled (see the section entitled " Loading the Detergent " ).
Press the Start/Pause button, the machine will pause, press the program button for more than 3 then
youcanchangethe program to the desired cyclesetting (see the sectionentitled " Starting a washcycle. . .").
1
2seconds,
Aforgotten dish can be added any time before the detergent cup opens.
Add forgotten dishes.
Close the door
After the spray arms stop working,you can open the door
completely.
2
3
Open the door a little to stop the washing.
14
5
6
Press the Start/Pause button
Press the button, the dishwasher will run
after 10 seconds.
Start/Pause
When you press the Start/Pausebutton to pause during washing, the running indicator will stop blinking and
the dishwasher will every minute unless you press the button to start.Start/Pausebe beeping
Starting a cycle wash
1 Draw out the lower and upper basket, load the dishes and push them back.
It is to load the lower basket first, then the upper one (see the section entitled
Loading the Dishwasher ).
2 Pour in the detergent (see the section entitled Detergent and Rinse Aid ).
3 Insert the plug into the socket. The power supply is 220-240 VAC /50 HZ, the specification
of the socket is 10A 250VAC. Make sure that the water supply is turned on to full pressure.
4 Close the door, press the ON/OFF Button, and the display will turn on.
5 Press the program Button to select your desiredprogram.
“”
“”
If a program is selected, the response light will light. Then press the Start/Pause button, the
dishwasher begins to start.
recommended
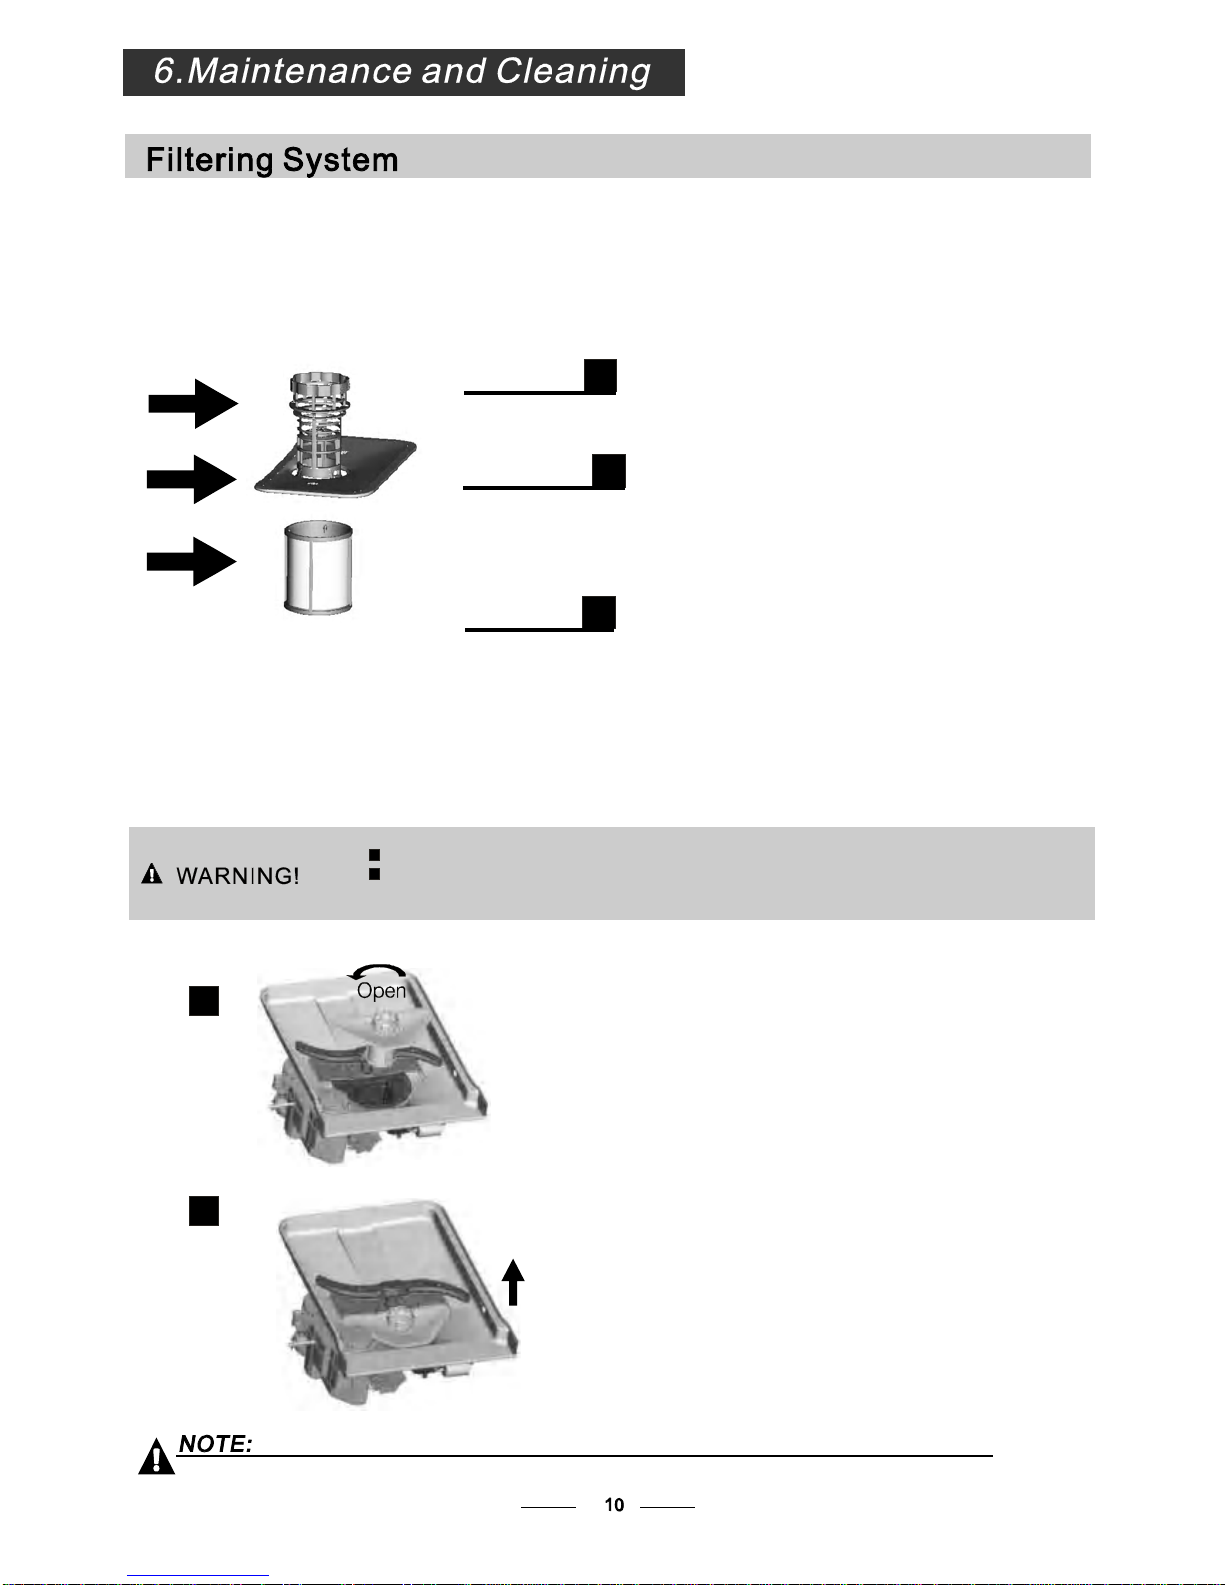
The filter preventslarger remnants of food or other objects from getting inside thepump.
Theresidues may blockthefilter, inthis casethey must be removed.
The filter system consists of a coarse filter,a flat (Main filter)
Anda microfilter(Fine filter).
Food and soil particles trapped inthis filterarepulverizedby a
special jet on the lower spray arm and washeddown todrain.
Larger items, such as piecesof bones or glass, that could block
the drain Toremove
the itemsandeasily become trapped inthecoursefilter
caughtbythe filter,gently squeeze thetap on thetopofthis
filterandliftout.
Thisfilter holds soil and food residuesin the sumpareaand
prevents it from being on thedishes duringwash cycle.redeposited
Main filter
1
Coarse filter
2
Fine filter
3
2
3
1
Filterassembly
Thefilter efficiently
For best performance and results, the filter must be cleaned regularly. this reason, it isa good idea to
remove the larger food particlestrappedin the filter after each washcycleby rinsing the semicircular filterand
cup under runningwater. To remove the filter device, pull the cup handle in the upward direction.
removes food particles from the wash water, allowing it to be recycled during the cycle.
For
The dishwasher must never be used without the filters.
Improper replacementof the filter may reduce the performancelevel of the appliance
and damage dishes and utensils.
Step 1 Turn the filter in anti-clockwise direction.:
Step 2 lift the filter up.:
When following this procedure from step 1 to step 2, the filter system will be removed;
when following it from Step 2 to Step 1, the filter system will be installed.
1
2

The control panelcan be cleaned by using a lightly dampenedcloth.
After cleaning, make sure to dry it thoroughly.
For the exterior, use agood appliance polish wax.
Never usesharp objects, scouring pads or harsh cleaners on any part of the dishwasher.
ProtectAgainst Freezing
1.Cut off the electricalpower to thedishwasher.
2.Turn off the water supply and disconnect the water inlet pipe from the water valve.
3.Drain the water from the inlet pipe and water valve. (Use a pan to gather the water)
4.Reconnect the water inlet pipe tothe water valve.
5.Remove the filter at the bottomof the tub and use a sponge to soak up water in the sump.
please take frost protection measuresonthe dishwasher in winter. Every fter washingcycles,
please operate as follows time a
:
Cleaning the Filter
CleaningThe Door
To clean the coarsefilter and the fine filter, use a cleaning brush. Reassemble the filter parts as shown in the figures
on the previous page and reinsert the entire assembly in the dishwasher, positioning it in its seat and pressing downwards.
When cleaning the filters, don't knock on them. Otherwise, thefilters could be
contorted andtheperformance ofthe dishwashercouldbe decreased.
To clean theedge around the door, you shoulduseonly a soft warm, damp cloth.
To avoid penetrationof waterinto the door lock and electrical components,do not
use a spray cleaner of any kind.
Never use a spray cleaner to clean the door panel as it may damage the door lock
and electricalcomponents.
Abrasive agents or some paper towels should not be used because of the riskof
scratching or leaving spots on the stainless steel surface.
Cleaning the SprayArms
If your dishwasher cannot work because of the ice,
please contact professional service persons.
It is necessary to clean the spray arms regularly for hard
waterchemicalswillclogthe sprayarmjetsandbearings.
- Inspect the filters for blockingafter every time the dishwasher has been used.
- By unscrewing the coarse filter, you can remove the filter system. Removeanyfoodremnants and
cleanthefilters underrunningwater.
Remarks:
The entire filter assembly shouldbe cleaned once a week.
To remove thelower spray arm, pulloutthe spray arm upward.
To remove the upper spray arm, hold the nut, rotate the arm
clockwisetoremoveit.
Wash the arms in soapy and warm water anduse a soft brush to
clean the jets. Replace them after rinsing them thoroughly.

Itis recommend that yourun a washcycle withthe
dishwasher emptyand thenremove the plug from the
socket, turn off the water supply and leave the door of
the appliance slightly open. This will help the door
sealstolastlongerandpreventodoursfromforming
withinthe appliance.
If the appliance must be moved, try to keep it in the
verticalposition.If absolutelynecessary, itcanbe
positioned on its back.
Oneofthefactorsthatcauseodourstoforminthe
dishwasher is food that remains trappedin the seals.
Periodic cleaning with a damp sponge will prevent this
from occurring.
Ensurethevoltage and frequencyof the powerbeing usedcorresponds to
those on the rating plate. Only insert the plug into an electricalsocketwhich is earthed
properly. If the electrical socket to which the appliance must be connected is not
appropriate for theplug , replace the socket, rather than using aadaptor or thelikes as
they couldcause overheatingandburns.
Pleaselook at therating label to know the ratingvoltage and connect the dishwasher to the appropriate power supply.
Use the required fuse 10 amp, timedelay fuse or circuit breakerrecommended and provide separate circuit serving
only this appliance.
Position the appliance in the desired location. The back should rest against thewall behind it, and the sides,
along the adjacent cabinets or walls. The dishwasheris equippedwith water supply and drain hoses that can
be positioned either to the rightor the left sidesto facilitate proper installation.
Once the applianceis positioned for levelling, the height of the dishwasher
may be alteredvia adjustment of the screwing level ofthe feet. In any case,
theappliance should not be inclined more than 2 .
For personal safety:
DO NOT USEAN EXTENSION CORD OR AN ADAPTER PLUG WITH THIS APPLIANCE.
DO NOT, UNDERANY CIRCUMSTANCES, CUT OR REMOVE THE EARTHING
CONNECTION FROM THE POWER CORD.
Before cleaning or performing maintenance, always
remove the plug from the socket.
Tocleantheexteriorandrubberparts ofthedishwasher,
donot use solventsor abrasive cleaningproducts.
Only use acloth with warm soapy water.
To remove spots or stains from the surface of the
interior, use a cloth dampened with water and a little
vinegar, ora cleaning product madespecifically for
dishwashers.
Remove the Plug
No Solvents orAbrasive Cleaning Moving theAppliance
Seals
After every wash, turn off the water supply to the
appliance and leave the door slightlyopen sothat
moisture and odours are not trapped inside.
After EveryWash
When not in Use for aLong Time
This appliance must be earthed. In the event of a malfunction or breakdown, earthing will reduce the risk of
electric shock by providing a path of least resistance for the electric current. This appliance is equipped with a
cord having an equipment-earthing conductor and an earthing plug. The plug must be plugged into an
appropriate outlet that is installed and earthed in accordance with all local standards and requirements.

for personal safety:
DO NOT USE AN EXTENSION CORD OR AN ADAPTER PLUG WITH THIS APPLIANCE.
DO NOT, UNDER ANY CIRCUMSTANCES, CUT OR REMOVE THE
FROM THE POWER CORD. EARTHING
CONNECTION
Improper connection of the equipment earthing conductor can result in the risk of an
electric shock.
Check with a qualified electrician or service representative if you are in doubt whether the
appliance is properly earthed.
Do not modify the plug provided with the appliance. If the plug does not fit properly to the
outlet, please have a qualified electrician to install a proper outlet.
Connect the cold water supply hose to a threaded 3/4(inch) connector and make sure
that it is fastened tightly in place.
Ifthewater pipes are new or have not been usedfor an extended period of time,let the
waterrunto make surethatthewater is clear. This precautionis needed to avoid the
risk ofthe water inlet to be blocked anddamage the appliance.
Please closethe hydrant afterusing.
Insert the drain hoseintoa drain pipe with a minimum diameter of 40mm, or let it run into thesink, making sure to
avoid bending or crimping it.The top of the hose mustbe less than 1000mm.
A
Counter
Front
Drain pipe
NOTE
The top of the hose
must be less than
1000mm.
φ40mm
B

The following things should be checked beforestarting the dishwasher.
The content of this manual is very helpfulto the users.
After installation, please make sure to keep this manual.
1
The dishwasher is level andfixed properly
2
The inlet valve is open
3
There is a leakage at the connections of theconducts
4
The wires are tightly connected
5
The power is switched on
6
The inlet and drain hoses are knotted
7
Allpackingmaterialsand printings should be taken out fromthe dishwasher
Extension Hose
Ifyou needa drainhoseextension,make sure tousea similar drain hose.
It mustbe no longer than 4 metres; otherwise the cleaning effectof the dishwasher could be reduced.
Water Outlet
Connect the waterdrain hose.The drain hose must be correctly fittedto avoid water leaks.
Ensure that thewater drainhose is not kinked or squashed.
If the sink is 1000mm higher from the floor, the excess water in hosescannot be drained directly
into the sink.Itwillbe necessary todrainexcesswater fromhoses into abowlorsuitable
container that is held outside and lower than the sink.
How to Drain Excess Water From Hoses
Syphon Connection
Insert the drain hose into a drainpipe with a minimum diameter of 40mm, or let it run into the sink, making sure to
avoid bending or crimping it.The topof the hose must be less than 1000mm.

Fuse blown, or the home
circuit breaker has been
triggered.
Replace fuse or reset circuit breaker. Remove any other
appliances sharing the same circuit with the dishwasher
Spilled rinse-aid Always wipe up rinse-aid spills immediately.
Hard water minerals
The affected items are
not corrosion resistant.
Aspayarmis
knocking against
an item in a basket
r
Items of crockery
are loose in the
wash cabinet
This may be caused
by on-site installation
or the cross-section of
the piping.
To clean the interior, use a damp sponge with
dishwasher detergent and wear rubber gloves.
Never use any other cleaner than dishwasher
detergent for the risk of foaming or suds.
Interrupt the programme, and rearrange the items
which are obstructing the sp ay arm.r
Interrupt the programme,
and rearrange the items of crockery.
This has no influence on the dishwasher function.
if in doubt, contact a suitably qualified plumber.
Detergent with
colourant was used Make sure that the detergent is the one without
colourant.
Improper detergent
Make sure the dishwasher is turned on and the door is
closed securely.
Check that the water supply is connected properly and
the water is turned on.
Make sure to close the door properly and latch it.
Make sure the power cord is properly plugged into the
wall socket.
Power supply is not
turned on
Error code:E1;
Water pressure is low
Door of dishwasher
not properly closed.
Kink in drain hose
Filter clogged
Kitchen sink clogged
Check drain hose.
Check the filter
(see section titled )" Cleaning The Filter "
Check the kitchen sink to make sure it is draining well.
If the problem is the kitchen sink not draining ,you may
need a plumber rather than a serviceman for dishwashers.
Use only the special dishwasher detergent to avoid suds.
If this occurs, open the dishwasher and let suds evaporate.
Add 1 gallon of cold water to the tub. Close and latch the
dishwasher, then select any cycle. Dishwasher will drain
out the water at the first step.
Repeat if necessary.
Open the door after the draining
has stopped and check if the suds have disappeared.
The items should be corrosion resistant.

The dishes were not
loaded correctly. See notes in " Loading the Dishwasher Baskets ".
Select a more intensive programme.
See" Wash Cycle Table ."
Use more detergent, or change your detergent.
Rearrange the items so that the sp ay can rotate freely.r
Clean and/or fit the filter combination correctly.
Clean the sp ay arm jets. See "Cleaning the Spray
Arms". r
Use less detergent if you have soft water and select
a shorter cycle to wash the glassware and to get
them clean.
Use a mild abrasive cleaner to eliminate those marks.
Re-loading the dishes properly.
Load the dishwasher as suggested in the directions.
Increase the amount of rinse-aid/refill the rinse-aid
dispenser.
Do not empty your dishwasher immediately after
washing. Open the door slightly so that the steam can
escape. Begin unloading the dishwasher only once
the dishes are barely warm to the touch. Empty the low
basket first. This prevents water form dropping off
dishes in the upper basket.
In short program the washing temperature is lower.
This also lowers cleaning performance. Choose
a program with a long washing time.
Water drainage is more difficult with these items.
Cutlery or dishes of this type are not suitable for
washing in the dishwasher.
The programme was
not powerful enough.
Not enough detergent
was dispensed.
Items are blocking
the path of sp ay arms.r
The filter combination
inthebaseofwash
cabinet is not clean or
is not correctly fitted.
This may cause
the sp ay arm jets
to get blocked.
r
Combination of soft
water and too much
detergent.
Aluminum utensils
have rubbed against
dishes.
Dishes block
detergent cups.
Improper loading
Too little rinse-aid
Dishes are removed
too soon
Wrong program
has been selected
Use of cutlery with
a low-quality coating
Overflow.
When some malfunctions come on, the appliance will display error codes to warn you:
Longer inlet time.
Faucets is not opened, or water intake is
restricted,or water pressure is too low.
Some element of dishwasher leaks .
E1
E4
If overflow occurs, turn off the main water supply before calling a service.
If there is water in the base pan because of an overfill or small leak,
the water should be removed before restarting the dishwasher.

Height : 845mm
Width : 448mm
Depth : 600mm(with the door closed)
Water pressure: 0.04-1.0MPa
Power supply: see rating label
Capacity: 10place settings
Table of contents
Other EURO Dishwasher manuals


