EUROPRO MIXPRO 14 User manual

USER MANUAL
MIXPRO 14
Ref. 30760 (oor screed version) - 30886 (plaster / air insulation version)
EUROPE PROJECTION - 228, avenue Olivier Perroy 13790 ROUSSET
Tél : +33 (0)4 42 29 08 96 – Fax : +33 (0)4 42 53 44 36
SAS au capital de 400 000€ - SIREN 394 961 510 – NAF 2892 Z
Edition of 11/09/2018

User manual - MIXPRO 14 201809-321-ENG
P2

201809-321-ENG User manual - MIXPRO 14
P3
SUMMARY
1. INTRODUCTION...........................................................p. 4
2. USER MANUAL ...........................................................p. 5
2.1. Importance of the manual .................................................p. 5
2.2. Receivers of the manual ..................................................p. 5
3. WARNING.................................................................p. 6
3.1. Safety ...................................................................p. 6
3.2. Electric connection .......................................................p. 8
3.3. End-of-life of the product ..................................................p. 8
4. YOUR MACHINE ..........................................................p. 9
4.1. Description ..............................................................p. 9
4.2. Technical characteristics ..................................................p. 9
4.3. Identication of the components ...........................................p.10
5. USE OF THE MACHINE....................................................p.12
5.1. Prerequisites.............................................................p.12
5.2. Start-up of Mixpro 14 oor screed version ..................................p.13
5.3. Start-up of Mixpro 14 plaster version .......................................p.14
5.4. Start-up of Mixpro 14 air insulation version..................................p.15
5.5. Error codes ..............................................................p.16
6. CLEANING PROCEDURE..................................................p.17
7. DECLARATION OF CONFORMITY .........................................p.19
8. WARRANTY...............................................................p.21
8.1. Warranty conditions ......................................................p.21
8.2. Warranty certicate .......................................................p.23

User manual - MIXPRO 14 201809-321-ENG
P4
1. INTRODUCTION
You just acquired a MIXPRO 14 continuous mixer and all the team of Europe Projection thanks you
for the condence you have granted us.
Manufacturer of professional equipments for paint and llers, we have put our know-how for 20 years
at the service of the users of our machines.
Our technical and commercial team is at your disposal for any further information you may need about
the machine you just acquired.
EUROPE PROJECTION
228, avenue Olivier Perroy 13790 ROUSSET
Tél : +33 (0)4 42 29 08 96 – Fax : +33 (0)4 42 53 44 36
SAS au capital de 400 000€ - SIREN 394 961 510 – NAF 2892 Z

201809-321-ENG User manual - MIXPRO 14
P5
2. USER MANUAL
2.1. IMPORTANCE OF THE MANUAL
This manual is a key part for the use of your machine. It summarizes the procedures of starting-up,
cleaning and maintenance of the device and also the safety instructions you need to observe.
Read carefully all the working and safety instructions and the warnings included in this manual before
starting your machine.
Most of the accidents are caused by the non-compliance of the safety standards and rules.
This manual must be kept near the machine, within reach of the user and held in good condition until
the nal destruction of the machine.
In case of loss or deterioration of the manual, you can ask the machine manufacturer mentioned on
page 4 for a copy at any moment.
2.2. RECEIVERS OF THE MANUAL
This manual is intended to any staff which will manipulate the machine :
- people in charge of the transport of the machine
- people in charge of the use of the machine
- people in charge of the cleaning and maintenance of the machine
- people in charge of the nal destruction of the machine

User manual - MIXPRO 14 201809-321-ENG
P6
3. WARNING
3.1. SAFETY
Using the machine in an incorrect way or in non-compliance of the safety instructions
indicated in this manual can cause death or serious injuries.
Read carefully all the working and safety instructions and the warnings contained in this
manual before starting your machine.
• Respect all the safety standards before running the equipment.
• Use the equipment only for the applications specied in the manual.
• Always remain alert when using the equipment.
• Transport the machine using the handles or the appropriate grips.
• During the breaks, disconnect electrically the machine.
• Run the equipment to its nominal voltage.
• Let at least 50 cm of free space between the equipment and any obstacle so that the air
ow is not blocked.
• Know how to quickly stop the equipment in case of necessity.
• Never use the equipment while it is running abnormally or it is defective.
• Do not direct a water jet or ammable liquid on the machine.
• Never direct an air jet or product jet on a person or an animal.
• Do not touch warm surfaces of the equipment.
• Always wear adequate body protections (glasses, gloves, overall and mask) and pay
attention to long hair.
• Never touch moving parts.
• Do not insert any object or the hands inside the protection grids to avoid any accident or
damage to the machine.
• For any outside job, only use appropriate extension cords.
• Maintain the equipment carefully and clean it properly after every use.
• Disconnect the equipment before any intervention.
• Avoid absolutely to unscrew any connection while the machine is under pressure.
• Check the damaged parts.
• Do not clean the plastic parts with solvant.
• In case of damage of the electric cable or the plug, do not run the machine and contact a
licensed After-Sale Service to put genuine parts instead of the defective ones.
• In case of needed After-Sale Service, always specify the machine model and its serial
number.
• For any replacement of parts, only use genuine parts.

201809-321-ENG User manual - MIXPRO 14
P7
3. WARNING (continued)
3.1. SAFETY (continued)
• Do not modify the machine.
• Do not cut or dismantle the protection grids.
• Do not open the electric box.
WORKSPACE
• Maintain the workspace clean and clear.
• Ambient operating temperature must be from 5°C and 35°C.
• Do not use the equipment in a potentially explosive area.
• Do not place any potentially inammable objects in close proximity to the machine.
• Take away every not qualied person from the working area of the machine, as well as children
and animals.
•
In case of installation of the machine on scaffolding or a plan above ground level, attach the machine
to avoid any fall while operating.
• Do not install the equipment on an inclined surface to avoid the risks of unexpected moves or falls.
HOSES
• Always use hoses and connections adapted to the used product (genuine parts), do not try to x it.
• Do not walk on the hoses, do not bend them.
• Do not use the hoses to pull the machine.
STORAGE
• Keep the equipment in a clean and clear area in which the temperature does not exceed +35°C.
• After every use, necessarily grease the pump with a mixture of water + storage liquid to avoid it
blocking up. The storage of a not greased pump can damage it seriously.
IN CASE OF NECESSITY, WE SAVE OURSELVES THE RIGHT TO MAKE ANY USEFUL
MODIFICATION WITHOUT ADVANCED NOTICE.

User manual - MIXPRO 14 201809-321-ENG
P8
3. WARNING (continued)
3.2. ELECTRIC CONNECTION
The electric connection of the machine must be on a 16A - 230V plug with a differential circuit
breaker.
Before any intervention on the machine, make sure that every energy supply is cut (air and
electricity).
GROUND CONNECTOR
All the machines must be connected to the ground when they work to protect the operator from electric
shocks. Our machines are all equipped with standardized connection plugs.
Electric connection must be made by a qualied technician. It is fobidden to modify or dismantle the
machine, especially the electric box.
Repairs must be made by an authorized center or our After-sale Service.
During any intervention on the machine, make sure that the ground is well reconnected.
EXTENSION CORDS
During the use of an extension cord, make sure that it is not crushed or damaged and that it contains a
ground. Check that the section of the used extension cord is sufcient to support the machine when it
is working. A too thin extension cord can cause voltage drops or overheating of the machine.
In case of use of a cable reel, it is imperative to unwind it entirely, otherwise, the equipment can be
damaged. The section must be proportional to the length of the cord.
3.3. END OF LIFE OF THE PRODUCT
At its end-of-life, the machine must not be eliminated with the other household waste. The
uncontrolled elimination of waste can harm the environment or human health. Individuals are
invited to contact the distributor which sold them the product or to inquire with their city hall
to know where and how to get rid of the product so it can be recycled while respecting the
environment.
Under the regulation of Waste of Electrical and Electronic Equipments (WEEE), we undertake
to process the used EEEs according to the following provisions: applicable only to products on
the market since 08/13/05, under the brands EUROPE PROJECTION or VOLUMAIR, products
of other brands sold by our company (upon presentation of the corresponding invoices),
products that operate using electrical energy (for example, thermal washers or compressors
do not fall into this category).
Treatment modality
WEEE returns collected by our clients/distributors at their own expense to our collection points
in Antony (92) or Rousset sur Arc (13). Upon receipt, the products are sorted by our employees
and directed to the most appropriate processing channels.
For any further information, please contact our hotline to conseil@euromair.com or
+33 (0) 4 42 29 08 96.

201809-321-ENG User manual - MIXPRO 14
P9
4. YOUR MACHINE
4.1. DESCRIPTION
Very handy machine, providing a quality continuous mixing.
Applications: oor screed, plaster, air insulatioon, reproof products, light powders (polystyrene) ...
Products with instant kneading and no need for rest time.
Do not use products not compatible with the mechanized projection, of which components are
not in homogeneous mixture, solvant-based
4.2. TECHNICAL CHARACTERISTICS
Floor-screed version Plaster / Air insulation version
Tank capacity 45 L 45 L
Electrical supply 230 V - 50 Hz 230 V - 50 Hz
Thermal protection yes yes
Geared-motor driving mixing
arm 1,5 kW 1,5 kW
Compressor -yes
Compressor power -2,2 kW
Compressor air ow -22 m3/h
Variable speed yes yes
Water pump yes yes
Flow-meter digital display digital display
Water safety switch yes yes
Product pressure from 0 to 20 bar from 0 to 20 bar
Product ow-rate depending on pump used depending on pump used
Rotor/stator MAP 3 MAP 3
Spraying yield -14 bags of 33 kg/h
Pouring yield 20 bags of 25 kg/h 20 bags of 25 kg/h
Spraying max. hose length
-
15 m
Pouring max. hose length 40 m 40 m
Loading height 99 cm 99 cm
Dimensions (L x w x h)
78 x 60 x 148 cm
78 x 60 x 148 cm
Weight
82 kg
82 kg
Delivered with
- a Ø19 x 10 m hose
- a Ø19 x 2 m hose
- a 10 m wire-controlled remote control
- an unplugging key
- a mixing tube cleaning part
- two cleaning balls Ø30
- a mounting spray for rotor/stator
- a Ø25 x 15 m air/product hose
- a Ø19 x 2 m hose
- an EUROPRO 30+ compressor
- a Ø10 x 10 m air extension hose
- a lumps-remover system with lter
- an unplugging key
- a mixing tube cleaning part
- a mounting spray for rotor/stator
- a spray lance
User manual - MIXPRO 14 201809-321-ENG
P10
4. YOUR MACHINE (continued)
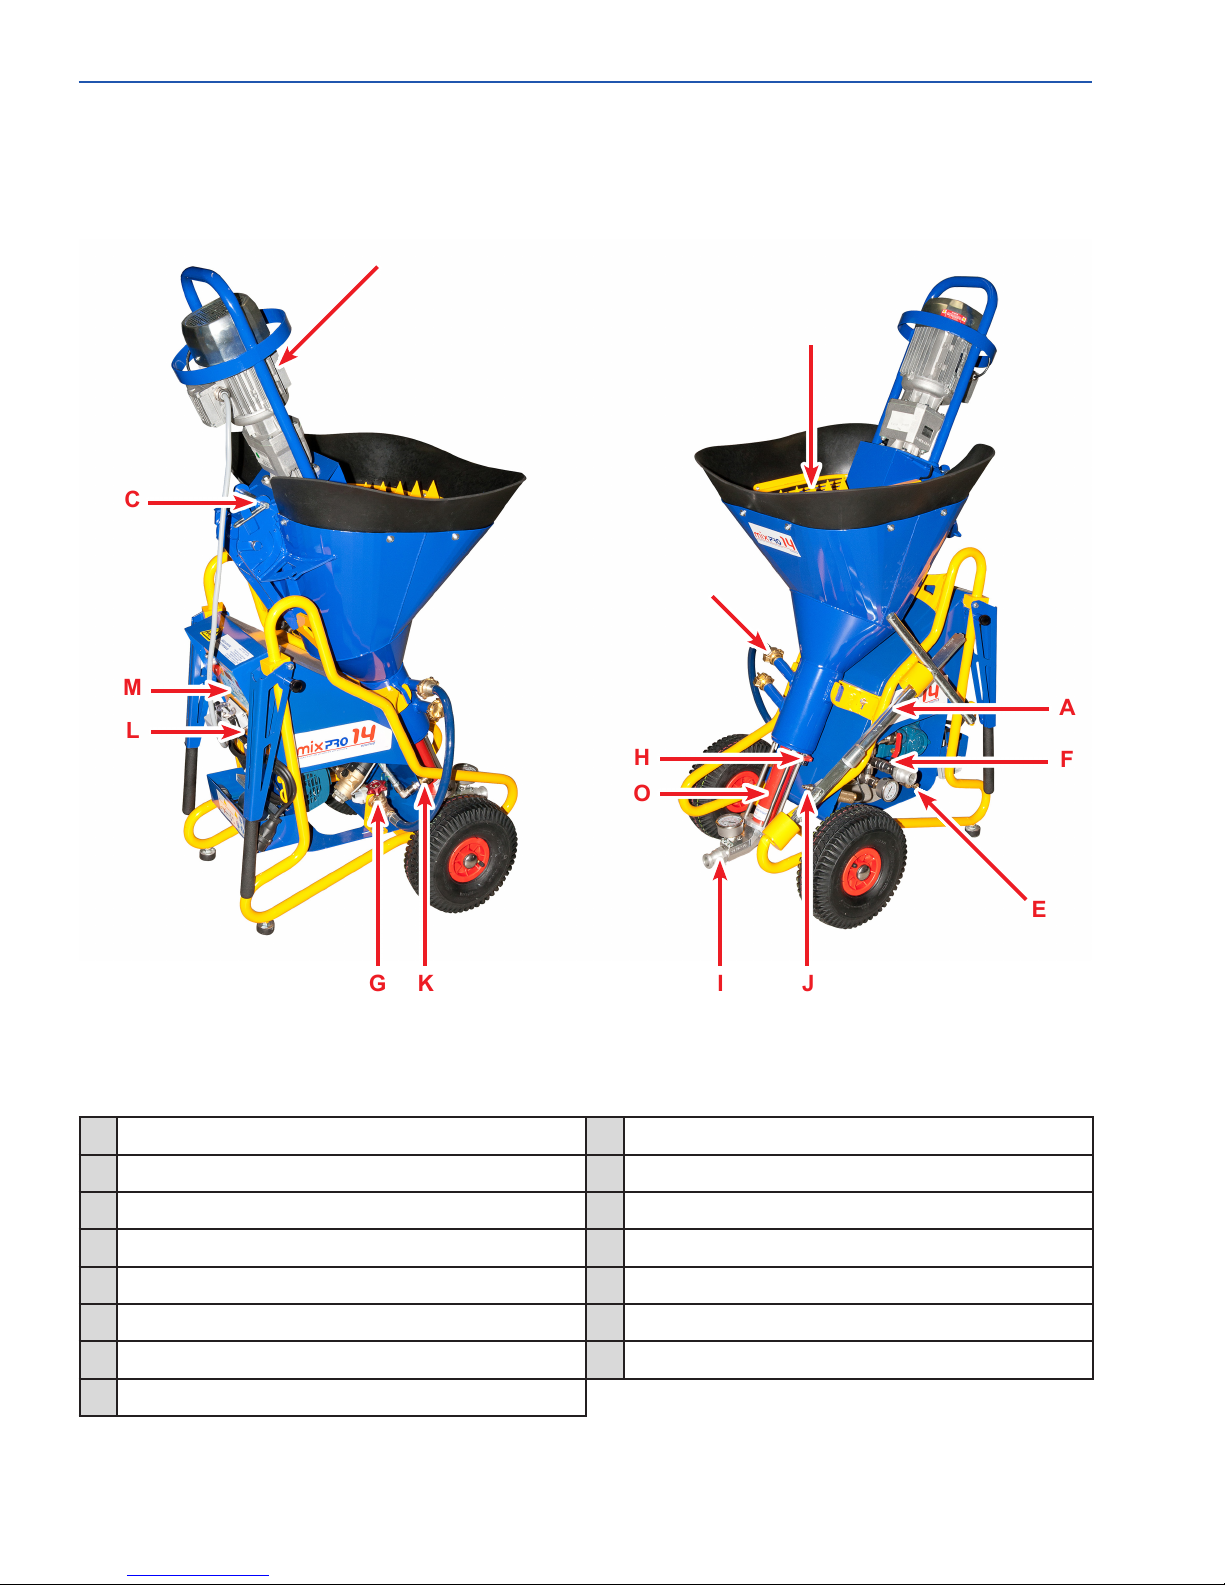
4.3. IDENTIFICATION OF THE COMPONENTS
AStraight axis / Crank IPump outlet
BMotor JAir inlet
CLocking axis KAir outlet quick connector
DMixing chamber water inlet LInsert for wire controlled remote control
EQuick connector MCommande panel (see details on next page)
FWater outlet valve NSafety grid
GWater ow-rate regulation valve ORotor / stator pump
HDrain valve
A
F
E
JIKG
L
M
C
B
D
N
H
O

201809-321-ENG User manual - MIXPRO 14
P11
4. YOUR MACHINE (continued)
4.3. IDENTIFICATION OF THE COMPONENTS (continued)
1
2
3
4
5
6
7
L1
L2
L3
L4
L6
AU PQ
ON/OFF : Start / Stop of the machine
MANU/AUTO : Start of forward or AUTO mode
REVERSE : Start of reverse mode
+ : increase motor speed
- : descrease motor speed
WATER BACK
Functionning with or without water
Light on: Power on
Light on: product pump is working
Light on: product pump is working in AUTO mode
Light on: product pump is working in reverse mode
Light on = pump is working with water / Light off = pump is working without water
Emergency stop Product pump motor display
Water ow-rate display
REMONTÉE EAU
WATER BACK
L/h
MANU
AUTO
ARRIÈRE
REVERSE
A
R
R
E
T
D
'
U
R
G
E
N
C
E
-
E
M
E
R
G
E
N
C
Y
S
T
O
P
-
ON
OFF
13008
1
AU P Q4 5
3 72 6L2L3L1 L4 L6
User manual - MIXPRO 14 201809-321-ENG
P12
5. USE OF THE MACHINE
5.1. PREREQUISITES
• The electric connection has to be 230 V - 16 A - 50 or 60 Hz with a 3 x 2,5 mm cable reel of 40m
maximum, completely unreeled.
• One push on the MANU button (2) makes the pump start working and the (L2) light lights up.
• One push on the button REVERSE (3) makes the product pump turn in reverse mode and the light
(L4) lights up.
• The (4) and (5) buttons allows you to set the speed of the pump rotation.
• In case of use of a powder product, one push on the WATER BACK button (6) provokes water
to ow into the mixing chamber. This function has to be used only at the start-up of the machine,
before breaking the rst bag of the powder product.
• In AUTO mode with water ((L6) lighted up), the opening of the lance or the start command provokes
the machine to work. The automatic cycle manages the functioning of the product pump, of the
water pump and the water inlet in the mixing chamber.
In case of a dysfunction of the machine, one 3 second push on the "ON/OFF" (1) will
allow you to verify that the power supply is over 210V.
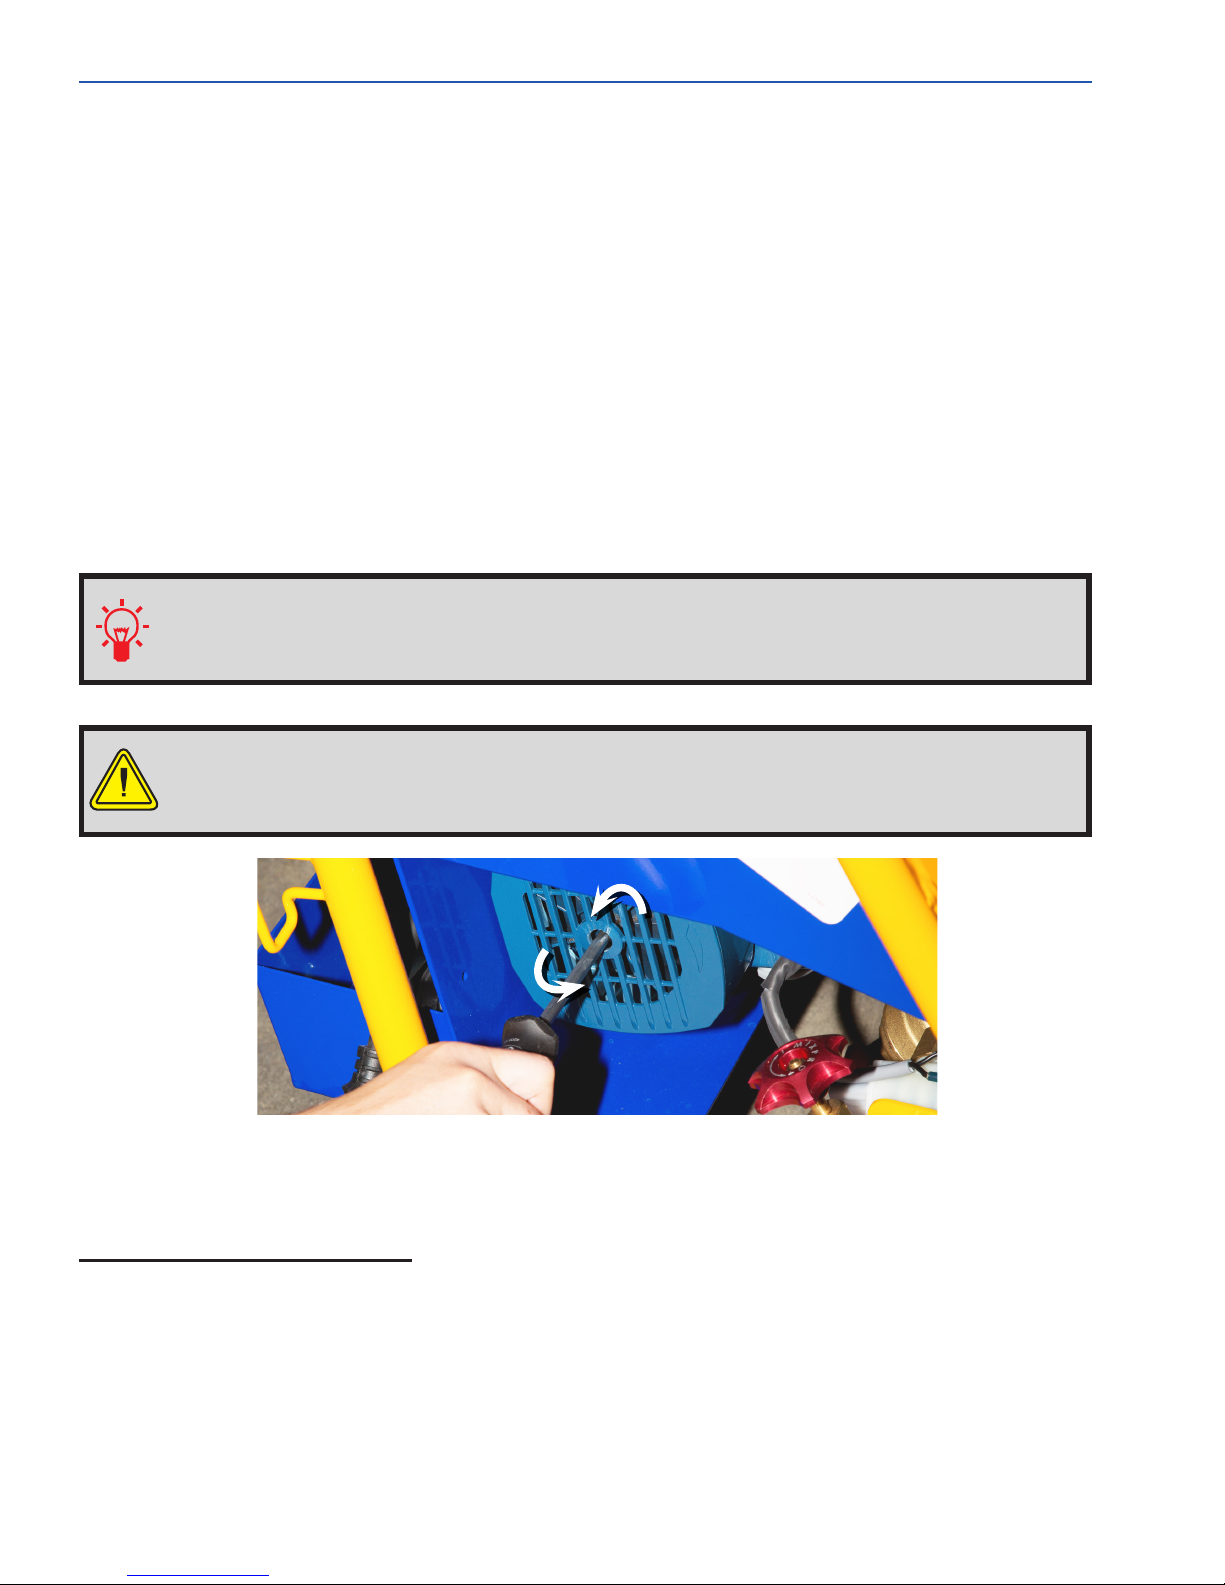
Before every use of the machine, verify that the water pump is not blocked at the risk
of damaging the machine. With help of a at screwdriver, turn to unblock the water
pump (see picture below).
Start / Stop of the machine
• Once the machine is plugged in, the machine is in stop mode, the display (P) shows "OFF".
• One push on the ON/OFF button (1), the display (P) shows the setting of the product ow-rate, the
light (L1) lights up, the machine is ready to work.
• One push on the ON/OFF (1) button when the machine is working (light (L1) lighted up), the machine
stops, the display (P) shows "OFF" (light (L1) off).
• One push on the button (7) allows the machine to work with or without water.
• When the (L6) light is on, the machine is in continuous mixing mode with water (for powder products).
• When the (L6) light is off, the machine is in "without water" mode (for pastrous products).

201809-321-ENG User manual - MIXPRO 14
P13
5. USE OF THE MACHINE (continued)
5.2. START-UP OF MIXPRO 14 FLOOR SCREED VERSION
1. Spray uniformly the lubricant (white spraying can) onto the rotor. Mount the rotor with help of the
crank and the straight axis (A) by turning it clockwise, until the rotor is mounted to its maximum.
Then unscrew it a quarter of a turn.
2. Put the center axis into the hopper and tip over the engine (B) into a vertical position. The mixer
shaft and the clamp of the engine have to be aligned.
Do not force during this procedure as this may cause heavy damage to the machine.
3. Insert the lock pin in the two holes intended for this purpose. (if you cannot insert it, the axis or the
rotor/stator are not put into place correctly, to be veried).
4. Connect the water hose to the quick connector of the machine (E), or to the water tank if used.
5. Plug in the machine electrically.
6. The display (P) indicates "AU", unscrew the button (AU) by turning it slightly.
7. "OFF" lights up. Press the button "ON/OFF" (1) to turn it on.
8. Open the water (as well as the valve on the water tank if used)
9. Press the button (7) and open the water valve (F) to prime the water pump (the water has to come
out at a regular ow rate)
10. Close the water valve (F) and press the button "WATER BACK" to ll the mixing chamber.
The water level must not be higher than the water inow in the mixing chamber (D),
otherwise open the drain valve (H).
11. Break one bag of material onto the grid (N) without shearing or opening the bag with a cutter.
12. Press the button (2) to put the machine into mode MANU (light (L2) lights up).
13. The mixture will come out of the product outlet (I). To rene the texture of the material, increase or
reduce the water ow rate (indicated on the display (Q)) with help of the control valve (G) and the
speed of the rotation of the pump by using the arrows (4) and (5).
14. Once the desired texture obtained, put the machine into mode AUTO (light (L2) lights up) and clean
the pump outlet (I).
15. Connect the product hose to the pump outlet (I) and put the machine into mode MANU, by pressing
onto the button (2), until the product comes out of the hose.
16. Press it once again (2) to put it back to AUTO mode, then connect the remote control into the
insertion. (L)
17. Press onto the button of the remote control, the machine will start.
18. Apply the liquid oor screed to the oor with smooth and regular movements.

User manual - MIXPRO 14 201809-321-ENG
P14
5. USE OF THE MACHINE (continued)
5.3. START-UP OF MIXPRO 14 PLASTER VERSION
1. Spray uniformly the lubricant (white spraying can) onto the rotor. Mount the rotor with help of the
crank and the straight axis (A) by turning it clockwise, until the rotor is mounted to its maximum.
Then unscrew it a quarter of a turn.
2. Put the center axis into the hopper and tip over the engine (B) into a vertical position. The mixer
shaft and the clamp of the engine have to be aligned.
Do not force during this procedure as this may cause heavy damage to the machine.
3. Insert the lock pin in the two holes intended for this purpose. (if you cannot insert it, the axis or the
rotor/stator are not put into place correctly, to be veried).
4. Connect the water hose to the quick connector of the machine (E), or to the water tank if used.
5. Plug in the machine electrically.
6. The display (P) indicates "AU", unscrew the button (AU) by turning it slightly.
7. "OFF" lights up. Press the button "ON/OFF" (1) to turn it on.
8. Open the water (as well as the valve on the water tank if used).
9. Press the button (7) and open the water valve (F) to prime the water pump (the water has come out
at a regular ow rate).
10. Close the water valve (F) and press the button "WATER BACK" to ll the mixing chamber.
The water level must not be higher than the water inow in the mixing chamber (D),
otherwise open the drain valve (H).
11. Break one bag of material onto the grid (N) without shearing or opening the bag with a cutter.
12. Press the button (2) to put the machine into mode MANU (Light (L2) lights up).
13. The mixture will come out of the product outlet (I). To rene the texture of the material, increase or
reduce the water ow rate (indicated on the display (Q)) with help of the control valve (G) and the
speed of the rotation of the pump by using the arrows (4) and (5).
14. Once the desired texture obtained, put the machine into mode AUTO (Light (L2) lights up) and clean
the pump outlet (I).
15. Connect the product hose the the pump outlet (I) and connect the lance, open and without nozzle,
on the other side of the hose.
16. Connect the air hose to the quick connector (K).
17. Put the machine into mode MANU, by pressing the button (2) once, until the product comes out of
the lance.
18. Press again onto the button (2) to switch back to mode AUTO and close the lance.
19. After having electrically plugged in the compressor, connect it to the machine onto the connector
(J), and start it.
20. Put the nozzle onto the lance.
21. The machine is ready to be used, she starts by opening the lance and stops when closing it.

201809-321-ENG User manual - MIXPRO 14
P15
5. USE OF THE MACHINE (continued)
5.4. START-UP OF MIXPRO 14 AIR INSULATION VERSION
1. Spray uniformly the lubricant (white spraying can) onto the rotor. Mount the rotor with help of the
crank and the straight axis (A) by turning it clockwise, until the rotor is mounted to its maximum.
Then unscrew it a quarter of a turn.
2. Put the center axis into the hopper and tip over the engine (B) into a vertical position. The mixer
shaft and the clamp of the engine have to be aligned.
Do not force during this procedure as this may cause heavy damage to the machine.
3. Insert the lock pin in the two holes intended for this purpose (is you cannot insert it, the axis or the
rotor/stator are not put into place correctly, to be veried).
4. Connect the water hose to the quick connector of the machine (E), or to the water tank if used.
5. Mount the after-mixer (Anti-lump System) onto the pump outlet (I).
6. Plug in the machine electrically.
7. The display (P) indicates «AU», unscrew the button (AU) by turning it slightly.
8. "OFF" lights up. Press the button "ON/OFF" (1) to turn it on.
9. Open the water (as well as the valve on the water tank if used).
10. Press the button (7) and open the water valve (F) to prime the water pump (the water has come out
at a regular ow rate).
11. Close the water valve (F) and press the button "WATER BACK" to ll the mixing chamber.
The water level must not be higher than the water inow in the mixing chamber (D),
otherwise open the drain valve (H).
12. Open the bag of powdered material with a cutter and pour it into the hopper (do not break the bag
on the grid (N)).
13. Press the button (2) to put the machine into mode MANU (light (L2) lights up).
14. The mixture will come out of the product outlet (I). To rene the texture of the material, increase or
reduce the water ow rate (indicated on the display (Q)) with help of the control valve (G) and the
speed of the rotation of the pump by using the arrows (4) and (5).
15. Once the desired texture obtained, put the machine into mode MANU (light (L2) lights up) and clean
the pump outlet (I).
16. Connect the product hose the the pump outlet (I) and connect the lance, open and without nozzle,
on the other side of the hose.
17. Connect the air hose to the quick connector (K).
18. Put the machine into mode MANU , by pressing the button (2) once, until the product comes out of
the lance.
19. Press again onto the button (2) to switch back to mode AUTO and close the lance.
20. After having electrically plugged in the compressor, connect it to the machine onto the connector
(J) and start it.
21. Put the nozzle onto the lance.
22.The machine is ready to be used, she starts by opening the lance and stops when closing it.
User manual - MIXPRO 14 201809-321-ENG
P16
5. USE OF THE MACHINE (continued)
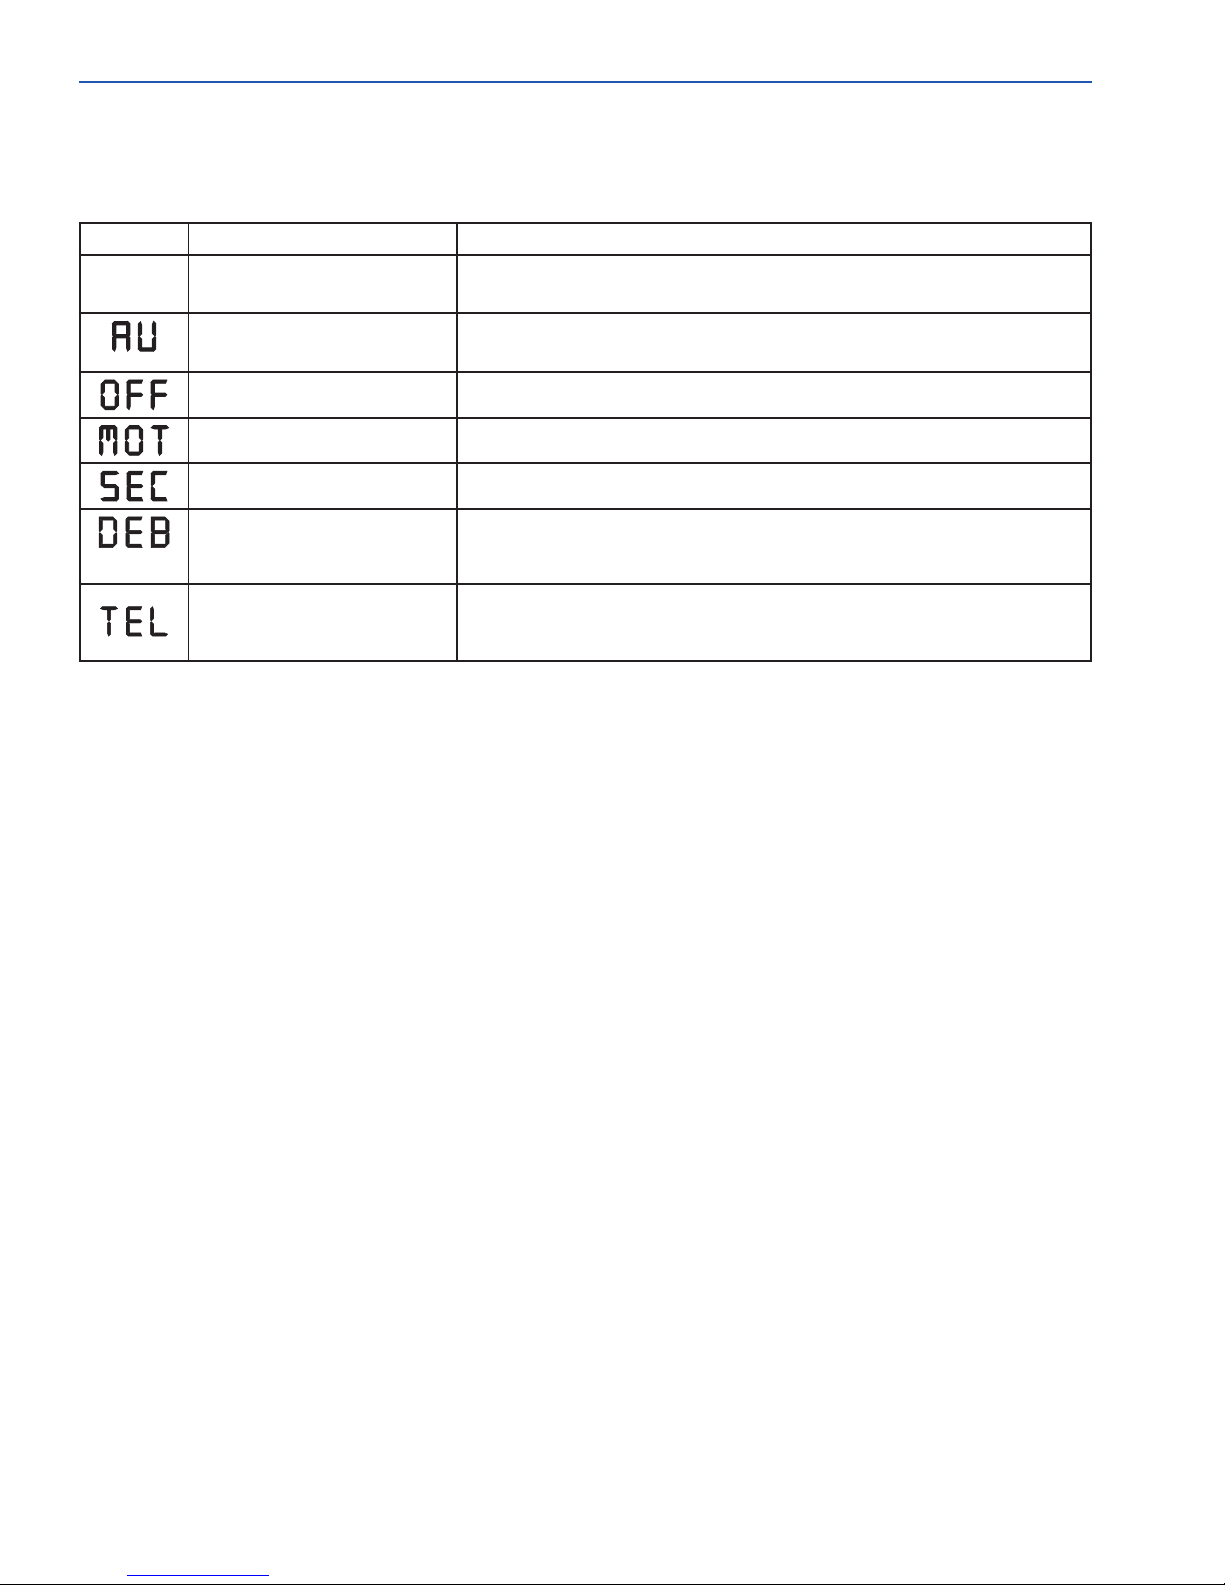
5.5. ERROR CODES
The different error codes show up on the display (P).
CODE DEFINITION TO DO
No display. Connect the plug, verify the power supply (230V), verify the
fuse on the electric box.
Emergency stop
pressed.
Unhook the emergency stop button (AU).
Machine is in OFF mode. Switch on the machine by pressing on the button (1).
Default control engine. Turn the machine to "OFF" for one minute, then start it up again.
Default safety sensor. Verify that the security grid is closed.
Default water pressure.
Only if L6 is on.
Verify the water pressure on the manometer, verify the water
inlet: pressure > 2 bars or adequate ow-rate.
Start-up order active
during the start-up of the
machine.
Close the lance or put the remote control onto "OFF". Clean
the ow sensor (disassembly of the piston).
If the problem persists or if in doubt about the correct working of the machine, do not try to repair the
machine yourself or to dismantle it.
Contact an authorized After-Sale Service or our hotline on : +33 (0) 4 42 29 08 96.

201809-321-ENG User manual - MIXPRO 14
P17
6. CLEANING PROCEDURE
Before unscrewing the hose, make sure that it is not under pressure.
1. Unscrew the nozzle and put it into a bucket of water.
2. Stop the compressor and drain it.
3. Open the lance and press onto the button REVERSE for 2 secs max to release the pressure
4. Unscrew the after-mixer and put it into a bucket of water, put the hose back into its position (version
air isolation only)
5. Put the machine into mode MANU (light (L2) lights up) to empty a maximum of product
6. Once again press onto REVERSE to free up the engine (B) and the lock pin (C)
7. Take out the mixer shaft and put instead of it the cleaning piece with the axis (A).
8. Put the engine back into place and set the product ow rate to 30 on the display (P) with the arrows
(4) and (5).
9. Press onto MANU (2). As the machine is working, set the water ow rate to 150L/h whilst using the
control valve (G)
10. Use the drain valve (F), opened 1/3, with the priming hose to clean the machine.
11. Once all the water evacuated out of the mixing chamber, press onto the button MANU (2) to stop
the engine.
12. Take off the product hose
13. Put the cleaning ball into the pump outlet (F) and connect the hose to it.
14. Open completely the valve (F) and press the button (7) until the ball comes out of the hose.
15. Carry out operations 12 and 13 a second time
16. Press onto REVERSE once again (button 3) to free up the engine (B) and the lock pin (C)
17. Take out the cleaning piece, unscrew the engine and stock it.
18. Clean the hose and roll it up
19. Disconnect the water hose from the mixing chamber (D) and press onto WATER BACK (6) to clean
the hose
20. Verify that the engine connector or the protective hood are well attached to the electrical box
21. Unplug the machine and disconnect the water hose from its water main.
22.Use a high pressure washer to clean the machine whilst insisting onto the water inputs (D) and
product outlet (I)
23. Clean the accessories.
24. Open the drain valve (H) and the water outlet valve (F).
The direct projection of water under pressure onto the control panel has to be
stopped at the risk of water inltration into the electric box. Proceed by simply
cleaning with a humid sponge.

User manual - MIXPRO 14 201809-321-ENG
P18

201809-321-ENG User manual - MIXPRO 14
P19
7. DECLARATION OF CONFORMITY
THE MANUFACTURER : EUROPE PROJECTION
228, avenue Olivier Perroy
13790 ROUSSET
DECLARES THAT THE EQUIPMENT DESIGNATED BELOW :
Trademark : EUROPE PROJECTION
Type : Continous mixer
Model : MIXPRO 14
COMPLIES WITH THE ARTICLE:
• the R.233-73 article of the Labour Code
THE DIRECTIVES :
• Machines 2006/42/CE
• Low voltage 2014/35/UE
• CEM 2014/30/UE
• ROHS 2011/65/UE
AND WITH THE STANDARDS:
• NF EN ISO 12100
• NF EN 60204-1
• NF EN ISO 13857
ROUSSET, APRIL 20th 2018
Patrick BOREL
President
Distributed by : EUROMAIR DISTRIBUTION
228, avenue Olivier Perroy 13790 ROUSSET
Tél : +33 (0)4 42 29 08 96 – Fax : +33 (0)4 42 53 44 36
SAS au capital de 400 000€ - SIREN 394 961 510 – NAF 2892 Z

User manual - MIXPRO 14 201809-321-ENG
P20
Other manuals for MIXPRO 14
2
Table of contents
Other EUROPRO Mixer manuals

EUROPRO
EUROPRO MIXPRO 28 CLASSIC User manual

EUROPRO
EUROPRO EP585L User manual

EUROPRO
EUROPRO EP595H User manual

EUROPRO
EUROPRO EP585W User manual

EUROPRO
EUROPRO MIXPRO 100 User manual

EUROPRO
EUROPRO MIXPRO 100 User manual

EUROPRO
EUROPRO MIXPRO 28 CLASSIC PLASTER User manual

EUROPRO
EUROPRO EP585 User manual

EUROPRO
EUROPRO KM550E User manual

EUROPRO
EUROPRO MIXPRO 70 User manual


