Eurotops Versand 41582 User manual
Digitaler Materialdetektor
Détecteur numérique de matériaux
Digital Material Detector
41582

DE
Gebrauchsanweisung
Sicherheitshinweise:
Lesen und beachten Sie alle Hinweise. Bewahren Sie diese Hinweise auf.
Lassen Sie das Messgerät nur durch qualifiziertes Personal reparieren, falls nötig, nur das sorgt für die Sicherheit
des Messinstrumentes
Benutzen Sie das Gerät nicht in explosionsgefährdeter Umgebung, wie entzündliche Flüssigkeiten, Gasen oder
Staub. Funken, die durch das Gerät erzeugt werden könnten, können Staub und Dämpfe entzünden
Aus technischen Gründen kann das Gerät nie eine 100 prozentige Sicherheit gewährleisten
Um mögliche Gefahren auszuschließen, nutzen Sie bitte auch andere Informationsquellen, bevor Sie bohren,
Schrauben oder Sägen, wie zum Beispiel Baupläne, Bilder von Konstruktionen u. ä.
Umwelteinflüsse, wie Feuchtigkeit und die Nähe zu elektrischen Geräten kann die Messgenauigkeit beeinflussen.
Die Qualität der Oberfläche und die Wandbeschaffenheit sowie die Position des Objektes kann zu falschen
Messergebnissen führen.
Funktionsbeschreibung
Bitte öffnen Sie die Verpackung und legen Sie das Gerät funktionsbereit daneben, während Sie die Bedienungsanleitung
lesen
Vorgesehene Verwendung
Das Messgerät ist für das Erkennen von Metall (Eisen und nicht-eisenhaltigen Metall, wie Betonstahl) Holzbalken und
aktiven Stromleitungen in Wänden, Decken und Böden konzipiert.
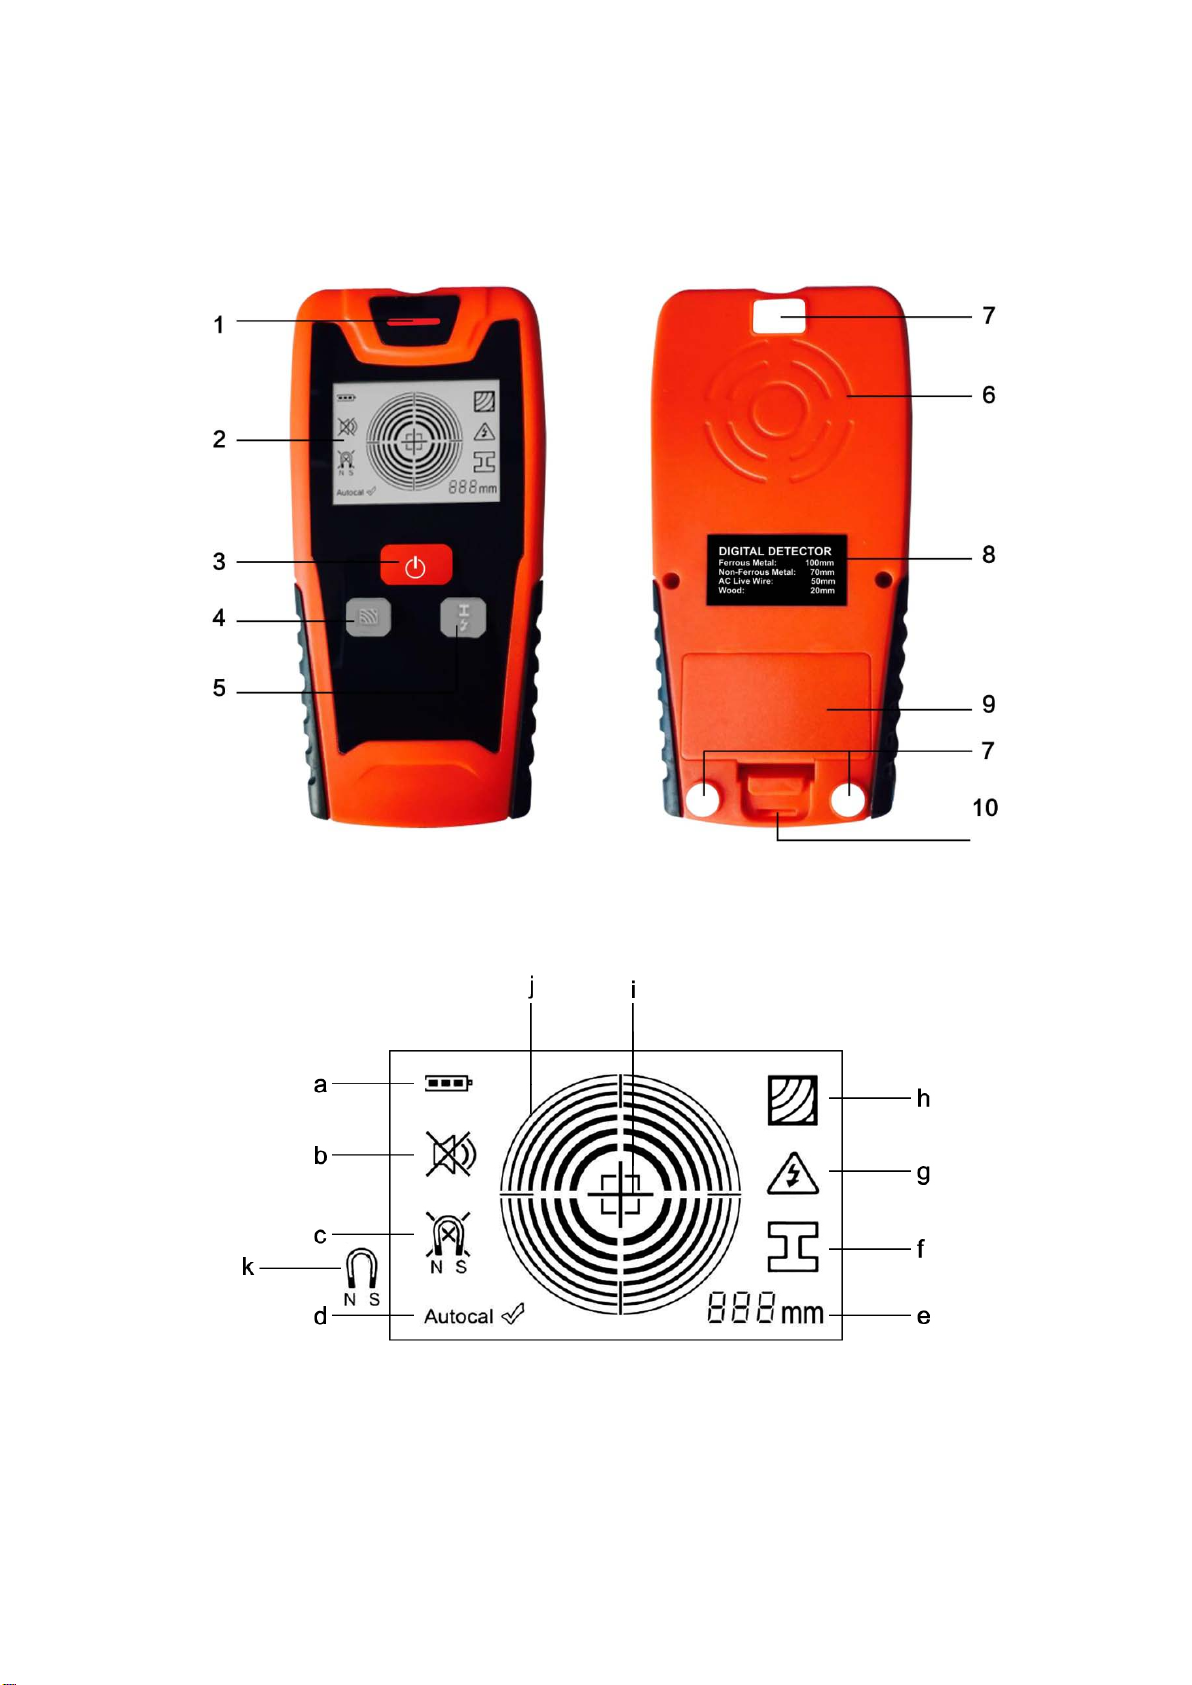
Produktdetails
Die Zahl/Buchstabe vor dem Produktdetail bezieht sich auf die Abbildung auf der ersten Seite.
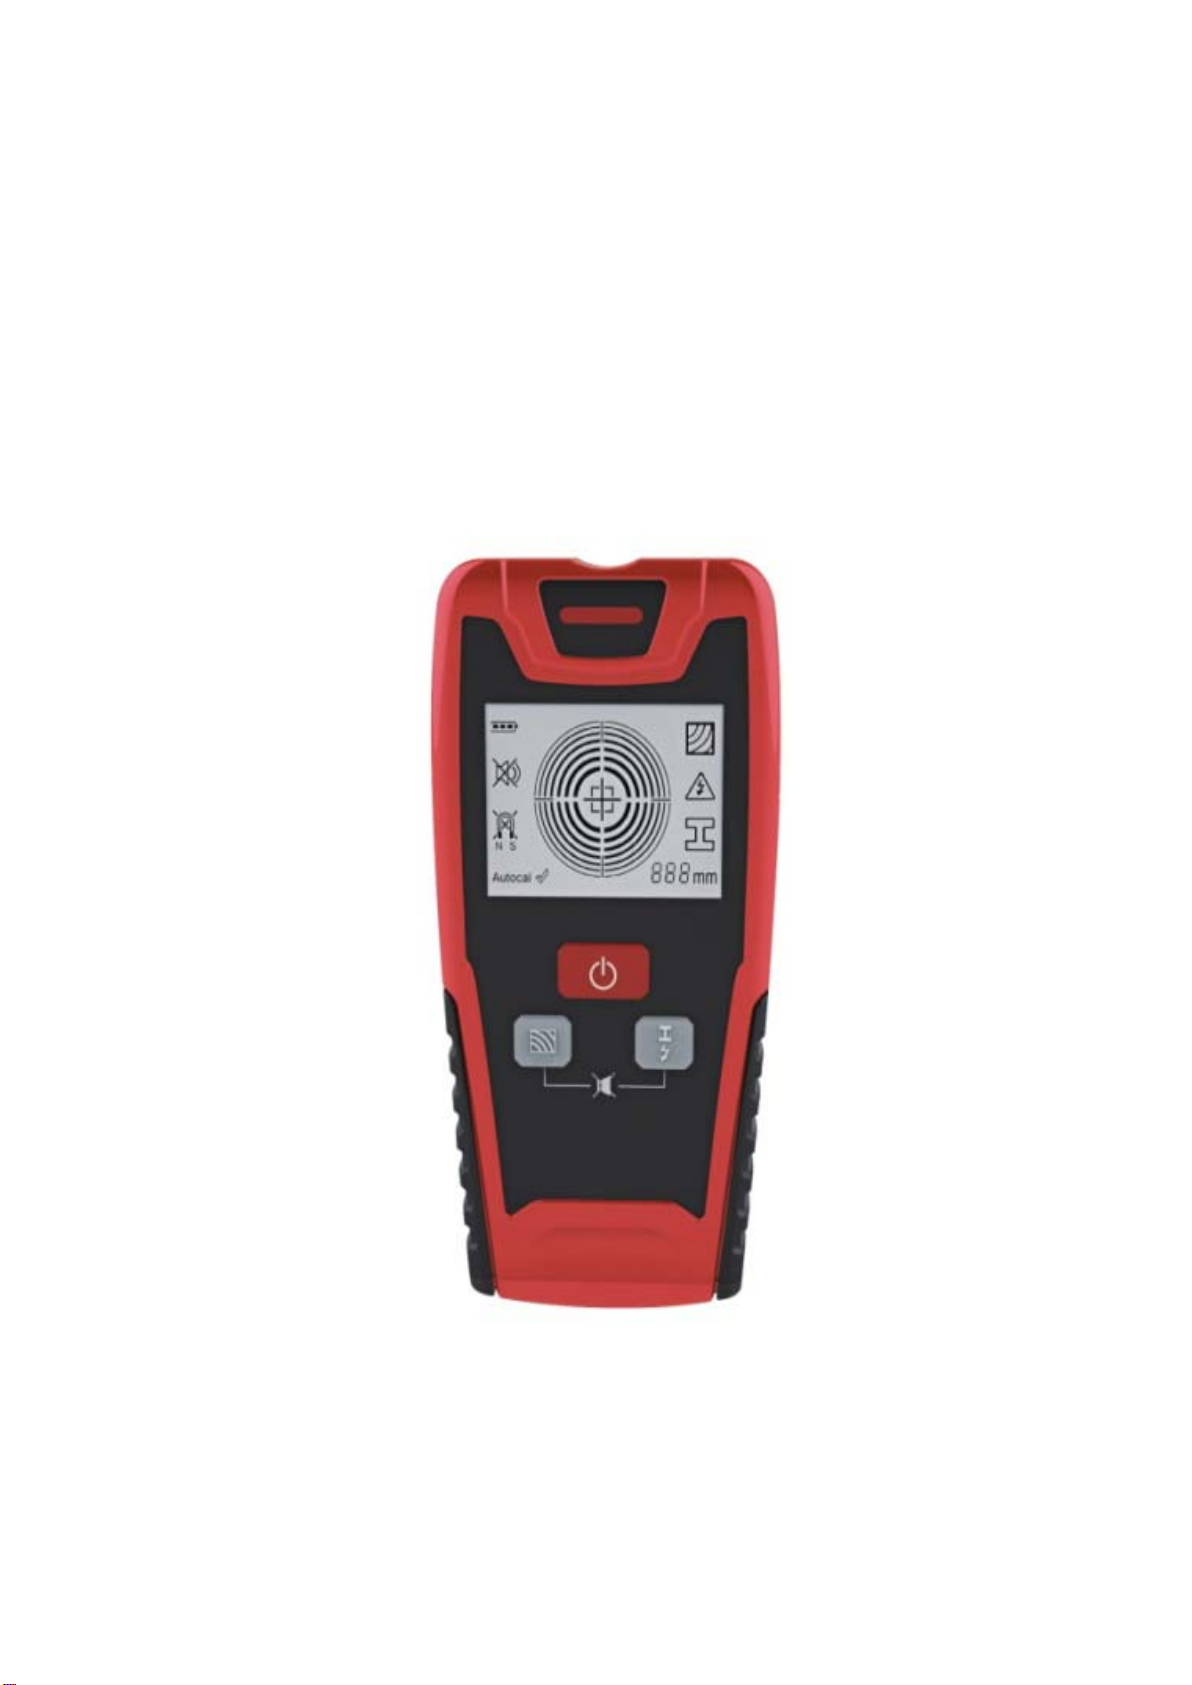
1LED
2 Display
Anzeige
3 “EIN/AUS” Schalter
4 Holzerkennungsknopf
5Metall/Stromkabel Erkennungsknopf
6Sensorfeld
7Filzgleiter
8Produktlabel
9Batteriefach
10 Vorrichtung zur Bandfixierung
Display Anzeigen
a Batterieanzeige
bAusgeschaltetes Audiosignal
c nicht-magnetischer Metallindikator
d“Autocal”Kalibrierungsindikator
eMetall Tiefe Indikator
f Metall Indikator
g“Strom” Kabel Indikator

DE
h Holz-Erkenungs Indikator
iObjekt Zentrumsanzeige
jMessindikator
k Magnetischer Metall Indikator
Technische Daten
Digital Detektor
Maximale Tiefe:
Eisenhaltiges Metall 100mm
Nicht-Eisenhaltiges Metall (Kupfer) 70mm
Elektrische Leitungen 50mm
Holz 20mm
Automatische Abschaltung nach ca. . 5min.
Betriebstemperatur: -10℃+50℃
Lagertemperatur: -20℃+70℃
Batterie:1x9V Blockbatterie
Betriebszeit je Ladung . 4h
Gewicht (ca.) 0.18kg
Alle Angaben sind abhängig vom gewählten Suchmodus, dem Material, der Größe des Objektes und dem Material und
der Beschaffenheit des Grundmaterials, durch das gescannt werden soll. Bei Stromkabel, die nicht aktiv sind ist die
Erkennungstiefe geringer als bei aktiven Leitungen.
Einsetzen/ Ersetzen der Batterie
Benutzen Sie nur 9V Blockbatterien.
Beim Einsetzen achten Sie bitte auf die richtige Polarität zwischen Batterie und den Anschlüssen im Gerät. Die
Batterieanzeige a zeigt immer den aktuellen Status der Ladung.
Batterie voll geladen
Batterie hat 2/3 ihrer Kapazität oder weniger
Batterie hat 1/3 ihrer Kapazität oder weniger
Bitte Batterie wechseln
Wenn Sie das Gerät anschalten, das Gerät aber nichts anzeigt, dann wieder ausschalten und die Batterie wechseln.
Wenn das Gerät für eine lange Zeit nicht genutzt wird, die Batterie entfernen. Die Batterie kann auslaufen oder sich über
einen längeren Zeitraum entladen
Betrieb
Das Gerät vor Feuchtigkeit und direkter Sonne schützen.
Das Gerät nicht zu hoher oder sich stark verändernden Temparaturschwankungen aussetzen. Sollten starke
Temperaturschwankungen herrschen, lassen Sie das Gerät sich einige Zeit in der Messumgebung anpassen, bevor
Sie es anschalten. Hohe Temperatur und starke Schwankungen können die Messgenauigkeit und die
Displayanzeige beeinflussen. Eebenso Übertragungssysteme wie WLan, UMTS, Radar, Funkmasten oder
Mikrowellen in unmittelbarer Nähe

DE
Erst-Inbetriebnahme:
1. EIN- und AUS-Schaltung
Das Gerät vor Feuchtigkeit und direkter Sonne schützen.
Vor dem Einschalten sicher gehen, dass im Sensorfeld 6 keine Feuchtigkeit ist, wenn notwendig mit einem weichen
Tuch trocknen. Wenn das Gerät großer Hitze ausgesetzt war, erlauben Sie eine kurze Zeit der Anpassung an die
neue Umgebung, vor Nutzung.
Zum EIN/AUS schalten den Knopf 3 drücken.
Wenn mehr als ca. 5min keine Funktion des Gerätes gedrückt wurde und es auf kein Objekt gerichtet ist, schaltert es
sich automatisch ab.
2. Ein/Aus schalten des akustischen Warntones
Drücken Sie den Holzerkennungs-Knopf 4 und den Metall-/ Kabelerkennungsknopf 5zur gleichen Zeit um den
akustischen Warnton ein-/auszuschalten. Wenn es ausgeschaltet ist, erscheint der Indikator bin der Anzeige des
Displays.
3. Objekterkennung
Die Objekterkennung findet innerhalb des Sensorfeldes 6 statt.
Das Gerät immer geradewegs über die zu erkundende Fläche bewegen, ohne anheben, ohne den Druck zu verändern.
Die Filzgleiter 7 müssen dabei immer Kontakt zur Oberfläche haben.
A. Metall-Objekte finden
Wenn Sie nach metallischen Objekten suchen wollen drücken Sie den Knopf 5. Zur Gleichen Zeit erscheint das
Metallsymbol (Eisenträgerquerschnitt) fim Display und der LED Indikator 1leuchtet grün.
Positionieren Sie das Messgerät auf der Messoberfläche und bewegen Sie es seitlich oder vertikal. Wenn das
Messgerät zu nah an ein metallisches Objekt kommt, schlägt die Amplitude am Gerät jaus.Ein stetiger Ton ertönt
“dididi”; bewegen Sie das Messgerät wiederholt über die Oberfläche um das Zentrum des metallischen Objektes zu
finden.
In der Position des höchsten Ausschlages ist das Objekt lokalisiert, im Zentrum des Sensorfeldes. Zu dieser Zeit
zeigt es auch der Inidikator I auf dem Display, ein stetiger Ton “diiiii” ertönt und der LED Indikator 1 leuchte rot. Wenn
Sie das Gerät wegbewegen, verringert sich derAusschlag der Amplitude.
Wenn das Gerät nicht magnetische Metalle, wie Kupfer findet, dann erscheint der Indikator c im Display. Wenn es
ein magnetisches Metall ist, wie Eisen, dann erscheint der Indikator k im Display.
Wenn das Metall zu tief oder zu klein ist, zeigt die Indikator LED 1 gelb an.
Hinweis: Wenn Sie nach metallischen Objekten suchen,zeigt der Tiefenindikator e den Wert fließend im Display an. Die
Genauigkeit der Tiefenmessung steht in Verbindung zu der Form und der Position des gefundenen metallischen
Objektes;Wenn das gemessene Objekt ein Standard Stahl von 20mm Durchmesser ist und wenn der Stahl relative
parallel zum Detektor ist, dann ist die Messgenauigkeit am Größten. Die Tiefenmessung gibt einen allgemeinen
Referenzwert an.
Hinweis:Für verstärktes Stahlgewebe und Stahl im untersuchten Grundmaterial geht die Amplitude über die komplette
Oberfläche des Messindikators i.
Für verstärktes Stahlgewebe ist typisch, dass das Symbol kfür magnetisches Metall im Display angezeigt wird neben
dem Eisenträger, während es bei nicht metallischem Eisen in der Form des Symbols cerscheint.

DE
Hinweis: Anschalten des Gerätes. Nach einem kurzen Selbstcheck ist das Gerät fertig zur Benutzung. Wenn das
Messgerät die folgenden Bedingungen zeigt, muss es kalibriert werden.
1.Das Messgerät ändert automatisch die Funktion Metall suchen, obwohl das Messgerät in nicht metallischer Umgebung
ist, der Alarmton trotzdem „dididid“ macht und das rote oder gelbe LED-Licht die ganze Zeit blinkt, dann muss das Gerät
neu kalibriert werden.
2. Im Fall hoher Temperaturen oder Temperaturschwankungen ist die Messgenauigkeit nicht sehr gut, dann kann eine
neue Kalibrierung das Ergebnis verbessern.
Die Kalibrierung funktioniert wie folgt:Positionieren Sie das Gerät um ein nicht metallisches und nicht magnetisches
Umfeld. Am besten halten Sie es in der Hand außerhalb der genannten Störfaktoren. Drücken Sie den Metallsuchknopf
für etwa 2sek. Dann startet ein automatischer Selbstcheck. Das LED Licht 1 leuchte grün, wenn die Kalibrierung fertig ist.
Hinweis: In der Metallsuchfunktion sucht das Gerät auch nach elektrischen Kabeln.
B. Suche nach elektrischen Kabeln
Das Gerät kann 50 oder 60 Hz “elektrische Kabel erkennen. Nicht andere.
Drücke zweimal den Knopf 5um das suchen nach elektrischen Kabeln zu starten. Zu dieser Zeit das Muster g für
elektrische Kabel erscheint im Display und das LED Licht 1 leuchtet grün auf.
Positionieren Sie das Gerät auf der Oberfläche und bewegen Sie es herum. Wenn das Messgerät sehr nah an
elektrische Kabel kommt, dann steigt die Amplitude j, das Warnsignal ertönt in schneller Abfolge; Bewegen Sie das
Gerät nochmal über die Oberfläche, um das Zentrum zu finden.
Das Zentrum ist bei der höchsten Amplitude unterhalb des Zentrums des Sensorfeldes. Zu diesem Zeitpunkt wird er
Indikatir i auf dem Display angezeigt, der Warnton ertönt in schneller Abfolge und das LED-Licht 1 leuchtet. Wenn
man das Gerät wegbewegt, verringert sich die Amplitude.
Elektrische Kabel können noch besser geortet werden, wenn die Verbrauchseinheiten, wie Lampen oder ähnliches
angeschlossen und eingeschaltet sind. Kabel mit 110V, 220V and 380V warden mit der Gleichen Scan-Kapazität
entdeckt.
Wenn das elektrische Kabel zu schwach oder zu tief liegt, dann leuchtet das gelbe Licht der Led Leuchte 1.
Vorsicht: Unter bestimmten Voraussetzungen (wie unter Metall Oberflächen oder unter Oberflächen mit hohem
Wassergehalt), können ”Strom” Kabel nicht sicher entdeckt werden. Die Signalstärke bei Stromkabeln ist abhängig von
der Position des Kabels.
Vorsicht: Suchen Sie, wenn möglich dann nach weiteren Messgeräten in der Nähe oder prüfen Sie alternative Quellen.
Statische Elektrizität führt zu einer ungenauen Anzeige von elektrischen Leitungen. Um das zu verbessern, positionieren
Sie die flache Hand neben dem Messgerät, um die elektrostatische Ladung zu entfernen.
Vorsicht: Wenn das elektrische Kabel zu schwach oder zu tief liegt, dann leuchtet das gelbe Licht der Led Leuchte 1.
C. Suche nach Holz
Wenn man Holz sucht, das Gerät auf der Oberfläche positionieren. Drücken Sie den Holzerkennungsknopf 4.Wenn
das Gerät die Kalibrierung beendet hat, leuchte die LED Leuchte 1 grün auf. Das Indikatorsymbol h für Holz
erscheint im Display.
Bewegen Sie das Gerät auf der Oberfläche hin und her. Wenn das Gerät in die Nähe von Holz kommt steigt die
Amplitude j, ein stetiger Ton “dididi”ertönt; Bewegen Sie das Gerät wiederholt hin und her um das Zentrum des
Gegenstandes zu lokalisieren.

DE
Das ist dort, wo die größte Amplitude angezeigt wird. Dann ist das Zentrum unterhalb der Mitte des Sensorfeldes. Zu
dieser Zeit erscheint der Indikator iim Display, ein stetiger Ton“diiii”ertönt und das LED Licht 1 leuchtet rot. Beim
wegbewegen verringert sich die Amplitude.
Wenn das Objekt zu tief oder zu klein ist, dann leuchtet das LED Licht gelb.
Vorsicht:Wenn Sie das Gerät zum Holz orten nutzen, muss die Hand in der Luft gehalten werden, weil die Hand die
Kapazität hat, den Holzscan zu beeinflussen.
Vorsicht: Das Gerät soll hölzerne Objekte erkennen, der Warnton “dididi” erklingt und das rote oder gelbe LED Licht blitzt,
wenn Sie das Gerät auf dem Grund der zu messenden Oberfläche ablegen. Wenn das passiert, bitte nochmal den Knopf
die Taste 4 drücken. Nach einem kurzen Selbstcheck, zeigt die LED mit einem grünen Licht an, dass die Kalibrierung
beendet ist.
Vorsicht: Nach dem es Holz erkannt hat, kann es auch elektrische Kabel erkennen.
Hinweise
Die Messergebnisse können durch vieles beeinflusst werden, die Nähe anderer Einrichtungen, die starke magnetische
oder elektrostatische Felder erzeugen, Feuchtigkeit, metallisches Baumaterial, Folien, leitfähige Tapeten u. ä. Daher
immer auch andere Informationsquellen nutzen, wenn möglich, bevor Sie in Wände, Decken oder Böden bohren, sägen,
fräsen
Wartung, Service, Reinigung
Wenn der Indikator jeine kontinuierliche Amplitude zeigt, obwohl kein Metall in der Nähe ist, dann bitte manuell
kalibrieren, wie vorher erwähnt. Dann bitte alle störenden Dinge in der Nähe entfernen, einschließlich Armbanduhren
und andere Metallteile. Am besten in der Hand halten und entfernt von magnetischen Feldern. Drücken Sie den
Metallerkennungsknopf 5 nochmal, bis das rote, gelbe und grüne LED Licht in gleicher weise leuchtet, dann den
Knopf loslassen. Nach ein paar Sekunden leuchtet das LED—Licht wieder grün. Die Kalibrierung war erfolgreich.
Schmutz mit einem trockenen, sauberen Tuch abreiben, keine Reciniger oder Lösungsmittel nutzen.
Um die Messgenauigkeit nicht zu beeinflussen, keine Klebeetiketten, besonders nicht aus Metall in der Nähe des
Sensorfeldes 6auf der Front oder Seite des Gerätes platzieren.
Lagern und transportieren Sie das Gerät nur in der bereitgestellten Tasche
ACHTUNG!!!
Die Rücksendung ist ausgeschlossen, wenn die Ware in Gebrauch genommen wurde oder durch unsachgemäßen
Gebrauch beschädigt worden ist.
ENTSORGUNG:
Das Verpackungsmaterial ist wiederverwertbar. Entsorgen Sie die Verpackung umweltgerecht und führen Sie sie der
Wertstoffsammlung zu.
Entsorgen Sie den Artikel und die Batterien umweltgerecht, wenn Sie sich von ihm trennen möchten. Das
Gerät und die Batterien gehören nicht in den Hausmüll. Entsorgen Sie sie bei einem Recyclinghof für
elektrische und elektronische Altgeräte. Nähere Informationen erhalten Sie bei Ihrer örtlichen
Gemeindeverwaltung. Entfernen Sie zuvor die Batterien.
Eurotops Versand GmbH
Elisabeth-Selbert-Straße 3
40764 Langenfeld, Deutschland

DE
Bei technischen Fragen wenden Sie sich bitte
in Deutschland an die 0180 5306363* oder info@eurotops.de
in Österreich an die 01 230604312 oder info@eurotops.at
in der Schweiz an die 044 2836125 oder info@eurotops.ch
I Norge tkd@eurotops.de
Bei ggf. erforderlicher Rücksendung der Ware adressieren Sie diese bitte an die auf Ihrer Rechnung stehende
Retourenadresse.
*14 Cents/Min. aus dem deutschen Festnetz, aus dem deutschen Mobilfunknetz max. 42 Cents/Min.
© 01.10.2018

FR
Manuel d’instructions
Consignes de sécurité
Veuillez lire et observer touts les manuels. CONSERVEZ CES MANUELS POUR RÉFÉRENCE.
Veuillez demander uniquement les techniciens qualifiés pour réparer l'outil de mesure avec les pièces de
rechange d'origine, afin de garantir le maintien de la sécurité de l'outil de mesure.
N'utilisez jamais l'outil de mesure dans des environnements explosifs, tel qu'en présence de liquides, gaz
ou poussières inflammables. Des étincelles peuvent être créées dans l'outil de mesure, ce qui peut
enflammer la poussière ou les émanations.
Pour des raisons technologiques, l'outil de mesure ne peut pas garantir une sécurité à 100 %. Pour écarter
les dangers, protégez-vous à chaque fois avant le perçage, le sciage ou l'installation dans les murs, les
plafonds ou les planchers au moyen d'autres sources d'information, comme les plans de construction, les
images de la phase de construction, etc.
Les environnements, telles que l'humidité ou la proximité d'appareils électriques, peuvent influencer la
précision de l'outil de mesure. La qualité de surface et l'état des murs (humidité, matériaux de construction
métalliques, papier peint conducteur, matériaux d'isolation et carreaux) ainsi que la quantité, le type, la taille
et la position des objets peuvent entraîner des résultats de mesure erronée.
Description fonctionnelle
Veuillez déplier la page d'image avec la représentation de l'outil de mesure et la laisser dépliée lors de lire votre mode
d'emploi.
Utilisation prévue
L'outil de mesure est destiné à la détection des métaux (métaux ferreux et non ferreux, par ex. barres d'armature),
poutrelles et fils/conducteurs "sous tension" dans les murs, plafonds et planchers.
CARACTÉRISTIQUES DU PRODUIT
Le numéro de la caractéristique du produit indiqué se réfère à l'illustration de l'outil de mesure sur la page graphique.
1Témoin lumineux LED
2 Écran d'affichage
3 Bouton "MARCHE/ARRÊT".
4 Bouton de détection des objets en bois
5Bouton de détection de fil métallique / fil sous tension
6Zone du capteur
7Feutre
8Zone de l’étiquette du produit
9Couvercle de batterie
10 Sangle
Éléments d'affichage
a. Indicateur de batterie
b. Indicateur de signal audio désactivé
c. Indicateur de métal non magnétique
d. Indicateur de calibrage "Autocal".

FR
e. Indicateur de profondeur de détection de métaux
f. Indicateur de détection de métaux
g. Indicateur de fil "sous tension"
h. Indicateur de détection des objets en bois
i. Indicateur du centre de l'objet
j. Indicateur de mesure
k. Indicateur magnétique métallique
Données techniques
Détecteur numérique
Profondeur de balayage maximale:
Métaux ferreux 100mm
Métaux non ferreux (Cuivre) 70mm
Câble "sous tension"** 50mm
Bois 20mm
Arrêt automatique après env. 5min.
Température de fonctionnement -10℃+50℃℃
Température de stockage -20℃+70℃℃
Batterie 1x9V
Durée de service env. 4h
Poids (environ) 0,18 kg
En mode de détection différent, la profondeur de balayage sera affectée par le matériau et la taille ainsi que par l'état
des objets.
Moins de profondeur de balayage pour les fils / conducteurs qui ne sont pas "sous tension".
Montage
Insertion/Remplacement de la batterie
Que la batterie 9V ne sera utilisée.
Insérez la batterie. Veillez à ce que la polarité soit correcte.
L'indicateur de batterie indique toujours l'état actuel de la batterie:
Batterie complètement chargée
2/3 de la capacité ou moins
1/3 de la capacité ou moins
Remplacer la batterie
L'écran n’affiche rien lorsque l'outil de mesure est ouvert, et puis l’outil s’éteint, ce qui signifie que la batterie est épuisée. Il
faut changer la batterie.
Si l'outil de mesure n'est pas utilisé pendant une longue période, il doit retirer la batterie. La batterie peut se corroder ou
se décharger pendant de longues périodes.
Fonctionnement
Protégez l'outil de mesure contre l'humidité et la lumière directe du soleil.

FR
Veuillez ne pas soumettre l'outil de mesure à des températures extrêmes ou à des variations de température. En cas
de fonctionnement dans une grande variation de température, l'outil de mesure doit s'adapter à la température
ambiante avant de l'allumer. Lors du fonctionnement dans une température extrême ou une variation de température,
la précision de l'outil de mesure et l'affichage seront altérés.
Les fonctions de mesure peuvent être influencées lors de l'utilisation ou du fonctionnement des systèmes de
transmission à proximité, tels que WLAN, UMTS, radar, pylônes d'émetteur ou micro-ondes.
Mise en service
1. Mise en marche et arrêt
Protégez l'outil de mesure contre l'humidité et l'ensoleillement direct.
Avant d'allumer l'outil de mesure, assurez-vous qu'il n'y a pas d'humidité dans la zone du capteur 6. En cas
nécessaire, séchez l'outil de mesure à l'aide d'un chiffon doux.
Si l'outil de mesure a été soumis à un changement de température extrême, laissez-le s'adapter à la température
ambiante avant de l'allumer.
Appuyez sur le bouton 3"On/Off” pour mettre l’outil en marche/arrêt.
Lorsqu'aucune touche d'outil de mesure n'est actionnée pendant environ 5 minutes et qu'aucun objet n'est dirigé, l'outil
de mesure s'éteint automatiquement.
2. Activer/désactiver l'audio
Appuyez simultanément sur le bouton de bois 4et sur le bouton de détection de fil de métal/fil sous tension 5pour
activer/désactiver l'Audio. Lorsque l'audio est désactivé, l'indication bapparaît sur l'écran.
3. Détection d'objets
Le détecteur utilisé peut trouver les objets sous la zone de détection 6.
Déplacez toujours l'outil de mesure en ligne droite sur la surface en appliquant une légère pression, sans la soulever ni
modifier la pression. Pendant la mesure, les patins de contact 7 doivent toujours être en contact avec la surface.
A. Détection d'objets métalliques
Lors de la recherche d'objets métalliques, appuyez sur le bouton de détection de métaux 5jusqu'à ce que le
symbole de détection de métaux f s'affiche sur l'écran et que l'indicateur LED 1s'allume en vert.
Positionnez l'outil de mesure sur la surface à balayer et déplacer l’appareil latéralement. Lorsque l'outil de mesure
s'approche d'un objet métallique, l'amplitude de l'indicateur de mesure j augmente et produit un son "didididi" stable.
Déplacez l'outil de mesure sur la surface à plusieurs reprises pour trouver le centre de l'objet balayé.
Àla position d'amplitude maximale, l'objet métallique est situé sous le centre du capteur. Àce moment, l'indicateur i
sur l'écran s'affiche, une tonalité continue "diiiiiiii" retentit et l'indicateur LED 1 s'allume en rouge. Lorsqu'il s'éloigne
de l'objet, l'amplitude diminue.
Lorsque l'objet métallique trouvé est un métal non magnétique (par ex. cuivre), l'indicateur de métaux non
magnétiques cs'affiche. Et lorsque l'objet métallique trouvé est un métal magnétique (par ex. fer), l'indicateur kpour
les métaux magnétiques s'affiche.
Lorsque le métal est trop profond ou que le métal est trop petit, le voyant LED 1 du détecteur s'allumera en jaune.
Note: La précision de valeur de la profondeur sera affectée par la forme et la position des objets métalliques. Lorsque les
objets mesurés sont la barre d'acier standard de diamètre 20mm, et la barre d'acier est relativement parallèle au détecteur,
la précision de la profondeur est la meilleure. La valeur de profondeur n'est qu'une valeur de référence générale.

FR
Note:Pour les treillis d’armature d’acier et les armatures d’acier sous la surface examinée, une amplitude est indiquée
sur toute la surface de l'indicateur de mesure i. Pour les treillis d'armature d’acier, il est typique que le symbole k pour le
métal magnétique soit indiqué sur l'afficheur si le détecteur est juste au-dessus de la tige de fer. Lorsque le détecteur se
trouve entre les tiges de fer, le symbole cpour le métal non magnétique apparaîtra.
Note : Lorsque l'outil de mesure présente une des conditions suivantes, l'outil de mesure doit être étalonné.
1. L'outil de mesure entre automatiquement en mode de détection de métaux. Lorsque l'outil de mesure n'est pas dans
un environnement d'interférence métallique, mais que le buzzer émet toujours un son "dididi" et que le voyant rouge ou
jaune clignote toujours, l'outil de mesure doit être calibré.
2. La température extrême ou les variations de température entraînera une précision pas très bonne, alors l'outil de
mesure doit faire un calibration.
Calibration : Positionnez l'outil de mesure dans un environnement sans métal ou magnétique fort (par exemple :
maintenez l'outil de mesure sur une surface non métallique et non magnétique forte). Appuyez sur le bouton métallique 5
pendant environ 2 secondes, pour mettre le détecteur à s'auto-vérifier brièvement jusqu'à ce que le voyant DEL1 s'allume
en vert.
Remarque: En mode de balayage des métaux, les fils "sous tension" peuvent également être détectés.
B. Balayage pour les fils "sous tensionn".
Le détecteur ne peut détecter que des fils "sous tension" de 50 ou 60 Hz.
Appuyez sur le bouton 5, le symbole de détection de fils "sous tension" gs’apparaît sur l'écran et le voyant LED 1
s'allume en vert.
Positionnez l'outil de mesure sur la surface et déplacez-le. Lorsque l'outil de mesure s'approche du fil "sous tension",
l'amplitude de l'indicateur de mesure jaugmente, le signal sonore retentit avec un son "dididi" rapide. Déplacez l'outil
de mesure sur la surface à plusieurs reprises pour trouver le centre de l'objet balayé.
Àla position d'amplitude maximale, le fil "sous tension" est situé sous le centre du capteur. Àce moment, l'indicateur i
sur l'écran s'affiche, la tonalité de signal retentit rapidement et l'indicateur LED 1s'allume en rouge. Lorsqu'il
s'éloigne du fil "sous tension", l'amplitude diminue.
Les fils et conducteurs " sous tension " peuvent être détectés plus facilement lorsque les consommateurs d'énergie
(p. ex. lampes, appareils électroménagers) sont connectés au fil/conducteur recherché et mis sous tension. Les
fils/conducteurs sous la tension de 110V, 220V et 380V (courant triphasé) sont détectés avec à peu près la même
capacité de balayage.
Lorsque le fil "sous tension" est trop profond ou que le signal est trop petit, le voyant du détecteur 1sera jaune.
Note: Dans certaines circonstances (par exemple sous des surfaces métalliques ou sous des surfaces à forte teneur en
eau), les conducteurs "sous tension" ne peuvent pas être détectés de manière sûre. L'intensité du signal d'un conducteur
"sous tension" dépend de la position du câble. C'est pourquoi il est recommandé d'effectuer d'autres mesures à proximité
ou d'utiliser d'autres sources d'information pour vérifier s'il existe un conducteur "sous tension".
Note: L'électricité statique peut conduire à une indication inexacte des fils électriques. Pour améliorer l'indication, placez
votre main libre à plat sur le mur à côté de l'outil de mesure afin d'éliminer l'électricité statique.
Note: Lorsque les conducteurs "sous tension" sont trop profonds ou que les conducteurs "sous tension" sont trop petits,
la LED du détecteur 1 s'allumera en jaune.

FR
C. Détection d'objets en bois
Lors de la recherche d'objets en bois, positionnez l'outil de mesure sur la surface à balayer. Appuyez sur le bouton
de détection du bois 4. Le voyant LED 1s'allume en vert. Le symbole de l'indicateur hs'affiche à l'écran.
Positionnez l'outil de mesure sur la surface et déplacez-le latéralement. Lorsque l'outil de mesure s'approche d'un
objet en bois, l'amplitude de l'indicateur de mesure j augmente et émet une tonalité "dididi" stable. Déplacez l'outil de
mesure sur la surface à plusieurs reprises pour trouver le centre de l'objet balayé.
À la position d'amplitude maximale, l'objet en bois est situé sous le centre du capteur. À ce moment, l'indicateur isur
l'écran s'affiche, une tonalité continue "diiiiiii" retentit et l'indicateur LED 1 s'allume en rouge. Lorsqu'il s'éloigne de
l'objet, l'amplitude diminue.
Lorsque l'objet en bois est trop profond ou que l'objet en bois est trop petit, le voyant LED 1du détecteur s'allumera
en jaune.
Note: En mode de détection du bois, interdit de poser votre main sur le panneau noir.
Note: Lorsque le détecteur sonne "dididi" et que l'indicateur clignote en rouge ou jaune après le calibrage, veuillez répéter
l'opération en appuyant sur le bouton 4. Le voyant DEL 1 s'allumant en vert signifie que l'étalonnage est terminé.
Note: Lorsque le détecteur recherche à nouveau les objets en bois ou sur un mur ou une surface différente, nous devons
répéter d’appuyer sur le bouton 4, après un bref autocontrôle, l'indicateur LED 1 s'allumant en vert indique la fin de
l'étalonnage.
Note: Dans le mode de balayage du bois, les fils "sous tension" peuvent également être détectés.
Guidage pour le mode de fonctionnement
En général, certaines conditions ambiantes peuvent influencer la valeur mesurée. Il s'agit notamment de la proximité
d'autres équipements qui produisent des champs magnétiques ou électromagnétiques puissants, de l'humidité, des
matériaux de construction métalliques, des matériaux isolants laminés, du papier peint conducteur ou des titres. C'est
pourquoi nous vous prions de tenir compte d'autres sources d'information (par ex. plans de construction) avant de percer,
scier ou fraiser dans les murs, les plafonds ou les planchers.
Entretien/Service/Nettoyage
Lorsque l'indicateur de mesure j indique en permanence l'amplitude, même s'il n'y a pas d'objet métallique à
proximité de l'outil de mesure, l'outil de mesure doit être étalonné manuellement.
Essuyez les débris ou la contamination avec un chiffon doux et sec. N'utilisez jamais de produits de nettoyage ou de
solvants.
Ne collez pas d'autocollants ou de plaques signalétiques, en particulier des objets métalliques, sur la surface du
capteur 6 de l'outil de mesure, afin de ne pas affecter la fonction de mesure.
Conservez et transportez l'outil de mesure uniquement dans l'étui de protection fourni.
VIKTIG!
Le retour est exclu si le produit a été utilize ou a des defaults à cause d’un usage anormal.
COLLECTE ET TRAITEMENT :
Le matériel d’emballage est réutilisable. Débarassez-vous de l’emballage de manière écologique et mettez-le à la collecte
des matériaux recyclables.

FR
Eliminez le produit et les piles d'une manière écologique si vous désirez vous en séparer. L’appareil et les
piles ne doivent pas être jetés dans les déchets ménagers. Apportez-les à un centre de recyclage pour
appareils électriques ou électroniques usagés. Votre administration locale vous donnera des informations
supplémentaires. Enlevez d’abord les piles.
Eurotops Versand GmbH
Elisabeth-Selbert-Straße 3
40764 Langenfeld, Allemagne
Pour des renseignements techniques veuillez contacter
en France 089 2700470 ** ou info@eurotops.fr
Pour retourner un produit, veuillez utiliser l’adresse indiquée sur la facture.
**0,34 €/min + surcoût éventuel d’un opérateur
© 01.10.2018

GB
Instruction Manual
Safety Notes
Read and observe all instructions. SAVE THESE INSTRUCTIONS FOR REFERENCE.
Have the measuring tool repaired only through qualified specialists using original spare parts. This ensures
that the safety of the measuring tool is maintained.
Do not operate the measuring tool in explosive environments, such as in the presence of flammable liquids,
gases or dusts. Sparks can be created in the measuring tool which may ignite the dust or fumes.
For technological reasons, the measuring tool cannot ensure 100%certainly.To rule out hazards, safeguard
yourself each time before drilling, sawing or routing in the walls, ceilings or floors by means of other
information sources, such as building plans, pictures from the construction phase, etc.
Environmental influences, such as humidity or closeness to electrical devices, can influence the accuracy
of the measuring tool. Surface quality and condition of the walls (e.g., moisture, metallic building materials,
conductive wall paper, insulation materials, and tiles) as well as the amount, type, size and position of the
objects can lead to faulty measuring results.
Functional Description
Please unfold the picture page with the representation of the measuring tool and leave it unfolded while reading the
operating instructions.
Intended Use
The measuring tool is intended for the detection of metals (ferrous and non-ferrous metals, e.g., rebar), joists and “live”
wires/conductors in walls, ceilings and floors.
PRODUCT FEATURES
The number of the product feature shown refers to the illustration of the measuring tool on the graphic page.
1LED
2 Display
indicator light
3 “ON/OFF button
4 Wood detection button
5Metal / live wire detection button
6Sensor area
7Felt pad
8Product label area
9Battery lid
10 The strap
Display Elements
a Battery indicator
bSwitched-off audio signal indicator
c non-magnetic metal indicator
d“Autocal” calibration indicator
eThe metal detecting depth indicator
f Metal detection indicator
g“Live” wire indicator

GB
h Wood detection indicator
iThe object’s center indicator
jMeasuring indicator
k Magnetic metal indicator
Technical data
Digital detector
Maximum scanning depth:
Ferrous metals 100mm
Non-ferrous metals(Copper) 70mm
“Live” Wire** 50mm
Wood 20mm
Automatic switch off after approx. 5min.
Operating temperature -10℃+50℃
Storage temperature -20℃+70℃
Battery 1x9V
Operating lifetime approx. 4h
Weight(approx) 0.18kg
Under different detecting mode, the scanning depth will be affected by material and size as well as the condition of
the objects.
Less scanning depth for wires/conductors that are not “live”.
Assembly
Inserting/Replace the battery
Use only 9V battery.
Insert the battery. Pay attention that the polarity is correct.
The battery indicator always indicates the current battery status:
Battery fully charged
Battery has 2/3 of its capacity or less
Battery has 1/3 of its capacity or less
Please change battery
When you open the measuring tool ,the display shows nothing,then power off .That means the battery has no power. It
needs to change the battery.
If the measuring tool is not used for a long period of time, the battery must be moved. The battery can corrode or
discharge itself over long periods.
Operation
Protect the measuring tool against moisture and direct sun light.
Do not subject the measuring tool to extreme temperatures or variations in temperature. In case of large variations in
temperature, allow the measuring tool to adjust to the ambient temperature before switching it on. In case of extreme
temperatures or variations in temperature, the accuracy of the measuring tool and the display indication can be

GB
impaired.
Use or operation of transmitting systems, such as WLAN, UMTS, radar, transmitter masts or microwaves, in the
close proximity can influence the measuring functions.
Initial Operation
1. Switching On and Off
Protect the measuring tool against moisture and direct sun irradiation.
Before switching the measuring tool on, make sure that there is no moisture on the sensor area 6. If required, dry the
measuring tool using a soft cloth.
If the measuring tool was subject to an extreme temperature change, allow it to adjust to the ambient temperature
before switching on.
To switch on/off the measuring tool, press the “on/off” button 3.
When none of the measuring tool buttons are pressed for about 5 minutes and when no objects are directed, the
measuring tool will automatically switches off.
2. Switching the Audio On/Off
Press the wood button 4 and Metal/live wire detection button 5at the same time to switches on/off the Audio. When the
audio is switched off, indication bappears on the display.
3. Detecting objects
Use the detector can find the objects below the detection area 6.
Always move the measuring tool in a straight line over the surface applying slight pressure, without lifting it off or
changing the pressure. During measurement, the contact pads 7 must always have contact to the surface.
A. Detecting metal objects
When scanning for metal objects, press the metal detection button 5till the metal detection indicator symbol fis
indicated on the display and the LED indicator 1lights up green.
Position the measuring tool onto the surface to be scanned and move it sidewards. When the measuring tool comes
close to a metal object, the amplitude of the measuring indicator jincrease and makes steady “didididi” sound. Move
the measuring tool over the surface repeatedly to find the center of the scanned object.
At the position of maximum amplitude, the metal object is located below the center of the sensor. At this time
indicator ion the display will be indicated, a steady tone “diiiiii” sounds and the LED indicator 1lights up red. When it
moves away from the object, the amplitude decreases.
If the metal object found is a non-magnetic metal (e.g.copper), the indicator for non-magnetic metals c is displayed. If
the metal object found is a magnetic metal (e.g. iron), the indicator k for magnetic metals will be displayed.
When the metal is too deep or the metal is too small, the detector LED light 1will show yellow.
Note: The accuracy of the depth value will be affected by the shape and position of the metal objects. When the measured
objects is the standard steel bar of diameter 20mm,And the steel bar is relatively parallel to the detector,The accuracy of
the depth value is the best. The depth value is only a general reference value.
Note:For reinforcement steel mesh and steel under the examined surface, an amplitude is indicated on the complete
surface of measuring indicator i. For reinforcement steel mesh, it is typical that the symbol kfor magnetic metal is
indicated on the display if the detector is right above the iron rod. If the detector is in between the iron rods, the symbol c
for non-magnetic metal will appear.

GB
Note: If measuring tool has the following condition, the measuring tool need to be calibration.
1.The measuring tool automatically enters the metal detecting mode. If the measuring tool is in no metal interference
environment, but the buzzer is always making a “dididi” sound and the red or yellow light is always flashing, the measuring
tool need to be calibration.
2. In case of extreme temperatures or variations in temperature, the accuracy of the measuring tool is not very well, the
measuring tool need to be calibration.
Calibration:Position the measuring tool to an interference environment without metal or strong magnetic (e.g: hold the
measuring tool on a nonmetallic and no strong magnetic surface). Press the metal button 5about 2 seconds, then the
detector will start to brief self-check until the LED indicator 1 light up green.
Notice: Under the metal scan mode, “live” wires can also be detected.
B. SCANING for “live” wires
The detector can only detect 50 or 60 Hz “live” wires.
Press button 5, the “live” wires detection symbol gappeared on the display and the LED indicator 1lights up green.
Position the measuring tool onto the surface and move around. When the measuring tool comes very close to “live”
Wire, the amplitude of the measuring indicator j increase, the signal tone sounds with a rapid “dididi” sound. Move
the measuring tool over the surface repeatedly to find the center of scanned object.
At the position of maximum amplitude, the “live” wire is located below the center of the sensor. At this time indicator i
on the display will be indicated, the signal tone sounds with a rapid tone and the LED indicator 1light up red. When it
moves away from the “live” Wire, the amplitude decreases.
“Live” wires/conductors can be detected easier when power consumers (e.g.lamps, appliances) are connected to the
wire/conductor being sought and switched on. Wires/conductors with 110V, 220V and 380V (three-phase current)
are detected with about the same scan capacity.
When the “live” wire is too deep or signal is too small, the detector led light 1 will show yellow.
Note: Under certain circumstance (such as below metal surfaces or below surfaces with high water content), “live”
conductors cannot be securely detected. The signal strength of a “live” conductor depends on the position of the cable.
Therefore, apply further measurement in close proximity or use other information sources to check if “live” conductor
exists.
Note: Static electricity can lead to inaccurate indication of the electric lines. To improve the indication, place your free
hand flat on the wall next to the measuring tool so as to remove the static electricity.
Note: When the “live” conductors is too deep or the “live” conductors is too small, the detector LED light 1will show
yellow.
C. Detecting wooden objects
When scanning for wooden objects, position the measuring tool onto the surface being scanned. Press the wood
detection button 4. The LED indicator 1lights up green. The indicator symbol h will be appeared on the display.
Position the measuring tool onto the surface and move it sidewards. When the measuring tool comes close to a
wooden object, the amplitude of the measuring indicator j increase, and sounds steady “dididi” tone. Move the
measuring tool over the surface repeatedly to find the center of scanned object.
At the position of maximum amplitude, the wooden object is located below the center of the sensor. At this time

GB
indicator ion the display will be indicated, a steady tone “diiiii” sounds and the LED indicator 1lights up red. When it
moves away from the object, the amplitude decreases.
When the wooden object is too deep or the wooden object is too small, the detector LED light 1 will show yellow.
Note: Under the wood detecting mode, do not put your hand on the black panel.
Note: If the detector sounds “dididi” and indicator flash red or yellow after calibration, please repeat to press the button 4.
When the LED indicator 1 lights up green, it means calibration is finished.
Note: When the detector scans for the wooden objects again or at a different wall or surface, we must repeat to press the
button 4, after brief self-check, the LED indicator 1 lights up green shows finish calibration.
Note: Under the wood scan mode, “live” wires can also be detected.
The guidance for operation mode
On general, the measuring value can be impaired by certain ambient conditions. These include: the proximity of other
equipment that produce strong magnetic or electromagnetic fields; moisture; metallic building materials; Foil-laminated
insulation materials or conductive wallpaper or titles. Therefore, please also observe other information sources (e.g.
construction plans) before drilling, sawing or routing into walls, ceilings or floors.
Maintenance、service、cleaning
When the measuring indicator j continuously shows amplitude even though there is no metal object in the vicinity of
the measuring tool, the measuring tool need to be calibrated manually.
Wipe away debris or contamination with a dry soft cloth. Do not use cleaning agents or solvents.
In order not to affect the measuring function, do not attach decals/stickers or name plates, especially metal objects,
on the sensor area 6of the measuring tool.
Store and transport the measuring tool only in the supplied protective case.
ATTENTION!!!
The returns will be impossible if products were used or damaged because of incorrect use.
DISPOSAL:
The packaging material is reusable. Dispose of the packaging in an environmentally friendly way by putting it in the
appropriate recyclable waste collection containers.
Dispose of the product and the batteries in view of the environment if you want to separate. The device and the
batteries must not be thrown in with domestic waste. Take them to a recycling center for used electrical and
electronic devices. For more information you can consult your local government. Remove batteries first.
Eurotops Versand GmbH
Elisabeth-Selbert-Straße 3
40764 Langenfeld, Germany
If technical support is needed, please call ...
in Germany 0180 . 530 63 63* or info@eurotops.de
in Austria 01 . 230 60 43 12 or info@eurotops.at
in Switzerland 044 . 28 36 125 or info@eurotops.ch
in the Netherlands 026 . 37 36 333 or info@eurotops.nl

GB
in France 0892 . 700 470** or info@eurotops.fr
In Norway
tkd@eurotops.de
* 14 Cents/minute via German landline, max. 42 cents/minute via mobile phone network
**34 Cents/minute via French landline
A possible return of products should be addressed to the return address stated on your invoice.
© 01.10.2018
Table of contents
Languages:
Popular Security Sensor manuals by other brands


LEGRAND
LEGRAND 0 489 55 manual

AJAX Systems
AJAX Systems Hub Plus user manual

Perry
Perry 1SPSP050 instructions

Edimax
Edimax AI-2002W user manual

Bircher Reglomat
Bircher Reglomat ProLoop 2 Translation of the original instructions

System Sensor
System Sensor DUCTSD240 Installation and maintenance instructions


