EV Hub EVBox Elvi User manual

Elvi
User Manual
July 2021

Page 2 of 22
www.ev-hub.com.au
Contents
1 EVBox Elvi - Installation Details ..................................................................................................... 3
2 Introduction .................................................................................................................................... 4
2.1 Get in touch............................................................................................................................. 4
3 Safety precautions .......................................................................................................................... 4
3.1 Warning: Risk of electric shock ............................................................................................... 4
4 Components & Features ................................................................................................................ 5
4.1 Product Classification .............................................................................................................. 5
4.2 Elvi - Socket ............................................................................................................................. 6
4.3 Elvi – Tethered Lead ................................................................................................................ 7
5 Activate EVBox Elvi ......................................................................................................................... 9
6 Smart Charging ............................................................................................................................. 10
7 Charge with EVBox Elvi ................................................................................................................ 11
8 Network Options and Accessibility .............................................................................................. 12
8.1 Accepting One-off Payments, as a Private User ................................................................... 13
9 Maintenance Instructions ............................................................................................................ 14
9.1 Maintenance by user ............................................................................................................ 14
9.2 Maintenance by a qualified electrician ................................................................................. 14
9.2.1 Remove the station ....................................................................................................... 14
9.2.2 Replace the charging cable ........................................................................................... 14
10 Remove Station ........................................................................................................................ 15
11 Troubleshooting ....................................................................................................................... 16
12 EVBox Elvi – Specification ........................................................................................................ 18
13 Warranty ................................................................................................................................... 19
14 Disclaimer ................................................................................................................................. 20
15 Smart Charge - App Operation ................................................................................................. 21

Page 3 of 22
www.ev-hub.com.au
1 EVBox Elvi - Installation Details
To be completed by the Installer. Keep this Manual safe, for your records.
Model Number:
Lead or Socket version:
Max kW Rating:
Registration #:
Security Code:
Installer Company:
Installer Name:
Installer Contact Details:
Commission Date:
Connected to Smart
Charge Network - Y/N:
Network Configuration:
RFID Card or Fob #:

Page 4 of 22
www.ev-hub.com.au
2 Introduction
Thank you for choosing the EVBox Elvi.
This User manual tells you how to use and fault find any potential issues with the EVBox Elvi.
Carefully read the safety information before you start.
These instructions are valid for several models of the charging station. It is possible that some
features and options described may not apply to your charging station.
2.1 Get in touch
If you have any suggestions how we can improve our offer, or if you see an error, we’d love to hear
from you. You can contact us by going to https://ev-hub.com.au/
All EVBox manuals can be downloaded from evbox.com/manuals.
3 Safety precautions
3.1 Warning: Risk of electric shock
• Read the supplied documentation carefully to familiarize yourself with all safety instructions
and regulations before using this product.
• This product is designed and tested in accordance with international standards.
• The use of this product is limited to those applications it is designed for.
• Installation, maintenance and repairs of this product are only to be performed by qualified
personnel.
• Incorrect installation or repairs may cause hazardous situations for the user of this product.
• This product is used in combination with a power source.
• Always switch off power before any maintenance activity.
• This product contains no user-serviceable parts. Consult EV Hub or your distributor for more
information. Do not attempt to service or repair the charging station yourself!
• Make sure that the product is only used under the correct operating conditions.
• Cord extension sets are not allowed to be used.
• Make sure that the power line to the wall dock is installed on a dedicated circuit breaker
(MCB) on your service panel. The installation must incorporate an adequate residual-current
device (RCD) Type A. The MCB must be in line with the capacity of the EVBox Elvi charging
cable used (3.7, 7.4, 11, 22 kW). In case the amperage rating of the charging cable is
different than the amperage rating of the (MCB), the installer/user must change the station
settings in the mobile app for station management and/or backend portal account as
provided by the operator or service provider for this product.
The installing party must always ensure that the charging station is installed according to the
local regulations. The installation settings of the service panel must always be adjusted by a
qualified electrician.
EV Hub and EVBox is not responsible for any damage that occurs if this product is transported in
a different packaging than the packaging in which the product was originally supplied. Store this
product in a dry environment; the storage temperature must be between -25 °C and +60 °C.

Page 5 of 22
www.ev-hub.com.au
4 Components & Features
4.1 Product Classification
• EV Supply Equipment connected to AC supply network
• Permanently connected
• AC EV Supply Equipment
• Outdoor use
• Equipment for locations with non-restricted access
• Stationary equipment, mounted on walls, poles or equivalent means: surface mounted
• Class I Equipment
• Mode 3 EVSE
• Operating temperature range: -25°C to 45°C
• Enclosure ratings: IP55, IK10
Page 6 of 22
www.ev-hub.com.au
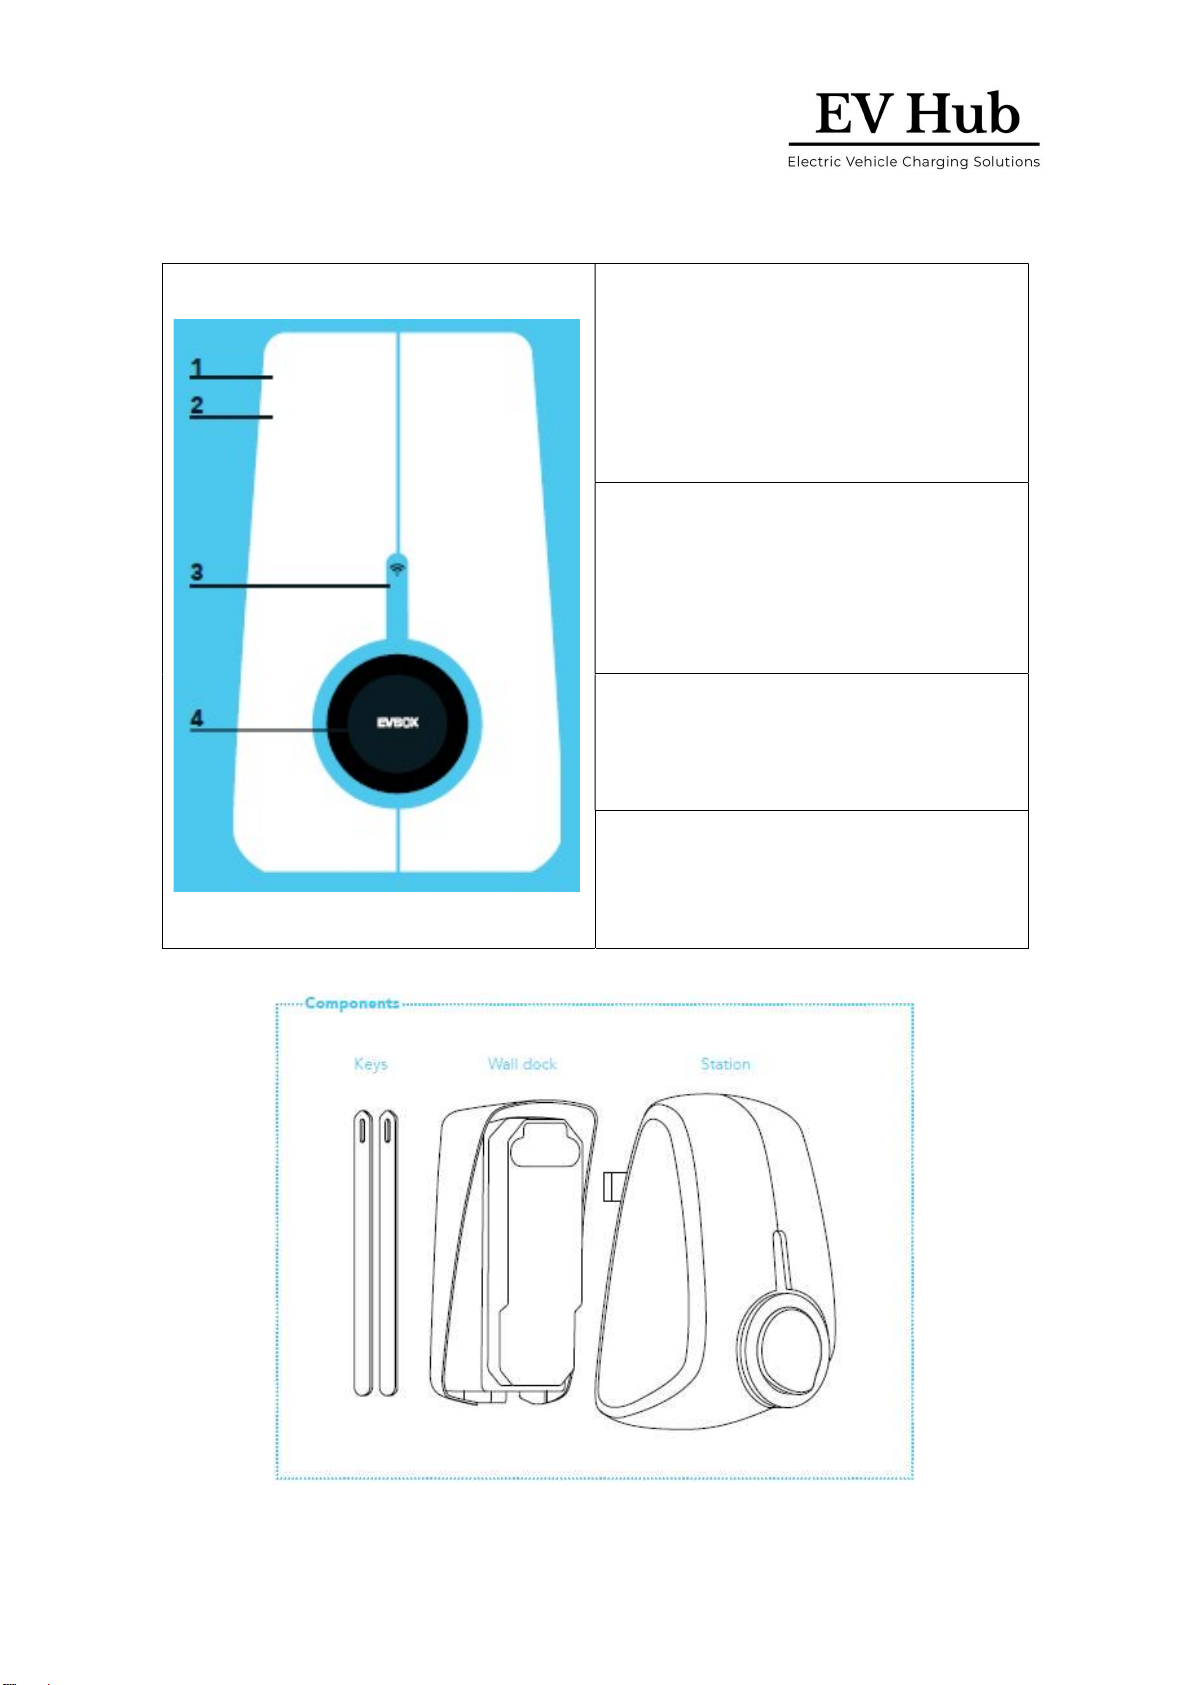
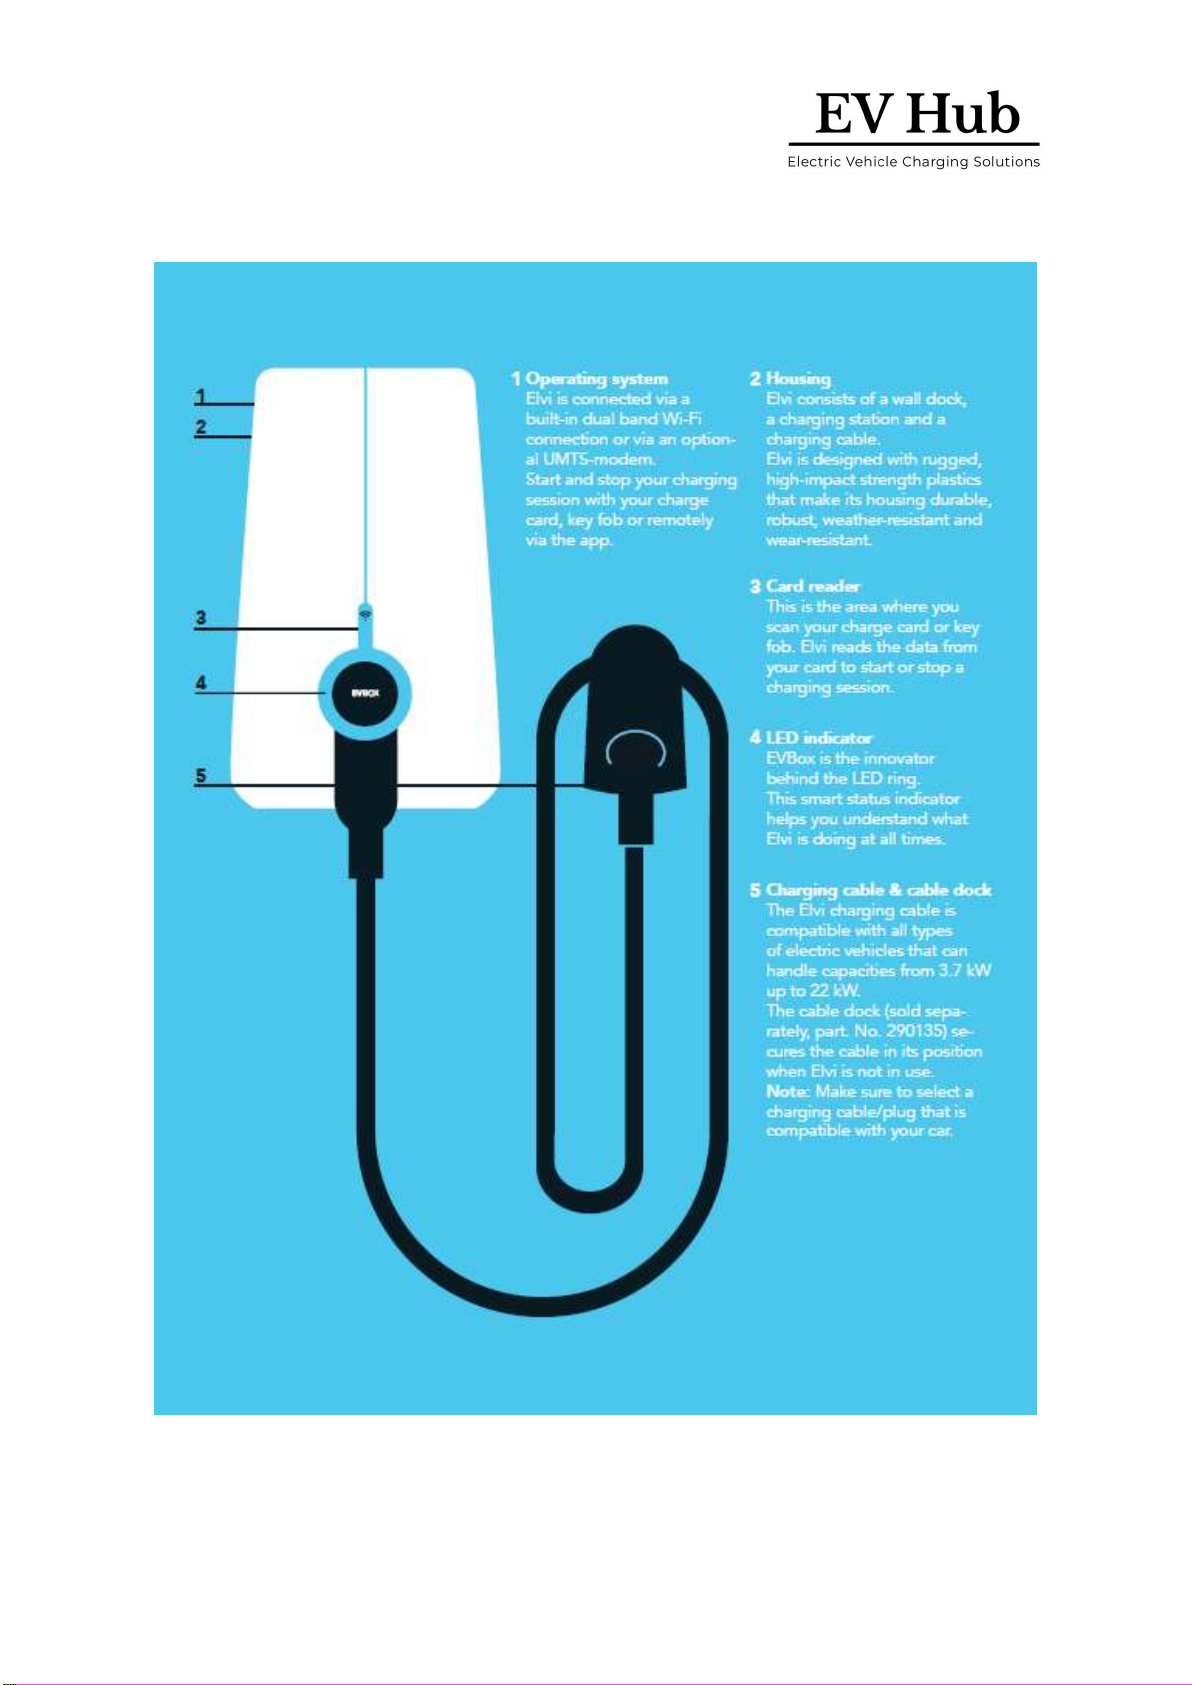
4.2 Elvi - Socket
1.
Operating system
EVBox Elvi is connected via a built-in dual
band
WiFi connection or via an optional UMTS
modem.
Start and stop your charging session with
your charge card, key fob or remotely via
the app.
2.
Housing
EVBox Elvi consists of a wall dock, a
charging station and a charging cable.
EVBox Elvi is designed with rugged, high-
impact strength plastics that make its
housing durable, robust, weather-
resistant and wear-resistant.
3.
Card reader
This is the area where you scan your
charge card or key fob. EVBox Elvi reads
the data from your card to start or stop a
charging session.
4.
Socket
EVBox Elvi with a socket offers you the
opportunity to make use of your own
charging cable.
The socket is standard, Type 2.
Page 7 of 22
www.ev-hub.com.au
4.3 Elvi – Tethered Lead

Page 8 of 22
www.ev-hub.com.au
Page 9 of 22
www.ev-hub.com.au
5 Activate EVBox Elvi
Your EVBox Elvi Charger can be configured, at commissioning, two ways to operate:
1. Autostart: The Charger will simply start when plugged in and stop when the plug is removed.
2. App or RFID Smart Card: Whilst your Electrician installs your EVBox Elvi Charger, he/she will
connect it to the Smart Charge backend management software.
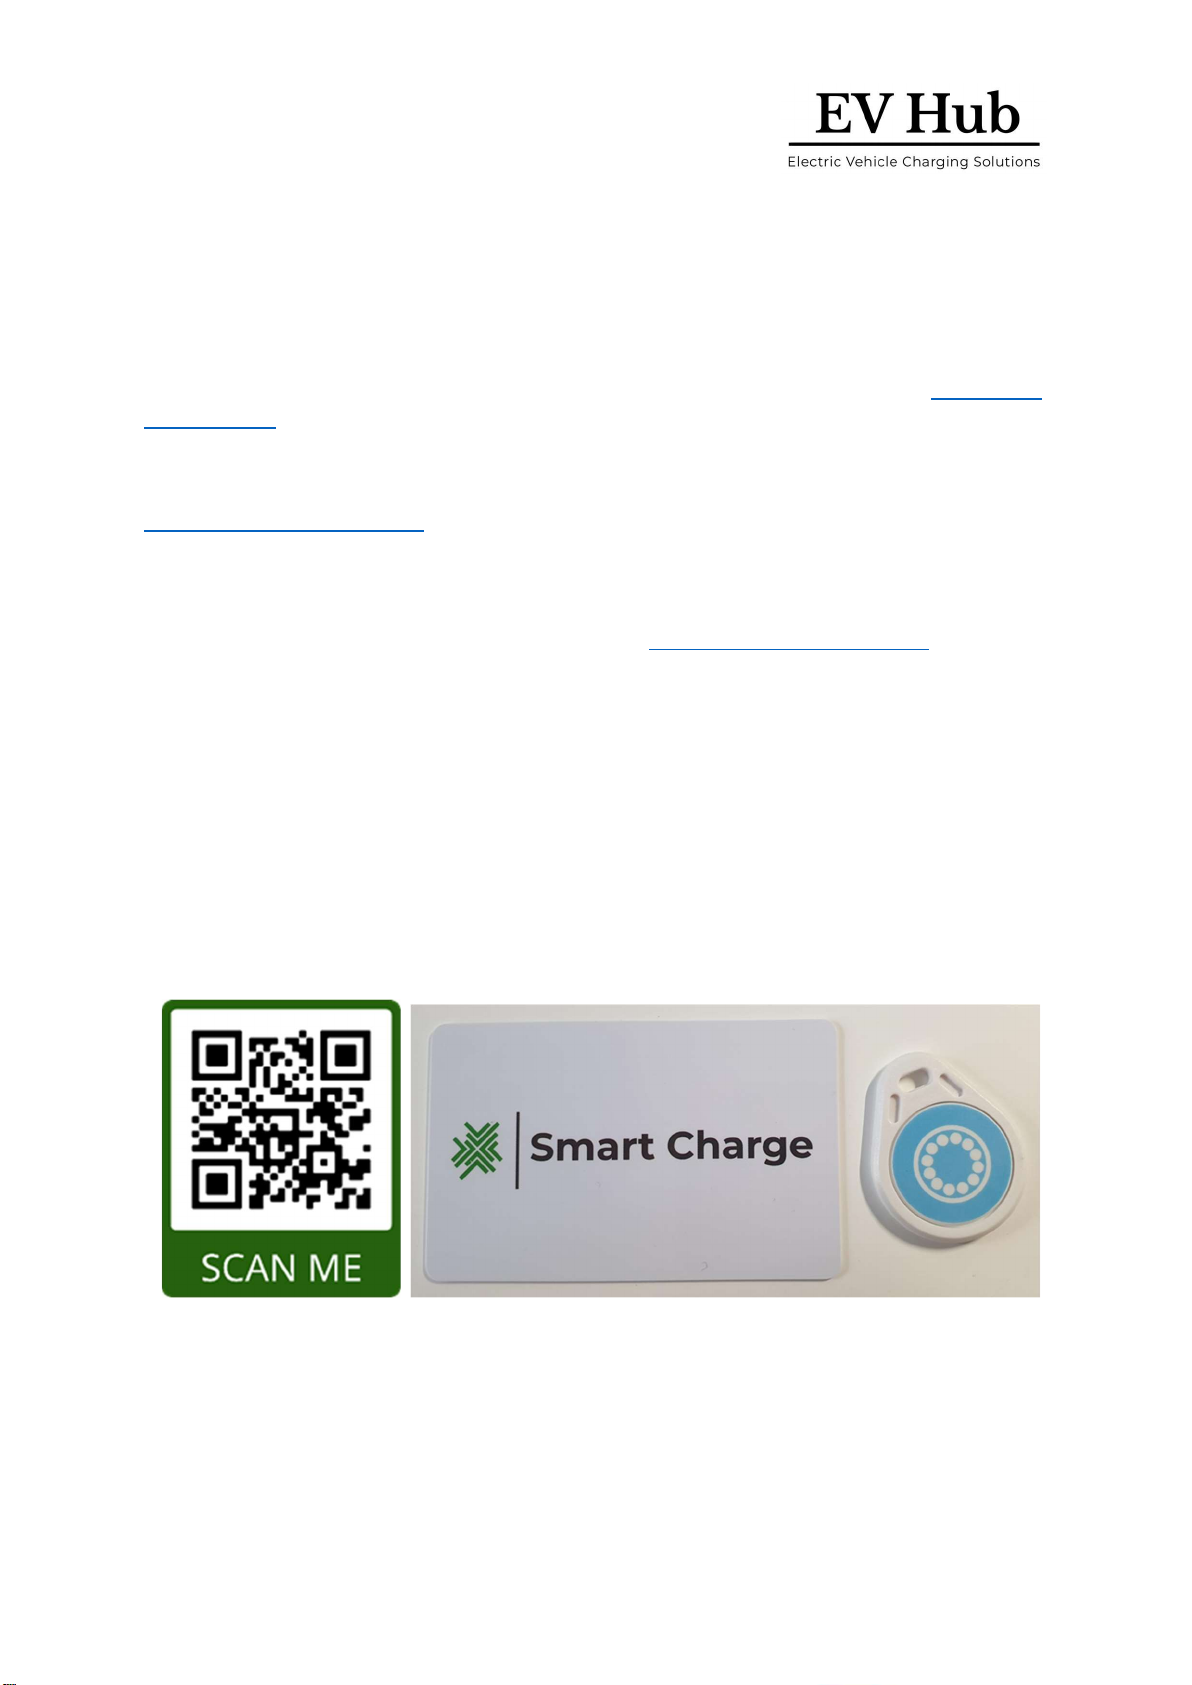
Download your Smart Charge station management application from your App Store, via www.smart-
charge.com.au, or by scanning the QR code below.
Once you have set up your Account in the App, Smart Charge will either connect the Smart RFID card
or Key Fob that was sent with the EVBox Elvi Charger or send you a new one. Please email the
[email protected]m.au with your requirements.
Your EVBox Elvi Charger will be set up to only recognise registered RFID Smart Cards, with Accounts,
that are registered under your Charger. No exchange of payment required. Just secure access.
If you lose your Smart Card, then notify Smart Charge at support@smart-charge.com.au ASAP, to
have your old one cancelled, and new one issued.
Benefits of connecting EVBox Elvi to Smart Charge backend management software:
• Remote access for Smart Charge to monitor the performance of the Charger,
• Early notification of issues,
• Remote Software updates,
• Remote activation or stopping – if ever required,
• Remote cancellation of lost RFID cards, and issue of new cards or Key Fobs,
• Integration of your EVBox Elvi with a Home Energy Management System – for smart
charging, dynamic load balancing, and Energy Retailer Tarif optimising.
Page 10 of 22
www.ev-hub.com.au
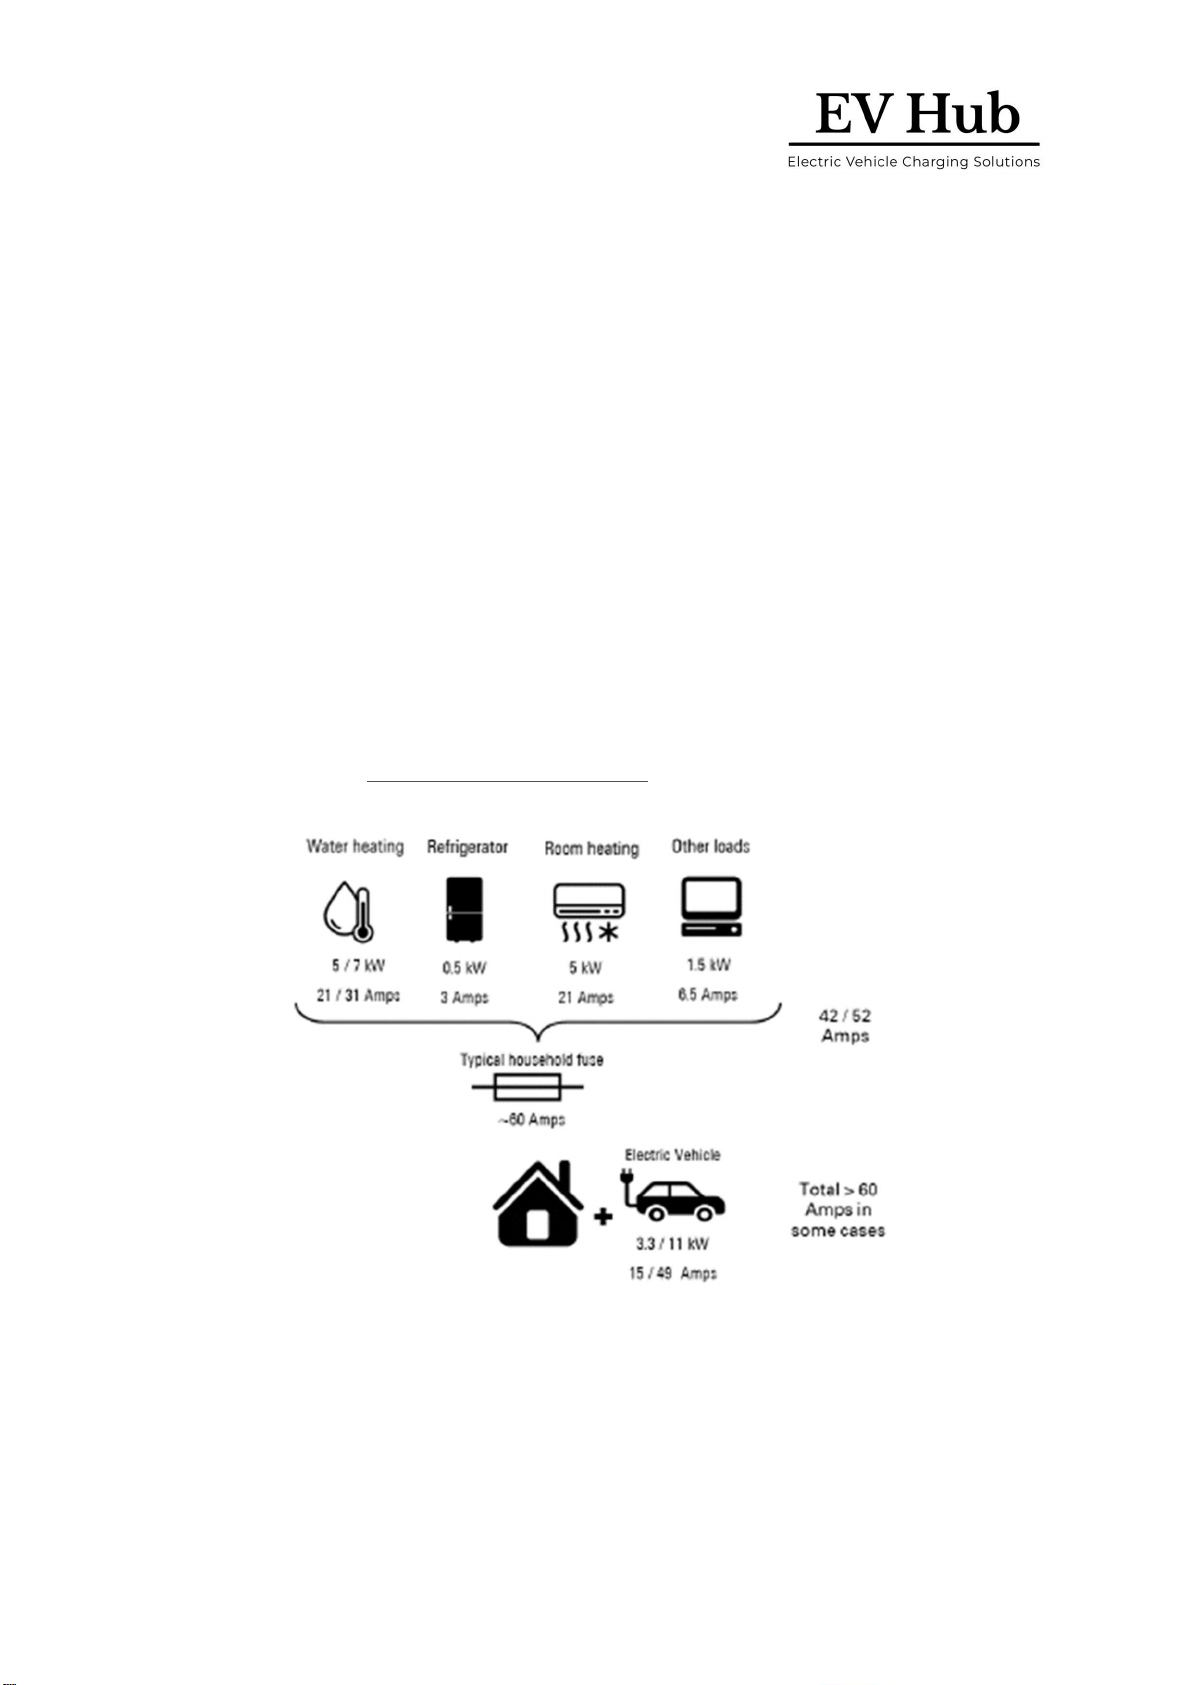
6 Smart Charging
EV chargers draw a relatively large electrical load, between 2.2 kW and 22 kW, dependent on a
single or three phase connections. These additional loads may exceed the design capacities of the
electrical supply circuits within a home or business, and on the distribution networks.
A household main supply is typically - single phase 60 Amps. Load levels of existing appliances will
have an impact on the rate and when an EV can charge, without overloading the system.
To achieve this on a real-time basis requires either an expensive electrical main supply upgrade to
the premises, or the integration of a Smart EV Charging. Smart Charging can coordinate the
electrical ecosystem, including solar, battery, pool pump, inverters, by dynamically varying the EV
Charger output based on loading from other appliances or from external market linked signals.
The Smart Charge - Smart Charging integration helps users to understand, optimize, and control
their energy usage.
EV owners/managers can rest assured that they’re using their site’s power capacity as efficiently and
as safely as possible.
What’s more, the Smart Charge - Smart Charging allows users to harness the solar power they
generate to power their charging stations.
Contact Smart Charge at su[email protected].au for me details.
Page 11 of 22
www.ev-hub.com.au
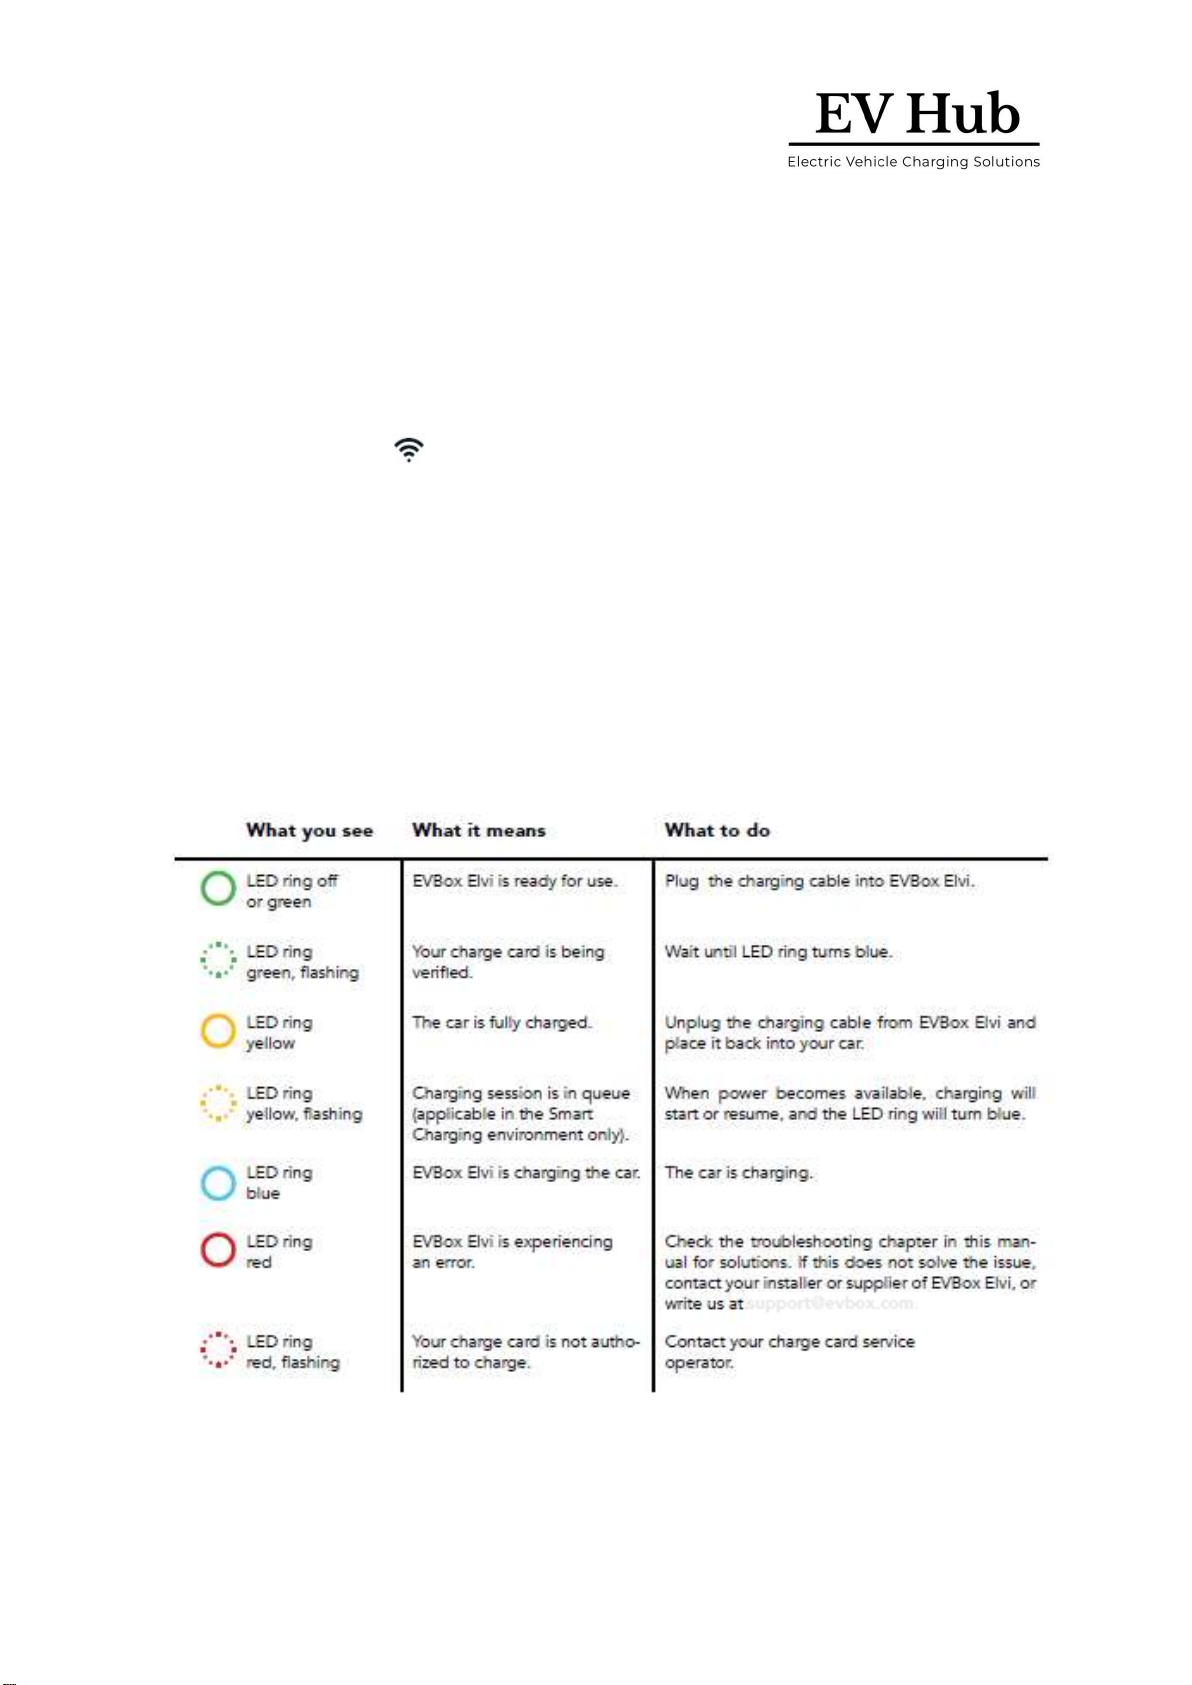
7 Charge with EVBox Elvi
Start charging
3. Plug your charging cable into your vehicle and the EVBox Elvi – if a Socket version.
4. To start and stop a charging session, you can use a registered charge card, key fob, or your
mobile Smart Charge application.
5. In case of charge card activation, hold your charge card (RFID Card) in front of the reader,
marked with icon.
6. EVBox Elvi reacts with a beep. This means that your card has been authorized.
7. The EVBox Elvi LED ring turns blue when it starts charging.
Stop charging
1. In case of charge card activation, hold your charge card (RFID Card) in front of the reader,
marked with icon.
2. EVBox Elvi reacts with a beep. This means that your charge card/key fob has been
authorized. The EVBox Elvi LED ring turns green when it stops charging.
3. Unplug your charging cable from your vehicle and EVBox Elvi and place it back into your car.
Alternatively, you can unplug your charging cable from your vehicle, if a tethered lead, and
hang it back up safe and securely.
support@smart
-
charge.com.au

Page 12 of 22
www.ev-hub.com.au
8 Network Options and Accessibility
Your EVBox Elvi Charger can be set up on the Smart Charge Electric Vehicle Charging network, in the
following ways: Public, Semi-Public and Private chargers:
Public: Charging stations that can be viewed and used by any EV drivers on the Smart Charge
network. Also, visible and accessible on the Network Map and Plugshare by all EV Owners.
• Annual License = Approx. $280 p.a. for App access, monthly reconciliation and transfer of
funds received.
• Common Use = For Public to get accessibility i.e., Shopping Centres, Restaurants/Cafes,
Hotel, public Convenience locations, Apartment Complexes
Semi-Public: Select charging stations that are be used by a set limited group of EV drivers only. E.g.,
Companies with employees, pool vehicles, Apartments with shared charging stations.
• Annual License = Approx. $250 p.a. for App access, monthly reconciliation and transfer of
funds received.
• Common Use = Apartment Complexes that the Public cant access e.g., has known Users
Private (Business): Charging stations that are only be used by 1 to 5 private EV Drivers. e.g., Tenant
or Landlord which use a shared parking environment with specific parking space.
• Annual License = Approx. $50 p.a. for access and an annual report of usage for FBT and
other requirements.
Private (Home): Charging stations installed in Homes, used by 1 or 2 EVs and Users.
• Annual License = $0 p.a., as there is generally no reporting or transfer of payment required.
• Benefits = Backend access for Smart Charge to monitor the performance of the Charger,
early notification of issues, software updates, remote activation or stopping, remote issue of
RFID Smart Cards for security, integration of smart charging, dynamic load balancing, and
Energy Retailer Tarif signalling.
Note: Pricing mentioned above is for budget purposes only and may be subject to change. Please
check with Smart Charge at [email protected]
Page 13 of 22
www.ev-hub.com.au
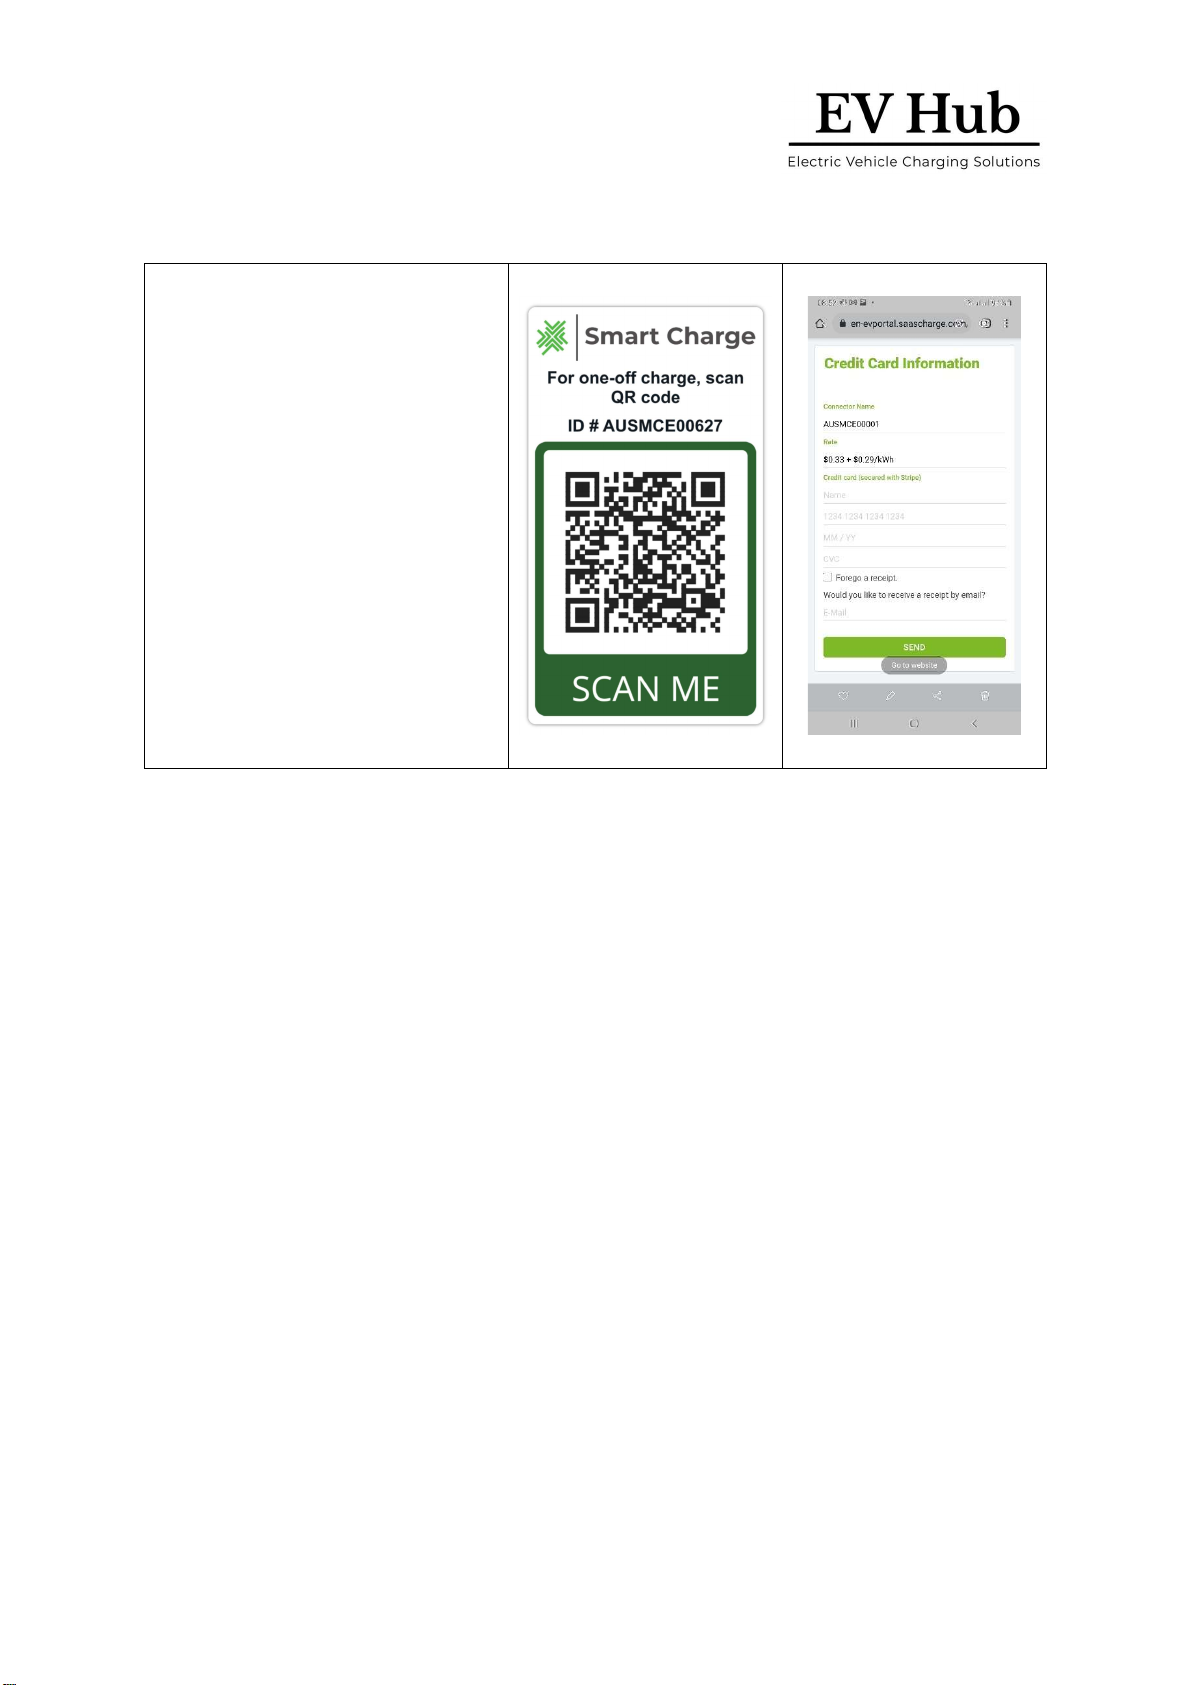
8.1 Accepting One-off Payments, as a Private User
To be able to receive one-off
payments from ‘Guests’, Smart
Charge are able to set up your EVBox
Elvi with a QR Code – that can be
fixed to the front of the Charger
(similar to this image).
All that is required is an Agreement
with your desired payment amount,
and Bank Account details, for monthly
transfer of any funds received.

Page 14 of 22
www.ev-hub.com.au
9 Maintenance Instructions
9.1 Maintenance by user
The user of Elvi is responsible for the condition of the charging station, whereby both the law
regarding the safety of persons, animals, and property must be observed, as well as the installation
regulations in force in the country of use. Have Elvi and its installation inspected by a qualified
electrician on a regular basis and in compliance with installation regulations applicable in your
country. For Australia and New Zealand, the Residual Current Device (RCD) and integrity of the
Charging Cable should be checked at least once per annum.
• CAUTION: Do not use a hose or a high-pressure spray to clean Elvi.
• CAUTION: Do not use aggressive chemical cleaners or solvents to clean Elvi.
1. Remove dirt and natural organic matter on the outside of Elvi using a damp soft cloth.
2. Check the charging plug for dirt. Clean if necessary.
3. Check the charging plug for damage. A qualified electrician must replace the charging cable
if the charging plug is damaged.
9.2 Maintenance by a qualified electrician
Only a qualified electrician is permitted to do the following maintenance procedures.
9.2.1 Remove the station
See the corresponding illustrations in Section 9 of this Manual.
1. Switch off power to the charging station at the power supply cabinet.
2. Push the two unlock tools, slot first, fully upwards into the holes on the bottom of the
station until you hear a click.
3. With both hands, pull the station from the wall dock in a straight line to disengage the
station electrical connector from the wall dock.
Note: To prevent damage to the locking tabs or the electrical connector, do not twist or
skew the station.
4. Remove the two unlock tools from the wall dock.
9.2.2 Replace the charging cable
See the corresponding illustrations in the EVBox Elvi Installation Manual.
Note: When working on the station, place the station on a soft surface to protect it from damage. Be
careful not to damage the locking tabs on the station.
1. Remove the station.
2. Remove the bolt at the back on the Charging Cable connection using the Torx T30 bit.
3. Turn the station over and remove the charging cable from the station.
4. If the rubber seal is not on the charging cable plug, remove the rubber seal from the station
socket.
5. On the new charging cable, make sure that the rubber seal is in place and not twisted. The
rubber seal must fit correctly to ensure that the enclosure rating is met.
6. Push the charging cable firmly into the station.
7. Turn over the charging station and place it on a soft surface.
Page 15 of 22
www.ev-hub.com.au
8. Install the Torx M6 x 45 bolt using a Torx T30 bit.
9. Install the station.
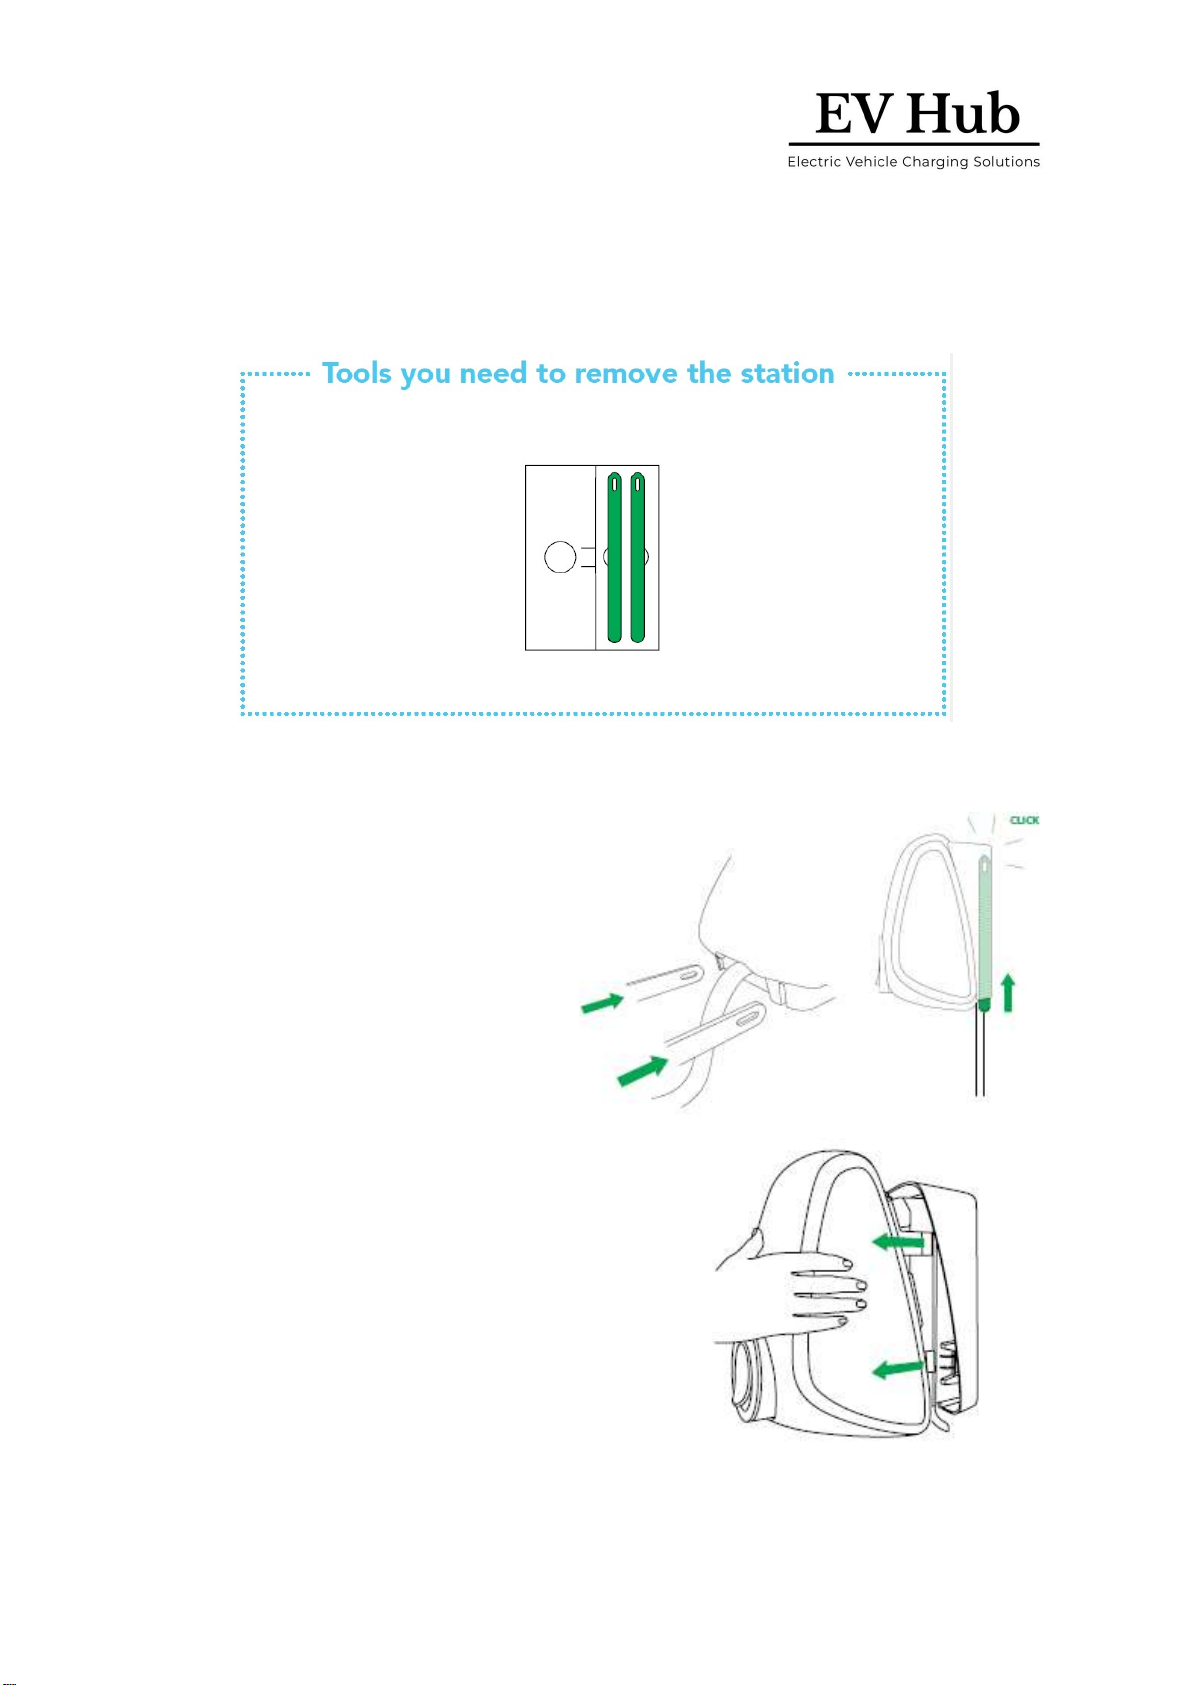
10 Remove Station
Warning: Risk of electric shock.
Before removing the charging station from the
wall dock, make sure that the power line
you’re using is switched off on your service
panel. The LED ring of the charging plug must
be off.
Take out the keys from the folder in the box.
Insert the keys into the slots in the bottom of
the wall dock. This releases the snap-fit
connection of the charging station to the wall
dock. Make sure to push them in until they
only stick out approx. 50 mm and cannot be
pushed in any further.
Now you can remove your charging station
from the wall dock. Pull the charging station
away from the wall dock in a straight line.
Important: Do not twist or skew the charging
station, as that might damage the station’s
snap fits and/or connectors.
Be aware that the charging station is still fixed
on the connector (socket) of the wall dock,
and it requires some force to pull it off.
Take out the keys from EVBox Elvi wall dock.

Page 16 of 22
www.ev-hub.com.au
11 Troubleshooting
Troubleshooting must only be done by a qualified electrician unless otherwise stated. Incorrect
installation, repairs or modification can result in danger to the user and may void the warranty and
liability.
This is a general troubleshooting guide listing the most common issues. If you are not able to solve
an issue, visit www.ev-hub.com for further help from our support team.
Problem
Possible cause
Solution
LED ring is off.
The charging station is in
idle mode and the LED
ring idle state is set to off
or timer. (The LED ring
comes on when the
charging station is used.)
• Use the EVBox Connect app to set
the LED ring idle state to on or timer.
The LED ring will stay on
continuously.
Charging station does not
react
No power to charging
station
•
Check that the residual current
device and circuit breaker on the
service panel are on (check by user).
• Check that the supply cable entering
the charging station is live. The LED
ring should be on.
• Turn the charging station off. Turn it
on again after 20 seconds by flipping
the circuit breaker or main switch to
EVBox Elvi.
Residual-current device
prevents charging. LED
ring flashes red 10x.
•
Grounding error in
the charging station
• Special ground
resistance needed for
the vehicle
• Fault in the vehicle or
defective charging
cable
• Contact your service technician for
inspection and solution. There are
no user-serviceable parts.
LED ring lights up red
constantly. Grounding fault.
•
Check whether your electrical
installation is properly grounded.
Contact your service technician in
case of doubt and for solving the
local grounding situation.
LED ring lights up yellow
constantly
• Vehicle is on a timer
• Vehicle is fully
charged
• Grounding resistance
is too high (with
specific vehicles, this
must be < 50 Ohm)
•
Check that the charging cable plug is
inserted into EVBox Elvi properly
(check by user).
• Change the setting of the timer in
the vehicle (check by user).
• Replace the charging cable (user-
serviceable).
• Check that the ground resistance is
correct (grounding measurement by
electrician).

Page 17 of 22
www.ev-hub.com.au
Red LED starts flashing
immediately after the
card is held against the
reader
Charge card is not
authorized for charging at
this charging station
There is no
communication with the
mobile app for station
management
•
Check that the charge card is
registered correctly (check by user).
• Check the settings of your charging
station in the mobile app for station
management and/or backend portal
account as provided by the operator
or service provider for this product.
For further details, contact your
operator or service provider.
• Check that there is proper Wi-Fi
reception where EVBox Elvi is
installed (check by user).
• Reboot your Wi-Fi network first.
Then reboot EVBox Elvi, and check
the Wi-Fi reception (check by user).
• Check in the mobile app for station
management that your Wi-Fi
network is properly connected to
EVBox Elvi. Reconnect again. (check
by user)
• If your EVBox Elvi is equipped with
the optional UMTS module, check
that EVBox Elvi is in contact with the
local cellular network and that it has
proper reception. (check by charging
point operator)

Page 18 of 22
www.ev-hub.com.au
12 EVBox Elvi – Specification
Charging capacity
Upgradable 3.7–22 kW
Charge mode
Mode 3 (IEC 61851-1)
Number of connectors
1
Connector options
Fixed cable or Type 2 socket
Fixed cable type
Type 2 (IEC 62196-2) plug
Fixed cable length
4 m or 8 m for Elvi models without dynamic load
balancing
6 m for Elvi models compatible with dynamic load
balancing
Connection capacity
Selectable 1-phase or 3-phase, 230–400V, 16 A and 32 A,
50-60 Hz
Metering
Optional 3-phase S-Bus MID-certified kWh meter in wall
dock
Enclosure ratings
IP55, IK10 (IEC 60529)
AS/NZ Certified
Yes (SAA Approved)
Compliance
IEC 61851-1, IEC 61851-21-2, CE EMC EU/2014/30,
CE Low voltage EU/2014/35, RED EU/2014/53
Authorization
Autostart / Keyfob / RFID card - controller with RFID
reader type Mifare 13.56 MHz
Smart Charging
Dynamic load balancing, solar integration, and scheduled
charging via EV Hub Smart Charge
Dimensions (W x H x D)
Fixed cable - 186 x 328 x 161 mm
With socket - 186 x 328 x 219 mm
Mounting
Wall or pole
Standard colours
Misty Black, Polar White

Page 19 of 22
www.ev-hub.com.au
13 Warranty
13.1 EVBox warrants to Customer on delivery and for a period of three (3) years thereafter that the
Products are free from material defects in material and workmanship and conform in all material
aspects with the specifications as explicitly listed in the Documentation, except for charging cables,
their connectors and software, for which the warranty is limited to three (3) months from delivery.
Except as stated in this clause 1, EVBox provides no warranties of any kind in respect of the
Products.
13.2 Subject to clause 3, EVBox shall, at its option, repair or replace defective Products, or refund the
price of defective Products if:
(a) Customer gives notice in writing during the warranty period within a period of fourteen (14) days
after the Customer has discovered or should reasonably have discovered that some or all of the
Products do not comply with the warranty as set out in clause 1;
(b) Customer returns such Products to EVBox (at the location specified by EVBox) at Customer’s cost
and following the RMA (return merchandise authorization) instructions from EVBox, if the nature of
the Product allows such return; and
(c) EVBox is given a reasonable opportunity of examining such Products and provided by Customer
with all information it may reasonably require to proceed to such examination. With respect to
repair, EVBox is entitled to apply problem-avoiding restrictions and/or Workarounds.
13.3 EVBox shall not be liable for the Products’ failure to comply with the warranty in clause 1 if:
(a) Customer makes any further use of such Products after giving a notice in accordance with or
failed to provide notification within fourteen (14) days as set out in clause 2;
(b) The Error arises because Customer failed to follow EVBox’s oral or written instructions as to the
storage, installation, commissioning, use or maintenance of the Products or (if there are none) good
trade practice (such as but not limited to use of the Products with parts, accessories or software not
provided or approved by EVBox);
(c) The Error arises as a result of EVBox following any customisation or Product specification supplied
by Customer;
(d) Repairs or other interventions on the Products are performed by persons not trained for this
purpose, against EVBox’s oral or written instructions, or with parts not supplied or approved by
EVBox; or
(e) The Error arises as a result of fair wear and tear, wilful damage or negligence by Customer and/or
a third party, or abnormal working conditions (such as but not limited to damages resulting from
vandalism, animals, high-pressure cleaners, or Error in connected vehicles).
13.4 In all cases, the following are excluded from the coverage of the warranty:
(a) Travel costs and labour costs of repair, including time spent on preliminary work or on
disassembly and reassembly, if the repair of the Products is to take place at the installation site due
to the nature of the Products;
(b) Cleaning, routine maintenance and preventative maintenance operations of the Products as
defined in the Documentation, as well as the supply of products necessary for these operations;

Page 20 of 22
www.ev-hub.com.au
(c) Restarting operations after the Product has been secured, for example by circuit breakers, ground
fault circuit interrupters (GFCIs), fuses or emergency stops; and
(d) In general, all operations on site, especially if no parts need to be replaced.
13.5 The Agreement shall apply to any repaired or replacement Products supplied by EVBox.
This warranty statement is subject to change.
Please refer to evbox.com/general-terms-conditions for the latest version.
14 Disclaimer
The present document is drawn up by way of information only and does not constitute an offer
binding upon EV Hub. EV Hub has compiled the contents of this document to the best of its
knowledge. No express or implied warranty is given for the completeness, accuracy, reliability or
fitness for particular purpose of its content and the products and services presented therein.
Specifications and performance data contain average values within existing specification tolerances
and are subject to change without prior notice. Prior to ordering, always contact EV Hub for the
latest information and specification. EV Hub explicitly rejects any liability for any direct or indirect
damage, in the broadest sense, arising from or related to the use and/or interpretation of this
document.
Smart EV Solutions Pty Ltd trading as both EV Hub and Smart Charge. ABN: 74 650 654 916
National Equipment Registration Responsible Supplier # E9093
Table of contents
Other EV Hub Batteries Charger manuals


