EVannex Front Lighted T User manual

Tesla!Model!S!Front!Lighted!T
Installation!Instructions!
The!front!lighted!T!makes!your!Tesla!Model!S!distinctive!if!not!unique!from!
other!cars!on!the!road!and!other!Model!S’s.!!This!LED!powered!device!is!
mounted!under!Tesla’s!standard!chrome!T!and!arch!on!the!front!of!the!car.!
With the supplied remote control the device can be turned on and off at will, its
brightness dimmed or intensified, and special effects such as flashing displayed.
In tandem with the rear lighted T the effects of the lighted Ts on the appearance of
the car win much public attention and admiration.
TESLA!MODEL!S!FRONT!LIGHTED!T!INSTALLATION 1

Parts!Supplied
• 15 feet 2-lead black and red 20 gauge stranded wire
• OBD2 connector (for 12v power and ground connections)
• 5 feet Spectra nylon parachute thread
• Mini LED RF wireless remote control
• 12v pre-wired LED for dash mounting
• 8 Posi-lock Connectors, 18-24 gauge
TESLA!MODEL!S!FRONT!LIGHTED!T!INSTALLATION 2

"
A."Remove"nose cone
The nose cone is attached to the front structure with a
number of spring clips. Using a plastic pry tool pry loose
one of the bottom right or left edges and remove the nose
cone. It the car is equipped with parking sensors or other
nose-cone mounted electronics, unplug the electrical
connections and set the nose cone aside.
B. Remove factory chrome Tesla T & arch from nose
cone
Remove the protective cover from the 3M adhesive on the back
side of the Lighted T. Thread the red and black leads through the
hole in the nosecone you drilled in Step C. Then press the T
firmly into!place in its indentation on the nose cone. Repeat the
same steps with the Arch. !
!
On the back side of the nose cone
locate the red and black leads from
the Lighted T and Arch!and strip
about ¾” from their ends. Then
tightly!twist together ends of red
leads. Do the same with!the black
leads. Then attach a Posi-lock
connector to the ends of the black
and red leads.
When the factory T and Arch have been removed from the nose
cone, you’ll see slight indentations on the nose cone for each one.
Clean off any tape residue and grime from the indentations. Then
drill a 3/16” hole on!upper right side of the indentations. These
holes are for threading the wiring through the nose cone for the T
and arch. The photo to the right shows the locations for these
holes, but you may want to temporally place the Light T and Arch
over the indentations to confirm these hole locations.
C. Prepare nose cone for mounting of T & arch
D. Mounting T & Arch to nose cone
Slide a 15-20” piece of the parachute thread behind the emblems and
use a back and forth sawing motion until the emblems are fully
detached. Use adhesive remover to remove all glue residue from the
back of the factory Tesla T and arch.
"
TESLA!MODEL!S!FRONT!LIGHTED!T!INSTALLATION 4
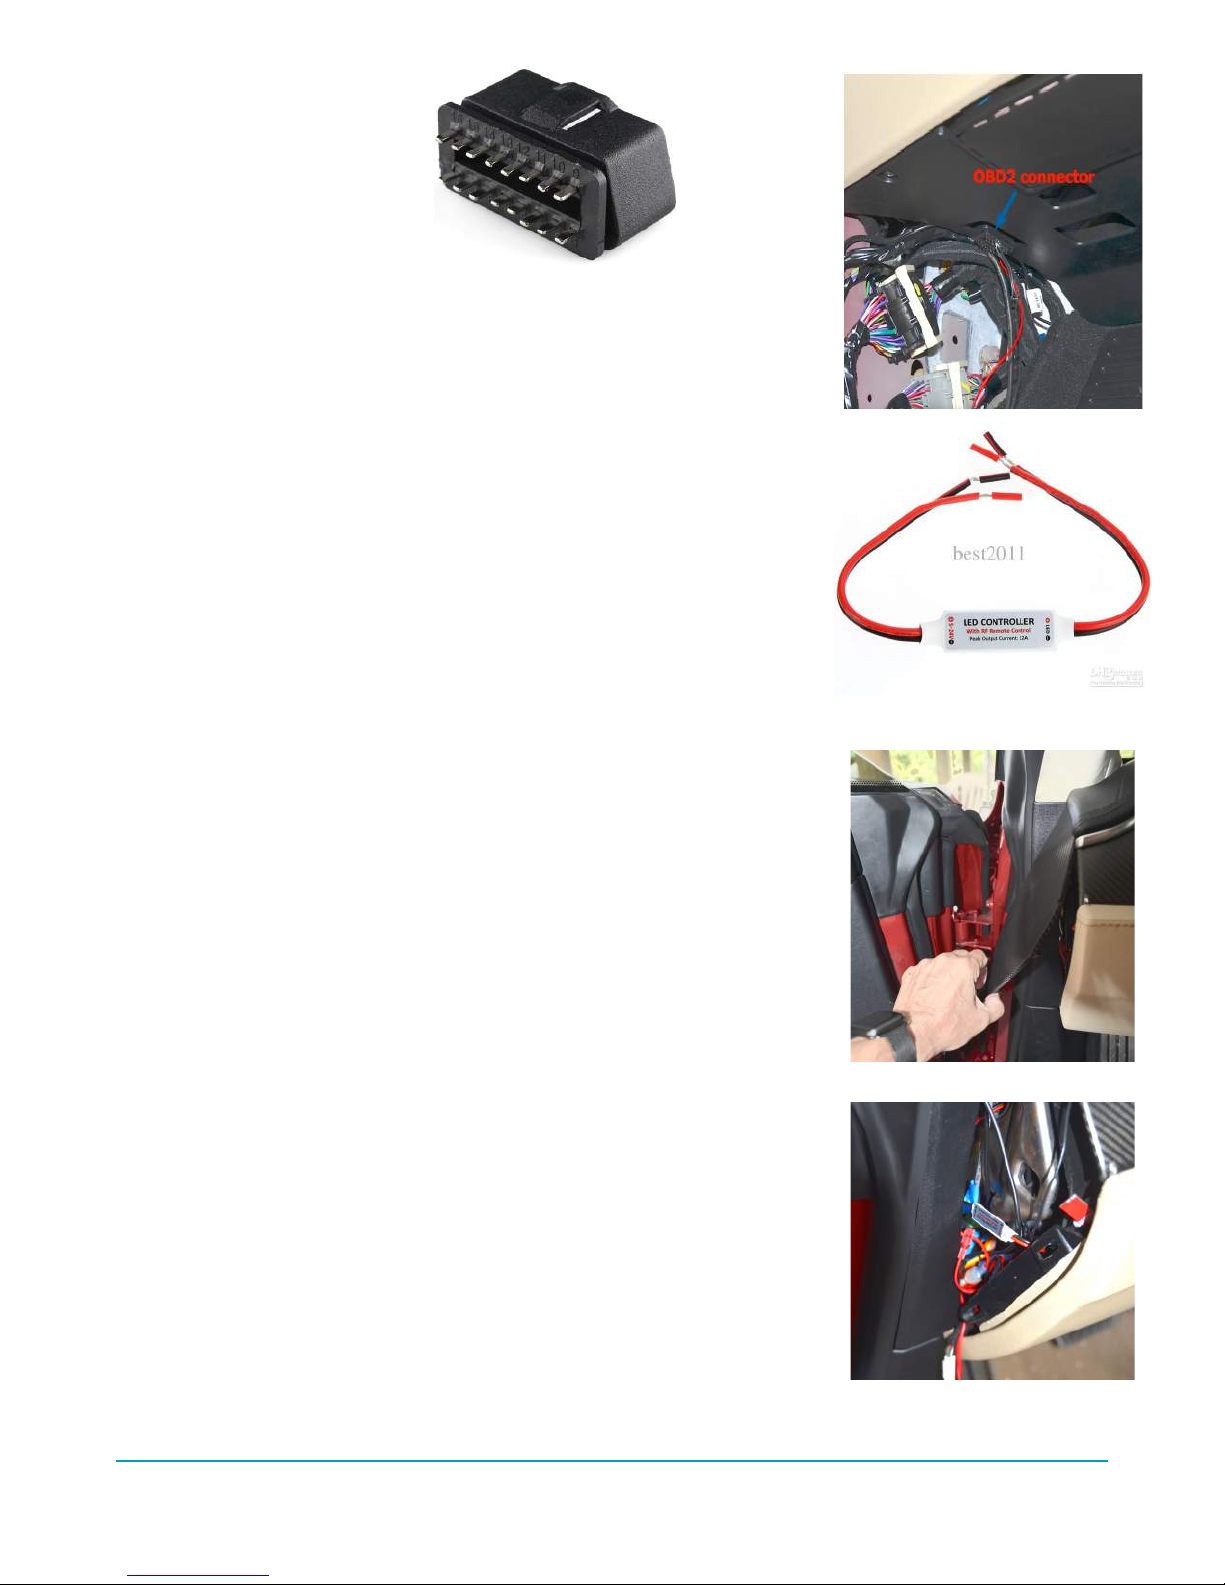
Tap 12v power and ground
An always on 12v connection and ground is necessary for proper
functioning if the Lighted T. The OBD2 connector is provided for this
purpose. Pin 16 provides the 12v connection and pins 4 or 5 ground.
Solder a 18” piece of red lead to pin 16 and an 18” black lead to pin 4
or 5. Do not strip the opposite lead ends at this time. Then locate the
Tesla OBD2 receptacle under the dash above the dead pedal. Place
the connector near the receptacle for later access but do not yet put it
in. The photo to the right shows the location of the Tesla OBD2
receptacle.
Mount the LED controller module and prepare the
connections to the Front T & Arch and LED dash indicator
The LED controller module mounts behind the dash where it is
protected from the weather and within close range of the remote. To
mount it in this location remove the triangular dash side panel by
prying it loose with a plastic trim tool (it’s attached to the dash side
with three spring clips). This will provide access to the space behind
the dash.
Next run the red and black leads from the OBD2 connector into this
space. Using Posi-Lock connectors attach these leads to the
companion red and black leads from the labeled “5-12V” side of the
LED Controller module. Attach Posi-Lock connectors to the red and
black leads on the “LED” side of the LED Controller. These will
connect to the Lighted T and Arch as well as the LED dash indicator.
Prepare 6 inch and 12 foot pieces of black and red wire. Strip one end
of both sets and twist the black and red leads of each together.
Connect the black leads to the Posi-Lock connector attached to the
black lead from the LED Controller. Do the same with the red leads.

TESLA!MODEL!S!FRONT!LIGHTED!T!INSTALLATION 5
Connect the LED Controller to Front T & Arch and LED
dash indicator.
Using Posi-Lock connectors attach the short red and black
leads from the LED Controller to the red and black leads on
the prewired dash LED. This LED will light when the Front T
and Arch are turned on, thus providing an indication about its
operation from inside the car. Just like the lighted T itself, it
will respond to all of the controls on the remote. Slip the LED
into the gap between the dash front and the panel that extends
into the footwell area. Place the LED as close to the dash end
as feasible.
Next remove the passenger side frunk trim. Then run the 12
foot leads from the LED Controller under the rubber door seal,
through the gap between the fender and window frame, into
the right side frunk area, and into the nose cone area where it
can be attached to the Posi-Connectors on the Lighted T and
Arch. Thread the wires carefully so they remain accessible but
largely out of sight.
Test functioning of the Lighted & Arch and dash LED.
Connect the red and black leads in the nose cone area to the
Posi-Connectors on the Lighted & Arch mounted on the nose
cone, then loosely mount the nose cone in place. Double check
all of your connections. If they are ok, plug the OBD2
connector into the OBD2 Receptacle then using the remote turn
on the T. The lighted T and Arch should light as should the
dash LED. Test the various functions of the remote to be sure
you understand their operation. If all is well, permanently
mount the nose cone and reinstall the frunk trim triangular
dash dash piece.
Table of contents


