ROKIOTOEX Coyote Crossbars User manual

Crossbar - (FRONT & REAR)
Driver/Left Side Brackets
Sticky Foam
(Optional)
Plastic Clips
(additional spares)
Keys
LEGEND
Same length or the longer for front
crossbar if they are different
Passenger/Right Side Brackets
Coyote Crossbars
INSTALLATION GUIDE
For All Model Flush Roof Rails with Groove Outside of 2022+ Acura MDX
Parts and Accessories
PART INDEX DESCRIPTION
A
QUANTITY PARTS
B1
B2
C
D
E
2
2
2
2
2
4
TOOLS INCLUDED
M5
TOOL INCLUDED
(M6x40mm bolts, Rubber pads,
Metal clamps , Plastic Clip, Cover)
(M6x40mm bolts, Rubber pads,
Metal clamps, Plastic Clips, Cover )
F4M6X12 Bolts

PLEASE NOTE:
PLEASE NOTE:
PLEASE NOTE:
PLEASE NOTE:
PLEASE NOTE:
STEP 1 STEP 3
2. Ensure bracket at the right side of the bar, Insert a bracket fillet
into the aluminum bar tube until hearing a click of the plastic clip
going into the hole at the end.
Check section 4 if need to take it off.
NOTE:
NOTE:
When the lock slot of the key is VERTICAL it means UNLOCK if
the slot of the key is HORIZONTAL it means LOCK
1. Ensure key hole in cover lock stays
vertical, slightly pull the cover from bottom
a bit(no more than 8mm space) , then slide
the cover off bracket gently from top.
This 4 pieces of Sticky Foam are included
on the packaged use for OPTIONAL.
Parts Assembling
1
3. Repeat step 1 and 2 to finish the
assembly of brackets and bars as illustrated
below
STEP 2
This 2 pieces of Plastic Clip included on the
packaged use for spare only.
This 2 pieces of Key included on the
packaged use for security.
Lock
Unlock KEYS
CLIPS
STICKY FOAM
B1.
A. Longer bar at the front if not equal
B2.
FRONT BAR
REAR BAR
Identify the brackets and aluminum bars for their designated positions.
The lock hole stays at the side facing forward
the bar top side with a beam stays at the side facing forward
Assembled Crossbars
Additional Attention Before Installation
Keep the bracket
uncovered
This is REAR side.
This is FACING
FORWARD SIDE .
(front side)
Which be placed
in the TOP FRONT
of the car.
Tighten the bolts
in tube until the
bar is not sliding
between bracke ts.
This Plastic clip is
pre-installed inside
each bracket
NOTE:
This Sticky Foam tape can be used under the clamp for any gap
or scratching concerns and it's optional.
If you want to apply this tape, you can apply it to the surface of
the roof rail at which more protective potential is required.
If you did not find any Plastic Clip inside the bracket, please use
the bare plastic clip that include in the package insert into the
slot.
M5
Crossbar at the Front
(longer or equal length to
the rear )
Crossbar at the rear
(shorter or equal length to
the front )
Keep all bolts loose but not disconnected on each bracket at this moment,
make sure aluminum bar can move inward or outward in the bracket in a adjusting condition .

Note: Use M5 Allen Key to loosen the bolt #1 and #2,
DO NOT get it off the fixing nut behind the clamps.
#3
#4
1 2 3 4 5
#1 #2
6. Verify clamps are well positioned, and bars are well
balanced between left and right, at the front and the
rear, then tighten all bolts #1, #2, #3,#4,#5, #6,
tighten the bolts at the back of the inside clamps
DO NOT over-turn the key or use so much force to turn the key if it
is hard to rotate, in that case, check the cover gap and slightly turn
the key left or right to identify the correct rotating direction.
NOTE:
Do both ends at left and right, double confirm before
fixing bolt #5.
NOTE:
4.1) Loosen or remove bolt #6 at the center until clamps are
positioned properly on the roof rails and have been holding
the roof rail groove(s) slightly tightened on the rails properly.
MOUNT CROSSBARS ON ROOF RAILS
1. Only Take off the plastic screw at the front of each
mounting position of the roof rail inside.
M5
3. Gently loosen the two bolts(#1,#2)to get enough
space for clamping plate riding on the roof rails. put
some blanket or protection under the bracket or on
rootop to avoid scratching or damage to car body
24" to 36"
2. Put the crossbars on roof rails at the mounting point.
NOTE:
Slide the cover into a bracket from the top gently,
then line up the hole with the plastic pole inside of the cover,
Using a key to adjust the lock keyhole to be vertical
Gently push down the cover at the position above the Coyote mark
until the plastic pole goes into the hole in the bracket.
Make sure the cover is close to the bracket enough, with no big space
or gap around the cover edge or underneath.
Turn the key to lock the cover by 90 degrees in a clockwise direction.
7. INSTALL THE COVERS
5. Balance the aluminum bars to be at the center,using
measure mark along the yellow line on bracket to keep both
end at equal distance, then tighten bolts #3, #4, #5 at the
top slightly
#5
2
Do this steps both LEFT and RIGHT brackets
NOTE: Do this steps for both LEFT and RIGHT brackets
#6
M5
M5
DO NOT over tighten bolts
Avoid using power tool to avoid damage to the parts.
NOTE:
4.2) Line up the hole from the inside clamp to the mounting holes
on the inside of the roof rails, Inserting or mounting the M6 bolts to
mount holes from the back of the bracket, pushing the bolts into
the hole until their cap touches the back of the clamp.
Note: M6 bolts are not mounting into the hole, just inserted into
the holes
4.3) Mounting bolt #6 from the outside into the clamp center hole
slightly. This is an assisting bolt and doesn't need to be tightened
before clamps are firmly fixed on roof rails.

DO NOT TAKE OFF BRACKETS FROM THE BAR BY FORCE.
REFER TO THE DISASSEMBLY SECTION BELOW TO TAKE OFF THE BRACKET FROM THE BAR.
Adjust the bracket position to the front or rear a bit to level the crossbar top surface at a
horizontal level if A loud noise yields when driving at 60~80 KMH.
Disassemble Bracket from Aluminum Bar
2.
FULL VIEW INSTALLATION
2. Slide the bracket outer part into the
bar center, and expose the inner part of
the fillets with the plastic clip in a slot.
1. Loose both bolts with Allen keys
on each end completely.
3. Use a small Allen key to push down
the top of the plastic clip to pop it out
from the slot, then slide out the inner
part from the tube.
3.
1.
3
4

SUPPORT
Visit https://rockautoaccs.com for more
products
Contact at [email protected] for any
concerns or problems in Canada.
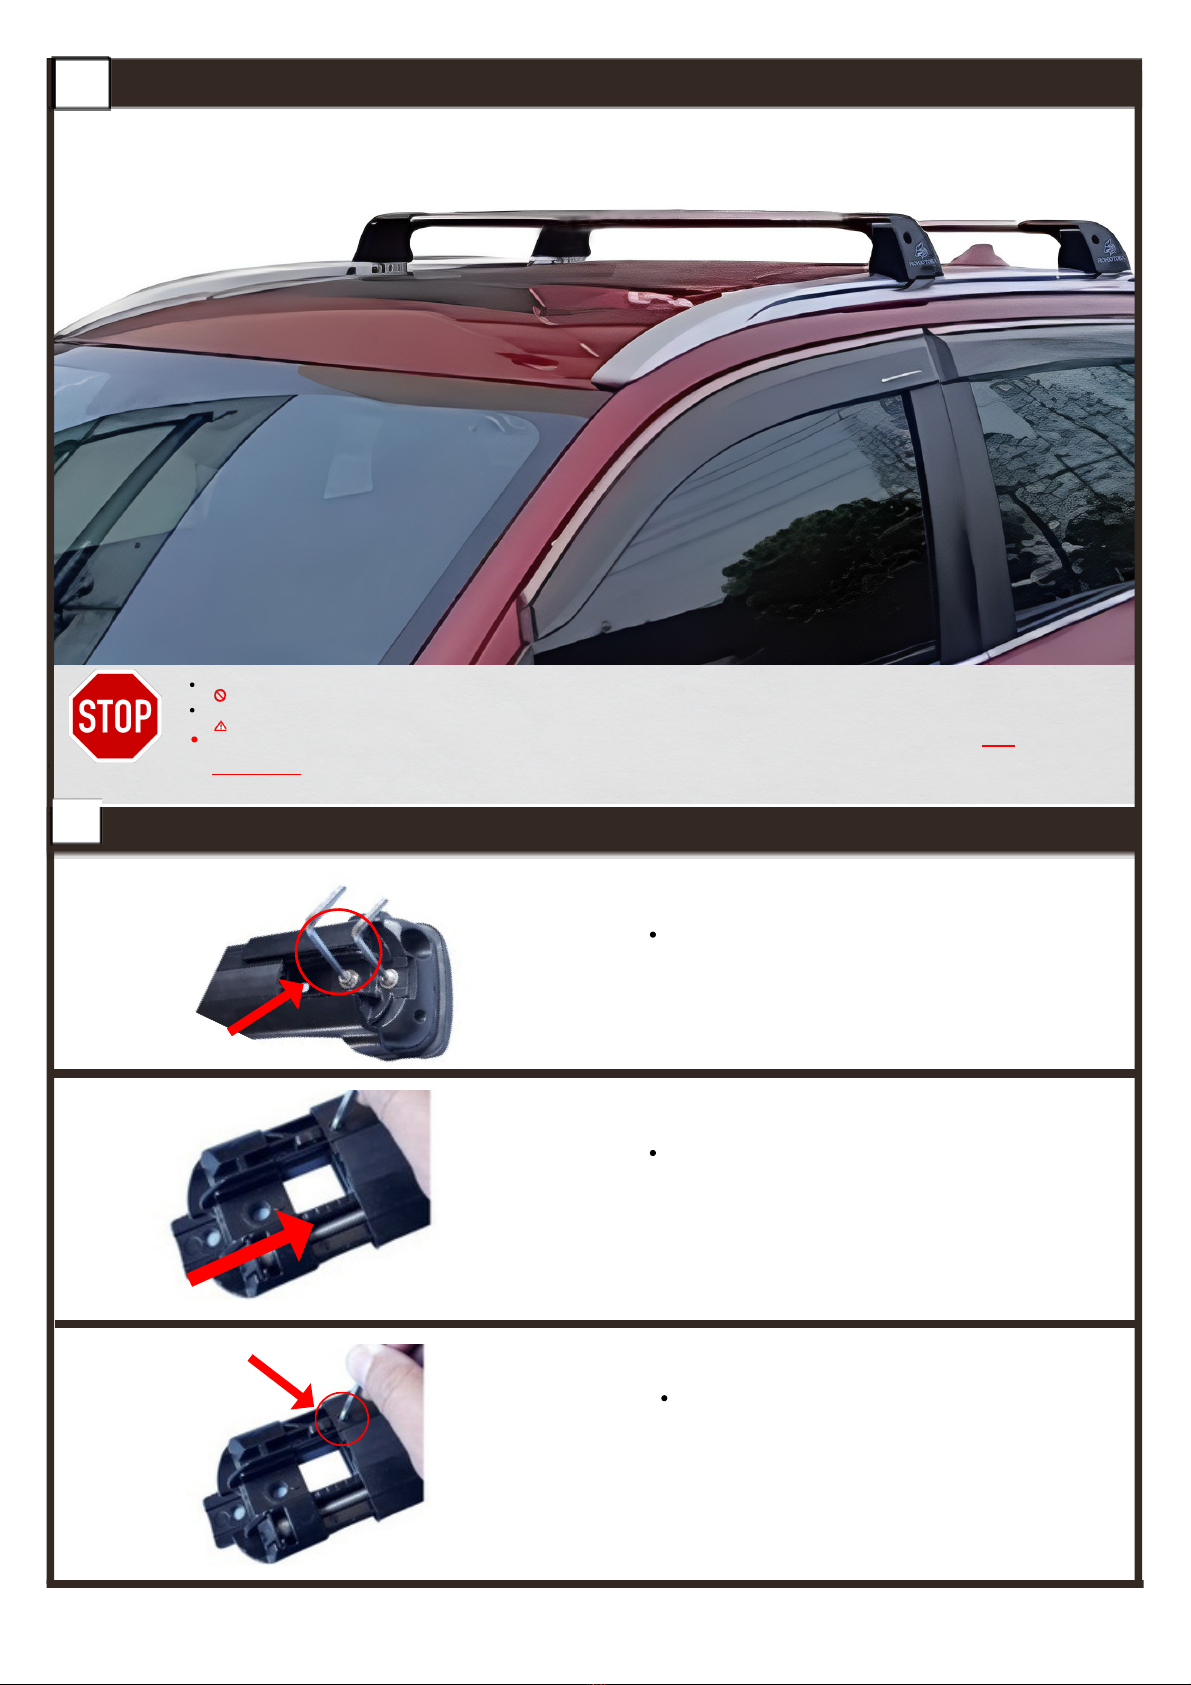
Ensure load is evenly distributed
between
the two crossbars and that it is as low as
possible refer to specification.
Confirm lightness every 1000 km,
periodi-
cally check that the load is secure and
crossbars are securely tightened.
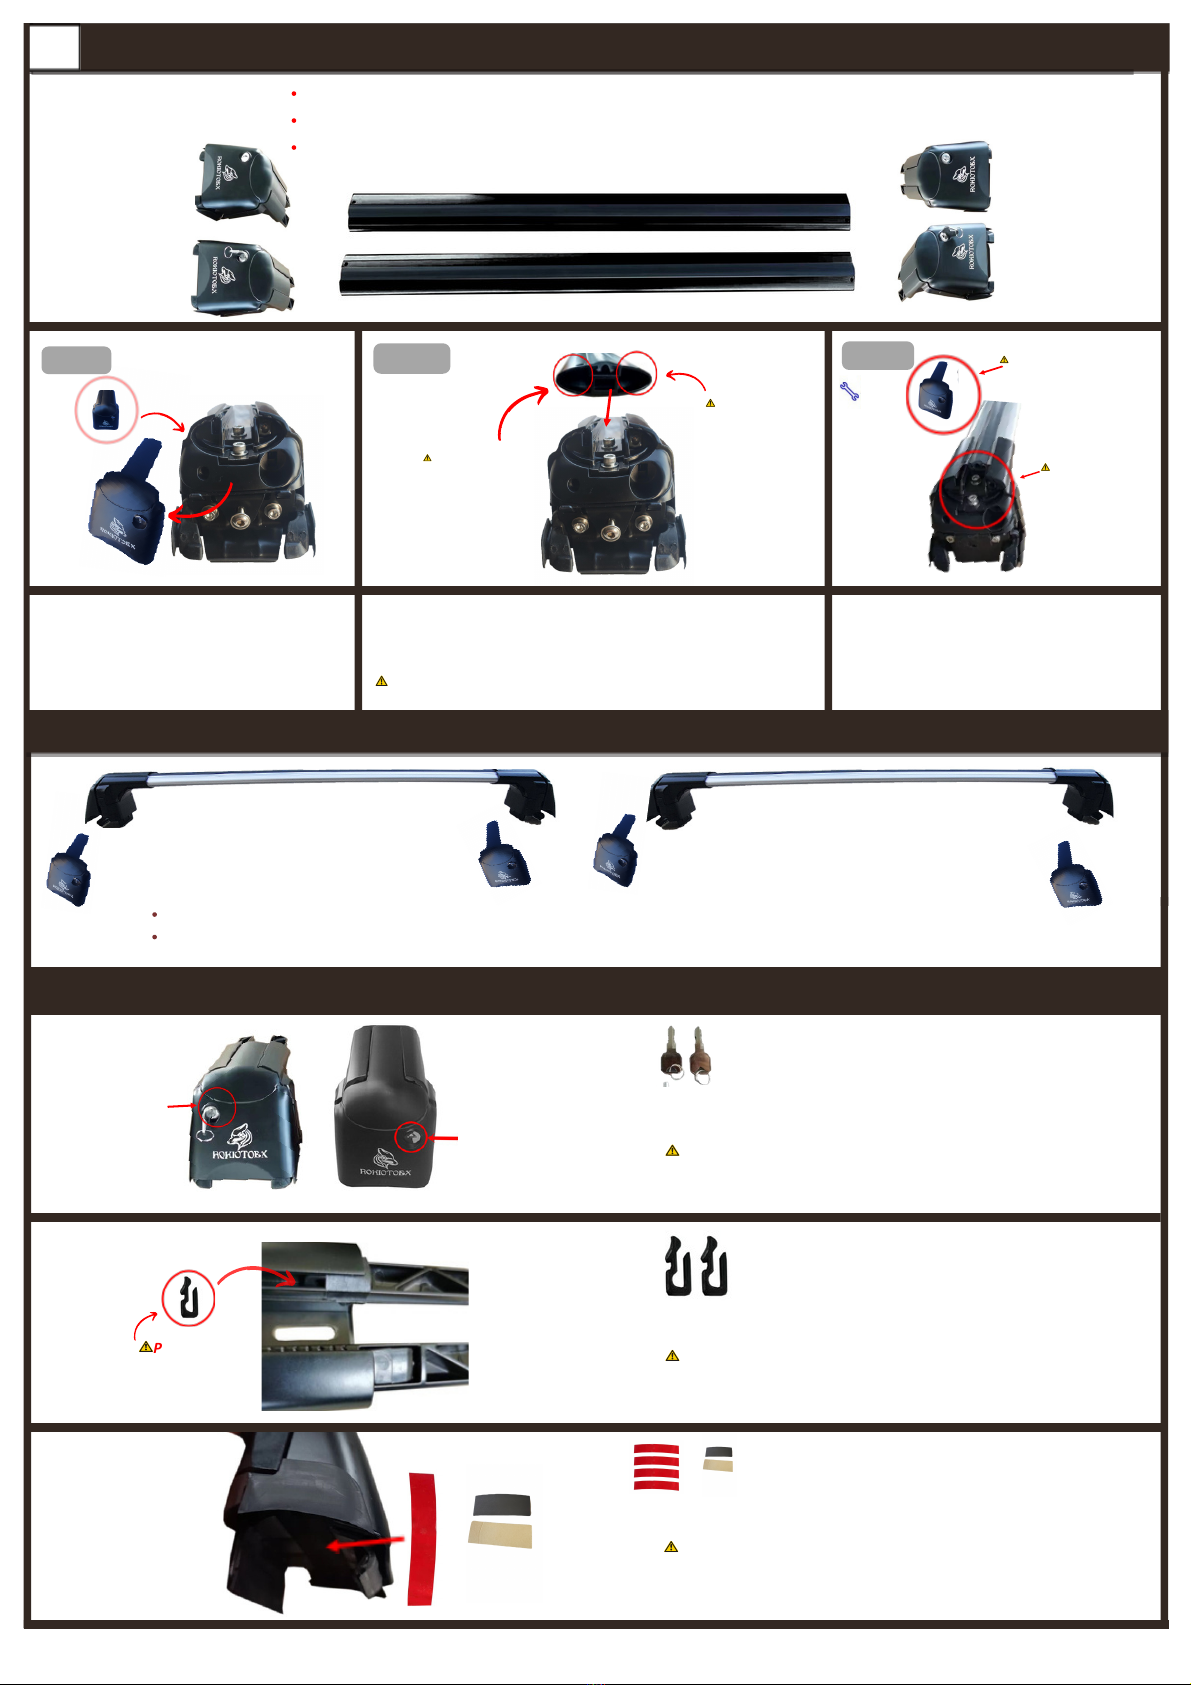
Ensure that the crossbar are installed in
Ensure that the crossbars are fully installed
to the side supports with no gaps.
Never Exceed the manufacturer's roof rack
load limit.
No warranty is given for defects resulting from
conditions beyond ROKIOTOEX’s control
includ- ing, but not limited to, misuse,
overloading, or failure to assemble, mount or
use the product in accordance with
ROKIOTOEX’s written in- structions or
guidelines included with the prod- uct or made
available to the purchaser.
Subject to the limitations and exclusions de-
scribed in this warranty, ROKIOTOEX will reme-
dy defects in materials or workmanship by
repairing or replacing, at its option, a defective
product without charge for parts or labor. In
addition, ROKIOTOEX may elect, at its option,
not to repair or replace a defective product but
rather issue to a purchaser a refund equal to
the purchase price paid for the product or a
credit to be used toward the purchase of a new
ROKIOTOEX load carrier system.
No warranty is given for Rokiotoex products
purchased outside of the United States, Canada
and Mexico.
In the event that a product needs to be re-
turned to ROKIOTOEX, a ROKIOTOEX technician
at the address or telephone number listed
above will provide the purchaser with the ap-
propriate mailing address and any additional
instructions. Please note that the purchaser will
be responsible for the cost of mailing the prod-
uct to ROKIOTOEX and that proof of purchase
in the form of an original purchase invoice or
receipt and a detailed description of the defect
must be included in the mailing.
No warranty is given for defects caused by
normal wear and tear, cosmetic rust, scratches,
accidents, unlawful vehicle operation, or modi-
fication of, or any types of repair of, a load
carrier system other than those authorized by
ROKIOTOEX.
car rack systems and its accessories manufac-
tured by ROKIOTOEX during the time that an
original retail purchaser owns the product.
This warranty terminates if a purchaser
transfers the product to any other person.
SOME STATES DO NOT ALLOW THE EXCLU-
SION OR LIMITATION OF INCIDENTAL OR
CONSEQUENTIAL DAMAGES, SO THE
ABOVE LIMITATIONS MAY NOT BE
APPLICABLE. THIS WARRANTY GIVES YOU
SPECIFIC LEGAL RIGHTS, AND YOU MAY
ALSO HAVE OTHER RIGHTS WHICH VARY
FROM STATE TO STATE.
THIS WARRANTY IS EXPRESSLY MADE IN
LIEU OF ANY AND ALL OTHER WARRANTIES,
EXPRESS OR IMPLIED, INCLUDING THE
WARRANTIES OF MERCHANTABILITY AND
FITNESS FOR A PARTICULAR PURPOSE.
ROKIOTOEX’S SOLE LIABILITY TO ANY PUR-
CHASER IS LIMITED TO THE REMEDY SET
FORTH ABOVE. IN NO EVENT WILL ROKIO-
TOEX BE LIABLE FOR ANY LOST PROFITS,
LOST SALES, OR FOR ANY CONSEQUENTIAL,
DIRECT, INDIRECT, INCIDENTAL, SPECIAL,
EXEMPLARY, OR PUNITIVE DAMAGES OR
FOR ANY OTHER DAMAGES OF ANY KIND OR
NATURE.
REPAIR OR REPLACEMENT OF A DEFECTIVE
PRODUCT OR THE ISSUANCE OF A REFUND
OR CREDIT (AS DETERMINED BY ROKIOTO-
EX) IS A PURCHASER’S EXCLUSIVE REMEDY
UNDER THIS WARRANTY. DAMAGE TO A
PURCHASER’S VEHICLE, CARGO AND/OR
TO ANY OTHER PERSON OR PROPERTY IS
EX- CLUDED.
SAFETY NOTES
correct orientation.
ROKIOTOEX will warranty all ROKIOTOEX brand DISCLAIMER OF LIABILITY
ROKIOTOEX Crossbars
Table of contents
Other ROKIOTOEX Automobile Accessories manuals