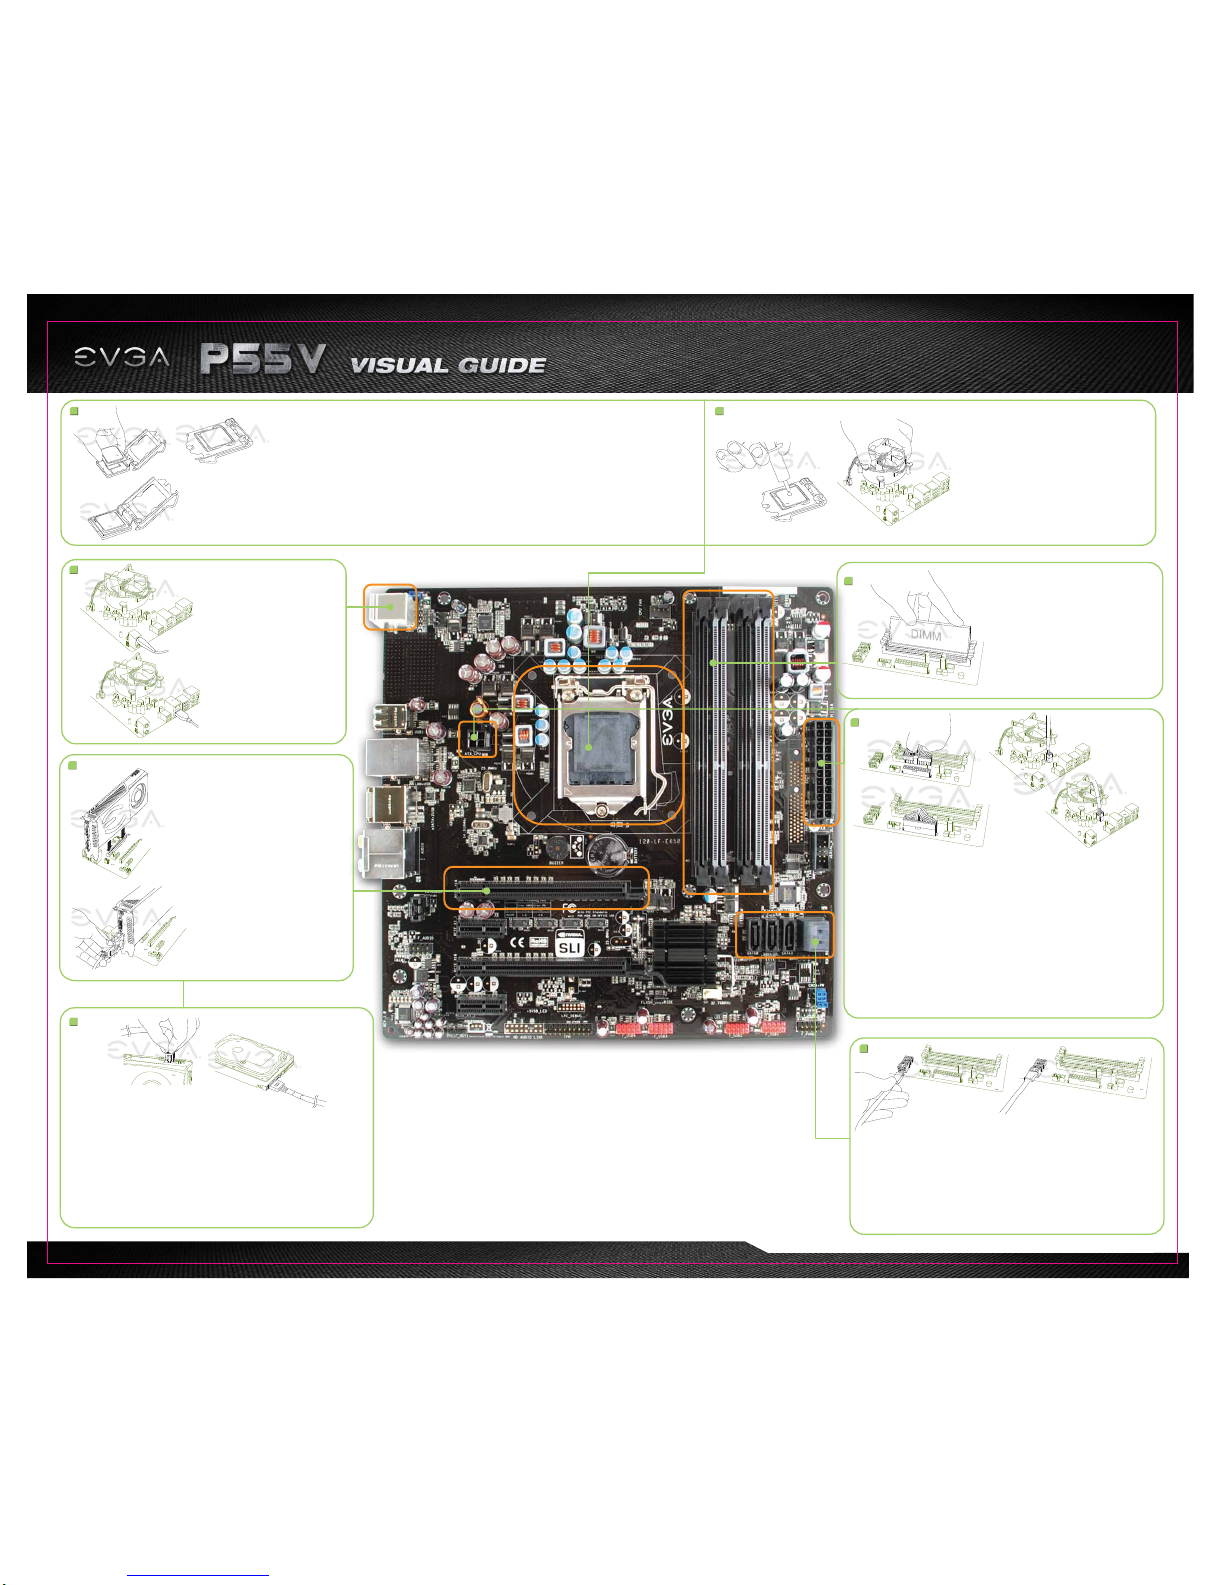
manuals.online logo
Brands
  1. Home
  2. •
  3. Brands
  4. •
  5. EVGA
  6. •
  7. Motherboard
  8. •
  9. EVGA 120-LF-E650-TR User manual

EVGA 120-LF-E650-TR User manual

1 2
a.
b.
a.
a.
b.
b.
c.
a.
b.
a.
a. b.
a. b.
4
3
6
8
a.
b.
5
7
PN #: 120-LF-E650-TR
Apply a small, pea-sized drop of thermal paste on to the middle of the processor.
Install your processor heatsink and fan.
プロセッサの中心部に小さな豆粒大の熱ペースト一滴を塗ります。
プロセッサの放熱板とファンを設置します。
Appliquez une petite noisette de pâte thermique sur le milieu du processeur.
Installez votre Ventirad (Radiateur et Ventilateur).
Aplíquele una cantidad pequeña, de pasta termal en el centro del procesador.
Instale su disipador del procesador y su ventilador.
Geben Sie einen erbsengroßen Tropfen Wärmeleitpaste mittig auf die CPU.
Installieren Sie Ihren CPU-Lüfter.
請於處理器正中央塗上豌豆大小水滴狀的散熱膏。安裝處理器的散熱器和風扇。
请于处理器正中央涂上豌豆大小水滴状的散热膏。安装处理器的散热器和风扇。
• Pull the socket lever back and the load plate will automatically lift.
• Remove the protective socket cover from the CPU Socket in a straight up motion.
• Align the notches in the processor with the notches on the socket.
• Lower the processor straight down into the socket without tilting or sliding it into the socket.
• Lower the load plate so it is resting on the CPU.
• Pull back the socket lever again to ensure the load plate tip engages under the shoulder screw cap.
• Carefully close and latch the lever.
• Ziehen Sie den Hebel nach hinten, und die Halterung öffnet sich automatisch.
• Entfernen Sie die Schutzabdeckung vom CPU-Sockel, indem Sie ihn nach oben abheben.
• Bringen Sie die Einkerbungen der CPU mit denen des CPU-Sockels in Übereinstimmung.
• Legen Sie die CPU in einer geraden Abwärtsbewegung in den Sockel, ohne sie zu verkanten oder
seitwärts zu verschieben.
• Klappen Sie die Halterung zurück, sodass sie auf der CPU liegt.
• Ziehen Sie den Hebel der Sockelverriegelung zurück, um sicher zu stellen, dass sich die Zungen der
Halterung unter dem Kopf der Zapfenschraube befinden.
• Verriegeln Sie den Hebel wieder.
• ソケット・レバーを後ろに引くと、ロード・プレートが自動的に持ち上がります。
• 保護用ソケットカバーをCPUソケットから垂直に持ち上げて取り外します。
• プロセッサのノッチ(V字型の刻み目)をソケットのノッチにそろえます。
• プロセッサをまっすぐ下に下ろして、ソケットにはめ込んでください。その際にプロセッサを斜
めにしたり、滑らせてソケットにはめ込まないようにしてください。
• ロード・プレートを下ろしてCPUの上においてください。
• ソケットレバーを再び後ろに引いて、ロードプレートの先端が肩付ねじの頭頂部の
下にかみ合っていることを確認してください。.
• 慎重に閉めてレバーをラッチで留めてください。
• 將固定扳手往回拉,處理器的金屬安裝上蓋將自動升起。
• 垂直向上移除 CPU Socket 保護蓋。
• 請確認CPU的金色三角形標示對準了插槽或金屬安裝上蓋上的三角形標示。
• 垂直的將處理器輕輕放上插槽,避免用傾斜或滑入的方式。
• 將金屬安裝上蓋蓋上。
• 拉回固定扳手,並確認金屬安裝上蓋上的兩個尖端分別被嵌入插槽的螺帽下緣。
• 小心的將固定扳手朝原方向推回,扣於固定扣上。
• 将脚座拉杆往回拉,处理器的金属盖板将自动升起。
• 垂直向上移除CPU脚座防护盖。
• 请确认CPU的金色三角形标示对准了插槽或金属盖板上的三角形标示。
• 垂直的将处理器轻轻放上插槽,避免用倾斜或滑入的方式。
• 将金属盖板盖上。
• 拉回拉杆,并确认金属盖板上的两个尖端分别被嵌入插槽的螺帽下缘。
• 小心的将拉杆朝原方向推回,扣于固定扣上。
• Soulevez le levier en le poussant vers le bas et le rabat métallique se soulèvera.
• Enlevez le couvercle protectif du socket du CPU en le soulevant verticalement.
• Alignez les détrompeurs du processeur avec les détrompeurs du socket.
• Abaissez le processeur verticalement dans le socket sans l’incliner dans le socket.
• Abaissez le rabat métallique pour qu’il se repose sur le CPU.
• Replacez le levier du socket en position et assurez-vous que le rabat métallique soit sécurisé sous
la vis.
• Fermez et verrouillez avec précaution le levier.
• Mueva hacia atrás la palanca del conector y el plato de carga (load plate) automáticamente levantara.
• Quite el cubierto protectora del socket del CPU en posición hacia arriba.
• Alinee las muescas (notches) en el procesador con las muescas en el socket.
• Baje el procesador al socket sin deslizarlo del socket.
• Baje el plato de carga para y deber de estar apoyándose en el CPU.
• Mueva hacia atrás la palanca del socket otra vez para asegurar que el plato de carga este debajo del tornillo.
• Cierre cuidadosamente la palanca.
Install DIMMs into the appropriate DIMM slots (see other side).
DIMMを適切なDIMMロットに設置します(他の面を参照)
Installez les barrettes de mémoire dans les ports appropriés DIMM.
Instale los DIMMs en las ranuras apropiadas (ver lado contrario) DIMM.
Stecken Sie die DIMM-Module in die dafür vorgesehenen Steckplätze.
請將記憶體模組安裝到適當的記憶體模組插槽(請參考背面)。
请将内存模块安装到适当的内存模块插槽(请参考背面)。
Make sure your power supply’s power switch is in the OFF position then connect your 24-Pin ATX Power Connector
and 8-Pin CPU Power Connector to the motherboard. (When using an 8-Pin CPU Connector, 4 pins will overhang).
パワーサプライの電源スイッチがOFFになっていることを確認した上で、24-Pin ATX 電源コネクターと8-Pin CPU 電源
コネクターをマザーボードに接続してください。(8ピンのCPU連結線を使う時には4ピンが外に外しています)
Assurez que l’interrupteur de votre alimentation est en position arrêt et connectez votre câble d’alimentation 24 broches et le
câble d’alimentation 8 broches à la carte mère. (Lorsque vous utilisez un connecteur d’alimentation CPU à 8 broches,
4 broches ne seront pas utilisées)
Asegure que el la fuente de poder este en la posición OFF entonces conecte su conexión de poder 24-pin ATX y la conexión
de poder 8-Pin para el CPU a la Placa Madre. (Al usar un conector de 8 alfileres, 4 alfileres sobresaldrán)
請先確定您電源供應器的電源開關已關閉,再連接24-Pin ATX電源連接線及8-pin CPU電源連接線至主機板上。
(當使用8-pin CPU電源連接線至主機板上的4-pin接頭,8-pin CPU電源連接線會超出接頭。)
请先确定您电源供应器的电源开关是否已关闭,再连接24针ATX电源连接线及8针CPU电源连接线至主板上。
(当使用8-pin CPU 电源连接线至主机板上的4-pin接头,8-pin CPU电源连接线会超出接头。)
Connect one hard drive disk to the SATA Connectors.
SATA Connection
ひとつのハードドライブ・ディスクをSATAコネクターに接続します。
SATA接続
Connectez un disque dur aux connecteurs SATA.
Connexion SATA
Conecte el disco duro a las conexiones SATA.
SATA Conexión
Verbinden Sie die Festplatte mit dem SATA-Anschlusskabel.
SATA Anschluss
連接一顆硬碟機至SATA插槽。SATA插槽
连接一颗硬盘到SATA接口。SATA连接头
Plug in one keyboard into a USB port or PS/2 port.
ひとつのキーボードのプラグをUSBポートまたはPS/2
ポートに差し込みます。
Branchez un clavier dans un port USB ou PS/2.
Enchufar el teclado al puerto USB o PS/2.
Schließen Sie die Tastatur am USB- oder PS/2-Port an.
請連接一個鍵盤到USB接頭或PS/2接頭。
请连接一个键盘到USB接口或PS/2接口。
Insert your graphics card into the PCI-E 2.0 slot .
The type of slot depends on the graphic card bus type. Connect a monitor
to the output connector of the graphics card.
グラフィックス・カードをPCI-E 2.0 スロット挿入します。
スロットの種類はグラフィック・カード・バスの種類によって異なります。
モニターをグラフィックス・カードの出力コネクターに接続します。
Installez votre carte graphique dans un port PCI-E 2.0. Le type
d’emplacement dépend de la carte graphique utilisée. Connectez un écran
au connecteur de la carte graphique.
Inserte su tarjeta gráfica en la ranura PCI-E 2.0.
El tipo de ranura depende del tipo de tarjeta gráfica. Conecte el monitor
para el conector de salida de la tarjeta gráficos.
Stecken Sie Ihre Grafikkarte in den PCI-E-2.0-Steckplatz.
Der Steckplatz hängt vom Bus Ihrer Grafikkarte ab. Verbinden Sie Ihren
Bildschirm mit dem Anschluss an der Grafikkarte.
請將您的顯示卡插入PCI-E 2.0插槽。應該使用的插槽型式取決於
顯示卡的匯流排種類。請連接螢幕至顯示卡的輸出端子上。
请将您的显示适配器插入PCI-E 2.0插槽。插槽类型要和显卡相彼配,
并将显示器连接于显卡的输出接口上。
Connect from power supply
電源に接続します
Branchez
Conectando la Fuente
de Poder
Anschluss vom Netzteil
另一端連接到電源供應器
另一端连接到电源供应器
Connect from power supply
電源に接続します
Branchez
Conectando la Fuente
de Poder
Anschluss vom Netzteil
另一端連接到電源供應器
另一端连接到电源供应器
Plug in power connectors to both the graphics card and the hard disk drive. Power connector types will vary
depending on the hard disk drive and graphic card’s power requirements.
電源コネクターのプラグをグラフィックス・カードとハードディスク・ドライブの両方に差し込みます。電源コネクターの
タイプはハードディスク・ドライブおよびグラフィックス・カードの電力要件によって異なります。
Connectez les câbles d’alimentation nécessaires pour la carte graphique et le disque dur. Les types de connexion sont
dépendants du type de disque dur et les pré-requis de la carte graphique.
Enchufe los conectores de ambas tarjetas gráficas y el disco duro. Los tipos de conectores de podrían variar depende del
disco duro y la tarjeta gráfica.
Schließen Sie die Stromkabel an der Grafikkarte und der Festplatte an. Die Stecker sind abhängig vom Festplatten-Typ und der
Stromaufnahme der Grafikkarte.
請將顯示卡和硬碟機接上電源連接線。電源連接線的類型將取決於硬碟機和顯示卡的接頭類型。
请将显卡和硬盘接上电源接口。电源连接线的类型必须与硬盘和显卡的接口类型一致。
Stellen Sie sicher, dass Ihr PC-Netzteil ausgeschaltet ist. Verbinden Sie das 24-Pin ATX-Stromkabel und das 8-Pin
CPU-Stromkabel des Netzteils mit dem Motherboard. (Wenn Sie einen 8-Pin-CPU-Stromstecker verwenden, stehen vom
Stecker vier Pins über)
24 Pin ATX Power
Fan Header
SATA Ports
PCI-E x8
PC Speaker
4 Pin 12v Power
• EVGA Corp Headquarters 2900 Saturn Street, Suite B Brea, CA 92821 USA • Latin America Office 1345 NW 98 Court, Bldg A, Unit #4 Doral, FL 33172
• Europe Office Lochhamer Schlag 12, 82166 Gräfelfing, Germany • Hong Kong Office Unit 05-06, 16/F, Grand City Plaza. No. 1-17 Sai Lau Kok Road. Tsuen Wan, N.T. Hong Kong
• Taiwan Office 7F.-3, No.736, Jhongheng Rd., Jhonghe City, Taipei County 235, Taiwan (R.O.C.)
Please see the manual for more details.
PN #: 120-LF-E650-TR
3
3
1
1
42
2 4
CPU Fan Header
CPU Socket 1156
Front Audio Connector
SPDIF
USB 2.0 Header Connector
Package Contains:
• EVGA P55 V Motherboard
• EVGA Driver Installation CD
with EVGA E-LEET
• 2 SATA Data Cables
• 1 SATA Power Cable
• 2-Way SLI Bridge
• USB Bracket
• Visual Installation Guide
• Manual
Contenu de la boîte:
• Carte Mère EVGA P55 V
• CD Pilotes/Logiciel EVGA avec
EVGA Precision
• 2 câbles SATA
• 1 câble d’alimentation SATA
• Bridge 2-Way SLI
• 1 carte d’extension USB
• Guide d’Installation Visuelle
• Guide de l’utilisateur
Contendió de la Caja:
• Placa Madre de EVGA P55 V
• CD Instalación de los Drivers EVGA
con EVGA E-LEET
• 2 Cables SATA Data
• 1 Cables de Poder SATA
• 2-Way SLI Bridge
• USB Bracket
• Guía de instalación Visual
• Manual
Dieses Produkt beinhaltet:
• EVGA P55 V Motherboard
• EVGA Treiber Installations-CD mit
EVGA E-LEET
• 2 SATA-Datenkabel
• 1 SATA-Stromkabel
• 2-Wege-SLI-Brücke
• USB Anschlussblende
• Visual Guide
• Installations-Anleitung
包裝內容:
• EVGA P55 V 主機板
• 驅動程式及E-LEET安裝光碟
• 二條SATA裝置排線
• 一條SATA裝置之電源線
• 2-WAY SLI橋接器
• USB擴充檔板
• 主板導覽說明
• 安裝手冊
包装内容:
• EVGA P55 V 主板
• EVGA CD 驱动安装程式
(其中包括EVGA E-LEET)
• 2个SATA数据线
• 1个SATA电源线
• 2-Way SLI桥接卡
• USB额外接口线
• 主板安装说明
• 说明书
包装に含まれるもの:
• EVGA P55 V マザーボード
• EVGA E-LEET付きEVGAドライバ
・インストールCD
• 2 SATA データ・ケーブル
• 1 SATA 電源ケーブル
• 両方向 SLIブリッジ
• USB ブラケット
• ビジュアル・ガイド
• インストール・ガイド
1156 CPU Mounting Holes
ATTENTION:
EVGA recommends applying 1.65V or less when setting the DIMM Voltage.
This will support long term stability.
One DIMM: If using 1 DIMM (Single Channel), install into: DIMM slot 1.
Two DIMMs: If using 2 DIMMs (Dual Channel), install into: DIMM slots 1 and 3.
Four DIMMs: If using 4 DIMMs (Dual Channel),install into: DIMM slots 2, 1, 4 and 3.
注意:
DIMM電圧の設定をする場合、EVGAの推奨は1.65V以下です。これは長期安定をサポートします。
DIMM1つ:DIMMを1つ(単一チャンネル)使う場合は:DIMMスロット1に設置します。
DIMMを2つ:DIMMを2つ(二重チャンネル)使う場合:DIMMスロット1および3に設置します。
DIMMを4つ:DIMMを4つ(二重チャンネル)使う場合は:DIMMスロット2、1、4および3
に設置します。
ATTENTION:
EVGA recommande d’appliquer 1.65v ou moins quand vous ajustez la tension DIMM.
Ceci maintiendra la stabilité à long terme.
Un DIMM: Si vous utilisez 1 DIMM (1 seule canal), installez dans le port DIMM 1.
Deux DIMMs: Si vous utilisez 2 DIMMs (bi-canal), installez dans les ports DIMM 1 et 3
Quatre DIMMs: Si vous utilisez 4 DIMMs (bi-canal), installez dans les ports DIMM 2, 1, 4, et 3.
ATENCIÓN:
EVGA recomienda aplicar 1.65V o menos al programar el Voltaje DIMM.
Esto proveerá estabilidad en el sistema a largo plazo.
Un DIMM: Al usar 1 DIMM (Single Channel), instalar: DIMM ranura 1.
Dos DIMMs: Al usar 2 DIMMs (Doble Canal), instalar: DIMM ranura 1 y 3.
Cuatro DIMMs: Al usar 4 DIMMs (Doble Canal), instalar: DIMM ranura 2, 1, 4 y 3.
ACHTUNG:
EVGA empfiehlt, die DIMM-Spannung auf 1,65V oder niedriger einzustellen.
Dadurch wird die Systemstabilität auf lange Sicht verbessert.
Ein DIMM-Speichermodul: Stecken Sie das einzelne DIMM-Speichermodul für
Single-Channel-Betrieb in Steckplatz 1
Zwei DIMM-Speichermodule: Stecken Sie die DIMM-Speichermodule für
Dual-Channel-Betrieb in Steckplätze 1 und 3.
Vier DIMM-Speichermodule: Stecken Sie die DIMM-Speichermodule für
Dual-Channel-Betrieb in Steckplätze 2, 1, 4 und 3.
注意:
EVGA建議設定DIMM記憶體模組電壓為1.65V或更低。這將使主機板長期處於穩定狀態。
1個記憶體模組:若使用1個記憶體模組(單通道),請安裝至DIMM 1記憶體模組插槽。
2個記憶體模組:若使用2個記憶體模組(雙通道),請安裝至DIMM 1和3記憶體模組插槽。
4個記憶體模組:若使用4個記憶體模組(雙通道),請安裝至DIMM2、 1、4和3記憶體模組插槽。
注意:
EVGA 建议将内存模块电压设为小于等于1.65V。这将有利于主板长期稳定状态。
1条内存模块:若使用1条内存模块(单通道),请安装于DIMM 1内存插槽内。
2条内存模块:若使用2条内存模块(双通道),请安装于DIMM 1和3内存插槽内。
4条内存模块:若使用4条内存模块(双通道),请安装于DIMM 2、1、4和3内存插槽内。
(CPU ファン・ヘッダー • Connecteur interne ventilateur CPU • Cabeza del Ventilador del CPU
• CPU Lüfter-Anschluss • CPU風扇電源接頭 • 中央处理器风扇头)
(CPU ソケット 1156 • Zócalo de CPU 1156 • CPU Sockel 1156 • Socket 1156 中央處理器插槽 • 中央处理器脚座1156针)
(ファン・ヘッダー • Connecteur interne ventilateur • Cabeza del ventilador
• Lüfter-Anschluss • 風扇電源接頭 • 风扇头)
(1156 CPU 冷却ファンの固定穴 • Trous CPU Socket 1156
• Agujeros de montaje 1156 CPU
• Sockel 1156 CPU-Lüfter Montagelöcher
• 1156 CPU 散熱風扇固定孔 • 1156 CPU 散热风扇固定孔)
(24 Pin ATX 電源 • Câble d’Alimentation ATX à 24 broches
• 24-Pin-ATX-Stromanschluss • 24 pin ATX電源插槽 • 24针ATX电源)
(SATA ポート • Connecteurs SATA • Puertos SATA
• SATA Anschlüsse • SATA插槽 • SATA端口)
(PC スピーカー • Haut-parleur PC • Lautsprecher • 蜂鳴器 • 蜂鸣器)
(USB 2.0 ヘッダー・コネクター • Connecteur USB 2.0 • Conector de cabezales USB 2.0
• USB 2.0 Anschluss • USB 2.0 擴充針腳 • USB 2.0接口连接器)
(SPDIF Anschluss • SPDIF音源接頭)
(PCI-E x8 Steckplatz • PCI-E x8插槽 • PCI-E x8扩展槽)
PCI-E x8
(PCI-E x8 Steckplatz • PCI-E x8插槽 • PCI-E x8扩展槽)
PCI-E x1
(PCI-E x1 Steckplatz • PCI-E x1插槽 • PCI-E x1扩展槽)
PCI-E x1
(PCI-E x1 Steckplatz • PCI-E x1插槽 • PCI-E x1扩展槽)
(フロント・オーディオ・コネクター • Connecteur Audio Interne
• Front-Panel Audio-Anschluss • 前置音源接頭 • 前置音效接口)
(4 Pin 12v 電源 • Alimentation 12v à 4 broches • Poder 4 Pin 12v
• 4-Pin-12V-Stromanschluss • 4 Pin 12V電源插槽 • 4针接口12V电源)
Thank you for purchasing an EVGA product. Please remember to register your product at: www.evga.com/register
For the latest drivers and updates for your product please visit: www.evga.com/support/drivers
To visit and search our knowledge base and product FAQ please visit: www.evga.com/FAQ
To visit the EVGA community message boards please visit: forums.evga.com
For more information about these services as well as our terms and conditions please visit www.evga.com
製品をお買い求めいただき有難うございます。是非、下記のサイトで製品登録をお忘れないように:
www.evga.com/register
最新のドライブ、および製品の更新については、下記のサイトでご確認ください: www.evga.com/support/drivers
弊社の知識ベース、および製品についてのよくある質問を閲覧し、検索するには下記のサイトを参照:
www.evga.com/FAQ
コミュニティーの掲示板を見るには下記のサイトを参照:forums.evga.com
これらのサービスについて、また契約条件については下記のサイトをご参照ください www.evga.com
Merci pour avoir acheter un produit EVGA. N’oubliez pas d’enregistrer votre produit sur notre site:
www.evga.com/register
Pour télécharger les pilotes les plus récents, veuillez visiter: www.evga.com/support/drivers
Pour faire une recherche parmi les questions fréquemment posées, veuillez visiter: www.evga.com/FAQ
Pour visiter la communauté et le forum EVGA, veuillez visiter: forums.evga.com
Pour tout renseignement concernant les services offerts et les conditions générales, veuillez visiter:
www.evga.com
Gracias por comprar un producto EVGA. Por favor registrar su producto en: www.evga.com/register
Para los últimos drivers y actualizaciones para su producto visite: www.evga.com/support/drivers
Para visitar y buscar información sobre pregunta frecuentes FAQ por favor visite: www.evga.com/FAQ
Por favor visitar la comunidad EVGA: forums.evga.com
Para más información acerca de estos servicios así como también nuestros términos y condiciones visiten
www.evga.com
SupportPremium Services
Wir danken Ihnen für den Kauf eines EVGA-Produkts. Bitte registrieren Sie Ihr Produkt auf: www.evga.com/register
Die neuesten Treiber und Updates finden Sie hier: www.evga.com/support/drivers
Fragen und Antworten zu Ihrem Produkt finden Sie hier: www.evga.com/FAQ
Unsere EVGA-Foren finden Sie hier: forums.evga.com
Weitere Informationen zu den von EVGA angebotenen Dienstleistungen, den Nutzungsbedingungen und den
Allgemeinen Geschäftsbedingungen finden Sie hier: www.evga.com
非常感謝您購買EVGA的產品。請記得線上註冊您的產品: www.evga.com/register
關於您的產品最新的驅動程式及更新,請參考: www.evga.com/support/drivers
關於知識庫和產品的問與答,請參考: www.evga.com/FAQ
歡迎造訪EVGA專屬社群: forums.evga.com
若需要瞭解更多服務資訊及相條款關,請造訪: www.evga.com
非常感谢您购买EVGA的产品。请记得在线注册您的产品: www.evga.com/register
关于您的产品最新的驱动程序及更新,请参考: www.evga.com/support/drivers
关于知识库和产品的问与答,请参考: www.evga.com/FAQ
欢迎访问EVGA论坛: forums.evga.com
若需要了解更多服务信息及相关条款,请访问: www.evga.com
(プレミアム・サービス • Services Privilégiés • Servicios Premium • Premium-Dienstleistungen • 尊榮服務 • 贵宾服务) (サ ポート • Assistance • Soporte • 支援 • 技术支持)
Advanced RMA:
Protect yourself and accelerate the RMA process.
www.evga.com/EAR
(USA only)
2 Year Warranty:
After registration within 30 days.
www.evga.com/warranty
MODS RIGS:
Show off your rig, post your specs, submit your
score, and win big. www.modsrigs.com
•Une Garantie de 2 Ans:
Avec enregistrement dans les 30 jours
suivant l’achat. www.evga.com/warranty
MODS RIGS:
Montrez votre système, révélez vos specs,
affichez vos scores, et gagnez gros.
www.modsrigs.com
•
2年有限保固服務:
請於購買後的30天內線上註冊。
www.evga.com/warranty
MODS RIGS:
展現你的裝備,發佈你的規格,提出你的分數,
並獲得大獎。 www.modsrigs.com
•
2年有偿保修期服务: 
请购买后于30天内在线注册。
www.evga.com/warranty
MODS RIGS:
展现你的装备,发布你的规格,提交你的分数,
并获得大奖。 www.modsrigs.com
•
2 años de Garantía:
Al registrar su producto dentro de
30 días de su compra.
www.evga.com/warranty
MODS RIGS:
Demuestre su sistema, muestre sus
especificaciones., someta su puntaje, y gane
premios espectaculares. www.modsrigs.com
•
2年間保証:
登録後30日以内。
www.evga.com/warranty
MODS RIGS:
自分のリングを見せびらかし、自分の仕様を掲載し、
自分のを提出しましょう。www.modsrigs.com
•
2 Jahre Garantie:
Bitte registrieren Sie Ihr Produkt innerhalb von
30 Tagen nach Kauf.
www.evga.com/warranty
MODS RIGS:
Zeigen Sie uns Ihre Maschine, machen
Sie Angaben zu technischen Daten und Ihren
Benchmark-Ergebnissen. Es gibt tolle Gewinne!
www.modsrigs.com
•
1. PS/2 Mouse Port
2. PS/2 Keyboard Port
3. USB 2.0 Ports
4. e-SATA Port
5. LAN Port (10/100/1000)
6. Audio Ports
1. PS/2 マウス・ポート
2. PS/2 キーボード・ポート
3. USB 2.0 ポート
4. e-SATA ポート
5. LAN ポート (10/100/1000)
6. オーディオ・ポート
1. Connecteur Souris PS/2
2. Connecteur Clavier PS/2
3. Connecteurs USB 2.0
4. Connecteur e-SATA
5. Connecteur LAN (10/100/1000)
6. Connecteurs Audios
1. Puerto para el Raton PS/2
2. Puerto para el Teclado PS/2
3. Puerto de USB 2.0
4. Puerto de e-SATA
5. Puerto de LAN (10/100/1000)
6. Puerto de Audio
1. PS/2 Maus-Anschluss
2. PS/2 Tatstatur-Anschluss
3. USB 2.0-Anschlüsse
4. e-SATA-Anschluss
5. LAN-Anschlüsse (10/100/1000 Mbit)
6. Audio-Anschlüsse
1. PS/2 滑鼠插槽
2. PS/2 鍵盤插槽
3. USB 2.0插槽
4. e-SATA接頭
5. 網路線連接埠
6. 音源接頭
1. P/2 鼠标接口
2. P/2 键盘接口
3. USB 2.0 接口
4. e-SATA 接口
5. 网络接口支持(10/100/1000)
6. 音频接口
Serial Connector
(シリアル・コネクター • Connecteur Serial
• Seriell Stecker • 序列埠接頭 • 串行接口)
Front Panel
(フロントパネル • Panneau Frontal • Panal Frontal
• Front-Panel-Anschluss • 前置接頭 • 前置接口)
2 3 43 6
1 5 3

Other manuals for 120-LF-E650-TR

1

This manual suits for next models

2

Other EVGA Motherboard manuals

EVGA 131-GT-E767-KR User manual

EVGA

EVGA 131-GT-E767-KR User manual

EVGA 132-GT-E768 User manual

EVGA

EVGA 132-GT-E768 User manual

EVGA P55 Micro V User manual

EVGA

EVGA P55 Micro V User manual

EVGA nForce 4 User manual

EVGA

EVGA nForce 4 User manual

EVGA nForce 750i SLI User manual

EVGA

EVGA nForce 750i SLI User manual

EVGA Z790 CLASSIFIED User manual

EVGA

EVGA Z790 CLASSIFIED User manual

EVGA 133K8NF41AX User manual

EVGA

EVGA 133K8NF41AX User manual

EVGA P67 SLI Micro User manual

EVGA

EVGA P67 SLI Micro User manual

EVGA Z68 FTW User manual

EVGA

EVGA Z68 FTW User manual

EVGA P67 FTW Owner's manual

EVGA

EVGA P67 FTW Owner's manual

EVGA X79 Classified User manual

EVGA

EVGA X79 Classified User manual

EVGA Z390 FTW User manual

EVGA

EVGA Z390 FTW User manual

EVGA X79 Classified User manual

EVGA

EVGA X79 Classified User manual

EVGA Z370 MICRO User manual

EVGA

EVGA Z370 MICRO User manual

EVGA Z68 SLI User manual

EVGA

EVGA Z68 SLI User manual

EVGA EVGA X79 DARK User manual

EVGA

EVGA EVGA X79 DARK User manual

EVGA 160-SB-E679-KR User manual

EVGA

EVGA 160-SB-E679-KR User manual

EVGA X79 Classified User manual

EVGA

EVGA X79 Classified User manual

EVGA Z97 Classified User manual

EVGA

EVGA Z97 Classified User manual

EVGA 37062314 User manual

EVGA

EVGA 37062314 User manual

EVGA 132-CK-NF79-A1 User manual

EVGA

EVGA 132-CK-NF79-A1 User manual

EVGA 270-WS-W555-A1 User manual

EVGA

EVGA 270-WS-W555-A1 User manual

EVGA EVGA X79 DARK System manual

EVGA

EVGA EVGA X79 DARK System manual

EVGA Z87 CLASSIFIED User manual

EVGA

EVGA Z87 CLASSIFIED User manual

Popular Motherboard manuals by other brands

OEM ITX-945GC3B N330 user manual

OEM

OEM ITX-945GC3B N330 user manual

BCM Advanced Research MX6210N user manual

BCM Advanced Research

BCM Advanced Research MX6210N user manual

Intel DG41AN specification

Intel

Intel DG41AN specification

ASROCK 970 Extreme3 R2.0 user manual

ASROCK

ASROCK 970 Extreme3 R2.0 user manual

Infineon iMOTION EVAL-M1-183M user manual

Infineon

Infineon iMOTION EVAL-M1-183M user manual

ASROCK AD2700-ITX user manual

ASROCK

ASROCK AD2700-ITX user manual

Microchip Technology XLP user guide

Microchip Technology

Microchip Technology XLP user guide

Asus J1800I-A user manual

Asus

Asus J1800I-A user manual

AZZA P4 Series manual

AZZA

AZZA P4 Series manual

MIPS Creator CI20 Schematic diagrams

MIPS

MIPS Creator CI20 Schematic diagrams

Compal LA-2541 Schematics document

Compal

Compal LA-2541 Schematics document

Intel DG965RY Product guide

Intel

Intel DG965RY Product guide

Gigabyte GA-8I865GME user manual

Gigabyte

Gigabyte GA-8I865GME user manual

Linear Technology DC503A quick start guide

Linear Technology

Linear Technology DC503A quick start guide

Motorola MVME2600 Series Installation and use

Motorola

Motorola MVME2600 Series Installation and use

Biostar P4 TDP user guide

Biostar

Biostar P4 TDP user guide

ASROCK H55DE3 user manual

ASROCK

ASROCK H55DE3 user manual

ON Semiconductor AP0202ATSL00XUGAH3-GEVB user manual

ON Semiconductor

ON Semiconductor AP0202ATSL00XUGAH3-GEVB user manual

manuals.online logo
manuals.online logoBrands
  • About & Mission
  • Contact us
  • Privacy Policy
  • Terms and Conditions

Copyright 2025 Manuals.Online. All Rights Reserved.