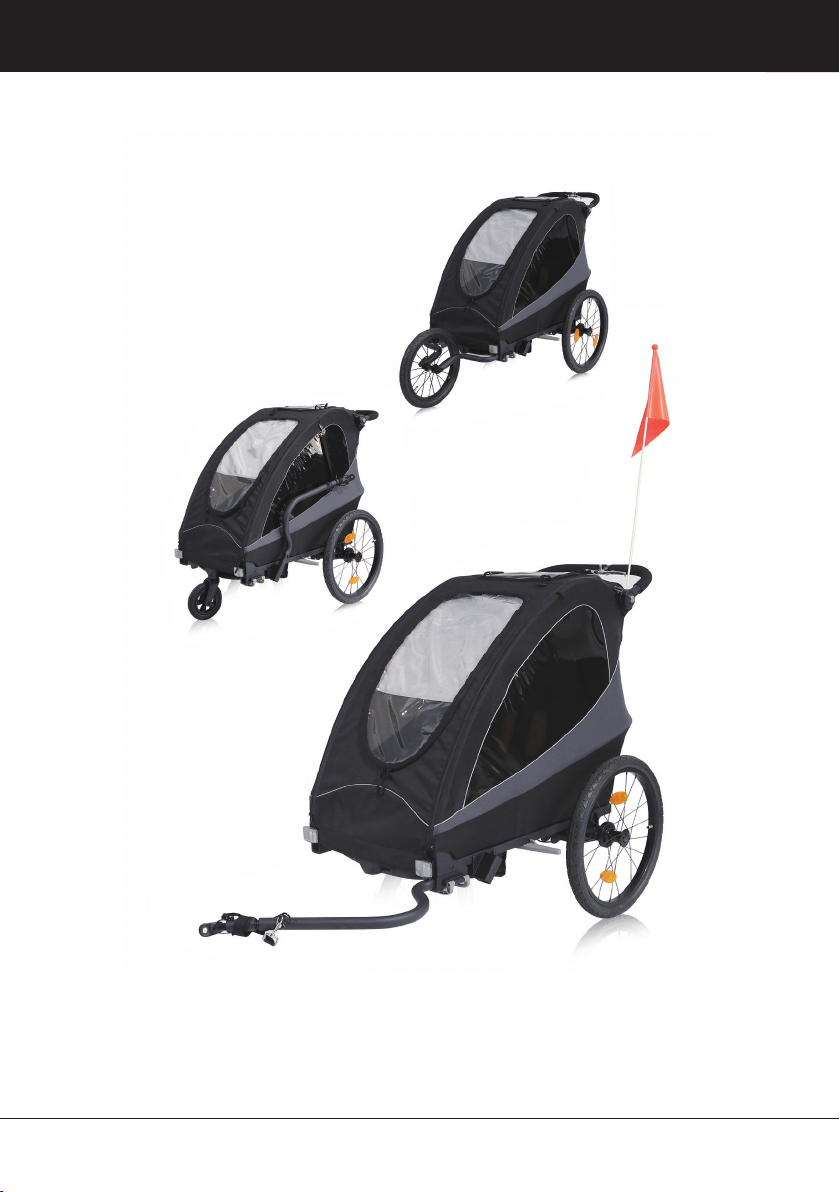
Evobike JBT03K User manual
EN: manual
EN: bike trailer
Art.: JBT03K
JBT03K

IMPORTANT! READ CAREFULLY
AND KEEP FOR FUTURE
REFERENCE.
•Read these instructions carefully before assembling and usingthe product.
•The assembly may only be carried out by an adult.
•Retain these instructions for future reference.
EN
!

EN
Components
A 1x frame
C 1x jogger wheel
D 2x wheel outrigger
E 1x buggy wheel
F 1x drawbar with axle coupling
H 1x axle coupling
G 1x safety pennant
A
F
D
H
C G
E
B

EN
Assembling the base frame
1. Reach into the folded bicycle trailer and pull the handlebar.
2. Pass the frame part to which the handlebar is attached under the linkage of the frame. Note: The
angleof the handlebar can be adjusted bypressing both buttons simultaneously.
3. Connect the frame part to which the handlebar is attached tothe frame of the bicycle trailer using
the black fastening hooks.
4. Secure the black fastening hooks by turning the locks until they engage.
5. The parts are correctly connected to each other when the connection looks like in picture 5, the
textile cover is taut and nothing wobbles. Note: Secure the textile cover by folding itover the frame
and closing the Velcro fastener.
1.
4.
2.
3. 3.
5.

EN
Folding the base frame
1. set the handle bar tothe lowest position.Note: The angleof the handlebar can be adjusted by
pressing both buttons simultaneously.
2. Open the Velcro fastener that connects the textile cover tothe frame.
3. To release the fastening hooks, press the fastening hooks down until they are free.
4. Push the frame part to which the handle bar is attached downwards until it is released from the
anchorage. Pass this part under the frame linkage.
5. Now fold the frame together.
6. The frame is correctly folded when it looks like in picture
1.
3.
5. 6.
2.
4.

EN
Use of the safety belt
The 5-point safety harness system consists of two shoulder straps, two lap straps and a crotch strap
secured in a buckle. Padded shoulder straps provide more comfort.
Warning!Never transport babies under 6 months or children who cannot yet sit independently.
1. etime the black buttons on the
buckle. The individual straps should now come out of the buckle.
2. let the crotch strap hang down towards the footwell and place the two shoulder straps and the lap
straps tothe sides of the seat for the time being, so that you can comfortably put your child into the
seat.
3. Place the child in the seat with the harness open.
4. guide the crotch strap with the buckle between the child's legs upwards tothe upper body. Guide
the hands away from the child.
5. pass the child's hands between the shoulder straps and lap straps. Place the shoulder straps over
the child's shoulders. Now insert the ends of the straps into the buckle.
Tip:The seat belts can be adjusted to the child'sheight.
6. Adjust the seat belts so that the child is held securely by the belts, but not so tight that the seat belts
cut in.
adjusted correctly.
Warning! Thedistance between the shoulder and lap belts and the child'sbody should be as
small as possible so that the child isheld optimallyin the seat. If the distance is too great, the
ead to life-threatening injuries in
the event of an accident. If the distance is too small, the seat belts may possibly cut into the
child'sbody.
Warning! Always fasten the child's seat belt! Your child could otherwise suffer life-threatening
injuries in dangerous situations.
Warning!Seat belts that are adjusted too loosely orbuckles that are notproperly fastened can
cause life-threatening injuries to your child in the event of an accident.
5.

EN
Attaching the rear wheels
Insert the rear wheels into the openingson the frame. When you hear a click, the rear wheels
an be removed bypressing the
button located in the middleof the wheel.
Warning! After assembly, check the locking bypulling both wheels back and forth! Thewheels
must notbe able to bepulled outwithoutpressing the button. Wheels that are not fullylocked
can come loose when riding, which can lead to accidents with life-threatening injuries. 2.
Note: Thebicycle trailer has a wheel guard. Always fold the wheel guard outwards when using
it as a bicycle trailer. Thewheel guard protects the rear wheels from collision.
ATTENTION!
THE CORRECT TIRES ARE ESSENTIAL! USE ONLY THE SUPPLIED TIRES AND KEEP THEM
PROPERLY MAINTAINED. INFLATE TIRES TO 30-35 P.S.I. AND CHECK PRESSURE BEFORE
EACH USE. DO NOT USE HIGHER PRESSURE TIRES AS THIS WILL MAKE THE TRAILER JUMPY
AND PRONE TO TIPPING OVERWHEN LIGHTLY LOADED. WE RECOMMEND ONLY TIRES WITH
ROAD TREAD. DO NOT USE OFF-ROAD TIRES.
1. 1. 2.
NOTICE.
The wheel guard
protects the wheels
fromcollisions with
obstacles

EN
The parking brake prevents the bicycle trailer from unintentionally rolling away when stationary. It is not
suitable for braking a rolling bicycle trailer. Always apply the parking brake when you:
1.) park the jogger or buggy.
2.) allow your child to get in and out of the trailer when using it as a jogger, buggy or bicycle trailer.
3.) fold the trailer so that it does not roll away.
The hand brake is operated by a brake lever located on the handlebar and acts on both wheels
simultaneously. To activate the parking brake, pull the brake lever towards you.
the brake lever. The parking brake can
be released by pulling the brake lever again.
Warning! Always apply the parking brake after parking the trailer and when getting in and out
of the trailer with the children. Check that the trailer cannot roll away bypulling it slightly for-
wards and backwards. An unsecured trailer could cause accidents with life-threatening injuries
by rolling away or could roll away when getting in oroutof the trailer, causing seriousinjuries
to the children.
Warning! Never drive with the parking brake applied! This can damage the brake mechanism.
Apply and release the locking devices
The parking brake can be released by lifting the
foot on the foot brake
The parking brake can be fixed by placing the
foot on the foot brake.

EN
Attaching the drawbar
2. Secure the drawbar with the clamp. To do this, insert both steel bolts of the clamp into the holes
on the side of the bicycle trailer and close the clamp. The clamp is securely closed as soon as you
hear a loud clack.
Note: Opening and closing the clamp is not smooth and requires a certain amount of force. This is
necessary to guarantee a secure hold of the clamp.
3. The drawbar must always be mounted on the left side of the bicycle trailer. The drawbar must not be
mounted on the right side.
ATTENTION!
Both steel bolts must always be locked
with the clamp when the trailer is used.
Always make sure that the drawbar is
securely mounted. Failure to do so may
result in serious accidents and injuries.
1.
3.
2.
EN
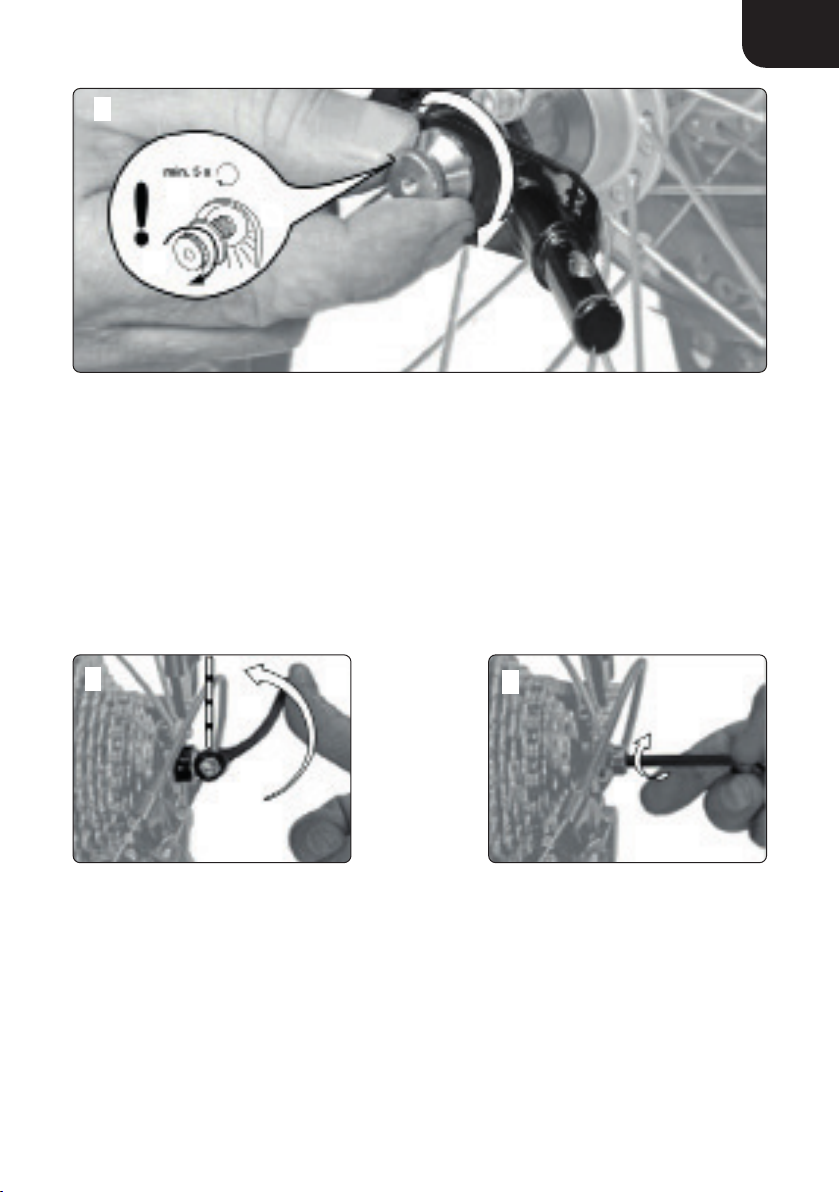
Mounting the axle coupling (quick release)
The coupling is always mounted on the left-hand side of the tractor wheel, as seen in the direction
of travel. It consists of two parts: the drawbar head, which is attached to the drawbar, and the axle
coupling, which is attached to the axle of the rear wheel hub of the towing bicycle. Before you
mount the axle coupling, you must determine whether your bicycle is suitable for towing a trailer.
Check the owner's manual of the bicycle, ask the manufacturer or ask a bicycle dealer.
can come loose while riding and lead to accidents with life-threatening injuries.
1. Open the quick-release lever on the rear wheel of the traction bike or loosen the hexagon
socket screw (5 mm), depending on the version of the quick-release axle. Often the direction of
movement of the clamping lever is marked "OPEN".
2. Unscrew the quick-release axle nut anticlockwise. Be careful, there is a small spring
underneath that could jump away.
3. Place the axle coupling on the quick-release axle without removing the spring.
4.
turns.
5. Align the rear wheel and close the quick-release lever or tighten the hexagon socket screw,
depending on the quick-release axle version. The direction of movement of the clamping lever is
often marked "CLOSE". The force you apply must increase from about half way. In the last area
the lever must be parallel to the frame and must not stick out.
6. Check whether the quick-release is really tightly closed by trying to turn the closed quick-
release around its own axis. If the quick-release can be twisted, the clamping force is not
and
If the clamping lever cannot be closed completely, open the clamping lever and screw the axle nut
half a turn anticlockwise. Repeat steps 5 and 6. Note that the axle nut must be screwed onto the
the rear wheel, which can lead to accidents with life-threatening injuries. The quick-release
axle is then too short and must be replaced. This is available as an accessory. Contact a
specialist workshop.
7.
Warning! The rear wheel must be correctly fastened after mounting the axle coupling. An
Warning! Less than five full turns of the thread will not ensure sufficient clamping force of
incorrectly fastened rear wheel can lead to accidents with life-threatening injuries when
riding. Refer to the instruction manual of your towing bicycle. There are many different
axles. If in doubt, consult a specialist mechanic.

EN
1. 1.
2.
3.
EN
4.
5. 6.

EN
Assembly of the axle coupling (solid axle)
The coupling is always mounted on the left-hand side of the tractor wheel, as seen in the direction
of travel. It consists of two parts: the drawbar head, which is attached to the drawbar, and the axle
coupling, which is attached to the axle of the rear wheel hub of the towing bike. Before you mount
the axle coupling, you must determine whether your bicycle is suitable for towing a trailer. Check
the owner's manual of the bicycle, ask the manufacturer or ask a bicycle dealer.
can come loose while riding and lead to accidents with life-threatening injuries.
1. Unscrew the axle nut on the left side of the rear wheel counterclockwise.
Warning! Do not remove the lock washer (2). It prevents the rear wheel from twisting in the
dropouts. Riding without lock washers can lead to accidents with life-threatening injuries.
2. Place the axle coupling on the axle without removing the lock washer.
3.
wheel, which can lead to accidents with life-threatening injuries. The axle coupling must
Warning! Less than five full turns will not ensure sufficient clamping force of the rear
Warning! The rear wheel must be correctly fixed after mounting the axle coupling.An
4.
5. Finally, try to move the rear wheel in the dropouts to make sure it is correctly secured.
incorrectly fastened rear wheel can lead to accidents with life-threatening injuries when
riding. Observe the operating instructions for your towing bicycle. If in doubt, consult a
specialist workshop.
1.

EN
2.
3.
4.
EN
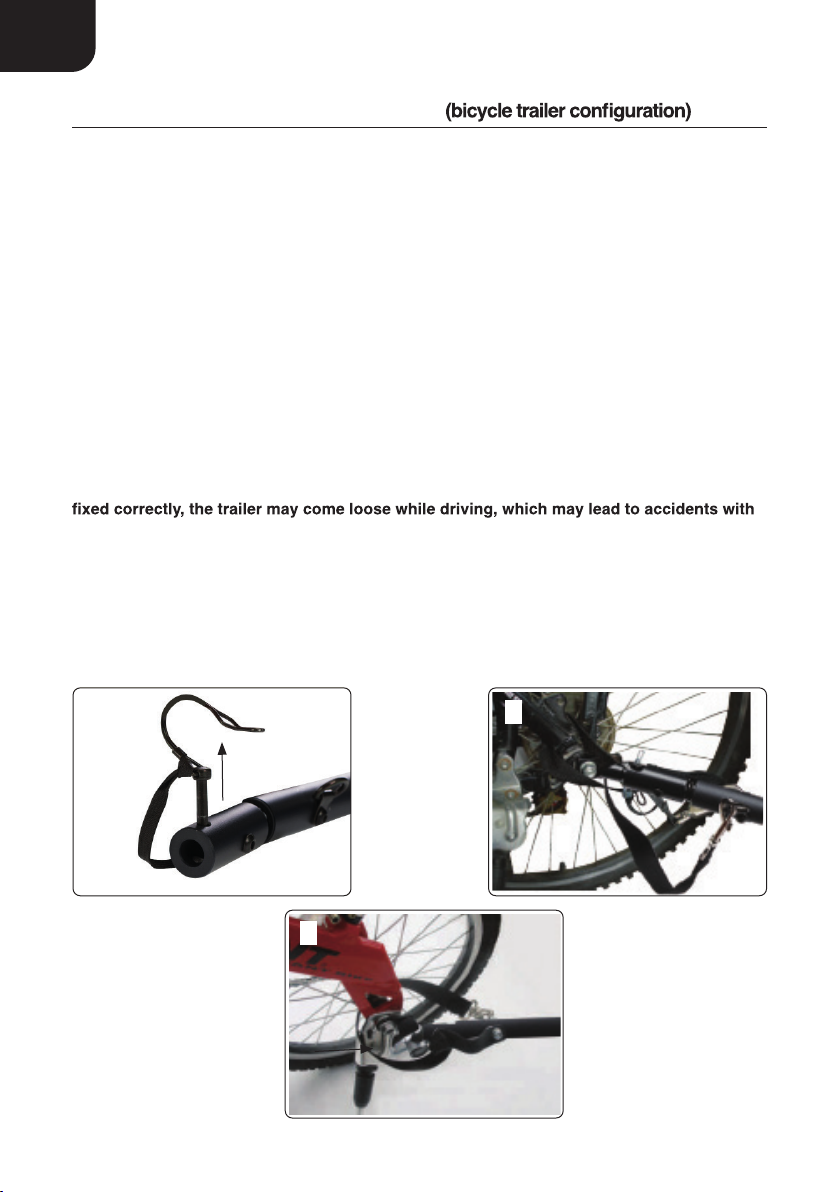
Coupling the trailer to the bicycle
Warning! Check whether the towing bike is approved by the manufacturer for towing
trailers! Pulling trailers with an unsuitable towing bike can lead to frame fractures and
accidents with life-threatening injuries.
Coupling should always be done without a child in the trailer.
1. open the safety bar of the cotter pin. The cotter pin is located on the drawbar head and remove
the cotter pin.
2. Lift the drawbar and push the drawbar head onto the axle coupling mounted on the bicycle.
3. Put the cotter pin back into the hole provided on the drawbar head and close the safety bar.
Caution. Make sure that the connection is secure by pulling on the drawbar.
4. Pass the safety strap around the frame tube and hook the carabiner into the holder on the
drawbar. Make sure that the safety strap does not get caught in the spokes or disc brakes.
life-threatening injuries.
Warning! Never drive without securing the drawbar with the safety strap! If the trailer
Warning! Make sure that the axle coupling is correctly fixed in the drawbar head. If it is not
comes loose, it will still be connected to the bicycle. Failure to observe this can lead to
accidents with life-threatening injuries.
1. 2.
4.

Attaching the safety pennant
To ensure that the bicycle trailer is better seen by other road users, you should always use the safety
pennant provided. This increases your safety and that of your child. The safety pennant is inserted into
a tunnel located on the left side of the handle bar.
Warning!If you use the carrier as a bicycle trailer, the safety pennant must always be
which could lead to accidents with life-threatening injuries.
Note: When folding the trailer, remove the safety pennant beforehand. Otherwise the pennant pole
could be broken.
EN
EN
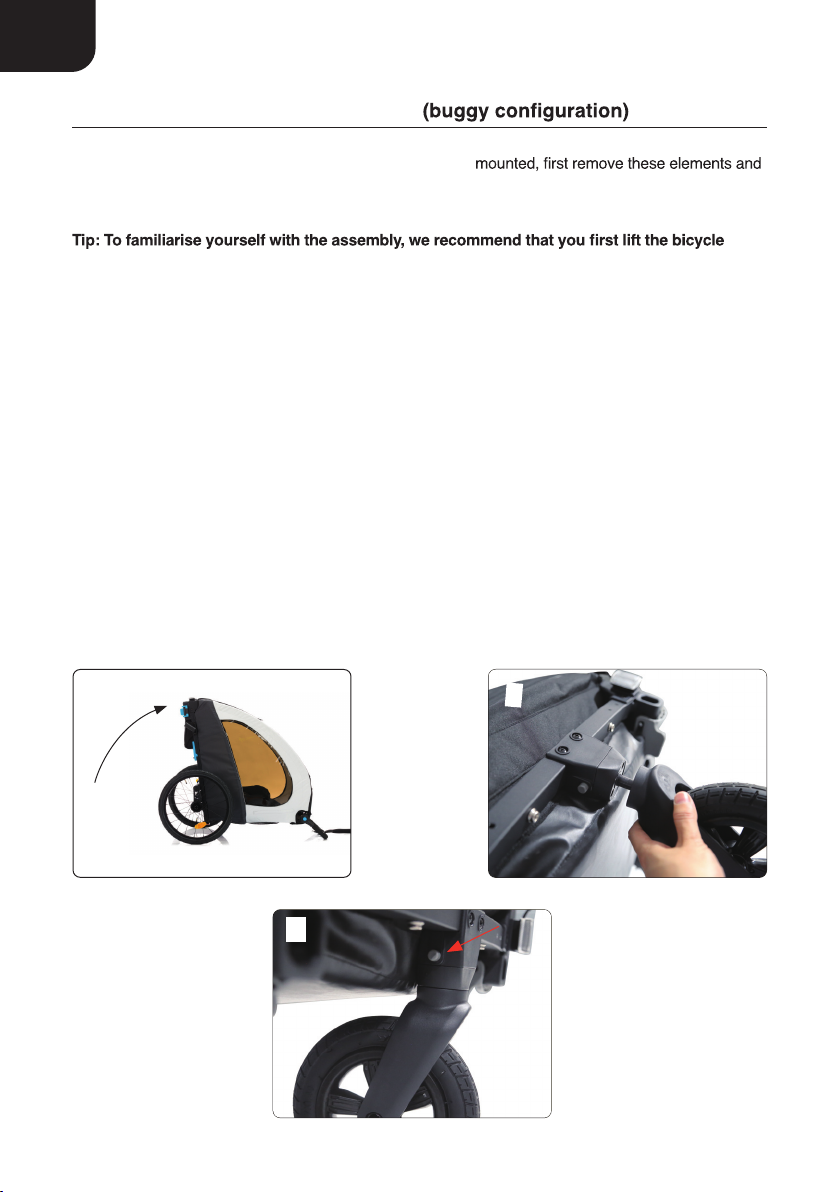
Mounting the buggy wheels
If the bicycle trailer has the drawbar or the jogger wheel set
insert the fastening hooks back into the holes provided. Make sure that the fastening hooks are closed.
trailer at the front, tiltitbackwards and support iton the handlebar. Make sure that the surface
under the trailer is clean and smooth so as not to soil ordamage the textile cover. Later, when
you are familiar with the assembly, itis enough to lift the trailer slightly at the front for this
work.
1. lift the trailer at the front or tilt it backwards.
2. insert the buggy wheel into the buggy wheel holder as far as it will go until you hear and feel it
engage.
3. to remove the buggy wheel, press the button and pull the buggy wheel out.
Caution! Make sure that the buggywheel is correctly engaged and cannot come loose byitself!
If the buggywheel isnot correctly engaged, the buggywheel can come loose, which can lead
to accidents with injuries.
Caution! Never ridewith a mounted buggywheel when using the trailer as a bicycle trailer! The
buggywheel could hitobstacles, which could lead to accidents and injuries.
1.
2.
3.
EN
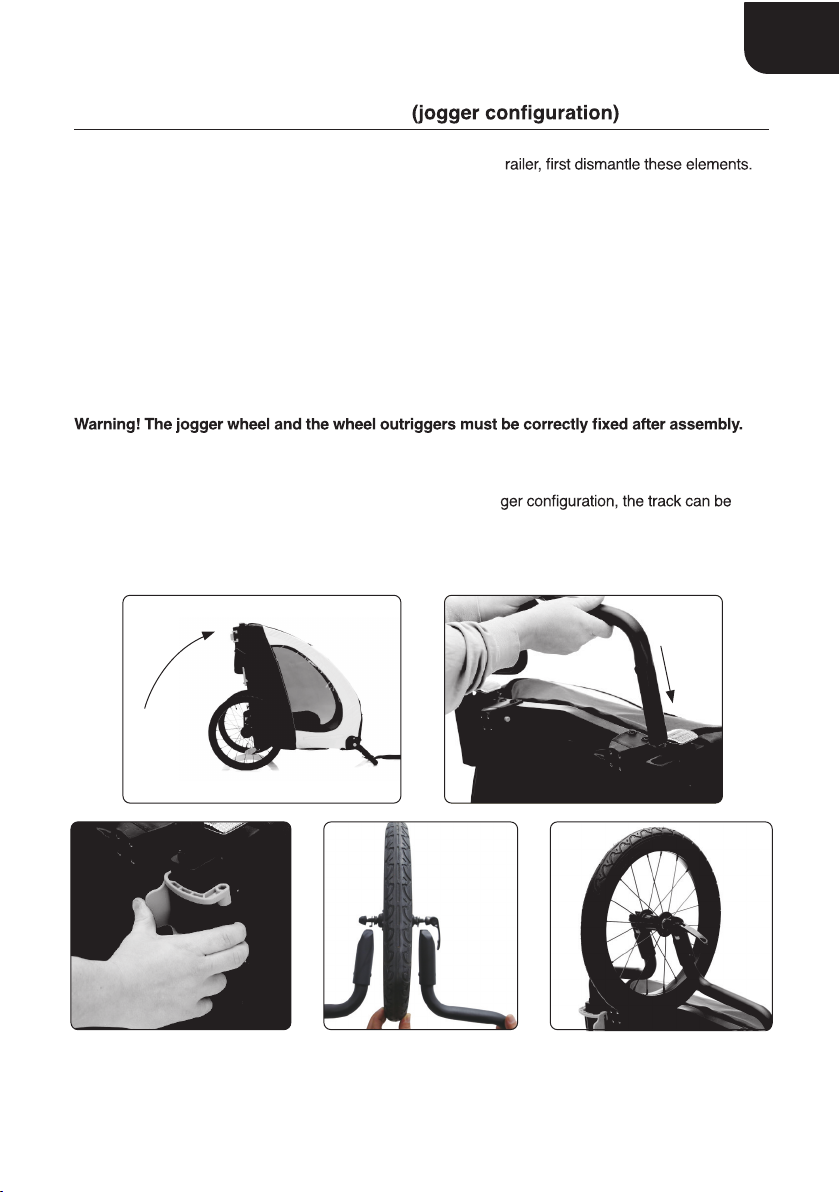
Mounting the jogger wheel
If the drawbar or the buggy wheels are mounted on the bicycle t
The jogger set consists of two wheel arms, a jogger wheel and a catch strap. The two wheel outriggers
are mounted in a similar way to the drawbar.
1. Lift the trailer at the front or tilt it backwards.
2. Loose the axle of front jogger wheel a bit, insert the two wheel outriggers. Please be known that
the gear for regulating front wheel should be downwards. Making sure the hook in axle should be
coupled with slots on the outriggers.
3. Insert the wheel arms into the holders.
4. Fix the wheel arms with the clamps. Check the wheel and outriggers are all fixed tightly.
Riding with an incorrectly fastened jogger set can lead to accidents with life-threatening
injuries. If in doubt, contact a specialist workshop!
Tip: If the trailer does not drive exactly straight ahead in the jog
adjusted by turning the adjusting rings on the dropouts.

EN
Assembly of reflectors
There are total 8pcs reflectors in the spare parts box.
2pcs white reflectors should be assembled at the front of carrier. 2pcs red reflectors should be assembled
at the rear of carrier. 4pcs orange reflectors should be inserted to the spokes of rear wheels, 2pcs on each
one.

Once don’t need the draw bar, can stock it into the holder fixed on the left side of carrier.
To avoid the safety belt getting caught into the rear wheel, can use the hook being connected to the
elastic circle on the fabric cover.
EN
Stock the draw bar
Table of contents
Other Evobike Bicycle Accessories manuals


