Evocare LM952 User manual
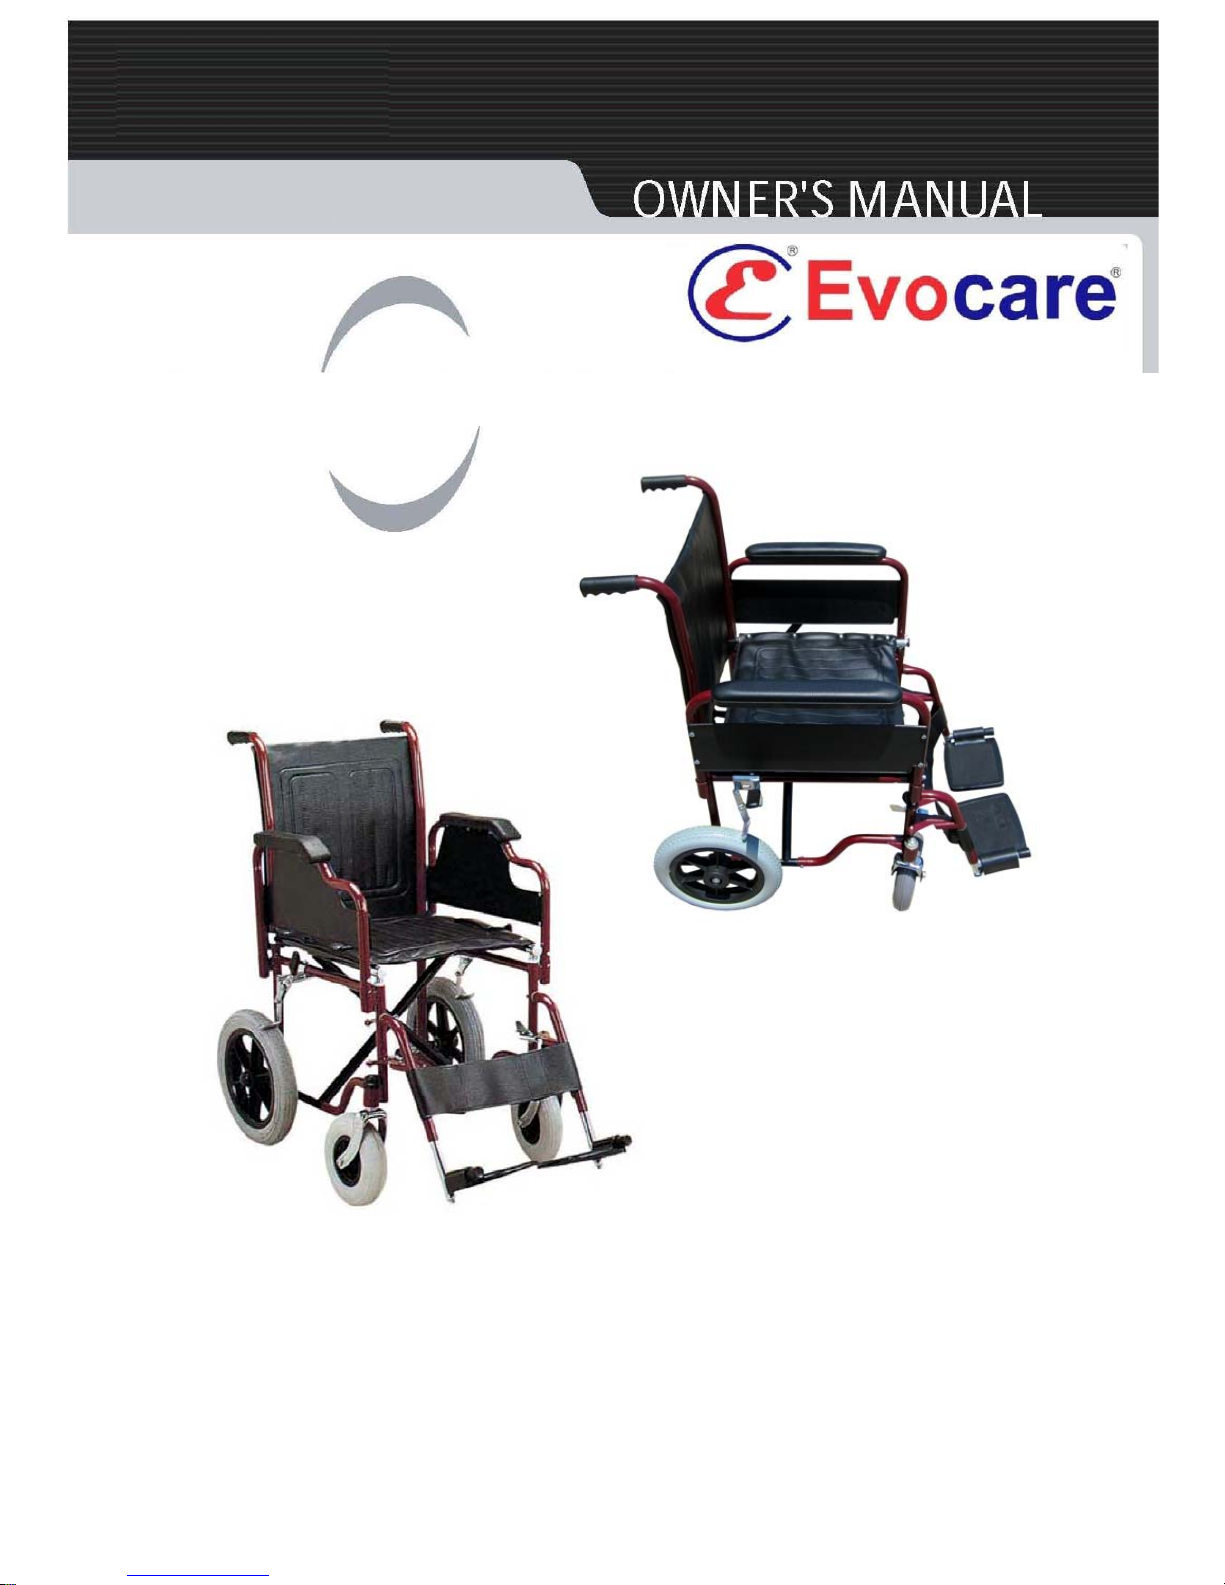
Transit Wheelchair
LM952 and LM953
Thank you for purchasing this Transit Wheelchair. It is strongly
recommended that you read through this user manual prior to using
your Transit Wheelchair for the first time. Your Transit Wheelchair
should provide years of trouble-free use, provided that you adhere to
these recommendations.


Page 3.
Note: Maximum user weight for this wheelchair is 100kg
Evocare is a quality endorsed company and supplies equipment listed with the
Therapeutic Goods Administration.
The ARTG number for the LM952/3 Transit Wheelchair is 175495.
Transit Wheelchair
LM953 Full Length Armrests

Page 4.
Safety / Handling of Transit Wheelchairs
Safety and handling of the transit wheelchair requires the close attention of the
transit wheelchair user as well as the assistant. This manual points out the most
common procedures and techniques involved in the safe operation and
maintenance of the transit wheelchair. It is important to practice and master
these safe techniques until you are comfortable in manoeuvring around the
frequently encountered architectural barriers.
Use this information only as a basic guide. The techniques that are discussed on
the following pages have been used successfully by many users.
Individual transit wheelchair users often develop skills to deal with daily living
activities that may differ from those described in this manual. All warnings and
cautions given in this manual MUST be followed.
Techniques in this manual are a starting point for the new transit wheelchair user
and assistant with safety as the most important consideration for all.
Stability and Balance
To assure stability and proper operation of your transit wheelchair, you must at all
times maintain proper balance. Your transit wheelchair has been designed to
remain upright and stable during normal daily activities as long as you do not
move beyond the centre of gravity.
Virtually all activities which involve movement in the transit wheelchair have an
effect on the centre of gravity. Use the adjustable seatbelt for additional safety.
DO NOT lean forward out of the transit wheelchair any further than the length of
the armrests. Make sure the castors are pointing in the forward position
whenever you lean forward. This can be achieved by advancing the transit
wheelchair and then reversing a little in a straight line.

Page 5.
Operating Instructions
To determine and establish your particular safety limits, practice bending,
reaching and transferring activities in several combinations in the presence of a
qualified health professional before attempting active use of the transit
wheelchair.
ALWAYS check hand grips for looseness before using the transit wheelchair. If
loose and/or worn, replace immediately.
If the transit wheelchair is exposed to extreme temperature (above 38°C or below
0°C), high humidity and/or becomes wet, prior to use, ensure hand grips DO NOT
twist on the transit wheelchair handle—otherwise damage or injury may occur.
DO NOT attempt to reach objects if you have to move forward in the seat as this
may tip the wheelchair.
DO NOT attempt to reach objects if you have to pick them up from the floor by
reaching down between your knees as this may tip the wheelchair.
DO NOT lean over the top of the back upholstery to reach objects behind you, as
this may tip the wheelchair.
DO NOT shift your weight or sitting position toward the direction you are
reaching, as this may tip the wheelchair.
DO NOT tilt the transit wheelchair without assistance.
DO NOT use an escalator to move a wheelchair between floors—serious injury
may occur.
NEVER leave an unoccupied transit wheelchair on an incline.
DO NOT attempt to stop a moving transit wheelchair with the wheel locks. Wheel
locks are not brakes.
Before attempting to transfer in or out of the transit wheelchair, every precaution
should be taken to reduce the gap distance. Turn both castors parallel to the
object you are transferring onto. When transferring to and from the transit
wheelchair, ALWAYS lock both hand brakes (locks) before transferring to and
from the transit wheelchair.
DO NOT sit or transfer into the transit wheelchair unless it is fully open.
DO NOT operate on roads, streets or highways.
DO NOT climb, go up or down ramps or traverse slopes greater than 9°.
DO NOT attempt to move up or down an incline which has a film of water, ice or
oil on it.
DO NOT attempt to ride over kerbs or obstacles. Doing so may cause your
transit wheelchair to tip, causing bodily harm or damage to the wheelchair.
DO NOT over tighten hardware attaching to the frame. This could cause damage
to the frame tubing.

Page 6.
Quick Release Components
The transit wheelchair comes with a number of
components which can be easily removed
without tools for storage or transport. For all
parts in this section see the relevant description
and diagram:
Armrests
Remove the armrest by pushing in the button on
the armrest tubing (1) whilst lifting the armrest
up (2).
Because the armrest are detachable , DO NOT
lift the wheelchair by the armrests.
Using the Stepper Tube
Use the stepper tube to raise the front castors (when mounting a low kerb for
example). To use, push down on the stepper tube with your foot. DO NOT raise
the front castors by pushing down on the push handles as this could tip the
wheelchair.
To mount a low kerb. Approach the low kerb
head on. Then the assistant uses the stepper
tube to raise the front castors, and lowers the
front castors on the raised kerb. Finally the
assistant should push the wheelchair forward,
lifting it up slightly to mount the kerb if required.
To go down a low kerb. Line up the front
castors with the edge of the low kerb. The
assistant uses the stepper tube to raise the front
castors and tip the users back slightly. Keeping
the castors raised slowly move the wheelchair
forward and slowly lower it down the low kerb.
Warning: When going down a low kerb, the front castors must be raised to
prevent the user from falling forward. The above are only recommendations and
may not be suitable for all events.

Page 7.
WARNING
After any adjustments, and before use, make sure all attaching hardware is
tightened securely. Otherwise, injury or damage may result.
Installing Swingaway Removable Legrest Assembly
NOTE: For this procedure refer to FIGURE 1.
1. Turn the footrest to the side (open footplate perpendicular to transit
wheelchair).
2. Install the hinge plates on the footrest
onto the hinge pins on the transit
wheelchair frame.
3. Push the footrest towards the inside
of the transit chair until it locks into
place.
NOTE: The footplate will be on the inside
of the transit wheelchair when locked in
place.
4. Repeat this procedure for the other
footrest assembly.
5. To release the footrest, push the
footrest release lever inward, rotate
the footrest outward.
Adjusting Footplate Height
NOTE: For this procedure, refer to FIGURE 2.
1. Remove the swingaway footrest assembly.
NOTE: lay the assembly on a flat surface to simplify this procedure.
2. Loosen, but DO NOT remove, the footplate mounting bolt until the footplate
assembly moves freely.
3. Reposition the footplate assembly to
the desired height.
4. Securely tighten the footplate
mounting bolt.
5. Repeat this procedure for the other
footrest, if necessary.
6. Reinstall the swingaway footrest
assembly.

Page 8.
WARNING
After any adjustments, and before use, make sure all attaching hardware is
tightened securely. Otherwise, injury or damage may result.
Replacing Back Upholstery
NOTE: For this procedure, refer to FIGURE 3.
1. Remove the screws and washers
that secure the existing back
upholstery to the back frame
tubes.
2. Position new back upholstery on
the back frame tubes.
3. Securely tighten the new back
upholstery to the back frame tubes
with the screws and washers.
Replacing Seat Upholstery
NOTE: for this procedure, refer to FIGURE 4.
1. Remove the screws that secure
the existing seat upholstery to the
crossbraces.
2. Remove the existing seat
upholstery from the crossbraces.
3. Securely tighten the new seat
upholstery to the crossbraces with
the screws.
NOTE: Back upholstery shown is for the Transit
NOTE: Seat upholstery shown is for the Transit
Wheelchair Specifications
Model Overall
(mm) Folded
(mm) Between Arms
(mm) Rear Wheel
Dia. (mm) Front Wheel
Dia. (mm) Seat Height
(mm)
LM952/3 600 220 450 310 200 500
Model Height to
Grips (mm) Seat Width
(mm) Backrest Height
(mm) SWL (kg) Gross Weight
(kg) Nett Weight
(mm)
LM952/3 860 430 400 100 17 15
Page 9.
WARNING
After any adjustments, and before use, make sure all attaching hardware is
tightened securely. Otherwise, injury or damage may result.
CAUTION
As with any vehicle, the wheels and tyres should be checked periodically for
cracks and wear, and should be replaced when necessary.
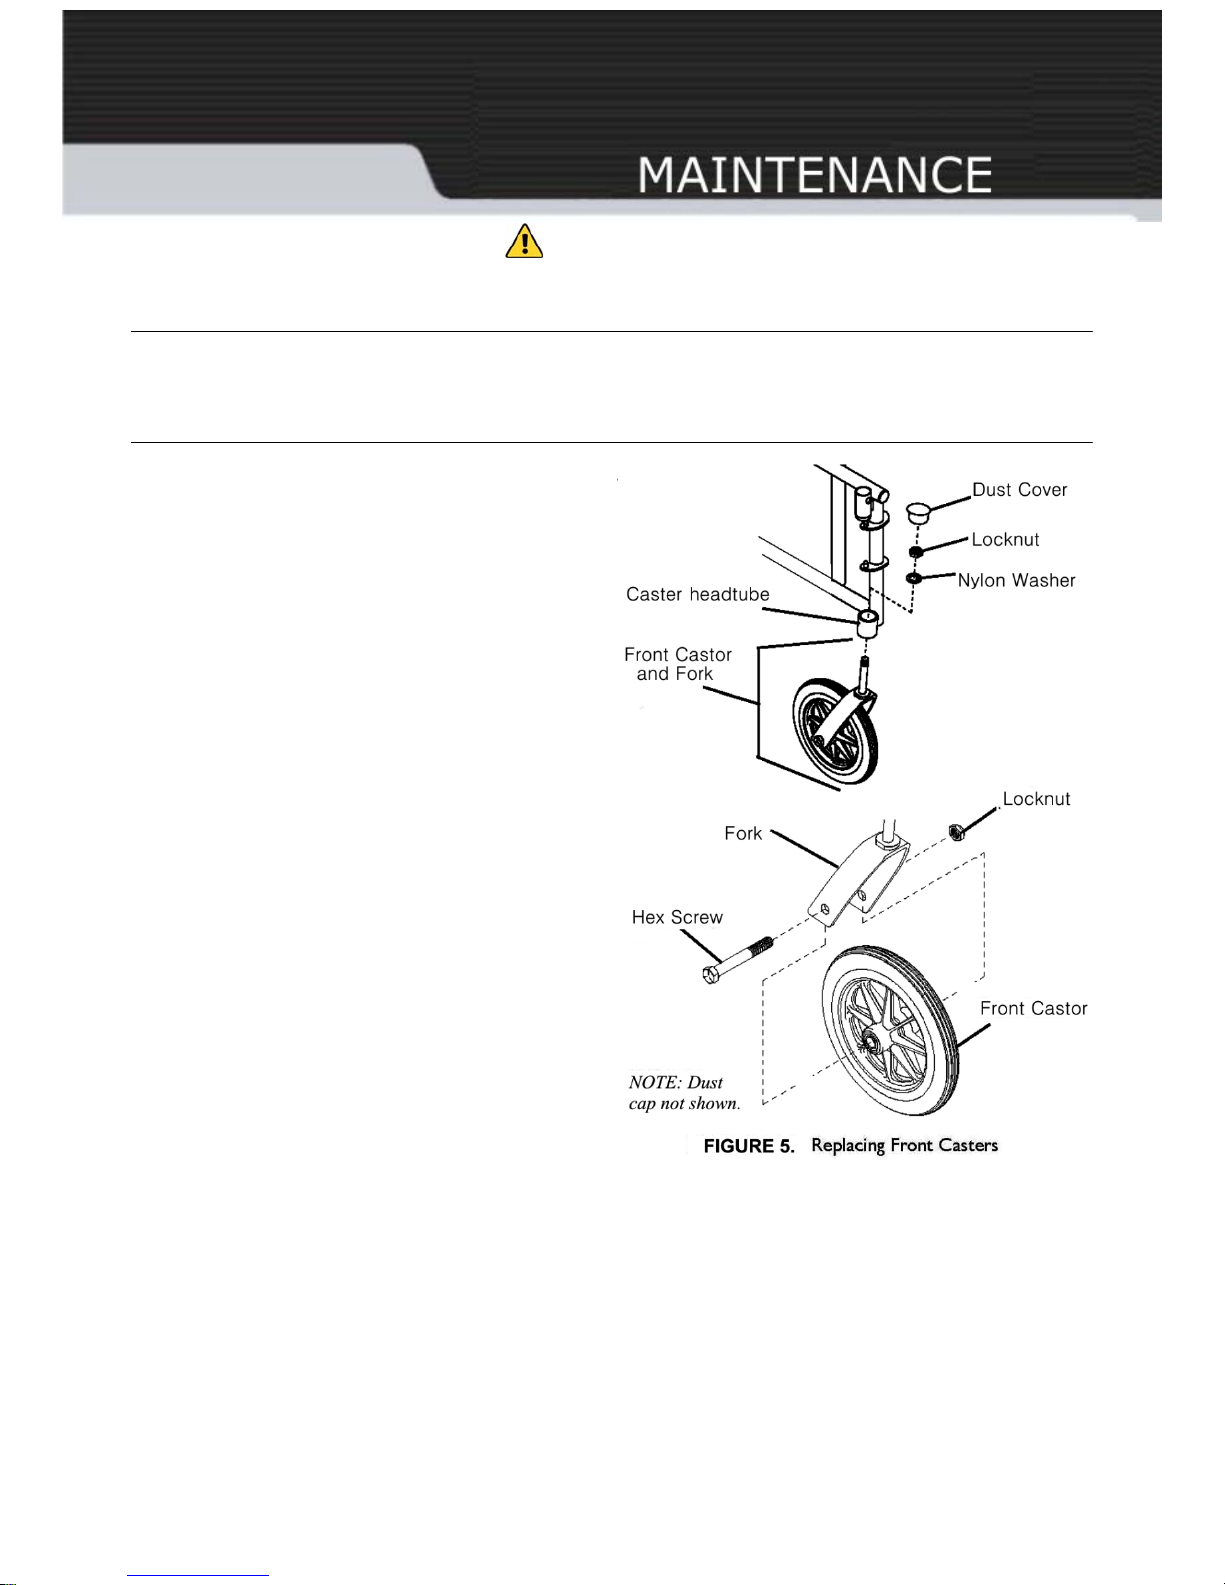
Replacing / Adjusting Front Forks
NOTE: For this procedure, refer to FIGURE 5.
Replacing
1. Remove the castor from the fork.
2. Remove the dust cover.
3. Remove the locknut and nylon washer
that secure the fork to the castor head-
tube.
4. Drop the fork out of the castor head-tube.
5. Slide the new fork into the castor head-
tube and reassemble by reversing STEPS
1 to 4.
6. Adjust the forks.
7. Repeat STEPS 1 to 6 for the opposite
fork, if necessary.
Adjusting
1. Remove the dust cover.
A. To properly tighten the castor
journal system and guard against
flutter, perform the following check:
B. Tip the transit wheelchair back to
the floor.
C. Simultaneously pivot both forks
and castors to the top of their arc.
D. Let the castor drop to the bottom of
the arc (wheels should swing once
to one side, then immediately rest in a straight downward position).
E. Adjust the locknuts according to freedom of the castor swing.
F. Test the transit wheelchair for manoeuvrability.
G. Readjust the locknuts if necessary, and repeat STEPS C &F until correct.
H. Snap the dust cover over the locknut.
Replacing Front Castors
NOTE: For this procedure, refer to FIGURE 5.
1. Remove the hex screw, washers and locknut that secure the front castor to the fork.
2. Reverse STEP 1 to install new front castor.
3. Repeat STEPS 1 & 2 for the opposite front castor.

Page 10.
Moulded rubber armrests (Pair)
LM952AR-PR

Page 11.
1. Evocare provides consumers with the following warranty in relation to this Product, in addition to complying
with the requirements of any relevant legislation, including the Competition and Consumer Act2010 (Cth) in
Australia and the Consumer Guarantees Act 1993 in New Zealand (the Acts), except where a New Zealand
consumer acquires the Product for the purposes of a business.
2. In this warranty, we have used the following definitions:
(a) Form means a warranty claim form issued by Evocare in respect of Products;
(b) Evocare or our means Evocare Australia Pty Limited, ABN 98 078 566 604 of Level 19, 144 Edward Street,
Brisbane 4000;
(c) Products means the goods manufactured for Evocare (including products manufactured by its contract
manufacturers);
(d) Material means a material or component used by Evocare in the manufacture of the Products;
(e) Retailer means the authorised dealer of Products from whom the Product was purchased;
(f) Warranty Period means the warranty period commencing from the date of purchase of the relevant Product.
If the Product or part (as the case may be) is repaired or replaced, there will be no extension to the original
warranty period; and
(g) Workmanship means the handling, assembly and manufacturing processes performed by or on behalf of
Evocare in order to manufacture the Products.
3. Evocare warrants that for the duration of the Warranty Period, all Products will be free of faults arising from
defects in Workmanship or Materials, on the terms and conditions set out in this warranty.
4. Evocare undertakes that if during the Warranty Period any Product, or any part of a Product, has failed to
operate correctly due to faulty Workmanship or defective Material, it will repair or replace the Product or part
(as the case may be) free of charge provided that the following procedures are met :
(a) The consumer must contact the Retailer or Evocare upon becoming aware of any defect to a Product upon
which the consumer will be required to complete a Form and provide satisfactory proof of purchase.
(b) Evocare will review the Form to determine whether there is a defect, and if so Evocare agrees to (at its option)
repair, replace or supply equivalent goods, or pay the cost of any of those remedies to the consumer.
(c) If Evocare requests the return of the applicable Product or part, the consumer will be responsible for the
collection and freight costs of returning that Product or part to Evocare.
(d) The consumer acknowledges that it is also responsible for the freight costs to deliver any new Product or
replacement part to it.
5. This warranty is in addition to any non-excludable legal rights or remedies conferred on the consumer under
any applicable Act and any similar laws. To the extent permitted by law, Evocare's liability for any non-
excludable condition or warranty is limited to rectifying any defect at its option, as set out in paragraph 4(b).
6. Subject to the requirements of any applicable Act or legislation and to the extent permitted by law, no liability
(whether expressed or implied) of any nature whatsoever, is accepted by Evocare for any consequential loss,
damage or injury arising as a result of any fault in the Products.
7. This warranty does not extend to damage to Products which occurs during transit or transportation, or which is
caused by any abuse, accident or improper installation, connection, use, adjustment or repair or use of goods
otherwise than in accordance with instructions issued by Evocare.
8. The warranty on Products is waived if any addition or attachment to the Products do not have Evocare's
approval or are not sold as Evocare products. The Products are designed to perform specific tasks under
established test loads and unauthorised attachments may produce stresses for which the design is not
appropriate.
9. The following applies to consumers who purchased a relevant Product in Australia:
Our goods come with guarantees that cannot be excluded under the Australian Consumer Law. You are entitled to
a replacement or refund for a major failure and compensation for any other reasonably foreseeable loss or
damage. You are also entitled to have the goods repaired or replaced if the goods fail to be of acceptable
quality and the failure does not amount to a major failure.

Page 12.
Your Evocare Transit Wheelchair is warranted to be free of defects in material and
workmanship for 12 months, for the original consumer.
This warranty does not cover device failure due to owner misuse, negligence, or normal
wear and tear.
The warranty does not extend to non-durable components such as rubber accessories,
brakes and grips, which are subject to normal wear and tear. Non-durable components
are warranted for 3 months.
For more information about your LM952 or LM953 Transit Wheelchair, warranty or to
order parts call 07 3355 8007.
Manufactured for:
Evocare Australia Pty Limited, 260 South Pine Road, Enoggera. QLD. 4051.
Phone: 07 3355 8000 FAX: 07 3355 5043
Website www.evocare.com.au
This manual suits for next models
1
Other Evocare Wheelchair manuals


