Evolio IFLY ONE HD User manual

1
Change the perspective!
User manual
Manual de utilizare

2
Main Features of the drone
Smooth and easy controllable flight behavior.
Simple construction, individual parts can be exchanged
quickly and easily.
Fun during flying is guaranteed because of 360° 3D-
flips.
Live image transmission via WiFi (App necessary).

3
Welcome to use our
●We reserve the final explanation right on this User’s Manual.
●This manual has been carefully checked. Please contact our service center at suport@evolio.ro , when
any typing mistake is found.
●Please read the operating instruction carefully and use the accessories only provided by the original
factory to avoid any unexpected damage. No warranty will be executed if you are not following the
instruction or connecting with the incompatible accessories, we assume no responsibility for any loss and
damage caused hereby.
1. Introduction
Dear Customer:
Thank you for buying this product. Please read this manual carefully to learn the ability of flying quickly and to
operate safety with this product. Please take care of the manual. We hope you will enjoy our new product.
IMPORTANT INFORMATION
Please note the valid standard for flying drones in your country!
The construction and operation of radio controlled models requires technical knowledge, craftsmanship and
safety-conscious behavior.
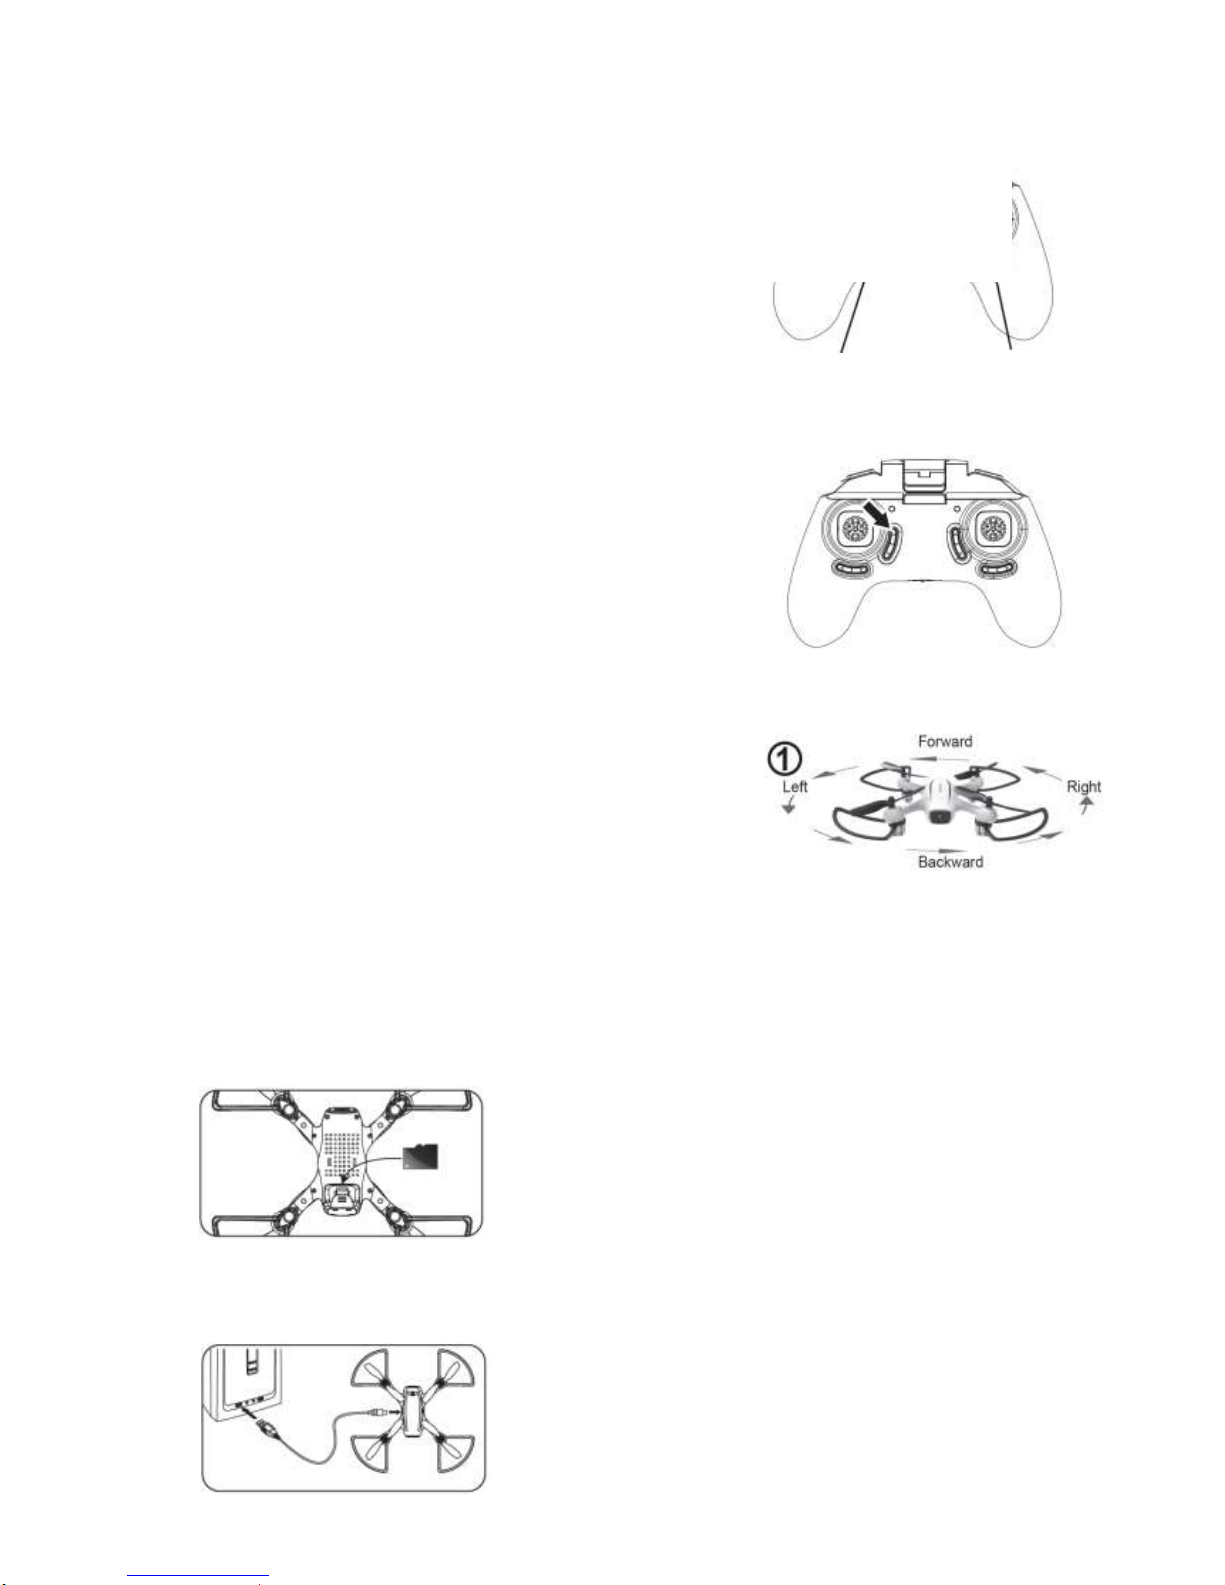
The drone is powerfull, when tacking off, move the throttle stick foreard gradually, to avoid it s rising too fast.
After the flight, torn off the drone first, then turn off the controller.
This product is not suitable for children under the age of 14. Children should be supervised by adults at all
times.
Fly only in safe areas and keep a reasonable safety distance to persons, animals and other objects.
The dealer and seller does not accept liability for any damage to property or injuries in case of non-observance
of the safety instructions.
1.1. Safety instructions
Fly only in safe areas away from other people or crowds. The operator is responsible for their actions,
damages or injuries occurred during the operation.
RC models are composed of many precision electrical and mechanical components. It is critical to keep the
model and associated equipment away from moisture and other contaminants. Do not operate or expose to
rain or moisture! Exposure to water or moisture may cause the model to malfunction resulting in loss of
responsiveness and could cause to crash.
Please keep people, animals or other objects away from the spinning blades of main rotors and tail rotors.
Please keep the model away from heat and strong sun exposure in order to avoid distortion or damage caused
by high temperature.
Please use this product only for its intended purpose.
Please store small parts in a place out of reach of small children to avoid choking hazard.
Please fly the drone according to your flight skills. Fatigue, illness and/or miss-operation will increase the
possibility of accidental hazard
If the product gets damaged, stop using it immediately.
Never throw any batteries into fire, risk of explosion!
If the blades need to be replaced, take care that they are assembled according to the correct direction of
rotation.

4
1.2.Battery Protection
The drone is powered by a Lithium-Polymer rechargeable battery (Li-Po). Li-Po batteries are different to
conventional batteries in that their chemical contents are encased in a relatively insubstantial foil packing. This has
the advantage of significantly reducing their weight, but does make them more susceptible to damage if roughly or
inappropriately handled. As with all batteries, there is a risk of fire or explosion if safety practices are ignored!
1. Do not charge Li-Po batteries near flammable materials or liquids.
2. Keep Li-Po batteries away from children or animals.
3. Never charge a Li-Po battery pack that has ballooned or swelled due to over-/undercharging or from crash.
4. Charge and store Li-Po batteries in a location where a battery fire or explosion will not endanger life or
property.
5. Never charge a Li-Po battery pack that has been damaged in a crash, discard it in accordance with your
country´s recycling laws.
6. Only charge your battery with the supplied charging cable and take care of the polarity.
7. If the Li-Po battery catches fire, never try to extinguish the fire with water. Use dry sand or a suitable fire
extinguisher.
8. Never overcharge a Li-Po battery and monitor charging batteries for signs of overheating.
9. Never leave a Li-Po battery unattended during charging.
10. Do not attempt to disassemble, modify or repair the battery.
11. Protect your battery during transportation or storage from damage.
12. To avoid that the battery gets deep discharged, charge the battery regularly when it is not in use. If the battery
voltage drops below 2V, the battery is defective and cannot be charged anymore. Dispose the battery
according to the applicable recycling laws of your country.
13. While not using the battery store it in a dry and dark area at a temperature between 18-25°C.
1.3.Maintenance
Clean the drone with clean, dry soft cloth only.
To avoid irreparable damage, keep the drone dry and away from water. Do not fly in rain condition.\
Check the drone and accessories for damage. If damage is found, do not use the drone until is repaired.
1.4.Symbols used on the product:
CE mark (Conformity Europe), this product is compliant
to designated European standards
Cells in the battery pack contain Lithium
The battery must not be disposed in the household waste.
Follow the instructions!
1.5 Package content
Drone
Replacement rotor blades 4pcs.
USB charging and data cable
Li-Po battery 3,7V
Remote control
Manual
Li-Ion

5
2. Battery Instalation & Charging
2.1.Installing the battery
1.Remove the battery cover.
2.Insert the 4x 1,5V AAA batteries according to the indicated polarity.
3.After the batteries are inserted, close the battery compartment.
Attention: Do not mix old and new batteries.
Do not mix different type of batteries.
Battery installation should be done under adult supervision only.
2.2 Charging the drone
1.Insert one side of the USB connector into the drone.
2.Insert the other side of the USB connector into any computer USB port.
Battery cover
4x 1,5V AAA
batteries

6
2. Controller
3. Drone:
Power LED
1. Start button for activating the drone
2. Auto landing
3. Emergency stop, press 3 seconds
Speed select
Press to change the speed
(listen to beeps)
1. slow speed (1 beep-sound)
2. medium speed (2 beep-sounds)
3. high speed (3 beep-sounds)
Throttle / rotate the drone
Rotate trim button
One-Key-Return
Headless mode
Trim button forward/backward
Trim button right/left
Directional control
3D-Flips
Press button (you can hear 1 beep-
sound)
Move the stick in any direction and the
drone makes a flip in the direction you
moved
With connected App: no function
With inserted micro SD Card: Picture/Video
1. press one time: take picture
2. press for 3 seconds: recording video
Camera LED
Flashing while taking picture
and lights while making video
Change of damaged or broken
rotor blades:
1. Loosen the screw on the rotor
blade
2. Remove the rotor blade
3. Install the new rotor blade (Take
care of the letter on the rotor blade
and the drone. The letter must match
to each other, otherwise the drone
doesn´t fly!)
4. Fix the rotor blade with the screw

7
4. Connecting drone and remote control
5. Operation and Control
Note: When the drone is flying towards you, the control direction are reversed.
Turn on the remote control
Turn on the drone after
battery is inserted
(The LEDs on the drone
starts flashing)
Place the drone
at a level position
Press the throttle stick
up and down. You can
hear a beep sound and
the LEDs stop flashing
and start shining. The
drone and the remote
control are connected
and the drone is ready
to fly
You have to press the
start button to start
the drone. Only after
pressing the button,
the drone reacts to
your flight commands.
For automatic landing
you have to press this
button as well.

8
6. Trim fine tuning
Left/right spin
fine tuning
Forward/backward
fine tuning
Left/right
fine tuning

9
8.Radical Flip& Rolls
You can perform flips with your drone in any of the speed settings. Press down the rudder once (one
beep sounds), then push the rudder in related direction.
Notice: Before you perform a Flip Trick, always make sure you have enough space both above and bellow your
drone.
9. Automatic trim function
If the drone does not hover stable, place it
on a level position when it is turned on.
Press both steering stick down to 45-
degree circle (as you can see in the right
picture) for 10 seconds, the LEDs on the
drone start flashing very fast. After the
steering sticks are back in start position
the LEDs of the drone shining
continuously and the automatic trimming
is finished.

10
10. One-Key Return
The drone is equipped with a “One-Key-Return function”. After pressing
the button on the remote control (shown below) the drone flies
independently and the direct way to the remote control. You only have to
press the right stick in any direction to quit this function.
11. Headless Mode
11.1 How to get into/quit Headless Flying Mode
You can activate the Headless Mode with the button (shown below) on the
remote control. When this Mode is activated you can hear a permanently
repeating beep-sound. No matter in which direction the drone is turned, the
side facing away from the pilot is always the front.
To quit from compass mode, just press the button again and you
will hear beep sound disappears.
11.2 How to recognize the „Forward side“ under Headless Function
When the drone is taking off, the LED light on the drone stop flashing, at
the moment, the drone sets its front side to be the front direction for
Headless Mode flying.
If you want to reset the front direction, then you need to turn off the rc drone
and reset it again.
12. Instruction for camera using
Pictures and Videos can be saved on a micro SD Card (not included), after putting it into the drone´s card slot.
One-Key-Return
Press is any
direction to quit
this function
The micro SD card can be inserted at the card slot on the
bottom of the drone.
Attention: The micro SD Card must have speed class 6,
otherwise pictures and videos can´t be saved!
You can read out and watch the recorded pictures or videos
on the computer. The drone must be connected to the
included USB cable and the computer. The file folder opens
by itself in general, if not will the drone be shown as a
removable disk.

11
13. Software download, installation and using
13.1 Connection and use of camera and App
First you have to download the „Helicute 720 FPV“ App in the Apple App Store or Google Play Store.
Alternatively, you can scan one of the two QR codes for your operating system with the smartphone.
IOS Android
13.2. Using instruction
Please proceed as follows:
1. Turn on the drone.
2. Activate WiFi on your Smartphone
(if WiFi is already activated, your smartphone will not be able to find the drones network. You must disable
WiFi and enable then again to get connected)
3. After your Smartphone found the „Helicute 720P FPV“ network, connect it with your phone.
4. Is the connection established, open the App and click play. The Live Image of the camera will be transmitted.
For customer assistance, please contact us at suport@evolio.ro.

12
Declaration of conformity
Televoice Grup S.R.L., with headqurtered in Bucharest, District 1, Grigore Cobalcescu no.39 RO15005294,
J40/11378/2002, declare on own responsability, this product Evolio iFly One HD solded in Romania :
Brand: Evolio;
Model: iFly One HD
Commercial name: drone
The electric and electronics equipment solded by our company respect legal terms like: Decision no. 1022/2002,
H.G. 497/2003 (electromagnetical compatibility), H.G. 457/2003, modified by decision 1514/2003 (about consumer
safety with electric equipment ) and all normative acts, H.G. 992/2005 (about limited uses of dangerous substances),
H.G. 448/2005 about prevention of wastes electrical and electronic equipment) and UE Directives 2002/95/CE,
1999/5/EC.
The product was evaluated according with the following terms, mentioned in annex II a H.G. 88/2003: EN
62479:2010, EN 60950-1:2006 + A11:2009 + A1:2010 + A12:2011, EN 301 489-1, EN 301 489-17, EN 300 328.
All documents of the evaluations received from the manufacturer, are stored at our company headquarters. The all
products have inscription CE.
The products warranty are in conformity with O.G. 21/1992, Law 449/2003,Law 296/2004 and O.U.G 174/2008,
about consumer protect.
Liviu Nistoran

13
Table of contents
Other Evolio Drone manuals