Evolution Aqua eaProSump Series Quick guide

INSTALLATION AND INSTRUCTION MANUAL
Evolution Aqua Ltd. - Evolution House - Kellet Close - Wigan - Lancashire - United Kingdom - WN5 0LP
UK
English
EAPROSUMP10508161MAN
IMPORTANT
Never attempt to clean glass sumps with a sharp,
blade-like object as this may damage the silicone bond
and invalidate the warranty.

WARNING: PLEASE READ THE FOLLOWING
SAFETY INFORMATION FIRST.
DANGER: To avoid a possible electric shock, ensure all electrical devices are
switched off when carrying out maintenance. Take extra care when handling a
wet aquarium. Do not attempt repairs yourself; return the appliance to the place
of purchase for service or dispose of the appliance.
• To avoid the possibility of the appliance plug or socket
getting wet, position the aquarium cabinet and tank to
one side of a wall mounted socket to prevent water
from dripping onto the socket or plug. You should
create a “drip loop” for each cord connecting an
aquarium appliance to a socket. The “drip loop” is
that part of the cord below the level of the socket, or
the connector. Use an extension cord, if necessary,
to prevent water travelling along the cord and coming
into contact with the socket.
• Always unplug an appliance from an outlet when not in use, before putting on or taking off
parts, and before cleaning. Never pull the cord itself to remove the plug from the outlet.
Hold the plug and pull to disconnect.
• If the plug or socket does get wet, DO NOT unplug the cord. Disconnect the fuse or circuit
breaker that supplies power to the appliance. Then unplug the device and examine for presence
of water in the socket.
• Close supervision is necessary when any appliance is used by or near children.
• Do not use an appliance for anything other than its intended use. The use of attachments not
recommended or sold by the appliance manufacturer may cause an unsafe condition.
• Do not install or store the appliance where it will be exposed to the weather or to temperatures
below freezing point.
• Make sure an appliance mounted on a tank is securely installed before operating it.
Read carefully all the important notices on the appliance and the corresponding instruction manual.
NOTE: A cord rated for less amperes or watts than the appliance rating may overheat. Care should
be taken to arrange the cord so that it cannot be tripped over or pulled accidentally.
IMPORTANT: NEVER ATTEMPT TO CLEAN THE AQUARIUM WITH A SHARP,
BLADE-LIKE OBJECT AS THIS MAY DAMAGE THE SILICONE BOND AND INVALIDATE
THE WARRANTY.
DRIP LOOP

3
380mm
400mm
500mm
FRONT OF SUMP
REAR OF SUMP
BAFFLE A
MOVEABLE
BAFFLE
PLATE A
MOVEABLE
BAFFLE
PLATE B
BAFFLE B
PANEL C
• 500mm (l) x 380mm (w) x 400mm (h)
• 2 x 2 chamber layout
• 6mm outer glass
• 8mm inner divider glass
• Blue acrylic adjustable baffles
• Top-up chamber volume = 17 Litres
400mm
400mm WIDE
GLASS
THICKNESS = 6mm
GLASS
THICKNESS = 6mm
GLASS
THICKNESS = 8mm
GLASS THICKNESS = 6mm
EVOLUTION AQUA - Standalone Sump Medium
240mm
INTERNAL DIMENSIONS
EXTERNAL DIMENSIONS
EXTERNAL DIMENSIONS
240mm
INTERNAL DIMENSIONS
500mm
FRONT VIEW SIDE VIEW
EXTERNAL DIMENSIONS
400mm
500mm WIDE
GLASS
THICKNESS = 6mm
GLASS
THICKNESS = 6mm
GLASS
THICKNESS = 8mm
180mm
INTERNAL DIMENSIONS
EXTERNAL DIMENSIONS
EXTERNAL DIMENSIONS
180mm
INTERNAL DIMENSIONS
368mm
INTERNAL DIMENSIONS
380mm
EXTERNAL DIMENSIONS
BAFFLE B
Moveable
Plate B
Moveable
Plate A
BAFFLE A
PANEL C

• 800mm (l) x 380mm (w) x 400mm (h)
• 4 chamber linear layout
• 6mm outer glass
• 8mm inner divider glass
• Blue acrylic adjustable baffles
• Top-up chamber volume = 21.7 Litres
380mm
400mm
800mm
FRONT
BACK
250mm 150mm
400mm
380mm WIDE
GLASS
THICKNESS = 6mm
GLASS
THICKNESS = 6mm
GLASS
THICKNESS = 6mm
GLASS
THICKNESS = 8mm
GLASS
THICKNESS = 8mm
GLASS THICKNESS = 6mm
Standalone Sump Large
BAFFLE A
MOVEABLE PLATE
MOVEABLE PLATE
BAFFLE B
Reservoir
INTERNAL DIMENSIONSINTERNAL DIMENSIONS
150mm
19mm
113mm 10mm 48mm
18.5mm
7mm
58.5mm 113mm 10mm7mm
216mm
INTERNAL DIMENSIONSINTERNAL DIMENSIONS
EXTERNAL DIMENSIONS
EXTERNAL DIMENSIONS
800mm
EXTERNAL DIMENSIONS
4

INSTALLATION
ALL AQUARIUM CABINETS MUST BE PLACED ON A STRONG, LEVEL CONCRETE
FLOOR, AND MUST BE PERFECTLY LEVEL AND POSITIONED BEFORE FITTING
A GLASS SUMP. AN UNEVEN FLOOR WILL CAUSE STRESS TO THE CABINET,
AQUARIUM AND SUMP WHEN FILLED WITH WATER.
INSTALLING THE SUMP
The sump comes fitted with protective mat. Do not remove this mat. When used with
eaReef aquariums, it is advisable to position the sump with the skimmer chamber on
the left hand side as you look into the cabinet.
Be careful not to touch the metal cabinet hinges with the glass sump as damage
may occur.
Push the sump to the back of the cabinet and centre it within the space left to right.
SUMP - FITTING ADJUSTABLE BAFFLE PLATES
The eaProSumps are supplied with adjustable baffle plates. If they are not already
factory fitted, it is a straight forward installation process.
IMPORTANT: HAND TIGHTEN NUTS AND SCREWS ONLY - NEVER USE TOOLS
Using the 4 plastic screws and nuts provided, simply fit the adjustable baffles into
position and thread the screws through the open sections in the baffle plates and
tighten the nut on the opposite side. The plates can be fitted to either side of the glass
dividers.
Level the plate by adjusting the screws to level the plate and re-tighten when happy.
Unscrew and re-screw the nuts to vary the baffle plate heights.
IMPORTANT: HAND TIGHTEN NUTS AND SCREWS ONLY - NEVER USE TOOLS
5

USING THE ADJUSTABLE BAFFLES
Most closed reef systems employ the use of a protein skimmer in their sumps. Every protein
skimmer manufacturer, and model, recommend a different optimum water height for it to run
in, which may cause problems with conventional fixed baffle glass sumps.
One way is for the manufacturer or tank builder to take an average sump running height of
say 200mm, but with recommendations varying between 150mm and 250mm or more, for
some makes and models this average can be far from ideal.
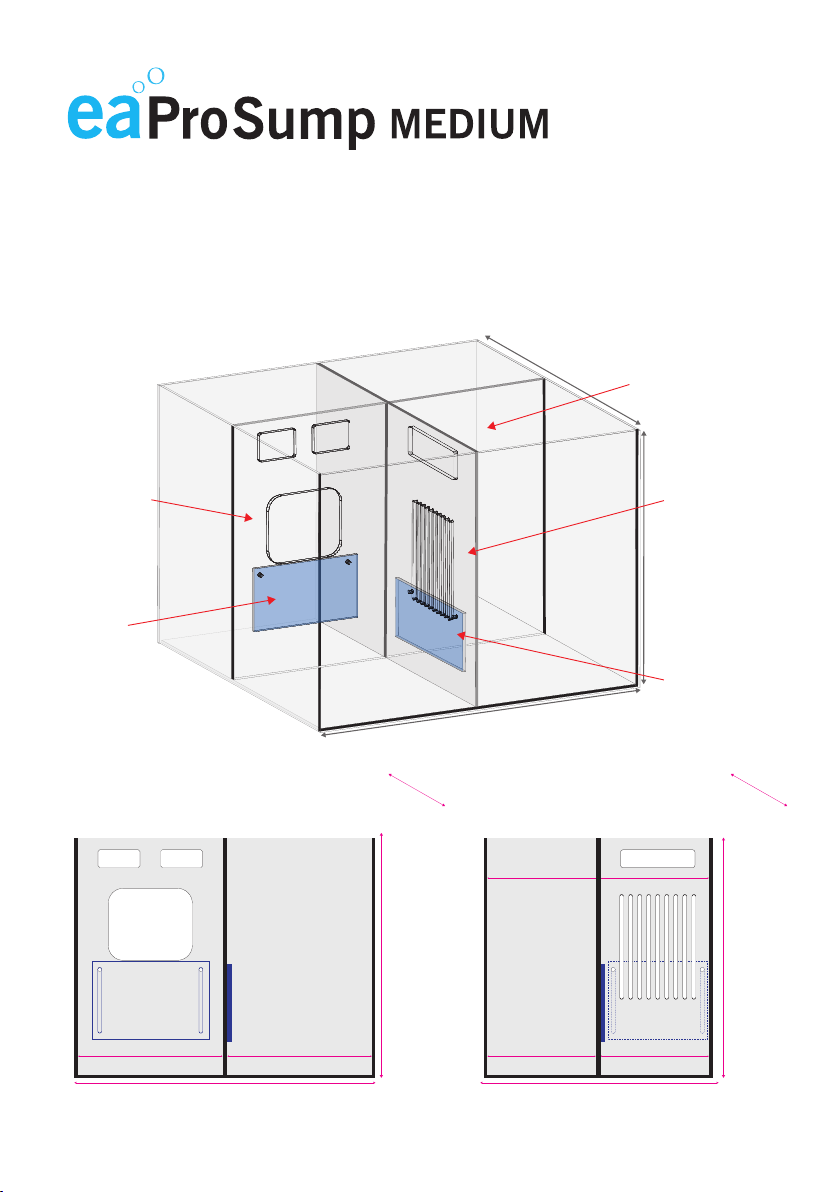
eaProSumps employ a clever system of moveable height baffles, enabling the user to set the
baffle height in the sump to exactly what their skimmer model needs for best performance.
By employing the same methodology in the second sump chamber, water level can be raised
there too, to best accommodate filters, reactors or algae refugiums, and raised either single or
in tandem, the water volume in the sump can be increased and set by the user.
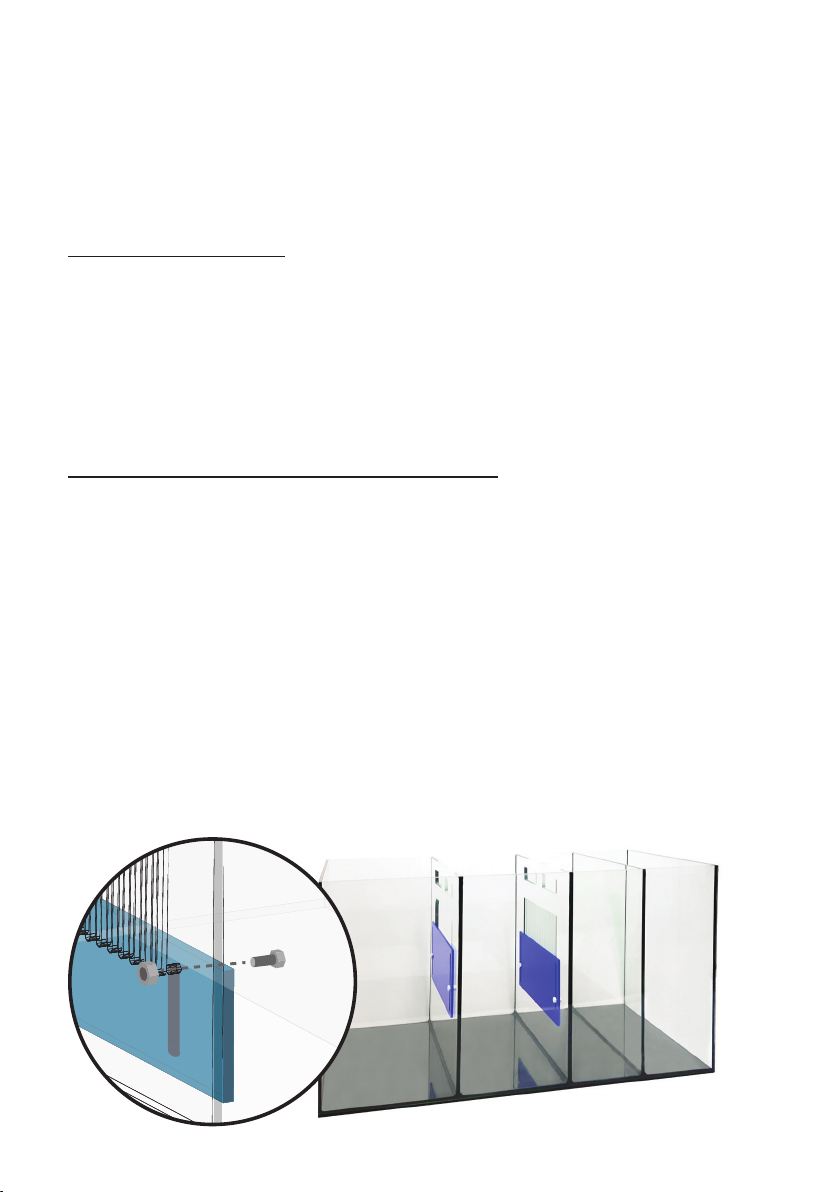
Adjusting the height
To raise the adjustable baffles simply slide them up, firmly, by hand. To make sure they
stay in place simply tighten the plastic nuts and bolts by hand. Don’t overtighten as they will
break. To lower the baffles simply slide them down and again tighten the nuts and bolts.
Left or right?
Every eaProSump comes complete with two blue acrylic baffles and these can be fitted either
on the left or right of the glass partitions.
What height to set it at?
The eaPro Sump is designed so that at its lowest setting, water depth in the (first) skimmer
chamber will be 190mm. Vertical height adjustment from 190-250mm water depth should
accommodate every sump based, home aquarium protein skimmer on the market, and
skimmer manufacturers should state the optimum water depth in their literature. The right
water level will mean the skimmer can produce the maximum amount of bubbles for the least
effort, meaning more efficient skimming.
When is a baffle too high?
Baffle height adjustment is an advanced reefkeeping feature, a certain amount of experience,
knowledge and common sense is assumed by the user. If the baffles are moved up to their
highest position and a high water flow-through is used water may back up, risking flooding.
If both baffles are operated at their highest position and large sump based skimmers and
reactors are used, the system must first be power-cut tested, to ensure it won’t flood. Not
only will the sump be holding more water before the power-cut, it will then also receive more
water from the weir above, and from the skimmer and reactor bodies as they empty.
All users should fully flood test their sumps by turning off all power after any baffle height
adjustment.
6

WARRANTY
Evolution Aqua warrants your product against defects in materials and workmanship for a
period of 12 months, valid from the date of original purchase and will repair this product
free of charge (not including shipping costs) with new / rebuilt parts.
The guarantee DOES NOT APPLY in case of improper use, negligence, lack of maintenance
or accidental damage to the sump, aquarium, cabinet or third party equipment used in
conjunction with the sump. Damage to the sump and / or aquarium glass is not included in
the warranty. Damage to the silicone caused by incorrect cleaning, such as using a sharp
object to clean the glass, will also invalidate the warranty.
The pre-condition for the warranty is that the stipulated set-up routine is observed.
In the event that a problem develops with this product during or after the warranty period,
contact the retailer from whom you originally purchased the item from. The retailer will then
liase with Evolution Aqua Ltd to organise for the warranty procedure to be undertaken.
The warranty is extended only to the original purchaser.
Proof of date of purchase will be required before any warranty work can be carried out.
This warranty only covers failures due to defects in materials or workmanship which
occur during normal use. It does not cover damage which occurs in shipment or failures
which result from misuse, abuse, neglect, improper installation, operation, mishandling,
misapplication, alteration, modification or service by anyone other than an authorised
Evolution Aqua dealer.
Evolution Aqua shall not be liable for incidental or consequential damages resulting from
the use of this product, or arising out of any breach of this warranty. All express and
implied warranties, including the warranties of saleability and fitness for particular purpose,
are limited to the applicable warranty period set forth above.
The installation and use of your product outside of our recommendations as printed in this
manual may also void the warranty.
These statements do not affect the statutory rights of the consumer.

Evolution Aqua Ltd
Evolution House, Kellet Close
Wigan, Lancashire,
United Kingdom
WN5 0LP
t: +44 (0) 1942 216554
f: +44 (0) 1942 418489
w: www.evolutionaqua.com
This manual suits for next models
2
Table of contents