manuals.online logo
Brands
  1. Home
  2. •
  3. Brands
  4. •
  5. Excel
  6. •
  7. Door Opening System
  8. •
  9. Excel XL8000 Series User manual

Excel XL8000 Series User manual

XL8000 Series
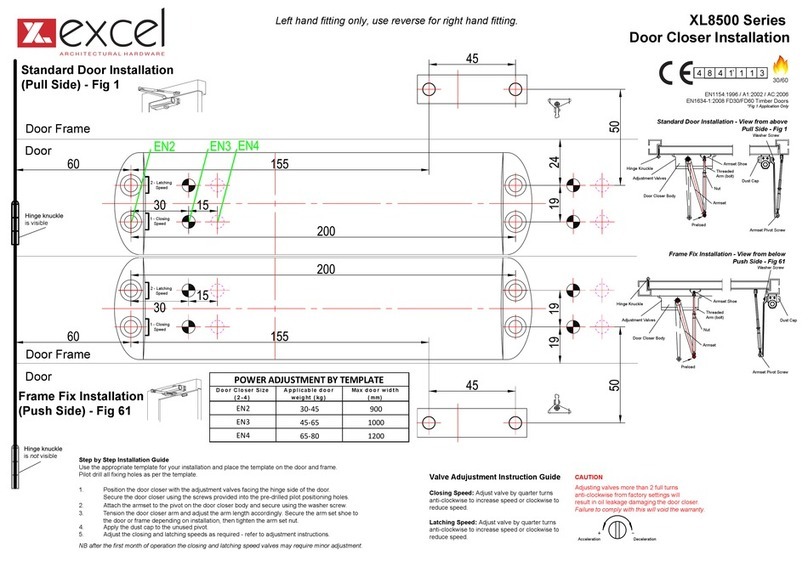
Door Closer Installation
Left hand fitting only, use reverse for right hand fitting.
Standard Door Installation (Pull Side) - Fig 1
Hinge knuckle
is visible
Door Frame
Door
2 - Latching Speed
Adjustment Valves
1 - Closing Speed
Door Closer Body
Armset Shoe
Frame Fix Installation (Push Side) - Fig 61
Hinge knuckle
is not visible
Door Frame
Door
Adjustment Valves
2 - Latching Speed2 - Latching Speed
1 - Closing Speed1 - Closing Speed
Door Closer Body
Armset Shoe
180 degree
door installation
120 degree
door installation
Step by Step Installation Guide
Use the appropriate template for your installation and place
the template on the door and frame. Pilot drill all fixing holes
as per the template.
1. Position the door closer with the adjustment valves facing
the hinge side of the door. Secure the door closer using
the screws provided into the pre-drilled pilot positioning
holes.
2. Attach the armset to the pivot on the door closer body and
secure using the washer screw.
3. Tension the door closer arm and adjust the arm length
accordingly. Secure the arm set shoe to the door or frame
depending on installation, then tighten the arm set nut.
4. Apply the dust cap to the unused pivot.
5. Adjust the closing and latching speeds as required -
refer to adjustment instructions.
NB after the first month of operation the closing and latching
speed valves may require minor adjustment.
Standard Door Installation - View from above
Pull Side - Fig 1
Washer Screw
Dust Cap
Armset Pivot Screw
Hinge Knuckle
Adjustment Valves
Door Closer Body
Preload
Armset
Nut
Threaded
Arm (bolt)
Armset Shoe
Frame Fix Installation - View from below
Push Side - Fig 61
Hinge Knuckle
Adjustment Valves
Door Closer Body
Preload
Armset
Nut
Threaded
Arm (bolt)
Armset Shoe
Washer Screw
Armset Pivot Screw
Dust Cap
4 8 3 1 1 3
EN1154:1996 / A1:2002 / AC:2006
EN1634-1:2008 FD30/FD60 Timber Doors
*Fig 1 Application Only
30/60
C
180 degree
door installation
120 degree
door installation
CAUTION
Adjusting valves more than 2 full turns
anti-clockwise from factory settings will
result in oil leakage damaging the door closer.
Failure to comply with this will void the warranty.
Acceleration Deceleration
Valve Adujustment Instruction Guide
Closing Speed: Adjust valve by quarter turns
anti-clockwise to increase speed or clockwise to
reduce speed.
Latching Speed: Adjust valve by quarter turns
anti-clockwise to increase speed or clockwise to
reduce speed.
Step by Step Installation Guide
Use the appropriate template for your installation and place
the template on the door and frame. Pilot drill all fixing holes
as per the template.
1. Position the door closer with the adjustment valves facing
away from the hinge side of the door. Secure the door closer
and bracket using the screws provided into the pre-drilled
pilot positioning holes.
2. Remove the shoe from the door closer arm.
3. Attach the armset to the pivot on the door closer body parallel
to the door/frame and secure using the washer screw.
4. Tension the door closer arm and adjust the arm length
accordingly. Secure the arm to the figure 66 bracket and tighten
the arm set nut.
5. Add the dust cap to the unused pivot.
6. Adjust the closing and latching speeds as required -
refer to adjustment instructions.
NB after the first month of operation the closing and latching
speed valves may require minor adjustment.
Key
1. Armset Pivot Screw
2. Armset
3. Nut
4. Adjustment Valves
5. Threaded Arm (Bolt)
6. Parallel Bracket (Figure 66)
7. Door Closer Body
8. Dust Cap
9. Washer Screw
10. Assembling Screw
1 2 3 4 5 6 7 8 9 10
45˚ Preload
Parallel Arm Installation
(Push Side) - Fig 66
Door Closer Body
Adjustment Valves
2 - Latching Speed
1 - Closing Speed
Parallel
Arm Bracket
Hinge knuckle
is not visible
Door Frame
Door
XL8000 Series
Door Closer Installation
4 8 3 1 1 3
EN1154:1996 / A1:2002 / AC:2006
EN1634-1:2014 FD30/FD60 Timber Doors
*Fig 1 Application Only
30/60
C
Right hand fitting only, use reverse for left hand fitting.
Parrallel Arm Installation - View from above
Push Side - Fig 66
CAUTION
Adjusting valves more than 2 full turns
anti-clockwise from factory settings will
result in oil leakage damaging the door closer.
Failure to comply with this will void the warranty.
Acceleration Deceleration
Valve Adujustment Instruction Guide
Closing Speed: Adjust valve by quarter turns
anti-clockwise to increase speed or clockwise to
reduce speed.
Latching Speed: Adjust valve by quarter turns
anti-clockwise to increase speed or clockwise to
reduce speed.

Other Excel Door Opening System manuals

Excel XL8800 Series User manual

Excel

Excel XL8800 Series User manual

Excel XL8500 Series User manual

Excel

Excel XL8500 Series User manual

Excel Encasa 207-001-10 User manual

Excel

Excel Encasa 207-001-10 User manual

Popular Door Opening System manuals by other brands

DELTA DORE TYXAL+ DO BR installation guide

DELTA DORE

DELTA DORE TYXAL+ DO BR installation guide

CAME SIPARIO1 Assembly and installation manual

CAME

CAME SIPARIO1 Assembly and installation manual

Assa Abloy Norton 7700ST installation instructions

Assa Abloy

Assa Abloy Norton 7700ST installation instructions

GEZE ECturn Original operating instructions

GEZE

GEZE ECturn Original operating instructions

Assa Abloy Corbin Russwin PED5800 Series installation instructions

Assa Abloy

Assa Abloy Corbin Russwin PED5800 Series installation instructions

WITTUR WSE 81 PLUS Series Installation sheet

WITTUR

WITTUR WSE 81 PLUS Series Installation sheet

Fireco Dorgard X2 Fitting and Operating Guide

Fireco

Fireco Dorgard X2 Fitting and Operating Guide

Cavity Sliders SofStop installation instructions

Cavity Sliders

Cavity Sliders SofStop installation instructions

Lamp FD30EX installation manual

Lamp

Lamp FD30EX installation manual

4Ddoors 4DR1 v4 Installation instructions and owner's manual

4Ddoors

4Ddoors 4DR1 v4 Installation instructions and owner's manual

B.M.P. DYNAMICROLL FOOD INOX operating instructions

B.M.P.

B.M.P. DYNAMICROLL FOOD INOX operating instructions

CRL JACKSON 300 Series installation instructions

CRL

CRL JACKSON 300 Series installation instructions

Micom 2ES ALE instruction manual

Micom

Micom 2ES ALE instruction manual

Record 5100 Series manual

Record

Record 5100 Series manual

DoorHan DH1500 user manual

DoorHan

DoorHan DH1500 user manual

SDC EP493 installation instructions

SDC

SDC EP493 installation instructions

Sargent ASSA ABLOY 3727 Series Instructions for installing

Sargent

Sargent ASSA ABLOY 3727 Series Instructions for installing

Siemens SIRIUS 3RV2926-0B Original operating instructions

Siemens

Siemens SIRIUS 3RV2926-0B Original operating instructions

manuals.online logo
manuals.online logoBrands
  • About & Mission
  • Contact us
  • Privacy Policy
  • Terms and Conditions

Copyright 2025 Manuals.Online. All Rights Reserved.