Extralite Hyper JR + User manual
H y p e r J R+
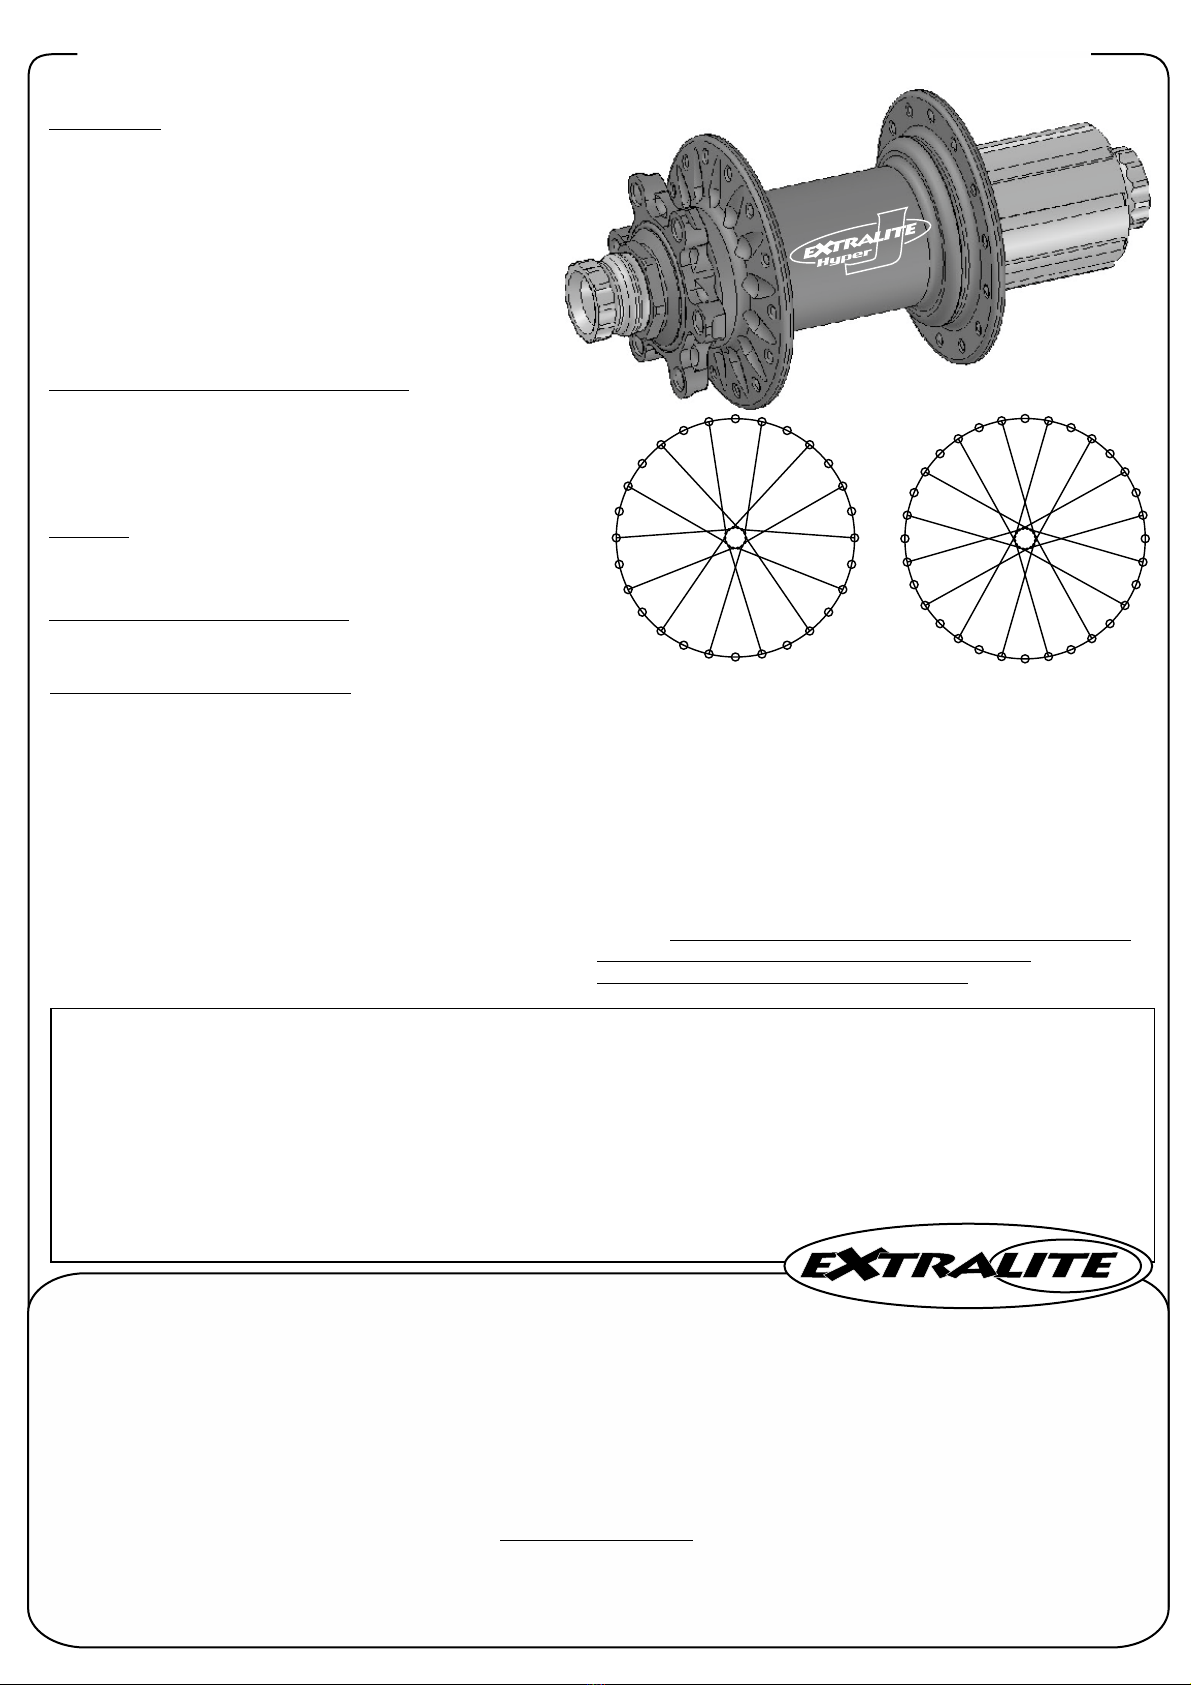
Features
Hyper JR offers unique features like low friction external OR and
lip seals, front engagement freewheel system, multishaped
oversized axle, top quality sealed ball bearings, Micro-Tuner
bearing preload system, “hart coat” anodized cassette body
and axle ends.
Bearings: 2x 6903 2RS (hub body) and 2X 6803 2RS (freewheel).
Use it proper care and its absolute performance will last for
years. This manual provides the informations needed for the set
up and the basic cleaning-lubing-maintenance.
Sealing HyperRear hub features low friction Lip Seal and external OR seals. However, since it is impossible to completely seal a
hub and still have it spin freely, with use water/moisture can get in.
Guideline Periodically clean hub internals (every 6-12 months in normal and dry conditions, every 3 months in wet conditions
and always before leaving the wheel un-used for more than 1 month) see Level1 instructions next page.
Never use high-pressure spray washing directly on hubs. Clean hubs externally with warm water and soap.
WARNINg Un-correct greasing and/or maintenance of freewheel mechanism can lock and destroy it!
WARNING Even small debris inside freewheel engagement can damage mechanism permanently.
WARNING Water and moisture stagnant inside hub can permanently damage bearings.
Bearing preload set-up:
Optimal bearing preload is important for a long bearing life.
Micro Tuner comes pre-adjusted from the factory. Do not
modify its position if not necessary.
Checking
Before modifying bearing preload carefully check the
complete wheel as follows:
1) Install wheel into dropouts and normally lock skewer.
2) Check there is no play at rim diameter.
3) Leave wheel free to completely stop spinning and carefully
control latest instants of movement. Stopping should be very
smooth.
Preload Tuning
If necessary fine tune as follows.
1) Install wheel into dropouts and normally lock skewer.
2) If you feel play at the rim turn in Micro-Tuner (clockwise). Use a
21mm wrench, very delicate torque and manners.
3) Unscrew Micro-Tuner for ca 1/4 of turn to release excessive preload
on bearing balls and achieve max rolling smoothness.
4) Repeat Preload Checking and eventually slightly correct it.
5) The optimal bearing preload cancels play at the rim without
affecting rolling smoothness.
Warning Incorrect bearing preload can bring to serious damages:
- Too tight --> bearings damage and premature wear
- Too loose -->permanent freewheel damage
Dimension for wheel building
Spoke hole Ø: 2.5mm
Right flange drilling Ø: 55.6mm
Disc flange drilling Ø: 55.6mm
Center to right flange: 23mm
Center to disc flange: 35mm
Lacing
See www.extralite.com to find spoke lengths.
Respect 28h or 32h lacing patterns (see drawings).
maximum spoke tension:
Drive side 130kgf
Disc side 90kgf
135mm / 142mm / XD Drive / Shimano
Extralite Limited Warranty
Extralite products are warranted against defects in materials and/or workmanship for a period of two years from original date of purchase to the original o w n e r o n l y.
Any Extralite product that is returned and found by Studio Riva to be defective in materials and/or workmanship will be repaired or replaced at the sole discretion of Studio
Riva. This warranty is the sole and exclusive remedy. Studio Riva shall not be held liable for any indirect, special or consequential damages. The warranty is expressly limited
to repair or replacement of the product that has been returned and found to be defective by Studio Riva and are the sole remedy of the warranty. No credits or refunds
will be issued.
The warranty does not cover: normal wear, tear and fatigue; damage or failure due to accident or collision. Improper assembling, poor maintenance, alterations or
modifications, installation of parts not compatible with Extralite products void this warranty. Warranty does not cover damage arising from crash, abuse and/or misuse or
any other circumstances in which the product had been subjected to forces or loads beyond its design.
Immediately replace the component after crash and violent shock, or after continuos heavy use.
Improper use, modification and/or part changing, including surface finishing, could irreparably damage the component.
All labor charges for warranty service are responsibility of the product owner.
INSTALLATION WARNING:
Extralite components are extremely performing and lightweight, crafted with very high quality, they request adequate installation and maintenance care. We strongly
recommended that a professional bike shop install and service your Extralite components.
Improper assembly and/or adjustment may significantly compromise strength and durability of the component causing serious personal injury.
Carefully check proper tightening torque of every bolt. Always respect installation recommendations.
Extralite components are designed for a specific use X-Country or Road or Downhill, respect product specific destination.
Note: the rider assumes all the risks regarding use and installation of Extralite components.
28H 32H

Right Axle End
9-10 Nm
Bearing Spacer
Axle Assembly
External OR 27x1.5
Left Axle End
Micro Tuner
Hub Body Freewheel Body
Lip Seal
Floating Ring
Springs
Freewheel
Engagement Teeth
Studio Riva engineering - Tel: ++39-0371-203059
info@extralite.com - www.extralite.com
135mm Axle End
5mm hex wrench
142mm Axle End
17mm closed wrench
Internal Splines
Lube with Oil,
Warning: do not
apply grease
HypeHubs Maintenance (level 1) Complete cleaning
Follow maintenance steps on a clean and well illuminated table since you’ll have to handle
tiny springs and delicate parts.
Even small debris can compromise freewheel engagement mechanism.
Water and moisture stagnant inside hub will damage bearings in few weeks.
Disassembling
1) Hold Left Axle End with a 17mm closed wrench (5mm hex wrench for 135mm).
2) Unscrew Right Axle End with another 17mm closed wrench (5mm hex wrench for 135mm).
3) Pull Freewheel Body and remove it.
4) Extract Bearing Spacer.
5) Remove Lip Seal from Hub Body.
6) Remove Floating Ring from Hub Body, you’ll find 3 tiny springs on its back side.
7) Push out Axle Assembly and completely extract it from disc side.
Cleaning
8) Clean all parts (Do not use aggressive solvents).
9) Clean very carefully Internal Splines, Floating Ring and Freewheel Teeth.
Hubshell Splines Check - IMPORTANT!
Once hub-shell internal is perfectly clean check well that every spline
corner (clockwise corners) is still well square and flat.
In case your hub has worn-out splines and you are not sure about it
contact us providing clear close-up photo. info@extralite.com
Potential risk
When riding HyperHubs with dirt inside the hard particles of sand can
badly grind the hubshell splines. Shortly the sand wears the hub-shell
splines till the "floating ring" will not move freely anymore. This easily
causes an uncomplete freewheel engagement and damages
permanently the newly installed freewheel parts. In this case replacing
"floating ring" and/or "Freewheel body" does not solve. The expensive
hub-shell should be replaced (or eventually sent back for re-
sharpening).
For more detailed information check HyperHubs Tips on extralite.com
Lubrification and reassembling
Warning: use only very soft density grease as original Alugrease Super.
Never use medium-dense or sticky grease since can slow down Floating Ring
movement, this can destroy the freewheel mechanism! Chemical additives may
damage O-rings and Lip Seal.
10) Grease Axle on bearing contact areas.
11) Fill up Micro Tuner internal face with soft grease.
12) Insert Axle Assembly from disc side.
13) Insert Bearing Spacer.
14) Oil Internal Splines of Hub Body with 1cc w10-40 motor oil, do not apply grease here.
15) Apply a minimal amount of grease into spring fitting holes on Floating Ring back
side, then carefully insert the 3 springs.
16) Insert Floating Ring into Hubshell Internal Splines.
17) Fully snap in Lip Seal (uncomplete/unaligned inserting voids its seal function).
18) Check again that the 3 springs are in their correct position.
19) Check that Floating Ring moves freely and quickly (press and release).
20) Apply 1cc of soft grease onto Freewheel Engagement Teeth.
21) Insert Freewheel, do not pinch Lip Seal.
22) Tighten Right Axle End at 9-10 Nm.
23) Check Preload Tuning (see chapter).
24) Install External OR (27x1.5 oiled) between Micro Tuner and bearing.
Grease
OIL
Table of contents
Other Extralite Bicycle Accessories manuals

Extralite
Extralite The Post UL2 User manual

Extralite
Extralite CyberRear SP-T User manual

Extralite
Extralite CyberFront SPD User manual

Extralite
Extralite HyperRear2 User manual

Extralite
Extralite CyberRear SPD3 User manual

Extralite
Extralite HyperBoost3 R User manual

Extralite
Extralite CyberRear SL 2 User manual


