Extralite Limited Warranty
Extralite products are warranted against defects in materials and/or workmanship for a period of two years from original date of purchase to the original o w n e r o n l y.
Any Extralite product that is returned and found by Studio Riva to be defective in materials and/or workmanship will be repaired or replaced at the sole discretion of Studio
Riva. This warranty is the sole and exclusive remedy. Studio Riva shall not be held liable for any indirect, special or consequential damages. The warranty is expressly limited
to repair or replacement of the product that has been returned and found to be defective by Studio Riva and are the sole remedy of the warranty. No credits or refunds
will be issued.
The warranty does not cover: normal wear, tear and fatigue; damage or failure due to accident or collision. Improper assembling, poor maintenance, alterations or
modifications, installation of parts not compatible with Extralite products void this warranty. Warranty does not cover damage arising from crash, abuse and/or misuse or any
other circumstances in which the product had been subjected to forces or loads beyond its design.
Immediately replace the component after crash and violent shock, or after continuos heavy use.
Improper use, modification and/or part changing, including surface finishing, could irreparably damage the component.
All labor charges for warranty service are responsibility of the product owner.
INSTALLATION WARNING:
Extralite components are extremely performing and lightweight, crafted with very high quality, they request adequate installation and maintenance care. We strongly
recommended that a professional bike shop install and service your Extralite components.
Improper assembly and/or adjustment may significantly compromise strength and durability of the component causing serious personal injury.
Carefully check proper tightening torque of ever y bolt. Always respect installation recommendations.
Extralite components are designed for a specific use X-Country or Road or Downhill, respect product specific destination.
Note: the rider assumes all the risks regarding use and installation of Extralite components.
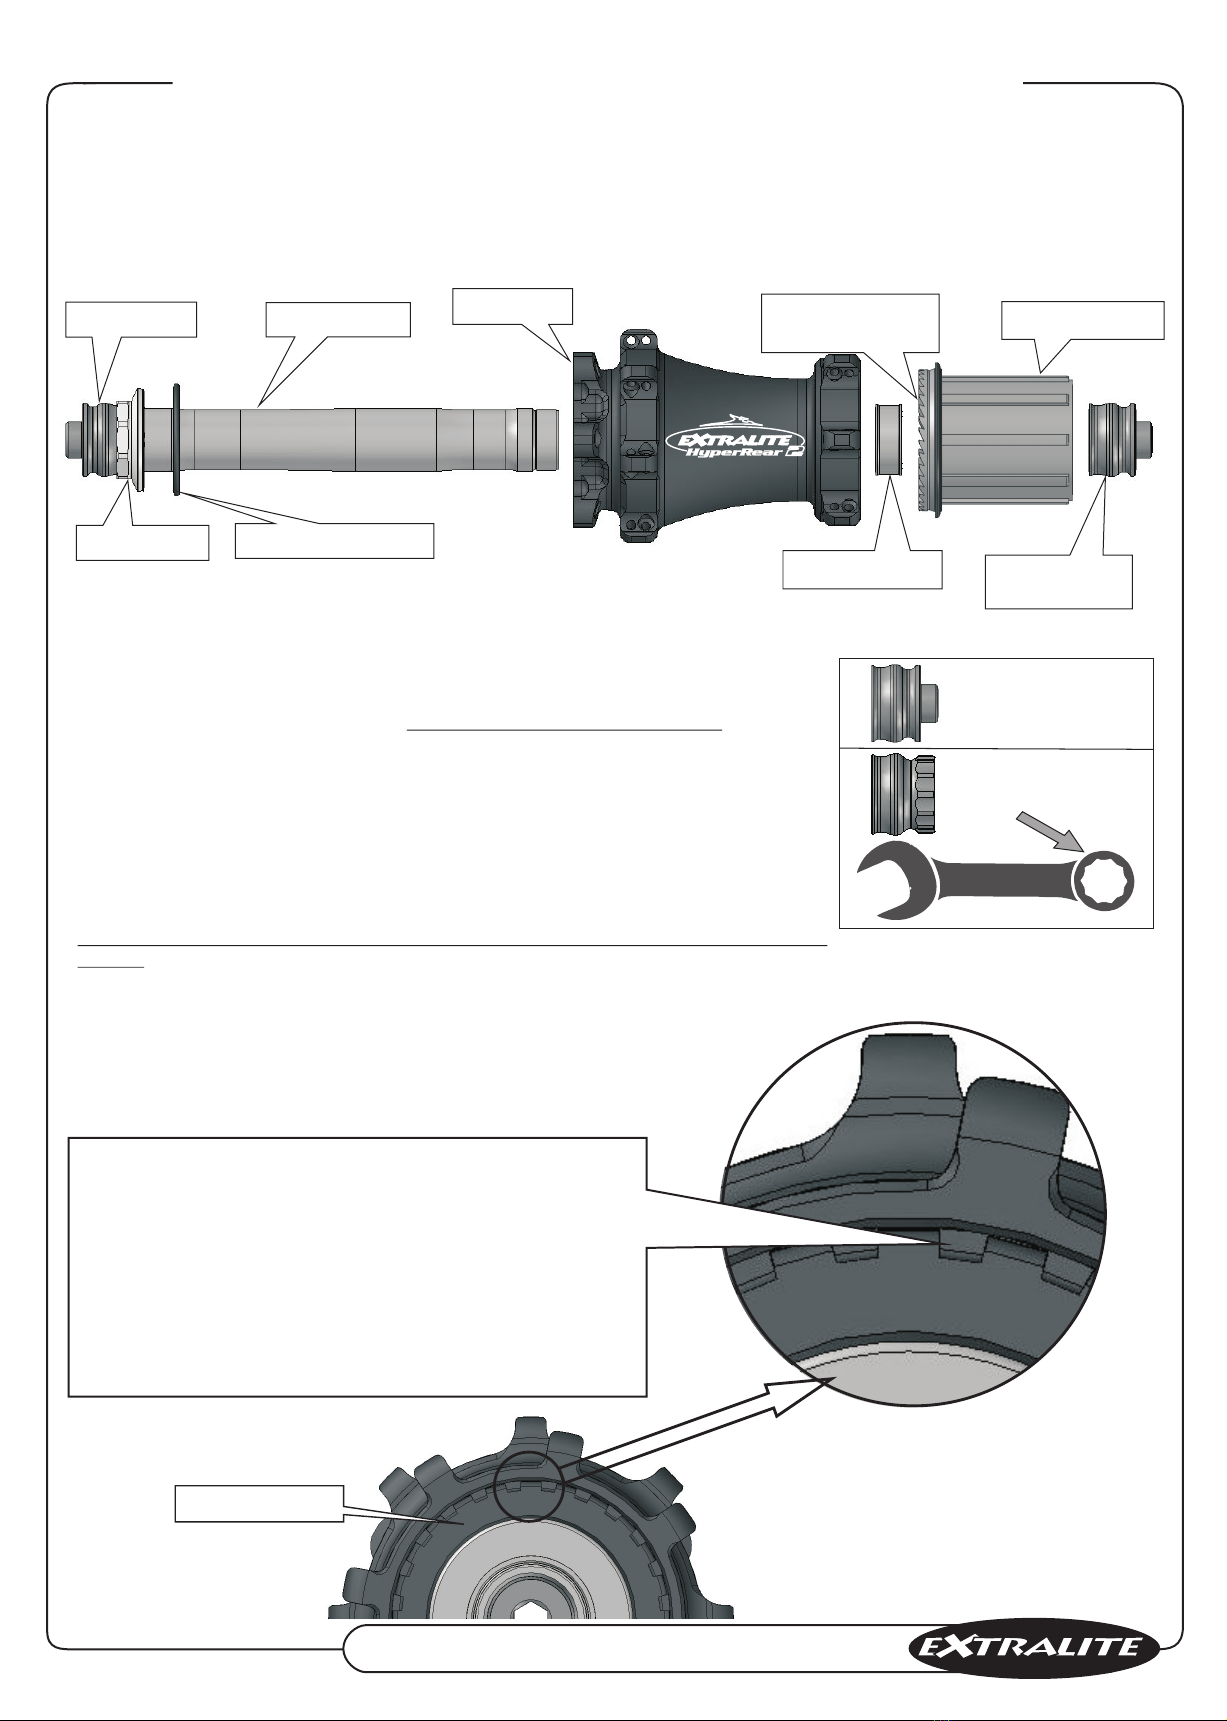
Right Axle End
9-10 Nm
Bearing Spacer
Axle Assembly
External OR 27x1.5
Left Axle End
Micro Tuner
Hub Body Freewheel Body
Freewheel
Engagement Teeth
Lubrification and reassembling
Warning: use only very soft density grease as original Alugrease
Super1
Medium-dense or sticky grease can lock or slow down Floating Ring
movement, this can destroy the freewheel mechanism! Chemical
additives may damage O-rings and Lip Seal.
10) Grease Axle on bearing contact areas.
11) Fill up Micro Tuner internal face with soft grease.
12) Insert Axle Assembly from disc side.
13) Insert Bearing Spacer.
14) Oil Internal Splines of Hub Body with 1cc w30-50 motor oil, do not
apply grease here.
15) Apply a minimal amount of grease into spring fitting holes on
Floating Ring back side, then carefully insert the 3 springs.
16) Insert Floating Ring (in the correct position, see notes above).
17) Fully snap in Lip Seal (uncomplete/unaligned inserting voids its seal
function).
18) Check again that the 3 springs are in their correct position.
19) Check that Floating Ring moves freely and quickly.
20) Apply 1cc of soft grease onto Freewheel Engagement Teeth.
21) Insert Freewheel without pinching Lip Seal.
22) Tighten Right Axle End at 9-10 Nm.
23) Check Preload Tuning (see chapter).
24) Install External OR (27x1.5 oiled) between Micro Tuner and bearing.
Lip Seal
Internal Splines
Lube with Oil,
Warning: do not
apply grease
Floating Ring
Springs
OIL
rease
G
Preload Tuning
If necessary fine tune as follows.
1) Install wheel into dropouts and normally lock skewer.
2) If you feel play at the rim turn in Micro-Tuner (clockwise). Use a 21
mm wrench, very delicate torque and manners.
3) Unscrew Micro-Tuner for ca 1/4 of turn to release excessive preload
on bearing balls and achieve max rolling smoothness.
4) Repeat Preload Checking and eventually slightly correct it.
5) The optimal bearing preload cancels play at the rim without
affecting rolling smoothness.
Warning Incorrect bearing preload can bring to serious damages:
- Too tight --> bearings damage and premature wear
- Too loose -->permanent freewheel damage