extronics iTAG User manual

Document Number X128910(2) (See Extronics DDM for the latest Version)
For warranty information, refer to Terms and Conditions at http://www.extronics.com
©2022 Extronics Limited. This document is Copyright Extronics limited.
Extronics reserve the right to change this manual and its contents without notice, the
latest version applies.
Operating Manual
iTAG X-Range Multicharger

2
Contents
Introduction.......................................................................................................... 3
1.1 What is inside the box? ................................................................................. 3
1.2 Nomenclature and symbols........................................................................... 4
1.3 Multicharger Rating ....................................................................................... 4
Safety Information ............................................................................................... 5
2.1 Storage of this manual................................................................................... 5
2.1 Warnings....................................................................................................... 5
2.1.1 Multicharger............................................................................................ 5
2.1.2 Wall mounting......................................................................................... 6
2.1.3 Table mounting....................................................................................... 6
Multicharger Features.......................................................................................... 7
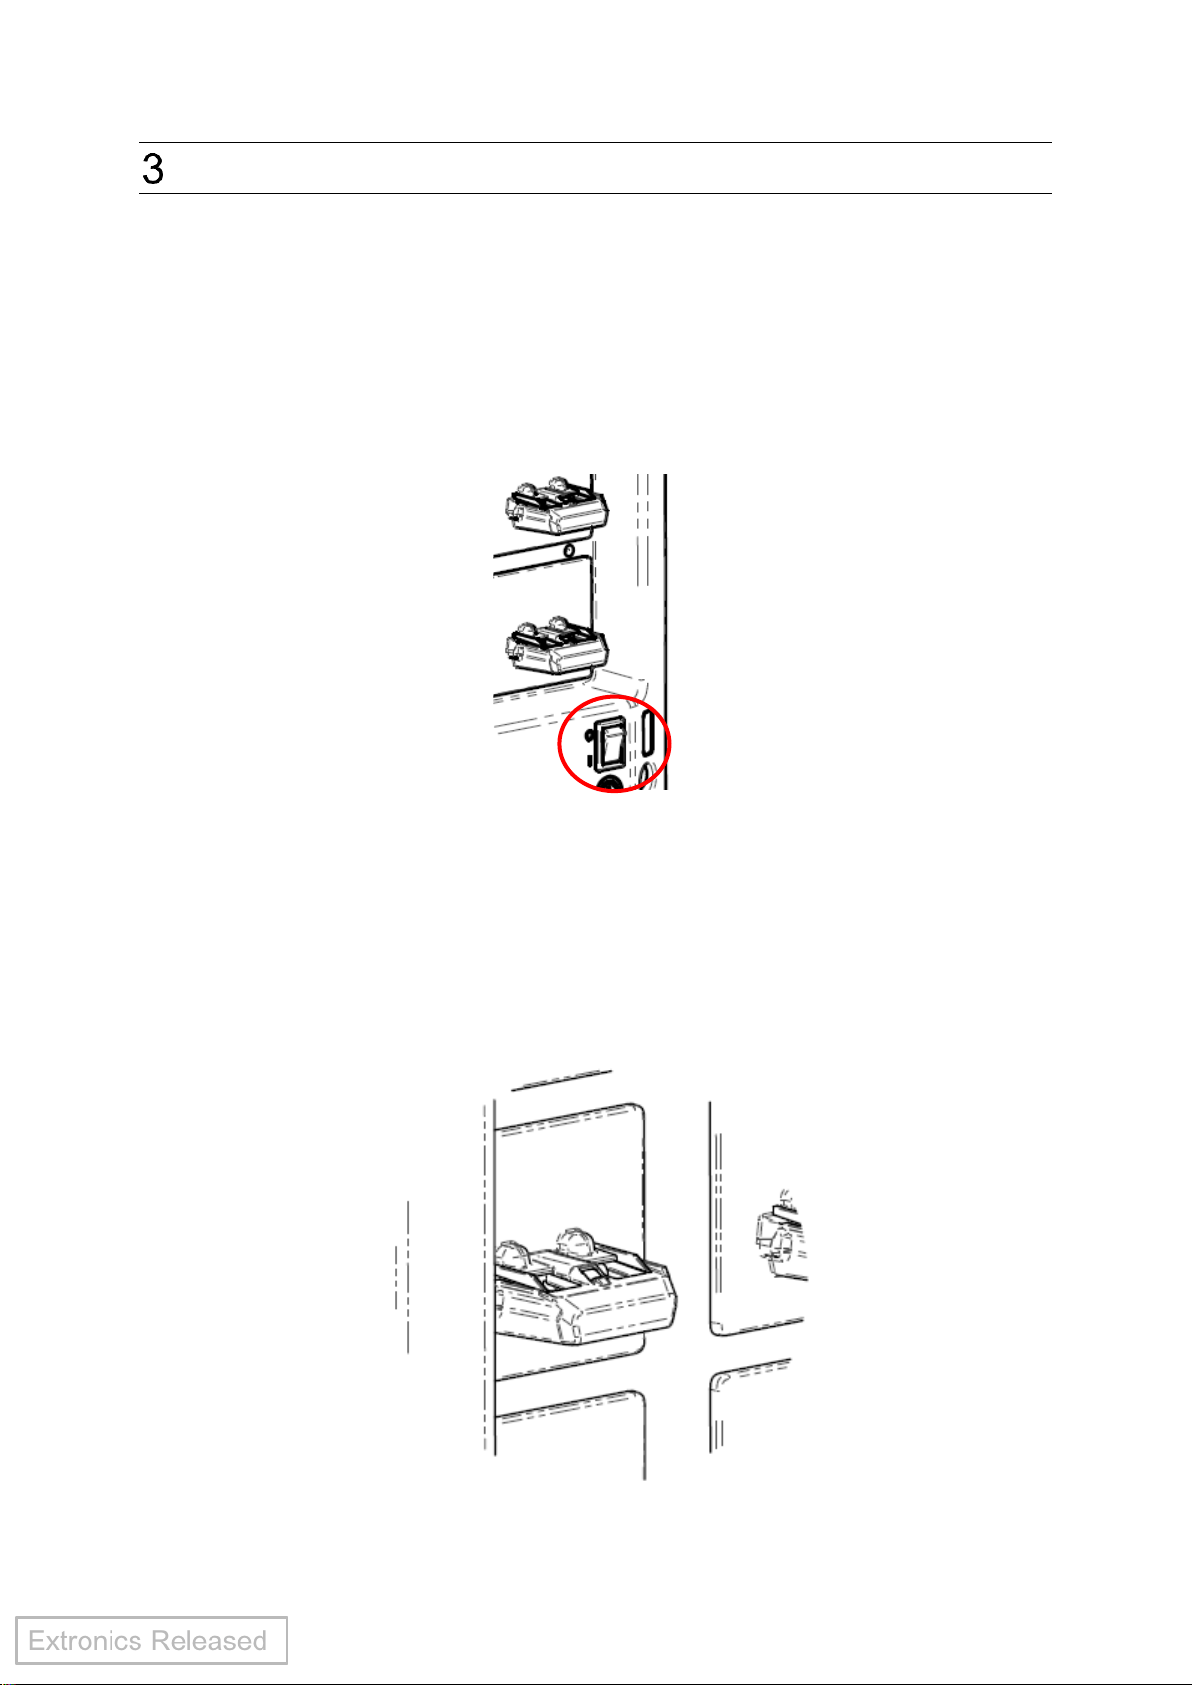
3.1 On / Off Switch .............................................................................................. 7
3.2 Charger cradles............................................................................................. 7
3.3 Fuse holder ................................................................................................... 8
3.4 Power in and daisy chain sockets.................................................................. 8
Multicharger Usage Instructions.......................................................................... 9
4.1 Before using the Multicharger........................................................................ 9
4.2 Mounting the Multicharger............................................................................. 9
4.3 Charging iTAGs............................................................................................. 9
4.4 Turning the Multicharger on or off.................................................................. 9
4.5 iTAG charging indication ............................................................................. 10
4.6 Cleaning and maintenance.......................................................................... 10
4.7 Assembly and disassembly ......................................................................... 10
4.8 Replacing the fuse....................................................................................... 10
Multicharger Wall or Table Mounting................................................................. 11
5.1 Wall Mounting.............................................................................................. 11
5.1.1 Daisy chaining Multichargers................................................................ 11
5.1.2 Installing on a wall................................................................................. 12
5.2 Table Mounting............................................................................................ 13
EU Declaration of Conformity............................................................................ 14
UKCA Declaration of Conformity....................................................................... 16
MET Declaration of Conformity ......................................................................... 18
Manufacturer..................................................................................................... 19
Appendix 1..................................................................................................... 20

3
Introduction
Thank you for purchasing the iTAG X-Range Multicharger. This document gives an
overview of the product, its features and how it is maintained. The iTAG X-Range
Multicharger (onwards called Multicharger) allows up to 10 iTAG X-Range tags to be
charged concurrently. The Multicharger is mains powered and can be daisy chained
together using the Multicharger’s power outlet reducing the number of mains power
sockets.
1.1 What is inside the box?
1 off Multicharger
1 off Mains cable
Rated at 0.5A at 230Vac and 0.75A at 110Vac
1 off Pack of wall fixings and feet
1 off Instruction Manual

4
1.2 Nomenclature and symbols
Description
Read manual
1.3 Multicharger Rating
Input: 110Vac –230Vac
110Vac 5A
230Vac 2.5A
Frequency: 50/60Hz
Output:
5Vdc 5A (10x0.5A)

5
Safety Information
2.1 Storage of this manual
Keep this user manual safe in the vicinity of the product. All persons required to work
with the product should be advised on where the manual is stored.
2.1 Warnings
2.1.1 Multicharger
Warning! Before using the Multicharger, read all instructions and cautionary
markings.
Warning! Check that the Mains cable plug is not damaged and that the cable has no
internal wires visible. Use only power cords suitable and rated for the
country of use.
Warning! Only the Extronics’ iTAG X-range of products are to be charged using the
Multicharger
Warning! Use a power source with the voltage specified on the label of the
Multicharger.
Warning! This product can be delivered in a number of different variants. Each
variant has restrictions on how it can be used. Please read the information
in this manual and on the Multicharger label fully.
Warning! Do not charge the iTAG X-Range of products in the presence of flammable
liquids or gases.
Warning! Do not expose the Multicharger to rain, snow or wet conditions.
Warning! Never carry the Multicharger by its cable or tug it to disconnect it from its
receptacle.
Warning! Before attempting any cleaning, unplug the Multicharger from the power
source.
Warning! Make sure the mains cable is located so that it will not be stepped on,
tripped over or otherwise subjected to damage or stress.
Warning! Do not operate or disassemble the Multicharger if it has received a sharp
blow, been dropped or otherwise damaged in any way. Contact Extronics
to seek advice. Incorrect use or reassembly may result in a risk of electric
shock or fire.

6
Warning! Do not use the Multicharger when the room temperature is BELOW 0oC
(32oF) or ABOVE 45oC (113oF). At cold temperatures charging may take
longer.
Warning! Do not attempt to use the Multicharger with a step-up transformer, an
engine generator or DC power receptacle.
Warning! Do not allow anything to cover or clog the Multicharger’s vents.
Warning! Never use gasoline, benzine, thinner, alcohol or the like to clean the
charger. Discoloration, deformation or cracks may result.
Warning! Only daisy chain Multichargers together. Do not daisy chain other
equipment to the Multicharger.
2.1.2 Wall mounting
Warning! Make sure to use the 4 screws for hanging the Multicharger on the wall.
Otherwise the Multicharger may fall and cause serious injury.
Warning! Always be sure that the Multicharger is unplugged and all the iTAGs are
removed from the Multicharger before performing wall mounting.
Warning! Follow the steps included in this manual and complete the whole
procedure at once. The Multicharger may fall and cause injury or damage
if you stop work part of the way through.
Warning! Check tightness of the screws on a regular basis. Otherwise the
Multicharger may fall because of loosened screws.
Warning! Carefully choose a stable wall for mounting the Multicharger. Make sure
there is no hindrance to mounting work or charging operation. The gross
weight of the Multicharger with 10 iTAGs is approximately 2.5Kg (5.5lbs).
Provide sufficient reinforcement for the wall if necessary.
2.1.3 Table mounting
Warning! Make sure that all 4 feet are adhered to the rear of the Multicharger.
Without the feet fitted, the Multicharger may slip off the table and cause
injury or damage.
Warning! Carefully choose a table for the Multicharger. Make sure there is no
hindrance to mounting work or charging operation. The gross weight of
the Multicharger with 10 iTAGs is approximately 2.5Kg (5.5lbs). Provide
sufficient reinforcement for the table if necessary.

7
Multicharger Features
3.1 On / Off Switch
The Multicharger has a convenient ON/OFF switch, Figure 3.1. In the OFF position
the Multicharger is disabled from charging the tags even though the Multicharger is still
connected to the mains socket. This switch should NOT be considered as a method
of disconnecting the Multicharger from the mains. Removing the mains power cable
ensures disconnection from the mains power. When the Multichargers are daisy
chained, turning one Multicharger off will not affect the operation of the other
Multichargers.
Figure 3.1
3.2 Charger cradles
The charger cradles are used to locate the iTAG onto the Multicharger, Figure 3.2.
Figure 3.2

8
3.3 Fuse holder
Should the fuse need replacing a fuse holder, Figure 3.3, is incorporating for simple
replacement without the need to open the Multicharger’s housing. Replace the fuse
with a good quality equivalent value. If needed check the Multicharger label for the
correct value.
Figure 3.3
3.4 Power in and daisy chain sockets
Multichargers can be daisy chained together to minimise power cables. See section 5
for further details. The daisy chain cable has an input rating of 2A at 230V and 4A at
110V. Daisy chain cables are ordered separately –See Appendix 1.
Use only appropriately rated and approved cables in accordance with the regulations
of the country it is used in.

9
Multicharger Usage Instructions
4.1 Before using the Multicharger
Please check for damage to the Multicharger and mains cable prior to use. Should
any damage be visible, do not use, and contact Extronics.
4.2 Mounting the Multicharger
For wall mounting, follow instructions in Section 5.1.
For table mounting, follow instruction in Section 5.2.
4.3 Charging iTAGs
Place the iTAG(s), up to 10 units, onto the Multicharger cradles as shown in Figure
4.3. It is not required to populate all charging slots, for safe operation, when the
Multicharger is ON.
Figure 4.3
4.4 Turning the Multicharger on or off
The Multicharger can be turned ON or OFF using its ON/OFF switch, Figure 3.1. The
Multicharger can be left turned on, even when no iTAGs are charging.

10
4.5 iTAG charging indication
An indication onthe iTAG will be visible whenthe tag is charging. Table 1 is a summary
of the iTAG’s LED indications.
Indication
LED Colour
Tag LED
position
Normal operation –high and medium battery
Green flashing
Top
Low battery
Red Flashing
Top
Reserve battery
Red on
Top
Battery charging
Red Slow Flash
Top
Battery fully charged
Green on
Top
Table 1.
Warning! If the Photo ID retention screw is fitted ensure it is fully tightened prior to
charging.
4.6 Cleaning and maintenance
The Multicharger and all its components require no maintenance. The fuse may need
replacing and if so reference Section 4.8. Any repair work on the Multicharger must
be carried out and performed by Extronics approved personnel.
The cleaning interval depends on the environment where the Multicharger is installed.
A damp cloth will usually suffice.
Some cleaning materials include aggressive ingredients that can affect the
Multicharger’s materials. We recommend that you do not use compounds containing:
• Combinations of isopropyl alcohol and dimethyl benzyl ammonium chloride.
• Combinations of ethylene Diamine Tetra Acetic Acid and Sodium Hydroxide.
• Benzul-C12-16-Alkyl Dimethyl Ammonium Chlorides.
• D-Limonene.
UV cleaning is not supported.
The Multicharger must not be subjected to excessive stresses e.g. vibration, heat, dust,
corrosive gases, condensation, impact and shock.
4.7 Assembly and disassembly
The Multicharger is provided ready assembled and should not be disassembled.
4.8 Replacing the fuse
The Multicharger incorporates a handy panel mounted fuse holder to allow the fuse to
be easily replaced, Figure 3.3. Ensure that the Multicharger is turned OFF and the
mains plug removed from the mains socket. Using a pan head screwdriver rotate the
cover anti-clockwise and remove the fuse. Fit a new fuse, re-insert the fuse holder
body and turn clockwise to secure.

11
Multicharger Wall or Table Mounting
The Multicharger can either be mounted on a wall or on a table. The Multicharger is supplied
with a supplementary bag containing the items in Table 2.
Item
Quantity
Screws
4mm x 40mm pozi pan
screw
4
Masonry wall plugs
6mm x 28mm
4
Feet
4
Mains cable
Approximately 180cm length
1
Table 2.
5.1 Wall Mounting
The Multicharger can be mounted to the wall as a single unit or daisy chained together.
Ensure a suitably strong wall is chosen. A drilling template is included.
5.1.1 Daisy chaining Multichargers
Multichargers can be daisy chained together, either horizontally or vertically. An
example is shown in Figure 5.1. Other daisy chaining combination may be possible,
although the daisy chain cable may not safely reach. The amount of Multichargers that
can be daisy chained together is shown in Table 3.
Voltage
Number that can be daisy chained
110
3
230
5
Table 3.
The Daisy Chain cable is not included with the Multicharger and needs to be ordered
separately. Contact Extronics and order part number X128426.
Ensure that the first Multicharger in the chain is sufficiently close to the mains socket.
Ensure you have sufficient mains sockets for the number of daisy chained
Multichargers.

12
Figure 5.1
5.1.2 Installing on a wall
The Multicharger should not be installed at a height exceeding 2m from the top edge.
Mark out the screw hole patterns as per the preferred configurations and drill a hole to
accommodate the wall plugs supplied. Insert the wall plugs into the drilled holes. All
holes should be drilled to avoid damaging the Multichargers.
If daisy chaining the Multicharger insert the daisy chain and mains cable into the rear
of the Multicharger. If a single Multicharger do not fit or purchase a daisy chain cable.
It is preferable to retain the cables using the ‘clip’ features.
Check that the screws and wall plugs provided are suitable for the chosen wall.
Alternative screws or wall plugs may need to be used. If suitable, using the screws
provided, insert them into the Multicharger’s mounting holes and offer the Multicharger
to the wall. Screw the screws into the wall plugs until the screw fully bottoms out inside
the Multicharger.

13
Follow the same steps for the next Multicharger in the chain. Notethat the mains cable
doesn’t need to be fitted. Instead the previous daisy chain cable should be fitted into
the power in receptacle.
Repeat this process until all Multichargers are fitted. The final Multicharger in the chain
doesn’t need a daisy chain cable.
Finally, plug the first Multicharger’s mains cable into the mains socket and turn each
Multicharger’s switch to the ON position. You are now ready to charge your tags –
Section 4.5.
5.2 Table Mounting
The Multicharger can be mounted onto a table top or daisy chained together whilst on
a table top. The supplementary bag contains 4 stick-on feet which can be stuck to the
Multicharger’s feet underneath the unit, Figure 5.2. The Multicharger’s feet mountings
may need a clean before applying the stick-on feet. These feet help to prevent the
Multicharger from slipping.
Figure 5.2
Ensure that the Multicharger or first Multicharger in the chain is sufficiently close to the
mains socket.
The Daisy Chain cable is not included with the Multicharger and needs to be ordered
separately. Contact Extronics and order part number X128426.
Place the Multicharger(s) in the desired location(s) and either connect the daisy chain
cable from one Multicharger to another or connect each Multicharger’s mains cable to
an individual mains socket. It is preferable to retain the cables using the ‘clip’ features.

14
EU Declaration of Conformity

15

16
UKCA Declaration of Conformity

17

18
MET Declaration of Conformity

19
Manufacturer
The Multicharger is manufactured by:
Extronics Ltd,
1 Dalton Way,
Midpoint 18,
Middlewich
Cheshire
CW10 0HU
UK
Tel. +44(0)845 2775000
Fax. +44(0)845 2774000
E-mail: [email protected]
Web: www.extronics.com

20
Appendix 1
Daisy Chain cable
Reference
Approximately 75cm length
X128402
Table of contents
Other extronics Industrial Equipment manuals