EZ One shot User guide

CHECK VERSION
SETUP MANUAL
PROGRAMING
SCANNER
BAR CODE
MANUAL VER:
MAR20020808
EZ One Shot
DefaultDefault
DEFAULT

Please shut down the Power of your P/C
system before connecting the scanner. This
process is critical prior protecting both
scanner and your P/C system from serious damage
.
WARNING
We reserve the right to change the specifications and
other info without prior notice, please contact us for
the updated info.
We shall be not liable for the technical or editorial
errors or emissions contained herein, nor for
consequential or incidental damages resulting from
performance abuse of this booklet.
This product is warranted for one year warranty from
the date of purchase under proper using conditions,
covering defects in material and workmanship. The
warranty does not cover incidental or consequential
damages incurred by customer misuse, or modification.
and Compliance :
This device has been tested and found comply with the
limits for a Class B digital pursuant to part 15 of the FCC
Rules.
This device has been tested and found compliant
with the following listed standards as required by the
EMC Directive 89/336/EEC as amended by directives
92/EEC and 93/68/EEC: EN55022(1992); EN55024(1992);
EN55082-1 (1998)
All rights are reserved, No part of this document may
be photocopied, reproduced, or translated into other
language without prior noticed from the owner.

CONTENTS
TABLE OF CONTENTS ----------------------------------------------------------------------- 1
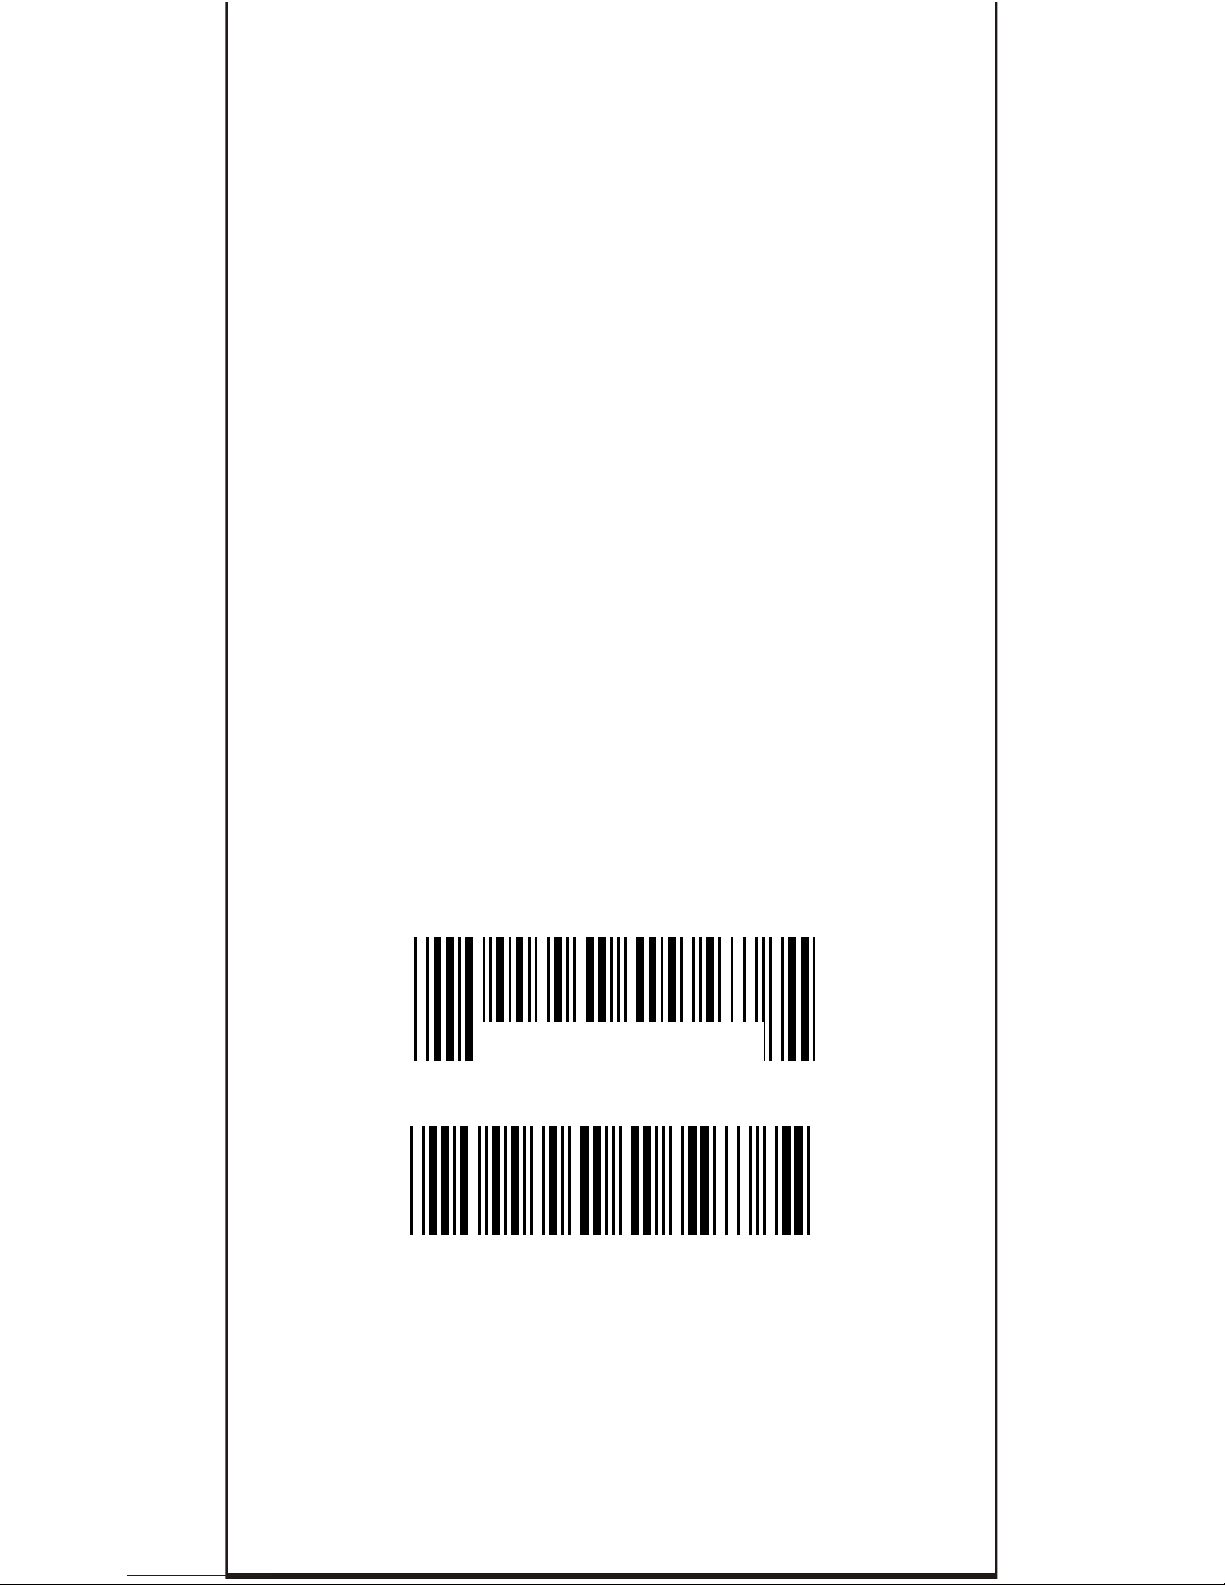
CLONING MODE ----------------------------------------------------------------------------4~5
GETTING STARTED
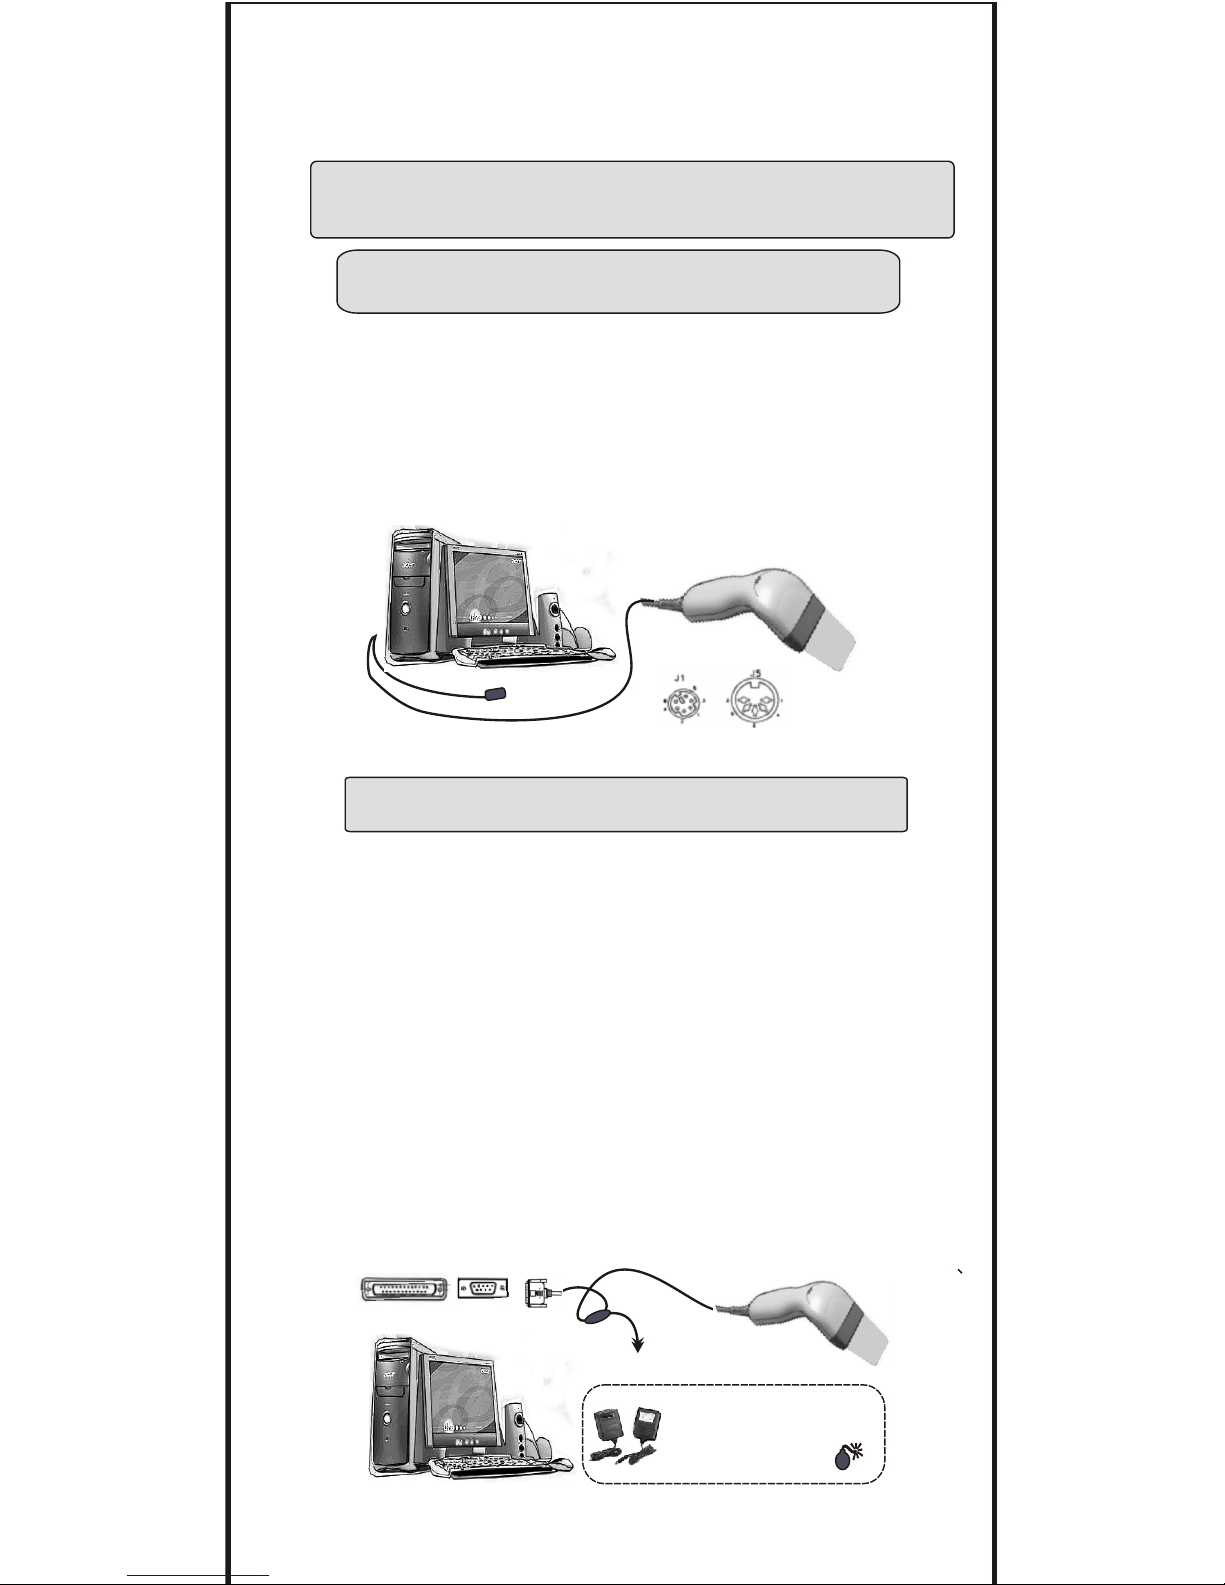
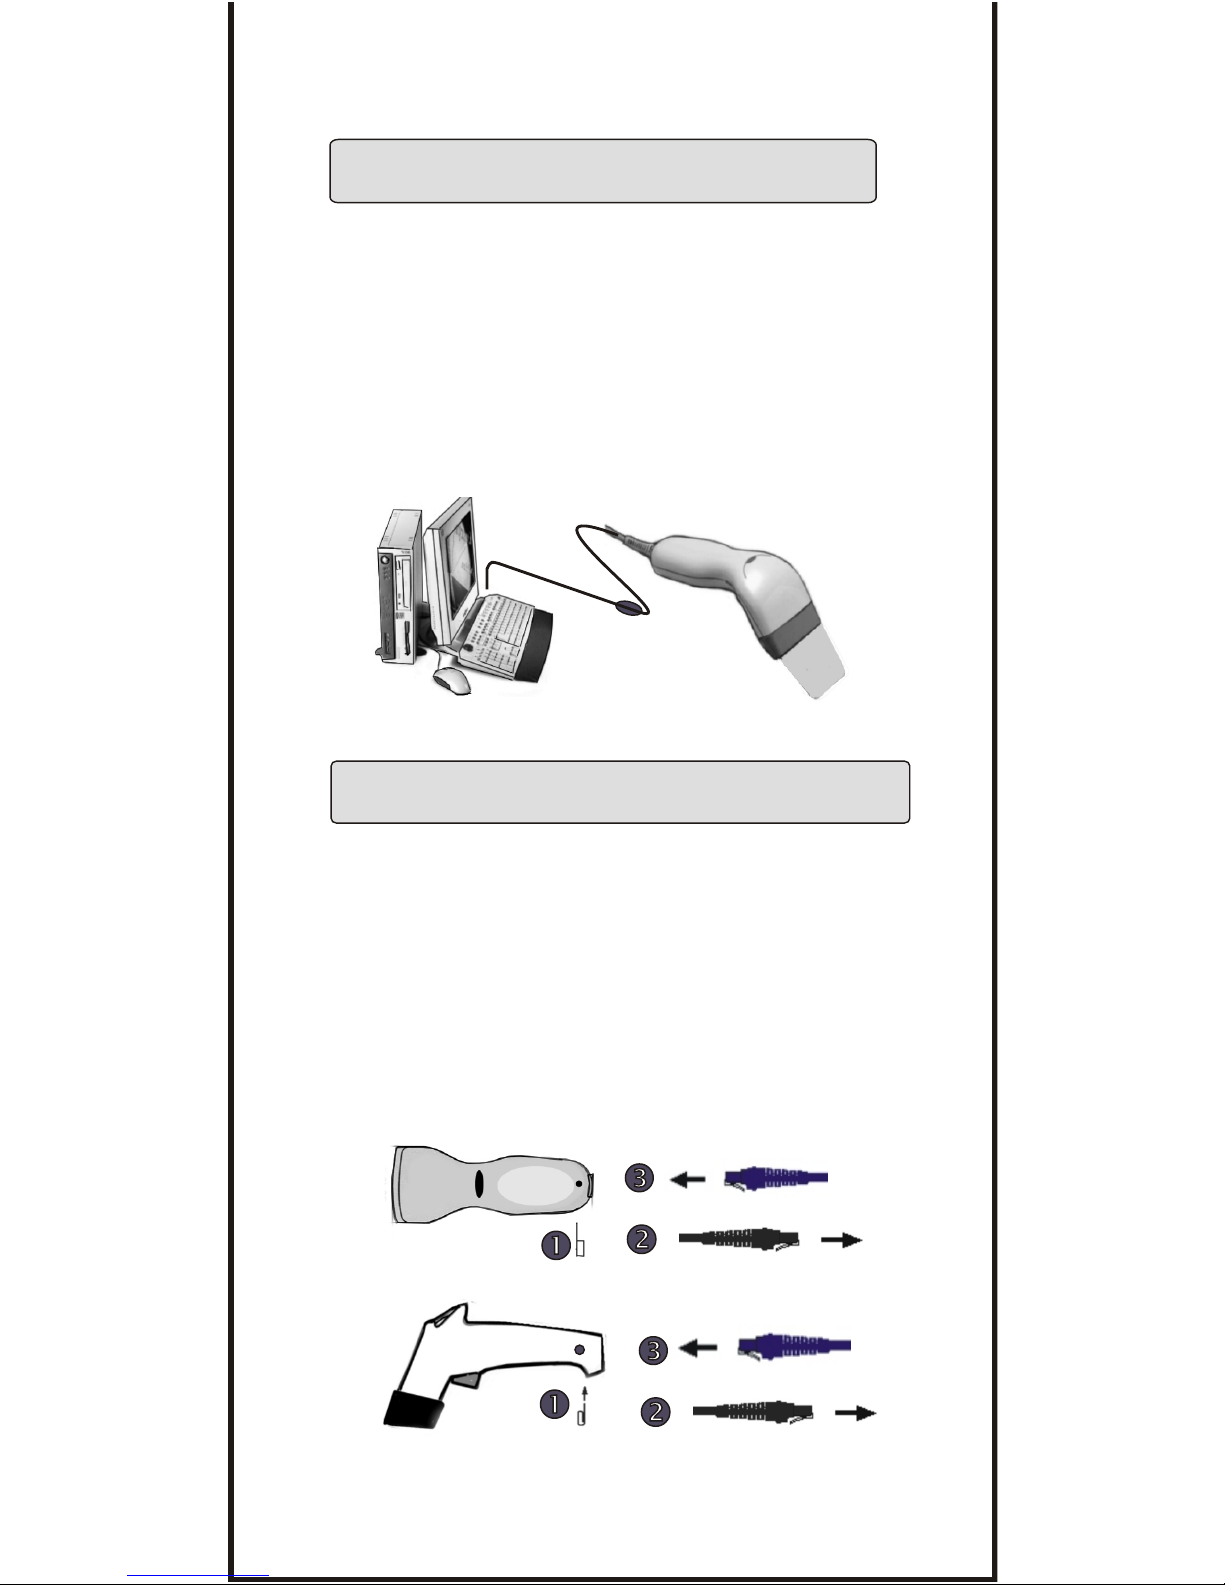
>>> HOW TO FIX THE SCANNER TO THE TERMINAL -----------------------6~7
>>> HOW TO CHANGE A CABLE -------------------------------------------------------- 7
>>> HOW TO SETUP THE PARAMETER.---------------------------------------------- 8
GROUP 1 >>>> INTERFACES SELECTION, COMPUTER TYPE, DEFAULT. ---------- 9
GROUP 2 >>>> READING MODE SETTING. -------------------------------------------- -------10
GROUP 3 >>>> CHECK VERSION, BEEP TONE, CAPLOCK MODE.-------------------- 11
GROUP 4 >>>> PREAMBLE AND POSTAMBLE.-----------------------------------------------12
GROUP 5 >>>> ACCURACY ADJUSTMENT.----------------------------------------------------13
INTRODUCTION, EZ TROUBLESHOOTING ----------------------- --- ----------- 2~3
GROUP 6 >>>> ENABLE AND DISABLE CODE ID.------------------------------------------- 14
GROUP 7 >>>> SYMBOLOGIES CODE ID IDENTIFIER., SET ID --------------- -------- 15
GROUP 8~9 >> CODE ID CONFIGURATION: SET CODE ID ----------------------- 16~17
GROUP 10 >>> DELAY BETWEEN BLOCK AND CHARACTER.-------------------------- 18
GROUP 11 >>> TERMINATOR AND KEYBOARD LAYOUT. -------------------------------- 19
GROUP 12 >>> RS232-BAUD RATE, DATA BITS & PARITY, STOP BITS.--------------- 20
GROUP 13 >>> HANDSHAKING, ------------------------------------------------------------------ 21
GROUP 14 >>> WAND EMULATION PARAMETER SETTING. --------------------------- 21
.
SYMBOLOGIES FORMATING (GROUP 15~ GROUP 31).
GROUP 15 >>> ENABLE AND DISABLE SYMBOLOGIES. -------------------------------- 22
GROUP 16 >>> ENABLE AND DISABLE SYMBOLOGIES. -------------------------------- 23
GROUP 17 >>> CHINA POST CODE ( TOSHIBA CODE), CODE 32.----------------- 24
APPEND 1 >>> NUMERIC TABLE, MIN/MAX LENGTHS SETTING -------------------- 25
GROUP 18 >>> UK PLESSEY CODE, MSI CODE. ----------------------------------------- 26
APPEND 1 >>> NUMERIC TABLE, MIN/MAX LENGTHS SETTING ------------------ 27
GROUP 19 >>> CODE IATA, CODE93.TELEPEN.-------------------------------------------- 28
APPEND 1 >>> NUMERIC TABLE, MIN/MAX LENGTHS SETTING -------------------- 29
GROUP 20 >>> INTERLEAVED 2 OF 5, CODE 11 .----------------------------------------- 30
APPEND 1 > >> NUMERIC TABLE, MIN/MAX LENGTHS SETTING ------------------- 31
GROUP 21 >>> CODABAR.------------------------------------------------------------------------- 32
APPEND 1 >>> NUMERIC TABLE, MIN/MAX LENGTHS SETTING---------------------- 33
GROUP 22 >>> ABC-CODABAR, CX CODE ----------------.--------------------------------- 34
GROUP 23 >>> CODABAR COUPLING, ------------------------------------------------------- 35
GROUP 24 >>> CODE 128, STANDARD CODE 39, FULL ASCII CODE 39.----------- 36
APPEND 1 >>> NUMERIC TABLE, MIN/MAX LENGTHS SETTING -------------------- 37
GROUP 25 >>> INDUSTRIAL 2 OF 5, MATRIX 2 OF 5.------------------------------------- 38
APPEND 1 >>> NUMERIC TABLE, MIN/MAX LENGTHS SETTING--------------------- 39
GROUP 26 >>> UPC-E. ----------------------------------------------------------------------------- 40
GROUP 27 >>> UPC-E(0), (1) ,UPC-E & UPC-A EXPAND ----------------------------- 41
GROUP 28 >>> UPC-A..----------------------------------------------------------------------------- 42
GROUP 29 >>> EAN 8. ------------------------------------------------------------------------------ 43
GROUP 30 >>> EAN 13 ----------------------------------------------------------------------------- 44
GROUP 31 >>> EAN/ UCC 128 -------------------------------------------------------------------- 45
GROUP 32 ~ 39 >>>> FULL ASCII TABLE ( CODE 39 --------------------- 46 ~53
GROUP 40 >>>>> NUMERIC ( CODE 39 ) TABLE. --------------------------- 54
GROUP 41~ 42 >>>> FUNCTION CODE ( CODE 39 ) FOR PC AT.----- 55~56
GROUP 43~ 46 >>>> TROUBLE SHOOTING --------------------------------- 57~60
Ms6262 CONTROL CODE LIST FOR Rs232. -------------------------------------------61
GENERAL
SETTING GROUP
1

GENERAL
INTRODUCTION
Machine-readable bar codes save human from senseless
boredom and costly errors of data entry. Human use a
keyboard or a mouse for data entry to a computer. Bar codes
must be scanned in via some other means. Thus bar code
Scanner is a high performance input devices which provide
fast and accuracy for bar code encoding, and will improve
your work efficiency. The bar Code scanner can be widely
applied to Logistic, Hospital, Production, Libraries ,Office
Management, Document Management, office Automation,
Time & Attendance, Security, Retail and POS, and etc .
Bar Code Scanner looks very simple and easy to install.
It seems that you can easily to fix it to your terminal/
computer easily as well as computer mouse and keyboard.
In fact, it is a very complicate computer device, there are
many technical difficulties in the software setting which
need professional assistance.
If you are the FIRST TOUCH bar code scanner users who
do not familiarly with a bar code, you are advised that do
not set any parameter to the scanner, before you get an
expert advisory with the System
Integrator Services Provider, ,
Hardware or software engineers before you go further
for setting.
VAR( value-added,
reseller, distributors
EZ TROUBLESHOOTING
To save your time, Before returning the scanner back, you can
fix-up the trouble step by step with Easy Troubleshooting guides
as follow.
if the troubles are caused by the
wrong setting, It can be fixed up easily with the Easy
Troubleshooting guide as follow,
Scanners may have a trouble, normally the trouble
attribute to a wrong setting,
1. Step: Unplug the Cable from Terminal.
2. Step: re plugs in the cable from the terminal.
3. Step: Set the scanner to Default ( Group 1)
4. Step: If you did the above steps for troubleshooting, but the
troubles are still unsolved, Please finds the troubleshooting
which provided at the Figure 2 at the next page.
5. Step: If you tested all the steps as Figure 2, and the scanner is
still in problems, please find troubleshooting at Group
43~46 for further assistance.
. A001$
2

Ki df Troubles
no
Comuter Tye
p p
(oup
1)
Gr
n e ce S let s
Itrfase c ion
G p1)
(rou
Stti
noeue
egP
rcdr
h ot c m ltedaven o p e
( e n ee Tr pe
S tti g N d i l
ht c
a
ni )Sos n
ng
-- -- - -- -- -- --
---- -- ---- -
p - ,5,8 ,17Grou 4,9 ,
8 1,20 2 3,2 ,1 ,9 ,2 ,2 4
25 1,3
Limitation o eth off l ng
th bar codee
Smp s
ytom
Scanner p fm
e l as us, b her
snoy tpu
data on
er or s w l ual
uttei an ou t of
t onitoh l s ni
he mr w i e
can ng.
Scannerwil beep a sund hen the LED light turn of ,no wonder howl ot f
manytimes hatypu h theswitch button, the cannersti l cnott ou s slan
workroperlyseemsthat thasse isly damages
p, i r ou .
l t i ye ot et i uthem
Most y ,all set ng need onl on shs t ng, b few of t need
r pl i r s g. est l ow:T ie scannng fo ettin There ar li ed as fo l
1. eam e blPr bl, Postam e(Group 4).
Adjm G oup.2.Accuracy ust ent (r 5,
Cust e Ionf guri r
3. om r DC iaton (G oup 8,9).
iax engt r1 21, 25)
4.Mn/ M L h (G oup17, 8,19,20, 22,24, .
5. a a bet AB 23)Set A D t ween C Codabar ( Group22, .
6.be X- Codabar).
SetAData tween C r (G oup 22,23
S t A i Codaba r 3)7. e Data between Couplng r(G oup22,2 .
Def ner
8. i EAN128 (G oup31) .
1. a nr s o a le to read the adertain legh bar ode.Sc n e in t b b r co e in c n t c
.iagnose itt y g witanoth rbr co e w ich should e sam s mbo ogies
2D r in h e a dshb eyl
but in di erent length
ff.
3. tecannerhs elle d to th siffrnlegh. Te p o leIf h s a w r ao e in d e e t n t h rb m
ma b cue b te nto
M
I
n/
M
axLnt
hy e asd yh l
egh feg .
a
cd
br oe
s23 oR2 Pr tocol
Comunicationsetting
rp oblem
Rs232tros l y e not mrotocol commu caton
oublem ty caused b th atch of p ni i
ecanne or mal, have a b for scanning, b outputs tting.S rsw k nor eep ut no
f datao
oN
1
2
3
4
So ution
l s
1. Unplug c e from the
ermi,a
abl T nal
2. Replug in t c e.
he abl
3. the sca toexac pu ert pe mm iatel .
Set nner tCom t y i ed y
1. Unpl ce
from te rmi ,
uga abl h Te nal
2. Replug n t ce.i he abl
3. he sca o t r g nterfaces,ou eSettnner t heihtiyar
remi o heck i
th cab e s e t the nt fes
nd t c felam o I er ac
whi hct y you wantc exal.
1. Th s ttingprocedu es are been desci ed clrlye e r r bea
at elat pag s.r ed e
or example Cod = de39, Min engt =6.
F e Co L h
an in Length (Grop2)Sc M u 4
Sc n 0","6" f om Appendix1.a" r
ScMin engtan L h
(Group 24)
2. anner Bee" Ti","Ti', T". runco pleted ettig.
Sc pI Fo msn
3. Scn ESET toetuon ag in.a Rs p ea
Ree thMin MaLngth ofth se sy bolo ie ,s t e / x e om g s
F gure 2
i
Set communication Parameter ofR23Pro ocls 2 t o:
BaudRate, Hanshaking, Stop Bi s, Da a Bits an Par tyt t d i
atch between the scanne and PC .
m r
5
3

CLONING MODE
WHAT IS CLONING MODE?
CLONING means duplicate a parameter's setup of a scanner to the
other's scanners. It can save much time for lots scanner setting.
HOW SHOULD THE CLONING WORK?
Step 1 : Take a scanner, set all the parameters with this manual.
Step 2 : Scan the CLONING MODE bar code shown at Figure 1.
Step 3 : nce CLONING MODE is Scanned, all setup parameter will be
converted into alphanumeric and throw it to the monitor.
Step 4: Use your bar code printer, print out all the value ( data values
are Into CODE 39 label.
Step 5 : Scan the printed label form up to down sequentially with the
scanner which is need to program..
.
O
shown on the monitor.)
. A016$
CLONING MODE
1. All strings are in upper cases.
2. All Cloning string which printed into labels should same to what
are shown on the monitor sequentially from 1st row to the end.
3. The CLONING MODE can be work in the Word, Note Pad Only.
4. The bar code of cloning label is Code 39 (No CDV).
5. Never edit data at first row (.A017$). It is an enter gate for cloning.
6. You can adjust the cloning string's length by combined multiple
strings into one or breaking one string to multiple strings starting
from Second Row after "....". , Note: the length must be in the
sequences of 4 ( FOUR); Such as 4,8,12,16,20(MAX).
7. Be aware of do not omit to print the dot which should same exactly
as what are shown on the monitor.
.
REMARK:
. A018$
CLONING MODE ON- PC/AT
.A018$( Cloning Mode on PC/AT) - you can clone the settings to a PC/AT
regardless what kind of device has been chosen on the scanner
Figure 1
* Format of Cloning :
1st rows >>> ".A017$" ( never edit any data of the first row )
2nd rows >>> "....XXXX" you can adjust the String's Length starting
from the dots"...." forward. The length of the string should
be in 4, 8,12,16 or 20 ( MAX )digits.
3rd rows~ so on >>> XXXX
End rows- A dot "." Is an ending of cloning.
XXXX Stand for any String
FORMAT OF CLONINGFORMAT OF CLONING
4

Wrong Setting: The string's lengths
of second and third rows do not match
the length's requirement, because the
length should be in the sequences of
4 digits
EXAMPLE :
1. Project Assignments :
1.1. Beep tone: BEEP LOW -- HIGH .
1.2. Capslock Mode: CAPSLOCK ON ( FIXED ).
1.3. Reading Mode: CONTINUOUS AUTO OFF.
2. Setting Procedure:
2.1. Scan BEEP LOW.--HIGH (GROUP 3).
2.2. Scan
Scan
3.Scan CLONING MODE.(FIGURE 1). All parameter's will be converted
into alphanumeric, and throw to the monitor.
CAPSLOCK ON (FIXED).(GROUP 3).
2.3. CONTINUOUS AUTO OFF. (GROUP2).
4. Print the result of the monitor into bar codes with your printer. The
Bar code should be printed into CODE39 format. The cloning string
printed which into bar code will be the EZ cloning Manual.
.A017$
....0604
5A025F04
.
5. scan these labels with any one of the scanners that you would like
to programme with same setting function as well as cloning, scan it
from first row to second and so on one by one, you should scan it
from up to down in sequences.
. A017$
. . . . 0604
5A025F04.
.A017$
....06045
A025F04
.
.A017$....
0604
5A02
5F04.
9 x
7 x
. (Dot)
4
4
4+.(Dot)
The 0.A17$ is a FIXED parameter for
setup entering. It is an unchangeable
parameter. Never adds, delete or
rearrange data from the FIRST row.
XWrong Setting Because you add
" ...." After .A017$
RIGHT OF SETTING
WRONG OF SETTING
.A017$
....
0604
5A02
5F04
.
4
4
4
4
. (Dot)
.A017$
....06045A02
5F04.
8+.( Dot)
12
}}
.A017$
..0604
5A02
5F04
.
..
Wrong Setting: The "...." Consists
of 4 Dots, located at the beginning of
second rows, Do not break the "...." Into
multiple string.
string
5

KEYBOARD WEDGE
GETTING STARTED
HOW TO FIX THE SCANNER TO TERMINAL
1. Turn off power to the terminal / computer.
2.. Connect the appropriate RS232 cable to the scanner and Computer.
3 Connect an appropriate power adaptor to the power cord of the cable.
4 Turn on the terminal / computer, .
5 . Plug in the Power Adaptor's to scanner's Power Jack.
6. Scanner will beep a sound for the connection.
7. Set the scanner to RS232 interface with Group 1 (Interfaces Selection). .
8. Set Rs232 Protocol: Baud Rate, Stop Bits, Handshaking, Data Bits& parity.
9. Scan any bar code, check if any data show on monitor?
10.END
REMARK:
1.Before plugging the power adaptor to the scanner, Please check if
the Voltage, Power Consumption, Inner and outer DC Jack's Position
of the Power Adaptor is right, otherwise, your carelessness will result
in the serious damage for scanner / terminal / Computer
2.Please make sure the PROTOCOLcommunication setting of the scanner
like Baud Rate, Data Bits, Parity, Hanshaking MUST match to terminal /
Computer RS232 setting, otherwise, no any data will be transmitted..
Rs232 INTERFACES
1. Turn off the power of a terminal / computer / notebook..
2. Disconnected the cable from the terminal / computer
3. Connect an appropriate keyboard cable to the scanner and to the terminal.
4. Turn on the terminal / computer,
5. The scanner will beep a tone after connection.
6 Set the scanner to KEYBOARD interface by referring to GROUP 1
(Interfaces Selections).
7. Scanner beep a tone for complete setting.
8. Scan any bar codes to ensure, see if any data show on the monitor.
9. END.
TO PC COM PORT
Check the power adaptor If:
1.Input of AC current 110V/ 220V match
to the power supply standard of your
country.
2.Output of Power is 5V DC
3.The jack is inner +5V.
DC JACK
To Power Adaptor
TO PC KB PORT
TO KB
6

The USB Interfaces supported is compatible to Apple MAC series /
later PCs and Window 98, Window 2000, Window Me, Window XP.
1. Turn off power to the terminal / computer
2. Disconnected the cable the terminal/ computer.
3. Connect an USB cable to the scanner and to the terminal/ Computer,
4. The scanner will beep a tone for the connection,
5. The Computer will detect the USB Driver automatically.
6. If you are the first USB user, please Installed USB driver step by
step carefully by the Instructions of the systems ( 1st Installer)
7. Set Interfaces Selection to Keyboard/USB.
8. Scanner will beep a Tone after Interfaces selections.,
9. Scan any bar codes, check if any data are output to monitor.
10. END.
All scanners are designed at the convenience for Easy Interfaces
Conversion, Most scanners' support for
change an interface of scanners from one to another, all you
have to do is simply change a cable. Please follow the instruction as
follow:
1.Insert a pin to the hole, 2.releases the cable simultaneously,
3.Plug in the new cable which required.
After changes to a new cable, you MUST reset the Interface Selections.
For the symptom, please refer to the trouble of EZ Troubleshooting.)
TTL, Wand Emulation,
Keyboard, RS232, Macs ADD, USB interfaces. If you would like
to
HOW TO CHANGE A CABLE
USB Interface
New Cable
Present cable
New Cable
Present cable
7

How do you program a scanner with this manual?
EZ One Shot Setting Procedure.
R
HOW TO SETUP THE PARAMETER
.
2. Most programming procedures need only One Shot Setting excepts :
Preamble, Postamble, Min / Max Lenght, Accuracy Adjustment.
Set A Data ( Insert data between Two Codabar : CX-Codabar,
ABC Codabar, Codabar Coupling) , Define EAN128. ( See related
pages for detail instructions). The are shown as follow:
.
1. Aim the scanner directly to the bar code ( function/ parameter ) you
want to set,
1.1. Then you will hear TWO beep sounds, mean the NEW parameter
is defined or updated into the memory processor.
1.2. Thus, the whole set up procedure is over.
2.1.Preamble / Postamble
Scan CLR PRE/POSTAMBLE Scan PREAMBLE/ POSTAMBLE
>>>> Scan any alphanumeric from Full ASCII Table from
Group 32 ~Group40. >>>> Scan
2.2.Min Length / Max Length:
Scan
2.3.Accuracy Adjustment:
Scan ACCURACY ADJUSTMENT >>>> Scan One digit number
from Numeric Table from APPENDIX 1 >>>>
( Max 16 digits ).
PREAMBLE or POSTAMBLE.
MIN LENGTH or MAX LENGTH >>>> Scan TWO digits number
from Appendix 1. ( next pages to the related setting pages ) >>>>
Scan MIN LENGTH or MAX LENGTH.
Scan ACCURACY
ADJUSTMENT.
2.4.Customer configuration ID -- ( Example: Code 39 )
Scan Code39 Set ID from Group8 ~ Group9 >>>> Scan alphanumeric
( Max TWO digits ) of FULL ASCII ( Code 39 ) Table from Group32 ~
Group40. >>>> Scan Code39 Set ID from Group8.
2.5.Set A Data - ( CX-Codabar, ABC Codabar, Codabar Coupling).
Scan Set A Data. >>>> Scan any alphanumeric data ( Max ONE digit )
from FULL ASCII (Code 39) Table from Group32 ~ Group 40 >>>>>
Scan Set A Data.
2.6 REMARK:
2.6.1. Most setting procedures of above-mentioned need TRIPLE setting.
2.6.2. Scanners will beep thrree rapid beeps"Ti", "Ti",Ti" to remind incomplete
of Setting, please go on to complete the setting.
2.6.3. If you make a mistake, forget where the steps to exit, Scan Reset
(. P023$) at below for resetting.
3. SYMBOL AND ABBREVIATION:
3.1. DEFAULT Setting:
All Default's Parameters are indicated in bold type and underlined
Characters. The Font of the Characters is ARIAL BLACK.
3.2. CD = Check Digits.
3.3. CDV = Check Digits Verification.
. A001$
DEFAULT
. P 0 2 3 $
RESET
Setting code
8

. A001$
COMPUTER TYPE
. C007$
NOTEBOOK*
. C005$
PC-XT
. C006$
MAC ADB
. C004$
PC- AT
-- GROUP 1 --
.
INTERFACES SELECTION,
COMPUTER TYPE, DEFAULT.
. C001$
KEYBOARD& USB
. C003$
WAND
. C008$
RS485
. C002$
RS232
INTERFACES SELECTION
DEFAULT
Scanners perform well as usual, but
there is no any output show on the
Computer's monitor while the
scanner is reading a bar code.
1.Unplugged the cable from
the computer,
2.Replug in the cable,set the
scanner to the exact Type of
Computer immediately.
SYMPTOMS SOLUTION
Cautions: Please set to right Computer Type when you change a terminal
The scanner will sound a beep then
the LED light turns off, no wonder how
many time you push the switch button,
the scanner still cannot work properly,
LED light will not light, seems that it
has been seriously damaged.
1.Please Unplugged the cable
from the computer.
2.Replug in the cable, and set
the scanner to the right
interfaces with the manual
immediately.
SOLUTIONSYMPTOMS
*Most scanners are designed with the flexibility for easy Interfaces
changing. You can change an interface of a scanner from one to
another just simply change a cable. Please do not forget to set the
scanner to the interfaces that matched to the cable..
* If Notebook is On, scanner operate with No external keyboard
9

. F001$
FLASH MODE
* LED is always on if bar codes close to
the scanner, and turns to flashing when
there is no any bar code approaching
after 60 sec.
* Trigger is in function.
. F005$
CONTINUOUS MODE
* LED is always on. ,
* The trigger is functionless eternally
if Continuous Mode on.
* LED will be switched off automatically
when there is no bar Code approaching
approximately after 60 Sec. .
* LED is always on when switch is pressed .
( Switch is no function when LED on )
.
. F006$
CONTINUOUS AUTO OFF
. F004$
* Factory Test
Scanning
TEST MODE
. F003$
TOGGLE MODE
* This function works as well as trigger Mode,
but "GOOD READ" beeps after encoding.
. F002$
TRIGGER MODE
* The LED will be switched on if
triggered.
* The LED will be switched off when the
switch button is released.
switch
button.is
-- GROUP 2 --
READING MODE SETTING
. F007$
* If Auto- Sensing ( Triggerless.) is on, LED
will be turned off if the scanner does not
detect for a bar codes..
* LED is lighted up automatically while
a bar code is detected.
*AUTO SENSING MODE
. F008$
*ULTRAVIOLET MODE
* If an Ultraviolet Mode is on, Ultraviolet
light will be lighted up ( Continuously.).
* The Ultraviolet will be turned off if
ONE push of a trigger, and back to the
mode that you left last.
REMARK:
2 Be informed that only few models support for Auto-Sensing Mode or
Ultraviolet Mode.
3.Please prints out the Ultraviolet Mode (.F004$) with A Bar code printers,
put the Ultraviolet Setting code near the working station, Scan Ultra
violet if you need it,
4.Ultraviolet Mode Converse - Press the trigger button, The reading mode
will swift from Ultraviolet Mode to the Reading Mode that you left last.
* Autosensing Mode and Ultraviolet Mode are available only for certain Model.
.
1.For extends the scanner's life time, Please set the scanner into Trigger
or Continuous Auto Of Mode.
10

BEEP TONE MODE
. F017$
BEEP LOW
. F015$
BEEP LOW--HIGH
. F013$
BEEP MEDIUM
. F012$
OFF
. F016$
BEEP HIGH--LOW
. F014$
BEEP HIGH
. A007$
CHECK VERSION
. A005$
CAPLOCK OFF
. A006$
CAPLOCK ON ( FIXED )
CAPLOCK ON
. A004$
REMARK
If CAPLOCK ON ( FIXED ) is on, The scanner will sent the Charactor in
Capital only, but CODABAR are exeptional. If ABCD/ABCD, abcd/abcd,
ABCD/TN*E, abcd/tn*e are on, they work independently according with
their rules..
-- GROUP 3 --
CHECK VERSION, BEEP TONE ,CAPLOCK MODE
CAPITAL LOCK MODE
CHECK VERSION
11

. A012$
PREAMBLE (16 )
. A013$
POSTAMBLE
SETTING PROCEDURE
STEP 1 : Scan : CLEAR PRE/ POSTAMBLE.
STEP 2 : Scan : PREAMBLE.
STEP 3 : Scan : " # " from FULL ASCII Table.
STEP 4 : Scan : PREAMBLE.
STEP 5 : Scan : POSTAMBLE.
STEP 6 : Scan : " $ " , "$ ", From FULL ASCII Table.
STEP 7 : Scan : POSTAMBLE.
EXAMPLE:
PREAMBLE String is " # "
POSTAMBLE String is " $$ "
. A011$
CLEAR PRE/ POSTAMBLE
PREAMBLE & POSTAMBLE ( PREFIX AND SUFFIX )
PREAMBLE & POSTAMBLE.
A. PREAMBLE ( PREFIX ).
A1. What is PREMABLE , Preamble means user can add any
data*** in front of a bar code.
A2. MAX input digit ( 16 digit ) .
A3. Default Value : None
B. POSTAMBLE ( SUFFIX ).
B
= Barcode
1. What is POSTAMBLE , Postamble means user can add
any data*** after a bar code,
B2. MAX input digit ( 16 digit ) .
B3. Default Value : None
*** The Data can be any alphanumerics data from Group 32 ~
Group 42. (Full ASCII Table ( Code 39 Table )).
C. FORMAT / STRUCTURE OF PREAMBLE & POSTAMBLE
(xxxx + KKK + dddddddd + yyyy)
C.1.xxxx = Preamble ( string/ alphanumerics / Function code).
C.2.KKK = Code ID
C.3.yyyy = Postamble.( String/ alphanumerics / Function code).
C.4.dddddddd
REMARK:
( 16 )( 16 )
-- GROUP 4 --
12

Accuracy Adjustment aims to assure for getting more reliable
decoded output. The accurate decoded output can be adjusted
by customer as follow. The higher the numbers is set mean
more accurate output will be. The higher the number is set,
.
.A010$
ACCURACY
ADJUSTMENT
SETTING PROCEDURE
STEP 1 : Scan : ACCURACY ADJUSTMENT.
STEP 2 : Scan : ONE digit Number ( 1--9 ) f rom bar code above.
STEP 3 : Scan : ACCURACY ADJUSTMENT.
-- GROUP 5 --
ACCURACY ADJUSTMENT
0
1
2
3
4
5
6
7
8
9
** Scanner beep " Ti"," Ti"," Ti", to remind setting incomplete.
** If you made a mistake, do not remember which step to be
complished, Scan RESET for resetting.
. P023$
RESET
13

ENABLE CODE ID
-- GROUP 6 --
ENABLE AND DIABLE CODE ID
. A009$
AIM ID ON
. A014$
. A008$
FACTORY ID ON
SET ID -ON
. A015$
DISABLE CODE ID
4 5 6 3 9 8 7 1 2 3 4 5 3 11421
145287
Preamble
145287
CODE ID
AIM ID : ]E0
BARCODE / DATA
EAN 13 +5
]E0
EXAMPLE : 1.Preamble 145287,
2.Code ID: enable AIM ID,
3.Bar code symbologies : EAN 13+5
OUTPUT : 145287]E0456398712345312411
14
REMARK:
1.Among those Code ID, only ONE type code ID will be sent.
2.Code ID is located at the position before the bar code data
and after the preamble, The Structures of data will be show
as follow:

-- GROUP 7 --
SYMBOLOGIES CODE ID IDENTIFIER, SET ID
1.Set ID need TRIPLE scanning for setting: The procedures are
Step 1: Scan Bar Code ( Set ID )
Step 2: Scan ( 1 OR 2 ) Digit of Full ASCII Table ( Group 32-40)
Step 3: Scan: Bar Code ( Set ID ).
Example :Define the MSI Code ID = A, Code 93 = G9
MSI :
Step1: Scan MSI Set ID (Group 9).
Step2: "A" from Group 35.
Step3: Scan MSI Set ID (Group 9).
Code 93:
Step1: Scan Code 93 Set ID (Group 9).
Step2: "G" from Group 36, Scan "9" from Group 40..
Step3: Scan Code 93 Set ID (Group 9).
2. You can Set ( Code ) ID with alphanumeric data from FULL ASCII ( Code 39 )
Table ( GROUP32 ~ GROUP40.)
4. Length's of Set ID are limited to TWO digits. You can input either ONE digit or
TWO digit as code ID, if one digit ID is set, the output Code ID of the bar code
will be in one digit only, If TWO digits characters are set, The Code ID will be in
TWO digits.
5. Only one type Code ID will be sent , you have to choose which type Code ID
you wan the scanner to sendt.
SET ID - SETTING PROCEDURES
SYMBOLOGIES Factory
ID
AIM
ID Factory ID AIM
ID
MSI O]M0 N]F0
EAN 8 S]E0 DELTA Code G
UPC-E E]E0 LABEL Code C
UPC-A A]E0 UK PLESSY P]PO
EAN 13 F]E0 MATRIX 2 OF 5 Y]X0
Code 93 L]G0 FULL ASCII Code 39 D]A0
Code 11 J]H0 STANDARD Code 39 M]A0
TELEPEN U]B0 IATA 2 of 5 R]R0
EAN 128 T]C1 V]S0
Code 128 K]C0 H]X0
Code 32 B]X0 I]I0
( Code 39 PARAF)
INDUSTRIAL 2
OF 5 ( Code 2 of 5
)
China Post Code
( Toshiba Code )
INTERLEAVED 2 OF 5
SYMBOLOGIES
CODABAR
SYMBOLOGIES CODE ID IDENTIFIER
15

-- GROUP 8 --
. P001$
. P005$
. P007$
. P003$
. P004$
. P002$
Codabar Set ID
UPC E Set ID
UPC A Set ID
CODE 39 Set ID
EAN 13 Set ID
EAN 8- Set ID
. P022$
Telepen Set ID
. P010$
Code 128 Set ID
. P009$
Code 11 Set ID
. P021$
IATA Set ID
. P013$
Code 93 Set ID
. P016$
EAN128 Set ID
. P011$
Code 32 Set ID
CODE ID CONFIGURATION: SET ID
16

-- GROUP 9 --
.
. P015$
. P014$
. P012$
China Post Code
[ TOSHIBA Code ] Set ID
MSI Code Set ID
UK Plessy Set ID
. P019$
Delta Code Set ID
( Reserved )
. P020$
LABEL Code Set ID
( Reserved )
. P017$
Matrix 2 of 5 Set ID
. P008$
Full ASCLL Code39
Set ID
. P006$
Interleaved 2 of 5
Set ID
. P018$
Industrial 2 of 5 Set ID
** All Set Code ID need TRIPLE scanning for setting.
** A beep " Ti", " Ti"," Ti" to remind of incomplete setting.
** If you make a mistake, forget where the steps to exit,
Scan Reset (.P023$) at below for resetting.
. P023$
RESET
CODE ID CONFIGURATION: SET ID
17

. B002$
. B003$
. B004$
. B005$
. B006$
10mS
50mS
100mS
200mS
500mS
0mS
. B011$
. B012$
. B013$
. B014$
. B010$
500uS
1mS
4mS
16mS
140uS
INTERCHARACTER DELAY
. B001$
18
DELAY BETWEEN BLOCKS AND CHARACTERS
-- GROUP 10 --
INTERBLOCK DELAY
Table of contents